
-
-
-
►Practical PowerShell Unit-Testing: Checking program flow
Contents
- Validating in a Test.
- Call History.
- Validating Array Data.
- Project Files.
- Pester Command Summary.
- Conclusion.
Part one of this series explained how to install and use Pester, and the basic structure of unit tests in PowerShell. Part two covered mocking and parameterized test cases. This final installment focuses on validation, both with data and with program flow.
Validating in a Test
I have touched on actual validation steps only implicitly in some of the examples thus far. This section describes the important Should command (see the Pester reference page at https://github.com/pester/Pester/wiki/Should). The canonical verification assertion is:
|
1 2 3 4 |
$actual="Actual value" $actual | Should Be "actual value" # Passes $actual | Should Be "other value" # Throws a Pester Failure |
Should offers a rich selection of operators, as detailed in the following two tables.
|
|
|
|
|
|
Be |
BeExactly |
|
|
Match |
MatchExactly |
|
|
Contain |
ContainExactly |
|
|
|
|
|
|
BeNullOrEmpty |
|
|
|
Exist |
|
|
|
Throw |
|
|
|
Not |
|
Note that earlier Pester versions-and earlier articles written about it-showed this syntax, which is no longer valid:
|
1 |
$actual.should.be("actual value") |

Use the Should command to validate scalar data.
Call History
Besides validating that you get back an expected value, the next most common thing to validate in a unit test is that a function g is called as a result of your calling a function f. Just as with standard .NET mocking framework moq (or others of its ilk), you can verify whether a function or cmdlet was called in PowerShell by using Pester to mock it, run your action, then check whether the mock was called. Here is the syntax for asserting that a mock was called:
|
1 2 3 4 |
Assert-MockCalled [ [-CommandName] <String> ] [-Exactly] [ [-Times] <Int32> ] [ [-ParameterFilter] <ScriptBlock> ] |
The simplest case is checking whether a mock was called or not, regardless of the arguments passed to the function, and regardless of how many times it was called, use this simple form:
|
1 |
Assert-MockCalled Select-String |
Contrariwise, if you wish to assert that a mock was never called, use the -Times parameter, specifying that it should be called zero times, hence not at all:
|
1 |
Assert-MockCalled Select-String -Times 0 |
It is important to note that the count you supply to -Times indicates that the mock must be called at least that many times. Thus, to assert that a mock was called but only once, add the -Exactly parameter:
|
1 |
Assert-MockCalled Select-String -Exactly -Times 1 |
Besides examining how often a mock was called, you can also check how a mock was called, i.e. with what parameters. Say, for example, you wanted to confirm that Select-String was invoked with the SimpleMatch switch parameter:
|
1 |
Assert-MockCalled Select-String -ParameterFilter { $SimpleMatch -eq $true } |
When validating that functions or cmdlets were called, it is important to consider scope. Say, for example, that you have multiple test (It) blocks inside a Context block, as shown. You also declare a mock inside the Context scope but outside of either It scope:
|
1 2 3 4 5 6 7 8 9 10 11 12 13 |
Describe <test-name-string> { Context <context-description-string> { Mock Get-Process It <test-description-string> { ... Assert-MockCalled Get-Process ... } It <test-description-string> { ... Assert-MockCalled Get-Process ... } } } |
You could (correctly) surmise that checking call history with Assert-MockCalled would fail in one or both tests because they would both be adding to the same mock’s history.
But now consider moving the mock inside the test scope (the It block), as shown below. Notice that each It block specifies the same mock.
|
1 2 3 4 5 6 7 8 9 10 11 12 13 14 |
Describe <test-name-string> { Context <context-description-string> { It <test-description-string> { Mock Get-Process ... Assert-MockCalled Get-Process ... } It <test-description-string> { Mock Get-Process ... Assert-MockCalled Get-Process ... } } } |
You would think the tests would now be completely independent-and correctly validate the mock calls-but not so! The mocks are still scoped to the Context block! See my forum post on this important point. It turns out that, as designed, Assert-MockCalled is scoped to its containing Context block (or if no Context block is present, then its current Describe block), which is why the above tests will not work correctly. I could see that that behavior is useful for some tests, but for others (like the example above) it would really be useful to be able to scope a mock to an It block. As Dave Wyatt responded in my post referenced above, the new 3.0 release now provides just this flexibility: the -Scope parameter. Thus, we need only change each Assert-MockCalled above to specify scoping to the It block…
|
1 |
Assert-MockCalled Get-Process -Scope It ... |
… for the above two tests in the same Context block to correctly validate calls on the mock. I would recommend explicitly using the Scope parameter (which may be set to It, Context, or Describe) on all Assert-MockCalled instances for clarity.
Pester 3.0 note: Version 3.0 is brand new as I write so I have only experimented with it for a short time. According to the documentation, a defined mock is still supposed to default to the closest Context or Describe block, but my cursory test seems to show that a mock actually defaults to the block in which it is defined, be it It, Context, or Describe. I found this out because my tests that had failed with 2.0 started working with 3.0 before I even added a -Scope It.
There is one other command available for verifying call history: Assert-VerifiableMocks. With this command, you flag each mock you wish to verify when you create the mocks. Then you invoke Assert-VerifiableMocks at the end of your test to validate all the mocks you have flagged in one go. See the official Pester documentation for more.
Use Assert-MockCalled or Assert-VerifiableMocks to validate program flow.
Validating Array Data
Earlier you saw how to validate results with the Should command. Unfortunately, Should does not always work for arrays. Consider the following tests:
|
1 2 3 4 5 6 7 8 9 10 11 12 13 14 15 16 17 18 19 20 21 22 23 24 25 |
Describe 'array techniques' { Context 'scenario 1' { $actual = 'a923e023.txt','ke923jd.txt' $expected = 'a923e023.txt','something_else.txt', 'not_there.txt' It 'array check (native)' { $actual | Should Be $expected } It 'array check (ArrayHelper)' { ArrayDifferences $actual $expected | Should BeNullOrEmpty } } Context 'scenario 2' { $actual = 'something_else.txt' $expected = 'a923e023.txt','something_else.txt', 'not_there.txt' It 'array check (native)' { $actual | Should Be $expected } It 'array check (ArrayHelper)' { ArrayDifferences $actual $expected | Should BeNullOrEmpty } } } |
Scenario 1 is expecting three values but the actual comes back with only one of those, plus one that was not expected. Within the Context block for scenario 1, I have one test using the native Should Be and a second using a helper function I created for validating arrays. Here is the output for the two tests in scenario 1:
|
1 2 3 4 5 6 7 8 9 |
Context scenario 1 [-] array check (native) 66ms Expected: {a923e023.txt something_else.txt not_there.txt} But was: {ke923jd.txt} at line: 64 in C:\usr\tmp\HelloWorld.Tests.ps1 [-] array check (ArrayHelper) 11ms Expected: value to be empty but it was {Surplus: ke923jd.txt && Missing: something_else.txt,not_there.txt} at line: 67 in C:\usr\tmp\HelloWorld.Tests.ps1 |
The native Pester approach does report some part of the problem but not the whole problem. Using the ArrayDifferences function, on the other hand, clearly spells out what was unexpected in the actual result, both missing and surplus items. Scenario 2 highlights an even more serious flaw:
|
1 2 3 4 5 |
Context scenario 2 [+] array check (native) 72ms [-] array check (ArrayHelper) 8ms Expected: value to be empty but it was {Missing: a923e023.txt,not_there.txt} at line: 78 in C:\usr\tmp\HelloWorld.Tests.ps1 |
Here, the native Pester test reports a passing result when it should be a failing result, as the ArrayDifferences version identifies.
ArrayHelper actually supplies two different functions for validating arrays, shown below. Both are, in fact, testing the same thing-that the two arrays ($actualResult and $expectedResult) are equal:
These two statements show the two helper functions. Both are, in fact, testing the same thing-that the two arrays ($actualResult and $expectedResult) are equal:
|
1 2 |
AreArraysEqual $actualResult $expectedResult | Should Be $true ArrayDifferences $actualResult $expectedResult | Should BeNullOrEmpty |
Both array helper functions compare arrays in an order-independent fashion. So if the actual and expected differ only by order, as shown here, then both of these test statements will pass:
|
1 2 |
AreArraysEqual @(12, -5) @(-5, 12) | Should Be $true ArrayDifferences @(12, -5) @(-5, 12) | Should BeNullOrEmpty |
Where these two functions differ is when a failure occurs, i.e. when the two arrays do not contain the same set of members. For this next example, assume we ended up with actual and expected arrays as follows:
|
1 2 |
$actualResult = 'nameA','nameB' $expectedResult = 'nameB','nameC','nameD','nameE', |
Obviously these arrays differ so attempting to validate that they are equal will report failure with both help functions. Here is what you would get:
|
1 2 3 4 5 |
AreArraysEqual $actualResult $expectedResult | Should Be $true Expected: {True}, But was {False} ArrayDifferences $actualResult $expectedResult | Should BeNullOrEmpty Expected: value to be empty but it was {Extras actual: nameA && Extras expected: nameC,nameD,nameE} |
Clearly, ArrayDifferences gives better quality output upon failure. When the Should BeNullOrEmpty predicate receives something other than null or “”, it reports Expected value to be empty but it was something. ArrayDifferences populates something with an empty string if the two arrays contain the same members. Otherwise, it enumerates the differences by reporting which elements appeared in the actual list that were not in the expected list, and vice versa. Thus, in the case of failure the test output directly reveals all the differences, obviating the need to fire up the debugger to uncover those details.
AreArraysEqual, on the other hand, is quite bad from that perspective. It merely returns one bit of information: whether the two arrays contain the same members. But AreArraysEqual has another use; you will see it used liberally in one of the sample files like this:
|
1 |
Assert-MockCalled ReportMissing 1 { AreArraysEqual $items $missingList } |
You can read this statement as: confirm that ReportMissing was called at least once where its $items parameter contained the values in our expected list, $missingList.
Pester uses script block parameters frequently, you may have noticed, making it quite flexible in what you can do. In the Call History section earlier, you saw a more conventional value supplied to ParameterFilter, specifying that a parameter had a given value ({ $SimpleMatch -eq $true }). With arrays, though, you cannot specify a simple Boolean predicate to test an array for equality to some other array. But looking at the ParameterFilter from a broader perspective, it is just a script block that evaluates to a Boolean value. So you can use any arbitrary logic you like, so long as it returns a Boolean. In the current example, we use AreArraysEqual for this purpose.
Finally, let us return to the example from part 2, wherein we tested the Get-TextFileNames function, and correct a hidden problem lurking in the shadows. Here is the latest version we used:
|
1 2 3 4 5 6 7 8 9 10 11 12 13 14 15 16 17 18 19 20 21 22 23 24 25 26 27 28 29 30 31 32 33 |
Describe 'Get-TextFileNames' { ContextUsing "file combinations" ( # Data for test #1 ('a923e023.txt', # the $files parameter 'a923e023.txt', # the $expectedResult parameter 'one text file when that is all there is'), # the description parameter # Data for test #2 (('a923e023.txt','wlke93jw3.doc'), 'a923e023.txt', 'one text file when there are assorted files'), # Data for test #3 (('a923e023.txt','wlke93jw3.doc','ke923jd.txt','qq02000.doc'), ('a923e023.txt','ke923jd.txt'), 'multiple text files amongst assorted files'), # Data for test #4 (('wlke93jw3.doc','qq02000.doc'), $null, 'nothing when there are no text files') ) { param($files, $expectedResult, $description) It "returns $description" { Mock Get-ChildItem { CreateFileList $files } Get-TextFileNames | Should Be $expectedResult } } } |
With fresh insight you can now quickly surmise that Should Be on the highlighted line is trying to validate arrays. All four tests were passing, but now you know you cannot necessarily trust that result! To make this more robust we need two changes. First, change the validation line to this:
|
1 |
ArrayDifferences @(Get-TextFileNames) $expectedResult | Should BeNullOrEmpty |
ArrayDifferences passes its two arguments to the built-in Compare-Object cmdlet, whose arguments must be arrays-a null value does not qualify! Thus, instead of (Get-TextFileNames) we use @(Get-TextFileNames) to force an empty result to be an empty array rather than null.
The second required change addresses the same point on the other argument, $expectedResult. Notice the highlighted $null in the fourth test: change that to an empty array, @( ), to complete the changes to make this a robust set of unit tests.
You cannot use Should to validate array data.
Project Files
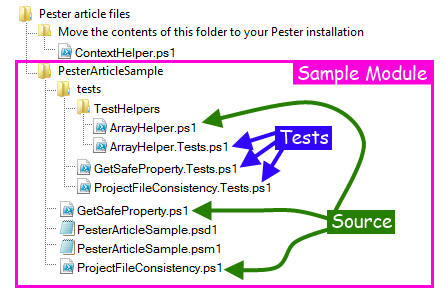
This series has described a variety of tweaks and techniques to streamline your work with Pester. Attached to this article is a file archive that contains the helper functions discussed herein, along with some sample source and test files so you can see how I have used Pester for some real-world code. Within the archive are two main folders: one contains code that needs to be installed within the Pester installation itself (ContextHelper.ps1) and the other contains a simple but real-world PowerShell module (PesterArticleSample) that contains the module source code (GetSafeProperty.ps1 and ProjectFileConsistency.ps1), the module infrastructure (PesterArticleSample.psm1 and PesterArticleSample.psd1), helper functions (TestHelpers folder) and unit tests for all the code. You might want to review the preamble to each of the test files (*.Tests.ps1) to see a couple different use cases for loading corresponding source. Here’s the content of the file archive, followed by details on the “helper” files.
ContextHelper.ps1
This file extends Pester itself by providing the ContextUsing command as described in Parameterized Test Cases in part two of this series. (Note that native support for parameterized tests in Pester is imminent, which will provide a slightly different syntax for accomplishing the same thing. Keep an eye on the Pester releases for this in the very near future.)
- Copy this file into the
Functionssubdirectory of your Pester installation. - Edit the Pester manifest (Pester.psd1 in the root of your Pester installation) to add
ContextUsingto the list of function names inFunctionsToExport.
Then go ahead and load the Pester module. (If you have already loaded it, you will need to reload it with the -Force parameter, i.e. Import-Module -Force Pester to have it recognize the update.)=”mono”>
ArrayHelper.ps1
This file provides the ArrayDifferences and AreArraysEqual functions discussed in Validating Array Data in part three of this series. It is included in the tests folder for the module. For your own projects, copy the file to a location of your choice. I typically put its containing folder (TestHelpers) in my tests directory to keep it separate from the tests yet near at hand so it is easy to reference, as described in Making your Test File Aware of Helper Files in part one.
Running the Module Tests
Go to the directory containing the sample module (or some ancestor) and run Pester with these two commands:
|
1 2 3 |
PS> Import-Module Pester PS> Invoke-Pester |
Here is the full test run. If you compare this to the test files themselves, you can easily discern the Describe commands and Context commands. The individual It commands are not noted explicitly in the output, but those are all the lines in green. Notice there is no visual demarcation of file boundaries; you only have a list of the functions at the top level (presuming you use the Pester convention of specifying function names as the description in the Describe commands).
|
1 2 3 4 5 6 7 8 9 10 11 12 13 14 15 16 17 18 19 20 21 22 23 24 25 26 27 28 29 30 31 32 33 34 35 36 37 38 39 40 41 42 43 44 45 46 47 48 49 50 51 52 53 54 55 56 57 58 59 60 61 62 63 64 65 66 67 68 69 70 71 72 73 |
PS tests> Import-Module Pester PS tests> Invoke-Pester Executing all tests in 'C:\usr\tmp\PesterArticleSample' Describing Get-SafeProperty Context for shallow property [+] returns value when property exists 328ms [+] returns default when empty property name specified 14ms [+] returns default when property does not exist 4ms [+] returns null when property does not exist and default not specified 4ms Context for deep property failure [+] returns default when no leaf specified 55ms [+] returns default when non-existent leaf specified 8ms [+] returns default when non-existent parent specified 5ms Context for deep property success [+] returns value when property exists (item.BaseItem.ChildItem) 53ms [+] returns value when property exists (item.BaseItem.OtherItem) 5ms Context for null object [+] returns default 54ms Context for deep property success on hashtable [+] returns value when property exists (item.BaseItem.ChildItem) 53ms [+] returns value when property exists (item.BaseItem.OtherItem) 5ms Describing GetFilesLackingItem Context checks all or none [+] reports all files missing item when none of them pass select-string 290ms [+] reports no files missing item when all of them pass select-string 31ms Context checks some files [+] reports subset of files missing item 99ms Context checks match type [+] is simple match when requested 82ms [+] is regex match when requested 25ms [+] is regex match when not directed otherwise 24ms Context When project filter is present [+] filters Get-ChildItem 80ms Describing GetFiles [+] reports files missing base item and from the remainder those with non-standard item 140ms Describing ProcessTestItem Context when processing an item [+] processes test name 162ms Context Processes both missing and non-standard items [+] with implicit direction 102ms Context Processes both missing and non-standard items [+] with explicit direction 118ms Context Processes non-standard items [+] but skips missing items when directed 79ms Describing Confirm-ProjectFileConsistency Context for a non-empty list [+] iterates over all items in test list 161ms Context for an empty list [+] iterates over no items 49ms Context for a test filter [+] iterates over only the matched items in test list 76ms Describing ArrayDifferences Context for equivalent arrays [+] no differences when args are empty arrays 106ms [+] no differences when args are equal arrays 18ms [+] no differences when args are equal arrays in different order 7ms Context for surplus results [+] reports one surplus value over an empty array 63ms [+] reports multiple surplus values over an empty array 10ms [+] reports one surplus value over a non-empty array 10ms [+] reports multiple surplus values over a non-empty array 12ms Context for missing results [+] reports one missing value over an empty array 58ms [+] reports multiple missing values over an empty array 7ms [+] reports one missing value over a non-empty array 18ms [+] reports multiple missing values over a non-empty array 8ms Context for missing and surplus results [+] reports all actual as surplus and all expected as missing 56ms [+] reports one surplus and one missing 6ms Tests completed in 2.5s Passed: 40 Failed: 0 |
Conclusion
Though Pester is a rather small package and offers a relatively small number of commands, it has tremendous capabilities for unit testing PowerShell code. Now that you have the tips and techniques provided in this series of articles added to your arsenal, go out there and conquer your code!
This document contains proprietary information and is protected by copyright law.
Copyright © 2026 Red Gate Software Limited. All rights reserved
Load comments