
Importing PST files in Exchange Server 2010 has always been difficult and prone to error. You had to use a 32-bit management workstation, or you had to install the Mailbox Server role on your management workstation, or you had to install Outlook on your Exchange Server; basically, there are all kinds of issues that can make the SysAdmin’s life difficult. Thankfully, things have changed in Exchange Server 2010 SP1 though. Time for a closer look…
Mailbox Replication Service
Importing PST files has always been difficult because the process relied heavily on some of the Outlook DLL’s, but this is no longer the case in Exchange Server 2010 SP1. Microsoft has completely reengineered this, and built PST reading/creation logic directly into Exchange Server 2010 SP1. The process is now integrated into the Mailbox Replication Service (MRS), the same engine that’s also responsible for moving mailboxes between Mailbox Databases. The MRS is a process that runs on the Client Access Server, continuously scanning the Mailbox Database for move requests. If it finds a move request, it will process it and start moving a mailbox from one Mailbox Database to another. This is an online process, so users hardly notice that their mailbox is being moved. The mailbox is still accessible while it is being moved ( and that’s true when moving from Exchange 2007 to Exchange 2010 or between Exchange 2010 Mailbox Databases), and the mailbox also continues to accept new messages as they arrive on the Hub Transport Server.
A similar process is used for importing PST files into mailboxes (and exporting PST files from mailboxes, of course); the only difference is that the source of the mail is not a mailbox, but a PST file.
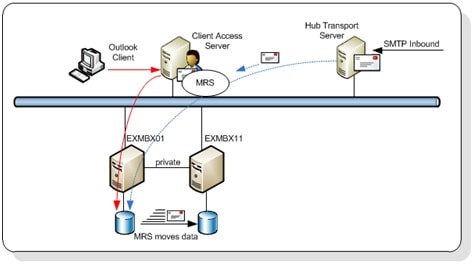
Figure 1: The Mailbox Replication Service is responsible for moving and importing mail data
Import Mailbox
Suppose we have an Exchange administrator (ExAdmin) and, after he implemented Exchange Server 2010 SP1 (including the Personal Archives), he is now responsible for importing the PST files into the Mailboxes and Archives.
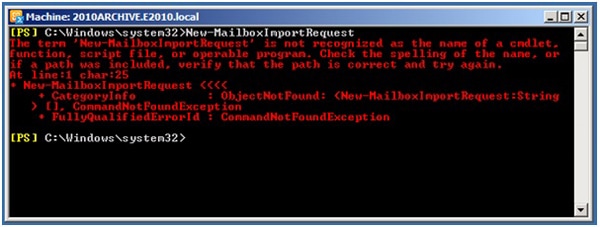
However, when the ExAdmin initially opens the Exchange Management Shell and enters the appropriate cmdlet (New-MailboxImportRequest) an error message is generated:
By default, no one has the required permission to perform these actions, and therefore the cmdlets are not available; to enable the mailbox import functionality, the “Mailbox Import Export” role needs to be assigned to the ExAdmin user. ExAdmin needs to Logon as the administrator (in this case, the user that first installed Exchange Server 2010, or anyone else who has been given the Organization Administrator privilege) and execute the following command:
|
1 |
New-ManagementRoleAssignment -Role "Mailbox Import Export" -User ExAdmin |
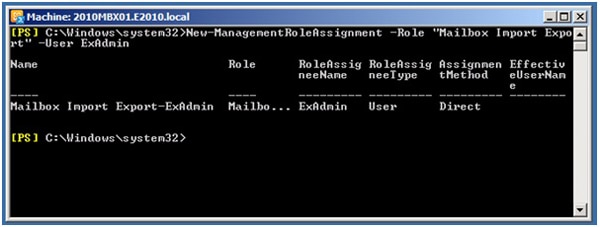
The ExAdmin user now has the appropriate permission, and can execute the cmdlets after he closes and re-opens the Exchange Management Shell. That’s all it takes…
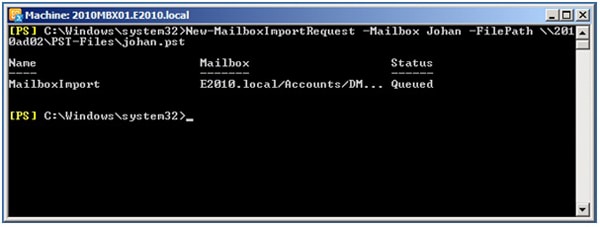
The cmdlet to import PST files into the mailboxes is New-MailboxImportRequest. It takes a number of parameters, but the most important ones are, of course, the mailbox and the path to the file share where the PST file is located. The request does not accept a local directory, so you have to use a file share, but there’s a snag here: when creating the file share, you have to grant the security group “Exchange Trusted Subsystem” read/write permissions on that file share. A nice feature to see in this cmdle is the -IsArchive parameter, which is responsible for importing a PST file into the user’s Personal Archive. However, note that to use the Personal Archive, you’ll need an Enterprise Client Access License (eCAL).
So, to import a PST file into Johan’s mailbox, you have to enter the following command:
|
1 |
New-MailboxImportRequest -Mailbox Johan -FilePath \\2010AD02\PST-Files\johan.pst |
You should be aware This command is not available in the Exchange Management Console in Exchange Server 2010 SP1 – only in the Exchange Management Shell.
Performing the actual import of the data into the mailbox is a process which runs on the Client Access Server, as explained earlier when I mentioned the Mailbox Replication Service. So, after entering the import cmdlet, it is therefore possible to close the Exchange Management Shell and log off from the server or management workstation which has the management tools installed.
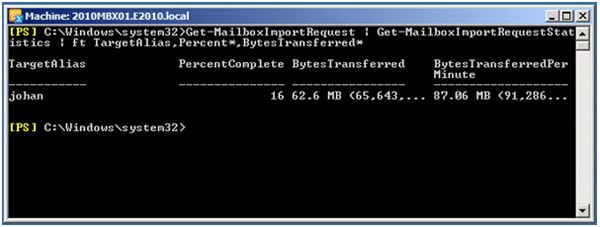
To monitor the status of the import request, you can use the Get-MailboxImportRequest and the Get-MailboxImportRequestStatistics cmdlets when needed, combined with a selection of parameters, such as the demonstrated in the command below:
|
1 2 |
Get-MailboxImportRequest | Get-MailboxImportRequestStatistics | ` ft TargetAlias,Percent*,BytesTransferred* |
It is also possible to enter multiple requests at the same time, or close to each other. The requests will be queued, and when the Client Access Server picks up a request it will then process them sequentially.
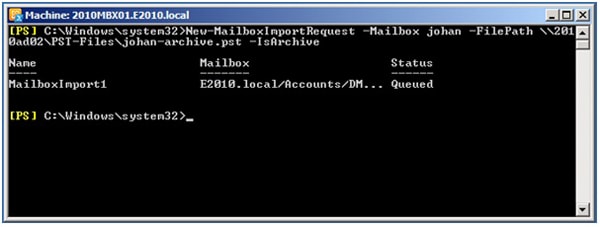
Now let’s demonstrate how to monitor the progress of an import action. First of all, to import a PST file into the user Johan’s Personal Archive directly soon after starting the previous import into his primary mailbox), you can use the following command:
|
1 2 |
New-MailboxImportRequest -Mailbox Johan -FilePath \\2010AD02\PST-Files\johan-archive.pst ` -IsArchive |
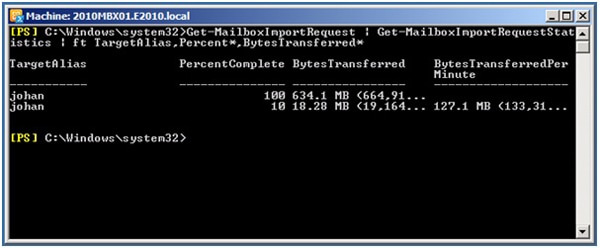
Now, when you enter the previous command for monitoring the import status, you’ll see two entries. In this example, the actual primary mailbox is already finished (100%) and the Archive import is still running:
Now that we’ve got the basics, I’ll mention that it’s possible to exclude certain folders during the import using the -ExcludeFolders parameter, and it is also possible to use a -SourceRootFolder parameter to define what data to import from within the source PST; everything outside of the targeted -SourceRootFolder will not be imported. Similarly, the -TargetRootFolder specifies the location in the mailbox where the import will store its data, for example in a \RecoveryFolder location in the mailbox.
Interestingly, it is also possible to perform bulk import of PST files. Suppose there are a number of PST files in the file share we’ve used earlier; it is now possible to request a list of those PST files, and pipe this output into the New-MailboxImportRequest:
|
1 2 3 4 |
Dir \\2010ad02\PST-Files\*.pst | %{ New-MailboxImportRequest -Name ImportOfPst -BatchName ImportPstFiles ` -Mailbox $_.BaseName -FilePath $_.FullName } |
The mailbox which is to be targeted, is identified from the file name of the PST file; so student-1.pst will be automatically imported into the mailbox named “student-1“. When importing multiple PST files in the same batch, you’ll notice that only one or two imports are active at the same time; other requests have the status “Queued” and are only processed when previous imports are finished.
One of the issues top bear in mind is to not overload the Client Access Server and the Mailbox Server during a PST import, which is why the import process is throttled. The good thing is that this throttling is fully configurable; so you can, for example, really stress your Mailbox Servers and Client Access Servers when you’re performing bulk imports on a Saturday or Sunday. The configuration for this is stored in a config file called MSExchangeMailboxReplication.exe.config, which is stored (by default) in the directory C:\Program Files\Microsoft\Exchange Server\V14\Bin on the Client Access Server; when you open it with Notepad, you’ll find some “MaxActiveMoves” parameters which you can edit (which you can see in the image below). Please note that this file exists on every Client Access Server, which means that you’ll need to adjust across all CAS machines if you have a large Exchange organization & are doing a bulk import / export.

As you can probably guess, increase the number of moves per target MDB and your Import Request will process more than just two PST files at a time.
Export Mailbox
Besides importing PST files into mailboxes, it is also possible to send mail the other way, and export mailbox information into PST files. You may want to do this when, for example, you want to delete a mailbox after an employee has left the company. The concept is exactly the same as importing data, except that the cmdlet to use is now New-MailboxExportRequest. To export a particular mailbox to a PST file you can enter the following command:
|
1 |
New-MailboxExportRequest -Mailbox J.Wesselius -FilePath \\2010AD02\PST-Files\J.Wesselius.pst |
And if you want to export only the Personal Archive to a PST file, you can use the -IsArchive parameter again:
|
1 2 |
New-MailboxExportRequest -Mailbox J.Wesselius -FilePath \\2010AD02\PST-Files\J.Wesselius.pst ` -IsArchive |
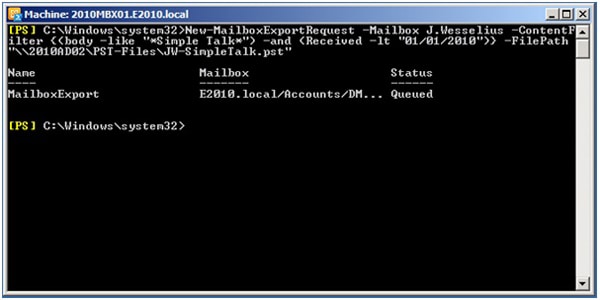
That’s nice and simple, and things actually become more interesting when you start using filtering. It is possible to filter on specific keywords and on specific dates; so, for example, if I want to export all messages related to “Simple Talk” that were sent and received before January 1st 2010, I can use the following command:
|
1 2 3 |
New-MailboxExportRequest -Mailbox J.Wesselius ` -ContentFilter {(body -like "*Simple Talk*") -and (Received -lt "01/01/2010")} ` -FilePath \\2010AD02\PST-Files\JW-SimpleTalk.pst |
Monitoring the export process is just like monitoring the import process, and you’ll need to use the following Exchange Management Shell command:
|
1 2 |
Get-MailboxExportRequest | Get-MailboxExportRequestStatistics | ` ft Sourcealias,per*,BytesTransferredPerminute |
Conclusion
The import and export mailbox processes in Exchange Server 2010 SP1 have been improved, and – to be honest – it was about time. Importing PSTs is handled by the Mailbox Replication Service, the same engine that’s being used by the online Move Mailbox technology.
The New-MailboxImportRequest and New-MailboxExportRequest cmdlets have quite a few parameters available, and you can filter the commands to customize them to your needs. The only downside is that the process is command-line only, but since Exchange 2007 came with PowerShell 3½ years ago, we are hopefully getting used to that.
You don’t fancy getting deep into a command-line process with a host of parameters?
The easiest way of migrating all the old PST files, including calendars, contacts and tasks. Red Gate’s PST Importer 2010 could well be the answer to your, and your users’, prayers. Try it!
Load comments