
In my previous article, Getting Started with Active Directory Rights Management Services for Exchange 2010, we went over detailed steps on how to install AD RMS and stepped through configuring a rights policy template through the AD RMS management console and Windows PowerShell. Finally, we also went over configuring AD RMS to work with Exchange Server 2010.
In this article, we’ll go over Information Rights Management (IRM) features, and the different ways you can set it up, based on your business requirements. We’ll cover the various decryption options, as well as both the manual and automatic application of rights policy templates through various means. Bear in mind that, because I am covering a lot of ground in this article, I am only aiming to describe what is needed to make the features we’ll discuss available for you to use, and offer examples of how they might function when applied. Let’s get started:
Now that you’ve set up your AD RMS, you’re now in a position to use IRM to protect email messages either automatically or manually, based on predefined criteria defined through protection rules in Microsoft Outlook 2010, Outlook Web App, or transport rules. Before digging into the different methods, it is worth mentioning that if you have implemented transport rules or journaling, both agents will need messages to be decrypted in order to access the original contents. Let’s take a look at the various decryption options available.
Transport Decryption
To start with, if you are using transport agent rules to control mail flow in your environment, you need to look at enabling transport decryption on your Hub transport servers. Failing to do so will lead to a failure in applying the transport agent rule.
Because the super users group is granted an owner use license when they request a license from the AD RMS, the Federated Delivery mailbox must be added to that group ( you can follow the same steps mentioned in Step 3 of my previous article). This will allow all RMS-protected content created by the AD RMS cluster to be decrypted.
Once you’ve got all those preliminaries out of the way, transport decryption can be configured using the Exchange Management Shell, and will be applied to messages on the first Hub Transport server they encounter, and they won’t be decrypted again by any of the other Hub Transport Servers in your organization. However, a message will be decrypted again if it is transferred to a Hub Transport Server in another Active Directory forest. To enable transport decryption, run the below cmdlet:
|
1 |
Set-IRMConfiguration -TransportDecryptionSetting Mandatory |
This will set the hub transport to reject messages that can’t be decrypted, and send a non-delivery report to the sender. A less secure approach is obviously to allow the delivery of the messages even if message decryption fails, which is an approach that can be used when message delivery needs to be prioritized over messaging security (i.e. we want to allow the message to be delivered regardless of whether the hub transport server can decrypt the message or not). To set that up, run the below cmdlet:
|
1 |
Set-IRMConfiguration -TransportDecryptionSetting Optional |
In both situations, if the message decryption is successful, the transport agent reviews the message and re-encrypts it again with the same user rights it had to start with. If a failure occurs, a non-delivery report will only be sent in the case where TransportDecryptionSetting is set to Mandatory. To disable hub transport decryption entirely, run the below cmdlet:
|
1 |
Set-IRMConfiguration -TransportDecryptionSetting Disabled |
Journal Report Decryption
For those who use journaling to record an organization’s mail flow, you need to consider journal report decryption; this will enable the journaling agent to attach a decrypted copy of a rights-protected message to the Journal report. If you’d like to know more about Journaling, please visit the following article on Understanding Journaling.
Just like transport decryption, the Federated Delivery mailbox must be added to the super users group configured on the AD RMS server before enabling decryption settings. Journal report decryption can also be set using the Exchange Management Shell but running the below cmdlet:
|
1 |
Set-IRMConfiguration -JournalReportDecryptionEnabled $true |
Clearly, if you would like to disable the journal report decryption of the wrapped message, you should set JournalReportDecryptionEnabled to $false.
Exchange Search Decryption
For Exchange 2010 to be able to index protected messages for Multi-Mailbox search, the emails will need to be decrypted. If you want to disable this feature (which is enabled by default), run the below cmdlet:
|
1 |
Set-IRMConfiguration -SearchEnabled $false |
In fact, transport decryption, journal report decryption and Exchange Search decryption are enabled by default, and can be checked by running:
|
1 |
Get-IRMConfiguration |
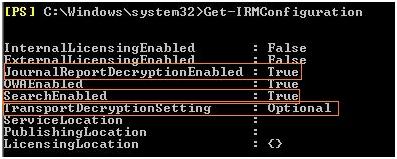
Figure 1.0: IRM default configuration<
IRM in Outlook Web App
Users can manually protect individual email messages in Outlook Web App by selecting a rights policy template when composing an email. However, the only email attachments that get encrypted are files related to Microsoft Word, Excel, PowerPoint, XPS, and email messages. By default, IRM is enabled in Outlook Web App, and is applied on the default Web App Virtual Directory and the default Web App mailbox policy. To check that, use the below cmdlets:
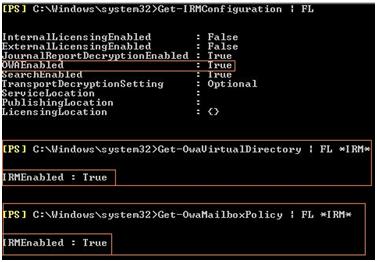
Figure 1.1: Check IRM for OWA
There is quite fine-grained control available for these settings. For example, to disable IRM in Outlook Web App, run the below cmdlet:
|
1 |
Set-IRMConfiguration -OWAEnabled $false |
To disable IRM on the OWA Virtual Directory, run the below cmdlet:<
|
1 |
Set-OwaVirtualDirectory -IRMEnabled $false |
And IRM can be disabled for the default OWA Mailbox Policy by running:
|
1 |
Set-OwaMailboxPolicy -IRMEnabled $false-Identity Default |
Now that we’ve set how we want IRM to behave in Outlook Web App, let’s enable the IRM feature for messages sent to internal recipients by running the below cmdlet:
|
1 |
Set-IRMConfiguration -InternalLicensingEnabled $true |
Note: If you would like to enable IRM features for messages sent to external recipients, you need to set the ExternalLicensingEnabled parameter to $true
The Pre-Licensing agent will attach a user license to IRM-protected messages, which will define the level of access to that specific item when opened in either Microsoft Outlook or Outlook Web App. Doing so will eliminate the need to repetitively visit the AD RMS cluster to ascertain the appropriate level of access, and at the same time will allow the offline access to protected messages.
By now, users should be able to select a rights policy template when they compose a message through the Outlook Web App. In the below figure, the user is sending an email to Mike while protecting the content with the “Do Not (Reply/Forward)” rights policy template:
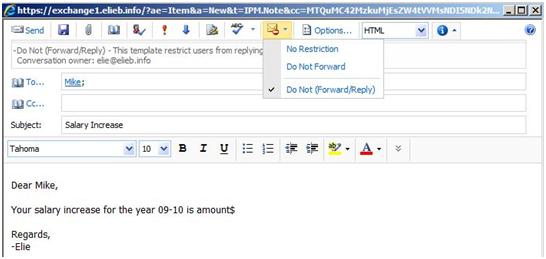
Figure 1.2: Manually selecting Rights Policy Template from OWA
As you see in Figure 1.3, Mike is able to read the decrypted message in the preview pane using the pre-licensing agent. If a pre-license isn’t available, Outlook Web App requests one from the AD RMS server. In the case of the template being applied here, the user won’t be able to “Reply”, “Reply to All”, “Forward”, or forward the message as an attachment.
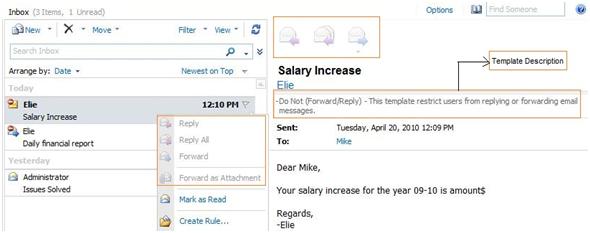
Figure 1.3: Viewing IRM protected message in OWA
Lastly, by checking Mike’s security rights on the AD RMS server, we can see that the rules have been successfully applied.

Figure 1.4: Mike’s security rights in AD RMS
This feature is currently not available for Web-Ready document viewing.
IRM in Microsoft Outlook 2010
In the latest version of Microsoft Outlook, users have the option to manually select a rights policy template in the same way as what we saw in Outlook Web App, although Outlook can also automatically protect messages based on an outlook protection rule.
As a requirement for both options, the AD RMS agent must be installed on the client machine; this is done automatically for users running Windows Vista or newer versions of the Windows Outlook client. If you do not have the client installed and you try to open files that have been rights managed by using IRM, the office program will prompt you to download the Windows Rights Management Services client.
The first time that you try to open a protected message through Outlook, the computer will retrieve the AD RMS URL, validate it by prompting for your credentials, and then configure itself for IRM. During this process, a license is downloaded that defines the users’ level of access to the desired item. The below figure shows the process while configuring the machine for the first time.
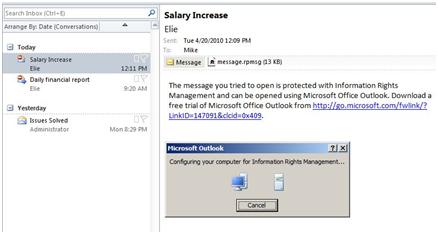
Figure 1.5: Configuring machine for IRM
As mentioned earlier, as an alternative to allowing users to manually select IRM policy templates in Outlook 2010 is, an Exchange administrator can choose to automatically protect messages before they leave Outlook by creating an Outlook protection rule. After an administrator configures these rules, which are defined to protect messages based on a predefined scope, they are automatically distributed to Outlook 2010 using Exchange Web Services.
As an example, to create an Outlook protection rule, run the below cmdlet:
|
1 2 |
New-OutlookProtectionRule -Name "IT Confidential" -SentTo "it@elieb.info" ` -ApplyRightsProtectionTemplate "Do Not (Forward/Reply)" |

Figure 1.6: Creating an Outlook Protection Rule
The above protection rule will automatically apply the policy template to emails sent to the “IT” distribution list as shown below:
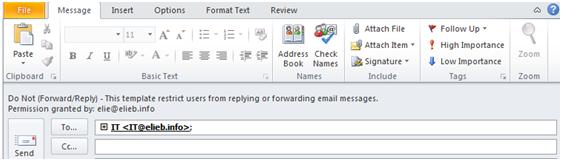
Figure 1.7: Outlook Protection Rule in action
It’s worth keeping in mind that emails sent to individual members of the defined distribution groups (in this situation) are not IRM protected. Just like SentTo, SentToScope can be used to protect messages for internal users by selecting the InOrganization scope or selecting All to apply it to all recipients. To apply the policy to all users within the organization, run this cmdlet:
|
1 2 |
New-OutlookProtectionRule -Name "IT Confidential" -SentToScope All ` -ApplyRightsProtectionTemplate "Do Not (Forward/Reply)" |
A third option is to use FromDepartment, where the user’s department property is compared with the value specified and, if it matches, then the policy template will be applied. To have a more detailed look at the parameters that you can define for an outlook protection rule, check out the New-OutlookProtectionRule article on Microsoft TechNet.
On the other hand, and in a similar manner to Outlook Web Access, policy templates can be manually selected by users when composing the message. To do that, choose the template from the Permissions group in the Options tab.

Figure 1.8: Manually selecting the ‘Sensitive Data’ Rights Policy Template from Outlook
After the message is delivered to the recipient, the content will be opened using the pre-defined permissions in the AD RMS template policy rights.
To follow on the above example and make sure that the correct security policy is being applied, we’ve compared the recipients’ permissions from Outlook with the respective ones in AD RMS, and as you can see in the below figure the fundamental behavior is the same:
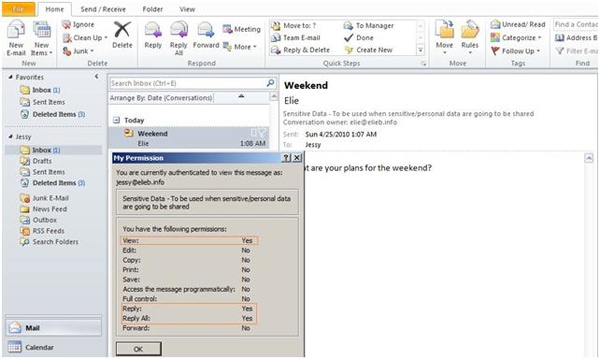

Figure 1.9: Comparing permissions between Outlook and Template Security in ADRMS
As in previous versions of Outlook, users are also able to select rights policy template while they are offline or the Exchange Server is unavailable for any reason. To make this possible, follow the steps below (for Outlook 2010):
- From the local machine, expand the below registry key:
1HKEY_CURRENT_USER\Software\Microsoft\Office\14.0\Common\DRM
- Select DRM, click Edit, point to New, click Expandable String Value, and then type AdminTemplatePath.
- Double-click the AdminTemplatePath registry value and type %UserProfile%\AppData\Microsoft\DRM\Templates in the Value data box where %UserProfile% equals C:\Users\, and then click OK.
- Verify that the path is valid. If it’s not, create the appropriate folders.
- Copy the exported AD RMS rights policy templates from the AD RMS to C:\Users\<user name>\AppData\Microsoft\DRM\Templates
Lastly, to remove an Outlook Protection Rule (perhaps because it is not longer valid, or was just incorrectly configured), run the below cmdlet:
|
1 |
Remove-OutlookProtectionRule -Identity "IT Confidential" |
This will remove the rule definition from Active Directory, and make it unavailable for use in both Outlook and Outlook Web App.
Transport Protection Rules
In addition to the different ways of using IRM we’ve seen so far, one last method is to enable message protection rules on the Hub transport server itself. For example, in the following example we will be protecting any incoming mail that contains the keyword “Salary” in its subject field with the “Do Not (Reply/Forward)” template.
To create a transport protection rule, open the Exchange Management Console from the Hub Transport server and go to the Organization tab. Select Hub transport and click on the transport rules tab. Right click in the rules list and click new transport rule. On the first page, choose a name for the rule, check the enable check box, and click Next.
On the conditions screen, check ‘from users that are inside or outside the organization‘ and make sure that ‘Inside the organization‘ is selected. Also make sure that the “when the Subject field matches text patterns” condition is selected, and edit the desired text pattern by entering the ‘Salary‘ keyword. On the actions page, check ‘rights protect message with RMS template‘ and select the “Do Not (Forward/Reply)” template.
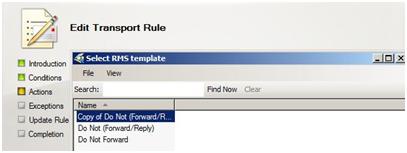
Figure 2.0: Selecting Rights Policy Template
On the exceptions list, click Next, and on the create page, make sure that the settings are as described above before clicking New to start creating the rule as shown below:
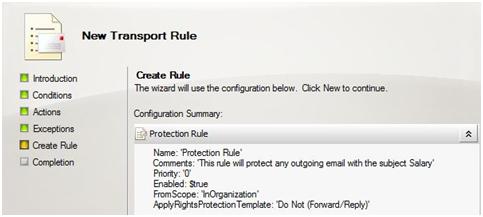
Figure 2.1: Transport Protection Rule configuration summary
And at the completion page, you should expect to see the below figure:
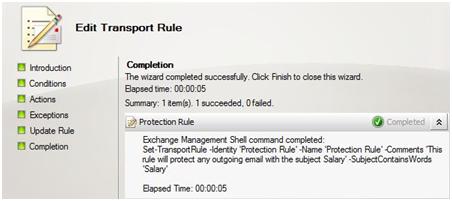
Figure 2.2: Transport Protection Rule completion
Now that we have created the transport rule, any email that includes the keyword ‘Salary’ in the subject will be protected by the defined template, as can be seen by the users below getting the “Do Not (Forward/Reply)” template applied for their message (To view the permissions, click on the template description that is above the “From” field).
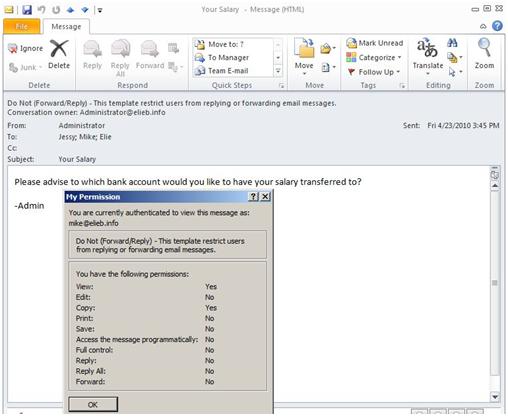
Figure 2.3: Viewing Rights Policy Template permissions in Outlook
Summary
That’s the end of the two-part tour of Active Directory Rights Management Server integration with Exchange Server 2010, and Information Rights Management features. With the four different models we described, you will have the option to automate the use of the policy template on the server side or on the client side through OWA or Outlook, or grant users the ability to manually protect messages before they are sent from their machines. As a result, the implementation and the use of rights policy template are made much simpler with the use of Exchange Server.
This article was commissioned by Red Gate Software, engineers of ingeniously simple tools for optimizing your Exchange email environment.
Learn more about Exchange Server Archiver and PST Importer.
Load comments