
In this series on SQL Server Integrations Services (SSIS), we’ve performed several exercises: creating a basic package, adding data flow to a package, working with variables, and using the ExecuteSQL task to return a result set. (You can find a list of the articles on my Author Profile page.)
In this article, we look at another control flow component: the Foreach Loop container. You can use the container to loop through a set of enumerated items such files in a directory or rows in a table. The container points to whatever you wish to loop through and provides the mechanism necessary to carry out the looping.
Within the container, you can add one or more control flow tasks (or other containers). For example, you might add an ExecuteSQL task to run a T-SQL statement for each enumerator or a DataFlow task to process data related to each item.
In this article, I show you how to use the Foreach Loop container to copy files from one folder to another. We will start with a new SSIS package, so you don’t have to try to work with a previous setup. However, before configuring the package, you’ll need a set of samples files to copy. Select a drive on your local system and then create four text files. On my system, I created the following four files in the C:\Desktop\Annette\Articles\Demo folder:
- File1.txt
- File2.txt
- File3.txt
- Test1.txt
One of the files (Test1.txt) follows a different naming convention from the other files. I did this intentionally to demonstrate the use of wildcards later in the article.
Once you’ve created your files, you’re ready to start building your package.
Setting up the Foreach Loop Container
Our first step is to drag the Foreach Loop container from the Toolbox to the control flow design surface, as shown in Figure 1.
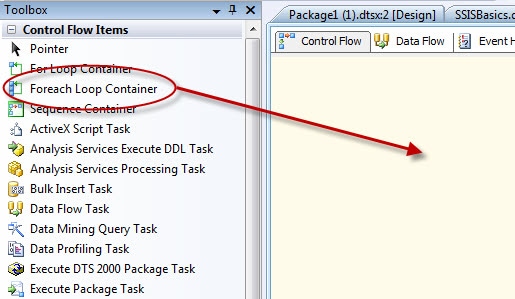
Figure 1: Getting started with the Foreach Loop container
When adding the container to the control flow, you’ll see that it looks different from control flow tasks, such as ExecuteSQL. The Foreach Loop container will display the name of the container at the top with an empty box beneath it, as shown in Figure 2.
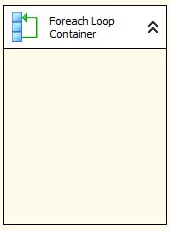
Figure 2: The Foreach Loop Container
To configure the Foreach Loop container, double-click the container to launch the Foreach Loop Editor. The editor includes the following four pages:
- General
- Collection
- Variable Mappings
- Expressions
For this exercise, we’re concerned only with the first three pages, where we’ll specify the type of enumerators (in this case, files), provide their location, and create a variable that will be used to identify each file and its location.
General Page
The General page includes the Name and Description properties, which you should define as you see fit. I’ve named my container MoveFiles and given it the description Containertomovefiles, as you can see in Figure 3.
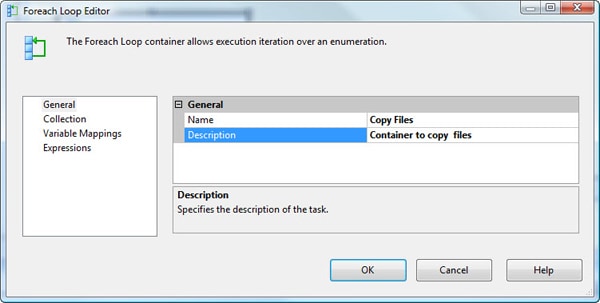
Figure 3: Configuring the General page in the Foreach Loop Editor
That’s all there is to the General page. The important point to remember is to provide a meaningful name and description so that other developers can understand what’s going on.
Collection Page
Next, we move to the Collection page, which is where we select the enumerator type and configure any properties associated with that type. Figure 4 shows what the page looks like when you first access it.
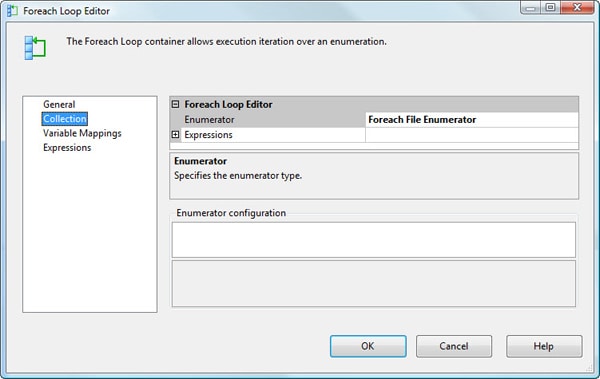
Figure 4: Configuring the Collection page in the Foreach Loop Editor
The enumerator determines the type of objects that we plan to enumerate. (Enumerate refers to the process of going through a collection of items one-by-one.) The ForeachLoop container supports the following enumerator types:
- Foreach File Enumerator: Enumerates files in a folder
- Foreach Item Enumerator: Enumerates items in a collection, such as the executables specified in an Execute Process task.
- Foreach ADO Enumerator: Enumerates rows in a table, such as the rows in an ADO recordset.
- Foreach ADO.NET Schema Rowset Enumerator: Enumerates schema information about a data source.
- Foreach From Variable Enumerator: Enumerates a list of objects in a variable, such as an array or ADO.NET DataTable.
- ForeachNodeList Enumerator: Enumerates the result set of an XML Path Language (XPath) expression.
- Foreach SMO Enumerator: Enumerates a list of SQL Server Management Objects (SMO) objects, such as a list of views in a database.
For this exercise, we want to use the Foreach File Enumerator type. However, when you first go to the Collection page, it’s not apparent how to configure the type. By default, the Foreach File Enumerator is listed, but no other configurable options are visible.
So the first thing we must do is to click in the Foreach File Enumerator listing. When the drop-down arrow appears to the right of the row, re-select Foreach File Enumerator. The options we must configure are then displayed on the Collection page, as shown in Figure 5.
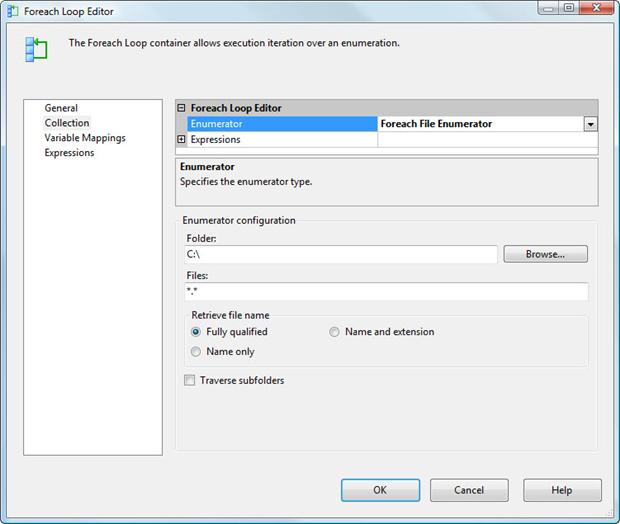
Figure 5: Selecting the Foreach File Enumerator type
For this exercise, we don’t need to define an expression, so we can leave the Expressions text box empty. The next step, then, is to configure the properties in the Enumeratorconfiguration section.
The first property we’ll configure is the Folder property. Click the Browse button to the right of the property. When the BrowseForFolder dialog box appears, navigate to the folder that contains the sample files you created for this exercise. On my system, I saved those files to the Desktop\Annette\Articles\Demo folder, as shown in Figure 6.
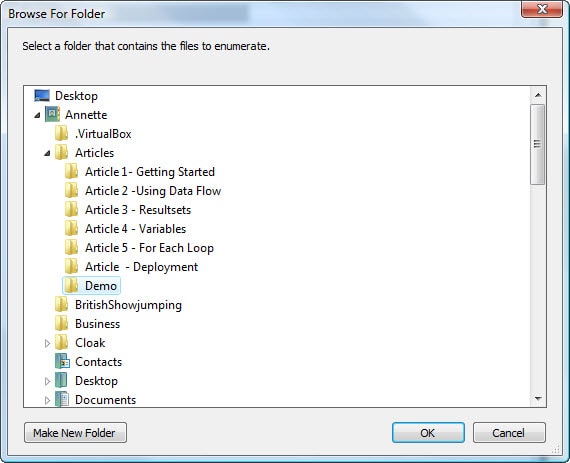
Figure 6: Navigating to the folder that contains your files
Once you have found the correct folder, select it and click on OK. When you’re returned to the ForeachLoopEditor, the folder will be listed in the Folder property.
Next, we need to configure the Files property. This is where we specify which files to include in our list of enumerated files. For this exercise, we’ll copy only those files whose names start with “File.” In the Files text box, enter File*.txt. The asterisk wildcard (*) let’s us include any text file that starts with “File,” without having to specify each file. If our files had instead been Word files, we would have entered File*.doc. If we were moving multiple file types, we would have used File*.* as our property value.
Next, we need to select one of the following options in the Retrieve file name section:
- Fully qualified: The fully qualified file name should be returned when a file in the enumerated list is being referenced.
- Name and extension: The file name with its extension should be returned when a file in the enumerated list is being referenced.
- Name only: The file name without its extension should be returned when a file in the enumerated list is being referenced.
For our example, we’ll select the Fully qualified option.
The only other option on the Collection page is Traverse subfolders. If there were subfolders that we wanted to include in our collection, we would select this option. But for now, we can leave it deselected. The Collection page should not look similar to the one shown in Figure 7.
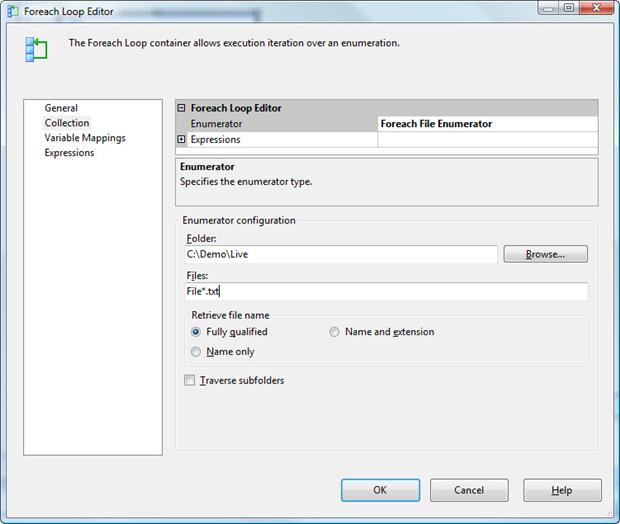
Figure 7: Configuring the properties on the Collection page
Once we’ve defined our collection (the list of files), we’re ready to configure the VariablesMappings page.
Variable Mappings Page
On the Variable Mappings page, we map our collection to a user-defined variable. The variable will point to a specific file each time the Foreach Loop container loops through a collection. Figure 8 shows what the VariableMappings page looks like when you first access it.
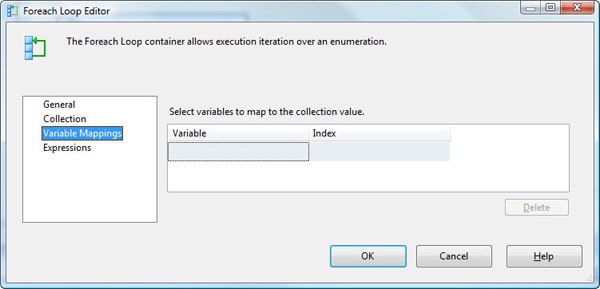
Figure 8: The Variables Mapping page in the Foreach Loop Editor
Because we have not yet created a variable to map to our collection, we need to create one now. For this exercise, we’ll create the variable from the VariableMappings page. In the Variable column of the first row of the grid, click <New Variable…> to launch the Add Variable dialog box, shown in Figure 9.
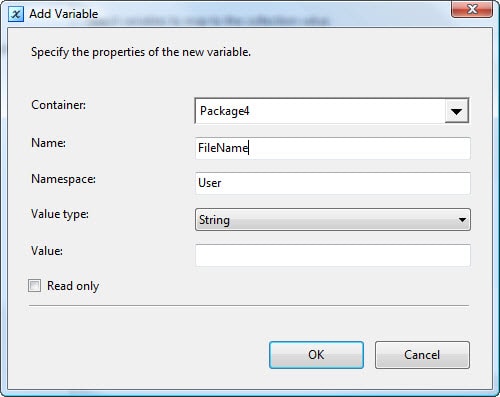
Figure 9: Adding a variable to associate with our collection
Configure each property in the AddVariable dialog box as follows:
- Container: Select the name of the current SSIS package. You want the variable to be created at the package scope.
- Name: Type a name for your variable. I used FileName.
- Namespace: Stick with the default: User.
- Value Type: Select String if it’s not already selected.
- Value: Leave this blank. It will be populated with the name of the current file each time the Foreach Loop container loops through your collection of files.
- Read only: Do not select this checkbox. SSIS must be able to write to the variable.
Once you’ve completed configuring the variable settings, click OK.
The Variable Mappings page should now look similar to the one shown in Figure 9. Notice that the value User::FileName appears in the Variable column and the value 0 in the Index column. The Index value is specific to the ForeachItem enumerator and does not apply in this case. So we’ll stick with 0, the default value. Click OK to close the ForeachLoopEditor.
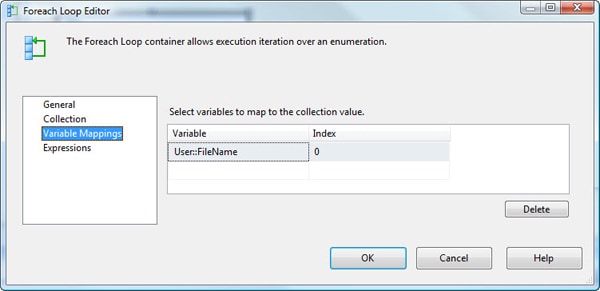
Figure 10: Configuring the Variables Mapping page
You can verify that the FileName variable has been created by viewing it in the Variables window. If the window is not visible, right-click the control flow design surface and then click Variables. The variable should be listed as one of the user variables.
Adding a Variable
By creating the FileName variable, we have provided a way to identify our source file each time the ForeachLoop container iterates through our collection. We now need to create a variable that identifies our destination folder. In the Variables window, click the AddVariable button. In the new row that is added to the grid, configure each column as follows:
- Name: Type a name for your variable. I used DestinationFolder.
- Scope: This should be the name of your package. You want the variable to be at the package scope.
- Data Type: Select String.
- Value: Type the name of the destination folder where you want to copy your files. I used C:\Users\Annette\Articles\Archive.
Once you’ve configured the new variable, the grid in the Variables window should look similar to the one shown in Figure 11.

Figure 11: Adding a variable to the Variables window
We have now set up the files we want to enumerate and the variable that will hold the path name of each source file. Our next step is to set up the connection manager necessary to connect to our source files in order to copy them to our destination folder.
Adding the Connection Manager
To connect to our source files, we must set up a File connection manager that points to those files. Right-click the ConnectionManagers window, and then click New File Connection. When the File Connection Manager Editor appears, verify that Existingfile is selected in the Usage type drop-down list. For the File option, enter the full path name to the first text file (File1.txt) or click the Browse button, navigate to the file, and select it from the source folder. When you’re finished, the FileConnectionManagerEditor should look similar to the one shown in Figure 12.
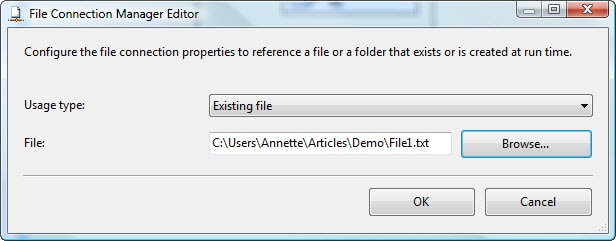
Figure 12: Configuring the File Connection Manager Editor
Click OK to close the FileConnectionManagerEditor. The new connection manager should now be displayed in Connection Managers window. If you want, you can rename your connection manager. I renamed mine SourceFile.
We now need to configure the SourceFile connection manager to use with our ForeachLoop container. To do so, we must add a property expression to the connection manager that uses the FileName variable to connect to our file. A property expression is an expression that defines a property value in place of a hard-coded value.
Right-click the SourceFile connection manager, and then click Properties. The Properties window should now be visible and should look similar to the one shown in Figure 13. The Properties window displays the properties and their values for the selected object. Because we opened the Properties window from the SourceFile connection manager, the displayed properties are specific to that connection manager.
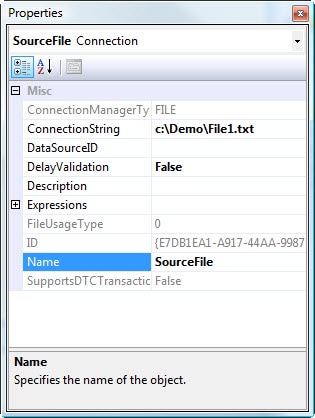
Figure 13: The SourceFile connection manager properties
Click the Expressions property so that the browse button (the ellipses) appears on the right-hand side, then click the browse button to open the Property Expressions Editor, as shown in Figure 14:
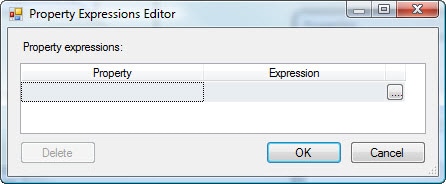
Figure 14: Creating a property expression on the Connection String property
In the first row of the grid, select Connection String in the Property column. Then click the browse button at the far right of that row (to the right of the Expression column). This launches the Expression Builder dialog box. In the top-left window, expand the Variables node and drag the User::FileName variable to the Expression text box, as shown in Figure 15.
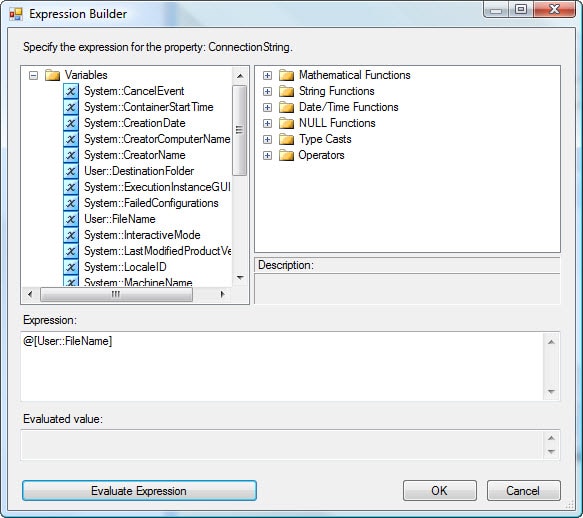
Figure 15: Defining a property expression
That’s all there is to it. Click OK to close the Expression Builder dialog box.
The Property Expressions Editor should now look similar to the one shown in Figure 16. Click OK to close the editor.
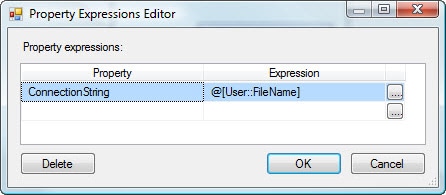
Figure 16: Defining a property expression on the Connection String property
Once we’ve configured our File connection manager, we’re ready to run the ForeachLoop container. However, as it stands now, the container won’t do anything but loop through the list of files, without taking any actions on those files. To actually copy the files to the destination folder, we need to add a FileSystem task to the container.
Adding a File System Task
To add the FileSystem task to the Foreach Loop container, drag the task from the Toolboxinto the container, as shown in Figure 17.
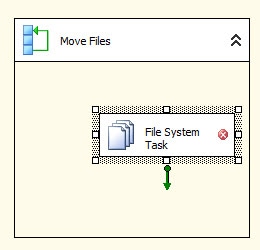
Figure 17: Adding the File System task to the Foreach Loop container
Notice that, on the FileSystem task, there is a red circle with a white X. This indicates that the task has not yet been set up, so we need to take care of that.
Double-click the task to open the File System Task Editor. The editor includes a number of configurable properties, as shown in Figure 18.
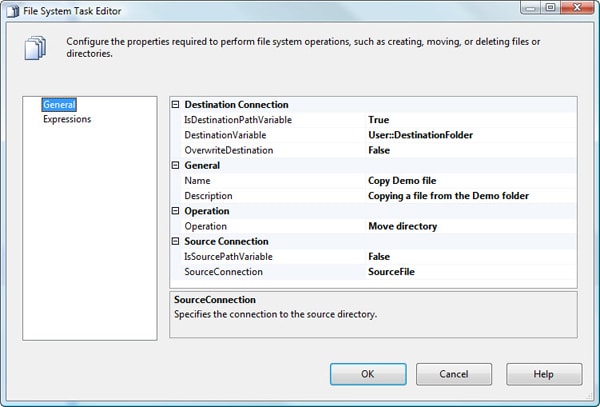
Figure 18: Configuring the File System task
For each property in the File System Task Editor, set the value as follows:
- IsDestinationPathVariable: Because we’ll be using a variable to specify the destination folder, set this property to True.
- DestinationVariable: This property is activated when you set the IsDestinationPathVariable property to True. From the drop-down list, select User::DestinationFolder variable-or whatever variable you created for the destination folder.
- OverwriteDestination: If there is already a file in the destination folder with the same name as the file you’re copying, the copy operation will fail if this property is set to False. Set the property to True if you want to overwrite the file in the destination folder. For the purposes of this example, I set my system to False. That way you can rerun the package multiple times without having to worry about deleting the files from the destination folder.
- Name: This property lets you specify the name you want to assign to this task. I used Copy Demo file.
- Description: This property lets you specify the description you want to assign to this task. I used Copying a file from the Demo folder.
- Operation: This property determines the operation you want the task to perform. The Operation property lets you choose from the following options:
- CopyFile
- CreateDirectory
- DeleteDirectory
- DeleteDirectoryContent
- DeleteFile
- MoveDirectory
- MoveFile
- RenameFile
- SetAttributes
For this exercise, we’ll use Copy File.
- IsSourcePathVariable: If you use a variable to specify the source file, you should set this property to True. However, in our case, the ForeachLoop container uses the variable to specify the source file, not the FileSystem task itself, so we will stick with False.
- SourceConnection: This property identifies the connection manager used to connect to the source files. Select the File connection manager you set up previously. On my system, it’s SourceFile.
When you’re finished, your FileSystem task should similar to one shown in Figure 19.
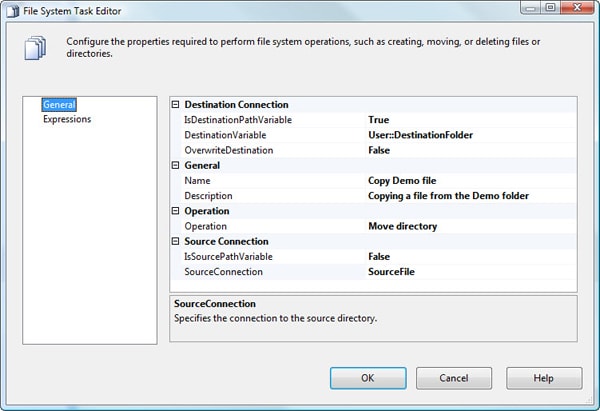
Figure 19: The File System Task Editor
Now click on OK. Your package is now ready. To test it click on the green execute arrow. Once this is complete you should be able to see the files have now been copied into the folder specified in the destination.
Summary
In this article, we used the Foreach Loop container to iterate through a set of files in a folder and move them one-at-a-time to another folder. To make that possible, we configured a property expression on out File connection manager to identify each file as we looped through the folder. Note, however, that the Foreach Loop container is not limited to files. For example, we could have used the container to process rows in a table one-by-one or other items that can be listed and grouped together. In the future articles, we’ll look at how to use the Foreach Loop container to run other tasks in a loop, such as the Script task.
This document contains proprietary information and is protected by copyright law.
Copyright © 2026 Red Gate Software Limited. All rights reserved
Load comments