
Encryption is one of the most powerful tools we have in SQL Server for protecting data, yet understanding the types of encryption available and how to implement them can often be a confusing process, especially as the encryption-related features have evolved.
In this article, I introduce you to some of the basic concepts behind SQL Server encryption and demonstrate how to implement encryption at the column level. This is the first in a series of articles that dive into the various ways you can implement encryption in SQL Server. I’ve started with column-level encryption because it provides an effective structure for explaining many of the encryption-related concepts in SQL Server. In the articles to follow, I’ll cover such features as Transparent Data Encryption (TDE), Always Encrypted, and Dynamic Data Masking. With that in mind, let’s get started with column-level encryption.
Preparing the environment
To demonstrate the various concepts in this article, we need to set up a test environment. I created mine on a local instance of SQL Server 2016, with the AdventureWorks2014 sample database installed. I used the following T-SQL script to create a database, add a table to the database, and populate the table with data from the AdventureWorks2014 database:
|
1 2 3 4 5 6 7 8 9 10 11 12 13 14 15 16 17 18 19 20 21 22 |
USE master; GO CREATE DATABASE EmpData; USE master; GO CREATE DATABASE EmpData; GO USE EmpData; GO CREATE TABLE EmpInfo( EmpID INT PRIMARY KEY, NatID NVARCHAR(15) NOT NULL, EncryptedID VARBINARY(128) NULL); GO INSERT INTO EmpInfo(EmpID, NatID) SELECT BusinessEntityID, NationalIDNumber FROM AdventureWorks2014.HumanResources.Employee WHERE NationalIDNumber IS NOT NULL; |
The BusinessEntityID and NationalIDNumber columns in the Employee table of the AdventureWorks2014 database provide the data for the EmpID and NatID columns in the EmpInfo table. The table’s EncryptedID column is empty for now, but that’s where we’ll store our encrypted values, which will be based on the values in the NatID column. (Normally we would not leave the NatID data in an unencrypted state, but we’re doing so here so we can easily verify our efforts.)
If you don’t have the AdventureWorks2014 database installed on your system, you can still follow along with the examples in this article. Just create the EmpInfo table and add a few rows of sample data to the EmpID and NatID columns.
Once we have our test environment up and running, we must prepare the EmpData database to support column-level encryption. Only then can we encrypt the EncryptedID column. The following steps outline the process we’ll follow to complete these tasks:
- Create the database master key (DMK)
- Create a self-signed certificate
- Create a symmetric key
- Encrypt the column data
- Query the encrypted data
This process takes advantage of SQL Server’s encryption hierarchy and key management infrastructure to deliver a layered architecture made up of a public key certificate and several symmetric keys. Each layer encrypts the layer below it, using the security mechanisms built into SQL Server.
Create the database master key
Encrypting a column starts with creating the DMK, if you haven’t already done so. The DMK is a symmetric key used primarily to protect the private keys in the database’s certificates and asymmetric keys. Since SQL Server 2012, the DMK has been encrypted with the 256-bit AES algorithm. Prior to that, it was the Triple DES algorithm.
Within a database, the DMK represents the top layer of the encryption hierarchy, but this is not the entire picture. SQL Server uses the service master key (SMK) and a user-supplied password to protect the DMK. The SMK sits above the DMK in the encryption hierarchy, at the server level.
The SMK is a symmetric key generated the first time a SQL Server instance is started. Once created, the SMK can be used to encrypt credentials, linked server passwords, and the DMK in each database.
SQL Server uses the Windows Data Protection API (DPAPI) to create and encrypt the SMK, which puts the DPAPI at a hierarchical level above the SMK. The following figure provides an overview of how these pieces fit together, with the DPAPI at the top of the hierarchy, followed by the SMK, and then by the DMK, which protects the certificates and asymmetric keys below it.
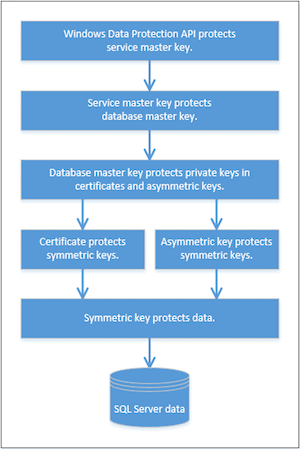
The hierarchy shown here represents only part of the entire encryption picture, but it includes all the pieces that go into encrypting a column of data, at least when taking the approach we’re taking in this article. There are other methods we can use for encrypting data, such as implementing an Extensible Key Management (EKM) module, but for now we’ll focus on the method reflected in the figure.
Because Windows and SQL Server take care of the top two levels of the hierarchy, we can turn our attention to the next level: the DMK. (We’ll get into the lower levels in a bit.) To create the DMK in the EmpData database, we can use the following CREATE MASTER KEY statement:
|
1 2 3 4 5 |
USE EmpData; GO CREATE MASTER KEY ENCRYPTION BY PASSWORD = 'pw1234!' |
The statement itself is simple enough. Each element is required and there are no optional arguments from which to choose. We need only add the password. In this case, I used a very simple password for demonstration purposes. We would of course want to provide a much stronger password under normal circumstances.
We can verify that the DMK key has been created by querying the sys.symmetric_keys catalog view in the EmpData database, as shown in the following SELECT statement:
|
1 2 3 4 5 |
SELECT name KeyName, symmetric_key_id KeyID, key_length KeyLength, algorithm_desc KeyAlgorithm FROM sys.symmetric_keys; |
Given that we just created the EmpData database, the statement should return only a single row, as shown in the following results.
|
KeyName |
KeyID |
KeyLength |
KeyAlgorithm |
|
##MS_DatabaseMasterKey## |
101 |
256 |
AES_256 |
SQL Server automatically names the DMK ##MS_DatabaseMasterKey## and encrypts it with the 256-bit AES algorithm.
That’s all there is to creating the DMK. SQL Server automatically uses the SMK in conjunction with the password to protect the DMK. Note, however, that after you create the DMK, you should use a BACKUP MASTER KEY statement to back up the DMK and then store the backup in a secure, off-site location.
Create a self-signed certificate
The next level down in our encryption hierarchy is the asymmetric encryption mechanism, which can take the form of a certificate or asymmetric key. Each one uses a private key and public key to provide asymmetric encryption, with the public key encrypting the data and the private key decrypting it. By default, SQL Server uses the DMK to encrypt the private key.
Certificates and asymmetric keys are fairly comparable, in terms of their ability to protect data. The main advantage of a certificate is that it can contain more information than the asymmetric key, such as an issuer or expiration data. The primary purpose of either type in SQL Server is to encrypt the symmetric keys used to protect the actual data at the next level down the encryption hierarchy.
For this article, we’ll define a certificate, rather than an asymmetric key. A certificate is a digitally signed statement that binds the public and private keys. In SQL Server, it is a database-level securable that is based on the X.509 standard and supports X.509 V1 fields.
Normally, a certificate authority (CA) issues and signs a certificate, which we can then incorporate into our encryption infrastructure. However, SQL Server also supports the ability to create a self-signed certificate, a handy alternative when we’re developing and testing functionality and want to bypass the CA, like we’re doing now.
To create a self-signed certificate, we can use the CREATE CERTIFICATE statement, providing a name for the certificate and a pseudo-issuer, as shown in the following statement:
|
1 2 |
CREATE CERTIFICATE Cert1 WITH SUBJECT = 'Employee national IDs'; |
I’ve named the certificate Cert1 and included a WITH SUBJECT clause, which specifies the issuer name, Employee national IDs. In a self-signed certificate, the issuer name serves primarily as a description for the certificate. In addition, I’ve created the certificate without specifying a password, which means SQL Server will automatically use the DMK to protect the private key.
We can now verify that the certificate has been created by querying the sys.certificates catalog view:
|
1 2 3 4 5 |
SELECT name CertName, certificate_id CertID, pvt_key_encryption_type_desc EncryptType, issuer_name Issuer FROM sys.certificates; |
The following table shows the results returned by the SELECT statement.
|
CertName |
CertID |
EncryptType |
Issuer |
|
Cert1 |
256 |
ENCRYPTED_BY_MASTER_KEY |
Employee national IDs |
Notice that the EncryptType column has returned the value ENCRYPTED_BY_MASTER_KEY, which confirms that the DMK is being used to protect the certificate. Also notice that the CertName and Issuer values match what we specified in our statement.
SQL Server generated the certificate ID (the CertID value) when we created the certificate. The certificate ID is unique within the database, although it’s not clear why SQL Server started with the value 256. (I re-created the database and certificate several times and SQL Server always assigned the value 256 to the first certificate, incrementing by one for additional certificates.)
The CREATE CERTIFICATE statement supports far more complex syntax than what we’ve shown here. For example, can add an expiration date, create a certificate based on a certificate file, retrieve the private key from a file, or use a password to encrypt the file, rather than the DMK.
As with the DMK, you should back up any certificates you create. For this, you can use the BACKUP CERTIFICATE statement to export the certificate to a file.
Create a symmetric key
The final encryption layer we need to create is a symmetric key, which sits directly above the data in the encryption hierarchy. Unlike an asymmetric key, the symmetric key uses only one key to encrypt and decrypt the data.
Symmetric keys tend to perform faster than asymmetric encryption, which is why Microsoft recommends that you use only symmetric keys to encrypt the actual data. That said, asymmetric encryption provides a higher level of security than symmetric encryption. By utilizing a layered approach to data encryption, we can take advantage of the protection we get from asymmetric encryption, but still realize the benefits of symmetric encryption for the actual data.
To generate a symmetric key, we can use a CREATE SYMMETRIC KEY statement to define a symmetric key that is encrypted with the Cert1 certificate we created earlier, as shown in the following T-SQL script:
|
1 2 3 |
CREATE SYMMETRIC KEY SymKey1 WITH ALGORITHM = AES_256 ENCRYPTION BY CERTIFICATE Cert1; |
The statement names the symmetric key SymKey1 and specifies that the 256-bit AES algorithm be used to encrypt the column data. SQL Server supports numerous other algorithms; however, starting with SQL Server 2016, all algorithms have been deprecated except 128-bit AES, 192-bit AES, and 256-bit AES, the one we’re using and the strongest of the three. (The higher the number of bits, the stronger the algorithm.)
The statement’s ENCRYPTION BY CERTIFICATE clause specifies that the Cert1 certificate be used to encrypt the symmetric key. If desired, we can instead specify another symmetric key, an asymmetric key, a password, or an EKM module to encrypt the new symmetric key. In fact, we can use multiple encryption mechanisms concurrently to protect our symmetric key, depending on the level of protection we want to achieve and the performance and maintenance overhead we’re willing to incur.
After we’ve created our symmetric key, we can once again use the sys.symmetric_keys catalog view in the EmpData database to verify that the key has been added:
|
1 2 3 4 5 |
SELECT name KeyName, symmetric_key_id KeyID, key_length KeyLength, algorithm_desc KeyAlgorithm FROM sys.symmetric_keys; |
Now our results include both the DMK and the new SymKey1 symmetric key, as shown in the following table.
|
KeyName |
KeyID |
KeyLength |
KeyAlgorithm |
|
##MS_DatabaseMasterKey## |
101 |
256 |
AES_256 |
|
SymKey1 |
256 |
256 |
AES_256 |
With the creation of the symmetric key, we have our encryption hierarchy in place and ready to go. The DPAPI protects the SMK. The SMK protects the DMK. The DMK protects the Cert1 certificate. The certificate protects the SymKey1 symmetric key. Now we can use the symmetric key to protect the actual data.
Encrypt the data
Encrypting the data is a relatively straightforward process that requires only three simple T-SQL statements:
- An
OPENSYMMETRICKEYstatement to decrypt the symmetric key and make it available to our session - An
UPDATEstatement that uses theENCRYPTBYKEYsystem function to encrypt the data - A
CLOSESYMMETRICKEYstatement to close the symmetric key so it’s no longer available to the session
The following T-SQL script demonstrates how to write the three statements to encrypt the EncryptedID column, using data from the NatID column:
|
1 2 3 4 5 6 7 |
OPEN SYMMETRIC KEY SymKey1 DECRYPTION BY CERTIFICATE Cert1; UPDATE EmpInfo SET EncryptedID = ENCRYPTBYKEY(KEY_GUID('SymKey1'), NatID); CLOSE SYMMETRIC KEY SymKey1; |
The OPEN SYMMETRIC KEY statement should be self-explanatory. It calls the SymKey1 symmetric key, using the Cert1 certificate to decrypt the key. In this way, the key is available throughout our current session.
The UPDATE statement sets the EncryptedID values based on the NatID values, using the ENCRYPTBYKEY function to encrypt the values with the SymKey1 symmetric key. The statement also uses the KEY_GUID system function to retrieve the key’s GUID, which is then passed into the ENCRYPTBYKEY function.
We follow the UPDATE statement with a CLOSE SYMMETRIC KEY statement to explicitly close the symmetric key so we don’t leave it lingering out there. Otherwise, the key remains available until the session has been terminated.
That’s all there is to performing the actual encryption. The EncryptedID column should now populated and the values protected by the encryption hierarchy we’ve put into place.
Query the encrypted data
We can query the EmpInfo table to verify that the data appears correct. This requires only a simple SELECT statement:
|
1 |
SELECT TOP 5 * FROM EmpInfo; |
In this case, I’m querying only the first five rows, which should be enough to demonstrate what’s going on. The following table shows the results I received on my system.
|
EmpID |
NatID |
EncryptedID |
|
1 |
295847284 |
0x00F3E5341DE5A94DA6121750553DC9AC01000000D492F7588822FA1720BF01E6CFAFD1C885AA39CBEE6A397B593206CEFF32FFAECCE98DE127F3C1818AE5DC9480DB8A5E |
|
2 |
245797967 |
0x00F3E5341DE5A94DA6121750553DC9AC0100000080B8D4DA39A5AD0A61E5538516A6F513F022FCED2D6741E8B0DEE723B94D23A70880D888A77747BD601D9EAF649DAC79 |
|
3 |
509647174 |
0x00F3E5341DE5A94DA6121750553DC9AC010000009D7BA49B4BB46CF86282EC15F0388246E7A19191D8FBC7490FAEE267938304377F5FB24852A54450968D3038C4E8A767 |
|
4 |
112457891 |
0x00F3E5341DE5A94DA6121750553DC9AC010000005CAD125D96F196BCF1F9F14310DB29887B62F084F848CFFD6D6AC5D6CF211CD188141A1254A9684C121FE362562CD7E3 |
|
5 |
695256908 |
0x00F3E5341DE5A94DA6121750553DC9AC01000000AE23D1BD2DEE7A811F98956E1E4E54FDAA7E34F4697170EA7EEA103E627420BD9F8A73A34B2F3D41ADCB840E41C4FA8A |
As you can see, the EncryptedID values are returned as binary values that represent the encrypted data. If we want to see the actual values, we must again open our symmetric key and then use the DECRYPTBYKEY system function to decrypt the data when we retrieve it, as shown in the following T-SQL script:
|
1 2 3 4 5 6 7 8 |
OPEN SYMMETRIC KEY SymKey1 DECRYPTION BY CERTIFICATE Cert1; SELECT TOP 5 EmpID, NatID, CONVERT(NVARCHAR(15), DECRYPTBYKEY(EncryptedID)) DecryptedID FROM EmpInfo; CLOSE SYMMETRIC KEY SymKey1; |
If we were to run the SELECT statement as is, without opening the symmetric key, the DecryptedID column would return only null values because the DECRYPTBYKEY function cannot decrypt the data. However, when we open the symmetric key, the SELECT statement returns the results shown in the following table.
|
EmpID |
NatID |
DecryptedID |
|
1 |
295847284 |
295847284 |
|
2 |
245797967 |
245797967 |
|
3 |
509647174 |
509647174 |
|
4 |
112457891 |
112457891 |
|
5 |
695256908 |
695256908 |
As we would hope, the DecryptedID values match the NatID values. Out column is encrypted until we explicitly open our symmetric key and decrypt the data.
Working with encrypted data
Once you have a basic understanding of how to create an encryption hierarchy to protect column data, you’ll be able to implement it as needed. Keep in mind, however, that the approach we’ve taken here is only one way we can encrypt column data. For example, we can instead use the symmetric key without a certificate or asymmetric key, use a symmetric key in conjunction with an EKM module, or use a symmetric key with a password-protected certificate, rather than a DMK-protected certificate.
You’ll have to determine the best approach for your system based on the amount of data you have, your security and performance requirements, how the data will be accessed, and the other security mechanisms you already have in place.
You will also need to determine whether column-level encryption is the best solution for your circumstances. It could be that the TDE or Always Encrypted features will serve you better. Before you make any decisions, you might want to wait until you’ve had a chance to review the subsequent articles in this series, when we look at some of the other methods you can use to encrypt SQL Server data.
This document contains proprietary information and is protected by copyright law.
Copyright © 2026 Red Gate Software Limited. All rights reserved


Load comments