
With the release of SQL Server 2008, Microsoft expanded the database engine’s security capabilities by adding Transparent Data Encryption (TDE), a built-in feature for encrypting data at rest. TDE protects the physical media that hold the data associated with a user database, including the data and log files and any backups or snapshots. Encrypting data at rest can help prevent those with malicious intent from being able to read the data should they manage to access the files.
SQL Server TDE takes an all-or-nothing approach to protecting data. When enabled, TDE encrypts all data in the database, as well as some outside the database. You cannot pick-and-choose like you can with column-level encryption. Even so, TDE is relatively easy to enable, once you’ve decided this is the path you want to travel.
In this article, we look at how to implement TDE on a user database. The article is the second in a series about SQL Server encryption. The first one (Encrypting SQL Server: Using an Encryption Hierarchy to Protect Column Data) covers column-level encryption. If you’re new to SQL Server encryption, you might want to review that article first.
The TDE encryption hierarchy
When I introduced you to column-level encryption, I discussed the encryption hierarchy and how SQL Server uses a series of keys and certificates to protect column data. The approach used for implementing TDE is similar, but different enough to take a closer look.
As with column-level encryption, the Windows Data Protection API (DPAPI) sits at the top of the hierarchy and is used to encrypt the service master key (SMK), a symmetric key that resides in the master database. SQL Server creates the SMK the first time the instance is started. You can use the key to encrypt credentials, linked server passwords, and the database master keys (DMKs) residing in different databases.
In the TDE encryption hierarchy, the SMK sits below the DPAPI, and a DMK sits below the SMK. The DMK is a symmetric key, just like you find with column-level encryption. However, with column-level encryption, you create the DMK in the user database where the column data will be encrypted. With TDE, you create the DMK in the master database, even though you’ll be encrypting a user database. SQL Server uses the SMK and a user-supplied password to encrypt the DMK with the 256-bit AES algorithm.
Before we go any further with our description, take a look at the following figure, which shows the entire TDE encryption hierarchy, starting with the Windows DPAPI at the top and the SQL Server data at the bottom. As you can see, the next level down our hierarchy is a certificate, which you also create in the master database.
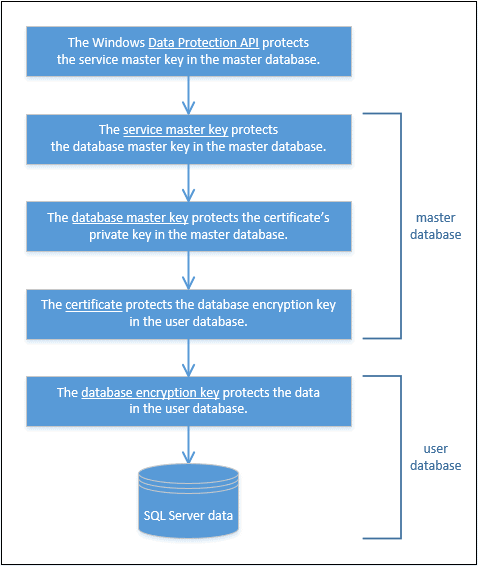
The DMK protects the certificate, and the certificate protects the database encryption key (DEK) in the user database. The DEK is specific to TDE and is used to encrypt the data in the user database in which the key resides.
You can skip the DMK and certificate altogether and instead use an Extensible Key Management (EKM) module to secure the DEK. SQL Server 2008 introduced the EKM infrastructure as a way for encryption keys to be stored in hardware outside of the database, essentially integrating the hardware into the encryption stack. That said, the topic of EKM is outside of the scope of this article, but one we might tackle later in this series.
For now, we’ll focus on the TDE encryption hierarchy as it is represented in the figure. From this, we can deduce that to implement TDE on a user database, we must take the following steps:
- Create the DMK in the
masterdatabase, if it doesn’t already exist. - Create a certificate in the
masterdatabase for securing the DEK. - Create the DEK in the user database to be encrypted.
- Enable TDE on the user database.
What is not included in the figure or in the steps is the importance of backing up the SMK, DMK, and certificate. If anything goes wrong in our production environment or we need to restore or move an encrypted database, we might need those keys or certificate, so we better make sure we have copies of them, stored securely in a separate location.
Later in the article, we’ll review how to back them up, but first let’s look at how to implement TDE on a user database. For that, we’ll need to set up a test database such as the one shown in the following T-SQL script:
|
1 2 3 4 5 6 7 8 9 10 11 12 13 14 15 16 17 18 19 |
USE master; GO CREATE DATABASE EmpData2; GO USE EmpData2; GO CREATE TABLE EmpInfo( EmpID INT PRIMARY KEY, NatID NVARCHAR(15) NOT NULL, LoginID NVARCHAR(256) NOT NULL); GO INSERT INTO EmpInfo(EmpID, NatID, LoginID) SELECT BusinessEntityID, NationalIDNumber, LoginID FROM AdventureWorks2014.HumanResources.Employee WHERE NationalIDNumber IS NOT NULL; |
The database and table created here are only slightly different from the ones we created in the first article in this series. The database includes the EmpInfo table and uses an INSERT statement to retrieve data from the HumanResources.Employee table in the AdventureWorks2014 database. However, I’ve named the new database EmpData2 in case you want to retain the database from the other article. (Note that I created all the examples on a local instance of SQL Server 2016.)
You don’t need to use this database to try out the examples in this article. If you have a different one you want to use (and it’s safe to experiment with it), just substitute the name for the database accordingly. You’ll want to keep the database small, however, so you don’t get bogged down during the initial encryption process.
Create the DMK
To create the DMK that will support a TDE-enabled database, you take the same steps you take when creating the DMK to support column-level encryption, except for one important difference. You must create the key in the master database, as shown in the following T-SQL code:
|
1 2 3 4 5 |
USE master; GO CREATE MASTER KEY ENCRYPTION BY PASSWORD = 'pw1234!'; |
The CREATE MASTER KEY statement supports no optional arguments; we need only specify a password, in addition to the basic syntax. (Of course, we would want to use a more robust password in the real world.)
To verify that the DMK has been created, we can query the sys.symmetric_keys catalog view:
|
1 2 3 4 5 6 |
SELECT name KeyName, symmetric_key_id KeyID, key_length KeyLength, algorithm_desc KeyAlgorithm FROM sys.symmetric_keys; _keys; |
The SELECT statement returns the results shown in the following table.
|
KeyName |
KeyID |
KeyLength |
KeyAlgorithm |
|
##MS_DatabaseMasterKey## |
101 |
256 |
AES_256 |
|
##MS_ServiceMasterKey## |
102 |
256 |
AES_256 |
Notice that the results include both the DMK and SMK. As already noted, SQL Server creates the SMK in the master database automatically. As you can see, the two keys are based on the 256-bit AES encryption algorithm.
Create the certificate
The next step is to create a certificate in the master database using a CREATE CERTIFICATE statement. In SQL Server, a certificate is a digitally signed, database-level securable that binds the public and private keys.
To keep things simple, we’ll create a self-signed certificate, which is automatically protected by the DMK. Normally, a certificate authority (CA) would issue and sign the certificate, which we would then incorporate into our encryption infrastructure, but a self-signed certificate can be handy for developing and testing, as well as checking out functionality like we’re doing here.
To create a self-signed certificate, we need only provide a name for the certificate and a WITH SUBJECT clause, as shown in the following statement:
|
1 2 |
CREATE CERTIFICATE TdeCert WITH SUBJECT = 'TDE certificate'; |
The WITH SUBJECT clause supposedly specifies the issuer name; however, it can be just about any value, although a relevant description is normally the best option. In this case, I’ve gone with TDE certificate.
Note that, in addition to self-signed certificates, the CREATE CERTIFICATE statement lets us define a certificate based on a certificate file as well as retrieve the private key from a file or use a password to encrypt the certificate.
After we run the CREATE CERTIFICATE statement, we can verify that the certificate has been created by querying the sys.certificates catalog view:
|
1 2 3 4 5 6 |
SELECT name CertName, certificate_id CertID, pvt_key_encryption_type_desc EncryptType, issuer_name Issuer FROM sys.certificates WHERE issuer_name = 'TDE certificate'; |
On my system, the SELECT statement returned the results shown in the following table.
|
CertName |
CertID |
EncryptType |
Issuer |
|
TdeCert |
258 |
ENCRYPTED_BY_MASTER_KEY |
TDE certificate |
As you can see, the value in the EncryptType column is ENCRYPTED_BY_MASTER_KEY, which confirms that SQL Server has used the DMK to encrypt the certificate.
Create the DEK
Now we switch over to our EmpData2 database to create the DEK, the next level down our hierarchy. When we create the DEK, we must specify the algorithm to use for the encryption key and the certificate to use to encrypt the DEK. Starting with SQL Server 2016, all algorithms have been deprecated except 128-bit AES, 192-bit AES, and 256-bit AES. (The higher the number of bits, the stronger the algorithm.)
To create the DEK, we can use a CREATE DATABASE ENCRYPTION KEY statement, as shown in the following example:
|
1 2 3 4 5 6 |
USE EmpData2; GO CREATE DATABASE ENCRYPTION KEY WITH ALGORITHM = AES_256 ENCRYPTION BY SERVER CERTIFICATE TdeCert; |
In this case, we’ve specified the 256-bit AES algorithm and the TdeCert certificate we created in the previous step. When you run the statement, you should receive the following warning.
|
1 |
Warning: The certificate used for encrypting the database encryption key has not been backed up. You should immediately back up the certificate and the private key associated with the certificate. If the certificate ever becomes unavailable or if you must restore or attach the database on another server, you must have backups of both the certificate and the private key or you will not be able to open the database. |
This is an important message and one you should heed. We’ll discuss backing up your keys and certificates later in the article, but know that it is something you should be doing whenever you’re using them as part of your encryption process.
Now let’s return to our DEK. Once we’ve created the key, we can verify its existence by querying the sys.dm_database_encryption_keys dynamic management view:
|
1 2 3 4 5 6 |
SELECT DB_NAME(database_id) DbName, encryption_state EncryptState, key_algorithm KeyAlgorithm, key_length KeyLength, encryptor_type EncryptType FROM sys.dm_database_encryption_keys; |
The sys.dm_database_encryption_keys view returns details about a database’s encryption state and its associated DEKs. The following table shows the results returned by our SELECT statement.
|
DbName |
EncryptState |
KeyAlgorithm |
KeyLength |
EncryptType |
|
EmpData2 |
1 |
AES |
256 |
CERTIFICATE |
Notice that the EncryptType column has a value of CERTIFICATE, which confirms that a certificate was used to encrypt the DEK.
Also notice that the EncryptState column shows a value of 1. This indicates that the database is in an unencrypted state. According to SQL Server documentation, the column can display any one of the values described in the following table.
|
Value |
Description |
|
0 |
No database encryption key present, no encryption |
|
1 |
Unencrypted |
|
2 |
Encryption in progress |
|
3 |
Encrypted |
|
4 |
Key change in progress |
|
5 |
Decryption in progress |
|
6 |
The certificate or asymmetric key encrypting the DEK is being changed |
Enable TDE on the user database
We now have all the pieces in place to enable TDE on the EmpData2 database. The only step left is to turn encryption on.
Before we do that, I want to point out that there are many considerations to take into account before actually enabling TDE. For example, if any filegroups associated with the database are set as read-only, the encryption operation will fail. You’ll also run up against a number of restrictions when trying to implement TDE, such as not being able to drop a database during the initial encryption process.
Before you implement encryption on anything other than a test database in a test environment, I highly recommend that you review the MSDN article Transparent Data Encryption (TDE), which explains the various considerations and restrictions to take into account before implementing TDE.
With that in mind, let’s return to the matter at hand, which is to enable TDE on the EmpData2 database. To do so, we need only run a simple ALTER DATABASE statement that sets encryption on, as shown in the following example:
|
1 2 |
ALTER DATABASE EmpData2 SET ENCRYPTION ON; |
That’s all there is to it. Because our database is so small, the encryption process will be very quick. Not surprisingly, the larger the database, the longer this process will take.
If we again query the sys.dm_database_encryption_keys view, we’ll get the results shown in the following table, which verify that the EncryptState value is now 3.
|
DbName |
EncryptState |
KeyAlgorithm |
KeyLength |
EncryptType |
|
tempdb |
3 |
AES |
256 |
ASYMMETRIC KEY |
|
EmpData2 |
3 |
AES |
256 |
CERTIFICATE |
The results also show something else that’s very important to note—the addition of a row for the tempdb database. When you implement TDE on any user table, SQL Server also encrypts the tempdb database.
If you consider the logic behind this, you can see why Microsoft has taken this step. The database contains such items as temporary user objects, internal objects, and row versions, any of which can expose sensitive data. The downside to this is that unencrypted databases can take a performance hit, although Microsoft claims that the impact is minimal.
This issue aside, as long as our certificate and keys are in place, we can query the TDE-encrypted database just like we did before we enabled TDE. For example, we can run the following SELECT statement against the EmpInfo table:
|
1 |
SELECT TOP 5 * FROM EmpInfo; |
Notice that we do not have to take any special steps with our query like we do with column-level encryption. We simply run the query as before, a fact that should make application developers happy. The following table shows the results returned by our SELECT statement.
|
EmpID |
NatID |
LoginID |
|
1 |
295847284 |
adventure-works\ken0 |
|
2 |
245797967 |
adventure-works\terri0 |
|
3 |
509647174 |
adventure-works\roberto0 |
|
4 |
112457891 |
adventure-works\rob0 |
|
5 |
695256908 |
adventure-works\gail0 |
As you can see, we’re getting exactly the results we would expect. From the user/application perspective, it’s business as usual.
Disable TDE on the user database
At some point, you might decide that you want to disable encryption on a user database. The process is as simple as enabling it. You again run an ALTER DATABASE statement, only this time turning off the encryption, as shown in the following example:
|
1 2 |
ALTER DATABASE EmpData2 SET ENCRYPTION OFF; |
You can verify that encryption has been disabled by again querying the sys.dm_database_encryption_keys dynamic management view, which now returns the results shown in the following table:
|
DbName |
EncryptState |
KeyAlgorithm |
KeyLength |
EncryptKey |
|
tempdb |
3 |
AES |
256 |
ASYMMETRIC KEY |
|
EmpData2 |
1 |
AES |
256 |
CERTIFICATE |
As you can see, the EncryptState value for the EmpData2 database is now 1, indicating that it is in an unencrypted state. But notice that the tempdb database is still encrypted. As it turns out, the database will stay encrypted until it is re-created, which occurs whenever the SQL Server service restarts.
For a development or test environment, restarting the service might not be a big deal, but restarting a production instance is an entirely different matter. One more reason to give careful consideration to implementing TDE.
In the meantime, if you do have control over your instance of SQL Server, you can restart the service to see for yourself what happens with the tempdb database. From there, you can again query the sys.dm_database_encryption_keys view, which should return the results shown in the following table.
|
DbName |
EncryptState |
KeyAlgorithm |
KeyLength |
EncryptKey |
|
EmpData2 |
1 |
AES |
256 |
CERTIFICATE |
As you can see, the tempdb database is no longer included in the results because the database has not been encrypted or subjected to TDE.
If you disable TDE on your database, you’re also free to drop the DMK, certificate, and DEK, using the DROP MASTER KEY, DROP CERTIFICATE, and DROP DATABASE ENCRYPTION KEY statements, respectively. Or you can re-enable TDE on the user database at any point. Just keep in mind the impact on the tempdb database.
Back up the certificate and keys
As already noted, you should back up your certificates and keys, preferably right after you create them. This is also true for the SMK, before you start relying on it to protect your DMKs.
To back up the SMK, you can use a BACKUP SERVICE MASTER KEY statement, as shown in the following example:
|
1 2 3 4 5 6 |
Use master; GO BACKUP SERVICE MASTER KEY TO FILE = 'C:\DataFiles\MsSqlServer\SvcMasterKey.key' ENCRYPTION BY PASSWORD = 'pw1234!'; |
The statement itself is fairly straightforward. You must provide the full path for the backup file and a password for encrypting the key in that file. One thing to note, however, is that not all the examples in the Microsoft documentation clearly demonstrate that you must provide a full path, including the file name and its extension. Without these, you will receive an error.
It’s also worth noting that the BACKUP SERVICE MASTER KEY statement includes no logic for what to do when the file already exists. If it does exist, you’ll again receive an error.
Backing up the DMK works much the same way, except that you use a BACKUP MASTER KEY statement:
|
1 2 3 |
BACKUP MASTER KEY TO FILE = 'C:\DataFiles\MsSqlServer\DbMasterKey.key' ENCRYPTION BY PASSWORD = 'pw1234!' |
Again, you must provide the full path and file name, along with a password. In addition, the file cannot already exist.
Backing up a certificate is a little different because you want to be sure to explicitly back up the private key along with the certificate. For that, you must use a BACKUP CERTIFICATE statement that includes the WITH PRIVATE KEY clause, as shown in the following example:
|
1 2 3 4 5 6 |
BACKUP CERTIFICATE TdeCert TO FILE = 'C:\DataFiles\MsSqlServer\TdeCert.cer' WITH PRIVATE KEY( FILE = 'C:\DataFiles\MsSqlServer\TdeCert.key', ENCRYPTION BY PASSWORD = 'pw1234!' ); |
In this case, we’re generating a file for both the certificate and the private key, as well as providing a password for the private key.
That’s all there is to backing up the certificate and keys. Of course, you should store your backup files in a remote locate separate from the database files, ensuring that they’re protected from any sort of mischief or recklessness.
The rest of the story
Under the right circumstances, TDE can be a useful addition to your data protection strategies. However, TDE protects only data at rest, such as the data and log files. It does not protect data in memory or data transmitted between an application and SQL Server. As a result, your database is still vulnerable to such risks as SQL injection attacks or hijacked administrative permissions. Once data has been unencrypted for use, it is just as vulnerable as it has always been.
If you decide to implement TDE, you should do so only as one piece of a much more comprehensive security strategy that takes into account all possible risks to your data. You might also consider alternatives to TDE, such as the new Always Encrypted feature introduced in SQL Server 2016 (a topic we’ll cover in a future article).
When Microsoft introduced TDE in SQL Server 2008, it represented an important step in data protection, but it was only one step and was never meant to be the sole means of safeguarding your data. Be sure to keep that in mind when working with TDE.
This document contains proprietary information and is protected by copyright law.
Copyright © 2026 Red Gate Software Limited. All rights reserved


Load comments