
Background
Visual Studio Online (VSO) is perhaps Microsoft’s worst-named tool. It’s NOT hosted Visual Studio. It’s hosted TFS 2015. As with Team Foundation Server (TFS), it’s a source-control server, a build server, and a project-planner. VSO lacks a few features of on-site TFS, but essentially it’s the same. Microsoft is now adopting a ‘cloud-first’ attitude – building new features into VSO first and then releasing them on-site – so VSO is certainly no second-class citizen.
TFS traditionally uses XAML definitions to define a build process. These are written in Visual Studio using a Workflow-style visual editor. This is a powerful but notoriously difficult process. Very few people bother, usually relying on the default templates.
Microsoft has created a new way of writing build process for VSO, currently known as ‘Build vNext‘. This new method will be very familiar for people working with build-systems such as Bamboo, TeamCity or Jenkins. On the VSO website, you create a build definition then click to add a few tasks (e.g. msbuild, run a command, start an Azure website, etc). You fill in the details of these tasks, then hit Queue Build. On the website you also setup options like build-triggering and build-variables.
Microsoft has declared that all new projects should use Build vNext, so they clearly consider it the future of TFS.
Writing TFS Build Tasks
What I want to talk about today is writing VSO Agent Tasks. These tasks are the fundamental steps in a build vNext build process, such as running MSBuild, deploying an Azure Cloud Service, or running a PowerShell Script. There are currently about 30 built-in tasks.
At Redgate Software, we make tools for SQL Developers and DBAs. Redgate SQL CI enables you to build, test, synchronize and publish databases. It’s a command-line tool, so can be invoked as part of a build by adding a PowerShell or Command Line step that invokes something like:
|
1 |
sqlCI.exe Build /scriptsFolder=WidgetShop\Database\Scriptsfolder /packageId=WidgetShop /packageVersion=1.0 /temporaryDatabaseServer=(localdb)\v11.0 |
This is a bit verbose, but perhaps tolerable. But what if I also want to add error-checking or some PowerShell? And re-use it all over? And what happens if the command-line changes slightly, and I have to update command-line invocations all over the place? Writing a custom build-task is a solution.
By building a task, you’re creating a reusable build component that can be shared with anyone using your technology.
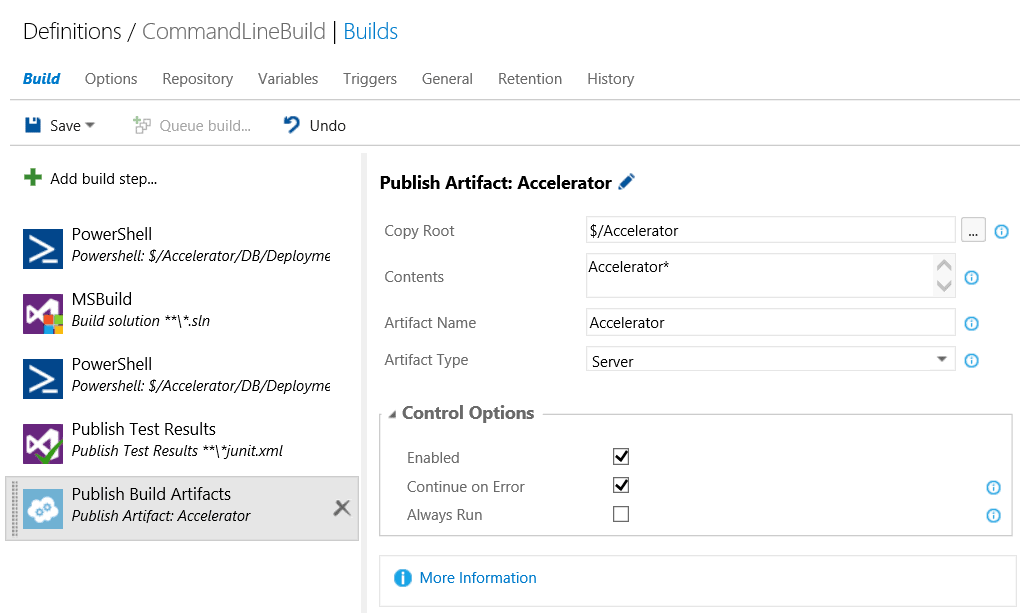
Before writing this article, I created four build tasks corresponding to the four Redgate SQL CI actions. This makes it much nicer to use from VSO:

Adding a build task to the build
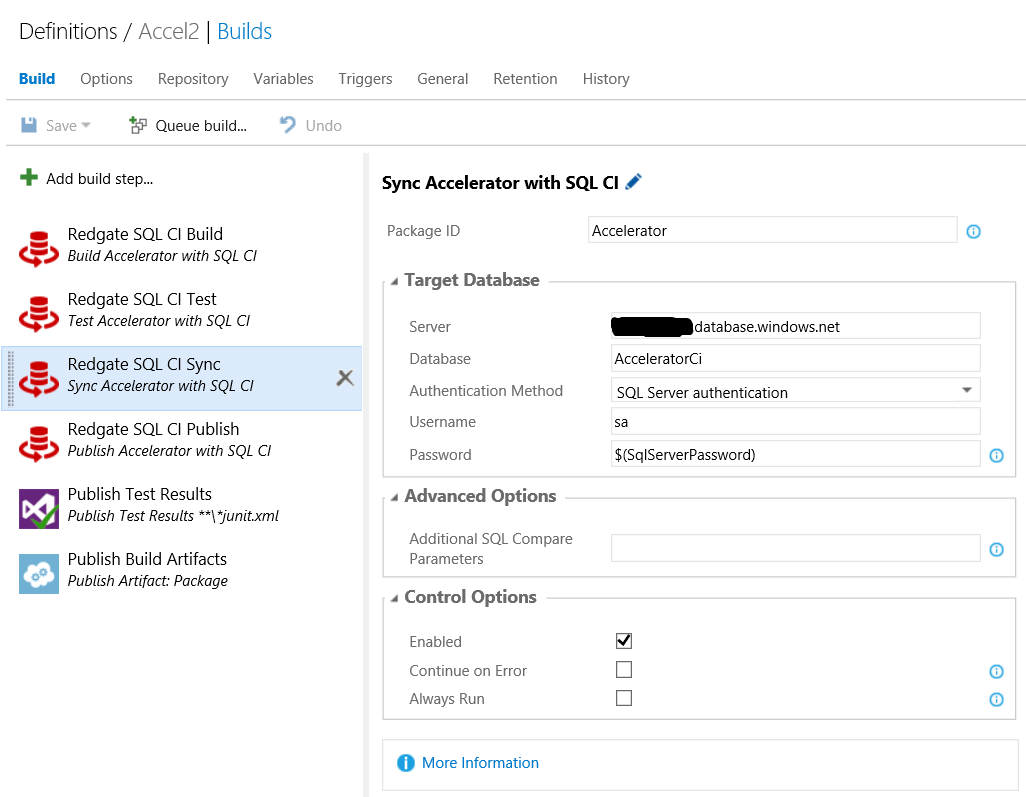
A build process with six steps
Writing a TFS Build Task
There are currently about 30 built-in tasks, which are all open-source in GitHub. At the time of writing, this GitHub repository is the primary place you should go for guidance and documentation. These is currently no formal documentation, so you’ll have to rely on scraps of information in this repository (and articles like this one!)
A task primarily consists of three components:
- A task.json file defining the web UI of the task. This describes things like the name of the task, the parameters it takes, and so on. This JSON format is currently not documented, so you’ll have to look at existing tasks for inspiration.
- A target to be executed (in PowerShell, Node.js, or both). This task file(s) is referenced by the JSON.
- icon.png – a 32×32 png icon which appears with your task in the VSO web UI.
You can also localize the JSON file by providing a task.loc.json file which references string-files in a Strings/resources.resjson folder.
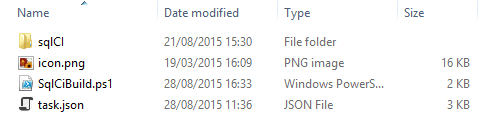
Here’s the layout of the task. The sqlCI directory contains various supporting files. I use the TFX tool to upload these items to VSO.
A quick disclaimer: this article is based on my own experiences and experimentation in the absence of documentation, so there may be errors and omissions.
Writing a Build Task
The easiest way is to take a basic build task from the GitHub, and edit it. All you need is the task.json file, an icon.png, and a target to execute (if, like me, you’re primarily a Windows developer, this will be a PowerShell file).
The task.JSON file
This file defines the task and its UI. It starts with a section defining the task. Here’s the file I used for making my SQL CI task:
|
1 2 3 4 5 6 7 8 9 10 11 12 13 14 15 16 17 18 19 20 21 22 23 24 25 26 27 28 29 30 31 32 |
{ "name": "RedgateSqlCiTest", "friendlyName": "Redgate SQL CI Test", "description": "Test a database package with Redgate SQL CI", "helpMarkDown": "[More Information](https://documentation.red-gate.com/display/SAP1/SQL+Automation+Pack+documentation)", "category": "Build", "visibility": [ "Build" ], "author": "Redgate Software", "version": { "Major": 1, "Minor": 0, "Patch": 0 }, "demands": [ ], "minimumAgentVersion": "1.83.0", "groups": [ { "name": "tempServerOptions", "displayName": "Temporary Server", "isExpanded": true }, { "name": "advancedOptions", "displayName": "Advanced Options", "isExpanded": true } ] |
This is fairly self-explanatory. A few things:
- The id is just the GUID that VSO uses to identify your task. Just generate a GUID.
- The friendlyName and description are what appear in the UI.
- demands are what the build agent must have to run your task, e.g. AndroidSDK or npm. These are the same as the SYSTEM CAPABILITIES of an agent in the VSO Control Panel under Agent pools.
- groups are just groups of UI controls. Each group is a collapsible box in the UI than includes all items marked with this groupName. It’s just a neat way to group related items. isExpanded determines if the group is closed or expanded by default in the UI.
The task.JSON then defines inputs. These are the fields in the web UI that the user fills-in. They take a form like this:
|
1 2 3 4 5 6 7 8 9 10 11 12 13 14 |
{ "name": "authMethod", "type": "pickList", "label": "Authentication Method", "defaultValue": "sqlServerAuth", "required": true, "options": { "sqlServerAuth": "SQL Server authentication", "windowsAuth": "Windows authentication" }, "helpMarkDown": "The authentication method you want to use." "visibleRule": "tempServerType = sqlServer", "groupName": "tempServerOptions" } |
Here’s a few things to note:
- name: passed onto node or PowerShell as a parameter.
- type can be:
- string – A text box.
- filePath – Also a text box, but with an additional button which opens a file selection box, where the user can select a file from source-control.
- pickList – A combo box. You select from a list of values.
- boolean – A checkbox. This takes the value true or false.
- label: the string shown in the UI, next to the control (e.g. “First line of address”).
- required: Set true if this field is mandatory. Then, if the user leaves it empty, he will get the standard red ‘required’ error.
- visibleRule: an expression which is evaluated to determine whether the field is shown in the UI. Usually, this will refer to the value of another field. For instance, you may only want to show a “Delete files recursively” checkbox if a “Delete files” checkbox is already selected, so would write: “visibleRule”: “deleteFiles = true”
- groupName: The group this controls is in (see groups described above).
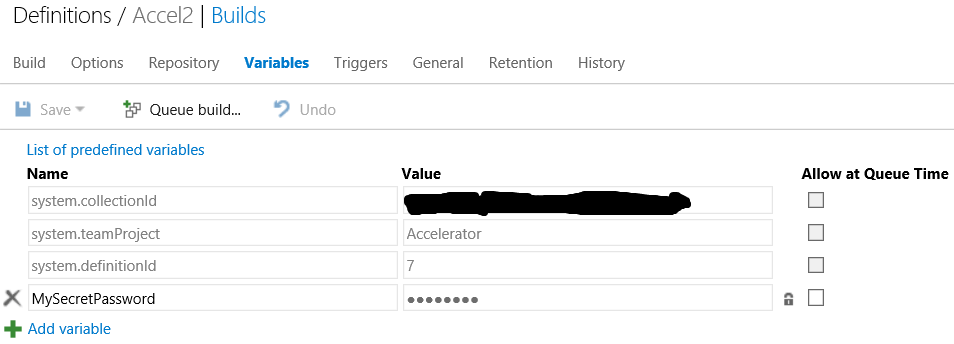
There is no password-style field. Instead, set sensitive fields to $(MySecretPassword), and define MySecretPassword in the Variables tab:
There may be more elements available, but due to the absence of documentation, I don’t know what they are yet!
At the bottom of the file, we see a few more items:
|
1 2 3 4 5 6 7 8 |
"instanceNameFormat": "Test $(packageId) with SQL CI", "execution": { "PowerShell": { "target": "$(currentDirectory)\\SqlCiTest.ps1", "argumentFormat": "", "workingDirectory": "$(currentDirectory)" } } |
- InstanceNameFormat is what is shown in the list of build steps. It can refer to inputs via the $(inputName) substitution.
- execution and target give the PowerShell file that should be invoked during the build. A similar thing is used for invoking node (see the Tasks GitHub for examples). This PowerShell file I will describe next.
The PowerShell file
This starts with parameters corresponding to the inputs in the task.json file:
|
1 2 3 4 5 6 |
param( [string]$dbFolder, [string]$subFolderPath, [string]$packageName, [string]$additionalParams ) |
You can then do whatever you want to do. In my SQL CI task plugin, it invokes the SQL CI command-line using code like this:
|
1 2 3 4 5 6 7 8 9 10 11 12 13 14 15 16 17 18 19 20 21 22 23 24 |
[string]$sqlCiExePath = [System.IO.Path]::GetFullPath(".\tasks\RedgateSqlCiBuild\1.0.0\sqlCI\SQLCI.exe") if(!(Test-Path $sqlCiExePath)) { Throw [System.IO.FileNotFoundException] "SQL CI executable not found at $sqlCiExePath" } $psi = New-Object System.Diagnostics.ProcessStartInfo $psi.FileName = $sqlCiExePath $psi.Arguments = $sqlCiArgs $psi.UseShellExecute = $false $psi.CreateNoWindow = $true $psi.RedirectStandardOutput = $true $psi.RedirectStandardError = $true $process = New-Object System.Diagnostics.Process $process.StartInfo = $psi $isNewProcessStarted = $process.Start() $hasExited = $process.WaitForExit(10 * 60 * 1000) # wait 10 minutes for process to exit $stdout = $process.StandardOutput.ReadToEnd() $stderr = $process.StandardError.ReadToEnd() Write-Host "$stdout" Write-Host "$stderr" |
Use Write-XXXX to write to the build log, e.g. Write-Verbose to write Verbose logging output and Write-Host to write essential information.
It’s usually best to start your script with $ErrorActionPreference = “Stop”. This ensures the script stops immediately when encountering an error, rather than executing further instructions.
Also, be aware that the task runs in the task directory, not the source directory. This is likely inconvenient, as you probably want to perform an operation on something in the source directory. To get around this, either pass the source directory as a parameter, or use the (undocumented) Get-TaskVariable cmdlet:
|
1 |
$buildSourcesDirectory = Get-TaskVariable -Context $distributedTaskContext -Name "Build.SourcesDirectory" |
Uploading a task
Once you’ve written your task, you’ll want to upload it to VSO. To do this, use the “TFS Cross Platform Command Line“, also known as TFX.
TFX is quite easy to use, instructions are in the README.md at the GitHub. Basically:
- Install Node.JS from the Node website.
- Run at the command-line:
npm install -g tfx-cli - Run
tfx loginand enter your collection url (probably https://youraccount.visualstudio.com) and your personal access token - Run
tfx upload <folder>to upload your task. - Run
tfx delete <GUID>to delete your task. TFX does not overwrite, so you’ll need to delete before uploading again.
Uploading will be pretty quick. If there’s a syntax error you’ll get an error. If there’s a semantic error (e.g. an input is in a non-existent group), you’ll probably get a 404 error. Debugging, of me, involved a “binary chop” to find the broken lines of code. The error-detection systems in task-writing are currently poor.
When uploading a task, you will need to refresh the VSO web page (e.g. hit F5) to update the task’s UI. Tasks are cached, so going to another page and back is usually insufficient. The task will update, you don’t need to remove and re-add it.
You can put any files or folders adjacent to the task.json and they will be uploaded too. This is useful for tasks which invoke binaries.
Running your task
To run your build, just click ‘Queue new build’ and watch it run.
If your task fails, try debugging using Write-XXXX commands. To see the output of Write-Debug and Write-Verbose, add the build-variable system.debug with the value true.
Load comments