
In my previous article, we went over how Azure storage affects the performance of our hosted virtual machines running SQL Server. We looked at the different ways in which performance is throttled, and talked about how to get your environment setup in the way that will get you the exact level of performance you need. As we saw, there are a lot of potential complications to navigate; and as I previously wrote, the best way around these is to play with things in a safe and sand-boxed setup, so that you can gain the knowledge and experience at your own pace rather than in the heat of the moment.
To do this we need to become familiar with how to manage Azure storage and that way that it interacts with our virtual machines. This involves a couple of different components:
- Storage accounts: creating, managing
- Virtual hard disk files: creating new ones, detaching and re-attaching existing ones, deleting unused ones
- Storage Spaces: Managing disks in the Windows operating system using Windows Storage Spaces
In the original version of this article, my first task was going to be to show you how to create, manage, and use storage accounts, since those were a pre-requisite. But, as is often the case with Azure, Microsoft introduced new functionality that now makes that unnecessary. Thanks for keeping me busy writing, Microsoft!
Recently, Microsoft began allowing us the use of what are called “Managed Disks”. Basically, you create virtual disks within your Azure subscription, but allow the Azure platform to manage them behind the scenes. All that you specify is a location, size, and the service level (Premium SSD based, or Standard magnetic drives), and Azure takes care of the rest. This is actually a really, really good thing! One of the more painful aspects of Azure to me was the task of figuring out how to parse storage account URLs and managing a number of different accounts. In addition, we had to consider the storage account as a possible bottleneck in terms of performance, as we discussed in my last article. Now, we need not worry about any of that!
That being said, there is still a bit of work we need to do in order to utilize this new feature. If you used my template from the first article to deploy your Azure lab, the virtual machines were deployed using conventional storage accounts. This means we need to take a couple of steps to convert the existing disks to managed volumes, as well as to enable future disks to use the newer model. Let’s get started!
From this point on I’m going to assume that you are both logged in to the Azure web portal and logged in via Azure PowerShell. If you need instructions on the latter, see this link.
Converting existing disks to Managed Disks
I’m going to walk you through how to do this with my specific lab setup. The chances are that these instructions will change over time, so I will link here to the authoritative Microsoft document on the subject.
First, because our virtual machines are in an availability set, there is a setting that must be changed. This can be done as follows.
|
1 2 |
Powershell $availabilitySet = Get-AzureRmAvailabilitySet -ResourceGroupName AzureLab2 -Name labsqlclus01as Update-AzureRmAvailabilitySet -AvailabilitySet $availabilitySet -Managed |
Next, we need to convert the virtual machine disks to managed disks. If the virtual machines are running, we must stop (and deallocate) them first.
|
1 2 3 4 5 6 7 8 9 |
$VMs = Get-AzureRmVM -ResourceGroupName AzureLab2 -Status | Where-Object { $_.AvailabilitySetReference.Id -eq $availabilitySet.Id } $VMs | ForEach-Object { if ($_.PowerState -ne 'VM deallocated') { Stop-AzureRMVM -Name $_.Name -ResourceGroup $_.ResourceGroupName } ConvertTo-AzureRmVMManagedDisk -Name $_.Name -ResourceGroupName $_.ResourceGroupName } |
Note: it is very important you do not do this if the disks on your virtual machine are in a storage account where encryption is or has ever been enabled. If so, you must follow the steps here before proceeding. Of course, never do these on a live environment without some kind of rollback plan. For example, you might only convert one VM at a time and ensure there are no issues.
Once these operations complete, if you browse the resource group that your lab was deployed in, you’ll see a number of new “Disk” resources.
It’s important to note that you remove neither the storage accounts nor the old VHD files by completing the above steps. So we must clean these up in order to avoid being charged for the resources they consume. You can do this by selecting the storage accounts in the portal, then clicking on the ‘Delete’ button along the top navigation bar. You’ll have to enter the storage account name as a way of confirming that you actually really want to delete them.
Note: do NOT do this for the storage account that contains your operating system disk. If you do, lots of things will break and you may have to re-deploy your virtual machine. Not that I’m speaking from experience, or might have ignored the fact that it says this on the official Microsoft instructions. Please learn from my mistakes.
Now, thanks to the marvellous addition of the Managed Disk feature, let’s see just how easy it is to add a new disk to our virtual machine.
Adding Disks
There are two ways to add disks to our virtual machines: by using either Azure Portal or PowerShell. We’ll go over both here for completeness, though I prefer PowerShell.
Portal
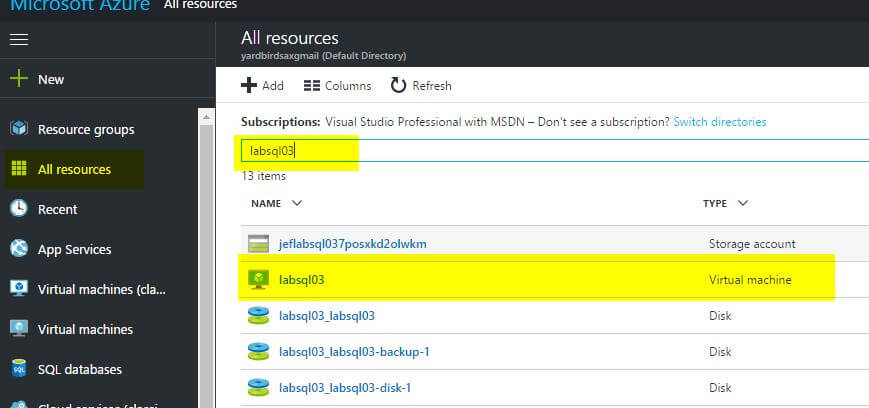
First, find your virtual machine in the portal. As a refresher, the quickest way to do this is probably by clicking on the ‘All Resources’ tab on the left navigation bar, then entering your virtual machine name in the Search field.
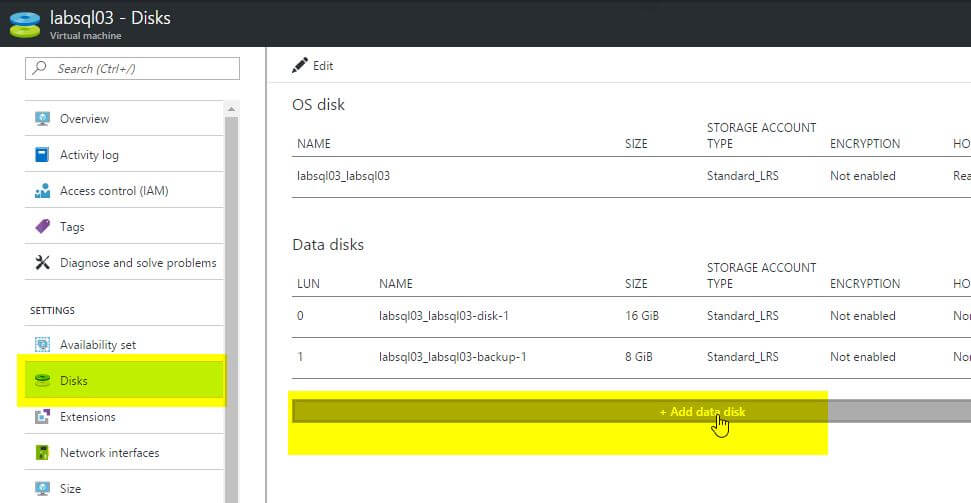
Once there, select the Disk tab. Then, click ‘Add data disk’.
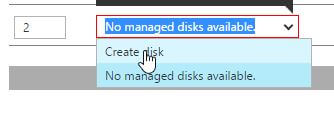
Then, select ‘Create disk’ in the drop-down menu, since we do not already have a free managed disk available.
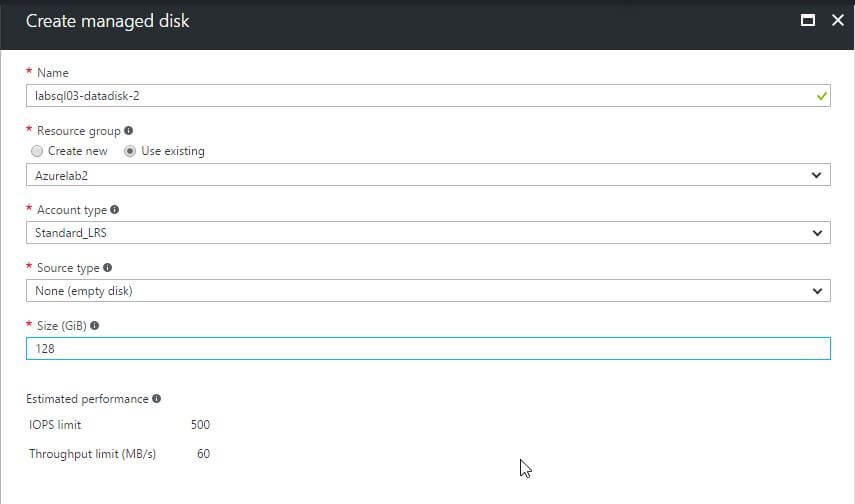
In the next dialog, enter a name for the disk (I recommend something simple yet meaningful, such as <vm name>-datadisk-<number>); then, since we are only in test mode, select ‘Standard_LRS’ under ‘Account Type’ (we don’t want to be charged for Premium disks; remember we accrue cost for them even if the VM is powered off). Finally, enter a reasonable size for the disk.
Once you return to the previous screen, you can click the ‘Save‘ button in the upper left of the screen to attach the new disk. However, if you are using the exact setup in my lab, you’re going to get an error message.
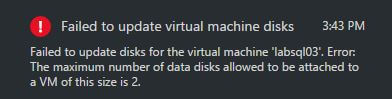
Remember, the number of data disks you can attach to a virtual machine is limited by the size of the virtual machine.
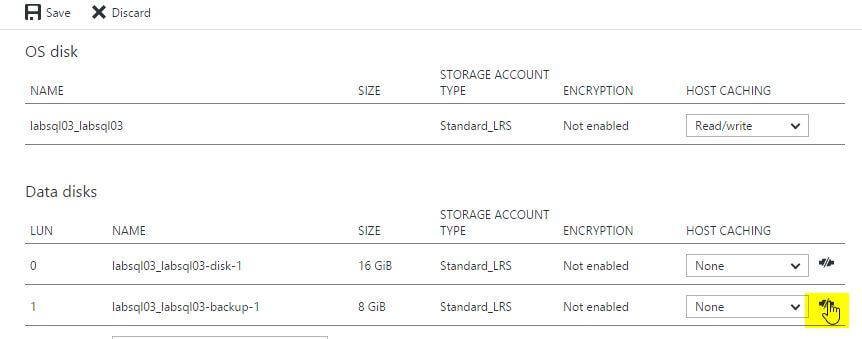
To get around it in this case, we’re going to detach one of the existing disks. You can do this by clicking on the icon on the far right hand side of the second row under the ‘Data disks’ section of the screen.
Now, click the ‘Save’ button and the disk will be attached. Voila!
Powershell
Let’s do the same steps in Powershell.
|
1 2 3 4 5 6 7 8 |
$vm = Get-AzureRmVM -ResourceGroupName AzureLab2 -Name labsql04 # Create the new disk $diskConfig = New-AzureRmDiskConfig -AccountType StandardLRS -OsType Windows -DiskSizeGB 128 -Location eastus -CreateOption Empty $disk = New-AzureRmDisk -ResourceGroupName AzureLab2 -DiskName labsql04-datadisk-2 -Disk $diskConfig # Remove the old disk $oldDisk = $vm.StorageProfile.DataDisks | Where-Object { $_.Name -match 'backup' } Remove-AzureRmVMDataDisk -VM $vm -DataDiskNames $oldDisk.Name Update-AzureRmVM -VM $vm -ResourceGroupName $vm.ResourceGroupName # Attach new disk Add-AzureRmVMDataDisk -VM $vm -Lun 1 -ManagedDiskId $disk.Id -CreateOption Attach Update-AzureRmVm -VM $vm -ResourceGroupName $vm.ResourceGroupName |
Make sure that you specify the same value for the -Location parameter as your resource group. To determine the location, use this command:
|
1 |
Get-AzureRMResourceGroup -ResourceGroupName 'AzureLab2' | Select Location |
Now that we have some disks attached, it’s time to go into Windows and work on configuring those drives properly.
Storage Spaces
Starting in Windows Server 2012, a new feature was introduced called “Storage Spaces”. This allows you to pool together a set of physical disks and create virtual disks on top of the pool. The complete history of the feature is not in scope for this article, but as you’ll see, it is hugely helpful to our work in Azure.
Recall that an individual disk in Azure has certain limitations in terms of throughput and I/O operations per second. Thus, if we want to achieve performance greater than the individual disks will afford, we must find a way to pool them together, which is where Storage Spaces comes in.
When we configure a pool of disks in Windows (known as a Storage Pool), we can then create virtual disks on top of that pool, utilizing the multiple disks for redundancy, performance, or both. In cases where the server is a physical machine with disk drives, you’d obviously want to include at least one redundant copy of the data (unless you think that the equivalent of RAID 0 is a good thing): In Azure however, virtual machine disks are already on locally-redundant storage and therefore we don’t need to worry about configuring any kind of mirroring. Instead, we can effectively stripe multiple disks together and therefore combine the performance of all available underlying Azure disks.
Let’s review a few key terms before proceeding.
|
Term |
Definition |
|
Storage Pool |
A set of one or more “physical” disks attached to a server, which have been combined together to act as a single combined pool for allocating disks from. “Physical” is in quotes, since the disks are presented in the operating system as physical devices, but may not actually be physical disks (i.e. they may be virtual hard drives attached to a virtual machine). |
|
Virtual Disk |
A disk that is created and allocated from the storage in a Storage Pool. |
|
Resiliency Setting |
The setting on a virtual disk that defines how data is either striped or mirrored across multiple underlying “physical” disks. Once the virtual disk has been created, this setting cannot be changed. |
|
Columns |
The number of physical devices that a virtual disk is striped across. For example, if you create a disk with 2 columns, the data will be striped across two physical devices. Once the virtual disk has been created, this setting cannot be changed. |
Let’s see about how we create a storage pool, then create, format, and assign a drive letter to a virtual disk.
Creating the Storage Pool
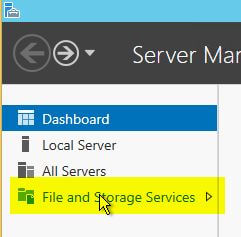
First, open the Server Manager application (if it isn’t already open, as by default it does so every time you log in). Then, select the ‘File and Storage Services’ tab.
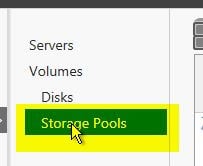
Then select the ‘Storage Pools’ tab.
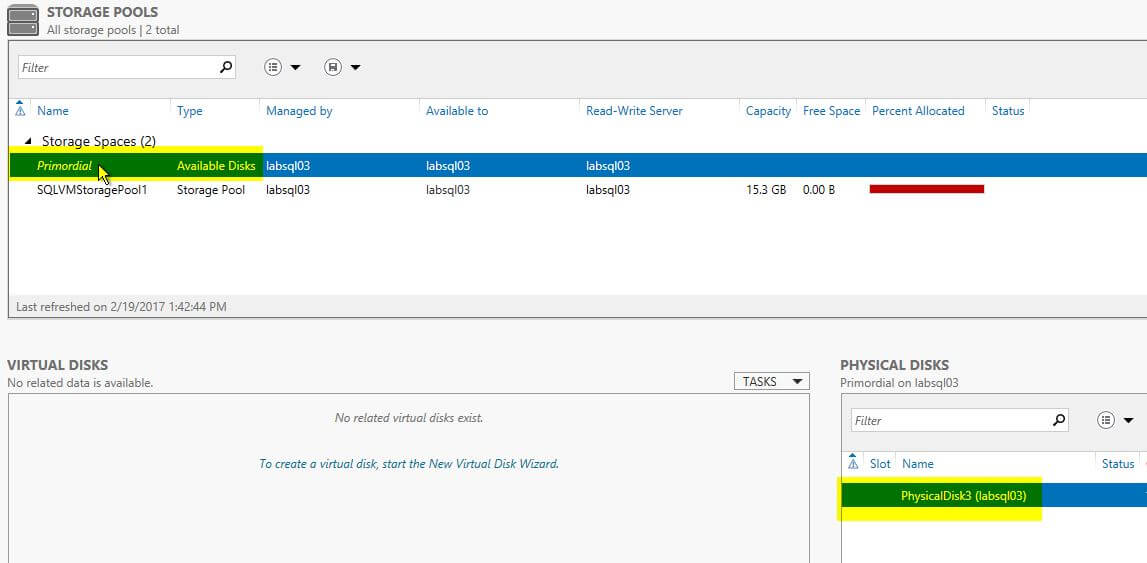
On the next screen you will see a list of the currently provisioned storage pools on your virtual machine. Assuming you are using the setup from my template, you will notice two.
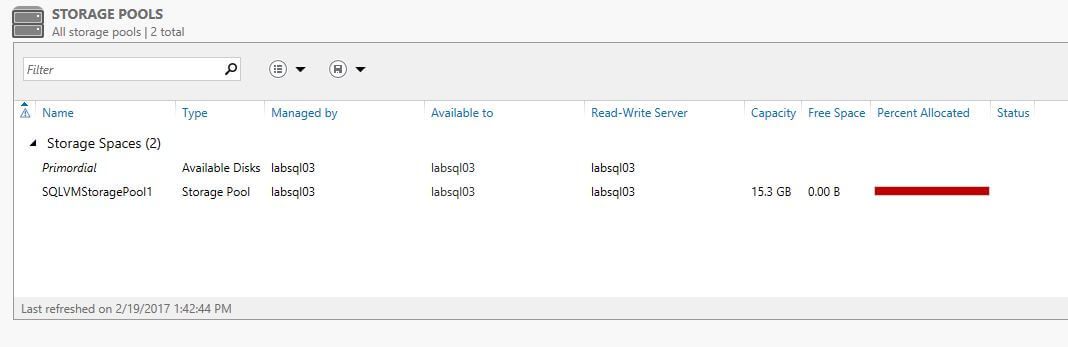
This is because the template that we used to deploy our lab environment included the creation of a storage pool, using the powerful Desired State Configuration (or DSC) functionality available within Windows (controlled by Azure’s extension framework). Normally, you would only see a single item listed here, namely the Primordial pool. We place in here the disks that are available for adding to a storage pool, but are not yet actually in one. You can verify this by clicking on that item, and then looking in the ‘Physical Disks‘ section of the screen.
Let’s create a new pool now.
- Right click in the ‘Storage Pools’ section of the screen, and select ‘New Storage Pool’. This will start the storage pool creation wizard.
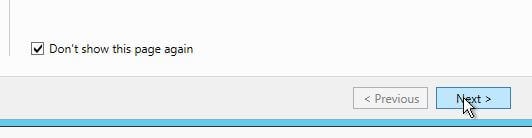
- Unless you want to see the introduction screen each time, check the ‘Don’t show this page again‘ check box, then click ‘Next‘.
- Enter a name for the storage pool, ‘MyTestPool‘, then click ‘Next‘.
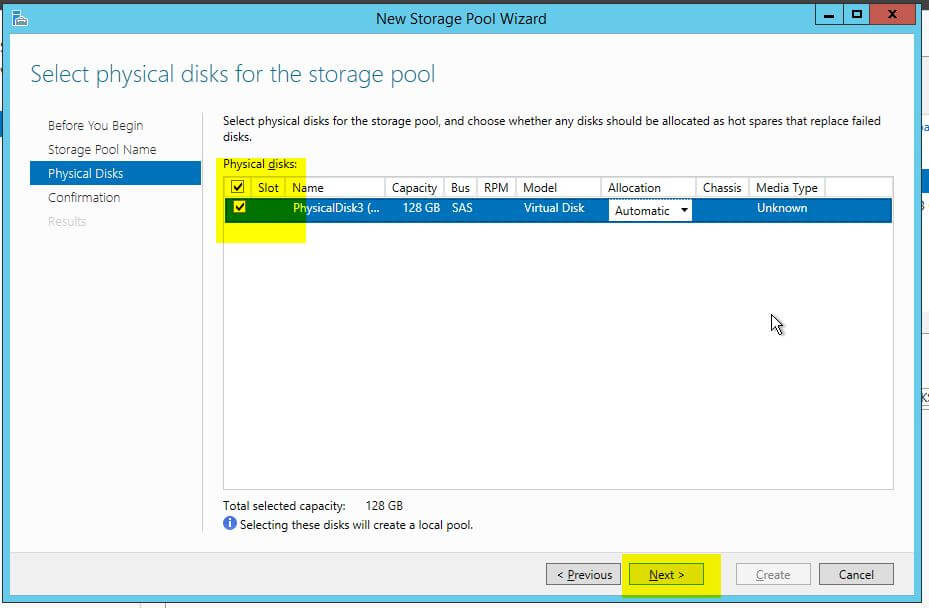
- The next screen is where we select the physical disks to add to our pool. In this case, there is only one, so check the box next to it, and click ‘Next‘.
- Click the ‘Create‘ button to create the storage pool. Once the create operations complete, click the ‘Close‘ button.
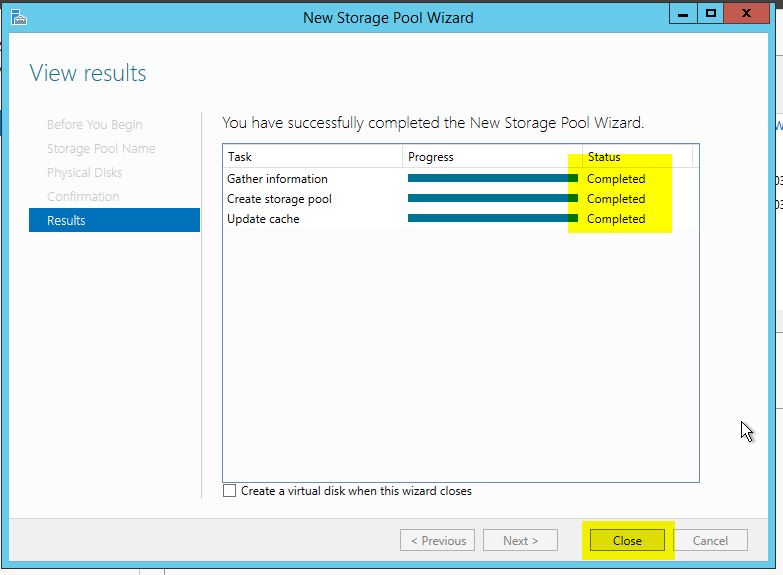
Congratulations, you just created your first Storage Pool!
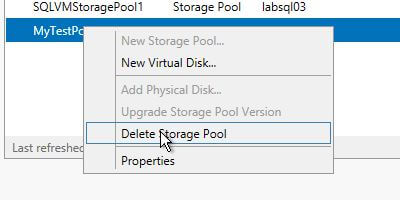
If you are using my template for your lab, we need to clean up this new Storage Pool, so we can practice a few more steps. Simply right click on it, and choose ‘Delete Storage Pool’.
If you’re more of a PowerShell person, here’s how you would do the same thing in PowerShell.
|
1 2 |
$disks = Get-PhysicalDisk -CanPool $true New-StoragePool -StorageSubSystemFriendlyName Storage* -FriendlyName MyTestPool -PhysicalDisks $disks |
Delete the pool (only if you’re using my template)
Re Remove-StoragePool -FriendlyName MyTestPool
Adding a disk to an existing storage pool
When you need to expand the capacity of a storage pool, you must add additional disks to it. Here’s how we do that.
- Select the storage pool you want to add the disk to in the ‘Storage Pools’ section of the screen, right click, and select ‘Add Physical Disk’.
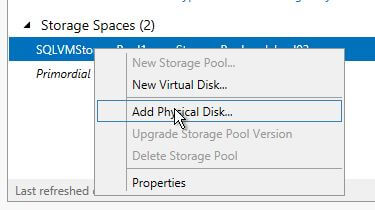
- Select the box next to the disk you wish to add, then click ‘OK‘.
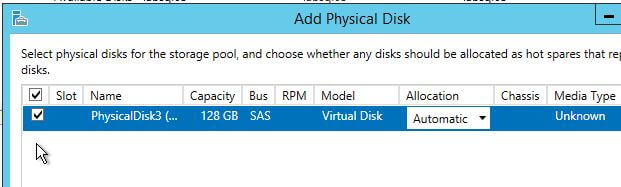
The disk has now been added to the pool and is ready for use!
The following PowerShell command will find all available disks and add them to a storage pool.
|
1 2 |
$disks = Get-PhysicalDisk -CanPool $true Add-PhysicalDisk -StoragePoolFriendlyName SQLVMStoragePool1 -PhysicalDisks $disks |
Creating virtual disks
Before we start, if you are using the lab environment set up by my template, we need to remove the existing virtual disk that was created as part of the provision process. Why? Because if we don’t there will only be a single disk with any free capacity left (since the provisioned one consumed all the space of the existing disk).
Deleting a virtual disk requires that we clean up the volumes on the disk first. Rather than clicking through a bunch of things, run this command in a PowerShell window.
|
1 2 |
Get-StoragePool -FriendlyName SQLVMStoragePool1 | Get-VirtualDisk | Get-Disk | Get-Partition | Remove-Partition Get-StoragePool -FriendlyName SQLVMStoragePool1 | Get-VirtualDisk | Remove-VirtualDisk |
Now, let’s see about how we can create a new virtual disk, which uses both of the attached Azure disks.
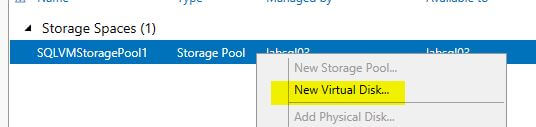
- Right click on the storage pool in Server Manager, and choose ‘New Virtual Disk’.
- Click “Don’t show this page again“, then click ‘Next‘.
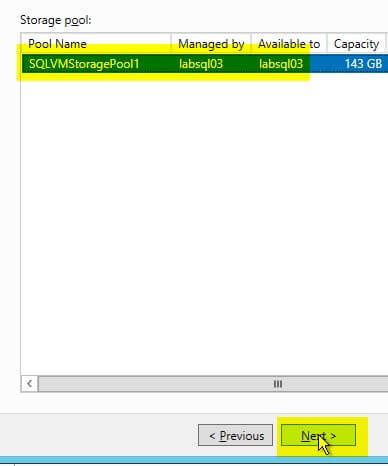
- Ensure that the storage pool you are selecting is the correct one, then click ‘Next‘.
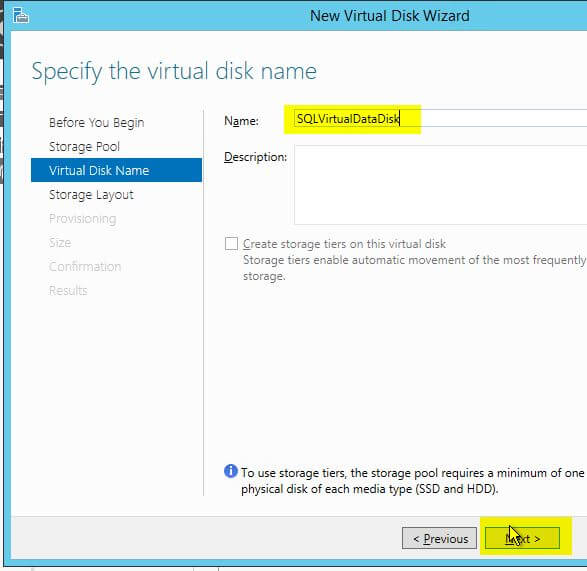
- Give the disk a meaningful name, such as ‘SQLVirtualDataDisk‘, then click ‘Next‘.
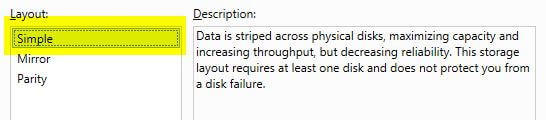
- Make sure that ‘Simple’ is selected, and click ‘Next’. This is where if you were actually using physical disks you would want to specify a different option.
- Select ‘Fixed’, then click ‘Next’. While it’s tempting to use what’s known as ‘thin’ provisioning (meaning disks only consume as much space as is used), my advice is to keep things simple. I’ve seen several times in my career when thin provisioning caused problems, mostly because people weren’t carefully watching to ensure that there was adequate space. Don’t be like those people.
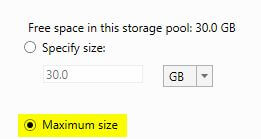
- Select ‘Use maximum size’, then click ‘Next’. If you wanted to only provision a certain size, then you would enter it here.
- Finally, click ‘Create’.
Once the disk has been created, by default when you close the wizard a new one will open that will allow you to create and format a new volume. You could use this method, or whatever method you normally use to format and assign mount points to disks, since at this point the disk is presented to the operating system like any other ordinary disk.
If that was a few too many clicks for you, here’s a PowerShell snippet that does the same thing.
|
1 |
New-VirtualDisk -StoragePoolFriendlyName SQLVMStoragePool1 -FriendlyName SQLVirtualDataDisk -UseMaximumSize -AutoNumberOfColumns -ResiliencySettingName Simple |
Note: if you are in a situation where you need to stripe across a large number of disks (specifically more than 8), you must use PowerShell to create the virtual disk in order to ensure that all disks are utilized. See this link for more details.
Summary
In this installment of my series exploring Azure from the perspective of a SQL Server DBA, we went over how to manage storage for your Azure virtual machines. We discussed how Managed Disks have made this process easier, thanks to the elimination of the Storage Account as a middle-man of sorts. Then, we walked through the process of how to create and attach new disks to your virtual machine. Finally, we looked at how to leverage the Storage Spaces feature in Windows Server to aggregate disks together and obtain higher levels of performance than a single disk would provide.
Before we close, I want to list a few quick tips, reminders, and best practices that might help you navigate this particular area; as I’ve said before, understanding Azure storage is perhaps the most important part of managing Azure based SQL Servers, since SQL is so dependent upon the performance of the underlying storage architecture.
- There are multiple levels at which storage performance is throttled: 1) disks (Premium versus Standard, larger vs. smaller), 2) virtual machine size (different sizes have different limits), and, if you are not using the new Managed Disk feature, 3) at the storage account level.
- Virtual machines are limited in terms of how many disks you can attach at the same time, based on their size. Because of this, be careful about excessive separation of storage; for example you may not want to split out data and log volumes unless your performance requirement truly mandates it.
- Always utilize Premium storage for production workloads, with the possible exception of volumes for backups (but do please make sure you can back up the database in a reasonable amount of time).
- Convert your virtual machines to using Managed Disks when possible, so that you can eliminate one layer of complexity from the system.
- On virtual machines that have mixed storage types (Premium vs Standard), consider creating two different storage pools: one for Premium, and one for Standard. That way, you can allocate drives based on what is needed and not consume precious Premium storage for less vital workloads.
In the next installment, we’re going to look at what I’d consider to be the second most critical part of the Azure ecosystem to understand: networking. As we’ll see, there are numerous limitations and complexities there as well, especially when we get into the areas of using high availability technologies like clustering and AlwaysOn Availabilty Groups. I hope to see you there!
Load comments