
Policy-Based Management (PBM) allows us to do compliance checks on our servers. We can build policies for the servers and run regular scheduled checks on them. SQL Server allows us to use PBM to check the configuration of all tables of all databases in our servers.
In order to illustrate PBM, I will show how to build two different policies: First, we will check our databases to see if they have the ‘Auto Shrink’ option enabled, which is against the current policy. This is just one simple policy out of many that you might want to check using the built-in features of PBM.
The main power of PBM, however, comes from being able to create any kind of custom policy. I will use an example of a problem I explained in a previous article. This involves the importance of the use of the attribute ‘large value types out of row’ for tables that have varchar(max) fields. We will need to create a custom query for the policy in order to check if all the tables that need this attribute have had it enabled.
The PBM uses Condition objects based on existing Facet objects and Policy objects. Conditions are, as the name implies, criteria that will be executed during the policy check. Facets are pre-defined objects that recover information from several types of objects in the server. They are used to build the conditions. Policies, in turn, bring together the conditions, determining how their outcome will be used.
For example, a policy to check something in our tables can use a condition to decide which servers will be checked, another one to decide which databases will be checked, one more to decide which tables will be checked and finally a condition to be checked against the table.
A very common pattern to begin is the creation of conditions to avoid the policy check against system databases and system tables. Let’s do a step-by-step walkthrough to achieve this.
Avoiding System Databases
We need two conditions for this: One to check system databases and another to check system tables. Let’s start:
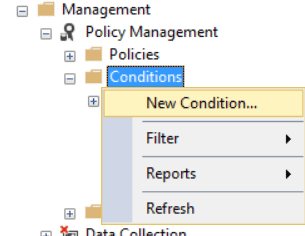
- Using SSMS, right-click the ‘Conditions’ folder, below ‘management’->’Policy Management’ and click the ‘new condition’ menu item to open the ‘Create new condition’ window.
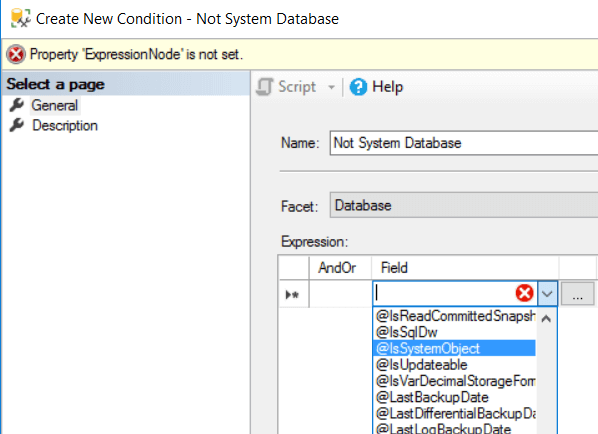
- In the ‘Create new condition’ window, type ‘Not System Database’ in the ‘Name’ textbox. It will be the name of our first condition
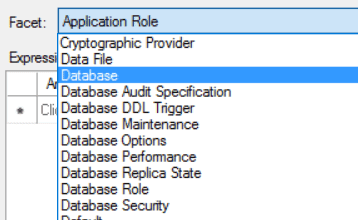
- In the ‘Create new condition’ window, in the ‘Facet’ drop-down list, select ‘Database’, so we can create a condition against database properties.
Each ‘Facet’ has several fields. Each field represents information that we can check in the object. There is a field in the ‘Database’ facet named ‘@IsSytemObject’ that we can use to identify whether the database is a system database. In our case, we need the condition to be true if the database is NOT a system database, so the policy check will continue
- In the ‘Create new condition’ window, in the ‘Field’ column inside the ‘Expression’ grid, select ‘@IsSystemObject’
- Select ‘=’ in the ‘Operator’ column inside the ‘Expression’ grid
- Choose ‘False’ in the ‘Value’ column inside the ‘Expression’ grid

- In the ‘Create new condition’ window, click the‘Ok’ button
Creating the ‘Auto Shrink’ condition
The main condition of our first policy will need to check whether the ‘Auto Shrink’ database option is enabled. Let’s build it:
- Using SSMS, right-click the ‘Conditions’ folder, below ‘management’->’Policy Management’ and click the ‘new condition’ menu item to open the ‘Create new condition’ window.
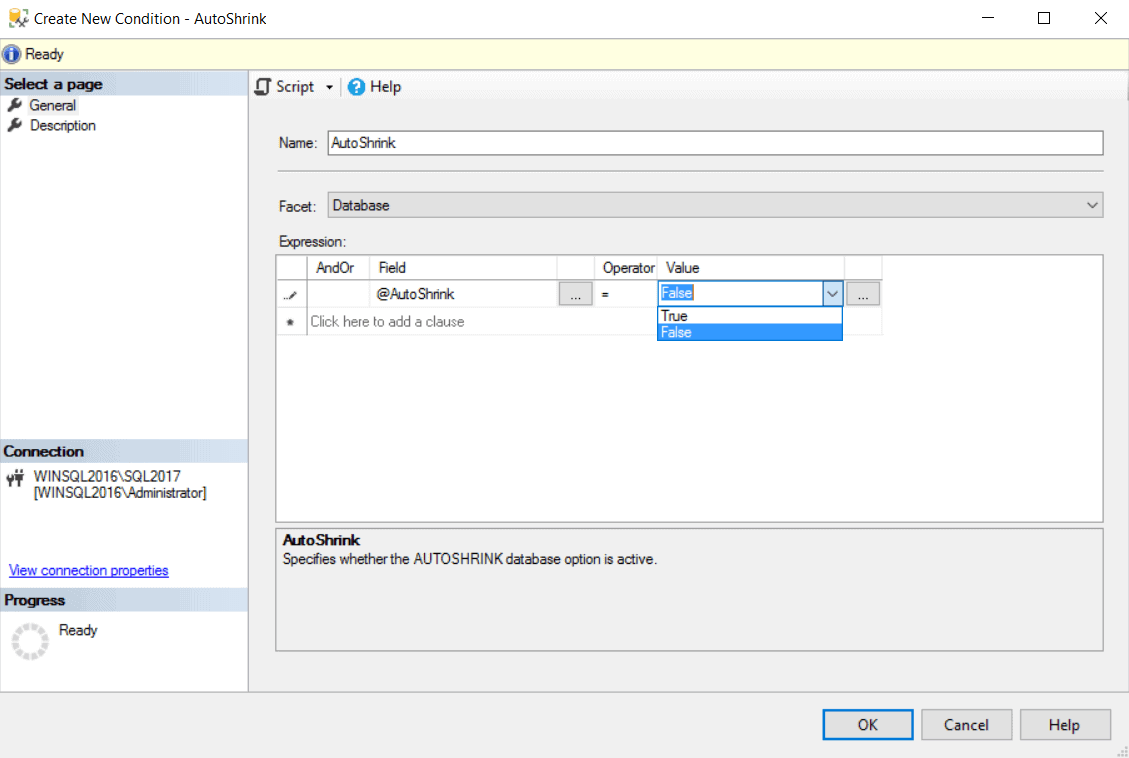
- In the ‘Create new condition’ window, type ‘AutoShrink’ in the ‘Name’ textbox: It will be the name of our first condition
- In the ‘Create new condition’ window, in the ‘Facet’ drop-down list, select ‘Database’, so we can create a condition against database properties.
- In the ‘Create new condition’ window, in the ‘Field’ column inside the ‘Expression’ grid, select ‘@AutoShrink’
- Select ‘=’ in the ‘Operator’ column inside the ‘Expression’ grid
- Choose ‘False’ in the ‘Value’ column inside the ‘Expression’ grid. The Auto Shrink option should be disabled, so our policy will pass if ‘@AutoShrink’ is false.
- In the ‘Create new condition’ window, click ‘Ok’ button
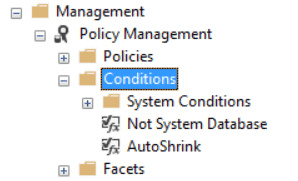
The two conditions that we’ve created so far will appear in SSMS like the image below:
Creating the first policy: Check for ‘Auto Shrink’ option
Let’s use our condition in a new policy.
- Right-click the ‘Policies’ folder, below ‘management’->’Policy Management’ and click the ‘new policy’ menu item to open the ‘Create new policy’ window.
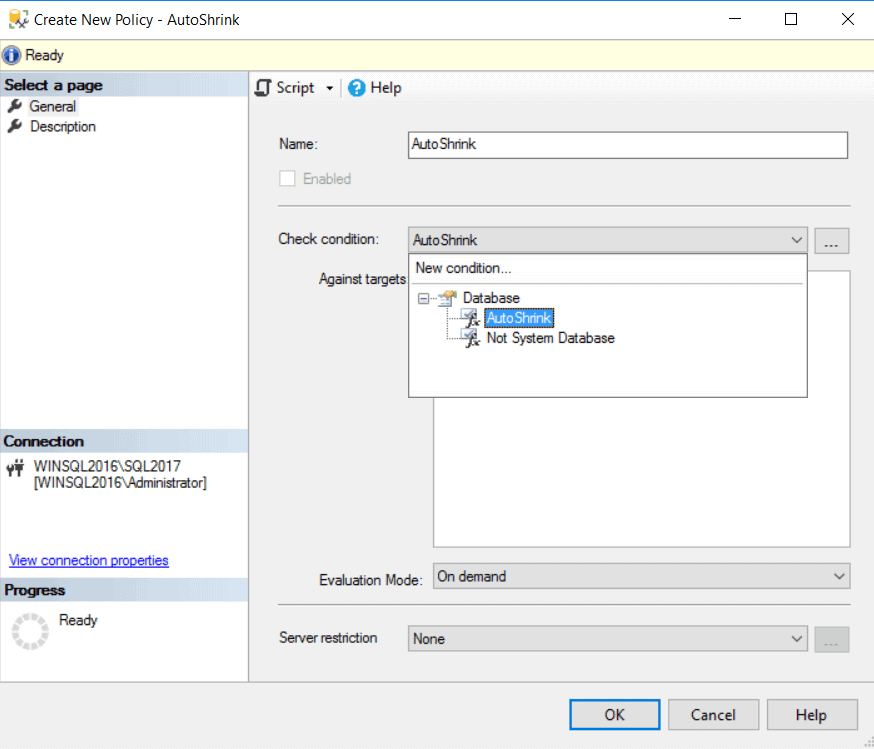
- In the ‘Create new policy’ window, type ‘AutoShrink’ in the ‘Name’ textbox, it will be the name of our first policy
- In ‘Check condition’ drop-down list, select ‘AutoShrink’, the main condition of our policy
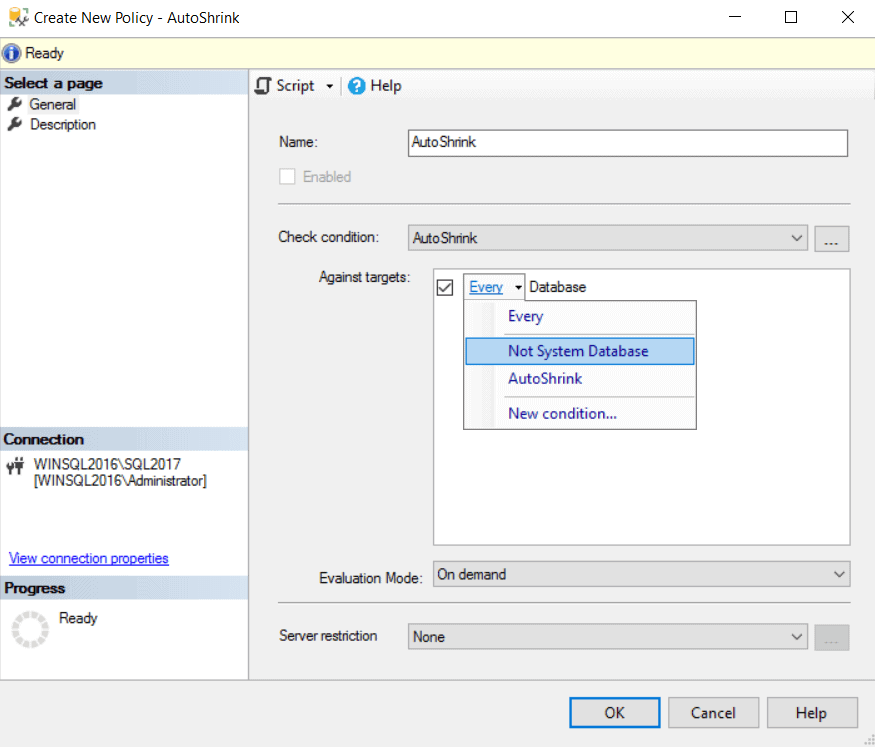
- In the ‘Against Target’ box, click the arrow besides ‘Every Database’ and select ‘Not System Database’, so our policy won’t be checked for system databases.
- Click ‘Ok’ button
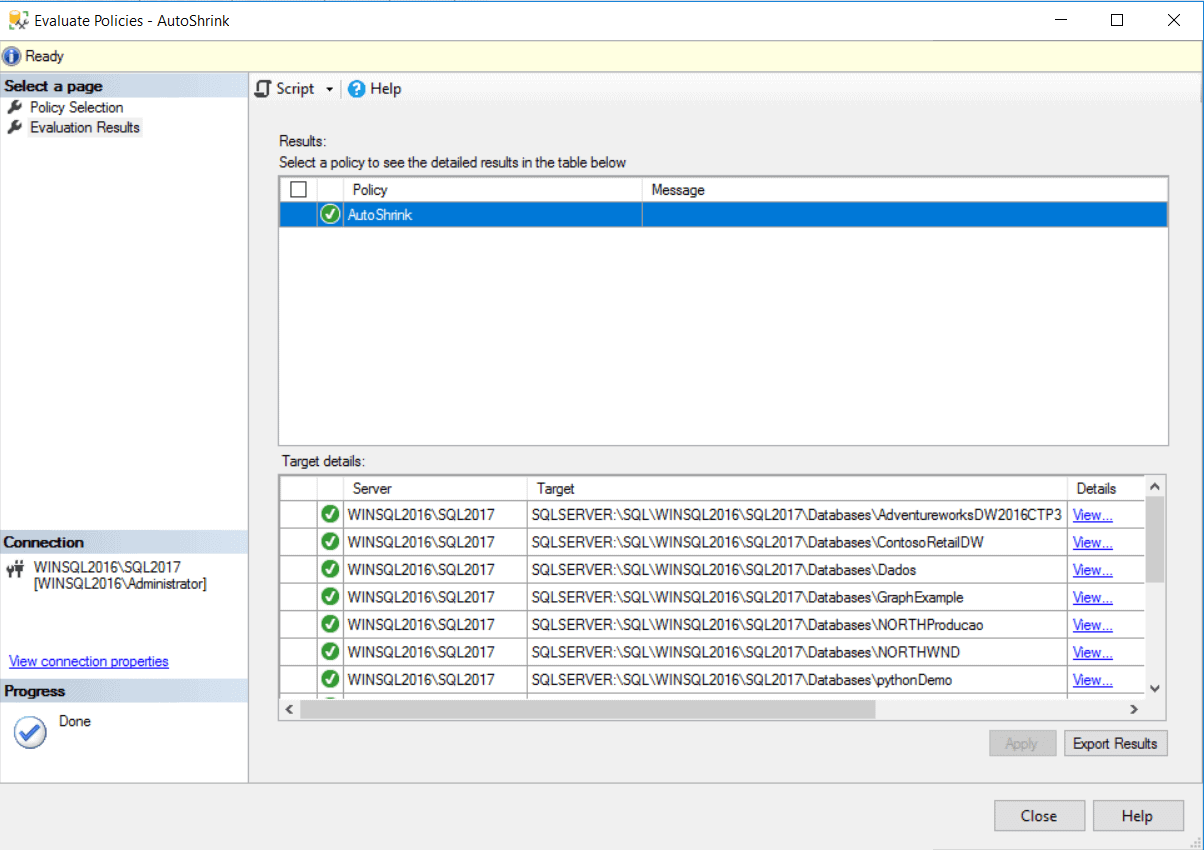
- Right-click the ‘AutoShrink’ policy and click the ‘Evaluate’ context menu item
- Check the result, you will be able to see if any database has the ‘Auto Shrink’ option enabled, then click ‘Ok’ button.
Avoiding policy checks on system tables
We need just one more condition that will filter the tables for which our policies will be checked. We don’t want our policies checking system tables.
Let’s name our new condition as ‘Not System table’. The condition will use the ‘Table’ facet, because it will be executed to check each table. The ‘Table’ facet also has the ‘@IsSystemObject’ field, so we can use it in the same way we did with the previous condition.
- Right-click the ‘Conditions’ folder, below ‘management’->’Policy Management’ and click ‘new condition’ menu item to open ‘Create new condition’ window.
- In the ‘Create new condition’ window, type ‘Not System Table’ in the ‘Name’ textbox, it will be the name of our first condition
- In the ‘Create new condition’ window, in the ‘Facet’ drop-down list, select ‘Table’, so we can create a condition against database properties.
- In the ‘Create new condition’ window, in the ‘Field’ column inside the ‘Expression’ grid, select ‘@IsSystemObject’
- Select ‘=’ in the ‘Operator’ column inside the ‘Expression’ grid
- Choose ‘False’ in the ‘Value’ column inside the ‘Expression’ grid
- In the ‘Create new condition’ window, click ‘Ok’ button
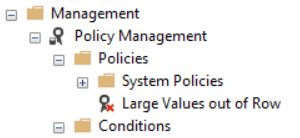
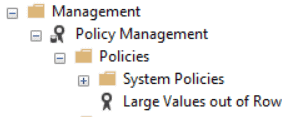
Check tables for the ‘large values out of row’ attribute
Our third condition will be the main condition for our second policy. Our policy will check whether the tables have the attribute ‘large value types out of row’ enabled, so we need to use the ‘Table’ facet. However, there is no field for the ‘large value types out of row’ attribute. In this case, instead choosing a field we need to use a custom expression built with some special functions.
The first step to build the custom expression is to create a query that returns a single value to be checked by the policy. Often, we have to mix several checks in the same query and return a single value, usually ‘0’ or ‘1’, to be checked by the policy.
In our example, if the table has ‘varchar(max)’ fields and has the attribute ‘large value types out of row’ disabled, it will fail the check (‘0’ as result): Otherwise it will pass the check (‘1’ as a result). We can use a ‘case’ statement with subqueries to achieve these results.
The query will be executed by the ExecuteSQL function used in a PBM expression. The PBM framework will execute our query once for each table and will pass parameters for the query, so we can identify the table during the execution.
Let’s build the query in several steps to better understand the result:
-
First step: The following query will result in a list of tables that have varchar(max) fields
1234select name from sys.tables t whereexists (select 1 from sys.columns cwhere user_type_id=167 and max_length=-1and c.object_id=t.object_id) -
Second step: Let’s filter the result for a single table using the parameter available in the ExecuteSQL function
12345select name from sys.tables t whereexists (select 1 from sys.columns cwhere user_type_id=167 and max_length=-1and c.object_id=t.object_id)and name=@@ObjectNameYou will have noticed that I’m using a variable called ‘@@ObjectName’ in the expression. PBM will replace this variable with the name of the object in ‘sys.objects’ DMV. This is important: The variable doesn’t exist when the object isn’t present in ‘sys.objects’ DMV. Since we are building a condition for tables, this problem will not affect our example.
-
Third step: Check if the attribute ‘large_value_types_out_of_row’ is disabled. If the table has varchar(max) columns and the attribute ‘large_value_types_out_of_row’ is disabled, then the table should not pass the policy check.
12345select name from sys.tables t whereexists (select 1 from sys.columns cwhere user_type_id=167 and max_length=-1and c.object_id=t.object_id)and name=@@ObjectName and large_value_types_out_of_row=0 -
Fourth step: If the query results in any row being returned, the final result should be 0: If it hasn’t a result returned, then the final result will be 1. So, ‘0’ will mean there are tables with problems, ‘1’ will mean everything is Ok. We need to be careful with the meaning of the query result and how we will build the policy.
123456789select casewhen (select name from sys.tables t where exists(select 1 from sys.columns cwhere user_type_id=167 and max_length=-1and c.object_id=t.object_id)and name=@@ObjectName and large_value_types_out_of_row=0) is not null then 0else 1end
Now that we have the query we will use for the condition, we can build the custom expression.
- Right-click the ‘Conditions’ folder, below ‘management’->’Policy Management’ and click the ‘new condition’ menu item to open the ‘Create new condition’ window.
- In the ‘Create new condition’ window, type ‘outofrow’ in the ‘Name’ textbox, it will be the name of our first condition
- In the ‘Create new condition’ window, in the ‘Facet’ drop-down list, select ‘Table’, so our condition will be executed once for each table.
- In the ‘Create new condition’ window, click the button ‘…’ besides the ‘Field’ column
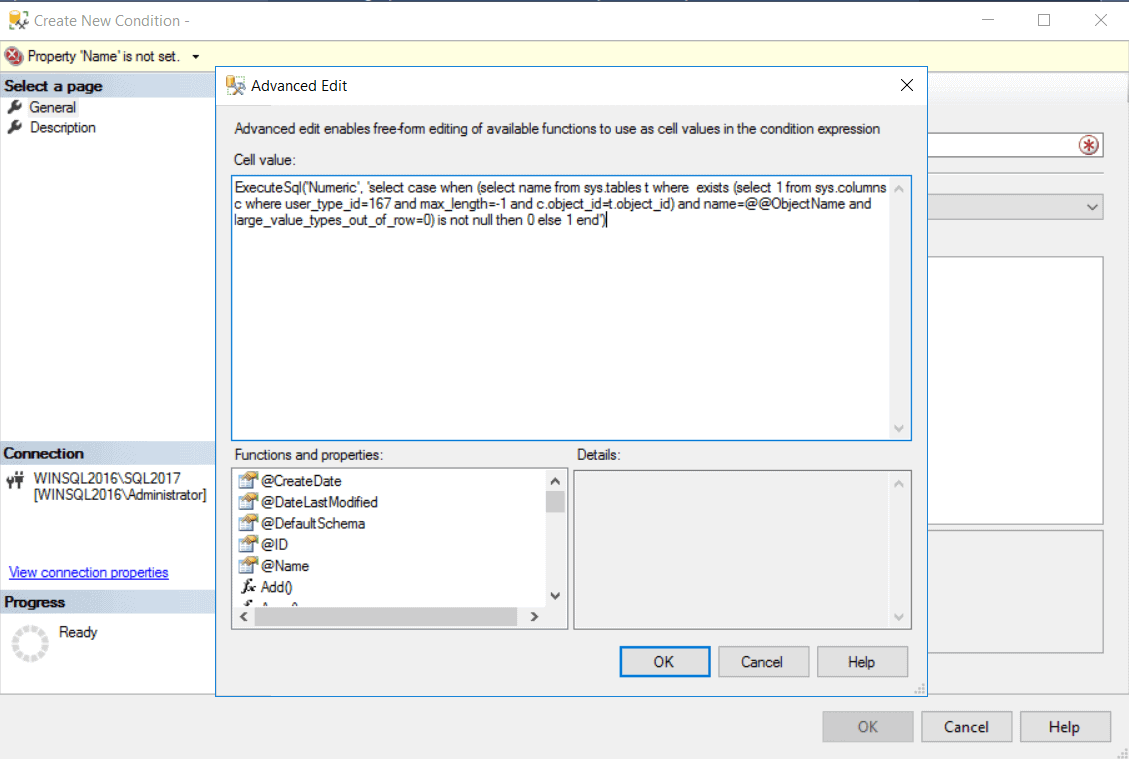
- In the ‘Advanced Edit’ window, type the following expression:
ExecuteSql(‘Numeric’, ‘select case when (select name from sys.tables t where exists (select 1 from sys.columns c where user_type_id=167 and max_length=-1 and c.object_id=t.object_id) and name=@@ObjectName and large_value_types_out_of_row=0) is not null then 0 else 1 end’)
The most irritating part of making this work is that you need to write the entire query in a single line, as a string expression. This expression uses the function ExecuteSQL to execute the query and return the numeric value.
- Click ‘Ok’ button in the ‘Advanced Edit’ window
- Select ‘=’ in the ‘Operator’ column inside the ‘Expression’ grid
- Type ‘1’ in the ‘Value‘ column inside the ‘Expression’ grid
As I explained before, it’s important to choose the correct value according to the meaning of the query.
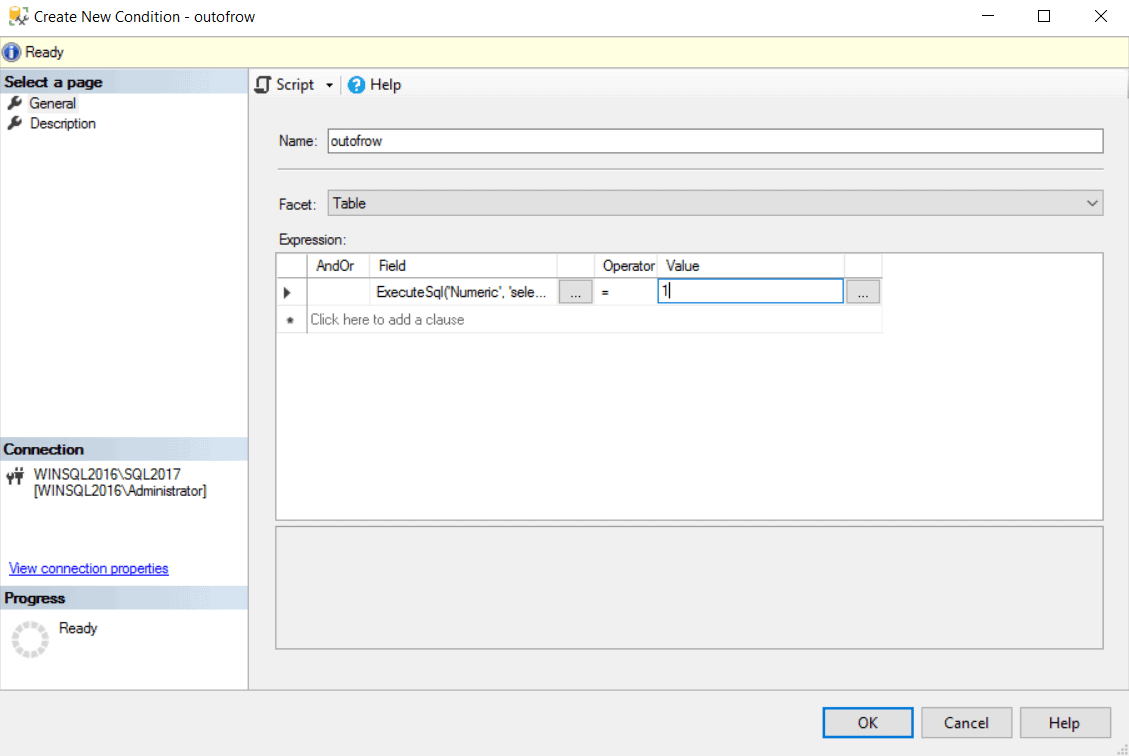
- In the ‘Create new condition’ window, click the ‘Ok’ button
Creating the second policy
Finally, after creating the conditions we need, it’s time to create the policy. Let’s do it step by step.
- Right-click the ‘Policies’ folder, below ‘management’->’Policy Management’ and click the ‘new policy’ menu item to open the ‘Create new policy’ window.
- In the ‘Create New Policy’ window, in the ‘Check Condition’ combobox, select ‘Large values out of row’
- Inside the ‘Against targets’ box, open the menu besides ‘Database’ object and select the ‘Not system databases’ menu item
- Inside the ‘Against targets’ box, open the menu besides ‘Table’ object and select the ‘Not system table’ menu item
- In the ‘Name’ textbox, type ‘large values out of row’ as the name of the policy.
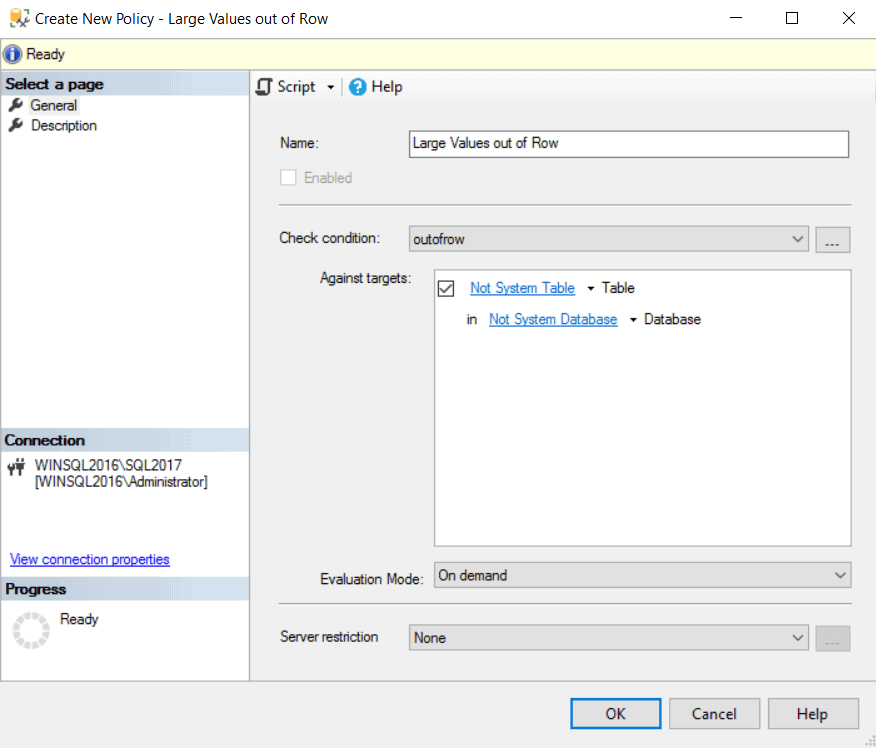
- Click the ‘Ok’ button
- Right-click the new ‘check large values’ policy
- Click the ‘Evaluate’ menu item
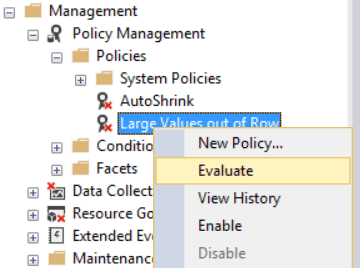
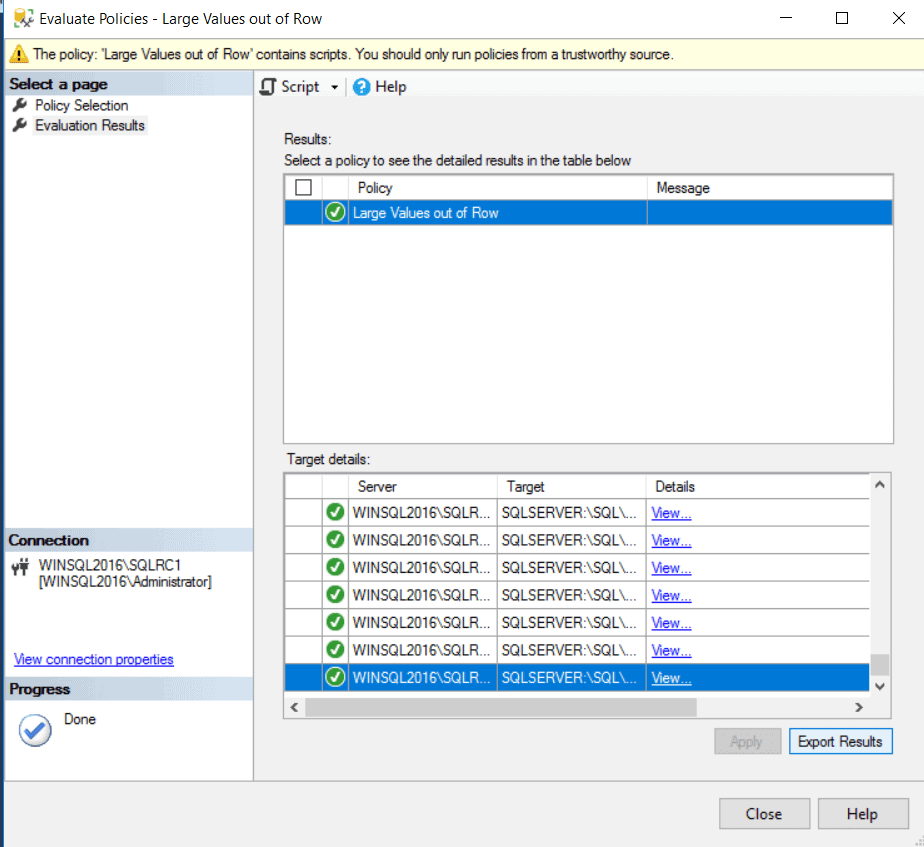
- In the ‘Evaluate Policies’ window, click the ‘Evaluate’ button
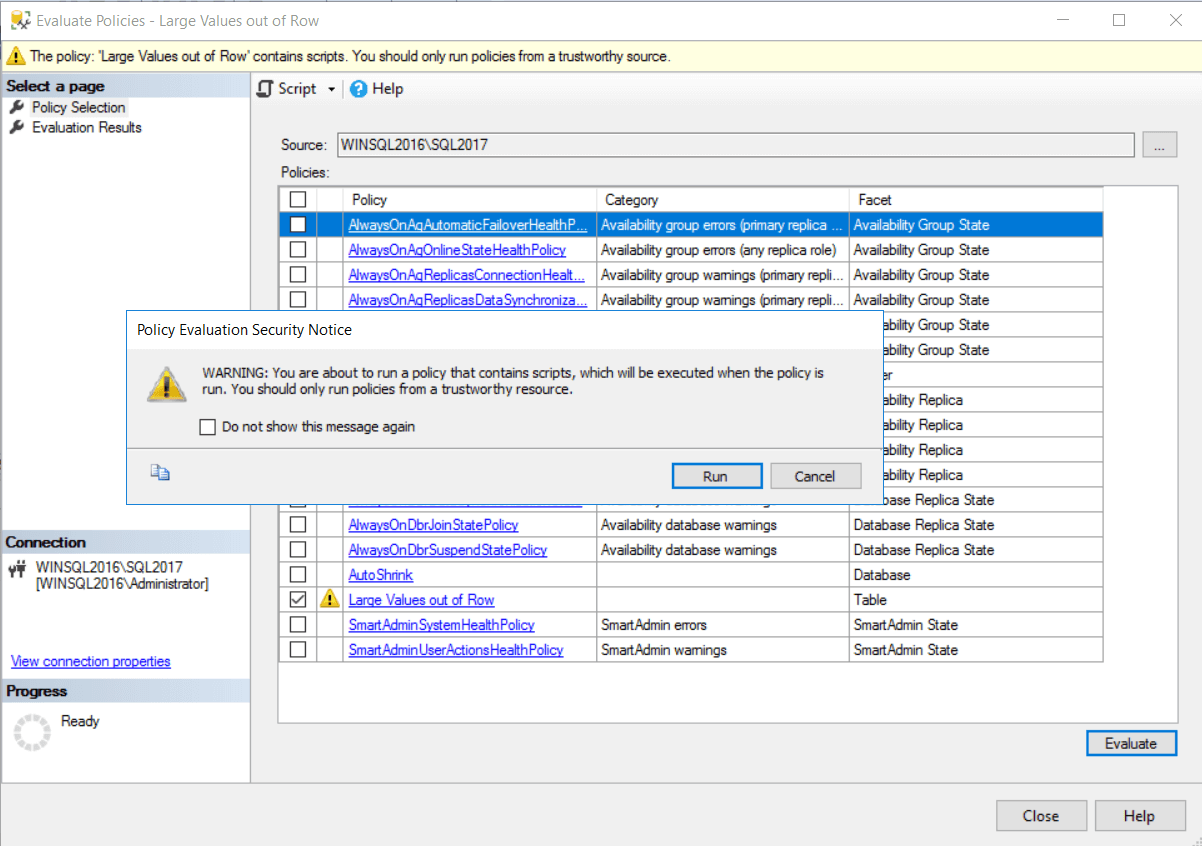
- In the ‘Policy Evaluation Security Notice’ window, click the ‘Run’ button. Custom conditions always generate an alert before execution. If you import a custom condition from the internet, for example, you need to be sure the custom code is trustable.
After a while you will see the results inside the ‘target details’ box, pointing all the tables that need the ‘large value types out of row’ enabled and which don’t comply with our new policy.
Policy Management and Execution
Until now, we created the policies and are executing them on demand. PBM also allows us to execute the policies in a scheduled configuration, using SQL Server Agent.
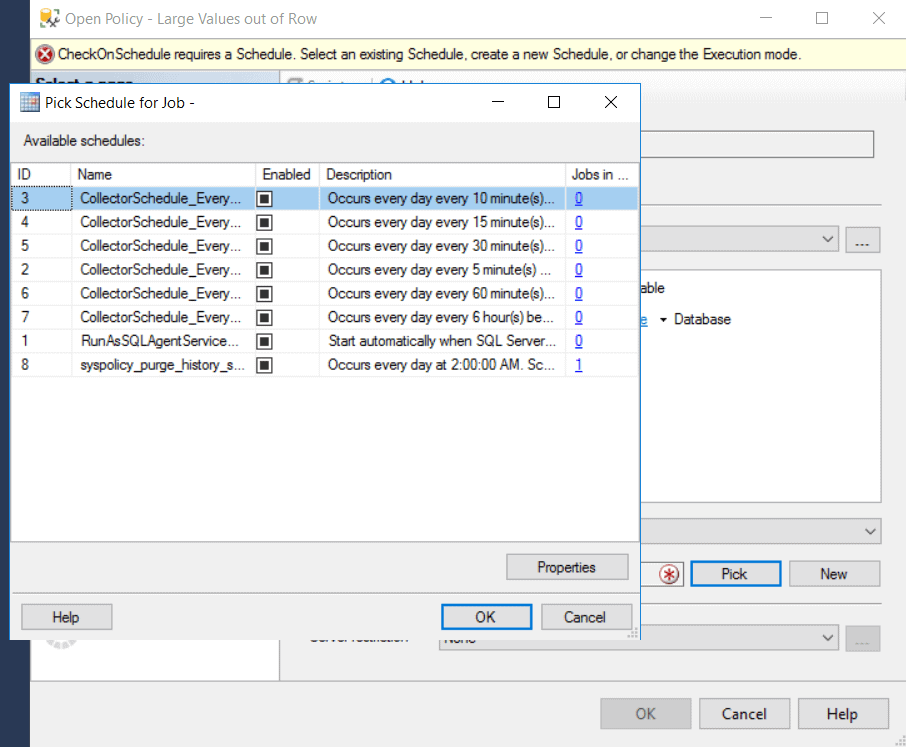
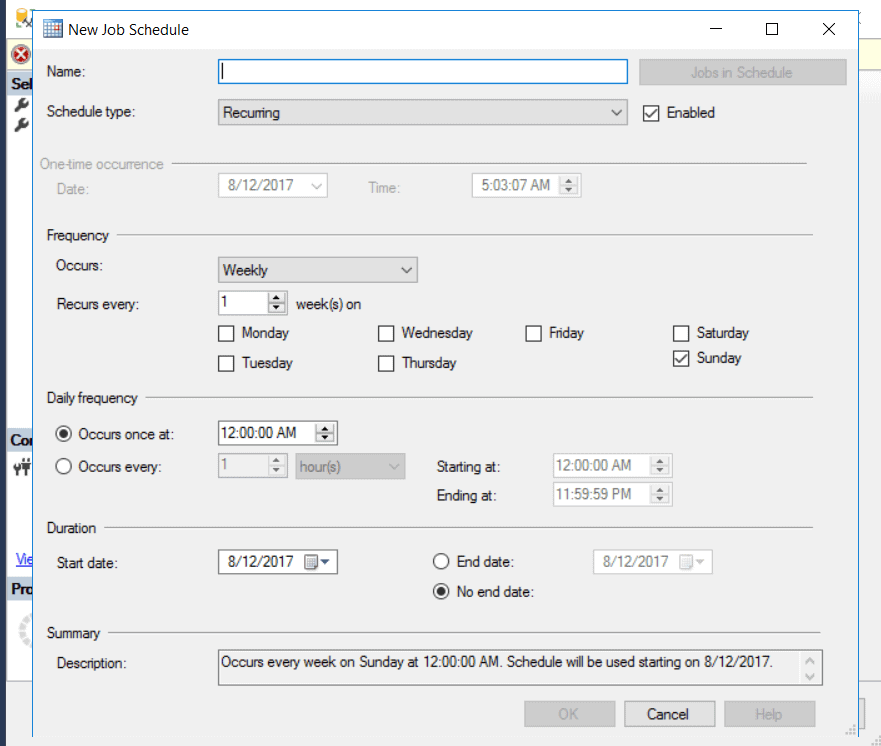
Editing the policy properties, you can change the ‘Evaluation Mode’ combobox to ‘Scheduled’. In the same window, you can either click ‘Pick’ button to choose a pre-defined scheduled or click ‘New’ button to create a new custom schedule, both options will create a new job in SQL Server Agent.

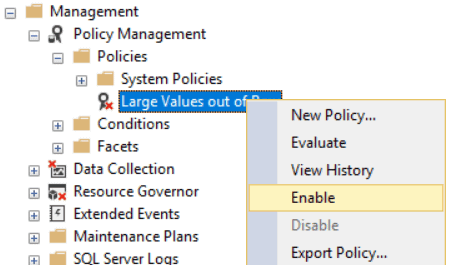
All policies with ‘Scheduled’ evaluation mode can be enabled or disabled. If the policy is enabled, the job is enabled and will be executed according to the schedule; otherwise the job is disabled. By right-clicking the policy, you can find the ‘Enable’ and ‘Disable’ menu item.
|
|
|
|


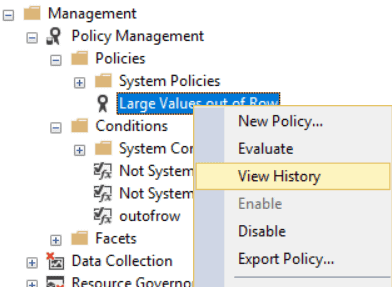
At any moment, you can right-click the policy and check the execution history, ensuring everything is OK with the server.
Managing Multiple Servers
What turns PBM from what is merely an interesting feature into an important resource for compliance is the way that you can execute the policies in multiple servers.
By using PBM, we can manage dozens or even hundreds of SQL Servers, ensuring the compliance of the servers with all the configuration rules we choose.
There are several solutions for the policy check across multiple servers:
Manual execution:
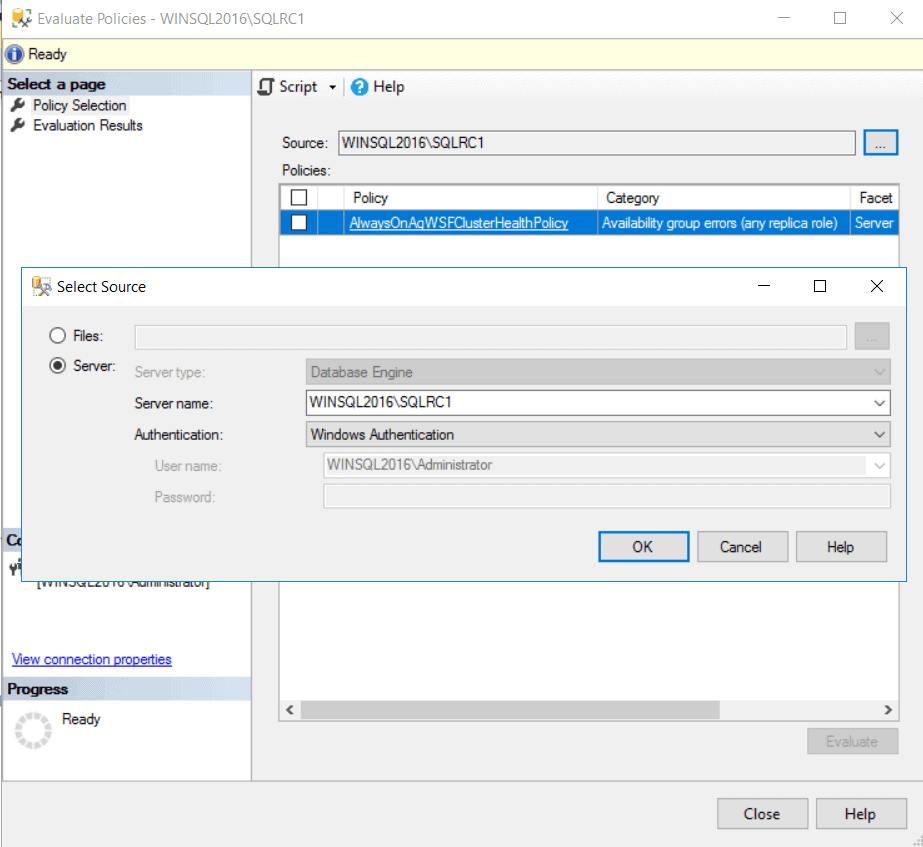
We can right-click the server to be evaluated and click ‘Policy’->’Evaluate’ in the context menu. We choose the server were the policies were created, choose the policies and execute.
We can keep all the policies in a single server and execute them in any server we would like.
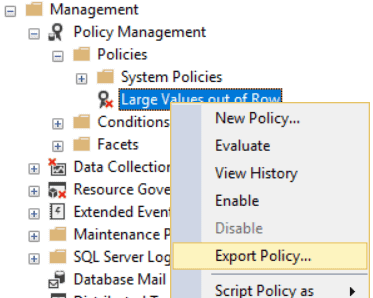
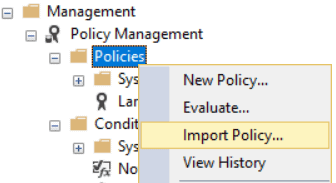
Import the Policies:
By right-clicking a policy, you can export the policy to a file. By right-clicking the ‘Policies’ folder you can import the policy to the server. You can export/import the policies to all your company servers and create the execution schedule for each server.
When you export a policy, all the conditions of the policy are exported together to a single XML file that we can import in a different server.
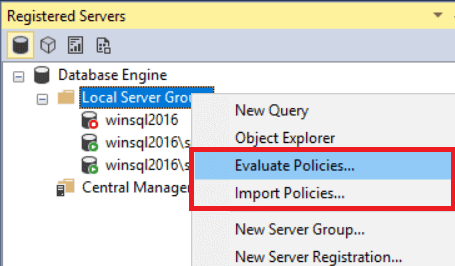
Use the Registered Servers window:
The Registered Servers windows is used to manage multiple servers. While the Object Explorer window allows us to import policies to one server or execute the policies against a server, we can, by using the Registered Servers window, create a group of servers and import or execute the policies all at once.
Using the Registered Servers window, we can even create several different groups of servers according to a common requirement: For example, one group for the servers of each country, checking different compliance rules in each group.
Use the Enterprise Policy Management:
Enterprise Policy Management, or EPM, is a public project that uses PowerShell, a custom database and some reports to manage the execution of the policies across several servers and create reports with the execution results. It’s a very good solution when you have too many servers.
You can download the Enterprise Policy Management framework here
You can see an article about Enterprise Policy Management here
Using PowerShell:
You can create a custom PowerShell solution, or even customize the EPM PowerShell scripts, to manage your policies execution.
Predefined Policies
SQL Server gives several predefined policies to us, a total of 50 database engine policies and some more to control surface area configuration.
You can find the policies in the folder
C:\Program Files (x86)\Microsoft SQL Server\140\Tools\Policies\DatabaseEngine\1033
and it’s a good idea to import them in SQL Server, as they represent important policies: For example, one of the available policies is able to check the trustworthy problem I described in a previous blog post (here). This misconfiguration could allow a SQL Server user to take the control of the server and the available policy is able to identify the vulnerability.
Careful with SQL Server Management Studio Version
Unfortunately, some versions of SSMS have a strange bug that appears when we execute a policy with a custom condition over the table facet. This happens with SSMS 2016 up to version 17.0. Version 17.2 already corrected the bug.
I registered this bug in Microsoft Connect web site, you can check the details here
Conclusion
When you are managing a number of servers, it helps a great deal to be able to create custom conditions and execute the policies across multiple servers. PBM is ideal for the task.
It doesn’t need to be restricted to check configurations, you can create conditions to check anything, including business rules, querying the data inside the databases. Your imagination is the only limit.
This document contains proprietary information and is protected by copyright law.
Copyright © 2026 Red Gate Software Limited. All rights reserved


Load comments