
I have a confession to make. Why, in my last article about shortest_path in SQL Server 2019, have I used Gephi in order to illustrate the relationships, instead of using a script in R for the same purpose and demonstrate Machine Learning Services as well?
The initial plan was to use an R script; however, the R script which works perfectly in SQL Server 2017 doesn’t work in SQL Server 2019.
This is the original R script I had planned to use:
|
1 2 3 4 5 6 7 8 9 10 11 12 13 14 15 16 17 18 19 |
EXEC <strong>Sp_execute_external_script</strong> @language = N'R', @script = N' require(igraph) g <- graph.data.frame(graphdf) V(g)$label.cex <- 2 png(filename = "c:\\R\\plot1.png", height = 1200, width = 1200, res = 100); plot(g, vertex.label.family = "sans", vertex.size = 40) dev.off() ', @input_data_1 = N'select LikeMember.MemberName as LikeMember, LikedMember.MemberName as LikedMember from dbo.ForumMembers as LikeMember, dbo.ForumMembers as LikedMember, Likes where Match(LikeMember-(Likes)->LikedMember)', @input_data_1_name = N'graphdf' go |
The purpose of the script was only to create an image file with the relationships stored in graph tables, but in SQL Server 2019, it results in an access denied message.
If you would like to reproduce this demonstration, you can use this script file to create the database in a SQL Server 2017. You must also install the R packages needed by the script. There are many ways to do it. My favourite is this:
- Open windows explorer
- Browse to the SQL Server R folder, usually is this one: C:\Program Files\Microsoft SQL Server\MSSQL15.MSSQLSERVER\R_SERVICES\bin
- Execute the R.EXE application
- Execute the instruction install.packages(“igraph”) , where “igraph” is the name of the package to be installed
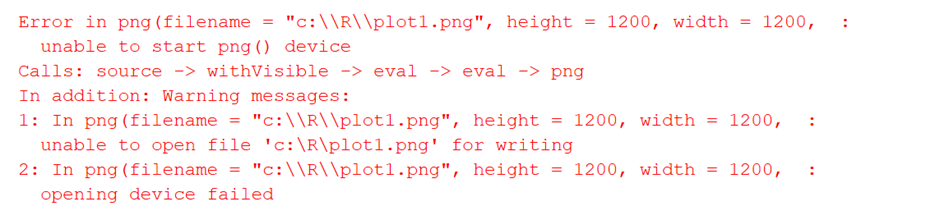
When you try and run the above R script. It will work well in SQL Server 2017, and fail in SQL Server 2019 with the error message you can see in the image below:
During PASS Summit, I was able to ask questions to the Microsoft employees in the Data Clinic, and they explained the differences between the two versions. The explanation hasn’t solved all the problems, but I was able to find a solution and create a workaround for this script.
While researching the workaround, I saw many examples of R scripts manipulating files and all these examples may fail in SQL Server 2019. Highlighting this problem, solution, and workaround in this article will be important to everyone using SQL Server Machine Learning and planning to migrate to SQL Server 2019.
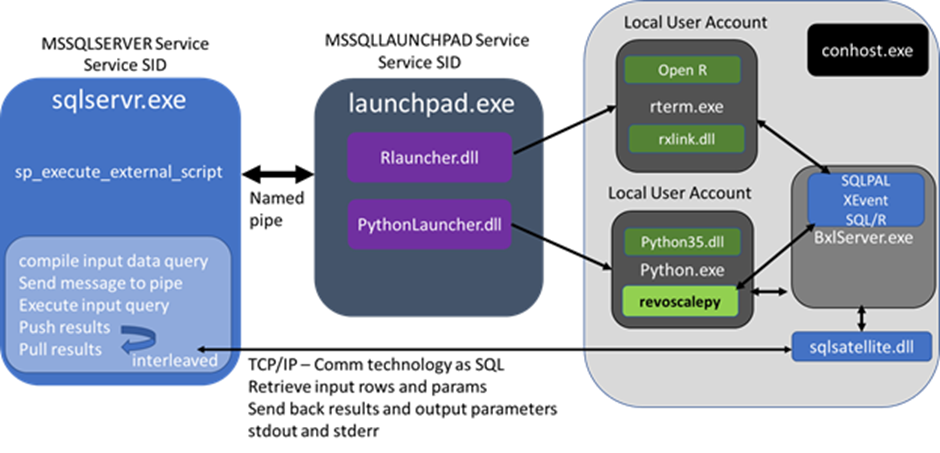
First, I’ll review how Machine Learning in SQL Server works: it involves the execution of an external script, in R or Python, but has a flexible structure, you could create your own external language. The execution itself is started by a service called SQL Server Launchpad, isolating the execution from SQL Server itself. The image below (from What is the Machine Learning Server) illustrates how the execution architecture works, although this article will not go so deep into the architecture.
Launchpad in SQL Server 2017
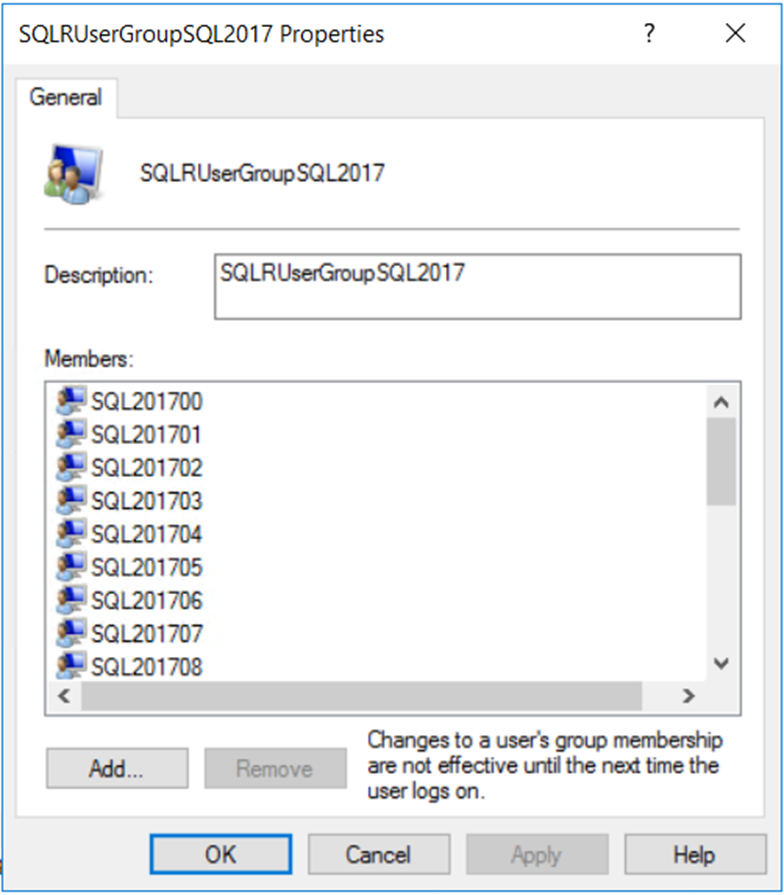
In SQL Server 2017 the Launchpad starts processes for each execution. The processes need an identity, so SQL Server dynamically creates users inside the group SQLRUserGroup. In the following image, you can see two groups, SQLRUserGroup, for SQL Server 2019 and SQLRUserGroupSQL2017 for SQL Server 2017, since I have both in the same machine.
![]()
The difference in the name is due to the instance name; SQL Server 2019 is the default instance in my machine. Due to that, its user group name has only the core name, while SQL Server 2017 is in an instance called SQL2017, so the instance name is attached to the core group name.
The processes have access to the machine resources, limited by the permissions given to the SQLRUserGroup. Since SQL Server 2017 creates many users, you shouldn’t grant permissions directly to the users, only to the group.
In order to be able to manipulate files in the file system, you only need to give the correct permissions to the group SQLRUserGroup. The image below shows the group and users for SQL Server 2017
Launchpad in SQL Server 2019
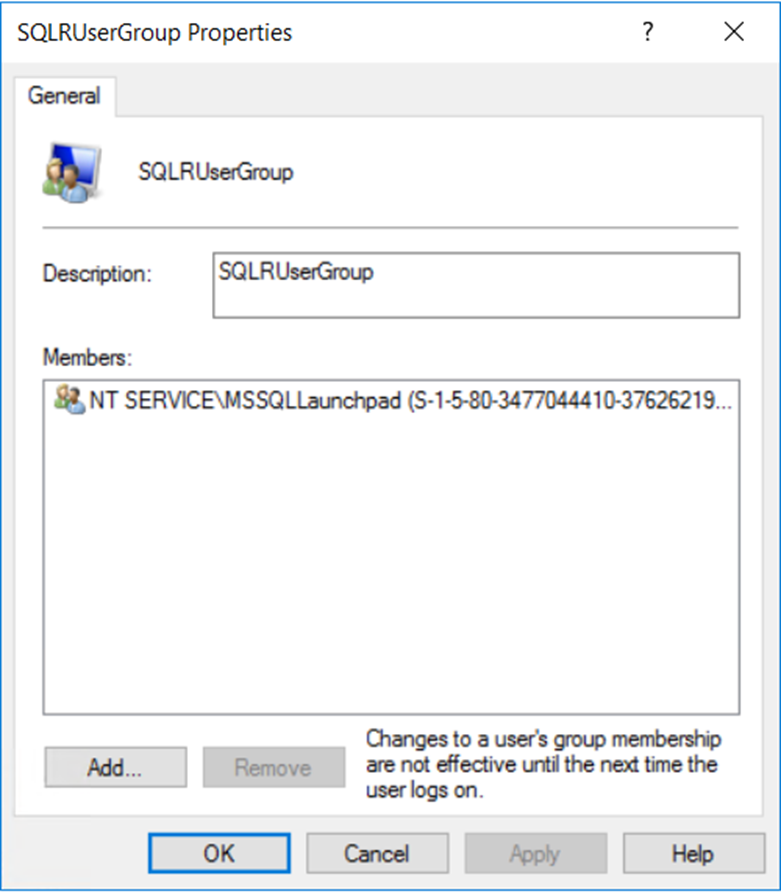
In SQL Server 2019, the Launchpad was improved. Instead of using processes for each execution, it uses app containers. The app containers need only a single identity, so they use the same identity as the Launchpad service.
While the 2017 version, the SQLRUserGroup, had many users; in the 2019 version, it has only one, the Launchpad service account. The image below shows the group for SQL Server 2019.
Nowadays, when talking about containers immediately, we think about Docker, but not in this case. The app containers I’m mentioning here are a sandbox set of APIs introduced in Windows 8. These allow any application to create app containers and start an execution inside an app container.
The app containers work as isolated virtual machines (but much more lightweight, of course). This means that you can’t access the file system of the host (your SQL Server), neither for reading or to save files. You save any files inside the app container, and they are destroyed after the app container is released. In fact, the container is redirected to save files in a temporary folder inside the host hard drive. This increases the security, no doubt about that, but any script dealing with the file system may need changes to work in SQL Server 2019.
These app containers are created by Launchpad using the windows Sandbox API. The Launchpad doesn’t offer any way to customize the app containers creation, which could solve the problem.
You can learn more about app containers with these two links:
https://techcommunity.microsoft.com/t5/Windows-Kernel-Internals/Windows-Sandbox/ba-p/301849
https://www.malwaretech.com/2015/09/advanced-desktop-application-sandboxing.html
Proving this Concept
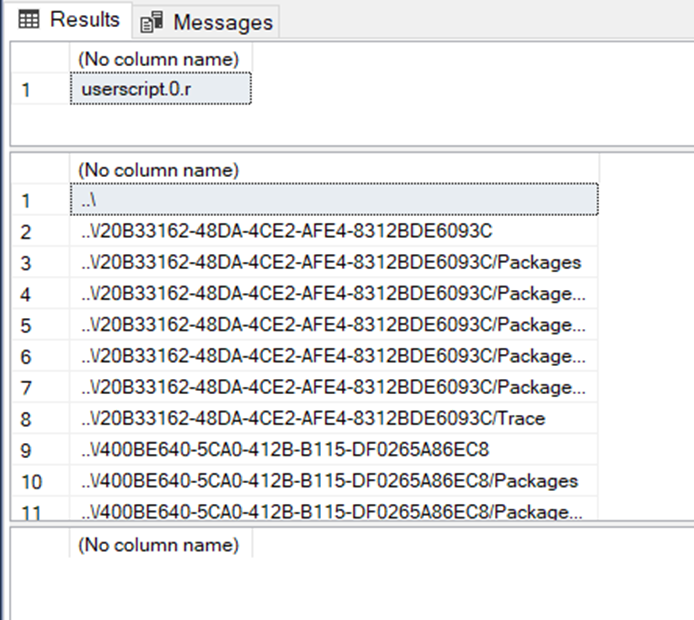
In order to determine this concept, you can use a script in R to access the disk and list the files. You can execute the script below in both SQL Server versions, 2017 and 2019, and compare the results. In SQL Server 2017, the script will have access to the host disk. In SQL Server 2019, the script will have access only to a fake disk, which is, in fact, a temporary folder in the host disk and will be deleted after its use by the app container.
|
1 2 3 4 5 6 7 8 9 10 11 12 13 14 15 16 17 |
EXEC <strong>Sp_execute_external_script</strong> @language = N'R', @script = N'data <- list.files() data2 <- data.frame(data)', @output_data_1_name = N'data2' EXEC <strong>Sp_execute_external_script</strong> @language = N'R', @script = N'data <- list.dirs("..\\") data2 <- data.frame(data)', @output_data_1_name = N'data2' EXEC <strong>Sp_execute_external_script</strong> @language = N'R', @script = N'data <- list.dirs("..\\..") data2 <- data.frame(data)', @output_data_1_name = N'data2' |
The image below the script shows the result in SQL Server 2019.
Solutions
The app containers are created during the SQL Server Machine Learning services setup. They are objects inside the Windows local directory, and such as all the objects in the local directory, they have a unique SID to identify the app container.
You can define file system permissions directly for the SIDs. The problem is: How to identify the SID’s of the app containers since they are not listed as user or groups.
Analyse two possible solutions:
- Easy and tempting: You can give permission to the object called All Application Containers. The R scripts will have the file system permission; however, any other app container eventually running on the same machine will have the file system permission as well.
- Secure: You can identify the SIDs of the app containers installed by SQL Server and give permissions directly to them. In this way, only the app containers used by the SQL Server Machine Learning Services will receive these permissions
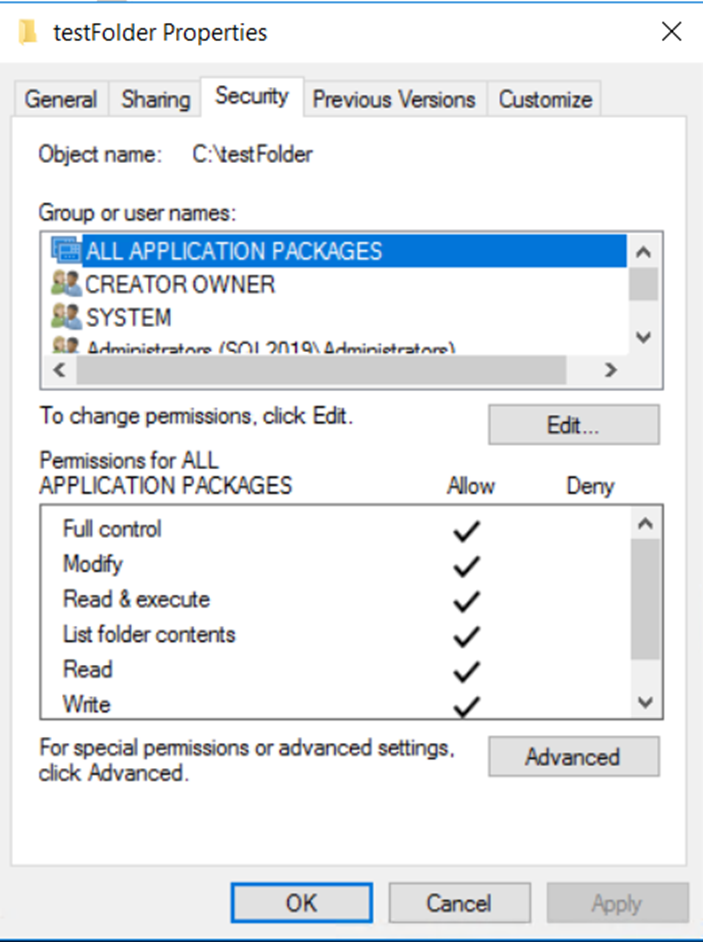
You can test both solutions using a straightforward script. First, create a folder called C:\testFolder and copy some files, any files, to the folder. Try to list the files in this folder using the script below.
|
1 2 3 4 5 |
EXEC Sp_execute_external_script @language = N'R', @script = N'data <- list.files("c:\\testFolder") data2 <- data.frame(data)', @output_data_1_name = N'data2' |
All Application Containers
The All Application Container object has a fixed SID in the local directory, which is S-1-15-2-1 . You can use the application icacls to grant permission
- Execute the R script above against the 2019 instance using SSMS. The script will return no result
- Press Win+R and type CMD to open a command prompt as administrator
- Type the following instruction and press ENTER
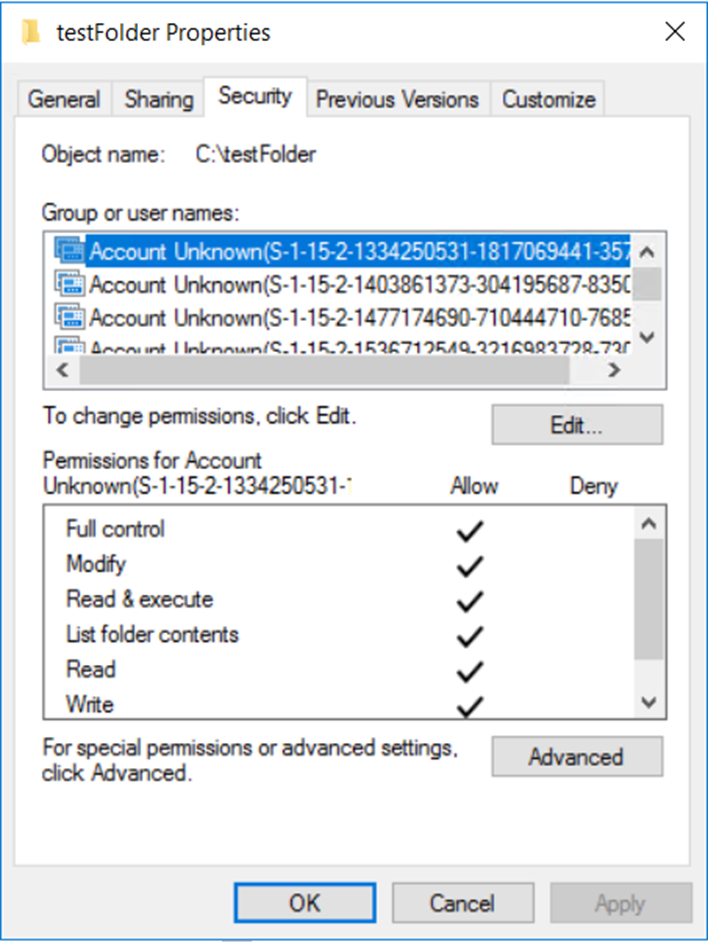
- Using Windows Explorer, right-click the testFolder and select Properties in the context menu
- In the Properties window, click the Security tab. You will be able to confirm the permission, like the image below.
- Open SQL Server Configuration Manager
- On the left side of SQL Server Configuration Manager, select SQL Server Services
- In the right-side of SQL Server Configuration Manager, right-click the Launchpad service and select Restart item in the context menu
- Execute the same R script again in SSMS. This time it will work and list the files in the folder.
- Delete the testFolder folder so that you can continue with the other solution below
|
1 |
icacls c:\testFolder /grant *S-1-15-2-1:(OI)(CI)F /t |
Using the App Containers SID
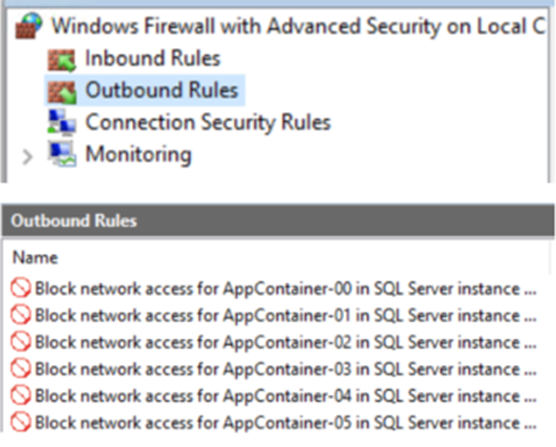
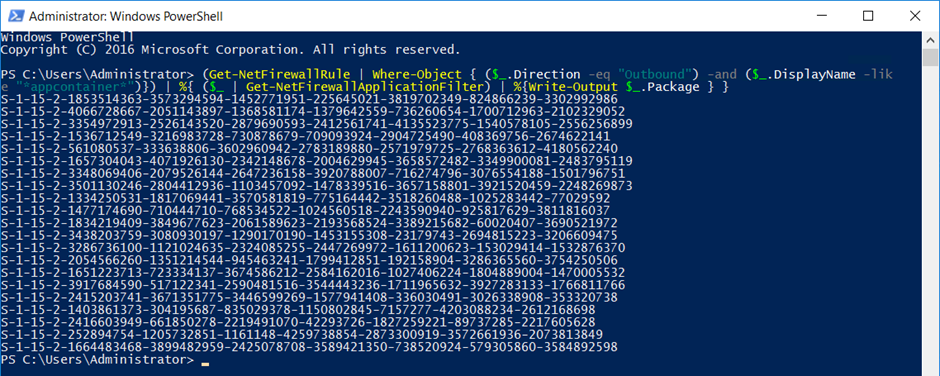
The challenge you will face when giving permissions to the App Containers SID is to discover which are the App Containers SID. There is not a direct solution for that, although, after knowing where to look, it becomes easy. SQL Server installs firewall rules in Windows Firewall in order to forbid app containers from making external contact to the network. These firewall rules are created precisely to block the app containers SID from using the network, so you can identify these SIDs by analysing these firewall rules.
If you look at the firewall rules, you can see that the app containers are blocked.
The firewall UI doesn’t provide the SIDs, however. You need to dig deeper using PowerShell to retrieve the SIDs from the firewall rules.
The PowerShell command is a combination of the cmdlet Get-NetFirewallRule, to retrieve the firewall rules and the cmdlet Get-NetFirewallApplicationFilter in order to retrieve, from each rule, the app container filter information.
The complete PowerShell command line is this:
|
1 |
(Get-NetFirewallRule | Where-Object { ($_.Direction -eq "Outbound") -and ($_.DisplayName -like "*appcontainer*")}) | %{ ($_ | Get-NetFirewallApplicationFilter) | %{Write-Output $_.Package } } |
Analyse this command line in more detail:
Get-NetFirewallRulewill retrieve all the firewall rules in Windows FirewallWhere-Objectfilters the firewall rules, retrieving only the outbound rules which contains ‘appcontainer’ in the name- The expression
%{ }is a shortcut toforeach-objectso that the instructions will be executed for each firewall rule Get-NetFirewallApplicationFilteris executed for each firewall rule, having the firewall rule($_ )as a parameter- The expression
% { }is used again to run one line for each application filter found - The
Write-Outputshows the value of thePackageproperty on each application filter
Having discovered the SIDs, you need to set the permission to the folder. The instruction will look like the one below for each SID.
|
1 |
ICACLS "C:\testFolder" /grant "*S-1-15-2-1853514363-3573294594-1452771951-225645021-3819702349-824866239-3302992986":(OI)(CI)F /t |
You could copy and paste all the sids returned to create a batch file to set the permissions, but PowerShell can do all of this you as well. The following script prompts you for a file path, the one where you want Machine Learning to have access, and sets the permissions:
|
1 2 3 4 5 6 7 8 9 10 11 12 13 14 15 16 17 18 19 20 21 22 23 24 25 26 27 28 29 |
Param ( [Parameter( Mandatory)] [string] $FolderName ) Get-NetFirewallRule | Where-Object { $_.Direction -eq "Outbound" -and $_.DisplayName -like "*appcontainer*" } | ForEach-Object { $_ | Get-NetFirewallApplicationFilter | ForEach-Object { $Acl = Get-Acl $FolderName $Sec= New-Object System.Security.Principal.SecurityIdentifier($_.Package) $AccessRule = New-Object System.Security.AccessControl.FileSystemAccessRule( $Sec, "FullControl", (1 -bor 2), 0, "Allow" ) $Acl.SetAccessRule($AccessRule) $Acl | Set-Acl $FolderName } # end 2nd FE-O } # end 1st FE-O |
The script is using COM objects System.Security.Principal.SecurityIdentifier and System.Security.AccessControl.FileSystemAccessRule in order to set the access rule on the folder.
After running the script, take a look at the security properties of the folder, and the R script should now work from SQL Server 2019.
Workaround with a FileTable
Although I have identified two solutions, it’s interesting to notice Microsoft is moving SQL Server Machine Learning towards a more secure environment, avoiding network and file system access. Considering this, you may like to use an alternative solution.
There are some options, all based on returning the image as an output parameter to SQL Server. Here is one of the options.
A filetable can map a disk folder as a table in SQL Server. This a very good solution when you need to deal with files. The script in R will see the table as a regular table. While reading or inserting into the table, the script will be reading and inserting from/to the disk.
It’s a very good solution for a permanent environment, however, it has some problems:
- You can’t define the final location of each file using SQL Server configuration. The filetable will be exposed from the server as a sharing folder, not a disk folder, so there is a slight difference in relation to the initial planning.
- Filetable is not supported in Azure PaaS cloud solutions, so you will be tied to IaaS solutions, which means creating and maintaining a virtual machine in Azure, or an on-premise environment.
The Filetable technology was created in SQL Server 2016, based on the filestream technology which was built on the previous version.
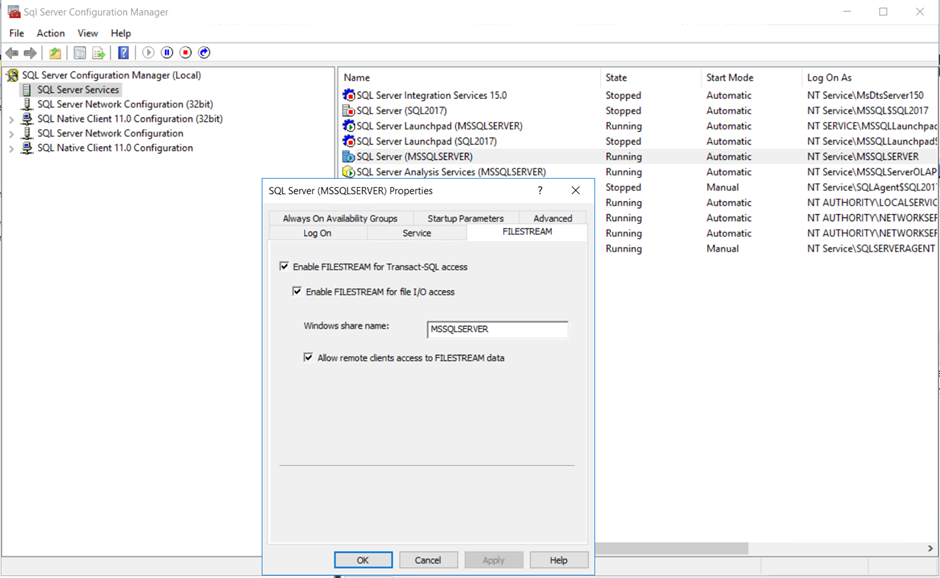
Enabling Filetable in SQL Server
A filetable solution needs some administrative care; for this reason, this solution can only be used after enabling it on a server configuration level. Follow these steps to enable this solution:
- Open SQL Server Configuration Manager
- On the left side of SQL Server Configuration Manager, select SQL Server Services
- On the right side, double click the SQL Server service you are using
- On the SQL Server properties window, select the FileStream tab
- In the filestream tab, check the box Enable filestream for Transact-SQL Access
- In the filestream tab, check the box Enable filestream for I/O Access
- The textbox Windows Share Name will be filled with the default value MSSQLSERVER. You can change it, but leave this default for now
- In the filestream tab, check the box Allow remote clients to access filestream data.
- Click the Ok button in the SQL Server Properties window
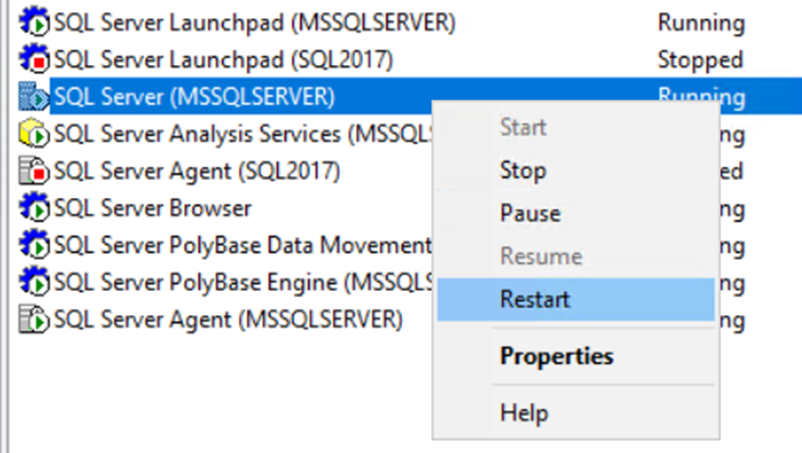
- In the right-side of SQL Server Configuration Manager, right-click the SQL Server service and select Restart item in the context menu
- In SSMS, change the FileStream access level configuration using the following code:
|
1 2 |
EXEC sp_configure 'filestream access level', 2 RECONFIGURE |
Value 1 enables filestream only for T-SQL access, which is not enough for filetable. Value 2 enables filestream for T-SQL and I/O access.
Preparing the Database to Support Filetable
In order to support filetable, you need to make some changes to the database. You need to create a filegroup to contain the filestream data, configure a special file, which will point to a folder and change some database settings.
Here is the T-SQL to execute for the database. Be sure to delete the c:\R folder before running this code:
|
1 2 3 4 5 |
ALTER DATABASE graphdemo ADD filegroup filestreamgroup CONTAINS filestream ALTER DATABASE graphdemo ADD FILE (NAME=fs, filename='c:\R') TO filegroup filestreamgroup |
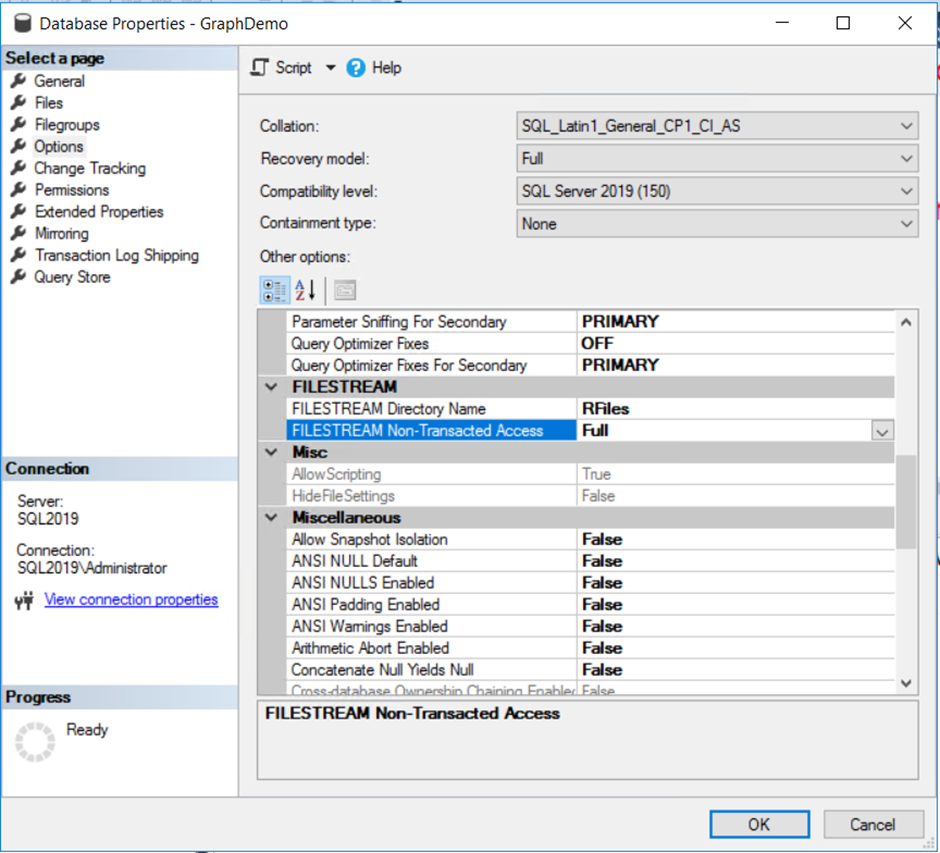
- In SSMS, Object Explorer, right-click the GraphDemo database and select Properties in the context menu
- In the database properties window, set the property Filestream Directory Name to RFiles. During further steps, you will better understand what this means.
- In the database properties window, set the property Filestream Non-Transaction access to Full
- In the database properties window, click the Ok button
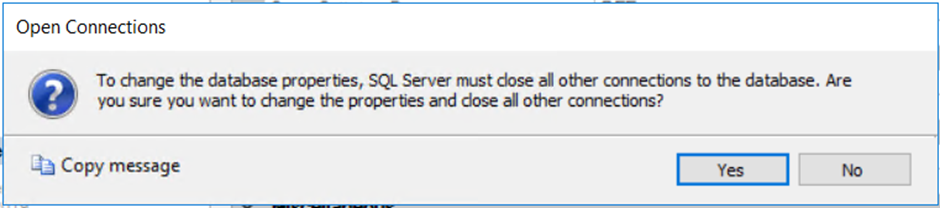
- Confirm the close of database connections clicking the Ok button in the dialog box that will appear
- Create the filetable using the following T-SQL:

|
1 2 3 4 5 6 |
CREATE TABLE images AS filetable WITH ( filetable_directory = 'Images' ); go |
The filetable you created, Images, is linked to a folder. Which folder? If you check the path c:\R, which was used to configure the database file, you will find some files and folders, but it’s not easy to understand them. So, what’s missing?
Follow these steps to see:
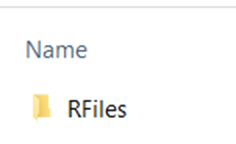
- Click win+R
- Type \\localhost and click Ok You will find the share MSSQLSERVER, that’s the name you configured in SQL Server Configuration Manager. Now that you know how the name is used, you can choose a better name if needed.
- Open the share MSSQLSERVER You will find a folder called RFiles. That’s the configuration made for the database. Each database configured to use filestream will have a share inside \\Localhost\MSSQLSERVER
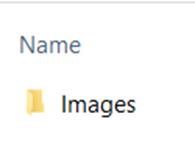
- Open the folder Rfiles You will find another folder called Images, the name used for the filetable. Each filetable in the database GraphDemo will have its own folder inside \\localhost\MSSQLSERVER\RFILES
- Open the folder Images. The folder is empty.
- In SSMS, execute the following query:
1select * from Images
The filetable is empty.

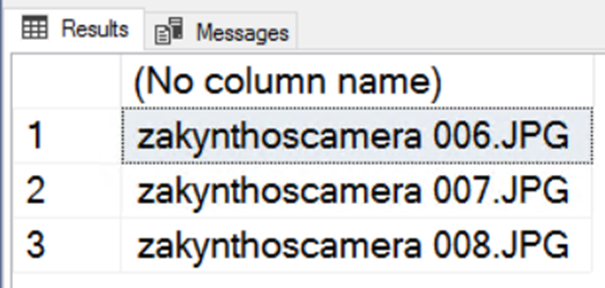
- Copy a file, any file, to the Images folder, \\localhost\MSSQLServer\RFILES\Images
- Execute the select again in SSMS:
![]()
|
1 |
select * from Images |
This time the table has one row, exactly the row for the new file you copied. The filetable is linked with the folder. So, if you insert a record inside the filetable, the record will be a file available in the folder, in this way you can save to disk the image generated by the R script
New R Script for Filetable
After preparing the filetable environment, the new script will be this one:
|
1 2 3 4 5 6 7 8 9 10 11 12 13 14 15 16 17 18 19 20 21 22 23 24 25 26 27 28 29 |
DECLARE @img <em>VARBINARY</em>(max) EXEC <strong>Sp_execute_external_script</strong> @language = N'R', @script = N' require(igraph) require(hexView) g <- graph.data.frame(graphdf) V(g)$label.cex <- 2 png(filename = "plot1.png", height = 1200, width = 1200, res = 100); plot(g, vertex.label.family = "sans", vertex.size = 40) dev.off() img <- readRaw("plot1.png") imageContent <- img$fileRaw', @input_data_1 = N'select LikeMember.MemberName as LikeMember, LikedMember.MemberName as LikedMember from dbo.ForumMembers as LikeMember, dbo.ForumMembers as LikedMember, Likes where Match(LikeMember-(Likes)->LikedMember)', @input_data_1_name = N'graphdf', @params = N'@imageContent varbinary(max) OUTPUT' , @imageContent = @img output; INSERT INTO images (NAME, file_stream) VALUES ('test.png', @img) go |
The script is very similar to the initial one; however, this time, it results in an output variable with the image.
Here are the differences between this script and the original:
- A
varbinary(max)variable which will be used as an output - A new R library,
hexView, must be installed in order to do additional manipulations in the file (yes, you will still use a file) - After saving the plot to disk, it’s read back, reading the raw file content
- The variable where you stored the raw image (
imageContent)is defined as a parameter using the@paramsargument of thesp_execute_external_script - You need to link this script variable with a variable outside the script to get the content
- Finally, you insert the variable into the filetable
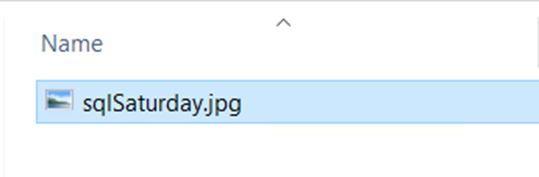
The result of the execution of the script above will be a new file in the folder, you can check by accessing \\localhost\MSSQLSERVER\RFILES\Images
Conclusion
During my research on the web, I saw many examples of R scripts dealing with the file system. These scripts which are running nowadays in SQL Server 2017 will break in SQL Server 2019 unless one of the changes explained in this article is applied.
You can choose to fix the file system permission or start to avoid direct file system access from the R script. I believe Microsoft will provide a fix for this problem soon, what probably will be an easier way to give permissions to the app container SIDs
This document contains proprietary information and is protected by copyright law.
Copyright © 2026 Red Gate Software Limited. All rights reserved


Load comments