
Azure Data Lake Store is an extensive repository in Azure Cloud which can be thought of as a store of varied forms of data such as structured, unstructured, and semi-structured data. There are different ways this data can be loaded to the data store. You can use Azure Data Factory, Azure UI, using languages such as C# or Java SDKs, etc. Once the data is uploaded to Data Lake, you can use U-SQL scripts to process that data.
When working on huge datasets, you might need more processing power and space. Azure Data lake provides an easy and simplified approach to improve development. The Azure Data Lake efficiently manages the data in HDFS (Hadoop Distributed File System). As you might be aware, HDFS brings in a lot of other benefits such as replication, scalability, and durability. This makes Azure Data Lake Store a very beneficial option when you have a huge amount of data being generated in your organization.
I’ll first explain what U-SQL is and how you can use this powerful big data query language to process the data.
U-SQL
The data being stored needs to be processed and analyzed to understand the current and future statistics by various departments within the organization. One such solution is U-SQL, Microsoft’s big data query language which unifies the benefits of T-SQL and C#. The use of C# types makes it even more powerful and easy to write. This allows the developer to conceptualize the way data will be processed right at the time of writing the query. You won’t need expertise in T-SQL or C# to write these queries, just the fundamental understanding of both these languages should be enough to move forward.
You can visualize how the ETL process works and, after you have the picture in mind, you will be able to write the U-SQL scripts easily. U-SQL helps you to extract and transform data in the required form. You can write the scripts to perform these operations and get the results/output back the way you want. U-SQL supports the extraction of values from various types of files such as txt, csv, etc., by using the concept of extractors. You can write your own extractors depending on the type of file you are using. Just like the way extractors are used to extract the data, there are outputters to output the data. The built-in extractor for tab separated files is Extractors.Tsv and for comma separated file it is Extractors.Csv. Similar to this, you can use Outputters.Tsv and Outputters.Csv depending on the format you want your output to have.
There are two ways to run the U-SQL scripts, the first is to execute the U-SQL locally and the second is U-SQL Cloud execution. When running locally, the data read and written by the scripts will be present on your local computer. On the other hand, if you are using Cloud execution, the data and script will be executed on the Azure Cloud which means you are using the Azure resources and thus paying for compute and storage resources. You may want to choose the local execution over cloud execution, especially during development, as it doesn’t cost you anything. In this article, I am going to demonstrate both the local execution path and Azure Data Lake execution. The first section of the article will show how to use Visual Studio to write and execute U-SQL scripts, and in the later section, you will see how to run the same U-SQL job using Azure Data Analytics and Azure Data Lake.
Creating and Executing the U-SQL Script Using Visual Studio
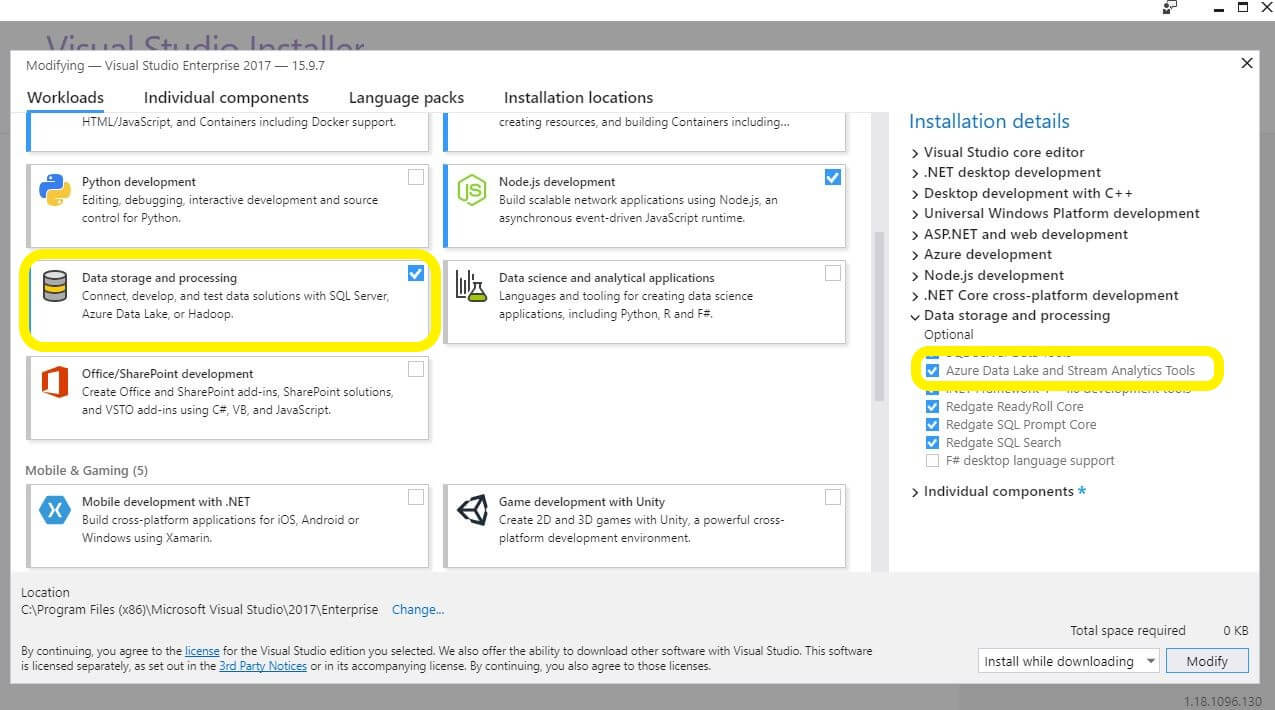
The first thing you should do is set up your environment, making sure that the proper workload is in place. Run the Visual Studio Installer. Navigate to the Workloads tab, Data storage and processing section. Select Azure Data Lake and Stream Analytics Tools. If this has not been installed, install it now.
After you have installed the Azure Data lake and Stream Analytics Tools, workload you can create a new project in Visual Studio by selecting the U-SQL option from the Azure Data Lake section.
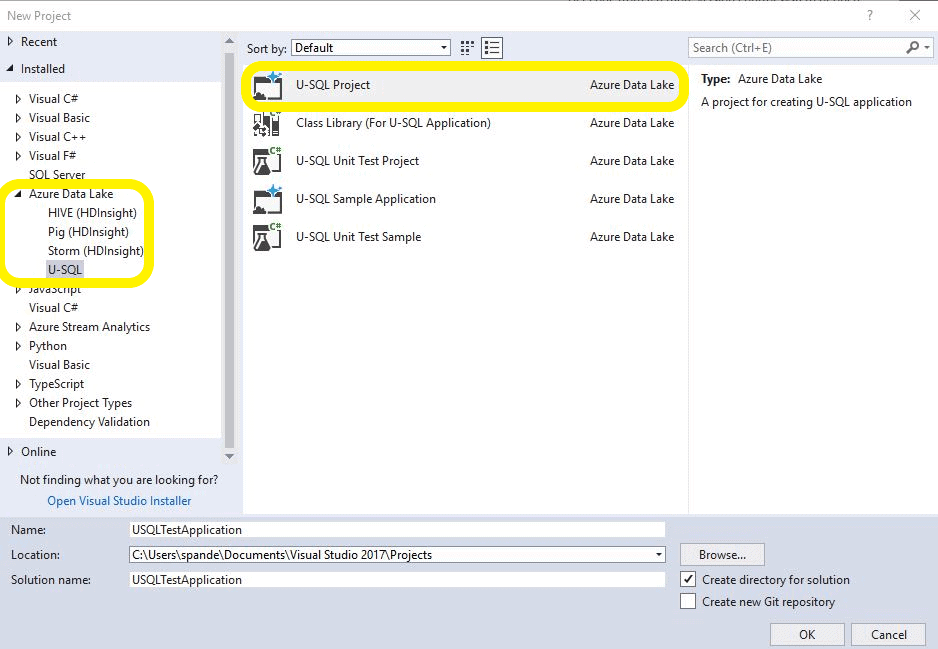
You might have noticed that there are various project options available here that provide you the flexibility to create unit test projects or class library projects. The class library projects will be used when you want to create your own USQL objects in C#, like custom outputters or extracters. For the scope of this article, select the U-SQL Project and start writing your first U-SQL script.
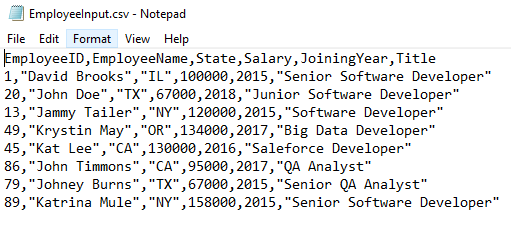
Before moving ahead and getting your hands dirty writing the U-SQL script, first, download the sample csv file. This is how the csv file looks:
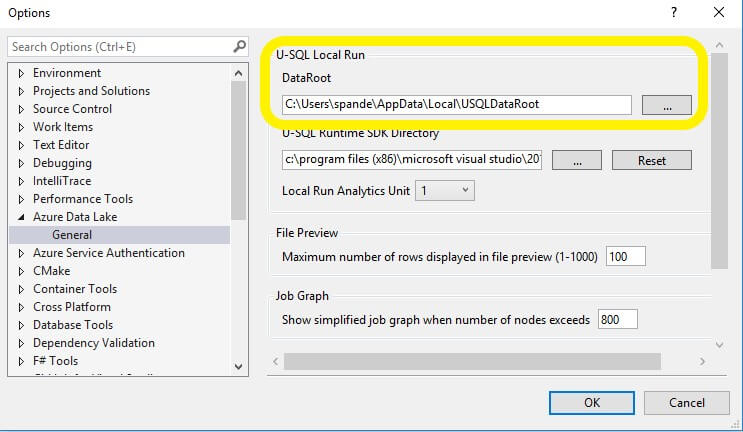
To feed the data to your script, you can add a physical path to your SQL script, but this might not be a good idea if you want to deploy this script over to the Azure Cloud later. Because any paths that exist in your local file system won’t exist in the Azure Data Lake account, this would eventually cause your script to fail. So instead of a physical path, you may want to use the relative paths which will help to run the paths locally as well as in Azure Data Lake. While running the script locally, the data file needs to be copied to an Azure Data Lake Catalogue which you can find by navigating to the Azure Data Lake Toolbar and clicking the options/settings from the menu.

The file needs to be copied to this location motioned in Data root folder path highlighted below.
After you navigate to USQLDataRoot folder, create a folder called InputFiles and copy the EmployeeInput.csv file there. It can then be referenced by the U-SQL script.
Another thing that you might notice here is that your U-SQL file comes with a C# code-behind file Script.usql.cs which can be used to add custom functions that can be used in your scripts.
The next step is to rename the Script.usql file to TestUsql.usql. Here is the code for the script:
|
1 2 3 4 5 6 7 8 9 10 11 12 13 14 15 16 17 18 |
//Extract values from input @employeedetails = EXTRACT EmployeeID int, EmployeeName string, State string, Salary decimal, JoiningYear int, Title string FROM "/InputFiles/EmployeeInput.csv" //Use in-built CSV extractor to read the CSV file and skip the first row USING Extractors.Csv(skipFirstNRows:1); //Query for calculating average on Salary field @average = SELECT State, AVG(Salary) AS AverageSalary FROM @employeedetails GROUP BY State; //specify output file and write the headers to the output file OUTPUT @average TO "/OutputFiles/AverageSalaryResults.csv" USING Outputters.Csv(outputHeader:true); |
Understanding the U-SQL Script
The first step is to extract the data from csv file and then perform the required transformations on the data. After these transformations are complete, the results are finally written to the output file. For extraction of the data, U-SQL provides various extractors depending on the file type. Here, the input file is in csv format, so a csv extractor is required. To extract the data, supporting C# types are used depending on the type of data elements.
For collecting the extracted values, the script uses a row-set variable @employeedetails. You might notice that the naming convention for variable declaration is similar to T-SQL naming convention with the @ sign.
A row-set variable @employeedetails will store the extracted values
|
1 2 3 4 5 6 7 |
@employeedetails = EXTRACT EmployeeID int, EmployeeName string, State string, Salary decimal, JoiningYear int, Title string FROM "/InputFiles/EmployeeInput.csv" |
A CSV extractor is used, and to help the extractor to detect that row headers are present on the first row of the file you have to set skipFirstNRows to 1.
|
1 |
USING Extractors.Csv(skipFirstNRows:1); |
For transformation, the SQL average function calculates the state-wide average. The results will then be collected into the @average variable.
|
1 2 3 4 |
@average = SELECT State, AVG(Salary) AS AverageSalary FROM @employeedetails GROUP BY State; |
The contents are written out to AverageSalaryResults.csv that will be created in the OutputFiles folder
|
1 |
OUTPUT @average TO "/OutputFiles/AverageSalaryResults.csv" |
Outputters.Csv is specified with the formatting using the Outputter command:
|
1 |
USING Outputters.Csv(outputHeader:true); |
Running the Script
Normally, for running any solution, you use the Start button in the Visual Studio toolbar, but, in this case, you will use a U-SQL toolbar to run the U-SQL script. By doing this, you will see the step-by-step execution of the script.
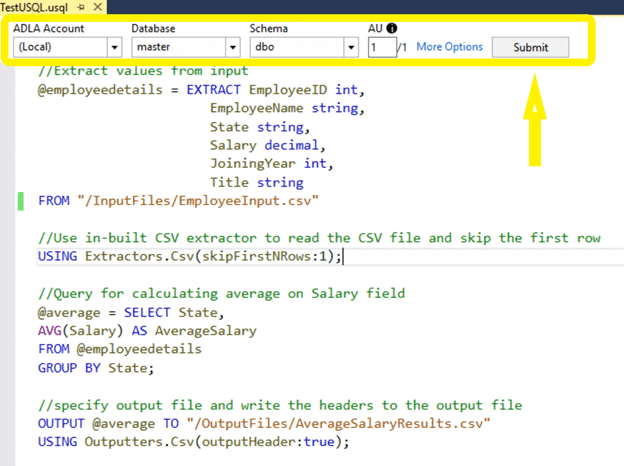
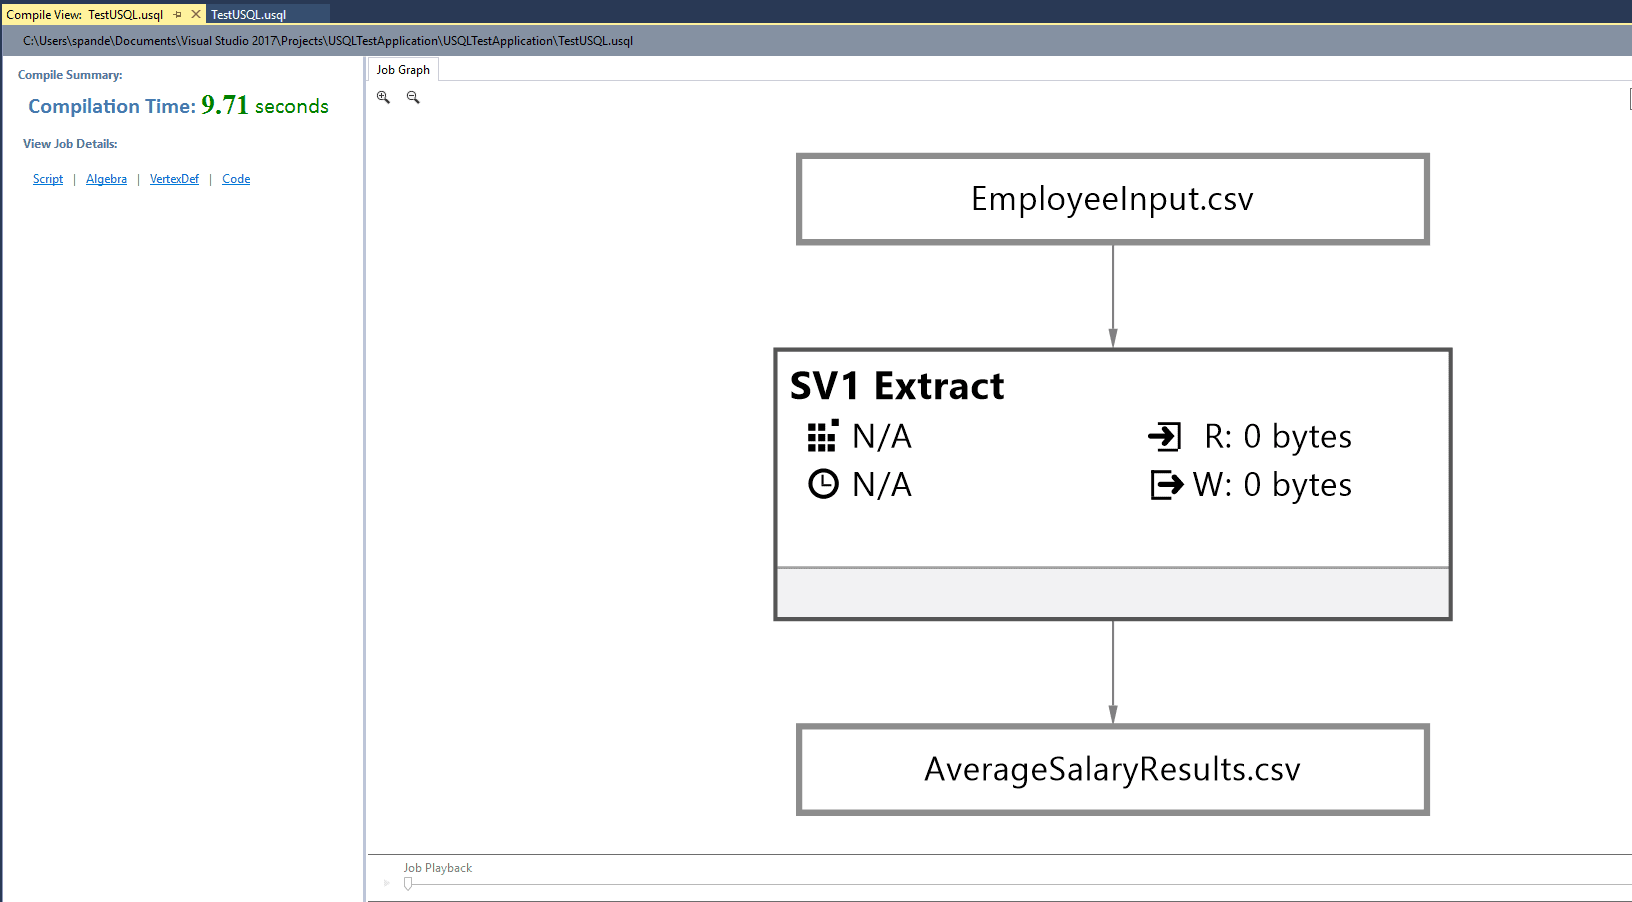
After the script runs, you will see the compile summary shown below.
By running with the Submit button, you will see detailed information about the job. For instance, the compile view will show you how the data has been processed from step1 to step n. Also, it shows the compile time details and easy to navigate to script options.
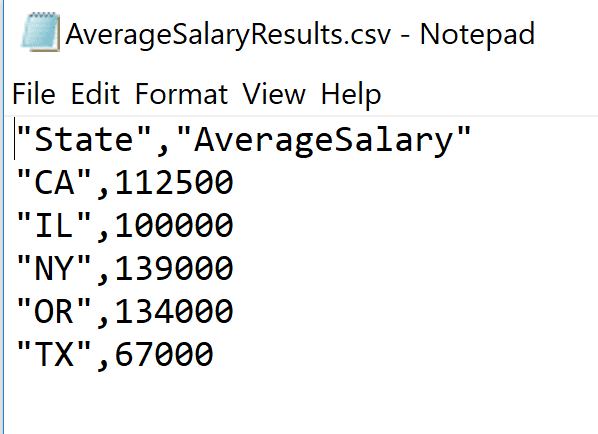
As mentioned, the output data should be written to the file /OutputFiles/AverageSalaryResults.csv. You can now go and check the same root directory where you created the InputFiles folder. You can also access the file using the local run results window just by right-clicking the output result path and selecting the Preview option to view the file.
As you can see, the resulting file, AverageSalaryResults.csv, contains the state-wide average salary as shown in the image below.
Create and Run U-SQL Scripts Using Azure Data Lake Analytics Account
Running the scripts locally is often a good option since Visual Studio doesn’t cost you anything for using the resources. In a real-life scenario, there might be many situations where you will want to use the Azure Portal to execute the U-SQL script. In the next section, I will show you how to execute a U-SQL script with an Azure Cloud account.
You will load your input file into Azure Data Lake Storage and then run a U-SQL script job using an Azure Data Lake Analytics account.
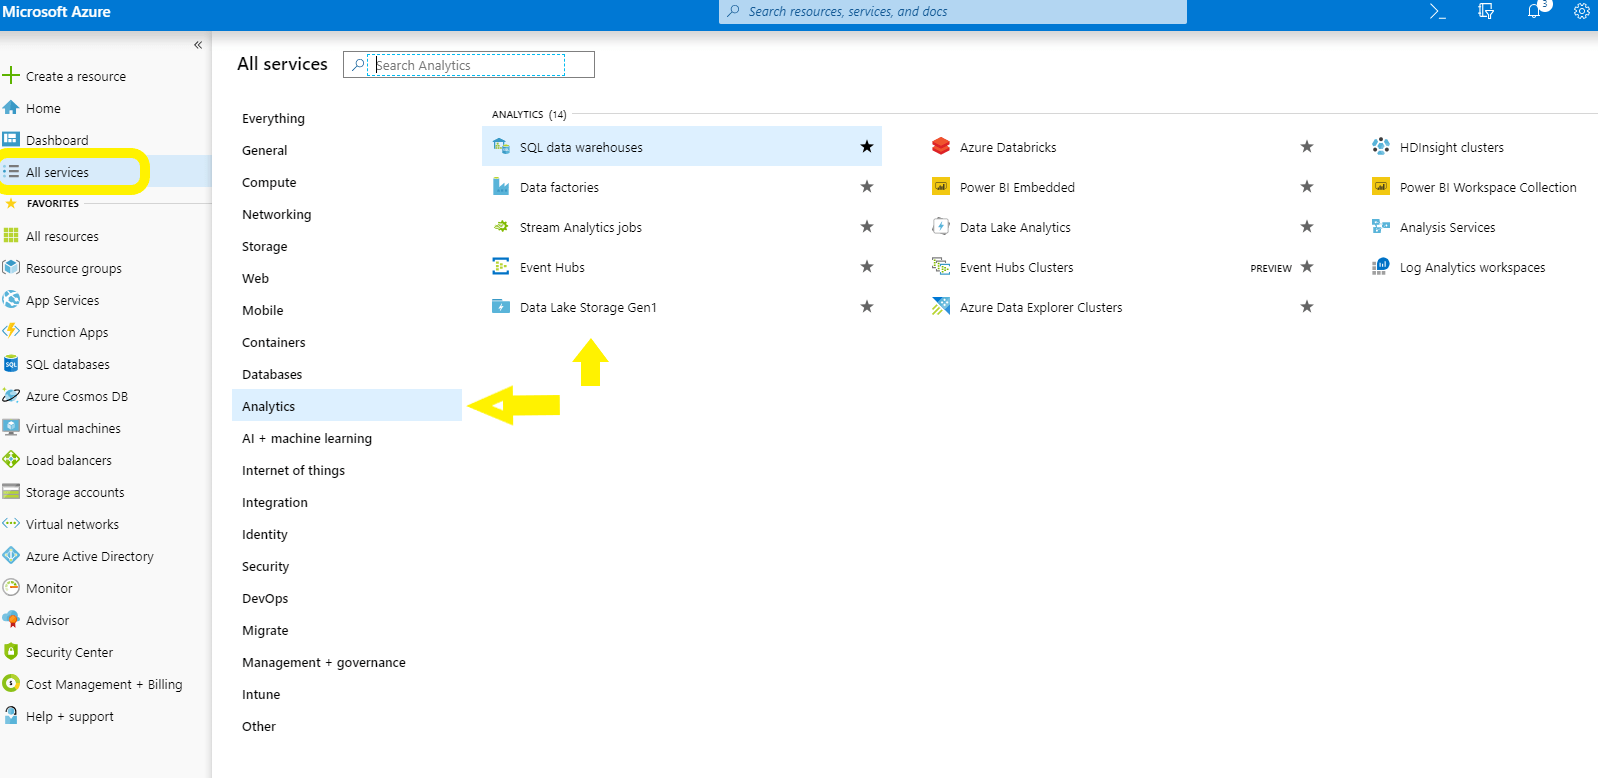
First login to Azure Portal and select the All services from the left options panel. Now choose the Analytics options. Select Data Lake Storage Gen1 and create a new Data Lake Storage account.
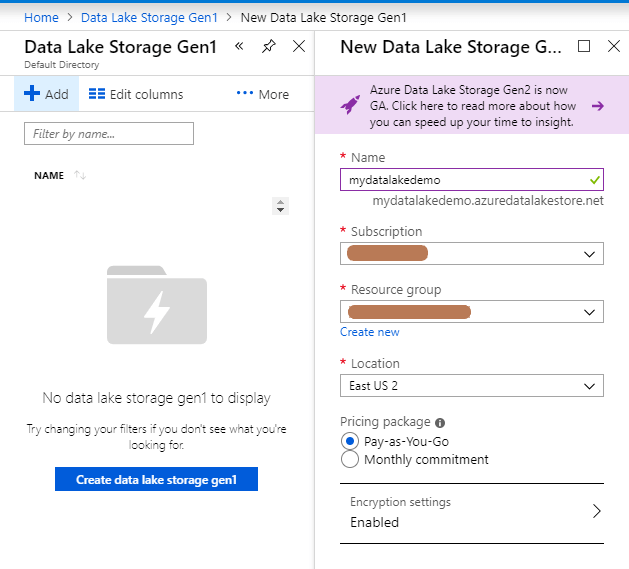
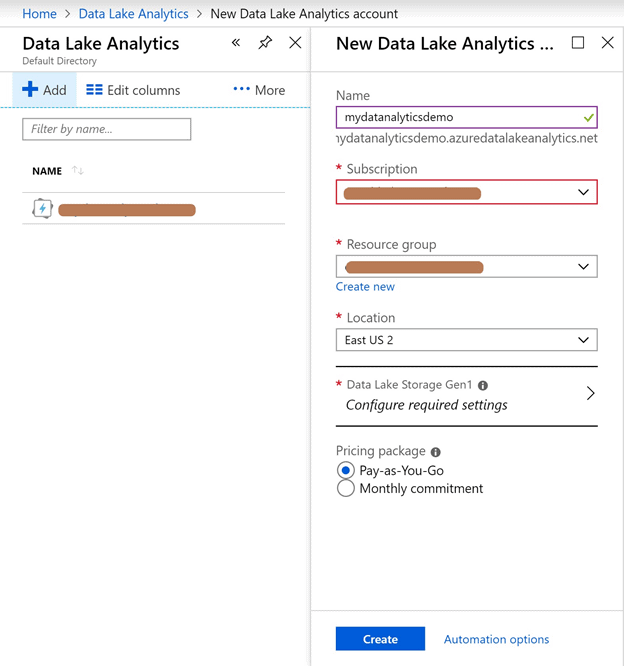
Configure your new Data Lake Storage giving it a Name, your Subscription, and a Resource Group. Note that the name must be unique across Azure. You might want to create a new Resource Group so that cleaning up the resources is easy when you are done experimenting.
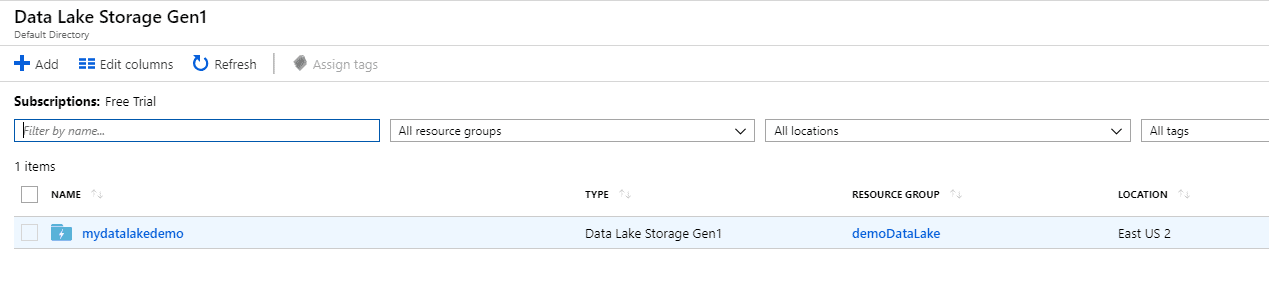
Once the Data Lake Storage has been deployed, you’ll see it in the list.
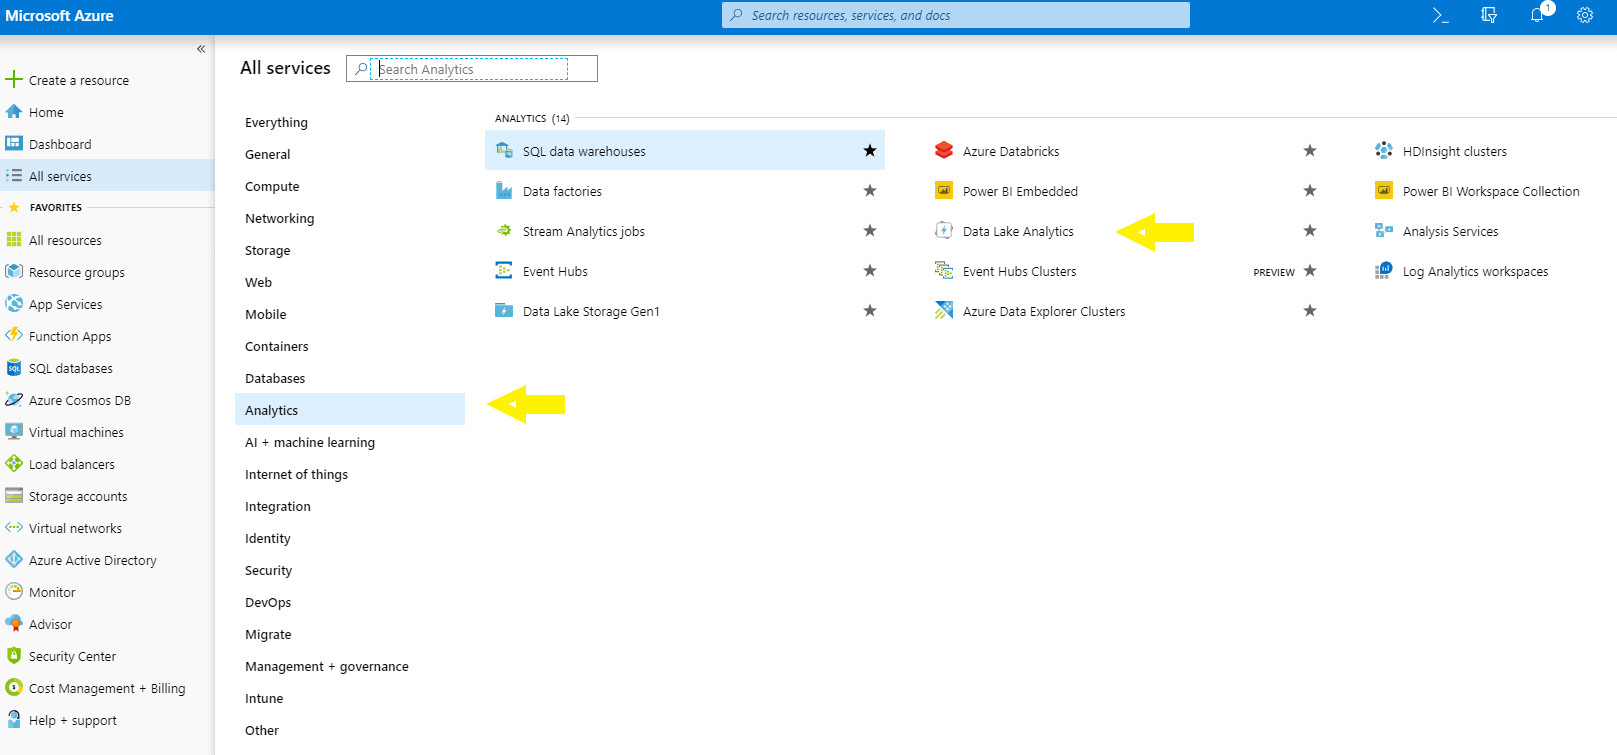
Now that the storage is created, you will learn how to create an Azure Data Lake Analytics account. From the Analytics menu, select the Data Lake Analytics option.
Now add a new Data Analytics account and select the Data Lake Storage that you just created.
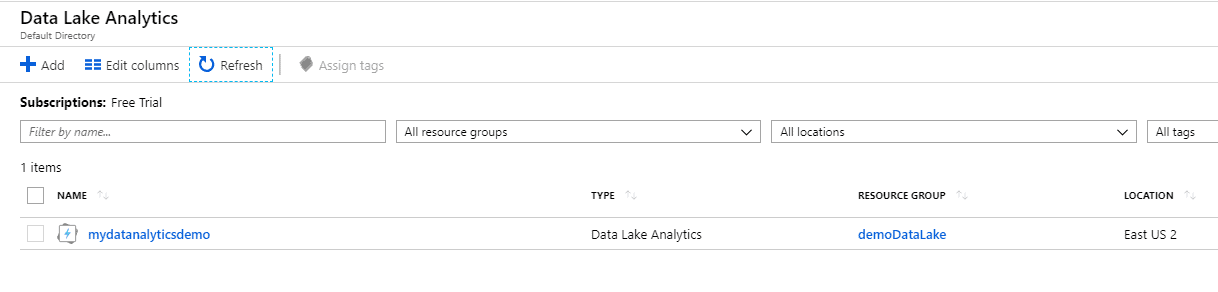
Once completed, you will notice your new account has been added to the Data Analytics section.
Uploading the Input File to Azure Data Lake Storage
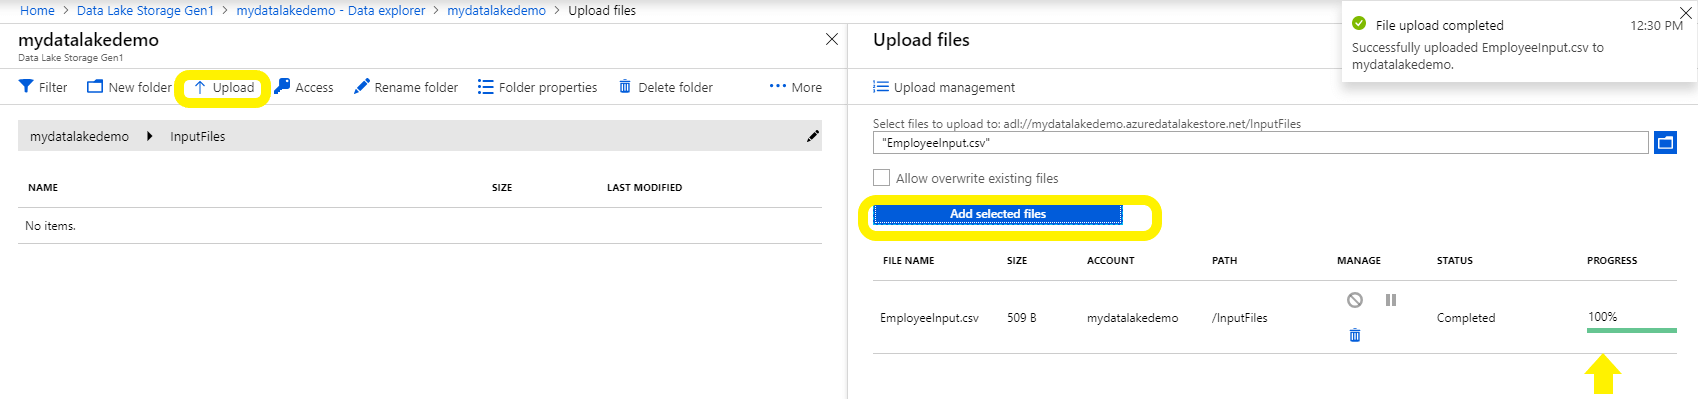
Navigate back to the Azure Data Lake Storage that you just created and click on the Data explorer option. You will notice that there are two default folders (catalog and system) already present in the storage account. Add a new folder named InputFiles to upload the file so that the experiment files are separated from system files.

After creating the new folder, click Upload and select the file and click Add selected files.
The next step is to create your first job with the Data Analytics account.
Adding a New Job to Azure Data Analytics
After you navigate to the Azure Data Analytics account and create a new job, be sure to name your new job so that you can keep track of it in the future.

Just for demonstration purposes, copy the same U-SQL script that you used in the previous section of the article. Make sure you use the correct path for the input and output files.
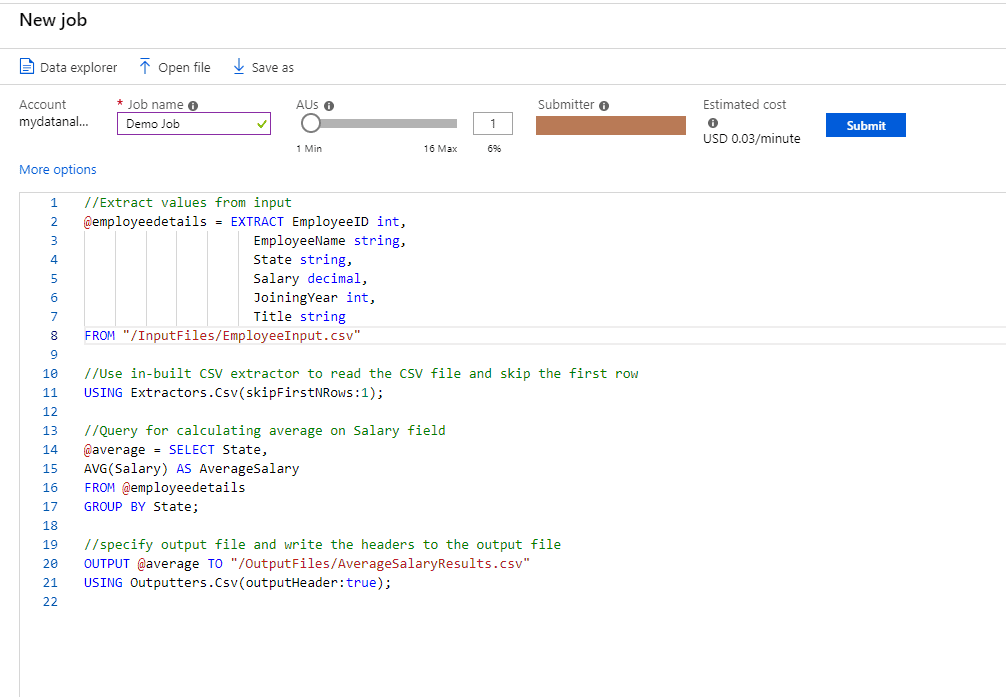
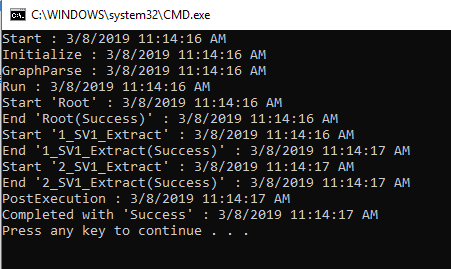
Once everything is ready, click on Submit. You will see the status of the job on the left-hand side section of the screen. This section contains all the details that you might want to know such as estimated cost, efficiency and the timestamp for all the steps involved in the process. It will take a few seconds to process the results. After every step has successfully executed, you will start seeing the Job graph. Yay! The job has run successfully, and you can see that everything has turned green.

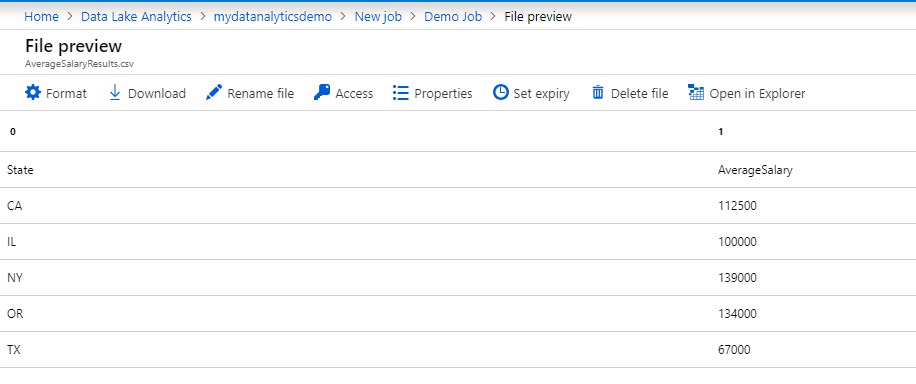
The job graph will show you the details of the job, where the input file is transformed, and that the results are written over to AverageSalaryResults.csv file. The easiest way to access the file is by clicking the AverageSalaryResults.csv in the graph.
You can now download the file and edit it as per your business requirements. There are various options that are available such as providing access to people who need to download the file which are very helpful when you need to share your results within your organization.
Whenever you need to access the output file in the future, you can simply navigate to the Azure Data Lake Storage and then access the file in OutputFiles folder that was created through the U-SQL job.

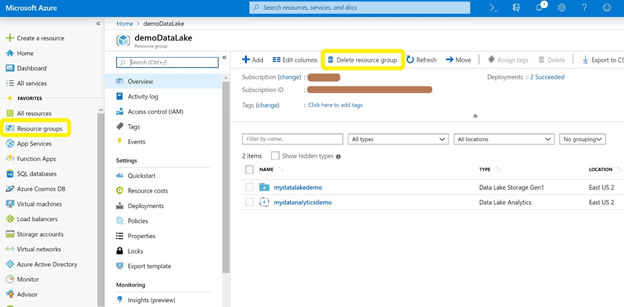
If you created a new Resource Group when you set everything up, you can delete the resources after you are done experimenting. For this, you can navigate to the Resource Group you have created and click the Delete resource group option. Make sure you have a copy of the input and output files downloaded before you delete the resource group.
Summary
In this article, I showed how you can conveniently write U-SQL scripts using SQL and C# language types and constructs. ETL is made easy with these new approaches of writing the U-SQL script and running it locally or on the Azure Cloud. You have seen how you can build your script locally using the local Visual Studio setup which is free of cost as it does not require any cloud resources. On the other hand, you can write and run the U-SQL script on the Azure Data Analytics account which works based on a pay-per-use basis, depending on resources used while running the job and for using the storage as well.
References
https://docs.microsoft.com/en-us/azure/data-lake-analytics/data-lake-analytics-u-sql-get-started
Load comments