
Table of Contents
–Introduction
–The Allow Partially Trusted Callers Attribute (APTCA)
–Custom Resources
–The .NET Security Annotator Tool
–Conclusion
Introduction
This article is the second of a series of two which introduce how Code Access Security has changed in .NET Framework 4.0. In the first article, we were introduced to the new .NET Framework 4.0 Level2 SecurityTransparence model and given some examples of its implementation. We’ve had a glimpse of the kind of changes which must be applied at assembly level in order to keep our code secure, and we have also seen that, with the new model, the host plays a principal role in defining what kind of resources can and cannot be accessed.
from what we saw previously, it seems that the new Level2 SecurityTransparence model is an all or nothing technology; If the assembly is fully trusted, all resources are available, and if it is only partially trusted, none of them are.
Thankfully, this is not the case, as we will see In this article. When protecting resources, in order to permit a more granular approach to security, an assembly can be marked with the Allow Partially Trusted Callers Assembly (APTCA) attribute. In this way, Security attributes become available at class or method level, bringing to more flexible configurations.
Another important thing we will see is that, with the Level2 SecurityTransparence model, it is now possible to easily protect resources beyond the classical CAS resources defined in the .NET Framework, and we’ll call these new kinds of resources “custom resources”. Finally, we’ll finish this investigation into the new CAS implementation by describing how a new tool, called Security Annotator tool, can help us to discover the correct way to mix the SecurityCritical and the SecuritySafeCritical attributes to implement our desired security strategy. Without further ado, let’s get started.
The Allow Partially Trusted Callers Attribute (APTCA)
The Allow Partially Trusted Callers Attribute (APCTA) is an assembly-scoped attribute which changes how the assembly responds to the Level2 Security Transparence model. When used, the following modifications take place:
- All the classes and methods inside the assembly became SecurityTransparent unless otherwise specified.
- To specify different behavior, the SecurityCritical or SecuritySafeCritical attributes can be added to desired class and/or method implementations.
The APCTA attribute is very similar to the SecurityTransparent attribute used in the previous article, which we used to force an assembly to run as SecurityTransparent. As a result, when the caller assembly tried to access SecurityCritical code, an exception was thrown (remember the PermissionSet property?) As mentioned, the main differences among the two attributes lies in the fact that, when the APCTA attribute replaces the SecurityTransparent attribute, we are able to directly specify security settings for each class or method in an assembly through the use of SecurityCritical and/or SecuritySafeCritical attributes. If the assembly were marked as SecurityTransparent, these two attributes would have no effect, due to the fact that the SecurityTransparent attribute only works at the assembly level, and no lower.
So, with the APCTA attribute we are able to:
- Elevate the permissions of an individual class or method, transforming it into a SecuritySafeCritical class or method. By doing so, we grant the class or method all permissions to access protected resources (as SecurityCritical code) while it remains visible to SecurityTransparent code. Essentially, we create a sort of bridge between SecurityTransparent and SecurityCritical code.
- Keep some classes or methods protected from the partially trusted assembly by marking them as SecurityCritical.
As we will soon see, these two features remove the supposed “all or nothing” behavior of the SecurityTransparent attribute. To prove this, we’ll start by reusing the example provided in the previous article, with some modifications:
|
1 2 3 4 5 6 7 8 9 10 11 12 13 14 15 16 17 18 19 20 21 22 23 24 25 26 27 28 29 30 31 32 33 34 35 36 37 38 39 40 41 42 43 44 45 46 47 48 49 |
[assembly:AllowPartiallyTrustedCallers()] namespace CassAssemblyInfo { /// <summary> /// Demo class /// </summary> public class AssemblyInfo { /// <summary> /// Write to the console the security settings of the assembly /// </summary> public string GetCasSecurityAttributes() { //gets the reference to the current assembly Assembly a = Assembly.GetExecutingAssembly(); StringBuilder sb = new StringBuilder(); //show the transparence level sb.AppendFormat("Security Rule Set: {0} \n\n", a.SecurityRuleSet); //show if it is full trusted sb.AppendFormat("Is Fully Trusted: {0} \n\n", a.IsFullyTrusted); //get the type for the main class of the assembly Type t = a.GetType("CasAssemblyInfo.AssemblyInfo"); //show if the class is Critical, Transparent or SafeCritical sb.AppendFormat("Class IsSecurityCritical: {0} \n", t.IsSecurityCritical); sb.AppendFormat("Class IsSecuritySafeCritical: {0} \n", t.IsSecuritySafeCritical); sb.AppendFormat("Class IsSecurityTransparent: {0} \n", t.IsSecurityTransparent); //get the MethodInfo object of the current method MethodInfo m = t.GetMethod("GetCasSecurityAttributes"); //show if the current method is Critical, Transparent or SafeCritical sb.AppendFormat("Method IsSecurityCritical: {0} \n", .IsSecurityCritical); sb.AppendFormat("Method IsSecuritySafeCritical: {0} \n", m.IsSecuritySafeCritical); sb.AppendFormat("Method IsSecurityTransparent: {0} \n", m.IsSecurityTransparent); try { sb.AppendFormat("\nPermissions Count: {0} \n", a.PermissionSet.Count); } catch (Exception ex) { sb.AppendFormat("\nError while trying to get the Permission Count: {0} \n", ex.Message); } return sb.ToString(); } } } |
With respect to the previous version of this dll library, we have inserted the following code prior to the namespace declaration:
|
1 |
[assembly:AllowPartiallyTrustedCallers()] |
… which states that our assembly is now an APCTA assembly. We have also added the following lines of code:
|
1 2 3 4 5 6 |
//get the MethodInfo object of the current method MethodInfo m = t.GetMethod("GetCasSecurityAttributes"); //show if the current method is Critical, Transparent or SafeCritical sb.AppendFormat("Method IsSecurityCritical: {0} \n", m.IsSecurityCritical); sb.AppendFormat("Method IsSecuritySafeCritical: {0} \n", m.IsSecuritySafeCritical); sb.AppendFormat("Method IsSecurityTransparent: {0} \n", m.IsSecurityTransparent); |
… which allow us to see if the GetCasSecurityAttributes method is SecurityCritical, SecuritySafeCritical or SecurityTransparent. By running the console application which we used to consume the previous assembly (and which you can download at the top of this article), we obtain the following output:
Figure 1. The console output of our modified demonstration program
Looking at figure 1, we can quickly see that:
- The assembly is running on the local computer,
- The assembly is fully trusted, but the AssemblyInfo class is transparent, and …
- Even the GetCasSecurityAttributesmethod is transparent;
- When trying to get the PermissionSet.Count value, we get an exception which reminds us that the assembly is marked with the APTCA attribute, so all of its classes and methods are SecurityTransparen, and cannot call SecurityCritical code.
At this point, it seems that we’re observing the same behavior we would have obtained by using the SecurityTransparent assembly attribute, so where is the difference? The difference lies in the fact that the APTCA attribute allow us to define the Security level of the code in a more granular way. With it, we can directly modify the Security level of the GetCasSecurityAttributes method, making it SecurityCritical or SecuritySafeCritical. At this point, we’ll choose to set it as SecurityCritical:
|
1 2 3 4 5 6 |
/// <summary> /// Write to the console the security settings of the assembly /// </summary> [SecurityCrtitical()] public string GetCasSecurityAttributes() { |
… and by running the .exe a second time, we obtain the following result:
Figure 2. Running the demonstration program with fine-grained control of method security level in place.
As you can see, the exception message has disappeared because, even if the class is SecurityTransparent, the underlying method is now SecurityCritical and can execute the PermissionSet property’s accessor. Just to demonstrate the difference between the APTCA and SecurityTransparent attributes, if we replace the following line:
|
1 |
[assembly:AllowPartiallyTrustedCallers()] |
… with:
|
1 |
[assembly:SecurityTransparent()] |
which we used in Part I of this short series (as I mentioned at the start of this section), we get a familiar output:
Figure 3. Running the demonstration program with assembly-level SecurityTransparency in place, and no fine-grained control.
As expected, the SecurityCritical attribute on the GetCasSecurityAttributes now has no effect, and the method remains SecurityTransparent.
Custom Resources
Despite the simplicity of the previous example, SecurityCritical and SecuritySafeCritical attributes can be mixed together in APCTA assemblies in very different ways to set up custom protection strategies. Rather than always invoking the same classical protected resources of a system, let’s look at an example that shows how the Level2 Security Transparence model can be used to protect any type of resource we want, thus going beyond the legacy CAS Policy model. Consider the following CasWriter class, defined inside a demo assembly named CasWriter.dll:
|
1 2 3 4 5 6 7 8 9 10 11 12 13 14 15 16 17 18 19 20 21 22 23 24 25 26 27 28 29 30 31 32 33 34 35 36 37 38 39 40 41 42 43 44 45 46 47 48 49 50 51 52 53 54 55 56 57 58 59 60 61 62 63 64 65 |
[assembly: AllowPartiallyTrustedCallers()] namespace CasWriterDemo { /// <summary> /// Write sentences /// </summary> public class CasWriter { /// <summary> /// Write a sentence to console /// </summary> /// <param id="text""></param> public void WriteCustomSentence(string text) { Console.WriteLine(text + "\n"); } /// <summary> /// Write a sentence to console /// </summary> /// <param id="text""></param> public void WriteDefaultSentence(int index) { switch (index) { case 0: WriteCustomSentence("homo homini lupus"); break; case 1: WriteCustomSentence("melius abundare quam deficere"); break; case 2: WriteCustomSentence("audaces fortuna iuvat"); break; } } /// <summary> /// Get the Security status of each method developed /// </summary> public string GetMethodsSecurityStatus() { //get the MethodInfo of each method MethodInfo[] infos = GetType().GetMethods(); StringBuilder sb = new StringBuilder(); foreach (MethodInfo m in infos) { if (m.ReturnType != typeof(void)) continue; sb.Append("\n"); sb.Append(m.Name + ": "); if (m.IsSecurityCritical) { sb.Append("SecurityCritical\n"); } else if (m.IsSecuritySafeCritical) { sb.Append("SecuritySafeCritical\n"); } else if (m.IsSecurityTransparent) { sb.Append("SecurityTransparent\n"); } } return sb.Append("\n\n").ToString(); } } } |
The class has the following three static methods:
- WriteCustomSentence(string text): this method writes a sentence, passed to it as input, to the console.
- WriteDefaultSentence(int index): This method writes a fixed sentence to the console, selecting from among three possible values. The input parameter states which sentence to write.
- string GetMethodsSecurityStatus(): This method returns, as a string, the Security status of the two previous methods.
Now we write a console application (CasWriterDemo.exe) that consumes the previous methods:
|
1 2 3 4 5 6 7 8 9 10 11 12 13 14 15 16 17 18 19 20 21 22 23 24 25 26 27 28 29 30 31 |
[assembly:SecurityTransparent()] namespace CasWriterDemo { class Program { static void Main(string[] args) { CasWriter writer = new CasWriter(); Console.WriteLine(writer.GetMethodsSecurityStatus()); try { Console.Write("Custom Sentence: "); writer.WriteCustomSentence("Barba non facit philosophum"); } catch (Exception ex) { Console.WriteLine("\n\n" + ex.Message + "\n\n" ); } try { Console.Write("Default Sentence: "); writer.WriteDefaultSentence(new Random().Next(0, 2)); } catch (Exception ex) { Console.WriteLine("\n\n" + ex.Message); } Console.ReadKey(); } } } |
We have marked the CasWriterDemo.exe assembly as SecurityTransparent because we want to test what happens when the CasWriter.dll assembly is called by partially trusted code.
Given that the CasWriter.dll is marked with the APTCA attribute, all the code inside it is SecurityTransparent, and so we should expect that the application will run correctly. We are in a situation where SecurityTransparent code calls other SecurityTransparent code, and the Level2 SecurityTransparent model certainly allows this. Running the application, we obtain the following result:
Figure 4. Testing the new demonstration CASWriterDemo program.
We see from figure 4 that, as expected, the two methods are both SecurityTransparent and the sentences are correctly written to the console. Now suppose that we want to prevent partially trusted code from being able to write a custom sentence, and only leave it with the ability to write a default sentence selected from an index. In this situation, the WriteCustomSentence therefore becomes our protected resource. To achieve this, we need to:
- Mark the WriteCustomSentence method as SecurityCritical, so that SecurityTransparent code cannot access it.
- Mark the WriteDefaultSentence method as SecuritySafeCritical.
This second modification should sound a little strange; after all, the WriteDefaultSentence method is already SecurityTransparent, and so it can be accessed by other SecurityTransparent code. Our executable is also SecurityTransparent, so it can also access the SecurityTransparent WriteDefaultSentence method. However, you should note that the WriteDefaultSentence method uses the WriteCustomSentence method after a sentence has been selected.
The overall effect is that the SecurityTransparent WriteDefaultSentence method now calls a SecurityCritical method: WriteCustomSentence. So, if we try to call WriteDefaultSentence from SecurityTransparent code, we’ll get an exception; let’s try to run our .exe without the second modification:
Figure 5. Running the demonstration .exe without marking the WriteDefaultSentence method as SecuritySafeCritical.
As we can see, the WriteCustomSentence method is now SecurityCritical, and cannot be accessed by SecurityTransparent code. You can find the exception associated with this behavior after the “Custom Sentence:” line in figure 5. To quickly recap, the WriteDefaultSentence method is SecurityTransparent, so the main method of the .exe can access it, but when WriteDefaultSentence tries to use the WriteCustomSentence method to write the output to the console, an exception occurs, as you can see after the “Default Sentence:” line in figure 5.
So, analyzing the each step involved in this demonstration, we have:
- The Main method calls WriteCustomSentence, which leads to an exception. A SecurityTransparent method cannot call a SecurityCritical method.
- (a) The Main method calls WriteDefaultSentence, which is successful. A SecurityTransparent method can call a SecurityTransparent method.
- (b) The WriteDefaultSentence method calls WriteCustomSentence, which leads to an exception. A SecurityTransparent method cannot call a SecurityCritical method.
If, as suggested in the second modification above, we mark the WriteDefaultSentence method as SecuritySafeCritical, we solve this potential problem. SecuritySafeCritical code is designed to act as a permission bridge, in that it can be called by SecurityTransparent code and it can, in turn, call SecurityCritical code. So, with this modification, we will create a bridge between the SecurityTransparent code (the Main method) and the SecurityCritical code (the WriteCustomSentence method). If we now run our .exe, we see this result:
Figure 6. Using SecuritySafeCritical code to bridge the permission gap between the Main method and the WriteCustomSentence method.
… Which is exactly the result we want to achieve. We have protected the WriteCustomSentence method (our custom resource) from the partially trusted assembly (which is SecurityTransparent code) while allowing the same assembly to access the WriteDefaultSentence method!
Inheritance and Override Rules
We’ve seen how resource protection works when one method calls another, but the security checks performed in these situations are not enough to achieve a complete set of security instruments. For example, we know that object oriented languages, such as those provided with .NET, allow inheritance and the overriding of classes, methods and types. So we need to protect those same objects with a derived version of the same inheritance structure. The new .NET Framework 4.0 Code Access Security system manages this need by using the following two rules:
- Derived types must be at least as restrictive as base types.
- Derived methods cannot modify the accessibility of their base methods.
Derived methods are SecurityTransparent by default and so, if the base method is not SecurityTransparent, the derived must be marked appropriately to prevent violating the first inheritance rule.
To demonstrate the two rules, we’ll write a CasWriter2 class that inherits from the CasWriter class, and will have a WriteCustomSentence method that inherits from the base WriteCustomSentence method (which we mark as virtual). The code for this will be:
|
1 2 3 4 5 6 7 8 9 10 11 12 13 14 15 16 17 |
namespace CasWriterDemo { /// <summary> /// Write sentences /// </summary> public class CasWriter2 : CasWriter { /// <summary> /// /// </summary> /// <param id="text""></param> public override void WriteCustomSentence(string text) { base.WriteCustomSentence(text); } } } |
To demonstrate the first inheritance and override rule, we’ll set the CasWriter class as SecurityCritical:
|
1 2 3 4 5 |
/// <summary> /// Write sentences /// </summary> [SecurityCritical()] public class CasWriter |
… and, in the main method of the CasWriterDemo.exe assembly, we’ll substitute the CasWriter object with the CasWriter2 object:
|
1 2 3 4 |
static void Main(string[] args) { CasWriter writer = new CasWriter2(); Console.WriteLine(writer.GetMethodsSecurityStatus()); |
So, we’ve tried to derived the SecurityTransparent CasWriter2 class from a SecurityCritical CasWriter class, but, with the first rule in place, this is not possible because we have tried to create a SecurityTransparent (low protected) type from a SecurityCritical (high protected) type. As a result, if we run our .exe we obtain:

Figure 7. An exception thrown from trying to derive a SecurityTransparent type from a SecurityCritical one.
As expected, a type load exception is thrown, stating that an inheritance security rule has been violated. Notice that the exe stop working as well; because the exception is detected when the assembly tries to load the CasWriter2 type, it’s not possible to handle the exception through code.
To make this as clear as possible, the following table sums up the inheritance rules for classes:
|
Base Class |
Derived Class |
|
Transparent |
Transparent |
|
Transparent |
SafeCritical |
|
Transparent |
Critical |
|
SafeCritical |
SafeCritical |
|
SafeCritical |
Critical |
|
Critical |
Critical |
To demonstrate the second rule, we’ll remove the SecurityCritical attribute from the CasWriter class. In this case, the first rules is no longer violated as both classes are SecurityTransparent. However, there is a second issue to consider; we are trying to override SecurityCritical code (the base WriteCustomSentence) with what is now SecurityTransparent code (the derived WriteCustomSentence), which is not allowed by the second rule. Remember that the derived method is SecurityTransparent by default, and we haven’t specified any other security attribute for it. Running the .exe, we therefore get:
Figure 8. Our new demonstration program violating the second Inheritance and Override CAS rule, and throwing an exception.
As expected, an exception is thrown saying that there is a violation on a security rule when overriding the WriteCustomSentence. I’ll leave it to you to mark the WriteCustomSentence method of the CasWriter2 class as SecurityCritical and verify that, in this last situation, all goes well. To try it, you can download the supporting zip file at the top of the page, which contains the entire example provided in this article. Before we finish looking at methods, let’s just confirm their inheritance rules:
|
Base Method |
Derived Method |
|
Transparent |
Transparent |
|
Transparent |
SafeCritical |
|
SafeCritical |
Transaprent |
|
SafeCritical |
SafeCritical |
|
Critical |
Critical |
I’ll end this section by pointing that the same rules apply when we develop a class that implements an interface. The implemented method must respect the inheritance rules (the same as those in the table above) in relation to the attributes set for the interface members.
The .NET Security Annotator Tool
In the previous example we saw how to mix the SecurityCritical and SecuritySafeCritical attributes to protect the WriteCustomSentence method from partially trusted code. Admittedly, that example was very easy and to set the correct attributes was a trivial task. Things are not so easy with more complex assemblies, and there is a risk of creating confusion as you try and unravel the security dependencies. This is precisely why Microsoft’s .NET Framework 4.0 provides a very useful tool, named .NET Security Annotator (SecAnnotate.exe), which can help developers to identify the correct attributes to use in theirs code. You can find it in the Microsoft Windows SDK version 7.0A, under the \bin\NETFX 4.0 Tools folder.
The SecAnnotate.exe tool browses an assembly to identify what modifications have to be made to avoid security exceptions when the assembly runs, and checks are made in several passes. In the first pass, the tool discovers what modifications must be performed on the assembly as it initially exists. If it detects that some code must be marked as SecurityCritical or SecuritySafeCritical, it performs a second pass, applying, at run time, the modifications discovered to be necessary in the first pass. The tool then makes a third pass, and if it detects that new modifications are needed as a result of the previous changes, it then makes these modifications in a fourth pass . The process repeats itself (scan – modify – scan – modify…), and ends when the tool doesn’t find anything left to change. At the end of the execution, SecAnnotation.exe generates an output report that contains the result of the analysis performed in each step.
There are two things you should bear in mind:
- If SecAnnotate.exe discovers that a method should be marked as either SecurityCritical or SecuritySafeCritical, it prefers the first attribute, it being a more secure option. Sometimes developers need to manually select the SecuritySafeCritical attribute instead of SecurityCritical, and this could generate problems during the following passes. We will see an example of what I mean in a moment. To avoid this, the SecAnnotate.exe tool comes with the /p:<n> command-line switch, which can be used to set the maximum number of passes that can be performed prior to stopping the execution and generating the output. In terms of a more tightly-controlled process which allows you to take direct and fine-grained control of your code security, It would be better to:
- run the tool with the /p:1 command-line switch so that, at each pass, a new output is generated;
- manually perform the desired modifications to the assembly on the basis of that output,
- recompile your assembly and
- re-run SecAnnotate.exe with the /p:1 command-line switch to obtain a new output, and repeat. The procedure ends when no other modifications are needed, as when you allow SecAnnotate.exe to run without human intervention.
- To perform the check, the SecAnnotate.exe tool has to verify how the assembly’s methods behave in relation to the methods that they call. Usually, assemblies use the .NET Framework base classes, and so checks regarding the attributes needed to call their methods can be performed. If an assembly uses other (third party or your own) assemblies, different from those present in .NET Framework base classes (and, in general, from those contained in the Global Assembly Cache), the path to them must be specified Using the /d:<directory> command-line switch.
With all that in mind, if we return to our CasWriter.dll assembly, remove the security attributes which we set in the previous section and launch the following command from the console:
|
1 |
SecAnnotate.exe CasWriter.dll |
…we will obtain the following output:
Figure 9. Running SecAnnotate.exe against our demonstration program.
The tool doesn’t find anything to annotate, because the assembly is made up of SecurityTransparent code that calls other SecurityTransparent code (specifically, those code of the .NET Framework base classes which we used).
But, if we want to protect the WriteCustomSentence method by marking it as SecurityCritical (as we did earlier), and we launch the previous command on the newly compiled assembly, we get a different result:
Figure 10. Getting SecAnnotate.exe to do some work on our demo .exe.
We can see that the tool found three necessary annotation and the jobs were completed in two passes. Moreover, it generated a detailed report titles TransparencyAnnotations.xml (we can override the name with the /o:<filename.xml>command-line switch), the contents of which looks like this:
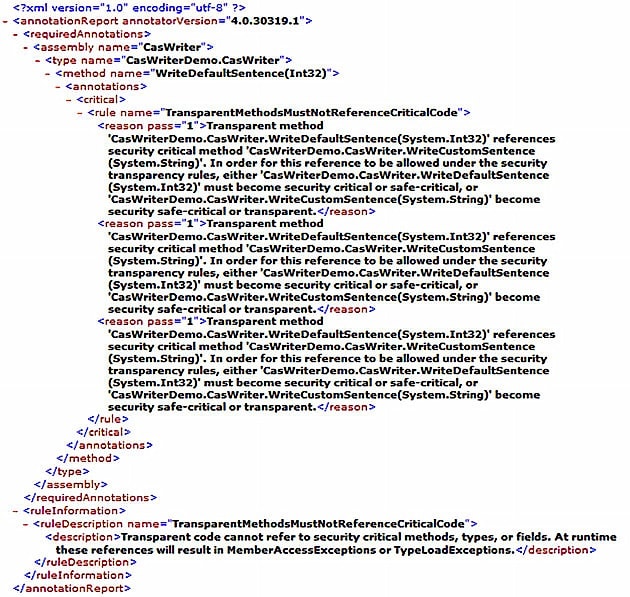
Figure 11. The contents of TransparencyAnnotations.xml
We can quickly see that the SecAnnotation.exe tool made an annotation in the WriteDefaultSentence method, for three identical reasons. The rule violated is given by TransparentMethodsMustNotReferenceCriticalCode, as we expected. The three reasons are all identical because the SecurityTransparent WriteDefaultSentence method contains three calls to the SecurityCritical WriteCustomSentence method (inside the switch block of code).
Another important aspect of this report to take note of is that the tool suggests four different ways to avoid the annotation:
- WriteDefaultSentence must become SecurityCritical
- WriteDefaultSentence must become SecuritySafeCritical
- WriteCustomSentence must become SecuritySafeCritical
- WriteCustomSentence must become SecurityTransparent
If they could all, separately, entirely resolve the problem, we know that, for the goals we have in mind, the only available solution is to make WriteDefaultSentence SecuritySafeCritical, in order to grant access to it from SecurityTransparent code, while leaving the WriteCustomSentence method protected. We also know that the tool, after the first pass, applies the rule that it consider to be preferable as it performs its second pass, and that it prefers changes that bring about the best possible security situation.
In our example it might have chosen option number 1 and, as a result, the assembly would become fully SecurityCritical, and thus completely protected from SecurityTransparent code. This represents the more secure situation. However, we know that, for our goals, the solution that we need is number 2. Indeed, applying option number 1 instead of number 2 could bring about another round of checks that could have a totally different output, sending SecAnnotate.exe further and further away from our desired outcome. So, as I mentioned, we should probably use the tools with the /p:1 command-line switch, and make the changes manually.
We’ll end this section by running the SecAnnotatio.exe tool against the console application, just to see what happens. To do so, we need to specify the location of the CasWriter.dll assembly from which CasWriterDemo.exe depends. As seen earlier, to do so, we must use the /d command-line switch; assuming that the CasWriter.dll is contained in root of the D:\ drive, we need to run the following command:
|
1 |
SecAnnotate.exe /d:D:\ CasWriterDemo.exe |
The output that we get is seen below:
Figure 12. Running SecAnnotate.exe against our console application.
We can quickly see that the tool has found only one annotation, which we can see in the accompanying report:
Figure 13. The SecAnnotate.exe report for our console application.
The annotation is related to the Main method, which is SecurityTransparent and is trying to access SecurityCritical code. Note that this is not an exception, but rather the behavior that we wanted to implement in our CasWriter.dll to protect WriteCustomSentence from SecurityTransparent code (such as the Main method). So, when using this tool, analyze the output generated with great care and attention.
Beyond all this, there is one last important point to consider. We have written two assemblies, CasWriterDemo.exe and its related CasWriter.dll assemblies, and if we want to use the SecAnnotation.exe tool to check the CAS rules for the entire solution, we simply cannot do it in a single step. In the last example, we analyzed the CasWriterDemo.exe assembly by specifying its referenced CasWriter.dll assembly. However, from the output that we obtained, it’s clear that the checks were only made for the CasWriterDemo.exe assembly and how it behaves in relation to its dependent CasWriter.dll assembly – No check was made for the CasWriter.dll assembly (If you didn’t notice it at the time, the three annotations related to the CasWriter.dll assembly are not present in the later report).
The point I’m trying to make is that, if you want to check your entire solution, you need to perform the check for each assembly, one at a time. Unless you have specific security goals in mind, the best way seem to be to check the dependent assembly first, and then its immediate callers.
Conclusion
We’ve covered a huge amount of ground in this article (much of which was set up and based on material in my previous CAS article, which you should read if you haven’t done so already). To start with, we’ve seen how to use APTCA, SecurityCritical and SecuritySafeCritical attributes to set up a protection strategy when an assembly must be callable by partially trusted code. We have also seen that the work that has to be done to implement security strategies within this new model is not as easy as we might like, but, fortunately, the new SecAnnotation.exe tool can give us a great head start.
Let’s end this article with some reflections about how to set up a successful protection strategy when working with the new Level2 SecurityTransparence model. We can define two different situations which we are likely to find ourselves in:
- Our assembly must protect the underlying dependent assemblies (for example, the .NET Framework base classes). In this case, we need to maximize the amount of SecurityCritical code. In this way, we are able to protect all the dependent assemblies from partially trusted (SecurityTransparent) assemblies with an impenetrable “wall”.
- Our assembly will be protected by its potential callers. If our assembly needs to be accessed by partially trusted assembly, we need to maximize the amount of SecurityTransparent code. If the assembly doesn’t make use of protected resources, we only need to mark it as SecurityTransparent, otherwise, we must use the APTCA attributes and try, method by method, to maximize SecurityTransparent code and minimize SecuritySafeCritical code.
Of course, it isn’t so easy to guess the entire spectrum of possible scenarios and verify if the two rules above are applicable to all of them, so those two must be considered as general guidelines instead. In any case, we shouldn’t enter too deeply into this particular subject at this stage; partly because it is too complex to analyze succinctly, and partly because the Level2 SecurityTransparence model is, at the time of writing, a very new, and not yet sufficiently documented technology. I’d suggest that you follow the .NET Security Blog, which will surely, over time, bring you up-to-date about the new Level2 SecurityTransparence model and its implementations.
This document contains proprietary information and is protected by copyright law.
Copyright © 2026 Red Gate Software Limited. All rights reserved
Load comments