
Contents
This is the third installment of the TortoiseSVN and Subversion Cookbook series, a collection of practical recipes to help you navigate through the occasionally subtle complexities of source control with Subversion and its ubiquitous GUI front-end, TortoiseSVN. So far this series has covered:
- Part 1: Checkouts and commits in a multiple-user environment.
- Part 2: Adding, deleting, moving, and renaming files, plus filtering what you add.
In the previous installment in this series, we focused on the minutiae of file management: adding, deleting, renaming, moving files and folders, with major emphasis on fine-tuning additions. This part now turns to file macro-management. Akin to the economic analogy of macro-economics dealing with forces that drive the economy as a whole, recipes in this part consider repositories and projects.
Reminder: Refer to the Subversion book and the TortoiseSVN book for further reading as needed, and as directed in the recipes below.
There are only two key terms you need to know to get the most from this part (from Basic Concepts in the TortoiseSVN book):
The repository is Subversion’s “central database which contains all your version-controlled files with their complete history.”
Your working copy is what you have checked out from the repository onto your local machine, regardless of whether this is the whole tree or a single folder, on the trunk or on a branch. Also see What is a working copy on StackOverflow to really get a grasp on this, if you haven’t already.
Furthermore, at the time of writing release 1.7 of Subversion (and the corresponding TortoiseSVN 1.7) is still fresh, barely a couple weeks in the wild. So starting with this part 3 article, I point out some notable improvements with this new release, where applicable.
Putting Things In
Setting up a new repository
You rarely need to set up a repository: Even when one is required, your system administrator is likely to want to do it. However, I am sure you will agree it is a crucial step so it would be remiss of me to omit a reference to this topic, however brief. Creating a repository is as simple as invoking the TortoiseSVN >> Create Repository here command (see Repository Creation in the TortoiseSVN book). It immediately starts to get a bit more involved though: your next step is to decide on your repository layout, i.e.do you want trunk, branches, and tags to be the absolute top-level in the repository, or do you want to subsume them within each project (see Repository Layout in the TortoiseSVN book).
Version 1.6
You must create the structure yourself.
Version 1.7
With version 1.7, TortoiseSVN will now add your trunk, branches, and tags directory structure for you, if you so wish. Select Create folder structure (see Figure 3-1) and the three standard folders are generated automatically, saving you several steps.
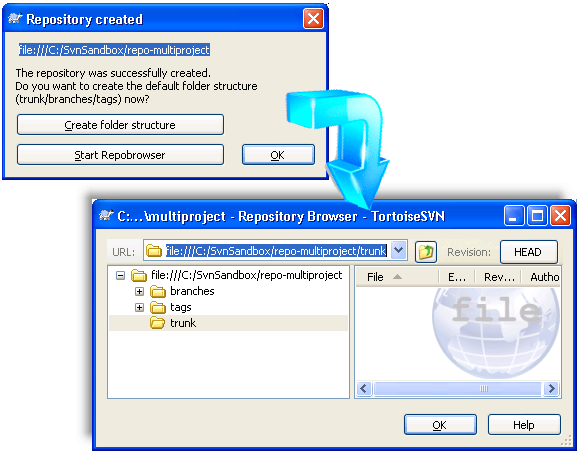
Figure 3-1 TortoiseSVN 1.7 now provides one-click convenience to setup the canonical folder hierarchy at the top of your repository.
The final step is to provide an appropriate access method to your repository. The simplest method is local access (via the file:// prefix protocol), but this is intended for local, single-user access only. As soon as you want a repository to be used by several people you must set up a proper server that uses either http:// or svn:// or their encrypted counterparts, https:// or svn+ssh:// respectively – see Accessing the Repository in the TortoiseSVN book. Do not be awed by the daunting task of setting up a server. Quoting the TortoiseSVN book:
In the early days of Subversion, setting up a server required a good understanding of server configuration and in previous versions of this manual we included detailed descriptions of how to set up a server. Since then things have become easier as there are now several pre-packaged server installers available which guide you through the setup and configuration process.
Grafting a subtree or importing a whole tree into a repository
Whether you want to start a whole project tree entirely, or just add a subtree to an existing project, the steps are essentially the same. In the case of a new project, you have to be familiar with the repository layout, though: unless your system administrator has set them up you will need to create the top-level trunk, branches, and tags folders for the new project before proceeding with this recipe. See the Setting up a new repository recipe for more.
There are two ways to import a file tree into the repository: the one-step import and the import-in-place techniques. The table shows that the latter is generally more advantageous-for each row, the item marked in green is better.
|
Item |
Description |
One-shot import |
Import-in-place |
|
1 |
Use global ignore settings to filter what to import |
Yes |
Yes |
|
2 |
Select specific files and folders to import |
No |
Yes |
|
3 |
Existing subtree becomes part of the working copy |
No |
Yes |
|
4 |
Easier to identify the path with respect to the repository |
No |
Yes |
|
5 |
Needs subsequent checkout (or update) to become part of working copy |
Yes |
No |
|
6 |
Needs containing folder created in the repo-browser |
No |
Yes |
The one-step import is so-called because of the narrow interpretation of the need: yes, it takes only a single step to import to the repository, but almost always the true goal is to import to the repository and have a working copy of what you just imported available to use. This morphs the one-step approach into a four-step task:
- Remove all files which you do not want to import (operate on a copy of the directory if you do not want to lose those!). This import technique isn’t versatile enough to be selective; it will include all objects in the tree (item 2 in the table).
- Invoke TortoiseSVN >> Import to import into the repository. Item 4 is relevant here: it is easy to lose your subtree root because the root itself is not imported; you must include that in the target URL.
- Delete the original subtree after successful importation. (Per item 3, this subtree is no longer needed.)
- Use SVN Checkout (if a new project) or SVN Update (if part of an existing project) to update your working copy to include the newly imported files.
The import-in-place technique is more flexible yet requires the same number of steps:
- Create a new folder in the repo-browser matching the name of the root folder of your subtree to import.
- Use SVN Checkout to checkout the new, empty folder right on top of your existing folder. TortoiseSVN will warn you that the folder is not empty, but you knew that already.
- Finally, invoke SVN Add on the newly versioned folder. The Add dialog lists all the unversioned objects, allowing you to select or deselect what you wish.
- Commit everything you have added.
See Importing Data Into A Repository in the TortoiseSVN book for more detail.
Taking Things Out
Copying a working copy without the .svn files
Version 1.6
Browse to the folder you want to export, and then invoke the (TortoiseSVN >> Export) command to export the subtree rooted at that folder. TortoiseSVN opens a standard folder navigator to let you select a destination (Figure 3-2), along with a couple options. You can optionally specify whether to include any unversioned files and to include externals. (If instead you want to convert your working copy to be unversioned-i.e. remove the .svn files/folders rather than make a copy without them-see the next recipe.)
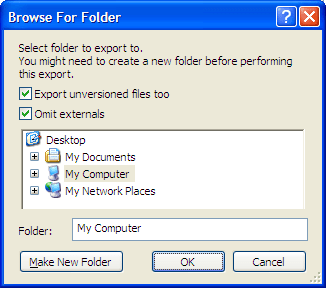
Figure 3-2 Folder navigator for exporting a working copy
Notice that the folder browser opens at the top of your file system tree so it may take you quite a few clicks to drill down to your destination folder. Alternately you can use drag-and-drop convenience instead of the Export command and the only thing you need give up is the choice to omit externals.
To do this, open Windows Explorer or equivalent so that you have access to your source location and your destination location at the same time so you will be able to drag from the source to the destination. Typically you could do this by enabling the folders pane and expanding the folder structure to expose your destination while setting the files pane to show your source. Alternately, you could use two separate Explorer windows, one for source and one for destination.
Select one or more folders from your source and drag them over the target by depressing the right-mouse button rather than the left. Upon releasing the mouse button, besides the standard copy, move, and shortcut buttons, the context menu will include two Subversion commands for exporting, as shown in Figure 3-3.
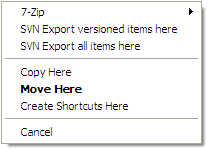
Figure 3-3 The context menu resulting from a drag-and-drop operation.
Those two choices are the equivalent of selecting or unselecting the Export unversioned items too checkbox above.
Version 1.7
The metadata storage within your working copy was substantially revised in version 1.7-there is but a single .svn directory in your root checkout folder. Thus it is a trivial task to copy the working copy to an unversioned tree: You just need to copy the tree through conventional means (Windows Explorer) and then delete that one .svn folder from the copy.
Converting a working copy to an unversioned tree
Version 1.6
A working copy in TortoiseSVN 1.6 is a subtree that is peppered with .svn files allowing TortoiseSVN to keep track of your interaction with the repository. If you want to strip out all these Subversion artifacts use the TortoiseSVN >> Export command, exporting the target folder to itself. TortoiseSVN will recognize what you are doing and prompt to ensure that you want to make the working copy unversioned.
A slightly better way requires installing a simple shell command with a registry tweak to actually give you a Delete SVN choice on the context menu. This saves the completely redundant step with the export command of having to navigate to the folder you already started from. See Jon Galloway’s Remove SVN Folders hook.
Version 1.7
The metadata storage within your working copy was substantially revised in version 1.7-there is but a single .svn directory in your root checkout folder. Thus it is trivial to convert the working copy to an unversioned tree by simply deleting that one .svn folder.
Unversioning specific files
There are two easy ways to unversion a file, i.e. to delete it from the repository but to keep your local copy. The first method does only that; the second method has a side effect of modifying your ignore list.
Method 1: Select the files in Windows Explorer. Hold down Shift as you right-click to open up the context menu. When you open TortoiseSVN’s menu, it reveals additional commands on this extended version, including Delete (keep local). (See Ignore files which are already versioned in the TortoiseSVN book.)
Method 2: Select the files in Windows Explorer. Select TortoiseSVN >> Delete and add to ignore list >> file.ext or *.ext. (Note that in version 1.6 it was Delete and add to ignore list.)
Whichever leaf action you choose, the specific file you started with is marked for deletion from the repository. Once you commit the deletion, the file will remain in place, but now be unversioned. The side effect of this command is that it updates the svn-ignore list of the parent directory, with either the specific file name, or the file’s extension. Once this change is committed, the now-unversioned file will be ignored by TortoiseSVN, showing no icon overlay.
Note that the svn-ignore list applies only to unversioned files; thus, if you selected to ignore by extension and you have other versioned files in the same directory with the same extension, they will be unaffected by the ignore directive. Any new files you create with the extension will be ignored by TortoiseSVN.
Unversioning all files of a specific type (or other criteria)
This recipe is essentially the same as the last, except for the first step. Instead of just opening Explorer, do a search in explorer to find all the files of interest. Select all ‘found’ files (Control-A) then proceed as above. Here, the TortoiseSVN leaf choice will say “Delete and ignore n items by name” and “Delete and ignore n items by extension”. Upon selecting it, all n files will be marked for deletion and the parent directory of each will have an entry added to its svn-ignore list. Thanks to this StackOverflow question for inspiration for this recipe.
Removing your working copy
Sometimes you just want to start over. Or sometimes (though rarely:-) you actually finish something and want to cleanse the project from your disk to make room for the next one. Cleaning out/erasing/removing/eradicating (pick your favorite term) your working copy-all the files you checked out and worked on from Subversion-is about the easiest task to do in all of Subversion because it does not require the use of anything in Subversion! So here is the entire recipe:
Just delete the file tree from your disk with Windows Explorer or equivalent.
Doing a sparse checkout
Be glad you live in a time where TortoiseSVN is at version 1.7 or later. Be very, very glad! Figure 3-4 shows a section of the 1.6 manual describing how to assemble a sparse working copy from selected pieces. It is reminiscent of trying “…to construct a mnemonic memory circuit using stone knives and bearskins”. (You can find previous versions of the manual at https://sourceforge.net/projects/tortoisesvn/files/.)
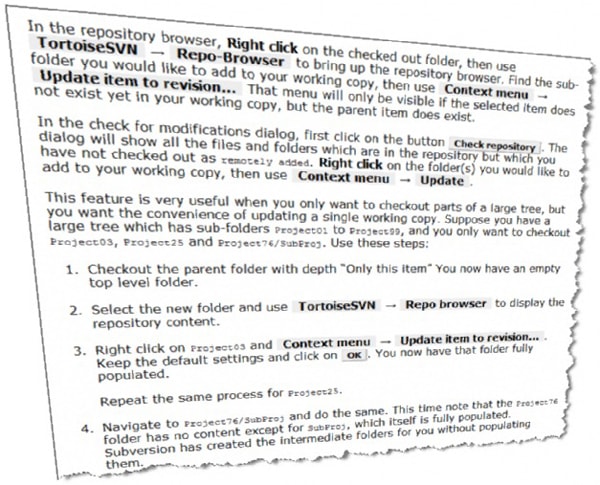
Figure 3-4 The tedious process of doing a sparse checkout prior to TortoiseSVN 1.7
One of the great boons of TortoiseSVN version 1.7 is the new implementation of sparse checkouts. The Checking Out A Working Copy section of the Tortoise SVN book now states simply:
To easily select only the items you want for the checkout and force the resulting working copy to keep only those items, click the Choose items… button. This opens a new dialog where you can check all items you want in your working copy and uncheck all the items you don’t want.
The Choose items… button is not particularly prominent, being in about the middle of the Checkout dialog. But what it lacks in prominence in makes up for in power! It opens a secondary dialog containing your file tree arranged hierarchically, with every file and folder having an adjacent checkbox to enable or disable it. Note that deselecting a folder will also deselect everything below it hierarchically, while selecting a folder selects just that individual folder. This makes it easy to prune subtrees out. But be careful! If you accidentally deselect some parent folder, this can wipe out a whole slew of choices you may have set up below that.
Repository Concerns
Deploying Subversion for a single-user installation
As discussed in the introduction to Part 1, version control is just as useful for a single-user environment as it is for a large team. Setting up a Subversion or TortoiseSVN installation for a single-user environment, though, can be done more simply than a multi-user environment. For example, you do not actually need to set up a server for your Subversion repository; you could just use the file:// protocol to access the repository on your local machine and you do not have to set up a server. See either TortoiseSVN for the single user or, for command-line use, Single-User Subversion. Both of those articles are quite ancient in Internet time but the basics they cover are still valid. Please note, however, that the non-server implementation approach, while possible, is not necessarily the best choice because you get no security with the file:// protocol and you have uncontrolled access to the Subversion database (allowing avenues for corruption). For small installations-including single user-consider running the svnserve server included with the Subversion distribution. And, as of TortoiseSVN 1.7, now included with TortoiseSVN as well! Svnserve is a lightweight, standalone Subversion server designed for situations where you do not need the full might of an Apache server. Also see the thorough discussion on the finer points of the svnserve server by David W. in his answer to this StackOverflow post.
Reconnecting to a relocated repository
TortoiseSVN offers a Relocate command that is available on the context menu – regrettably. It is regrettable in that it appears mixed in with Branch, Switch, Export, and Add, all commands that you are likely to use on a regular or at least an occasional basis. But Relocate is a command to be used quite rarely; indeed, you may never need to use it. Here are a few common scenarios that you might think could be handled by Relocate, but they are not:
- If you want to connect to a new repository, i.e. a different one than one you have previously been working in, simply do a clean checkout from the new repository. Full stop.
- If you want to switch to a different branch or directory within your current repository tree, use the TortoiseSVN >> Switch command. Full stop.
- If you want to relocate your working copy, either do a clean checkout to a new local file location or move your existing subtree with Windows Explorer. Full stop.
You should only be continuing to read this recipe if the address to your repository has changed, whether it is the IP address, the protocol (e.g. http vs. https); or the root path. In such cases, you want to redirect your existing working copy to point to the new location of the repository on the server. Use the TortoiseSVN >> Relocate command to do this. All you have to specify is the new URL. See Relocating a working copy in the TortoiseSVN book.
Load comments