
When Silverlight 3 was released back in July 2009, one of the features that stood out was the facility to take a Silverlight application and install it onto the local users’ desktop machine so that it could be run offline, or without the overhead of running within the full browser.
Now that it is more common to build enterprise business applications with Silverlight, this feature has become more useful, particularly as it is supported on both Windows and Mac OS X
In this article we’ll cover the benefits of SLOOB, or Silverlight Out-Of-Browser and what you need to do in order to implement all its features, for both Silverlight 3 and Silverlight 4
For the purpose of this article, we’ll be looking at a simple ‘Swag Tracking’ application that demonstrates the features of Silverlight Out-Of-Browser applications.
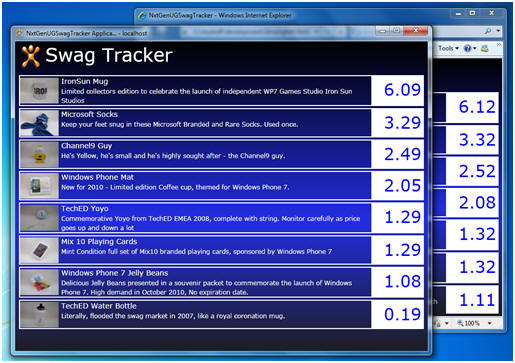
Fig 1 – Our Sample Swag Tracking Silverlight application
Going Out
An ‘out-of-browser’ application is created in exactly the same way as any other Silverlight application. All the necessary settings are within the ’Project Properties Dialog’ in your Silverlight Application Project. Here you’ll find an ‘Enable running application out of the browser’ checkbox – check this and then then click on the ‘Out-of-Browser’ setting button to see the additional options that are available.
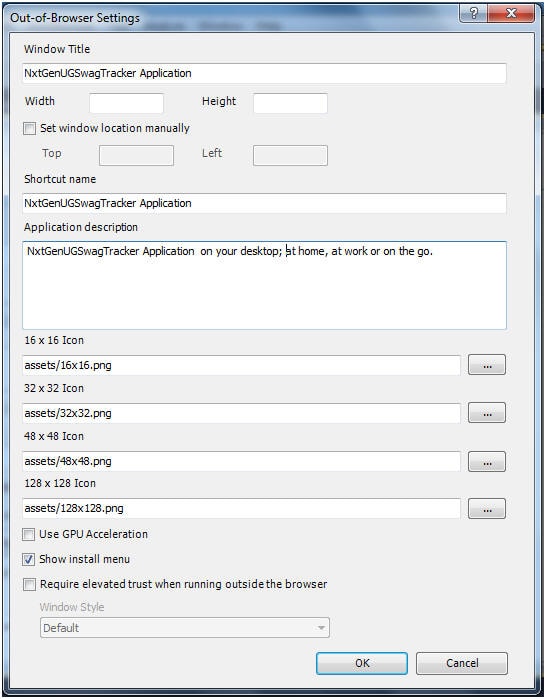
Fig 2 – Out-Of-Browser Property Settings
The properties window (Fig 2 above) allows us to configure settings for our ‘out-of-browser’ application. The shortcut name is used on the install dialog and also for the desktop shortcut and Start Menu application name. The Description is used as a tooltip. The Window title is displayed in the header bar of the chrome of the Silverlight application.
You can also configure the starting height and width of the application. The application will center itself on the desktop unless you check the ‘Set Window Location Manually’ property, in which case you can set the starting position of the application by changing the top and left properties.
Various sized images can be provided, which are used at various stages.
The ‘Show install menu’ option allows you to remove the install prompt when you right click on the Silverlight region of the application when it is running inside the browser. The reason for this will become clear later in the article.
If the application utilizes GPU acceleration, then you’ll need to tick the ‘GPU acceleration’ check box, as this setting is done via the object tag, something we won’t have available to us when we are running out-of-browser.
In addition to ‘In and Out-of-browser’, Silverlight supports a third mode ‘Elevated Privileges’. We’ll be covering this in a subsequent article. The last few properties in this dialog are used for enabling and configuring ‘elevated privileges’ mode.
Configuration Settings
All of the configuration settings are persisted to a XML file called OutOfBrowserSettings.xml which is subsequently merged into the AppManifest.xml file inside the Silverlight XAP package.
|
1 2 3 4 5 6 7 8 9 10 11 12 13 14 15 16 |
<OutOfBrowserSettings ShortName="NxtGenUGSwagTracker Application" EnableGPUAcceleration="False" ShowInstallMenuItem="True"> <OutOfBrowserSettings.Blurb>NxtGenUGSwagTracker Application on your desktop; at home, at work or on the go. </OutOfBrowserSettings.Blurb> <OutOfBrowserSettings.WindowSettings> <WindowSettings Title="NxtGenUGSwagTracker Application" /> </OutOfBrowserSettings.WindowSettings> <OutOfBrowserSettings.Icons> <Icon Size="16,16">assets/16x16.png</Icon> <Icon Size="32,32">assets/32x32.png</Icon> <Icon Size="48,48">assets/48x48.png</Icon> <Icon Size="128,128">assets/128x128.png</Icon> </OutOfBrowserSettings.Icons> </OutOfBrowserSettings> |
Fig 3 – The Out-Of-Browser Property Settings, persisted as XML
Installation
The application is now configured to be installed on the clients’ desktop. When the user navigates to our Silverlight application running in the browser, they can right-click on the Silverlight region of the page and select the’ Install application on the local machine’ option in the subsequent context menu.. This will present the user with a dialog that allows the selection of both the Desktop and the Start menu.
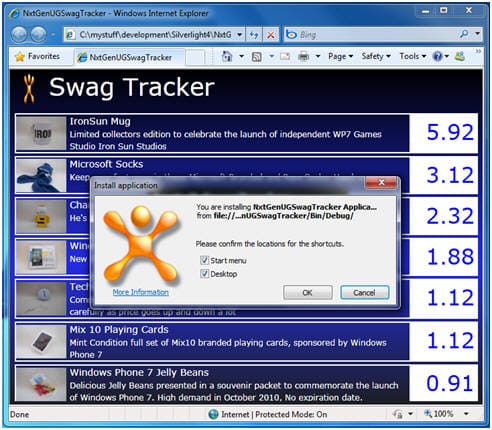
Fig 4 – Installing our application on the local machine
This works well in practice, but it’s not very intuitive to use. How, for example, does the user know this application can be taken ‘out of browser’, and how many users would realize that they can right-click on the Silverlight region to reveal the context menu?
Fortunately Silverlight allows the developer to install the application via code. This can be achieved with a single line of code.
|
1 2 3 4 5 6 |
private void OOBPrompt_InstallClick(object sender, EventArgs e) { // Use Application.Current.Install // to install the application via code Application.Current.Install(); } |
Fig 5 – The code to install the application manually
In the above code sample; we call the install method from a custom popup, which we present to the user on startup of the application. By using this approach, we can now untick the ‘Show Install Menu’ in the Silverlight project properties as it’s no longer required.
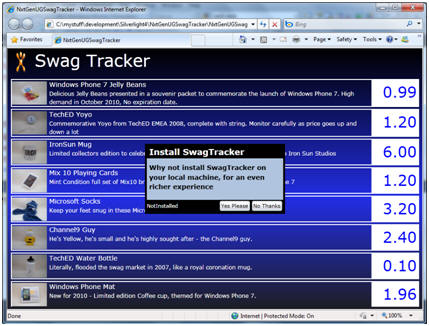
Fig 6 – Our custom Out-of-browser install dialog
As we can see in the image above, the prompt is now more intuitive to the end user, and we can install the application with the click of a button. The ‘out-of-browser’ instance is fired up, but we are faced with a new problem because we still get the prompt to install the application.
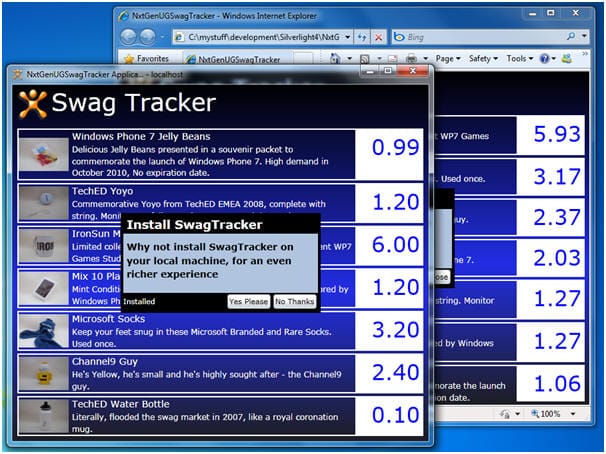
Fig 7 – when running Out-of-browser we need to remove the prompt
We only want to prompt the user to install the application if we are running inside the browser and the application has not been installed. To achieve this, we can add a check to the Loaded event of our Silverlight application to handle this. Application.Current.IsRunningOutOfBrowser will return true if we are running out-of-browser and Application.Current.InstallState will return an enumeration of the installed state of the application. The InstallState enumeration returns one of the following states Installed, Installing, NotInstalled and InstallFailed
|
1 2 3 4 5 6 7 8 |
// only show the popup if the application is // running in browser and it's not installed if (!Application.Current.IsRunningOutOfBrowser && Application.Current.InstallState == InstallState.NotInstalled) { popup1.IsOpen = true; } |
Fig 8 – The Code to hide the custom install prompt
As the installation status changes, our application can listen, and handle these notifications via the Application.Current.InstallStateChanged event handler. From this event we can get the current status through the InstallState enumeration. The following code sample shows how we achieve this.
|
1 2 3 4 5 6 7 8 9 10 |
// This handler will be fired when ever // the installed status changes Application.Current.InstallStateChanged += InstallStateChanged; void InstallStateChanged(object sender, EventArgs e) { oobPrompt.InstallState = App.Current.InstallState.ToString(); } |
Fig 9 – Handling changes to the Installed state of the application

Fig 10 – The custom install prompt is no longer shown
Uninstalling the application
Once it has been installed the user can easily remove the Silverlight application, via right-clicking on the application when it’s running, or using by accessing ‘add/remove programs’ from the control panel.
Connectivity
So far we’ve configured our Silverlight application to run ‘out-of-browser’, written a custom piece of User-interface to prompt the user to install the application and we’ve tracked the installation status changes. When the user runs the Silverlight application outside the browser you can’t always guarantee that they have an internet connection. The machine may have just started, or an internet connection may not be available. Silverlight provides some basic support to check whether there is an internet connection. The System.Net.NetworkInformation namespace provides an event you can subscribe to, which will give you a notification when the status of the network changes.
|
1 2 3 |
// This handler will fire when the network // status changes - online or Offline NetworkChange.NetworkAddressChanged += NetworkAddressChanged; |
Fig 11 – Handling changes to the network Status
Inside the handler you can then check the network status via the static GetIsNetworkAvailable method on the NetworkInterface class. In our sample we are using a storyboard to spin the NxtGenUG logo. Should we lose the network connectivity the logo will stop spinning. In real world examples, such as saving a draft email, or a high score for a game, you could then use Isolated storage to store information and then, when connectivity is restored, send the information to the server at that time.
|
1 2 3 4 5 6 7 8 9 10 11 |
void NetworkAddressChanged(object sender, EventArgs e) { // Use NetworkInterface.GetIsNetworkAvailable // to see if we have an internet connection if (!NetworkInterface.GetIsNetworkAvailable()) { SpinningLogoStoryboard.Stop(); } else { SpinningLogoStoryboard.Begin(); } } |
Fig 12 – Spinning the logo, when we have network availability
The information that GetIsNetworkAvailable returns may not be correct in one of these circumstances
- the Silverlight application is running on a virtual machine
- a device has multiple network cards
- you are in an airport where WIFI is available, but you don’t have access to the internet, .
A good way to solve this is to use the WebClient class to ping a known website such as Google or Bing, or your applications host site, and catch the response. This is a sure way to detect network connectivity.
Tracking Updates
Now we’ve got our Silverlight application running ‘out-of-browser’, we are presented with a new challenge. What happens when the Silverlight application is updated on the server? When the user runs the application inside a web page they will automatically get the latest version, but when it’s installed on the local machine we won’t get the benefit of automatic updates.
Silverlight supports this functionality through a service call and an event handler. All service calls in Silverlight are asynchronous, so the first step is to handle the completed event and then call the CheckAndDownloadUpdateAsynch method.
|
1 2 3 4 5 6 7 |
// check for updates to the Silverlight application if (Application.Current.IsRunningOutOfBrowser) { Application.Current.CheckAndDownloadUpdateCompleted += CheckForUpdates; Application.Current.CheckAndDownloadUpdateAsync(); } |
Fig 13 – Handling, and calling a check for updates to the application
When the service call returns, we’ll be passed a CheckAndDownloadUpdateCompletedEventArgs object which will allow us to detect whether or not an update is available. At this stage, the update will have been already been automatically downloaded, stored, and will be run the next time the user launches the application. To handle this you should prompt the user to restart the application. If the service call returns a PlatformNotSupportedException it means the updated Silverlight XAP package requires a newer version of Silverlight to run.
|
1 2 3 4 5 6 7 8 9 10 11 12 13 14 15 16 17 18 19 20 21 22 23 24 |
void CheckForUpdates(object sender, CheckAndDownloadUpdateCompletedEventArgs e) { //this is where we do our check ... if (e.UpdateAvailable) { MessageBox.Show("New Version Available - Please Restart"); return; } if (e.Error != null && e.Error is PlatformNotSupportedException) { MessageBox.Show("A New version of Silverlight is required" + Environment.NewLine + "Please visit the application home page") ; return; } if (!e.UpdateAvailable) { // no new version logic } } |
Fig 14 – Handling the return from the check for updates
In this code sample we’re prompting the user with a message box, but you could also provide some custom UI which disables the functionality of the application until the application is restarted.
As the above code sample shows, it’s pretty simple to enable our ‘out-of-browser’ Silverlight application to automatically check for updates and install them. Even if, in the early stage, you don’t envisage making any changes to your XAP it’s worth putting the infrastructure in place to make your life easier in the future.
Notification Window
Even if you run the application ‘out-of-browser’, it still runs in a sandbox. Silverlight 4 has the facility to run it in elevated mode, but we’ll cover that in a subsequent article. One benefit of running ‘out-of-browser’ means that the isolated storage limit is increased from 1mb to 25mb. Isolated storage is a file based storage structure for you to persist your data.
Another feature, which is available to the developer in ‘out-of-browser’ mode is the Notification Window. The most obvious example of a notification window is when you receive an email in outlook and a popup window or ‘Toast’ Notification appears down by the taskbar. This mechanism is useful for communicating with the user when you have something important to say or to notify them when the application is minimized.
In our application we’ll pop-up a toast notification of the top priced swag item every time the service updates the list.

Fig 15 – A Toast Notification Window
The NotificationWindow class is used to show the Toast item to the user. There are a few restrictions though. The notification window can be no bigger than 400 pixels wide by 100 pixels high. There’s no support for putting any opacity on the control, or any support for rounded corners.
Like most of the Slverlight Content controls the NotificationWindow can contain any framework element.
To show the Popup, we simply create an instance of the NotificationWindow class and set its Content property to be our custom ToastControl UserControl. We then call the Show method on the NotificationWindow instance and pass the time the Popup should be shown for in milliseconds. There is a maximum time limit of 30 seconds on a NotificationWindow being shown.
|
1 2 3 4 5 6 7 8 |
if (App.Current.IsRunningOutOfBrowser) { NotificationWindow _nw = new NotificationWindow(); _nw.Content = new ToastControl(); _nw.Content.DataContext = LayoutRoot.DataContext; _nw.Show(5000); } |
Fig 16 - Displaying a Toast Notfication
In this code sample we are checking whether the Silverlight application is running ’out-of-browser’, otherwise an exception will be thrown. The screenshot below shows our NotificationWindow Class in action.
You can only show one Notification Window at any time, and an exception will be thrown if this is not the case. There isn’t any inbuilt support for handling this, but it’s not too hard to implement a simple queue-based approach and process the messages one at a time, until the queue is empty.
Conclusion
With just a few lines of code, and by setting a few configuration parameters, we’ve created an application which can be installed on the local machine, through both standard and custom installation prompts. We also provided functionality for our application to automatically check, and react to, changes to the network status, as well as automatically download and install updates from the server.
We’ve just built a cross platform desktop business application.
Load comments