
Executive Summary
Microsoft Graph API is Microsoft’s unified REST API for accessing data and services in Microsoft 365 – including users, email, calendar, files (OneDrive and SharePoint), Teams, and more. Any application that needs to read or write to a user’s Microsoft 365 account uses Microsoft Graph. The API follows a consistent URL pattern: https://graph.microsoft.com/{version}/{resource}. This article introduces the request structure, demonstrates the Graph Explorer tool for testing endpoints interactively, and shows a .NET Core integration that retrieves user profile data and sends an email using the Microsoft Graph SDK.
It is a common practice for big players in the cloud market to allow their users to have more than one method to access their data. With Google, for example, you can have one single account and easy access to a bunch of free services like Gmail and Drive.
Google also provides public APIs for developers to be able to access data via other applications. The whole process happens through the usual OAuth +, an application provided by the player.
With Microsoft, there’s Microsoft Graph. It provides some REST endpoints that allow access to their services like Office 365 (which is in the cloud, unlike the older versions), Azure and Outlook.
Here’s a single example for you to get a taste. A common URL endpoint to retrieve personal information about a specific account is https://graph.microsoft.com/v1.0/me. Here’s what you’ll get if you try it out in a browser tab:
|
1 2 3 4 5 6 7 8 9 10 |
{ "error": { "code": "InvalidAuthenticationToken", "message": "Access token is empty.", "innerError": { "request-id": "a2115c87-341f-405a-b127-d3432748d38b", "date": "2020-06-08T13:46:07" } } } |
That’s when OAuth takes place. The URL, in turn, follows some pattern rules that you’ll see right away.
Microsoft Graph API Structure
The access to each resource must follow a pattern. Here’s the request construction:
|
1 |
{HTTP method} https://graph.microsoft.com/{version}/{resource}?{query-parameters} |
First, as usual, you define the HTTP method for the operation. Note that it’s not up to you to decide that; you must go to the docs and check which method is available for that operation. Plus, the endpoints follow the RESTful principles, so make sure to refer to it for better comprehension.
Then it comes the version of the Graph API you’re targeting. As per the writing of this article, the only available versions are v1.0 and beta. As you may have noticed, for production purposes, only the v1.0 version should be used. The beta version brings some new stuff, which might include breaking changes, so be careful when using it.
The resource defines the entity (and its properties) you’re willing to access. These resources usually come alone like in the previous example (/me), so they’re called top-level entity resources. However, you may want additional inheriting data, like /me/messages, for example. You can refer to the list of available resources here.
Remember that each resource is secure information, so it requires permission to be accessed. You’ll see more about how to do it soon.
Finally, you have the parameters. Like the other REST API endpoints, it’s necessary to provide the filters for the endpoints that demand that, like when retrieving all of your email messages filtered by the sender, for example.
Microsoft Graph API makes use of the OData (Open Data Protocol) namespace, which defines a set of best practices for building and consuming RESTful APIs. You can read more detailed information about the whole API architecture here.
Seeing it in Action
Microsoft Graph also provides a great tool to easily explore the endpoints, and it’s the Graph Explorer. Open it, check out at the top of the screen if you’re already logged in, otherwise log in to your Microsoft account. Figure 1 shows how it looks.
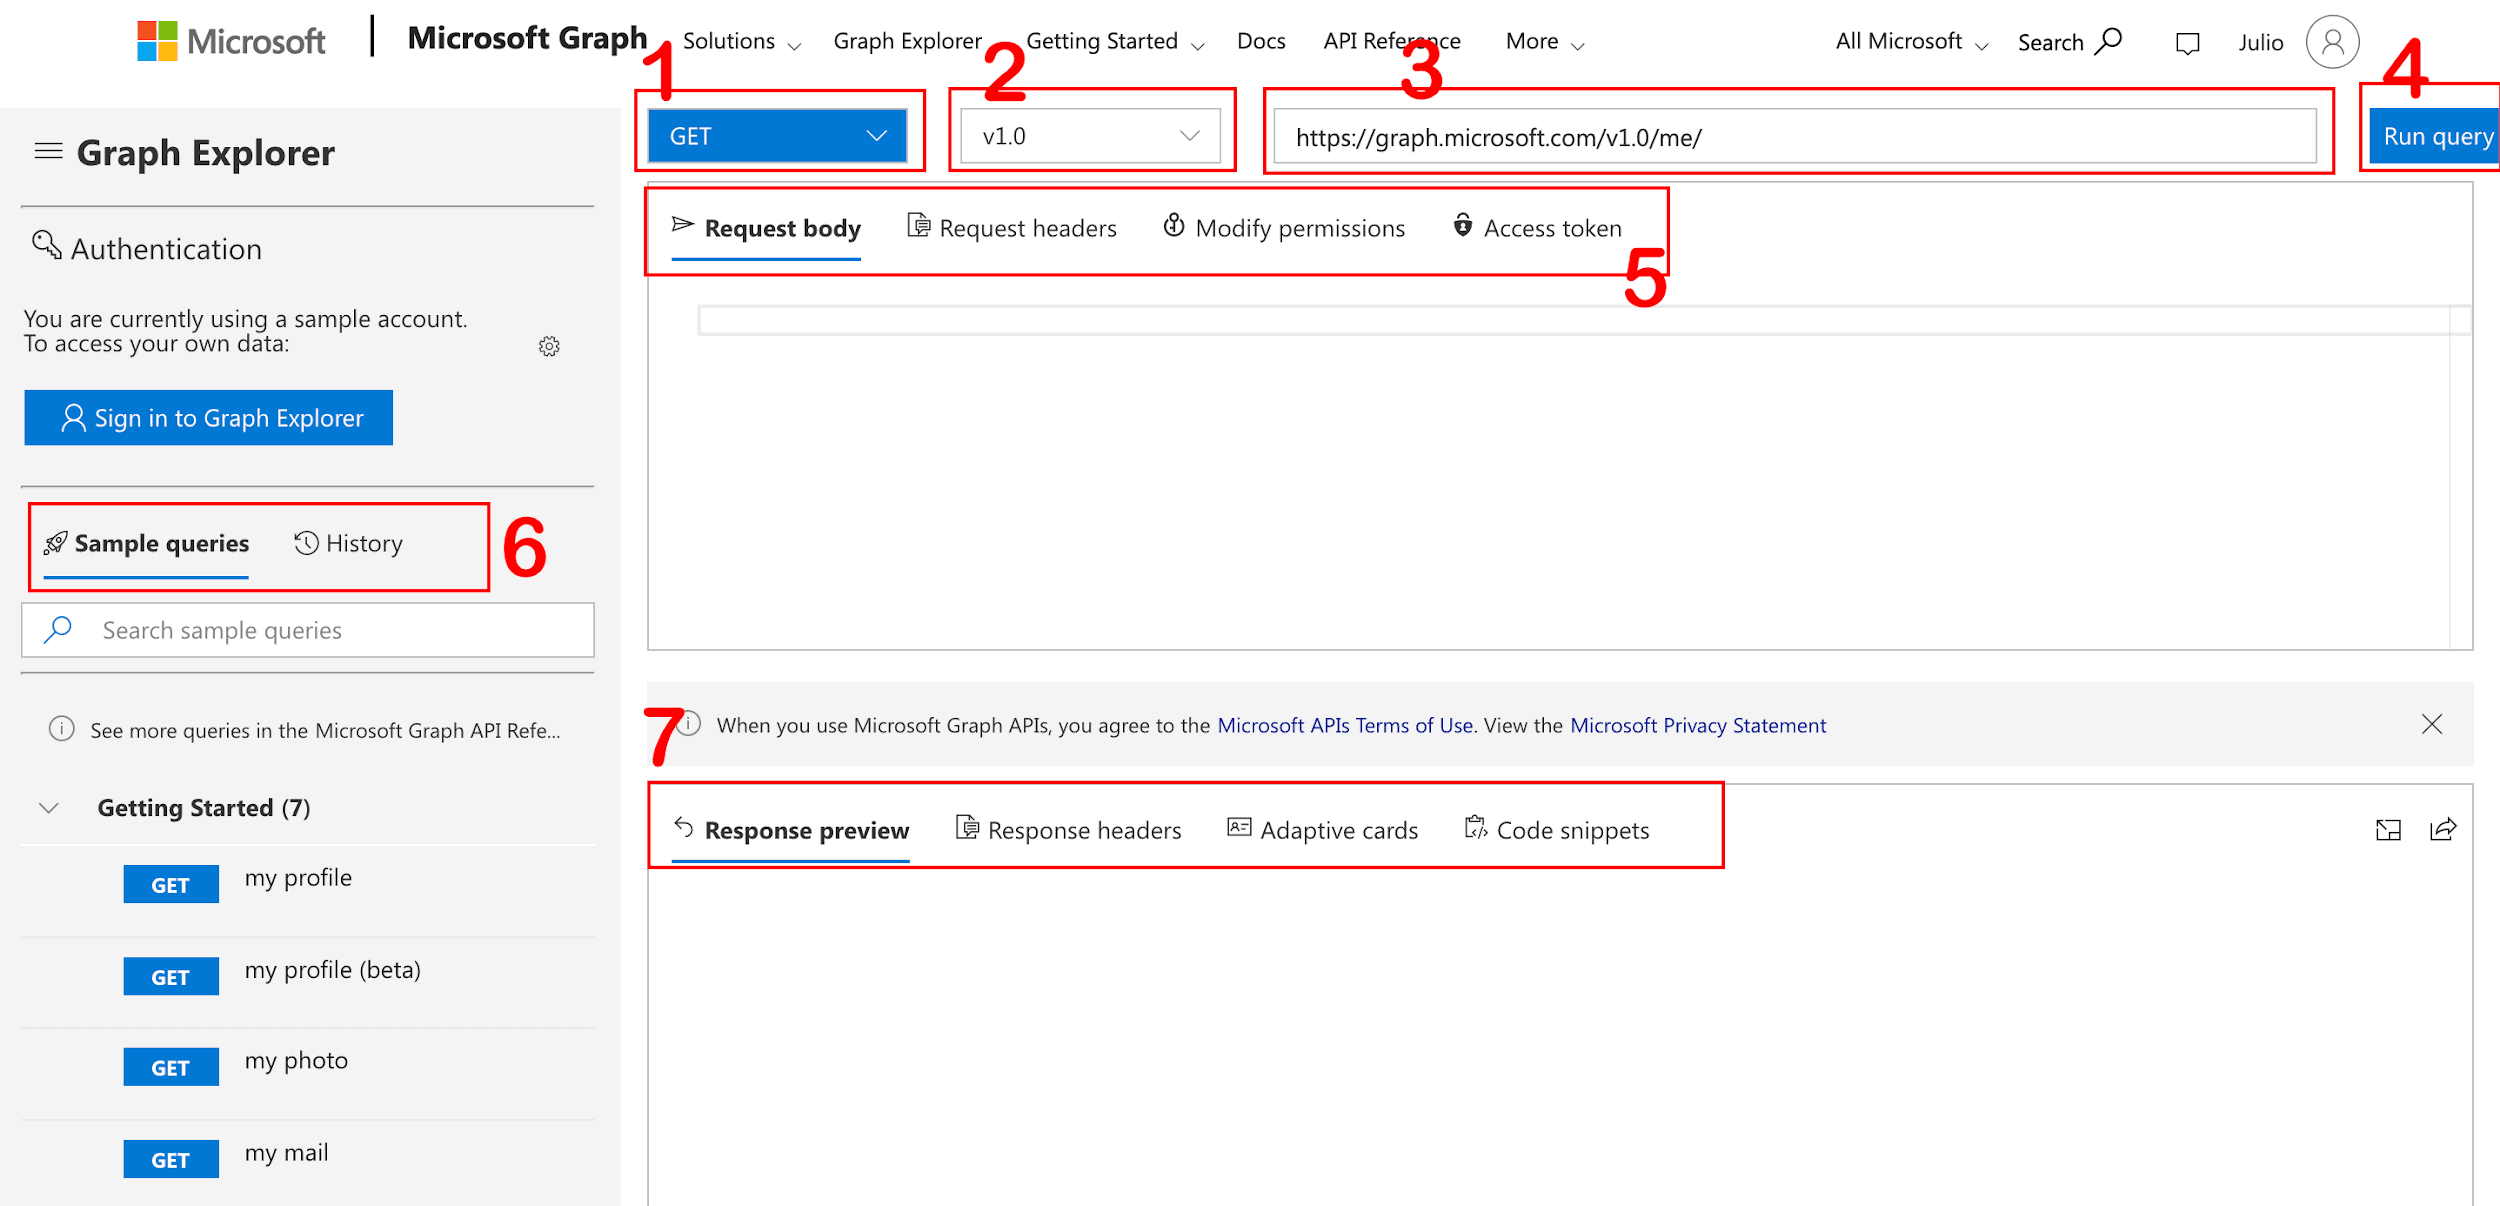
Figure 1. Microsoft Graph Explorer view.
In the top bar of this screen, you’ll see a few combo boxes and a text field to customize your search. Number 1 shows the option to select which HTTP method you want this search to be run. Number 2 states the API version (v1.0 or beta).
Number 3 represents the full URL of the necessary resource. In this example, the /me was filled by the first option available at Sample queries tab (number 6). It helps you to figure out the available options, pre-filling the required values and making the Explorer ready to run the request. The History tab lists the searches executed until now.
Number 5 brings four other options:
- The request body with the request data your search may need.
- The request headers.
- Modify permissions: once you’ve authorized the Explorer to have access to your account data, you can customize each permission individually.
- Access token: the access token needed to perform each request. Explorer automatically generates it. In case you need to search in another environment other than here, the token must be generated each time.
Number 7, finally, deals with the tabs of the API responses. Here you’ll have the response body preview (once it’s completed) and the response headers.
The Adaptive cards functionality is just a nice feature in which Microsoft tries to adapt the returned information into cards, like a business card.
The Code snippets tab is very interesting. It auto-generates the code for the current request in four different languages: CSharp (Figure 2), JavaScript, Java and Objective-C:
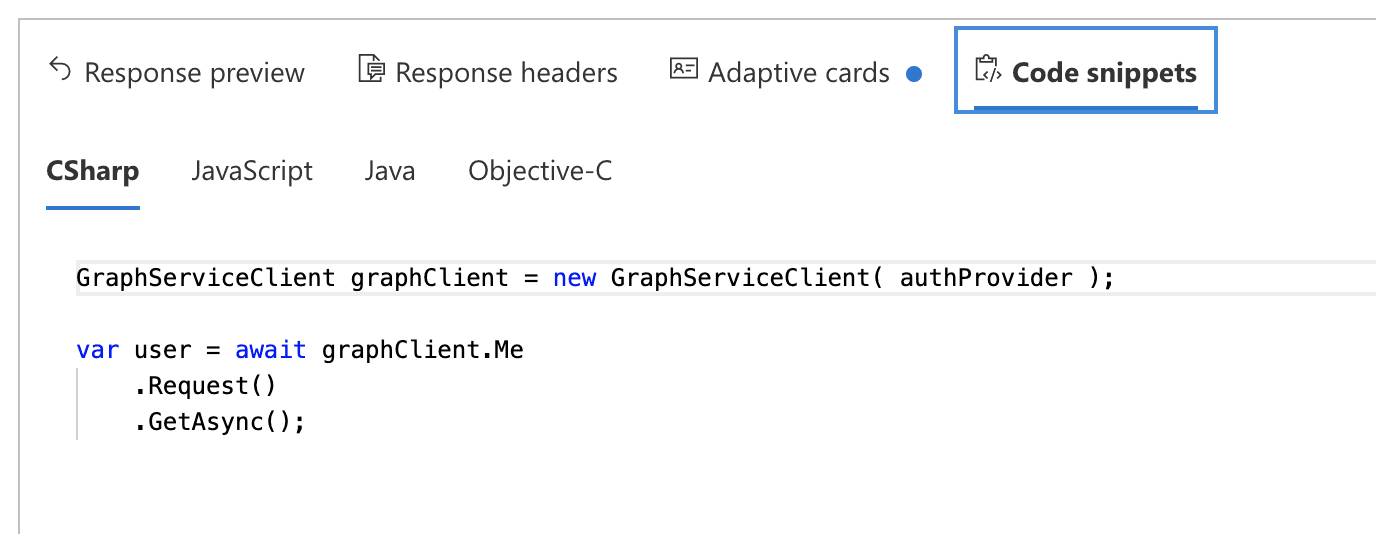
Figure 2. Code snippets for 4 languages.
Besides all that, you still need to sign in to Graph Explorer with your Microsoft account to fetch its data. For this, click the Sign in to Graph Explorer button in the left side panel. Then, you’ll be redirected to the access page to permit the Graph Explorer app (Figure 3). Click the Yes button.
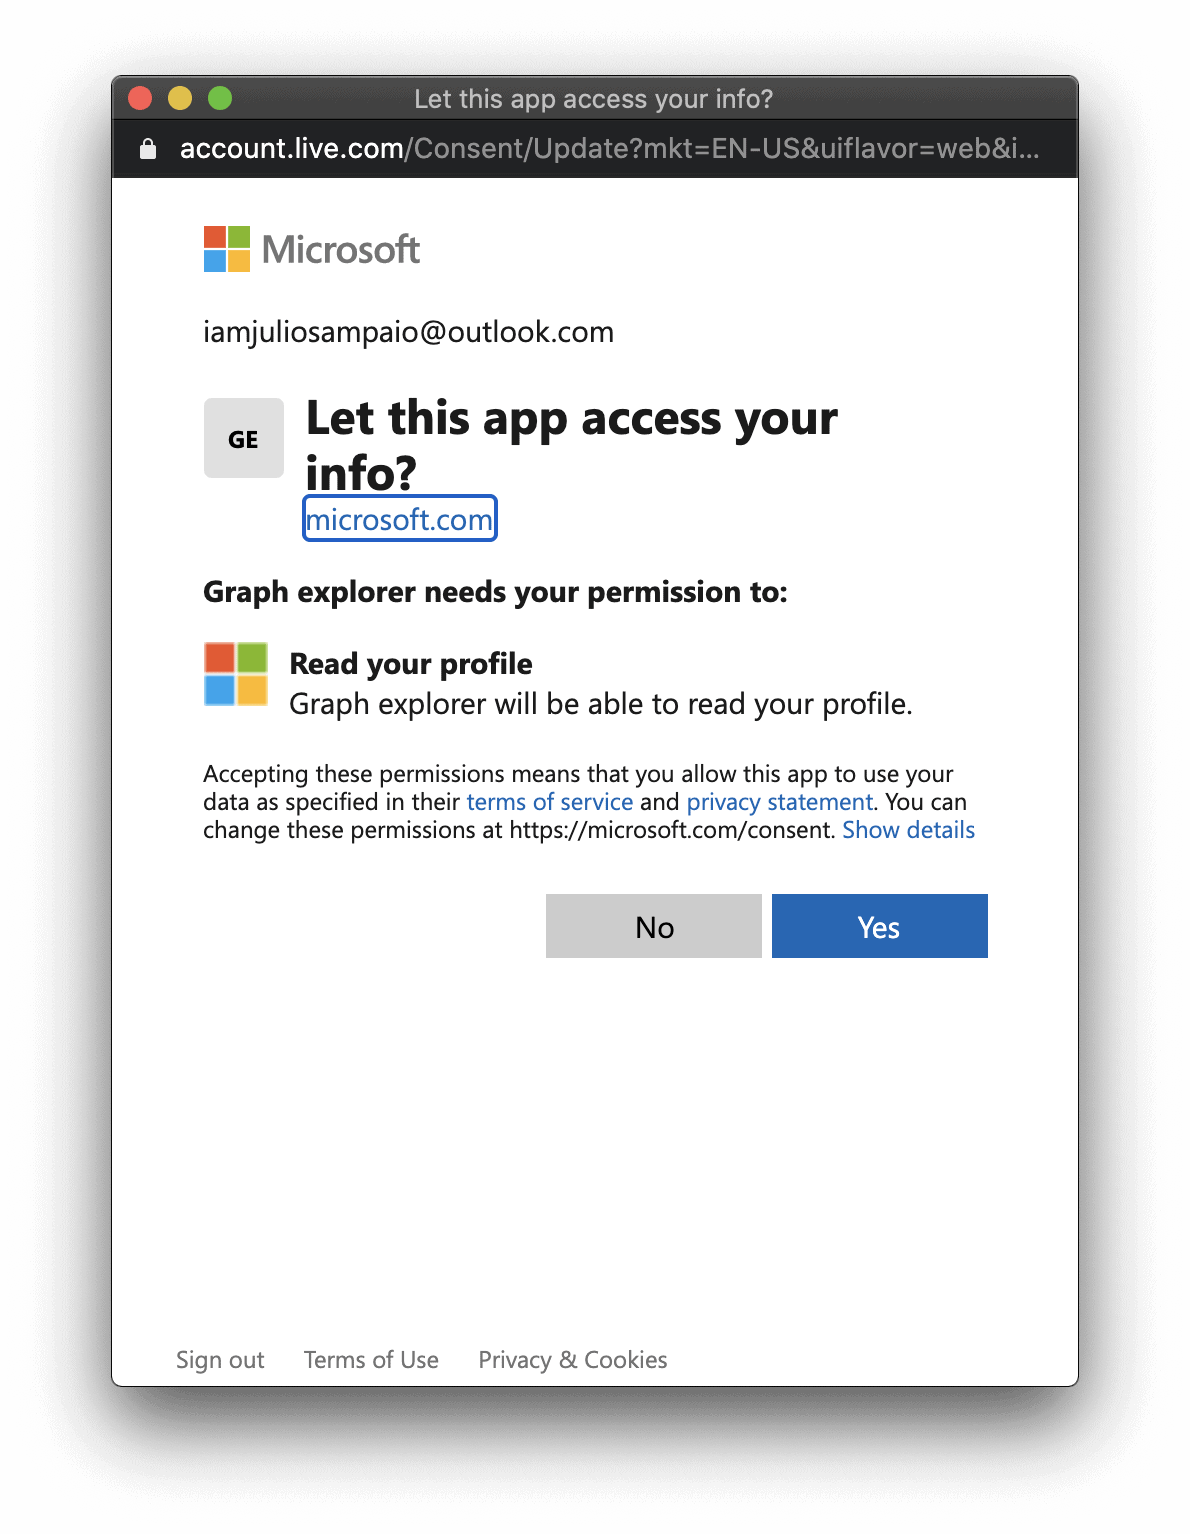
Figure 3. Giving access to the Graph Explorer app.
Once you’re logged, run the /me request. Listing 1 shows the response content that’ll be shown in the Response preview tab.
Listing 1. Response content for /me request.
|
1 2 3 4 5 6 7 8 9 10 11 12 13 14 |
{ "@odata.context": "https://graph.microsoft.com/v1.0/$metadata#users/$entity", "displayName": "Julio Sampaio", "surname": "Sampaio", "givenName": "Julio", "id": "4e108eb8cbcb0495", "userPrincipalName": "-----@outlook.com", "businessPhones": [], "jobTitle": null, "mail": null, "mobilePhone": null, "officeLocation": null, "preferredLanguage": null } |
Sometimes, depending on the operation you’re performing, you’ll be prompted to consent to the specific permissions, in the Modify permissions tab.
Run another sample query. Go to the Sample queries tab and search for my mails from an address, then click the GET option shown in Figure 4:
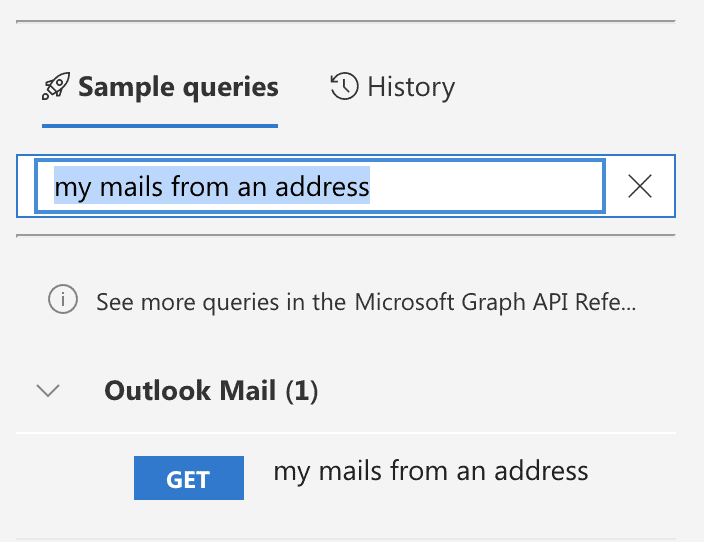
Figure 4. Searching for a sample query.
When you try to run this query, you’ll get the following error message: Forbidden – 403 – 260ms. You need to consent to the permissions on the Modify permissions tab.
Opening the referred tab, you’ll see the Consent buttons in the Status column, like in Figure 5. If you’re in a small screen, pay attention that the buttons are “hidden”, so you have to scroll to see them horizontally.

Figure 5. Consenting to the permissions.
If the operation goes on successfully, you’ll see the status changing to Consented. Now, run the query. Don’t forget to change the email parameter to one of yours at the query text field.
The result should be similar to Figure 6.
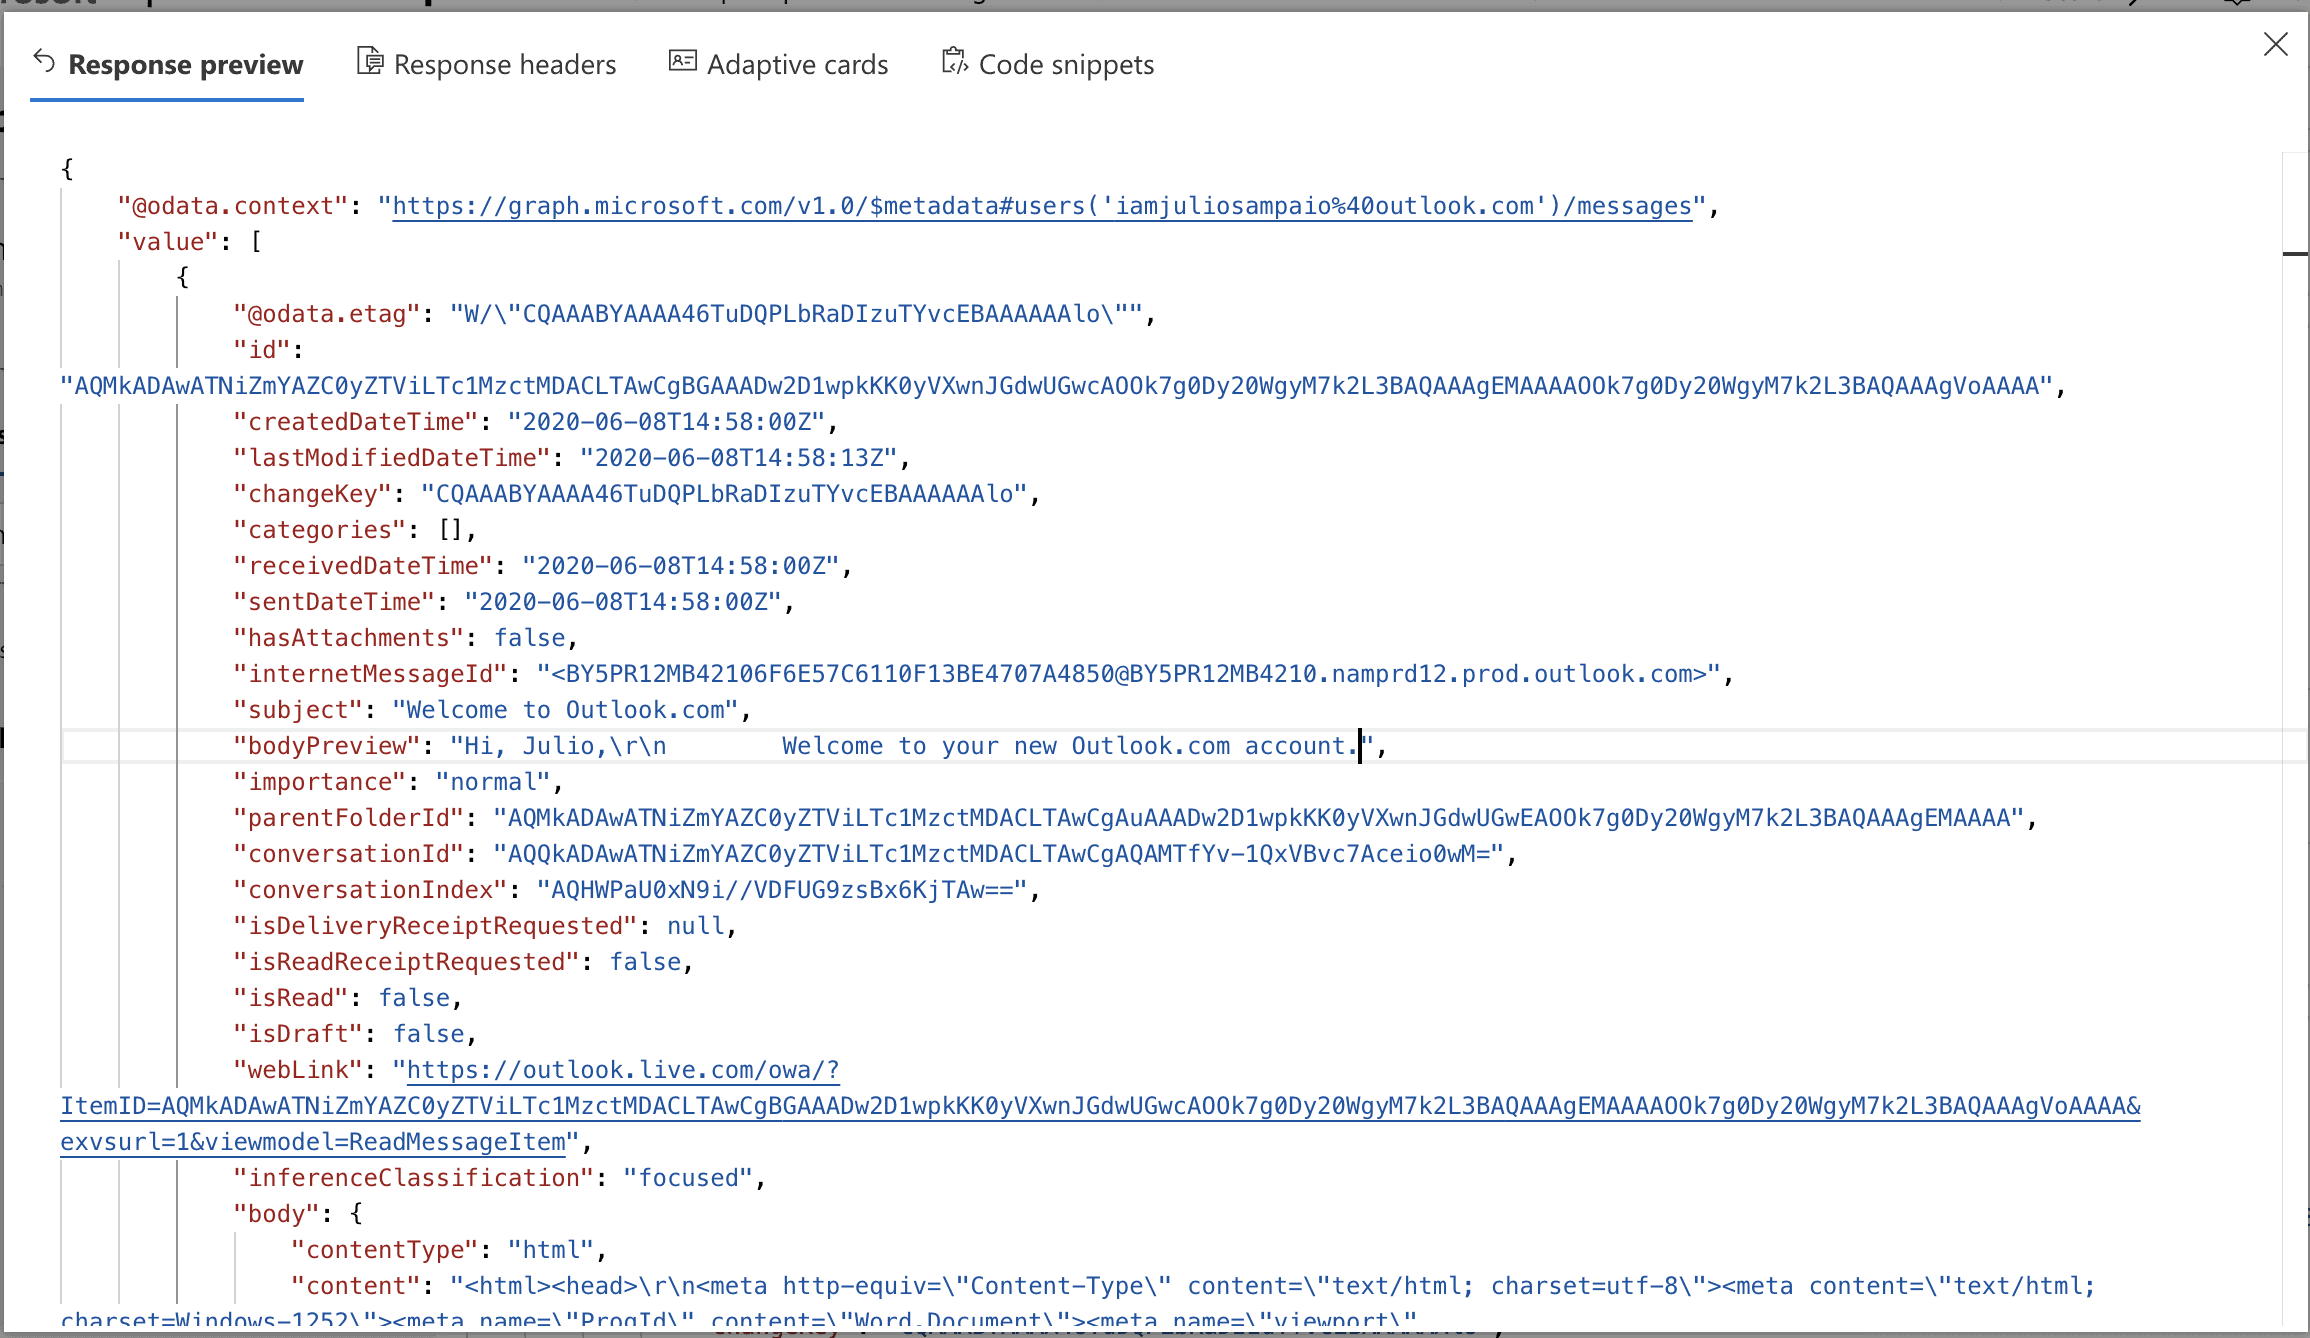
Figure 6. Querying email messages by sender email.
Now to move to an example that creates data in the server, using the API to send an email. For this, go again to the Sample queries tab and search for send an email, then click the button. You’ll notice that Graph Explorer fills in the Request body area with a pre-generated JSON. It is pretty much what’s necessary to send a basic email. Obviously, you may change its contents to your preferences. Listing 2 shows what the JSON looks.
Listing 2. JSON example to send an email.
|
1 2 3 4 5 6 7 8 9 10 11 12 13 14 15 16 |
{ "message": { "subject": "Meet for lunch?", "body": { "contentType": "Text", "content": "The new cafeteria is open." }, "toRecipients": [ { "emailAddress": { "address": "YOUR_EMAIL@outlook.com" } } ] } } |
Before submitting the query, remember that you have to authorize Graph Explorer with the right permissions. Go to the Modify permissions tab again and allow the required accesses.
Run it. If everything went right, you’ll see the successful message with an HTTP 201 – Accepted code. It means that the request was OK, and something was created in the server. In this case, the sent email.
Go to your email inbox and check that the email was sent (Figure 7).
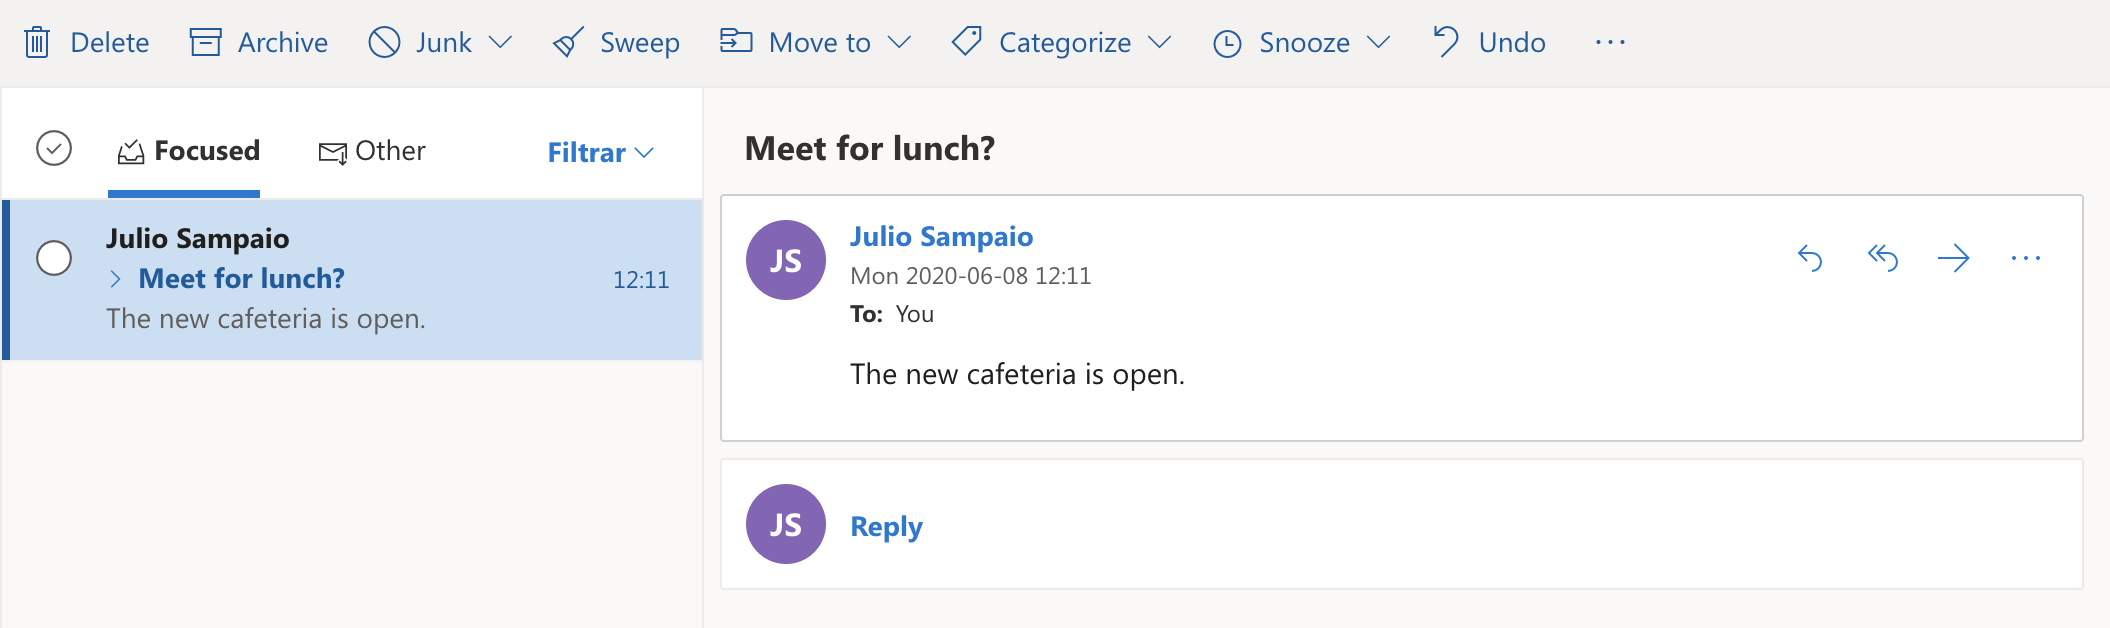
Figure 7. Email sent successfully.
Integrating .NET Core with Microsoft Graph
Here’s another example. This time, you’ll integrate a simple .NET Core application with Microsoft Graph to retrieve user’s data and send an email as well.
You may also be interested in:
OAuth 2.0 and ASP.NET Core for handling Microsoft Graph authentication flows
First, create a new app by running the following command:
|
1 |
dotnet new console -o simpletalk-graph-api |
This command creates a Console app. Then, add the required NuGet dependencies:
|
1 2 3 |
dotnet add package Microsoft.Extensions.Configuration.UserSecrets dotnet add package Microsoft.Identity.Client dotnet add package Microsoft.Graph |
To enable the use of Graph API within .NET applications, you’ll need to set up an Azure AD application. For this, go to the Azure Admin Center and log in to your Microsoft account.
In the home page, click the All resources > Manage Azure Active Directory option and, finally, go to the App registrations option. Click the New registration button. In the next screen, give the app a name (simple-talk-graph-app, for example) and fill the options like shown in Figure 8.
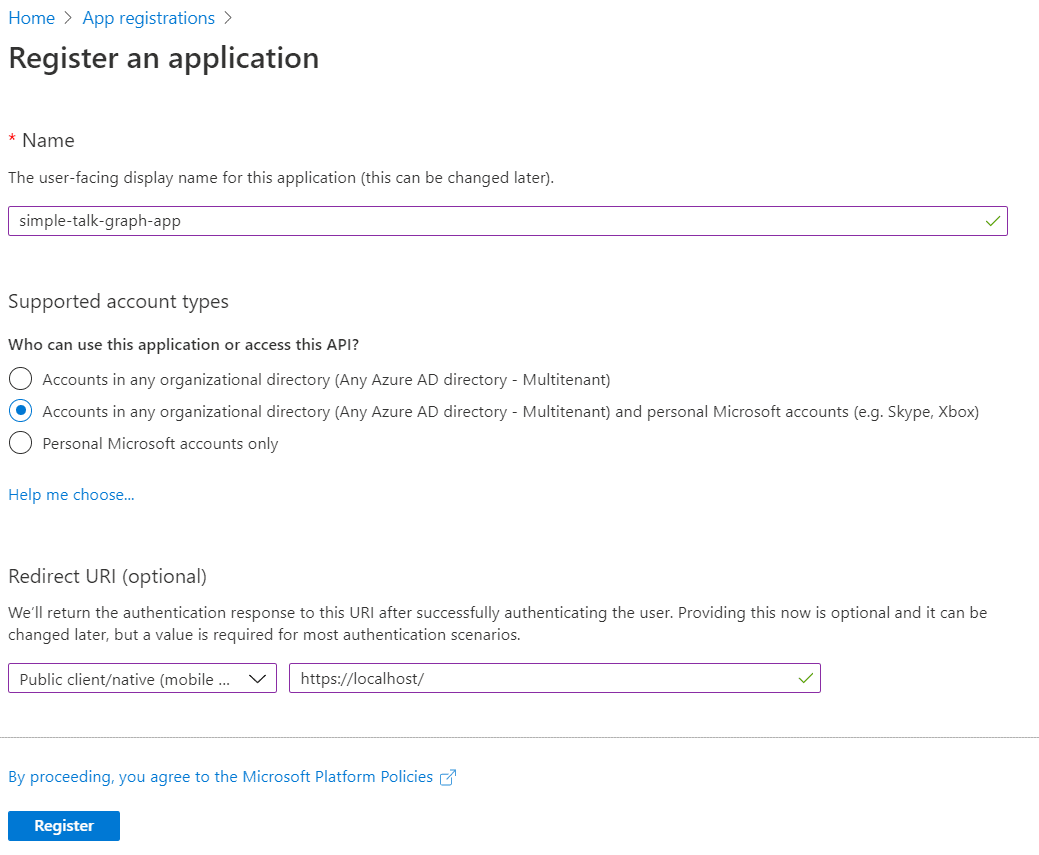
Figure 8. Registering a new application.
The next screen you will see shows the app details, including the Application id, which is going to be used soon in the C# code. It’s also necessary that this app is treated as a public client, so you need to toggle it going to the Authentication > Advanced Settings > Default client type option. Toggle it and click Save.
Next, you need to initialize the .NET development secret store. Since it’s necessary to generate new OAuth tokens for every new request, the automatic way to do it is by Azure AD:
|
1 |
dotnet user-secrets init |
After it’s initialized, you can add the credentials related to the client id and the scopes (permissions):
|
1 2 |
dotnet user-secrets set appId "3f2458ff-43d2-45f8-a0f0-b2f403461ef4" dotnet user-secrets set scopes "User.Read;Mail.Send" |
Remember to replace the appId with yours. Now, open the created project into Visual Studio and create two new folders: Auth (to deal with the auth flow) and Graph (to store the graph helpers).
Start with the authentication process. Create a new class into the Auth folder called DeviceCodeAuthProvider.cs. The name already suggests that this is the flow this example uses to authenticate users. Listing 3 shows the code.
Listing 3. DeviceCodeAuthProvider code.
|
1 2 3 4 5 6 7 8 9 10 11 12 13 14 15 16 17 18 19 20 21 22 23 24 25 26 27 28 29 30 31 32 33 34 35 36 37 38 39 40 41 42 43 44 45 46 47 48 49 50 51 52 53 54 55 |
using Microsoft.Graph; using Microsoft.Identity.Client; using System; using System.Net.Http; using System.Net.Http.Headers; using System.Threading.Tasks; namespace simpletalk_graph_api.Auth { public class DeviceCodeAuthProvider : IAuthenticationProvider { private IPublicClientApplication _msalClient; private string[] _scopes; private IAccount _userAccount; public DeviceCodeAuthProvider(string appId, string[] scopes) { _scopes = scopes; _msalClient = PublicClientApplicationBuilder .Create(appId) .WithAuthority(AadAuthorityAudience.AzureAdAndPersonalMicrosoftAccount, true) .Build(); } public async Task<string> GetAccessToken() { if (_userAccount == null) { try { var result = await _msalClient.AcquireTokenWithDeviceCode(_scopes, callback => { Console.WriteLine(callback.Message); return Task.FromResult(0); }).ExecuteAsync(); _userAccount = result.Account; return result.AccessToken; } catch (Exception exception) { Console.WriteLine($"Error getting access token: {exception.Message}"); return null; } } else { var result = await _msalClient .AcquireTokenSilent(_scopes, _userAccount) .ExecuteAsync(); return result.AccessToken; } } public async Task AuthenticateRequestAsync(HttpRequestMessage requestMessage) { requestMessage.Headers.Authorization = new AuthenticationHeaderValue("bearer", await GetAccessToken()); } } } |
The code is designed under the MSAL patterns. It injects the scopes and credentials you’ve previously set in the command line. There are two main methods: one to generate new access tokens and another one to authenticate each of the requests, feeding them with the proper bearer tokens.
Listing 4 shows the code to be placed in the GraphHelper.cs file (please, create it under the Graph folder).
Listing 4. GraphHelper code.
|
1 2 3 4 5 6 7 8 9 10 11 12 13 14 15 16 17 18 19 20 21 22 23 24 25 26 27 28 29 30 31 32 33 34 35 36 37 38 39 40 41 42 43 44 45 46 47 48 49 50 51 52 53 54 55 56 57 58 59 60 61 |
using Microsoft.Graph; using System; using System.Collections.Generic; using System.Threading.Tasks; namespace simpletalk_graph_api.Graph { public class GraphHelper { private static GraphServiceClient graphClient; public static void Initialize(IAuthenticationProvider authProvider) { graphClient = new GraphServiceClient(authProvider); } public static async Task<User> GetMeAsync() { try { // GET /me return await graphClient.Me.Request().GetAsync(); } catch (ServiceException ex) { Console.WriteLine($"Error getting signed-in user: {ex.Message}"); return null; } } public static async void SendMailAsync() { try { var message = new Message { Subject = "Testing from .NET SDK", Body = new ItemBody { ContentType = BodyType.Text, Content = "The SDK is working fine!" }, ToRecipients = new List<Recipient>() { new Recipient { EmailAddress = new EmailAddress { Address = "YOUR_EMAIL@outlook.com" } } } }; await graphClient.Me .SendMail(message, null) .Request() .PostAsync(); } catch (ServiceException ex) { Console.WriteLine($"Error getting signed-in user: {ex.Message}"); } } } } |
The code of these methods was extracted from the auto-generated ones shown in the Graph Explorer before. Once you have the auth provider, you can instantiate the graph client and call the respective Graph operation.
Finally, move on to the code of Program.cs file, which calls these methods. Listing 5 shows the content.
Listing 5. Program class code.
|
1 2 3 4 5 6 7 8 9 10 11 12 13 14 15 16 17 18 19 20 21 22 23 24 25 26 27 28 29 30 31 32 33 34 35 36 37 |
using Microsoft.Extensions.Configuration; using simpletalk_graph_api.Auth; using simpletalk_graph_api.Graph; using System; namespace simpletalk_graph_api { class Program { static async System.Threading.Tasks.Task Main(string[] args) { var appConfig = LoadAppSettings(); var appId = appConfig["appId"]; var scopesString = appConfig["scopes"]; var scopes = scopesString.Split(';'); var authProvider = new DeviceCodeAuthProvider(appId, scopes); var accessToken = await authProvider.GetAccessToken(); Console.WriteLine($"Access token: {accessToken}\n"); GraphHelper.Initialize(authProvider); var user = await GraphHelper.GetMeAsync(); Console.WriteLine($"Welcome {user.DisplayName}!\n"); GraphHelper.SendMailAsync(); Console.WriteLine("Email sent!"); } static IConfigurationRoot LoadAppSettings() { var appConfig = new ConfigurationBuilder() .AddUserSecrets<Program>() .Build(); if (string.IsNullOrEmpty(appConfig["appId"]) || string.IsNullOrEmpty(appConfig["scopes"])) { return null; } return appConfig; } } } |
First, you need to load the app settings where the credentials and scopes were placed. After extracting the app id and scopes array, you may retrieve a valid access token (which is going to be printed to make sure it works), initialize the graph helper (that will, in turn, create the graph client from the auth provider) and, finally, call the /me and /sendMail operations.
When you run the app, a new console window opens and asks you to access the https://microsoft.com/devicelogin URL and enter a printed code to authenticate. Copy the code, access the URL and paste it. Click Next, then authenticate to your Microsoft account.
The final screen shows what type of information the app is trying to access and ask for your permission (Figure 9):
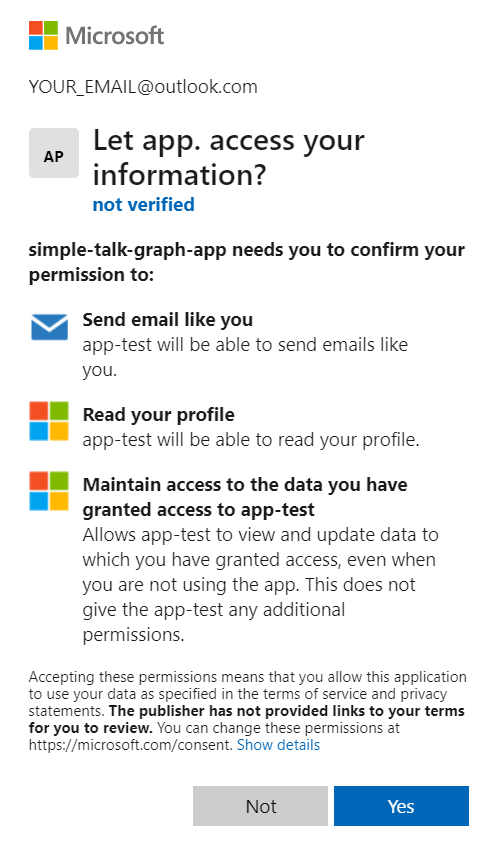
Figure 9. Giving access to the Graph app.
Click Yes and close the window. When you get back to the console, the username is printed, and the email was sent as shown in Figure 10.
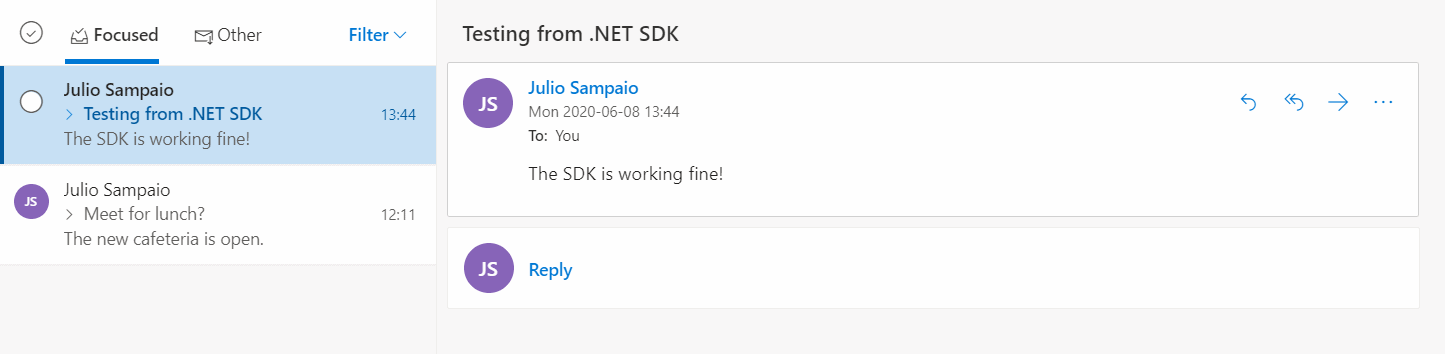
Figure 10. Second email sent via SDK.
Note: Be aware that, due to occasional instabilities, sometimes this service can fail or time out. If you face an error, wait a minute and try again.
Conclusion
From here, the best place you can follow up for more accurate information, especially regarding the latest updates, is the official docs.
Microsoft Graph is continuously working to add more and more resources to the API. The possibility to manage the Outlook Calendar and Cloud communications, for example, are very recent due to that constant upgrade process. In the end, it is a powerful API if you want to embody your own projects with Microsoft product’s data. Best of luck!
FAQs: Getting Started with Microsoft Graph API
1. What is the Microsoft Graph API?
Microsoft Graph is Microsoft’s unified REST API for accessing data across Microsoft 365 services – including Outlook (email, calendar, contacts), OneDrive files, SharePoint, Teams, Azure Active Directory user profiles, and more. Applications authenticate with Azure AD (now Entra ID) to get an access token, then call graph.microsoft.com endpoints to read or write user and organisational data. Microsoft provides SDKs for .NET, JavaScript, Python, Java, and Go that wrap the raw HTTP calls.
2. How do I authenticate to Microsoft Graph API from a .NET application?
Register an application in the Azure Portal (Azure Active Directory / Entra ID). Add the Microsoft.Identity.Client NuGet package (MSAL.NET). Obtain an access token using the client credentials flow (for daemon/service apps) or the authorization code flow (for apps that act on behalf of a user). Pass the token as a Bearer header in Graph API calls, or use the Microsoft.Graph SDK which handles authentication through an IAuthenticationProvider. The Microsoft.Graph NuGet package simplifies API calls with strongly-typed client methods.
3. What can I do with Microsoft Graph API?
Common Microsoft Graph use cases: read and send email via Outlook (Mail.Read, Mail.Send permissions); read and write calendar events; manage OneDrive files; search SharePoint content; access Azure AD user profiles, group memberships, and directory data; send Teams messages; access Microsoft Planner tasks; create Excel workbooks and write data to them; and access usage reports. The Graph Explorer at developer.microsoft.com/graph lets you try any endpoint interactively before writing code.
4. What permissions does Microsoft Graph API require?
Each Graph API operation requires specific permission scopes granted to your Azure AD app registration. Permissions are either delegated (acting as a specific signed-in user) or application (acting as the application itself without a user). Example: Mail.Read (delegated) allows the app to read the signed-in user’s email; Mail.Read (application) allows reading all users’ email without sign-in. Permissions must be declared in the app registration and consented to by an administrator (for application permissions or admin-required delegated permissions) or the user (for standard delegated permissions).
This document contains proprietary information and is protected by copyright law.
Copyright © 2026 Red Gate Software Limited. All rights reserved
Load comments