
On May 2nd, Unity Technologies unveiled the newest version of their Unity game engine. Simply titled Unity 2018.1, this updated Unity engine brings numerous new features to it, including Shader Graph, GPU Instancing, and ProBuilder. But the new features that have arguably gotten the most attention and discussion is the C# Job System, the Scriptable Rendering Pipeline, and the Entity Component System. It also just so happens that all of those features involve writing some C# code. Suddenly, users of the Unity engine have ways to more easily write safe multi-threaded code and even change the way that Unity renders graphics. This article is going to take a brief look at these different features, primarily looking at how they work and why they may be important to your projects. Before talking about them though, it may be helpful to talk about Unity’s new Burst Compiler: the new Unity compiler that makes these new features possible.
Burst Compiler
The Burst Compiler is Unity’s LLVM-based, math-aware backend compiler technology. If you’re unaware of what LLVM (Low Level Virtual Machine) is, it’s a compiler infrastructure that is a collection of modular and reusable compiler and toolchain technologies. It’s designed for optimization of programs written in arbitrary programming languages, including C#. This ties almost directly into Unity’s new Job System. Thanks to the Burst Compiler, Unity will take your jobs written in C# and in return give optimized code.
Essentially, you acquire the different advantages of hand-tuned assembler code without actually performing the work normally required to accomplish such a goal. Not only that, but it will be optimized for every platform that you compile your project for, lightening your workload even more. If you wish to create a Mac version of your project, as an example, Burst will help you optimize your code so that your project runs just as well as it does on a PC. As you can see, optimization is the name of the game for Unity 2018, and it doesn’t stop at its compiler.
C# Job System
Unity’s new C# Job System is responsible for allowing you to write safe multi-threaded code to increase performance. In other words, creating jobs allows you to better utilize all the cores within a CPU to achieve maximum performance. Combined with the Entity Component System (which is currently still in beta as of 2018.1) and the Burst Compiler, you have the tools needed to make sure your project can run as smoothly as it possibly can. But how exactly are they made? Just how much of an impact does it really have on performance?
Simply making the jobs is a surprisingly simple process. The user must create structs, and those structs can inherit from interfaces such as IJob, IJobParallelFor, IJobParallelForTransform, and others. From there, within an Execute method, you then specify what you wish this job to do. This can adjust the object’s position, manipulate a mesh using perlin noise, and whatever else you wish the job to do. From there you will need to schedule the jobs to do their respective tasks.
Figure 1 shows the code from this Github project which is an example job used to move cubes in a scene:
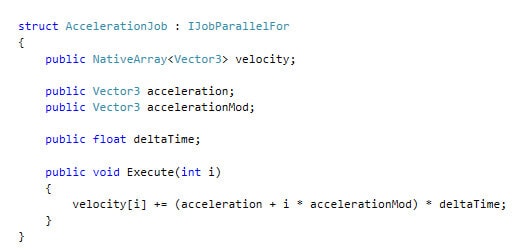
Figure 1: Code for an example job
But just how much of an impact does this really have on your project’s performance? I took one of the example scenes from this GitHub project and modified it to see how much of a difference there was. A boolean was created to toggle whether to use the C# jobs created within the project or to use code that one may have used before jobs were an option. An effort was taken to make sure the non-job code behaved as similarly to the code seen in the different jobs. Figure 2 shows the result when I ran Unity and opened the Profiler window with jobs turned off.
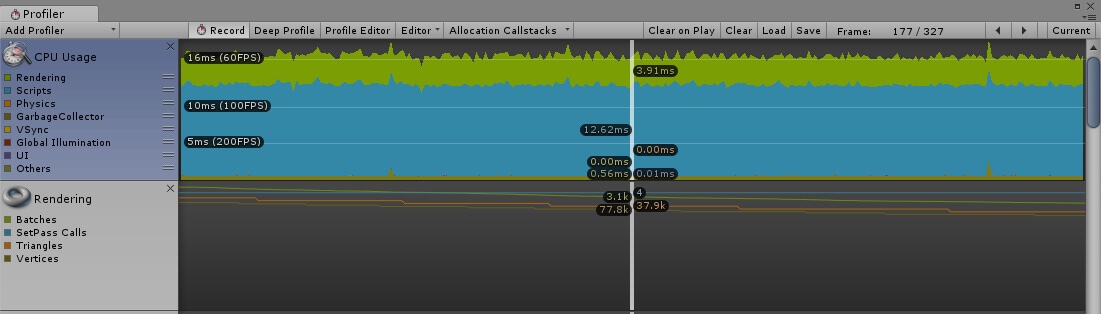
Figure 2: Unity’s Profiler window showing performance when not using C# jobs.
In the above image, I manage to get an average framerate just a little under sixty frames per second, an acceptable framerate, certainly. But notice the blue area in the Profiler? This measures how much CPU usage goes into performing the actions requested from the script pulling all of this off. As you can see, this is a pretty large amount. Now, when I toggle the script to use C# jobs, the result is Figure 3.
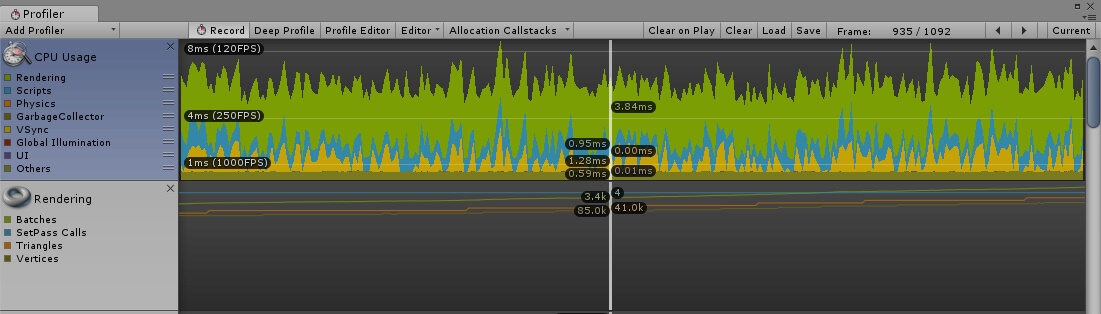
Figure 3: Unity’s Profiler showing performance when using C# jobs.
How’s that for a performance boost? The average framerate is over double what the framerate was when not using C# jobs. You’ll also notice that the large blue section from before is now considerably smaller. Remember, the blue area represents the amount of CPU usage going towards performing tasks specified in the script. By utilizing C# jobs, the amount of work the computer’s CPU must do is reduced since it’s taking advantage of the CPU’s multiple cores.
As of now, the job system is available for anyone using Unity 2018.1 to use. It’s admittedly a little tricky to get into since there is very little information or guidance on how to use it. However, the GitHub project I linked above has several examples that you can check out to help you get your feet wet. The benefits of a smooth running project cannot be overstated, and Unity’s C# job system makes it easier to assure your Unity project runs as well as it possibly can, allowing you to more easily increase the scale of your projects. Combined with the Entity Component System, the end result could become Unity being a place where the best running games come from.
Entity Component System (ECS)
Currently, Unity’s new Entity Component System (ECS) is in open beta. Unity Technologies have not stated when ECS will be have an official release, but you can at least experiment with it now in 2018.1 using the newly unveiled Package Manager. The only catch is that you cannot build your projects with ECS, so my personal recommendation is to not make any full projects with ECS in mind at this time. ECS is defined as a way of writing code that focuses on the data and behavior that make up your game. With this system marks a very significant change to the way Unity projects are made. Instead of the object-oriented design most Unity projects have used, Unity is looking to move to data-oriented design. Hardly a surprise as many game programmers have been using a data-oriented approach for a long time now.
Obviously, this means that the way Unity projects are made will change drastically once this becomes the norm. But seeing as it’s still in beta, there isn’t much use for it in a commercial sense right now. Even if you want to try out ECS now but aren’t feeling too sure about changing from object-oriented to data-oriented design, Unity does allow you to utilize a hybrid mode of ECS. This means you would create your entities that have a backing game object with a GameObjectEntity component added to the object in question. If you were to instead use pure ECS, you would be required to implement all your own components, right down to the Rigidboy and Animator components you may already be familiar with.
I’ve created an example of ECS in action in Figure 4, but it’s not pure ECS. I’ve opted instead to make a hybrid ECS project, since going pure ECS gets extremely complex. And with so little information available for pure ECS, it’s currently better to go with a hybrid version. In this example project I simply made the program spawn a line of cubes. Right away you may notice that there’s none of the usual code you might use to create an object in your scene during runtime. Though this may be the hybrid version in action, the code still looks incredibly different than your standard Unity code.
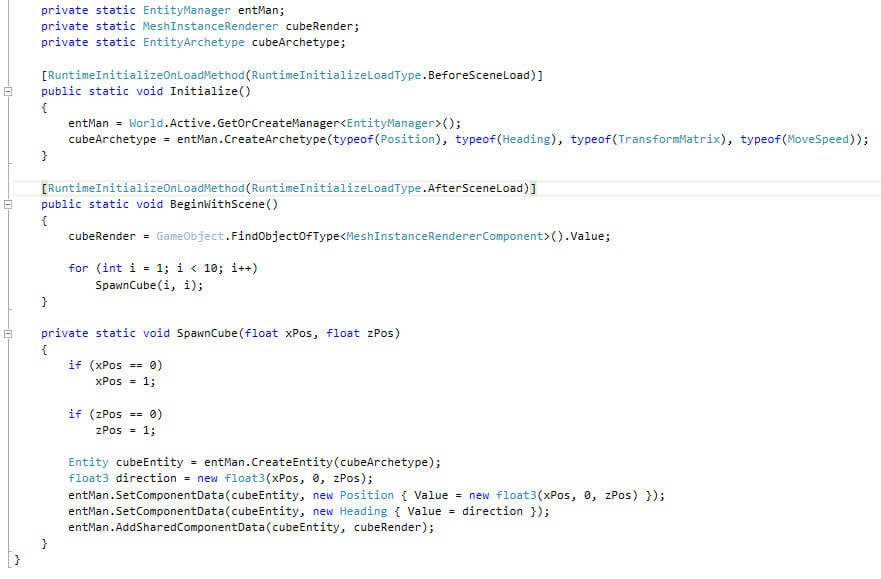
Figure 4: An example script using hybrid ECS
Instead of using Instantiate like you might normally do, you use CreateEntity. But before you can even create the entity, you must first create an archetype. From there you use SetComponentData to effectively create a new entity’s components, a far cry from simply selecting Add Component in the Inspector window within Unity. You also may be surprised to hear that you never actually attach this script to a game object in Unity. Instead, you save the script and leave it in your Assets window. Also remember that you’ll need to include using Unity.Entities if you wish to try this code out yourself.
To get this script to do its job and spawn the cubes, you have to do something a little different. After installing the Entities package from the Package Manager window in Unity, you must create an object that will have the now installed Mesh Instance Renderer Component. This, along with several other new components, is effectively a script you attach to a game object in your scene. By downloading the Entities package you gain access to several different scripts that are designed to work with Unity’s new ECS system. It’s a lot to comb through and out of the scope of this article, but some experimenting and checking out example projects can give you an idea of what is expected of anyone who wants to start trying out ECS. Figure 5 shows the result of playing the project after creating a script containing the code from Figure 4.
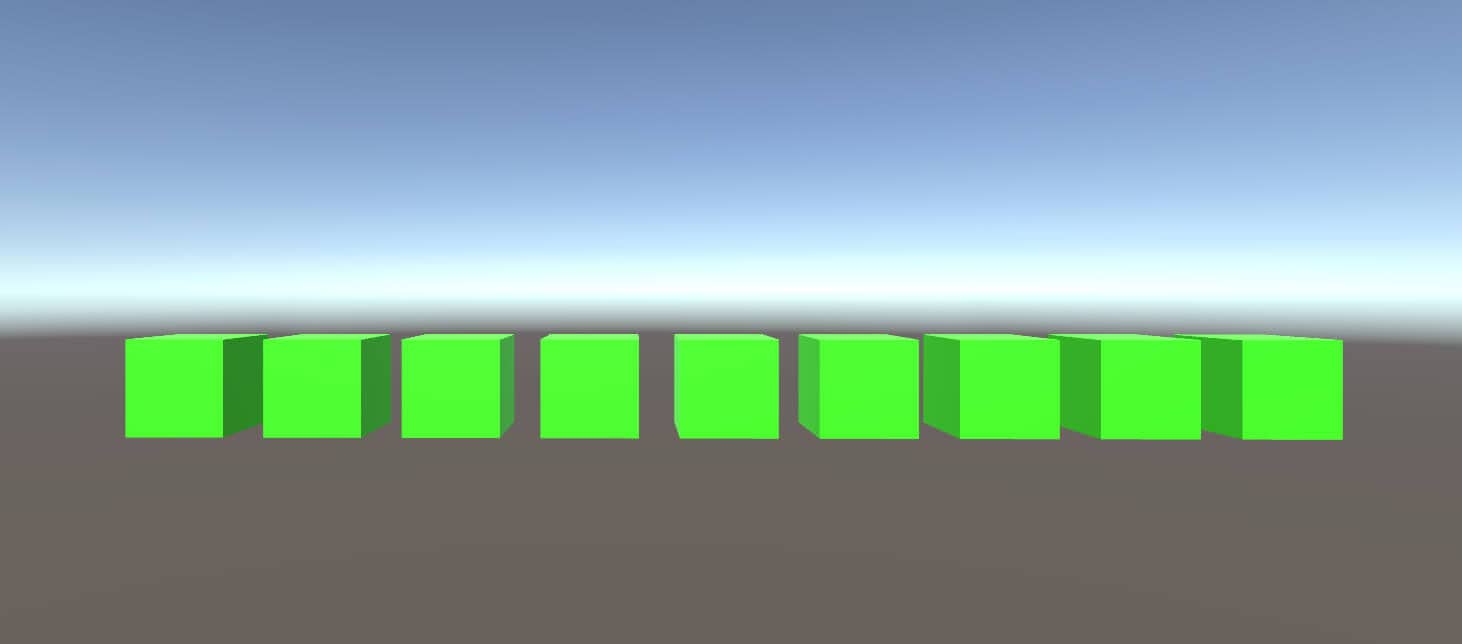
Figure 5: Spawning a handful of cubes using hybrid ECS.
Like with the C# Job System, there’s a GitHub project you can download to see more ECS in action. This project has a bit more pure ECS happening than what I have shown off here. You can find this project here. Once downloaded, open it up in Unity and poke around in the scripts to see what ECS has to offer. Just be aware there are some script components that come with the Entities package and others that are actually created by the user. Not all of the code you may see in this project will necessarily need to be written if you wish to replicate the project yourself.
Scriptable Rendering Pipeline
Unity’s new Scriptable Rendering Pipeline (SRP) is a way to handle and configure how Unity handles rendering by means of a C# script. Now, you may be wondering why you would ever script your own rendering pipeline when Unity’s built in rendering works well enough. That all depends on you and your project’s needs. Having control over how your project is rendered presents a lot of customization options to you that you may wish to take advantage of. For most projects, the built-in rendering works fine, but if you’re looking to achieve a very specific look for your game, SRP may be just what you’re looking for without needing to build your own engine from the ground up.
To help introduce some possibilities of using SRP, Unity now comes with some new templates. The Lightweight pipeline is made specifically for delivering maximized performance, especially for low-end hardware. If you desire to get your project on as many machines as possible, regardless of their hardware, then this rendering pipeline will be the way to go. Another new pipeline template is the High Definition pipeline. As the name suggests, this pipeline strives to render your scenes as beautifully as possible. By using this template, you’re specifically targeting high end computers and consoles as the machines that will run your project. Figure 6 shows where to find these new templates.
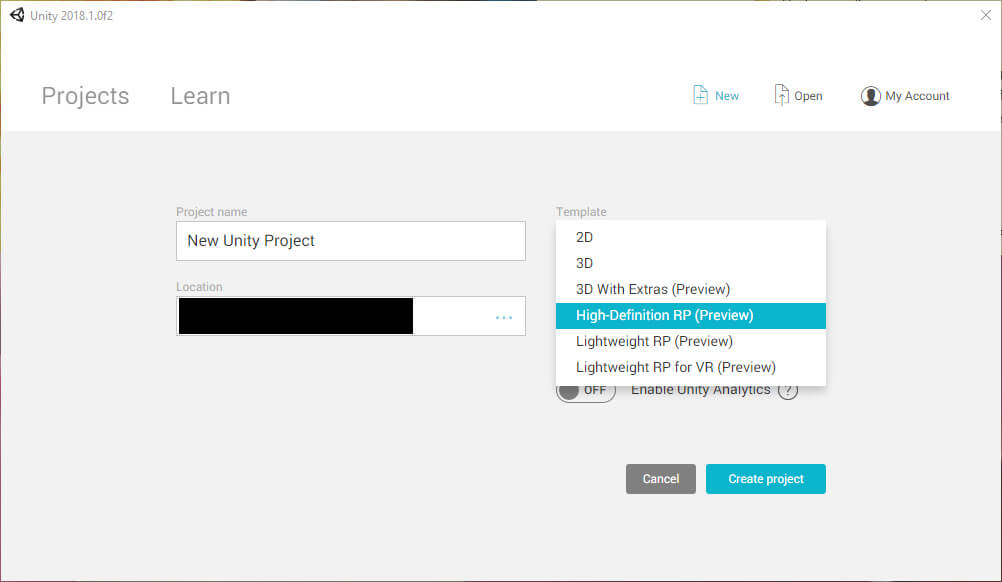
Figure 6: Unity project creation window with the new render pipeline templates.
If neither of those templates come with the appearance you want out of the box, there’s always the option of customizing the render pipeline yourself, either from scratch or using the templates as a starting point. The thing you must remember though is that this is by no means a beginner friendly approach. To create your own render pipeline, it’s advised that you either be a graphics programmer or have one you can work with to create the rendering pipeline for your project. I may not be able to provide any examples of SRP in action seeing as I’m not at all a graphics programmer, but there is a project created by Keijiro Takahashi that you can get from GitHub to see a great example of what a custom rendering pipeline can do for your project (Figure 7). Note: you may have trouble getting the project to work correctly on newer versions of Unity. If that’s the case, try commenting out the line _cb.GetTemporaryRT(rtID, rtDesc); in the Retro3DPipeline script.
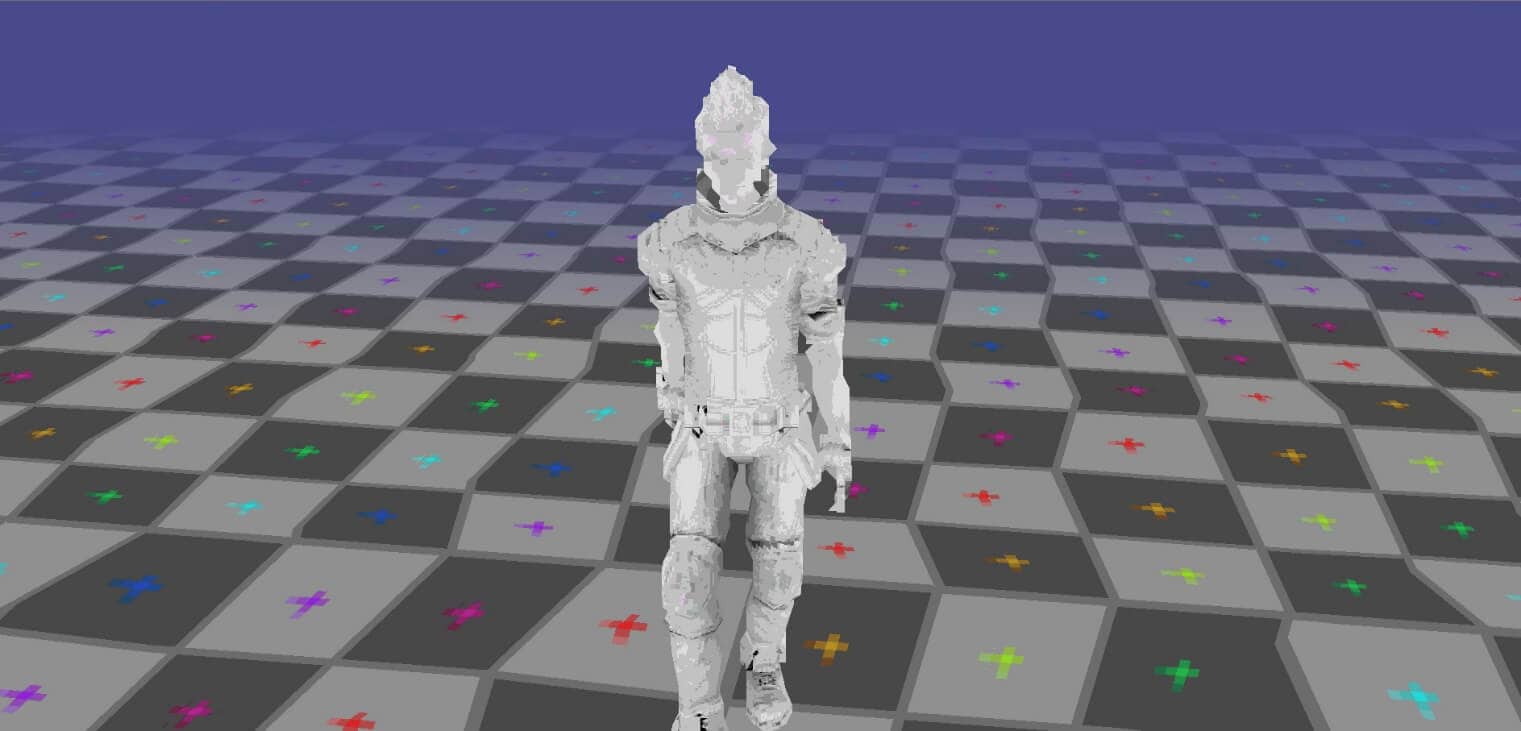
Figure 7: Keijiro Takahashi’s Retro3D rendering pipeline in action.
The fact that a game can undergo such a drastic change in appearance from a C# script opens up all kinds of possibilities for future projects made with the Unity engine. There’s been a derogatory term applied to just about any game created with Unity. It’s known as the ‘Unity look’ which is used whenever a game doesn’t look very pleasing to the eyes, thus making it safe to assume it was made in Unity. This wasn’t true to begin with as it all boils down to the one responsible for making the game look the way it did, but with the ability to customize how Unity renders objects it now looks like that term may become a thing of the past.
Conclusion
The tagline for Unity 2018 is ‘performance by default.’ When looking at these new features, both those officially released and those still in open beta, it’s easy to see where that tagline is coming from. Excellent performance is something all people like to see when playing games or using other tools, and Unity has now made it much easier to achieve great performance without the need to work so hard to get it. Right now, you can put the Job System to use in your current projects to begin taking advantage of multi-core processors. Though the Entity Component System is still in open beta, experimenting with it now could give you an edge when it’s officially released in a future version of Unity.
Finally, there’s the Scriptable Rendering Pipeline, allowing you to dig deeper into Unity’s rendering process and change it to suit your needs. You can create something that will run smoothly or increase the visual fidelity of your scenes. Perhaps you’re feeling very experimental and want to create a completely unique art style to your game. With SRP, all one needs are some graphics programming knowledge and the ability to write C# code and they can go anywhere. All this and the Burst Compiler making it easier for you every step of the way. And these are only the features focused specifically on coding. Combined with everything else that has come to Unity by way of the 2018 update, your project has just gotten much easier to see to fruition.
This document contains proprietary information and is protected by copyright law.
Copyright © 2026 Red Gate Software Limited. All rights reserved
Load comments