
The ability to change the appearance of the player-controlled character is practically a staple of video games. Some will argue that the appearance of the character is more important than the statistics or personalities of the characters themselves. A player often wants to put themselves in the game’s world, and the outward appearance of the one they are controlling is often the first way to accomplish this task. Creating the art for the character is most of the work itself, but of course, programmers have to develop the tools for the user to take advantage of it. As it turns out, developing those tools is easier than you may think.
This project will demonstrate how a character creator is made as well as how the character can retain its attributes from one scene to the next. As you may have guessed, there are several parts to the character creator itself, so this article will focus on the code to save time. That said, an overview will still be done to give you an idea of how the project will look and function once it’s complete. If you wish to follow along, you can download a version of the project without code. Also, there is a code completed project you can refer to as well.
The Project
To open a pre-existing project, you will first open Unity and click Open.

Figure 1: Opening a project
After this, navigate to the folder containing the project. Select the folder with the Unity project within it, then click the Select Folder button that appears in the bottom right. Once this is done, the project will begin loading. Keep in mind that you may have to navigate lower into another folder before finding the correct directory that Unity can open.
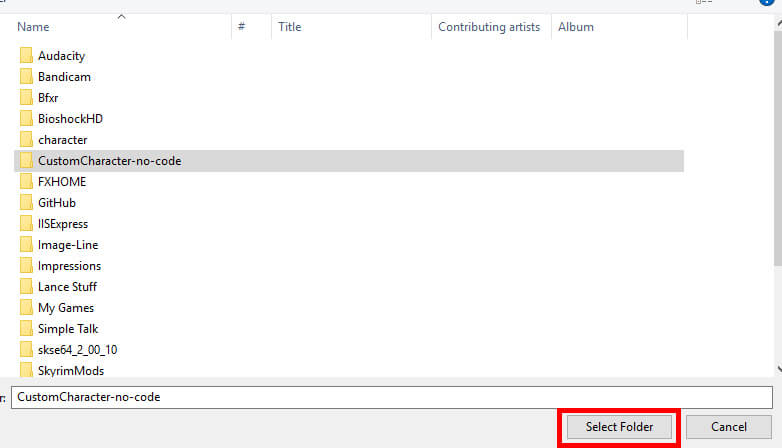
Figure 2: Selecting the project to be opened.
Once loaded, you’ll be greeted with a project that looks like the figure below:
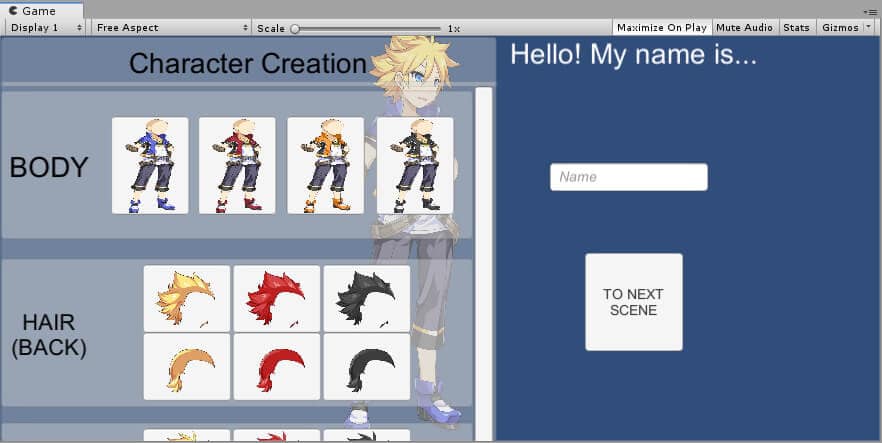
Figure 3: The character creator project
The screen won’t appear this way when testing the project in full-screen mode. This appearance is due to the way Unity is currently drawing the user interface (UI) in the game view. Right away, you’ll see a very menu-based project with several buttons and a scrollbar. The buttons, in particular, were created from a single button that was duplicated multiple times. Once all buttons are created in this manner, all that remains is adjusting their position, size, and image. There are an input field and a button saying “to next scene” on the right side of the screen. In the middle behind the UI objects is the user’s character, ready to be customized. The assets being used for the character come from the Custom Character 2D Vol. 1 asset from the Unity asset store. You can view these assets from its respective asset store page here.
Over in the Hierarchy, you can get a better idea of just how much is in the project. Expanding UI->CharacterCreatorBackground->OptionsContainer->Content reveals the different sections that the user will be able to change to their likings, such as the eyes and hairstyles. Expanding the different sections from there shows the individual buttons that make up each section. There’s a total of thirty-seven different buttons in the entire character creator menu!
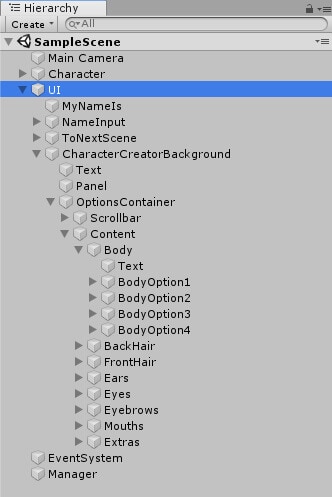
Figure 4: List of objects.
The last items of note are the two different scenes given the precise names of SampleScene and New Scene. Currently, you’re looking at SampleScene. You can double-click New Scene found in the Scenes folder in the Assets window to check out what’s inside that area if you wish, but there isn’t much. A salmon pink color with some white text that appears unfinished is all that lies within this scene. When the project is complete, this scene will have the newly created character along with some new text to demonstrate persistence between scenes.
For now, it’s recommended to have SampleScene opened as that’s where most of the action will take place. Now that you’re familiar with all the pieces bringing the project together, it’s time to create the code that will make your character creator operate. In the Scripts folder, you’ll need to create three C# scripts. The names of these scripts are in the figure below:

Figure 5: All scripts
The CustomChar Script
CustomChar is an excellent place to begin as its purpose is to hold all the various pieces that make up the character. Update can be deleted or commented out as it will not be needed.
|
1 2 3 4 5 6 7 8 9 10 11 12 13 14 |
public SpriteRenderer hairBack; public SpriteRenderer hairFront; public SpriteRenderer ear; public SpriteRenderer body; public SpriteRenderer eyebrow; public SpriteRenderer eye; public SpriteRenderer mouth; public SpriteRenderer effect; public SpriteRenderer faceOption; public string charName; void Start() { DontDestroyOnLoad(this); } |
Several SpriteRenderer variables are declared with a name that relates to what part of the customized character that’s being edited. For example, the ear variable will hold the character’s ear sprite. At the end of this list of variables is a string, called charName. This variable will contain the string the user inputs into the input field from earlier. In both of your scenes, some text will change to show the user’s name along with the remainder of a message. Finally, in the Start function, you have DontDestroyOnLoad called and given a target. When loading a new scene, all objects in the current scene would ordinarily get destroyed. If you wish for an object to persist throughout scenes, such as your custom character, then DontDestroyOnLoad will preserve this object and bring it into any new scene that is loaded.
The CustomChar script is now complete. UIManager is up next, and as you can imagine, it has a lot more going on, however, there are ways to simplify the coding process.
The UIManager Script
First, you’ll need to delete or comment out Start and Update. After that, you’ll also want to add using UnityEngine.UI and using UnityEngine.SceneManagement in order to perform certain tasks. Then you move on to the variable declaration:
|
1 2 3 4 |
[SerializeField] private CustomChar cc; public InputField nameInput; public Text message; |
You might think that some Sprite variables are missing for the different parts of the character, but what you’ll see later on is that the various button functions can take care of sprite assignment for you. While you can certainly create arrays to hold the different sprites, it would be far easier to give the function a parameter that you can fill in from the Unity Editor. What’s more, there’s no need to do one function for each button. You can instead create one function for each type of character part and let the parameter take care of the rest. The function will look like this:
|
1 2 3 4 |
public void HairBackAssign(Sprite selection) { cc.hairBack.sprite = selection; } |
This particular function would be given to the buttons that deal with the character’s back hair. All it does is get the CustomChar script, get the correct SpriteRenderer from it, and assign that SpriteRenderer the selection Sprite. All the other buttons follow a similar pattern with some minor differences. Table 1 shows all the functions and the corresponding code for each function.
Table 1: All functions and their code
|
Function Name |
Code |
|
HairBackAssign(Sprite selection) |
cc.hairBack.sprite = selection; |
|
HairFrontAssign(Sprite selection) |
cc.hairFront.sprite = selection; |
|
BodyAssign(Sprite selection) |
cc.body.sprite = selection; |
|
EarAssign(Sprite selection) |
cc.ear.sprite = selection; |
|
EyeAssign(Sprite selection) |
cc.eye.sprite = selection; |
|
EyebrowAssign(Sprite selection) |
cc.eyebrow.sprite = selection; |
|
MouthAssign(Sprite selection) |
cc.mouth.sprite = selection; |
Not all the button functions are complete though. There’s an extras section in the character creator which allows you to put glasses on the character and have them create a fireball. Where are the functions for those? They operate a little differently as neither the glasses or fireball have additional images that they could be. Instead, the buttons for those extras will enable or disable the item.
|
1 2 3 4 5 6 7 8 9 10 11 12 13 14 |
public void EffectOn() { if (cc.effect.enabled == true) cc.effect.enabled = false; else cc.effect.enabled = true; } public void FaceOptionOn() { if (cc.faceOption.enabled == true) cc.faceOption.enabled = false; else cc.faceOption.enabled = true; } |
The functions check if the sprite renderer for the fireball and the glasses is enabled or not. Depending on the answer it will reenable or disable the extras as needed. To complete the script, some assignments will need to be given to the button saying “to next scene” and the input field.
|
1 2 3 4 5 6 7 8 9 |
public void UpdateText() { cc.charName = nameInput.text; message.text = "Hello! My name is... " + cc.charName; } public void ToNextScene() { SceneManager.LoadScene("New Scene"); } |
UpdateText, unlike all the other functions in this script, will be called every time the value of the input field changes. This is being done so you can watch the text in the same scene update in real-time. It also will assign the text in the input field to the charName variable in CustomChar. The final function, ToNextScene, calls SceneManager to load New Scene. Speaking of New Scene, there’s one final script that needs coding for the code of this project to be complete.
The NewLevelText Script
Open the NewLevelText script, remove or comment out Update, add using UnityEngine.UI to the top, then enter the following:
|
1 2 3 4 5 6 7 |
private Text levelText; void Start() { string character = GameObject.Find("Character").GetComponent<CustomChar>().charName; levelText = GetComponent<Text>(); levelText.text = "Greetings! I am " + character + ", and I hope you have a wonderful day!"; } |
Used in New Scene, this script will find the character you create, get the CustomChar script and get charName. Then NewLevelText gets the Text component of the object to which it’s attached. Finally, it updates the level’s message to include the character’s name.
Save the code in Visual Studio and head back to Unity.
Completing the Project
Perhaps the most important script in the entire project goes to the Manager object. With the object selected, click and drag UIManager into the Inspector window to attach the script.
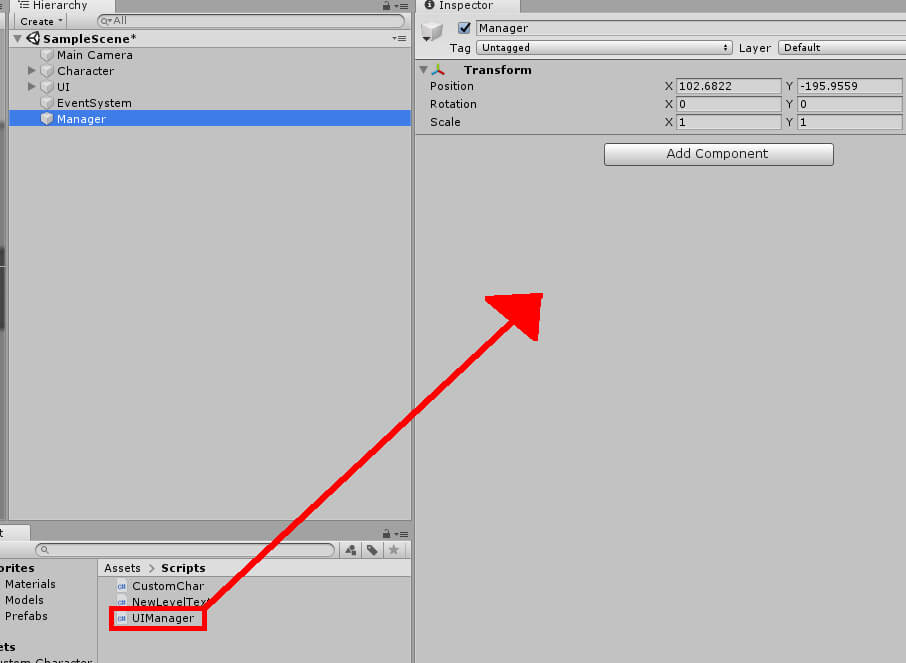
Figure 6: Attaching the UIManager component to the Manager object.
You should also do the same for the Character object and the CustomChar script.
Back at the Manager object, assign Character to cc, NameInput to UIManager’s NameInput, and MyNameIs to Message.
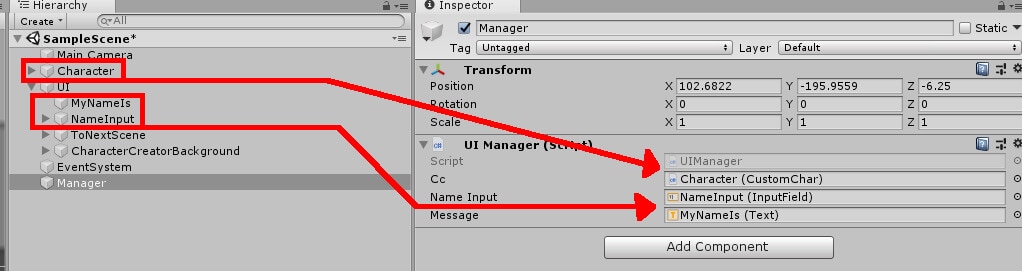
Figure 7: Assigning component fields
Next, you’ll need to tell Unity of all the different sprite renderers that make up the character. Expand the Character object in the Hierarchy, followed by expanding the Face child object to get all the different parts of the character. Then, with Character selected, click and drag all the different character parts into their respective fields in the CustomChar component.
Figure 8: Assigning the various character pieces to their respective fields.
Now comes the assignment of functions to UI elements. Starting with the NameInput field, find the On Value Changed event in the Input Field component within the Inspector window. Once located, click and drag the Manager object into the Object field. From there, select the button currently saying No Function. From the drop-down menu that appears, navigate to UIManager->UpdateText().
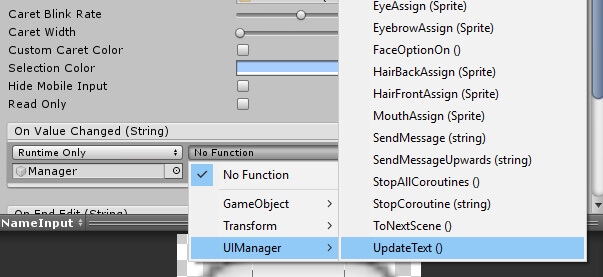
Figure 9: The function assigned to the input field’s On Value Changed event.
Similarly, you’ll need to give ToNextScene the ToNextScene function by finding the button’s Button component looking for the OnClick event. Once again, drag in Manager. This time look for the ToNextScene function.
All that remains after this is to assign all the character creator buttons to their respective functions as well as fill in the required parameter. Given the large number of buttons to work with a table will be provided showing the different buttons, the function to use, and which sprite to use for each button. But first, a quick example of how to handle these assignments as well as where to find the images in the first place.
First, you should navigate to the sprites to be used. In the Assets folder, navigate to Custom Character_Vol 1->png->character. From here, there are several folders corresponding to the various character pieces. Going into any of these folders will reveal the sprites you’ll need to fill parameters. Be aware that some of the files come as individual sprites while others are sprite sheets which are files with multiple images in a single file that get separated in Unity. Like with child objects in the Hierarchy, in these cases, you’ll need to expand the sheet to find the individual images.
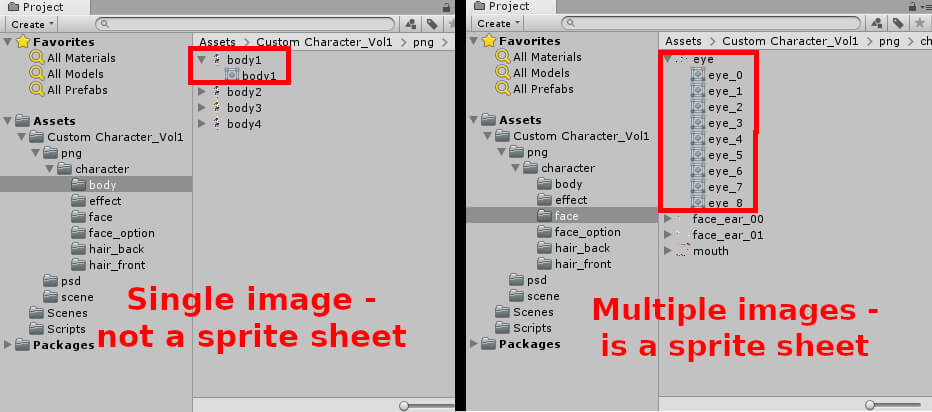
Figure 10: Comparison of sprites with and without sprite sheet.
As for assigning functions to buttons, it’s the same as the ToNextScene button as before but with an additional step. Once again, you’ll set Manager as the object in the On Click event followed by selecting the correct function. After that, a field will appear below the function drop-down menu asking for a sprite. Click and drag an image from the Assets window into this field to complete the button. Look for the buttons in the Hierarchy at UI CharacterCreatorBackground OptionsContainer Content.
Figure 11 uses the BodyOption1 button as an example.
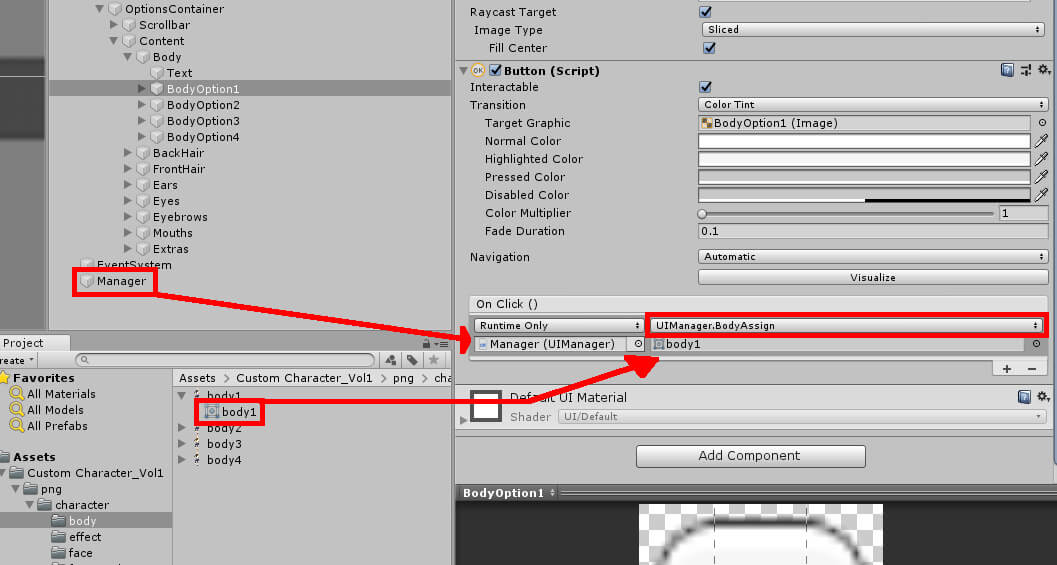
Figure 11: BodyOption1 button being given a function and sprite.
Using the table below, assign the character creator buttons to the correct functions and make sure they use the correct sprite. The codeless version of the project may fill the sprites in automatically after assigning the button function. This is due to some changes I made to the project before uploading it to GitHub. Though convenient, it is recommended you at least check the correct sprite is being used. It is also worth noting that the below table will specify if the sprite is found within a sprite sheet. Note that the button objects found in Extras will not need a sprite. This will also be specified in the table.
Table 2: All character creator buttons, their functions, and sprites.
|
Button Object |
Function |
Sprite |
|
BodyOption1 |
BodyAssign() |
body1 |
|
BodyOption2 |
BodyAssign() |
body2 |
|
BodyOption3 |
BodyAssign() |
body3 |
|
BodyOption4 |
BodyAssign() |
body4 |
|
BackHairOption1 |
HairBackAssign() |
h_b_a1 |
|
BackHairOption2 |
HairBackAssign() |
h_b_a2 |
|
BackHairOption3 |
HairBackAssign() |
h_b_a3 |
|
BackHairOption4 |
HairBackAssign() |
h_b_b1 |
|
BackHairOption5 |
HairBackAssign() |
h_b_b2 |
|
BackHairOption6 |
HairBackAssign() |
h_b_b3 |
|
FrontHairOption1 |
HairFrontAssign() |
h_f_a1 |
|
FrontHairOption2 |
HairFrontAssign() |
h_f_a2 |
|
FrontHairOption3 |
HairFrontAssign() |
h_f_a3 |
|
FrontHairOption4 |
HairFrontAssign() |
h_f_b1 |
|
FrontHairOption5 |
HairFrontAssign() |
h_f_b2 |
|
FrontHairOption6 |
HairFrontAssign() |
h_f_b3 |
|
EarOption1 |
EarAssign() |
face_ear_00 |
|
EarOption2 |
EarAssign() |
face_ear_01 |
|
EyeOption1 |
EyeAssign() |
eye_4 (found in eye sprite sheet) |
|
EyeOption2 |
EyeAssign() |
eye_5 (found in eye sprite sheet) |
|
EyeOption3 |
EyeAssign() |
eye_6 (found in eye sprite sheet) |
|
EyeOption4 |
EyeAssign() |
eye_7 (found in eye sprite sheet) |
|
EyeOption5 |
EyeAssign() |
eye_8 (found in eye sprite sheet) |
|
EyebrowOption1 |
EyebrowAssign() |
eye_0 (found in eye sprite sheet) |
|
EyebrowOption2 |
EyebrowAssign() |
eye_1 (found in eye sprite sheet) |
|
EyebrowOption3 |
EyebrowAssign() |
eye_2 (found in eye sprite sheet) |
|
EyebrowOption4 |
EyebrowAssign() |
eye_3 (found in eye sprite sheet) |
|
MouthOption1 |
MouthAssign() |
mouth_0 (found in mouth sprite sheet) |
|
MouthOption2 |
MouthAssign() |
mouth_1 (found in mouth sprite sheet) |
|
MouthOption3 |
MouthAssign() |
mouth_2 (found in mouth sprite sheet) |
|
MouthOption4 |
MouthAssign() |
mouth_3 (found in mouth sprite sheet) |
|
MouthOption5 |
MouthAssign() |
mouth_4 (found in mouth sprite sheet) |
|
MouthOption6 |
MouthAssign() |
mouth_5 (found in mouth sprite sheet) |
|
MouthOption7 |
MouthAssign() |
mouth_6 (found in mouth sprite sheet) |
|
MouthOption8 |
MouthAssign() |
mouth_7 (found in mouth sprite sheet) |
|
ExtraOption1 |
FaceOptionOn() |
N/A |
|
ExtraOption2 |
EffectOn() |
N/A |
Save your work. Go into New Scene by double-clicking the name in the Scene folder in the Assets. Find the Text object under Canvas. Once found, attach the NewLevelText component to it. After you finish that, save the scene and go back back to SampleScene and give the character creator a try.
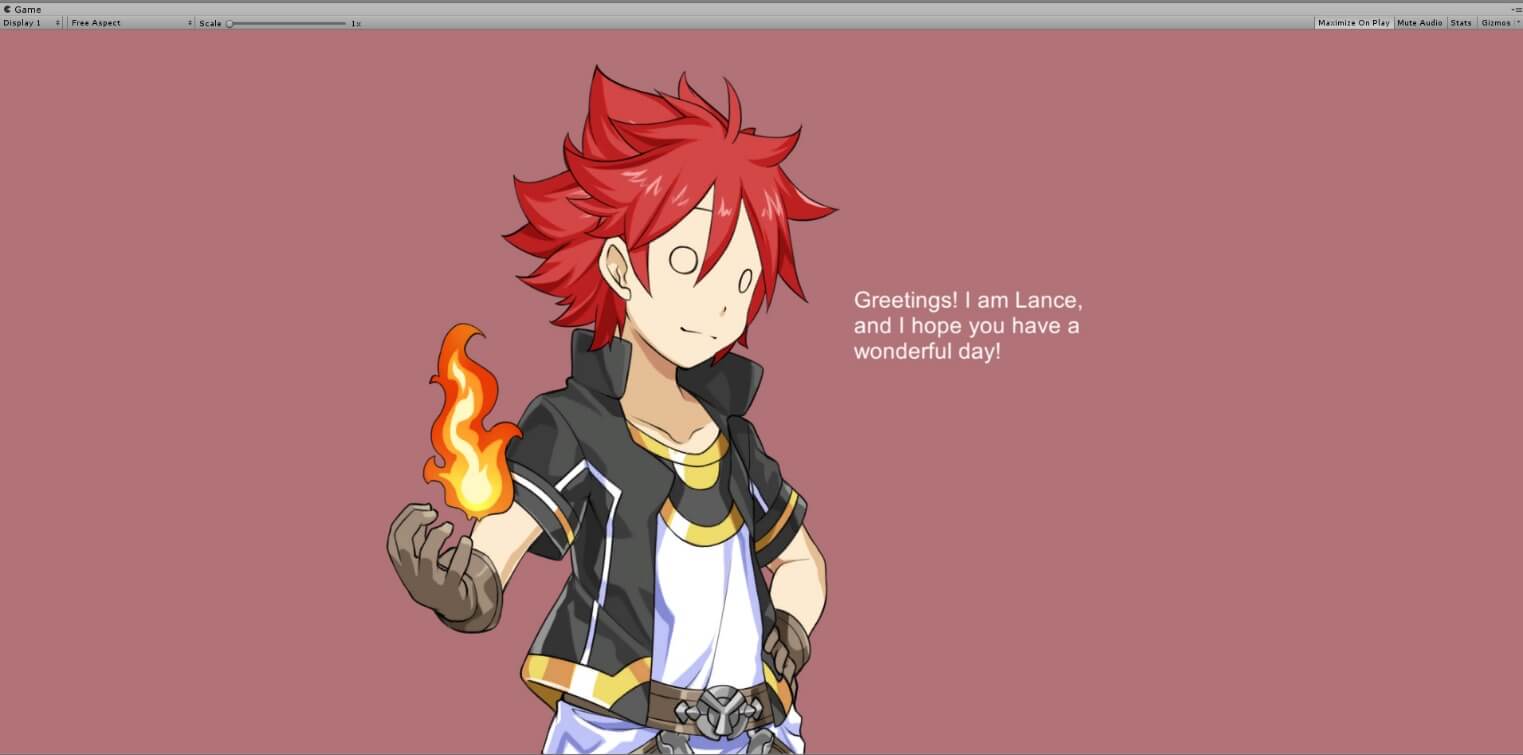 Figure 12: Character created in the previous scene persists into the new scene with DontDestroyOnLoad.
Conclusion
The two main takeaways from this project come from the button functions and DontDestroyOnLoad. Both simple items but can make game development much easier, especially when it comes to the more complex tasks like a character creator. Using parameters helped lower the number of lines in the code and kept everything tidy. DontDestroyOnLoad demonstrated the simplest way to have an object persist between scenes, thus eliminating the need to rebuild complex objects each time it’s required. All of this was shown in the context of character creators, but it could be used in other places such as stat keeping and tracking decisions the user makes.
Load comments