
Contents
This is the fourth installment of the TortoiseSVN and Subversion Cookbook series, which is a collection of practical recipes to help you manage source control with Subversion and its ubiquitous GUI front-end, TortoiseSVN. So far this series has covered:
- Part 1: Checkouts and commits in a multiple-user environment.
- Part 2: Adding, deleting, moving, and renaming files, plus filtering what you add.
- Part 3: Putting things in and taking things out of source control.
This installment explains the simple and elegant mechanism for sharing code among several projects, with both the separate projects and the shared code under source control.
Reminder: Refer to the Subversion book and the TortoiseSVN book for further information, and as directed in the recipes below.
Sharing common code in source control sounds daunting. In Subversion it really is simple-once you have seen how to do it. So I expect that, once you read this recipe, you will likely never need to come back to it; the whole concept will be folded into your “That’s obvious!” mental bucket.
To create linkages to external/shared code you need an appreciation of the following sometimes subtle points:
- You need to decide whether you want to use an absolute reference to the shared code repository or a relative reference. An absolute reference is simpler on the face of it, but introduces maintenance issues. If you choose instead to use a relative reference, you need to know the location of the shared code repository in relation to your local code. Depending on the distance between the two (which you will understand shortly) you can select one of the four relative addressing notations, or even a combination of them.
- You need to decide whether to use the head revision of the shared code repository or an explicit revision. The former is again, on the face of it simpler, but should almost never be done as you will soon learn.
A linkage involves specifying where you want to connect shared code into your local tree. You can make that specification right at the connection point itself but you are not limited to that point-you can actually specify the connection elsewhere (e.g. at the root of your project)!
The svn:externals property is the nexus of all things relevant to sharing code. With Subversion 1.7 it is easier than ever to set the fields of this property to properly specify your local connection point, your external reference, and the appropriate revision.
Reusing common code
Inevitably, when you have several projects under source control you will want to avoid duplication of code by sharing some code between two or more of them. Subversion provides a facility for linking projects in order to make this possible. In Figure 4-1, for example, you have two projects sharing some common code. This is quite simple in concept, but since they are separate projects in your Subversion repository, how then can they both include the common library under source control?
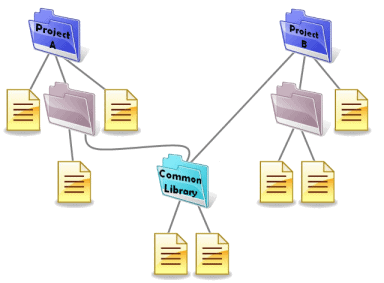
Figure 4-1 The desired file system organization to share common code.
The answer is to promote the Common Library so it is also a first-class project in Subversion: Then have both projects (Projects A and B) each establish a link at the appropriate point in their respective project trees (Figure 4-2).
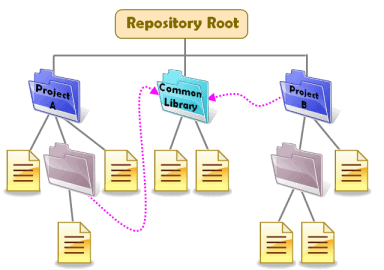
Figure 4-2 The underlying organization of the main projects and shared project in the Subversion repository.
To set up a connection to a shared project that you want to link into your main project, you specify just three key pieces of information in the svn:externals property:
- The connection point in your project.
- The address of the target/shared project.
- The revision number of the shared project.
To do this, you need to edit the svn:externals property. Version 1.7 of TortoiseSVN makes this easier and less error-prone by introducing a customized property editor. Figure 4-3 shows an example of the svn:externals property editor with the three data supplied.
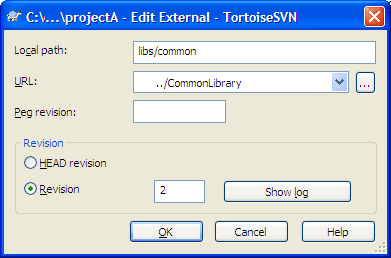
Figure 4-3 The svn:externals property editor.
The following sections describe the three components of the svn:externals definition in detail. Note, however, that you can easily experiment with the linkage without committing anything to your repository: after you define the svn:externals property, then perform an SVN Update on that item. That will pull down files from your repository if your URL is specified correctly, or yield an error if not. If you get a successful download from the repository, then examine where it places your files and fine-tune the local path appropriately if it did not place them where you expected. When you’re satisfied that it’s correct, commit the folder with the svn:externals definition.
Connection Point (Local path)
The first key field is the connection point (the Local path field in Figure 4-3). What you specify for the connection point depends on where you define the svn:externals property. This is not some global setting but, like all Subversion properties, must be attached to one or more files or folders in your tree. This specific property, though, should be attached to just a single folder. There are two obvious choices for which folder to attach to: the project root folder or the linkage point itself. Suppose that the connection folder in Figure 4-2 for Project A is named libs. Underneath libs you want to have the CommonLibrary folder but with a different name, say common. If you choose to define svn:externals on the root folder of Project A, set Local path to libs/common (i.e. the path from the root to the linkage point) and include, as the leaf node of the path, the name of the folder that the linked folder will assume. If you choose instead to define svn:externals on the libs folder then just give Local path the value common. In other words, Local path is simply a relative file path from the folder on which you define the property to the connection point.
Target Address (URL)
The second key field is the address of the target project (the URL field in Figure 4-3). You can specify the shared project’s address with either an absolute or a relative path; the latter is strongly recommended in order to avoid runtime issues (e.g. protocol differences) or maintenance issues (e.g. relocated folders). Either way, be sure to properly encode the URL or it will not work. Curiously both the Subversion book, Externals Definitions section, and the TortoiseSVN book, External Items section, mention only that the space character must be encoded as %20 in a URL. However, I suspect that all the standard encoding rules apply, meaning there are a variety of characters that need to be encoded-see Wikipedia’s Percent Encoding article for more.
The typical Subversion absolute URL is shown in Figure 4-4 with its component parts identified.
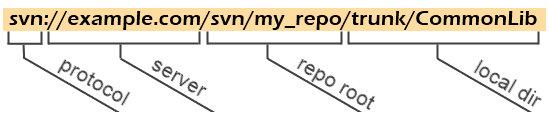
Figure 4-4 An exploded view of a typical Subversion URL.
The conventional notion of a relative path, as you know, means relative to your current directory. Subversion, however, lets you construct a relative URL that is relative to any one of the four component parts identified in Figure 4-4, giving you great flexibility to select the style that fits best in your environment. You specify which style with appropriate notation.
Examining each of these in turn, first consider the nearest accessor, the conventional local (or current) directory. You know how to do this in your sleep if you have ever used a command line, but it’s a starting point! Assume that your local directory is just the Project A root folder in Figure 4-2. To reference the CommonLibrary directory, which is a sibling of Project A, you simply need to traverse “up” one to the common parent then traverse “down” to the folder of interest, i.e., ../CommonLibrary. If you started at a folder several levels deep under Project A, use successive repetitions of the parent notation, e.g. ../../../../../../CommonLibrary.
While you could use that last path, it is rather ugly and error-prone. So it would be quite a convenience to have a direct way to refer to your project’s repository root: Subversion uses the caret (^) notation for this. So no matter how deep you are in Project A, you can just use ^/CommonLibrary to refer to CommonLibrary as relative to Project A’s repository root. That works because, as Figure 4-2 shows, both Project A and CommonLibrary are immediate children of the repository root. If these projects themselves are lower down, you can add additional relative path components, e.g. ^/folder1/folder2/CommonLibrary. One important point to keep in mind with repository-relative paths: the typical Subversion repository has exactly three children-the top-level trunk, branches, and tags directories. All the projects are under the trunk subdirectory. So you would likely need to use ^/trunk/CommonLibrary rather than ^/CommonLibrary.
Thus far, the examples have shown how to share code from projects within the same repository. But that is not an inherent limitation of Subversion; you can easily refer to projects in different repositories and you can still use relative URLs! You might, for example, have a single parent folder containing a collection of repositories on your server, making all the repositories siblings. You can then just combine the current-directory-relative accessor with the repository-relative accessor to reference a sibling repository, as in ^/../OtherRepo/trunk/CommonLibrary.
If, on the other hand, your repositories are not clustered together, move to the server-root-relative accessor, the virgule (/), allowing the flexibility to range across your file system with a relative URL.
Finally, be aware that if you use different schemes (or protocols) depending upon network location (e.g. svn:// on your intranet but svn+ssh:// on the internet), then you should use protocol-relative URLs, beginning with a double virgule (//).
The table below summarizes the relative URL accessors with both textual paths and illustrated paths. In the illustrations, the current directory is represented by the green dot and the target project is represented by the blue dot. Which type of relative URL to use will vary depending on your particular environment.
| Relative to… | Path Prefix | Examples | Visualization Example |
| current directory | ../ | ../CommonLibrary ../../../../repo/a-projects/trunk/lib |
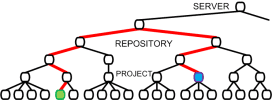 |
| repository root | ^/ | ^/trunk/CommonLibrary ^/../other-repo/stuff/trunk/lib ^/a/b/c/d/e/trunk/lib |
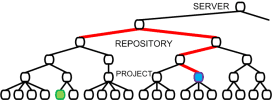 |
| server root | / | /svn/my_repo/trunk/CommonLib | 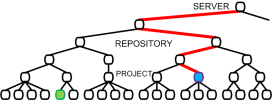 |
| protocol (scheme) | // | //example.com/svn/my_repo/trunk/CommonLib |

“…relative URLs…are relative to the object where you define the svn:externals property, not where your svn:externals property specifies to actually link the external directory.”
When using relative URLs, keep in mind that these are relative to the object where you define the svn:externals property, not where your svn:externals property specifies to actually link the external directory (with the Local path field in the property editor). Figure 4-5 shows an example where Project A specifies an external library in the root folder of Project A itself. The heavy dashed arrows show the connection specification: the connection point in Project A (Local path) is two levels deeper in the Project A tree, while the target address (URL) is a relative path-relative to the Project A root folder because that is where the specification is defined. The resulting connection, though, is represented by the magenta arrow.
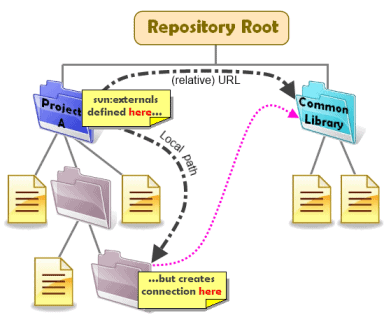
Figure 4-5 The specification of an external link may be far from the actual linkage point; a relative path to the target is relative to the specification point rather than the linkage point.
Revision numbers
“You code to a specific revision of the shared library so you must explicitly define that revision in the svn:externals linkage.
The third key field is the revision of the target project (the Revision field in Figure 4-3). Note in the figure that you could select either the head revision or a specific revision. Never choose the head revision; it is a bad idea to even have it available as a choice in the dialog. Why? Think of this shared code as a single package with a revision number, just like some other single DLL or other third-party library you use in your project. You cannot just use any version of thingamabob.DLL with your code; you code against a specific release. If the supplier releases an update to their DLL you do not just blindly plug it in: you review it for any API updates and breaking changes and test for runtime differences, then choose a convenient time when to make a change to a new release of the library. The situation is exactly analogous here. You code to a specific revision of the shared library so you must explicitly define that revision in the svn:externals linkage. The Subversion book makes the case for an explicit revision so well that the TortoiseSVN book simply repeats it:
… you get to decide when to pull down a different snapshot of external information, and exactly which snapshot to pull. Besides avoiding the surprise of getting changes to third-party repositories that you might not have any control over, using explicit revision numbers also means that as you backdate your working copy to a previous revision, your externals definitions will also revert to the way they looked in that previous revision, which in turn means that the external working copies will be updated to match the way they looked back when your repository was at that previous revision. For software projects, this could be the difference between a successful and a failed build of an older snapshot of your complex codebase.
In other words, you want to be in control of when your third-party code changes even if that third party code is still your code but from a different, shared project. The second part of that exposition is perhaps even more significant. If you ever need to go back to a previous release, your code will still work because you have explicit versions on your shared code. Consider the fictitious Remplissage product as an example to illustrate this. Assume you have had three releases of the product, cleverly labeled versions 1.0, 2.0, and 3.0. The table below shows the Subversion revision of your local code base associated with each label. Your product also includes a shared library that you keep in a separate repository and, per the advice given here, you specified explicit revision numbers when you linked in the shared code.
|
Release Label |
Local Code Revision |
External Code Revision |
|
Remplissage 1.0 |
1932 |
431 |
|
Remplissage 2.0 |
2456 |
431 |
|
Remplissage 3.0 |
2601 |
509 |
Say you have just completed and labeled Remplissage 3.0. But you have received a bug report on release 2.0, which you are naturally still supporting. So you revert to the revision associated with release 2.0 (revision 2456 from the table). Because your svn:externals included revision numbers your code automatically rolls back the shared code from revision 509 to revision 431 as well!
To my mind, it would be even better if TortoiseSVN could be redesigned to let you specify a tag name or a revision number. In development, you could easily be working with unfinished shared code so that the shared code would not be officially released, and so would not necessarily have been given a tag. However, when you are finished, or at least ready to release to production, it would be nice to be able to reference the shared code library by its tag rather than just its revision number. As it stands, you need to take the extra step to cross-reference a tag name to a revision number and then plug in the revision number in the svn:externals property editor.
Bug with file scheme
As I was assembling this recipe I came across a subtle defect. In order to test scenarios, I used a local repository with the file scheme, which uses this canonical URL format: file://host/path (see File URI scheme on Wikipedia). You may omit the host (implicitly specifying localhost) but you must keep all the virgules, yielding three contiguous virgules: file:///path. The svn:externals property editor is actually three dialogs deep from the context menu, shown at the top of Figure 4-6. You can specify a file scheme as shown, accept the choices to close the dialog and return to the second-level dialog that now shows all of the possibly multiple values with one per line (middle of Figure 4-6). Accept the values there to return to the first-level dialog, showing all Subversion properties, one per line (bottom of the figure). That works fine the first time you add an entry using the file scheme. But I found that when I went back in to edit the svn:externals property-regardless of whether I touched the entry using the file scheme or not-TortoiseSVN erroneously alters the three virgules to two virgules!
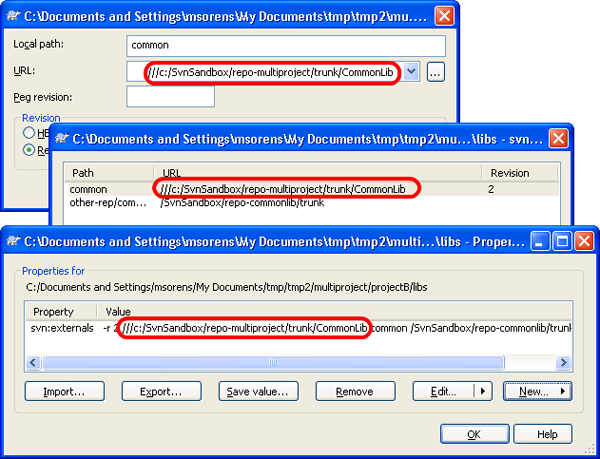
Figure 4-6 A URL using the file scheme works fine when just created, as shown here in the successive dialogs from the svn:externals property editor, the list of separate entries associated with the svn:externals property, and the list of all Subversion properties for the current object. But version TortoiseSVN 1.7.1 has a defect that changes the triple virgule to a double virgule if you re-edit the svn:externals property.
Load comments