
Contents
Introduction
Should you use source control?
“Yes”.
No equivocation. No conditions. No ifs, ands, or buts: Just ‘Yes’.
More often than not in computing, black and white answers dissolve to shades of grey on closer inspection: Not so with the question of whether to use source control. No matter the size of your development team, you should use source control. StackOverflow offers a wealth of supporting material if you need to convince yourself, your manager, or your colleagues. Here are a few of the more poignant comments from Is Subversion (Version Control) Necessary For A Small Development Group (1-2 programmers)? on StackOverflow:
Version control is only necessary where the number of programmers is > 0. – Murph
Version Control is the most important tool that a programmer has, even more important than the actual programming languages. – David Lambert
Not having some sort of source control is pure insanity. – 17 of 26
These statements serve to illustrate how overwhelmingly clear the answer to the question is. The discussion for ‘Why should my team adopt source control?‘, on the other hand, gives you page after page of reasons why the answer is clear, including multiple-release support, rollback capability, diagnostic capability, traceability, backups, and more. And as several posts point out, you are probably already using source control even if you have not installed a source control system. Saving a copy of your work folder as work_save or work_bak or work-05-21-2011 is source control, just not very good source control!
Which source control system should you select?
Obviously I think Subversion is a great system, otherwise I would not have invested the time and energy in writing what you are reading; but it is not necessarily the best choice for you. If you know what specific features you need in a version control system, but are not sure which systems deliver which features, start by reading the Wikipedia entry. Wikipedia offers outstanding, detailed comparison tables for many different types of software. Their comparisons of version control software are very thorough, comparing a large number of facets of each in eight tables-Figure 1 shows a tiny excerpt highlighting an entry for Subversion:
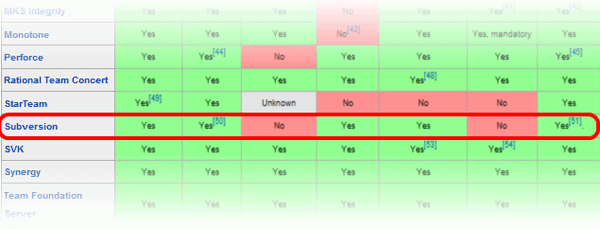
Figure 1: An excerpt from Wikipedia’s comparison of source control systems
One key piece of information available in the Wikipedia tables is the history and adoption of each product, i.e. when was it commercially available and who is using it. SCCS was extremely useful when it came out… but that was 1972 and it is rather dated today! The version control timeline from the Plastic SCM Blog organizes many of the same VCS products in an illustration that lets you see history at a glance.There you will see that Subversion dates back to 2000 and there are quite a number of newer systems worth consideration. However, Subversion still ranks highly on the cost-benefit curve of VCS products, when considering its ease of use, simple installation, flexibility, and scalability, among other key features.
Probably the most important question to consider when selecting a VCS is whether a centralized or a distributed system is more appropriate. Craig Trader’s answer to the StackOverflow question Comparison between Centralized and Distributed Version Control Systems included this great synopsis of the two:
Centralized VCS systems are designed with the intent that there is One True Source that is Blessed, and therefore Good. All developers work (checkout) from that source, and then add (commit) their changes, which then become similarly Blessed. The only real difference between CVS, Subversion, ClearCase, Perforce, VisualSourceSafe and all the other CVCSes is in the workflow, performance, and integration that each product offers.
Distributed VCS systems are designed with the intent that one repository is as good as any other, and that merges from one repository to another are just another form of communication. Any semantic value as to which repository should be trusted is imposed from the outside by process, not by the software itself.
A later response to the same question shows that Subversion is the major player in the former category and Mercurial in the latter. So if you think a centralized VCS might be a good fit, you may find the recipes in this cookbook to be quite handy!
What will you get from reading this?
This is the first part of a book of recipes for Subversion. What you will find is a collection of practical guides to help you navigate through the occasionally subtle complexities of source control with Subversion. The title mentions both Subversion and TortoiseSVN because, though Subversion is the foundation, the main focus is on using the elegant, clean, interface of TortoiseSVN. To be sure, though, there are some recipes that discuss operations from both a GUI perspective and from the standpoint of Subversion’s command line. There are even some recipes that dive deep into command line territory supplemented by PowerShell scripts to allow you to tease great things out of Subversion. And finally, a later part of the cookbook will cover other tools that supplement TortoiseSVN and Subversion; tools such as AnkhSVN for integrating Subversion into Visual Studio and SQL Source Control for easily keeping your database to Subversion source control.
There are two other outstanding resources you should refer to in your explorations of Subversion: Oreilly’s Version Control with Subversion, available free at the link provided, and the TortoiseSVN Manual, which is a great reference for the GUI application. This cookbook does not replace either of those; indeed, you will find copious references to both of those (hereinafter referred to as the Subversion book and the TortoiseSVN book, respectively). The issue is that both of those are primarily references; this cookbook takes a different perspective, focusing on the tasks you need to accomplish and helping you do so efficiently and effectively.
Subversion is reasonably easy to use from the command line; however, the graphical front end provided by TortoiseSVN makes it downright simple to use for most day-to-day tasks. So why the two voluminous reference books I’ve mentioned as well as the cookbook you are now reading? As with many things, the practice is not just a bit more complicated than the theory but when you truly need to appreciate all aspects of the problem, it is a lot more. This cookbook brings theory and practice together into a cohesive whole; consider this the GUI of the Subversion references!
Part 1: Basics
Initial Concepts
Checking out a working copy
To start working on a project in Subversion you first checkout the project to your local machine creating a working copy. Unlike some source control systems, Subversion uses a non-locking strategy. With a locking strategy, when you checkout a file it is locked, preventing other users from editing the same file. Once you complete your modifications you commit it back to the repository, releasing the lock. Subversion, on the other hand, allows simultaneous editing of a file: your checkout is completely transparent to other users on your project.
To perform a checkout, simply use Windows Explorer (or equivalent), to select a directory where you wish to load the files, open the context menu, and select SVN Checkout. Note that a checkout is a one-time operation: you check out to an ordinary, non-Subversion-aware directory. If you try to checkout to an existing Subversion-aware directory, you cannot: the checkout command will not be on your context menu. (Thanks to the question TortoiseSVN Missing Checkout from Context Menu on StackOverflow.)
The checkout dialog, by default, checks out the entire subtree rooted at the repository URL you specify. However, you can selectively checkout a subset if you do not want to pull down an entire project. See Checking out a Working Copy in the TortoiseSVN book for details on specifying checkout depth.
Working well with others
Once you have checked out your project, you are free to edit whatever files in the project you need for a particular task. When you have completed the task you commit the file or files back to the repository (SVN Commit). The commit operation publishes your local changes to the repository, at which point they are exposed to other users of your project.
If you are the only developer on a project then that is all you need to do. In the real world, however, other people are also making changes to the repository at the same time as you. Furthermore, except in the very rare case where you have just checked out the project for the first time and made a quick edit, time will have passed between your initial checkout and the point at which you need to begin editing a file. Because of commits from other users in the meantime, you are likely to have a stale copy (point 1 in Figure 1-1). To ensure that you are always working on a current version of a file, use the SVN Update command to freshen your working copy immediately before you begin (point 2).

Cardinal Rule #1:
“Never do a commit in isolation;
treat SVN updateÂ-manually verify-SVN commit as an atomic operation.”
You should also use SVN Update periodically as you work (red arrows), assuming your edits span some considerable period of time. As you reach appropriate milestones you may want to release your work to your project members via SVN Commit. But before you do, you should again ensure that your copy is not stale. That is, you should perform an SVN Update to merge in any changes that other developers may have committed while you were working on your changes (point 3). Once you have done the update you must then confirm that any merged changes do not interfere with any of your pending changes and then commit your changes (point 4). Good practice dictates you abide by this cardinal rule: Never do a commit in isolation; treat SVN update-manually verify-SVN commit as an atomic operation.
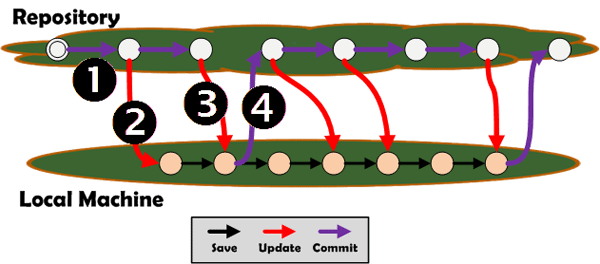
Figure 1-1: Keeping your working copy in sync and safely committing your changes
Coping with a multi-user environment: the merge
Let’s assume that you are editing a file, and another member of your team is editing that same file. As long as the changes are on different lines of the code, Subversion can merge in both of your changes when you do a commit. (See the next recipe for changes to the same lines.) So you make some changes… your neighbor makes some changes… you both commit… life goes on. But watch out! No source control system deals with semantics; merging is purely mechanical. Consider the progress from left to right in the table below. Developer A works on a particular bug, changing the line indicated in the file. Developer B, unbeknownst to Developer A, works on the same bug, making the change shown. The changes are on different lines, so there is no problem merging them all together mechanically to get the final result shown.
|
Original |
Developer A |
Developer B |
Merged Result |
|
function f(int n) { int start = 0; start += n; return start; } |
function f(int n) { int start = 1; start += n; return start; } |
function f(int n) { int start = 0; start += n; return start+1; } |
function f(int n) { int start = 1; start += n; return start+1; } |
But the code is broken! Instead of (n + 1) you end up with (n + 2). Nothing in a source control system can prevent this. But remember the SVN update–verify–SVN commit cardinal rule given earlier? It is the middle step-the verification that you do manually-where you need to notice and fix the problem caused by the merge.
(Thanks to the question Why did TortoiseSVN merge a file and not conflict it? on StackOverflow for inspiration.)
Handling multiple edits to the same line of a file: conflicts
If you are editing a file that another team member is editing, then you have the potential for conflicts. As the previous recipe showed, if you and your neighbor are working on unrelated lines in the file, you can both commit your changes without conflict, though you need to be careful to ensure the code semantics are not corrupted. If you are working on one or more lines in common, the first person to commit will sail through unscathed (point 1 in figure 1-2). The second person who attempts to commit receives a warning that the file is out of date and an update is required before you can commit (point 2). Finally, when you do the update, it reports a conflict on the file (point 3).
You can see the result of the conflict in Windows Explorer or equivalent (point 4). The file with the original file name (stuff.txt in this example) is now marked with a conflicted overlay icon; this file has also been annotated with conflict markers so you can see where the issues are. Fear not! You have not lost your version of the file. It is safely tucked away in stuff.txt.mine, one of three additional files created due to the detected conflict. The suffixes of the other two new files indicate the revision numbers of those files. The smaller number (stuff.txt.r16 in this example) is the base version that you began your edits on; the larger number (stuff.txt.r18) is the head version of the repository, the one you need to actually reconcile with.
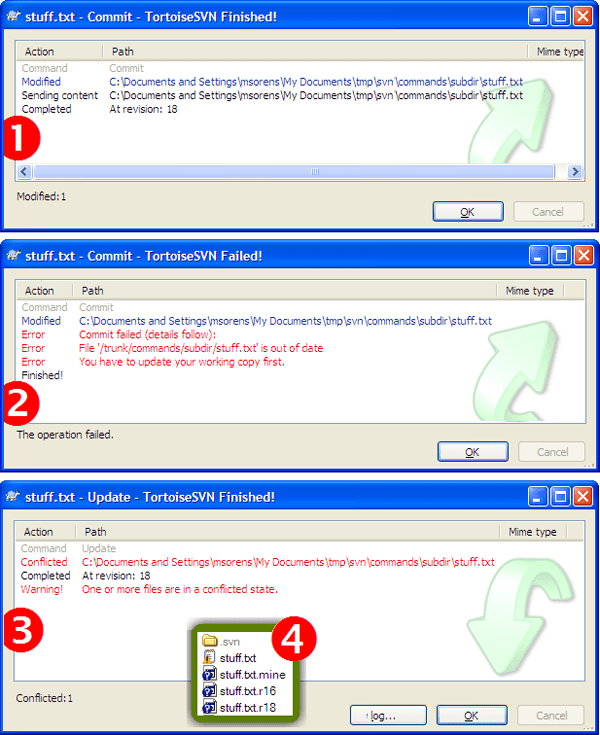
Figure 1-2 Multiple editors on the same portion of a file. (1) First committer succeeds. (2) Second commit attempt fails. (3) Updating to sync with first commit reveals a conflict requiring manual resolution.
In order to reconcile the difference, you need to open the context menu on the conflicted file (stuff.txt) and select TortoiseSVN >> Edit Conflicts. This launches either TortoiseMerge or your custom-configured merging tool. Once you manually examine and resolve each difference, save the file, then execute TortoiseSVN >> Resolved… to open the Resolve dialog. You can then just select the OK button since you have already resolved the issues.
Alternatively, rather than invoke TortoiseMerge or equivalent, you can go to TortoiseSVN >> Resolved… right away. Once you’ve reached the Resolve dialog, you should open the context menu on the file in question (Figure 1-3). The first choice, Edit Conflicts, is yet another way to open TortoiseMerge. Once you manage the conflicts, use the Resolved choice from the same context menu to indicate it is, in fact, resolved. The remaining two choices are handy shortcuts for particular conditions:
- Choose Resolved conflict using ‘mine’ if your newly edited version is the one you want to use. The conflicted version of the file (stuff.txt) is discarded, your version of the file (stuff.txt.mine) is renamed to take its rightful place (stuff.txt), and the revision-suffixed files are both discarded.
- If, on the other hand, you prefer to throw away your edits and just use the head revision from the repository, choose Resolved conflict using ‘theirs‘ to now rename stuff.txt.r18 back to stuff.txt, discarding the other two variants.
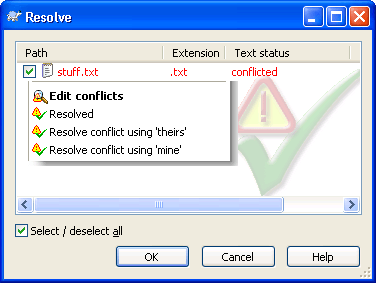
Figure 1-3 Resolution shortcuts available on the context menu inside the Resolve dialog box.
See File Conflicts in the TortoiseSVN book for more on files. Tree conflicts are much more involved; the TortoiseSVN book presents exhaustive detail on those so no need to repeat it here.
The Art of the Commit
Understanding the two-stage process of Subversion
Unless you are working directly in the repository browser, everything in Subversion is a two-stage process: first you make changes in your working copy; then you publish those changes to the repository. This becomes immediately obvious if I use the example of editing a single file.
“Outside of the repository browser, everything in Subversion is a two-stage process: first you make changes in your working copy; then you publish those changes to the repository.“
In your editor you make changes to a file and save the file. Saving is not the same as committing to Subversion. In order for the world to see your changes, you must perform a second step of committing your file. In other words you edit, and then you commit. Both steps are noticed by Subversion: if you look at your file in Windows Explorer or equivalent, you’ll see that Subversion marks your file as current before your edit, tainted after you edit, and current again once you commit (Figure 1-4).

Figure 1-4 The Subversion Two-Step: Perform an action on your working copy and the icon overlay changes from current to out-of-date. Committing brings the working copy of this object back to current.
This two-stage process doesn’t just apply to editing files but to any file operations including adding, deleting, moving, changing properties, etc. That is, you add a file to Subversion then you commit. Or you delete a file from Subversion then you commit. It’s important to realize that operations like editing, adding, deleting, moving, and so forth are local ones. This has two important repercussions: you can cancel or revert any such operation without touching the repository, and you can assemble a change set incrementally. See the recipe Determining what to commit together: the change set for more on change sets.
Grouping your files for reducing commit clutter: the change list
If you are working on several unrelated tasks at once, you’ll see that all of your changed files appear, by default, intermixed in one long list when you open either the Commit dialog or the Check for Modifications dialog. TortoiseSVN provides change lists to help reduce or eliminate this clutter by letting you create logical file groupings. These groupings exist on your local machine only; they are completely transparent to the repository. The groupings may be temporary (the default) or permanent; to get the latter, you need to check the Keep changelists option at the bottom of the dialog.
To create a change list, select one or more files inside the Commit dialog or the Check for Modifications dialog; open the context menu, and select the Move to Changelist menu choice. To start a new change list, select the <new changelist> choice. To add to an existing one, simply choose its name.
There is one changelist provided by default, called ignore-on-commit. Normally when you open the Commit dialog, TortoiseSVN automatically selects all files that have been modified. Any files that you have added to the ignore-on-commit change list, however, will not be selected by default. They are still listed and still have associated checkboxes, so you are free to add them in if desired. This change list, though, is for those types of files that may frequently change but you do not want to commit every time (user configuration files, for example).
See Change Lists in the TortoiseSVN book for further details.
Determining what to commit together: the change set
A change list, as described in the previous recipe, is a Subversion-specific term. A change set, on the other hand, is not specific to Subversion but rather applies to source control systems in general. To couch it in Subversion terminology: a change set is a collection of changes comprising a single commit resulting in a new revision to the repository.
How many files should be in a change set? Just enough. Each commit should have a reason.
“Each Subversion revision should exist for a unique reason; a committed log message should be used only once… build a change set consisting of all files connected to a single reason and commit them together.”
Collect all files that you modified because of reason R and commit them as a single change set. That is, do not commit changes in one folder with reason R followed by another commit for changes in another folder with reason R just because they are in separate folders. Each Subversion revision should exist for a unique reason; a committed log message should be used only once. If, for example, your Subversion log looked like this …
|
Revision |
Date/time |
Message |
|
1148 |
2:43:49 |
Bug fix for 110239-solved buffer problem. |
|
1147 |
2:42:00 |
Refactored Caramel class. |
|
1146 |
1:59:34 |
Added functionality: Oompah_âLoompah |
|
1145 |
9:15:11 |
Bug fix for 110239-solved buffer problem. |
… then you could not tell if bug 110239 was fixed at revision 1145 or at revision 1148! Thus, build a change set consisting of all the files connected to a single reason and commit them together; a single reason should not be re-used for multiple commits.
If you modified just one file because of reason Y, that single file constitutes your change set.
If you modified 934 files all because of reason Y, together they constitute your change set.
In the latter case, where you have a large number of files, chances are you will build your change set in stages. You might use any or all of these, in any order and any number of times:
- Add a single file.
- Add selected files from a single directory.
- Add a whole directory.
- Add all assorted files across multiple directories at one time from the root.
- Remove some files you added (because sometimes it is more efficient to add a whole directory then remove the few files you do not want).
Once you have assembled all the correct files into a change set, commit it.
You might wonder if this notion of potentially large change sets might get your project into an inconsistent state. Imagine, for example, that you were committing 100 files, and half way through the task Subversion decided to abort because the next file needed to be updated before committing. If Subversion encounters a problem with any single file in your change set, it rolls back the entire change set. To put it a different way, a commit (or a change set, depending upon your perspective) is an atomic operation: either everything is committed or else nothing is committed. The next recipe helps you understand the mechanics of assembling a change set.
Committing in a huge project
When you have finished fixing a bug, implementing a new feature, or updating code to match a changed API, you must commit your files to the repository, effectively publishing them so your team members and your build system see your changes. If you have a single file to commit, simply open the context menu on that file, select SVN Commit, and provide a reason for the commit. Similarly, if you have multiple files but all are within a single folder, you could open the context menu on that folder then select SVN Commit. This brings up a dialog showing all the items in the folder that have been modified. You can then fine-tune which of the modified files belong to the change set you wish to commit.
Often, however, your set of modified files may be scattered throughout your source tree. You might have several files in one folder over here implementing a user control; several files over there that document it; and a configuration file way over there that needs to be updated to match. The general practice for selecting where to open the commit dialog is either at the closest common ancestor of all files you wish to commit, or at any ancestor of that folder up to and including the root. The higher you go, however, the more files that have to be examined for modifications. For a good-sized project tree the time to do this becomes tricky. That is, when you select SVN Commit from a given directory node, TortoiseSVN goes through the entire subtree rooted at that spot to determine what you have edited, and then presents a list in the Commit dialog. A large project can cause substantial delay before you see the list, though.
Sometimes you have no choice-you have a variety of edited files that are spread out sparsely through the tree, so you just have to wait. But for most cases-say, for example, having two isolated folders widely separated in your project tree-there is a handy shortcut. You can open the Commit dialog on one of the two low-level folders. Then you simply drag the other folder from Windows Explorer into the open Commit dialog. TortoiseSVN automatically adds just the modified files to the open dialog!
Managing several unrelated changes
Every commit should have a single reason, where practical. That is, for traceability, maintainability, and just plain panache, separate changes into separate commits.
Good:
Commit N: “Bug fix for issue 19023: added check for xyz.”
Commit N+1: “Added method for new site switcher.”
Bad:
Commit N: “Bug fix for issue 19023: added check for xyz. Also added method for new site switcher. Refactored UI classes to handle new color scheme. Oh, and bought a new toothbrush.”
If you have several reasons for changes in a file, you should have several commits.
There are two ways of achieving this.
- Do your development work on one change at a time. Check it in as each change is done. This gives you a neat and tidy log that is easy to review when you need to.
- In the heat of development, though, that is not always possible or practical. If you do end up with multiple unrelated changes, consider committing a file incrementally(!), described next.
An incremental commit involves several steps. Start by doing a quick review of your file to determine how many unrelated fixes/updates are in the file. Note that any single fix may involve an arbitrary number of non-adjacent pieces of code. After saving a copy of your current version of the file, revert the file to the last repository version. Use a merge tool (e.g. WinMerge) to select all the changes from the first fix you have identified and merge those code sections into the freshly reverted file. Figure 1-5 shows an example (using plain text rather than code) of the file at this stage. Commit the file, entering the single reason for the commit. Repeat overlaying each successive change and committing with a single reason, until your file is restored to your finished copy with all of your changes.
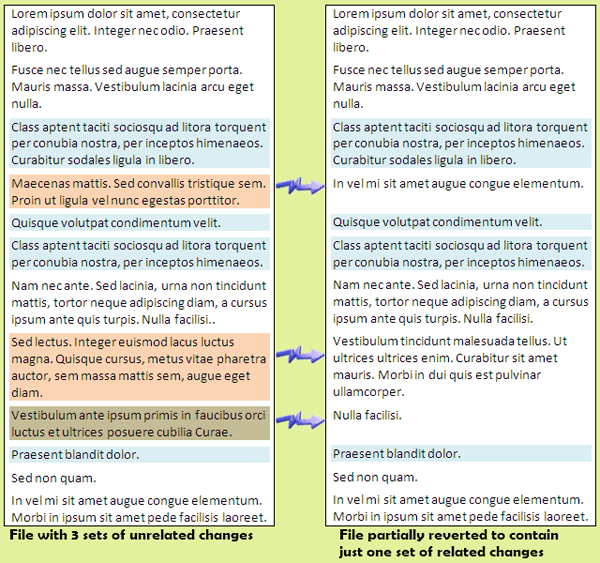
Figure 1-5 Incremental Commits: Revert your file to the last repository version then successively apply each change and commit. The left panel shows three color-coded changes in non-contiguous regions; the right panel shows the file after reverting then applying just the first change (blue), ready for the first commit.
Both of these suggestions take extra effort. Cleanly isolated, single-reason commits are not always achievable in practice, but I find that by just being aware of the notion, my commits become more organized.
Conclusion
Now that you understand some of the finer points of the fundamental operations of source control–checking out and checking in–the next part of this series will take you further into file management, understanding the differences between conventional file operations and working copy file operations, as well as describing how to efficiently and effectively put just the right things under source control.
Load comments