
One of the earliest-but still important-tenets of software engineering is the concept of reuse with “software building blocks”. In the .NET framework, user controls are the quintessential building blocks, giving you a simple yet powerful way to encapsulate a set of visual components into a more complex one. This holds true both in the WinForms realm and the WPF realm. That is, you can build WinForms user controls and embed them in WinForms applications, and likewise build WPF user controls and embed them in WPF applications. As a designer in at least one of these realms, you likely know this well.
But what is not well known, nor particularly obvious, is that you can build hybrids, embedding WPF controls in a WinForms application or WinForms controls in a WPF application. All you need is a simple adapter when using controls from the opposite realm (Figure 1). I deliberately use the term control in the figure rather than user control because this interoperability is not limited to user controls. You can embed any controls-your custom controls or standard .NET controls-from one technology into the other. This article provides an in-depth look into the symmetries of hybrid applications. As a by-product, the occasional asymmetries become readily apparent. Here is the first one: you can actually embed a broader set of WPF elements into a WinForms application: not just elements that derive from Control, but those that derive from a broader base class called UIElement (see Embedding Standard .NET Components for more on this).
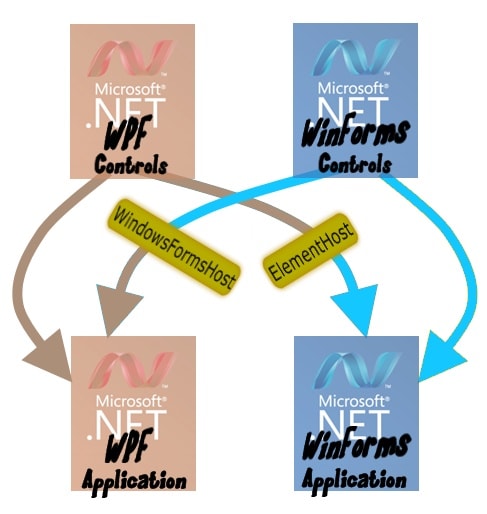
Figure 1 WPF / WinForms interoperability
With a simple adapter you can embed standard or custom elements from the alternative technology in your application.
- When is it useful to create a hybrid application?
- If you want to migrate to WPF but have a huge investment in WinForms libraries.
- If you want to add WPF power to your existing WinForms applications.
- If you want some UI component not available in your “native” technology.
Consider these main points when thinking about where your own roadmap should be leading you:
| WPF | WinForms | |
|---|---|---|
| Longevity | WinForms has been around longer, so many applications and libraries utilize it. | |
| Richness | More controls are available in WinForms than WPF | |
| Power | WPF is more expressive, flexible, and customizable, including adding 3D graphics and animation. | |
| Compatibility | WinForms can run on older systems. |
But also keep in mind that WPF / WinForms interoperability is not without costs and issues. Rather than me describing potential pitfalls, take a look at what Scott Berry, a developer on Microsoft’s UI Frameworks team specializing in WinForms / WPF interop, has to say in his list of collected Gotchas for Working with Windows Forms/WPF Interop
A Brief Groundwork
To get the most out of this article you should be an experienced .NET developer from either the WinForms realm or the WPF realm. I wrote it as an introductory exposition but it assumes at least a reading-familiarity with both technologies. That is, I do not going into inordinate detail of getting started in WPF or WinForms, but by taking advantage of inherent symmetries of the two, your experience in one technology will aid in understanding the other. After setting the stage in these next two sections, the remainder of this article is organized as two articles in parallel, walking you through hosting a WinForms user control in a WPF application on the left, and hosting a WPF user control in a WinForms application on the right.
Before getting into interoperability, just a word about controls. You use standard controls all the time. In Visual Studio you drag controls-buttons, text boxes, grids, etc.-from the toolbox onto the designer surface to build your user interface. If you find yourself repeating the same group of five controls in each new project, bundle them together as a user control. Once you create such a composite control you can add it back to the toolbox so it becomes just another standard control. You can even repeat the process to make composite controls consisting of other composite controls. (Taken to the extreme, your entire UI could be just a single, gargantuan user control-though I would not recommend that!)
So reuse is the first reason to create your own user controls. The second main reason is encapsulation. Good software design dictates that each element (be it a file, class, structure, etc.) should have high cohesion and loose coupling. As a trivial (and contrived!) example, say the left side of your user interface has a collection of controls all associated with file management and the right side has a collection of controls all related to color adjustments. You could have a flat design where all of these exist just in your main application class, but this cries out for encapsulating the left side controls into one composite control and the right side controls into another. For more on coupling and cohesion, see this post by Sammy Larbi.
This article briefly describes how to build user controls. If you want more in-depth information, though, I refer you to two of my earlier articles on DevX.com (which does require registration nowadays but it is free). Both articles discuss WinForms user controls, but if you are WPF-leaning you can still glean some useful concepts from them.
- .NET Building Blocks: Custom User Control Fundamentals
- .NET Building Blocks: Custom User Controls In Practice
Also, these MSDN articles are good starting points as reference material rather than guides:
A Dual Demo
The .NET documentation repository on MSDN provides, as usual, some valuable insights into the topic of WPF-WinForms interoperability. In fact, the example I use throughout this article originated from two separate articles on MSDN:
I started with their two sample applications, refactored the code for clarity and simplicity, and combined the two separate projects into a single solution that makes the whole process much more digestible. Furthermore, I restructured the code in parts to be as nearly identical as possible when the originals had variations that were distracting. This lets you see the meaningful differences between the WPF and WinForms technologies. Here are some of the changes I implemented for this article to emphasize parallelism:
- Combined two separate solutions into a single solution.
- Converted from Visual Studio 2010 to Visual Studio 2008 to allow access to a broader audience. [3]
- Renamed projects (MyControls => WFControlLibrary and MyControls => WPFControlLibrary as appropriate).
- Renamed classes (CustomControl1 => WPFInputControl, MyControl1 => WFInputControl).
- Converted WPFInputControl (CustomControl1) from a Grid derivative to a true user control.
- Renamed methods (MyControlEventArgs => InputControlEventArgs, avAddressCtrl_Loaded => Panel_Loaded).
- Refactored common class into new CommonLibrary (InputControlEventArgs).
- Refactored code to delineate functionality (input vs. output data flow in WPFInputControl.xaml.cs).
- Refactored/mirrored code across projects (WPFInputControl.ButtonClicked and WFInputControl.ButtonClicked).
- Added a simple WPF test container to roughly parallel the built-in WinForms test container.
- Rewrote property setters in WPFInputControl to eliminate massive code duplication.
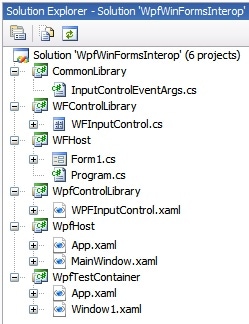
Figure 2 The Demo Solution in Visual Studio
The solution of six simple projects lets you
readily see how to build hybrid applications.
The original two articles had a total of four projects split across two solutions: a WPF host, a WPF control, a WinForms host, and a WinForms control. As shown in Figure 2, the demo application that accompanies this article includes six projects in a single solution. The two additional projects are the CommonLibrary, a library of non-UI classes used by both user controls, and the WpfTestContainer-see Runtime Representation of a WPF User Control. (If you peruse the original two MSDN articles, be aware that there are a few errata that I have noted in footnotes [1] and [2].)
Structure of a UI Component
Structure of a WPF UI ComponentThe structure of a WPF application consists of three pieces stored in two files (Figure 3). The WPF designer operates on both the design view and the XAML view of the component. These are two views of the same code that is stored in a file with a .xaml suffix.
|
Structure of a WinForms UI ComponentThe structure of a WinForms application consists of three pieces stored in two files (Figure 3). The Windows Forms designer operates on both the design view of the component and the auto-generated code that defines it. These are two views of the same code that is stored in a file with a .designer.cs suffix.
|
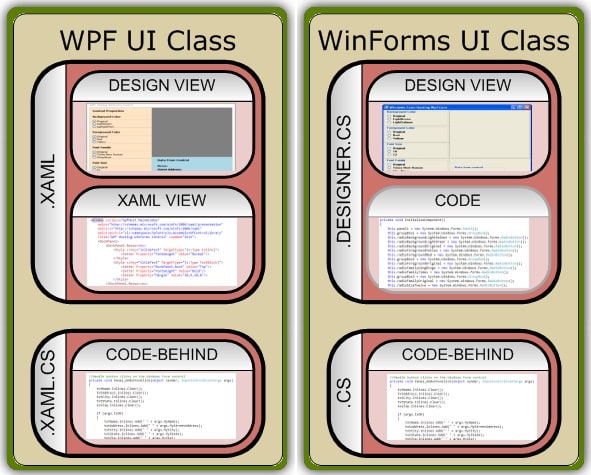
Figure 3 Structure of UI components in both technologies
The WPF designer works strictly with the .xaml file while the Windows Forms designer works with the .designer.cs file. The code-behind file in each is where you write your support code.
Designing a Simple User Control
Designing a Simple WinForms User ControlThe WFControlLibrary project defines a simple collection of Labels and TextBoxes that specify a name and address, along with an OK button to accept the input and a Cancel button to ignore the input (Figure 4). When either button is clicked, the control generates a custom event that may be consumed by a host application. The event includes all the values entered by the user along with a status (the IsOK field) that indicates which button was clicked. |
Designing a Simple WPF User ControlThe WPFControlLibrary project defines a simple collection of TextBlocks and TextBoxes that specify a name and address, along with an OK button to accept the input and a Cancel button to ignore the input (Figure 4). When either button is clicked, the control generates a custom event that may be consumed by a host application. The event includes all the values entered by the user along with a status (the IsOK field) that indicates which button was clicked. |
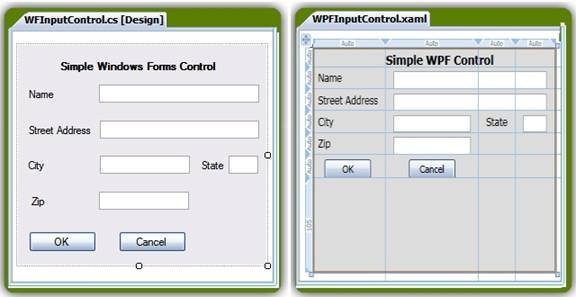
Figure 4 Equivalent user controls in the WPF designer and Windows Forms designer
The two controls are semantically equivalent, though the layout varies just a bit. (There is no special reason for the variation; I believe it is due simply to the fact that the original implementations from Microsoft were either done by two different people or at different times.)
|
The code-behind for the control is shown below, which is the complete code except for the designer-generated portion backing the layout. The code consists primarily of the described event handler that processes clicks from both buttons. The IsOK field is set true by default (the first argument to the InputControlEventArgs constructor). If the Cancel button was the one clicked, IsOK is reset to false.
public class WFInputControl : UserControl { public WFInputControl() { InitializeComponent(); }
public delegate void MyControlEventHandler( object sender, InputControlEventArgs args); public event MyControlEventHandler OnButtonClick;
private void Button_Click( object sender, EventArgs e) { InputControlEventArgs retvals = new InputControlEventArgs(true, txtName.Text, txtAddress.Text, txtCity.Text, txtState.Text, txtZip.Text);
if (sender == btnCancel) retvals.IsOK = false;
if (OnButtonClick != null) OnButtonClick(this, retvals); } }
The only code differences between this user control and the WPF user control are: the class and constructor name, the event handler name, and the type of the event handler’s second argument. The class diagrams shown in Figure 5 highlight the similarities between the two. |
The code-behind that manages passing data to a host application is shown below. For simplicity, the user interface (XAML) code is omitted, as is the code-behind for passing data from the host back to the control, which will be discussed later. The code consists primarily of the described event handler that processes clicks from both buttons. The IsOK field is set true by default (the first argument to the InputControlEventArgs constructor). If the Cancel button was the one clicked, IsOK is reset to false. public class WPFInputControl : UserControl { public WPFInputControl() { InitializeComponent(); }
public delegate void MyControlEventHandler( object sender, InputControlEventArgs args); public event MyControlEventHandler OnButtonClick;
private void Button_Clicked( object sender, RoutedEventArgs e) { InputControlEventArgs retvals = new InputControlEventArgs(true, txtName.Text, txtAddress.Text, txtCity.Text, txtState.Text, txtZip.Text);
if (sender == btnCancel) retvals.IsOK = false;
if (OnButtonClick != null) OnButtonClick(this, retvals); } }
The only code differences between this user control and the WF user control are: the class and constructor name, the event handler name, and the type of the event handler’s second argument. The class diagrams shown in Figure 5 highlight the similarities between the two. It is important to realize how this code file ties to the XAML file. Notice the class header above, which states that WPFInputControl derives from UserControl. You will see this mirrored exactly in the root element of your XAML: <UserControl x:Class= “WpfControlLibrary.WPFInputControl” . . . Finally, note that you do not strictly need to make your WPF composite class inherit from a UserControl to be eligible to be hosted in a WinForms application. You could use a standard WPF application (with a <Window> root element), a WPF browser application (<Page>), or other containers. The sample code with the MSDN article, for instance, just uses a <Grid> root element. This flexibility greatly broadens the universe of WPF components that you may embed within a WinForms application. |
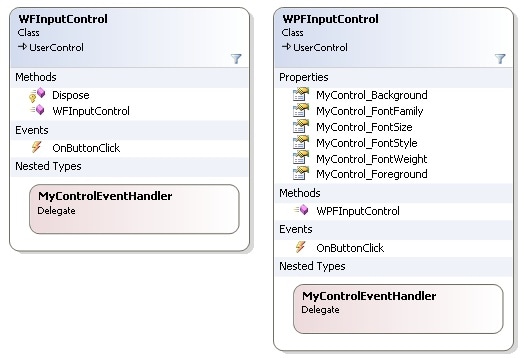
Figure 5 Class diagrams for the user controls
The interfaces between the two are very similar: these expose the same, single event; they use the same delegate, and they have no methods other than a simple constructor. The WPF control does, however, need some properties to be exposed as well.
Runtime Representation
Runtime Representation of a WinForms User ControlWhen you create a WinForms user control using the Windows Forms designer, you see a design-time representation. But it would also be nice to see a runtime representation. You could create a simple WinForms wrapper application in which you embed your user control. But Visual Studio saves you the effort; it provides a UserControl TestContainer for WinForms development. Simply set your user control library to be your startup project and execute it (F5). Normally you cannot execute a class library, but WinForms user controls are an exception. Visual Studio launches its test container host that contains a dropdown listing all of your user controls in the current library. Select one and it is rendered just as if you had wrapped it into your own host application. Additionally, the test container provides a property pane that gives you access to all of the control’s properties so you can manipulate them and see how your control behaves (see Figure 6). |
Runtime Representation of a WPF User ControlWhen you create a WPF user control using the WPF designer, you see a design-time representation. But it would also be nice to see a runtime representation. You could create a simple WPF wrapper application in which you embed your user control. (Alas, Visual Studio does not provide any similar TestContainer for WPF development.) So for the purpose of this article, I have included a basic wrapper application called WpfTestContainer (one of the six projects listed in Figure 3). This wrapper lets you see how your user control renders, just as if you had wrapped it into your own host application. It does not, however, provide any property access equivalent to the WinForms support. This WPF Test Container is illustrated in Figure 6. |
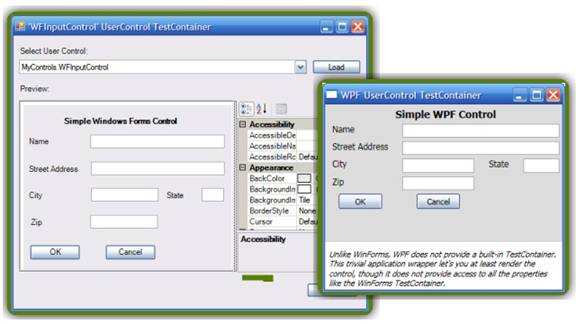
Figure 6 TestContainers
The built-in TestContainer for WinForms user controls provides a powerful mechanism that exposes all the controls in your library and all of the selected control’s properties. WPF has no similar mechanism but I provide a basic wrapper in the demo solution.
Hosting a User Control
Hosting a WinForms User Control in a WPF ApplicationOnce you are satisfied with your WinForms user control, you are ready to host it in a WPF application. Unlike native (WinForms) controls, you cannot insert it directly: you must use a WindowsFormsHost Class as an adapter between the WPF host application and the WinForms user control, as shown in Figure 1. To add a WindowsFormsHost, then, you can drag it from the toolbox onto the designer or just enter it in XAML. Either way, you then add your foreign (WinForms) user control in XAML. Here is the resultant XAML that instantiates both the WindowsFormsHost and the WFInputControl user control: <WindowsFormsHost id=”wfh”” DockPanel.Dock=”Top” Height=”250″ Width=”375″> <myctrl:WFInputControl id=”wfInputControl””/> </WindowsFormsHost>
Just as when working in C#, though, you need to give Visual Studio proper references so it knows what a WFInputControl is, along with its namespace designator, myctrl. Whereas you add using directives in C#, you add namespace declarations to some parent element of your element in XAML (typically the root element, just as you typically put all your using statements at the top of a file). Here is the root element for the WpfHost application; the last line is the namespace declaration that defines the “myctrl” namespace designator and maps it to the WFControlLibrary DLL. <Window x:Class=”WpfHost.MainWindow” xmlns=”http://schemas.microsoft…” xmlns:x=”http://schemas.microsoft…” xmlns:myctrl= “clr-namespace:MyControls; assembly=WFControlLibrary”
To make best use of Intellisense, it is better to add these two code fragments in the opposite order: first enter the namespace declaration so when you instantiate the control Intellisense can assist you. Intellisense first assists with the namespace declaration itself: In Figure 7 I typed up to the equals sign (xmlns:local=) whereby Intellisense added the quotes and then popped up the list of available libraries. Note that for the WFControlLibrary to appear in the list you must add to the current project a reference to the assembly containing your user control library (right click References in the solution explorer and choose Add Reference). Selecting an item from this list inserts it with proper syntax, as shown in the code fragment shown above. With the assembly named and referenced in your root XAML element (equivalent to the C# using directive in WinForms), Intellisense can now guide you in instantiating the user control. Referring back to the WindowsFormsHost element shown above, start with no content then start to type the namespace reference you created: <WindowsFormsHost id=”wfh”” DockPanel.Dock=”Top” Height=”250″ Width=”375″> <my </WindowsFormsHost>
At that point Intellisense will popup myctrl: as a choice. Accept that and Intellisense returns immediately showing you available user controls you may select. |
Hosting a WPF User Control in a WinForms ApplicationOnce you are satisfied with your WPF user control, you are ready to host it in a WinForms application. Unlike native (WPF) controls, you cannot insert it directly: you must use an ElementHost as an adapter between the WinForms host application and the WPF user control, as shown in Figure 1. To add an ElementHost, then, you can drag it from the toolbox onto the designer or enter it in your code-behind file. Either way, you then add your foreign (WPF) user control. If the library containing the control is in the same solution as your application you can do this directly in the Windows Forms designer. Figure 8 shows an example of this: after dragging an ElementHost onto the design surface, it automatically opens its task list so you can select a control to host. If, as is more typical, the control library is not in your current solution, you can still add the ElementHost in the designer but you must add the user control in your code-behind file. Here is the code to instantiate both the ElementHost and the WPFInputControl from the code-behind file for the demo project: private ElementHost ctrlHost; private WPFInputControl wpfInputControl;
// from the load event handler ctrlHost = new ElementHost(); ctrlHost.Dock = DockStyle.Fill; panel1.Controls.Add(ctrlHost); wpfInputControl = new WPFInputControl(); wpfInputControl.InitializeComponent(); ctrlHost.Child = wpfInputControl;
Just as when working in XAML, though, you need to add to the current project a reference to the assembly containing your user control library (right click References in the solution explorer and choose Add Reference) so Visual Studio knows about the namespace you need. With the reference in place, you can then declare the namespaces you need with appropriate using directives at the top of the file (equivalent to the namespace specifiers in the root element in XAML). You will also need a using directive for the namespace of ElementHost. Both of these are shown highlighted here: using System; using System.Windows; using System.Windows.Forms; using System.Windows.Forms.Integration; using WpfControlLibrary;
To make best use of Intellisense, it is better to add these two code fragments in the opposite order: first enter the using directives so when you instantiate the controls Intellisense can assist you. |
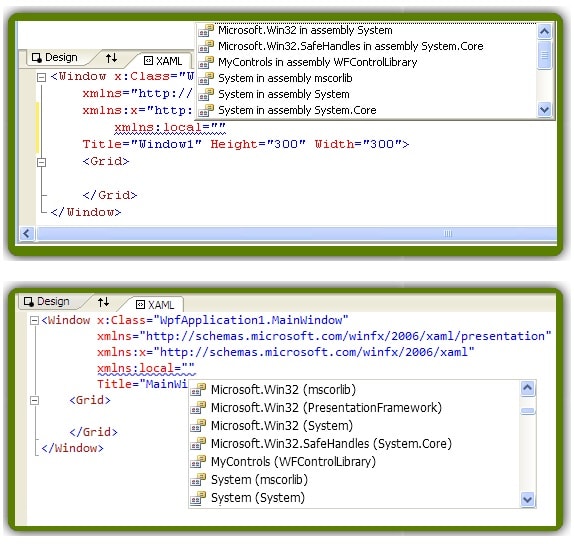
Figure 7 Intellisense aids WPF namespace declarations
The figure shows the same screenshot in Visual Studio 2008 (top) and Visual Studio 2010 (bottom).
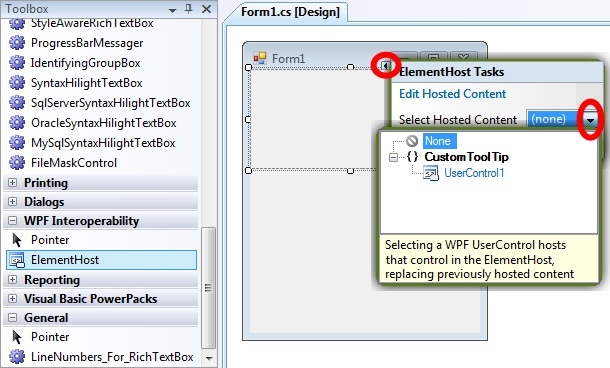
Figure 8 Designer support for the ElementHost object in the Windows Forms designer
When you insert an ElementHost from the toolbox (left) it automatically opens the task list on the designer surface (you can close it or reopen it with the small caret button marked in red. Within the task list opening the dropdown (also marked in red) lists the available user controls present in any projects within the current solution.
Embedding Standard .NET Components
Embedding Standard .NET Components in a WPF ApplicationYou are not restricted to only embedding custom controls in a WindowsFormsHost control. Here in year 2010 the WinForms library offers more choices of standard controls than WPF. You can easily embed one using the same techniques you just saw. 1. Add a reference to the standard WinForms library (System.Windows.Forms.dll) to your project. 2. Add a namespace declaration to your root XAML element: xmlns:wf= “clr-namespace:System.Windows.Forms; assembly=System.Windows.Forms”
3. Specify the control inside your WindowsFormsHost: just type wf: and Intellisense provides a list of all the WinForms controls from which to select. Example: <wf:MaskedTextBox x:Name=”mtbDate” Mask=”00/00/0000″/>
In fact, any class that derives from System.Windows.Forms.Control may be embedded in similar fashion. |
Embedding Standard .NET Components in a WinForms ApplicationYou are not restricted to only embedding custom controls in an ElementHost control. Here in year 2010 the WPF library provides some powerful controls that are unavailable in the WinForms realm. You can easily embed one using the same techniques you just saw. 1. Add a reference to the standard WPF library (Presentation.Framework.dll) to your project. 2. Add namespace directives to the top of your code-behind file: using System.Windows; using System.Windows.Controls;
3. Instantiate the control (or other UIElement-based object) and attach it to the ElementHost in your form’s constructor or load event handler. Example: UIElement uiElement = new PasswordBox(); elementHost1.Child = uiElement;
In fact, any class that derives from System.Windows.UIElement may be embedded in similar fashion. (UIElement encompasses System.Windows.Controls.Control and is thus a much broader set of elements than may be hosted in a WPF application.) |
Design time vs. Runtime Representation
Design time vs. Runtime Representation for a WPF ApplicationEven with the user control instantiated in your visual tree, only the WindowsFormsHost appears in the WPF designer-it does not actually render the child user control. So to check its placement and appearance you must actually execute the application. Figure 9 shows the WPF designer view and the runtime view. |
Design time vs. Runtime Representation for a WinForms ApplicationIf you happen to have your user control library in the same solution and you instantiated it in the Windows Forms designer, the designer renders the user control at design time. But, as stated above, typically you have some external library so you will need to add your user control in code-behind. So to check the placement and appearance of the user control you must actually execute the application. Figure 9 shows the Windows Forms designer view and the runtime view. Note that this particular WinForms application reveals an obscure defect in Visual Studio 2010 where the radio button labels are truncated. [4] |
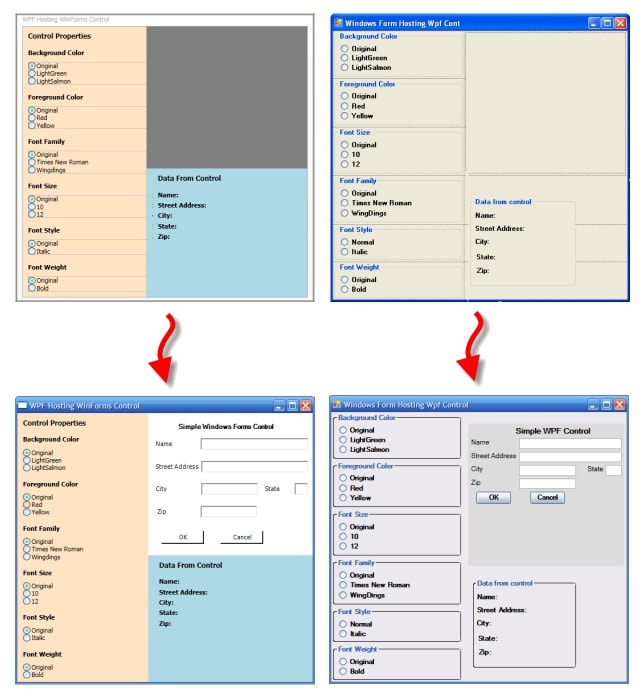
Figure 9 Rendering embedded controls of the “opposite” technology
In the WPF and Windows Forms designers (top), neither technology has support to show the embedded control. Once you execute (bottom) the controls appear. The one exception is that if your WPF control is in the same solution it will be displayed in the Windows Forms designer.
With the user control now incorporated into your application, you need to “wire it up” so that you can act on its content when a user clicks on one of its buttons. For the purposes of this article, the demo application illustrates how to flow data in both directions: data from the user control (name and address) passes to your application and data from the application (layout setting properties) passes to the control. (Thanks again to the Microsoft team for the first pass of these dual applications!)
Output Data Flow
Output Data Flow: From User Control to WPF HostThe goal here is to take data entered directly in the user control (Figure 10, top) and report it back in the application (Figure 10, bottom). The WinForms user control fires the OnButtonClick event when either the OK button or the Cancel button is clicked (code shown earlier). In the form load event handler for the main application, then, connect a handler to that event on the control. Because the control is hosted in a WindowsFormsHost and not instantiated directly, access the user control from the Child property of its host container. Cast this to the right type then you can assign the event handler just as with any other control. |
Output Data Flow: From User Control to WinForms HostThe goal here is to take data entered directly in the user control (Figure 10, top) and report it back in the application (Figure 10, bottom). The WPF user control fires the OnButtonClick event when either the OK button or the Cancel button is clicked (code shown earlier). In the form load event handler for the main application, then, connect a handler to that event on the control. The control is hosted in an ElementHost and may be accessed from the Child property of its host container, just as was done in the WPF application. However, since the WPFInputControl was added to the layout in the code-behind file, it is immediately accessible so can be used directly. |
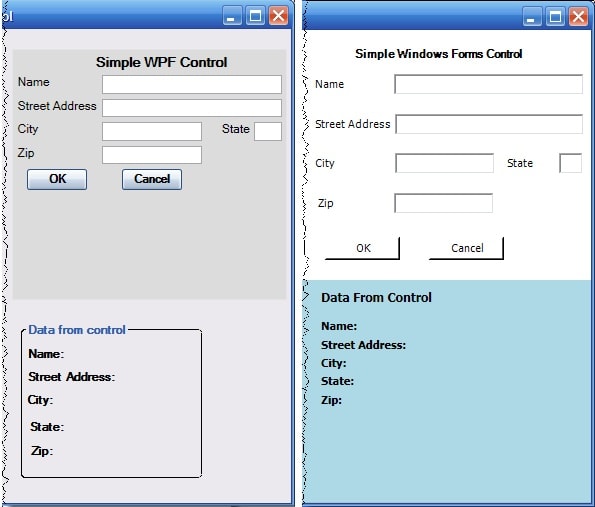
Figure 10 Focus on data flow from the user control to the application
When you click the OK button in the user control (top) it feeds data back to the application in the panel at the bottom.
|
private void Init(object sender, EventArgs e) { . . . (wfh.Child as WFInputControl) .OnButtonClick += new WFInputControl .MyControlEventHandler( Pane1_OnButtonClick); . . . } The Init method is specified as the form load event handler in the root element in XAML: <Window x:Class=”WpfHost.MainWindow” . . . Loaded=”Init”> Finally, here is the event handler method to receive either button click. It first clears all the text fields (Figure 10, bottom). If the IsOK property is true-indicating the OK button was clicked rather than the Cancel button-it then fills in the displayed fields with data passed in from the event.
private void Pane1_OnButtonClick( object sender, InputControlEventArgs args) { txtName.Inlines.Clear(); txtAddress.Inlines.Clear(); txtCity.Inlines.Clear(); txtState.Inlines.Clear(); txtZip.Inlines.Clear();
if (args.IsOK) { txtName.Inlines.Add( ” ” + args.MyName); txtAddress.Inlines.Add( ” ” + args.MyStreetAddress); txtCity.Inlines.Add( ” ” + args.MyCity); txtState.Inlines.Add( ” ” + args.MyState); txtZip.Inlines.Add( ” ” + args.MyZip); } } |
private void Form_Load(object sender, EventArgs e) { . . . wpfInputControl .OnButtonClick += new WPFInputControl .MyControlEventHandler( Panel_OnButtonClick); . . . }
The Form_Load method is specified as the form load event handler in the generated code file (Form1.Designer.cs):
private void InitializeComponent() { . . . this.Load += new System .EventHandler(this.Form1_Load); . . . }
Finally, here is the event handler method to receive either button click. If the IsOK property is true-indicating the OK button was clicked rather than the Cancel button-it fills in the displayed fields (Figure 10, bottom) with data passed in from the event; otherwise, it omits any returned data.
private void Panel_OnButtonClick( object sender, InputControlEventArgs args) { if (args.IsOK) { lblAddress.Text = “Street: ” + args.MyStreetAddress; lblCity.Text =”City: “+args.MyCity; lblName.Text =”Name: “+args.MyName; lblState.Text=”State: “+args.MyState; lblZip.Text =”Zip: ” +args.MyZip; } else { lblAddress.Text = “Street: “; lblCity.Text = “City: “; lblName.Text = “Name: “; lblState.Text = “State: “; lblZip.Text = “Zip: “; } } |
This particular demo control is intended for output data flow, i.e. sending its collected data to its host application. However, for educational purposes it was set up to illustrate input data flow as well, because the mechanisms are quite different. The left hand side of the demo application provides a series of layout property settings that you may adjust at runtime with the various radio buttons provided. As you select different settings you should see them immediately reflected in the user control.
Input Data Flow
Input Data Flow: From User Control to WPF HostThe demo application lets you adjust:
Figure 11 shows the available choices. |
Input Data Flow: From User Control to WinForms HostThe demo application lets you adjust:
Figure 11 shows the available choices. |
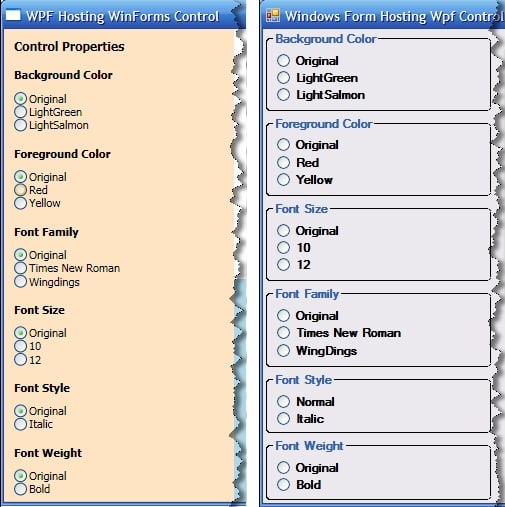
Figure 11 Focus on data flow from the application to the user control
Making selections among the radio buttons shown adjusts properties within the respective user controls.
|
Here is how the on-screen controls change the properties of the embedded user control. This excerpt from the XAML for the WPF application shows the group of three radio buttons that control the font family. The first one has the IsChecked property set true so that button will be checked on-screen by default. All three buttons specify the same event handler, FontChanged. <TextBlock Style=”{StaticResource titleText}”> Font Family </TextBlock> <StackPanel Margin=”10,10,10,10″> <RadioButton id=”rdbtnOriginalFamily”” IsChecked=”True” Click=”FontChanged”>Original </RadioButton> <RadioButton id=”rdbtnTimes”” Click=”FontChanged”>Times New Roman </RadioButton> <RadioButton id=”rdbtnWingdings”” Click=”FontChanged”>Wingdings </RadioButton> </StackPanel>
The event handler determines which button was clicked and sets the FontFamily property on the WindowsFormsHost object (wfh) to the appropriate font. (You can see the XAML fragment that declares wfh back at Hosting a WinForms User Control in a WPF Application.) private void FontChanged( object sender, RoutedEventArgs e) { if (sender == rdbtnTimes) wfh.FontFamily = new FontFamily(“Times New Roman”); else if (sender == rdbtnWingdings) wfh.FontFamily = new FontFamily(“Wingdings”); else if (UIIsReady == true) wfh.FontFamily = initFontFamily; }
Setting the property of the WindowsFormsHost is all that is needed to propagate the change down to individual components in the WFInputControl; no code support is needed in the control itself, unlike in the WinForms application. The five other properties that you may adjust at runtime all have analogous code so there is no need to show it here. The behavior of all six property setters, however, is not exactly the same: this demo reveals one curious artifact of the property inheritance. Except for the first property, background color, all the remaining properties affect text. So focusing just on the remaining five, setting the foreground color (i.e. the text color) applies only to the Label controls that label each field in the WFInputControl whereas setting any of the other four text properties changes the corresponding properties of both the Label controls and the TextBox controls. [5] |
Here is how the on-screen controls change the properties of the embedded user control. This excerpt from the generated layout code for the WinForms applications shows where each radio button related to font family specifies its separate event handler. (Note that this could have just as easily been done with a single event handler like the WPF application; this is a style preference of the original developer.) radioForegroundOriginal .CheckedChanged += new EventHandler( radioForegroundOriginal_CheckedChanged); radioFamilyWingDings .CheckedChanged += new EventHandler( radioFamilyWingDings_CheckedChanged); radioFamilyTimes .CheckedChanged += new EventHandler( radioFamilyTimes_CheckedChanged);
With separate event handlers the code of each one is much simpler-trivial in fact. The trade-off is that this approach uses three event handlers instead of just one. private void radioFamilyOriginal_CheckedChanged( object sender, EventArgs e) { wpfInputControl .MyControl_FontFamily = initFontFamily; }
private void radioFamilyTimes_CheckedChanged( object sender, EventArgs e) { wpfInputControl .MyControl_FontFamily = new System.Windows.Media .FontFamily(“Times New Roman”); }
private void radioFamilyWingDings_CheckedChanged( object sender, EventArgs e) { wpfInputControl .MyControl_FontFamily = new System.Windows.Media .FontFamily(“WingDings”); }
Each event handler sets the appropriate property on the WPF user control directly, in this case the MyControl_FontFamily property, unlike in the WPF application where you need only set properties on the host container. Here is the property definition from the code of the user control. public FontFamily MyControl_FontFamily { get { return _fontFamily; } set { _fontFamily = value; textBlockList.ForEach( tb => tb.FontFamily = value); } }
This property setter does two things. First, it remembers the value passed in so that the property getter can return it when asked. Second, it sets the FontFamily property of each TextBlock that labels each field. (Label controls could have served equivalently here.) Five of the six properties use exactly analogous setters. The background color is different, though, because it applies to the control itself rather than to content of an individual TextBlock. Here is its getter and setter: public SolidColorBrush MyControl_Background { get { return _background; } set { _background = value; rootElement.Background = value; } } |
Going Further
If you have reached this point after completing either or both tracks of this article, you should understand the fundamentals of WPF / WinForms interoperability. Every case is different, though, so chances are you will encounter issues that require more in-depth knowledge. Here are just a few sources that can aid you in your continuing journey.
- Microsoft’s authoritative Migration and Interoperability section of MSDN
- Windows Forms – WPF Interoperability FAQ
- WPF Designer for Windows Forms Developers
Footnotes
[1] Errata in Hosting a Windows Forms Composite Control in WPF:
- OKButton_Click and CancelButton_Click methods should be more robust and check whether the OnButtonClick event is null before invoking it.
- The article claims the user control assembly must have a strong name to be referenced by a WPF application; in practice this does not seem to be the case.
- The article talks about creating the WPF host application as a WPF Browser Application. The code that accompanies the article, however, uses a WPF Application (i.e. a desktop app).
- The XAML for the WPF host application is accidentally duplicated in the article.
[2] Errata in Hosting a WPF Control in Windows Forms:
- The article talks about creating the WPF user control as a WPF Browser Application. The code that accompanies the article, however, implements it just as a component (with a Grid as the top-level element).
[3] I converted these solutions manually by recreating them since I knew I would be doing quite a bit of reorganization at the same time. If you have substantial projects that you want to back port, however, I found a couple references to convert VS2010 to VS2008 that may be of interest to readers. Convert VS2010 Projects back to VS2008 ones… and Converting a Visual Studio 2010 Project to Visual Studio 2008 .
[4] When you open the main form of the WFHost project, Form1, in the in the Windows Forms designer, it displays just fine in Visual Studio 2008. However, in Visual Studio 2010 all the radio buttons are curiously truncated by 1 or 2 characters! I have submitted this defect to Microsoft Connect (winforms visual designer strangely truncates text-oncertain elements). At the time of writing the report has been accepted and routed to the product team for “triage and resolution”.
[5] The fact that different properties percolate differently through the hosted WinForms user control to its children is an inconsistency in .NET. It may just be my ignorance of the nuances of inheritance-particularly cross-technology inheritance; however, I still believe it is worth reporting so I submitted this to Microsoft Connect (windowsformshosts property settings do not filter down to all expected child components). At the time of writing the report has been accepted and routed to the product team for “triage and resolution”.
Load comments