
If you have been in the DevOps space, you should know about version control and must have worked with 0ne. But, have you heard of BitBucket? No? Well, this tutorial is for you.
Bitbucket is a web-based platform that provides hosting services for version control repositories, specifically for source code and development projects. It offers support for two different version control systems: Mercurial and Git. It is owned by Atlassian and used for source code and development projects that use either Mercurial or Git version control systems. It provides a centralized location for storing and managing code, facilitates team collaboration and version control, and includes features such as pull requests, code reviews, and issue tracking. Bitbucket is widely used by software development teams for both personal and enterprise projects.
Bitbucket integrates well with many third-party continuous integrations (CI) tools, including Jenkins, Travis CI, CircleCI, Bamboo, and more. This integration allows developers to automate the build, test, and deployment processes for their software projects, making it easier to identify and resolve bugs and deliver high-quality software more quickly. Bitbucket provides a variety of APIs and integrations that allow developers to connect it with other tools and systems, including issue trackers, chat apps, and other development and collaboration tools.
This tutorial will teach you how to get started with Bitbucket. You will start with learning how to push an HTML project to a Bitbucket repository, configure Bitbucket pages for that respository so it can be viewed over the web browser, create and push a VueJS project to the same Bitbucket repository and then see how to configure CI/CD workflows with CircleCI for that Bitbucket repository.
In this article I am going to go through the follow steps to demonstrate using Bitbucket in your projects
- Prerequisites
- Initializing a Hello_World project.
- Creating a Bitbucket workspace and repository.
- Pushing your code to your Bitbucket repository.
- Hosting repository with Bitbucket pages.
- Using a third-party CI tool with Bitbucket.
Prerequisites
These are the things you will need to have (or expect to get if you want to follow along with the examples in this article)
- This tutorial uses a Linux machine with An Ubuntu 22.04 LTS OS. Every other OS works fine.
- A text editor (E.g VScode).
- A Bitbucket Cloud account. You can register here if you don’t have one.
- An Atlassian account. If you don’t have one, sign up for a free Atlassian account first.
- Git installed locally on your machine, otherwise, you can follow this guide to get it installed depending on your OS.
- Circle CI account created with your Atlassian Bitbucket account
Initializing a Hello_World project
Prior to getting started with Bitbucket, you’ll need to first have a project to work with. For demo and simplicity’s sake, you will create a project that simply outputs “Hello World” to the browser.
Create a project directory to store the files for the hello_world project. You can name this directory whatever you like – this tutorial uses hello_world.
|
1 2 3 4 5 6 |
mkdir hello_world #creates the hello_world directory cd hello_world #goes into the hello_world directory code . #opens up the hello_world directory via your #default code editor |

Fig 1: Creating project directory “hello_world”
Create an index.html file and paste in the code snippet below:
|
1 2 3 4 5 6 7 8 9 10 11 12 13 14 15 16 17 18 19 20 21 22 23 24 25 26 27 28 |
<!DOCTYPE html> <html lang="en"> <head> <meta charset="UTF-8"> <meta http-equiv="X-UA-Compatible" content="IE=edge"> <meta name="viewport" content="width=device-width, initial-scale=1.0"> <title>Bitcket App</title> <!-- Google fonts --> <link rel="preconnect" href="https://fonts.googleapis.com"> <link rel="preconnect" href="https://fonts.gstatic.com" crossorigin> <link href="https://fonts.googleapis.com/css2?family=IBM+Plex+Sans:wght@100&display=swap" rel="stylesheet"> <!-- Internal styles --> <style> * {padding: 0; margin: 0; box-sizing: border-box;} body {background-color: hsl(46, 100%, 50%); Font-family:'IBM Plex Sans', sans-serif; margin: 60px; display: flex; justify-content: center; align-items: center;} h1 {color: hsl(0, 4%, 10%); text-align: center;} div { border: 5px solid hsl(318, 73%, 22%); width: 500px; margin: 0 auto; padding: 10px;} </style> </head> <body> <div> <h1>Hello World</h1> </div> </body> |
When you view this over a web browser, this is how the web page will look like:

Fig 2: Viewing hello_world project over a web browser
The output above simply displays Hello World to the browser.
Creating a Bitbucket Workspace and Repository
Just like GitHub, you need to have a repository to house the application you’d like to save on Bitbucket. If you are logging in to Bitbucket for the first time, you will be asked to first create a workspace.
A Bitbucket workspace is a container for projects and repositories in Bitbucket, where users can store, manage, and collaborate on their source code. It allows teams to organise their work, assign access permissions to different users, and track changes to code in a centralised location. A workspace can contain multiple repositories, each with its own set of files and folders.
Be sure to click on the create workspace button to create your Bitbucket workspace, just like what the output below does:
Fig 3: Initializing creating a bit bucket workspace
A new page will show up asking you to add the name of your workspace. This tutorial uses my-helloworldworkspace as the name of the workspace. You can name yours whatever you like. Additionally, you have the option of making this workspace public or private. In this tutorial, you’ll on-check the checkbox to enable the workspace to be public as shown in the output below:
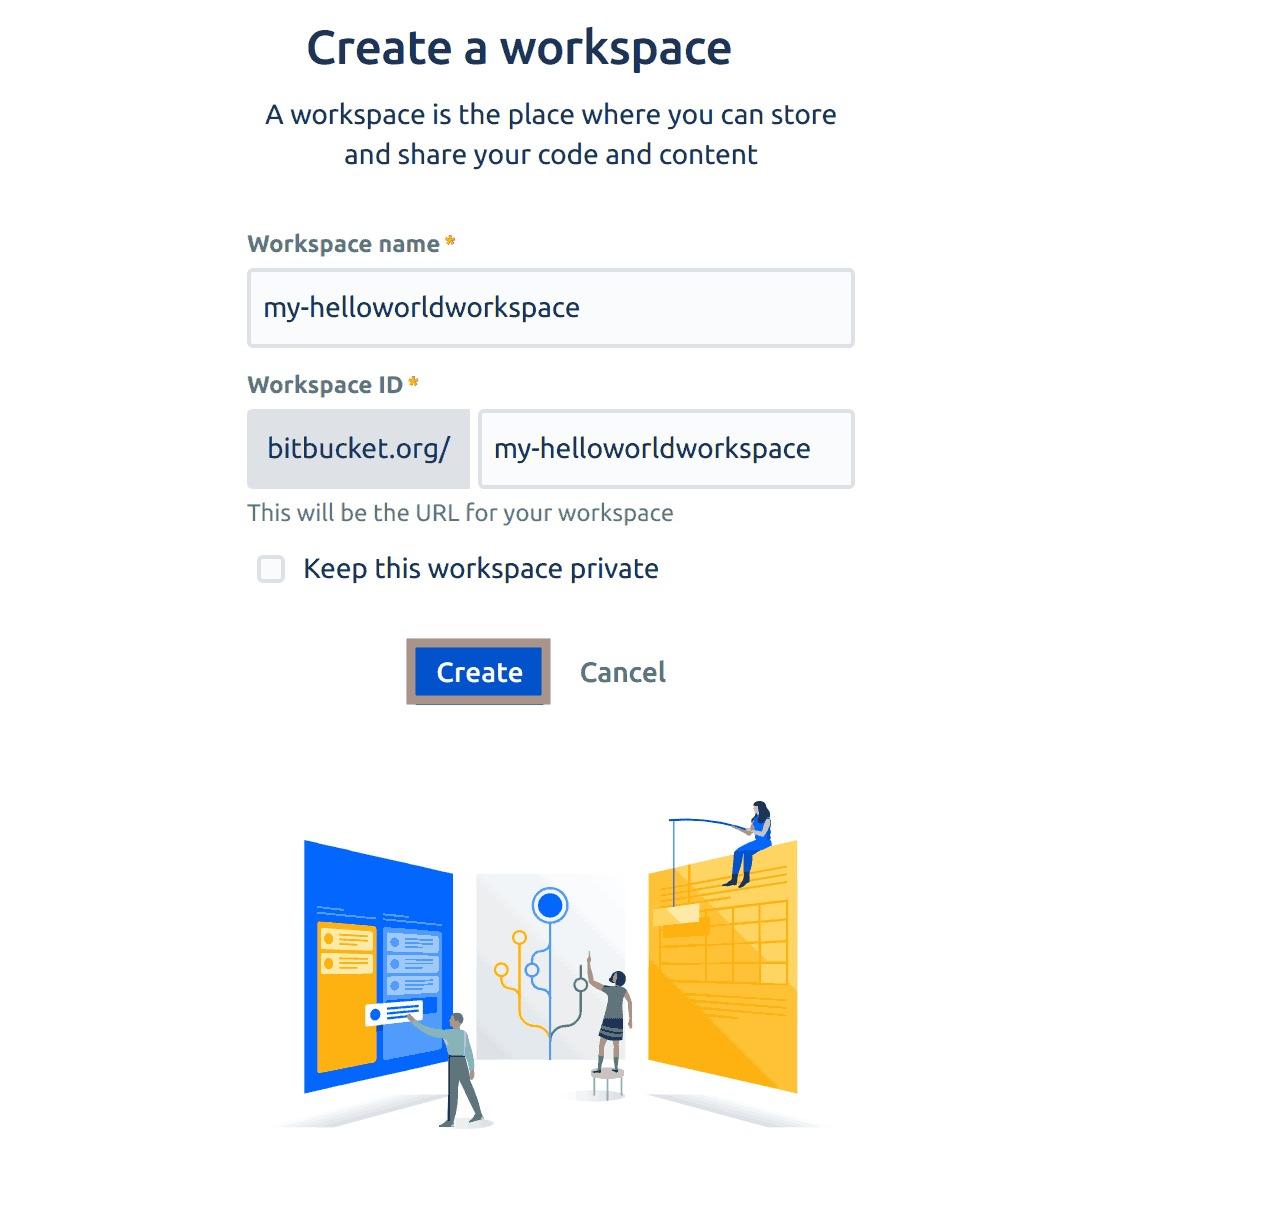
Fig 4: Creating a Bitbucket workspace
Once you have created your workspace, you will be directed to your Bitbucket dashboard.
This dashboard provides a centralized view of your repositories, projects, pull requests, issues, and more. It also allows you to manage your code, collaborate with others, and track the progress of your development projects.
To create a repository, click on the create button on the navigation menu and select Repository from the drop-down menu. This will initialize the process of creating a Bitbucket repository in your current workspace:
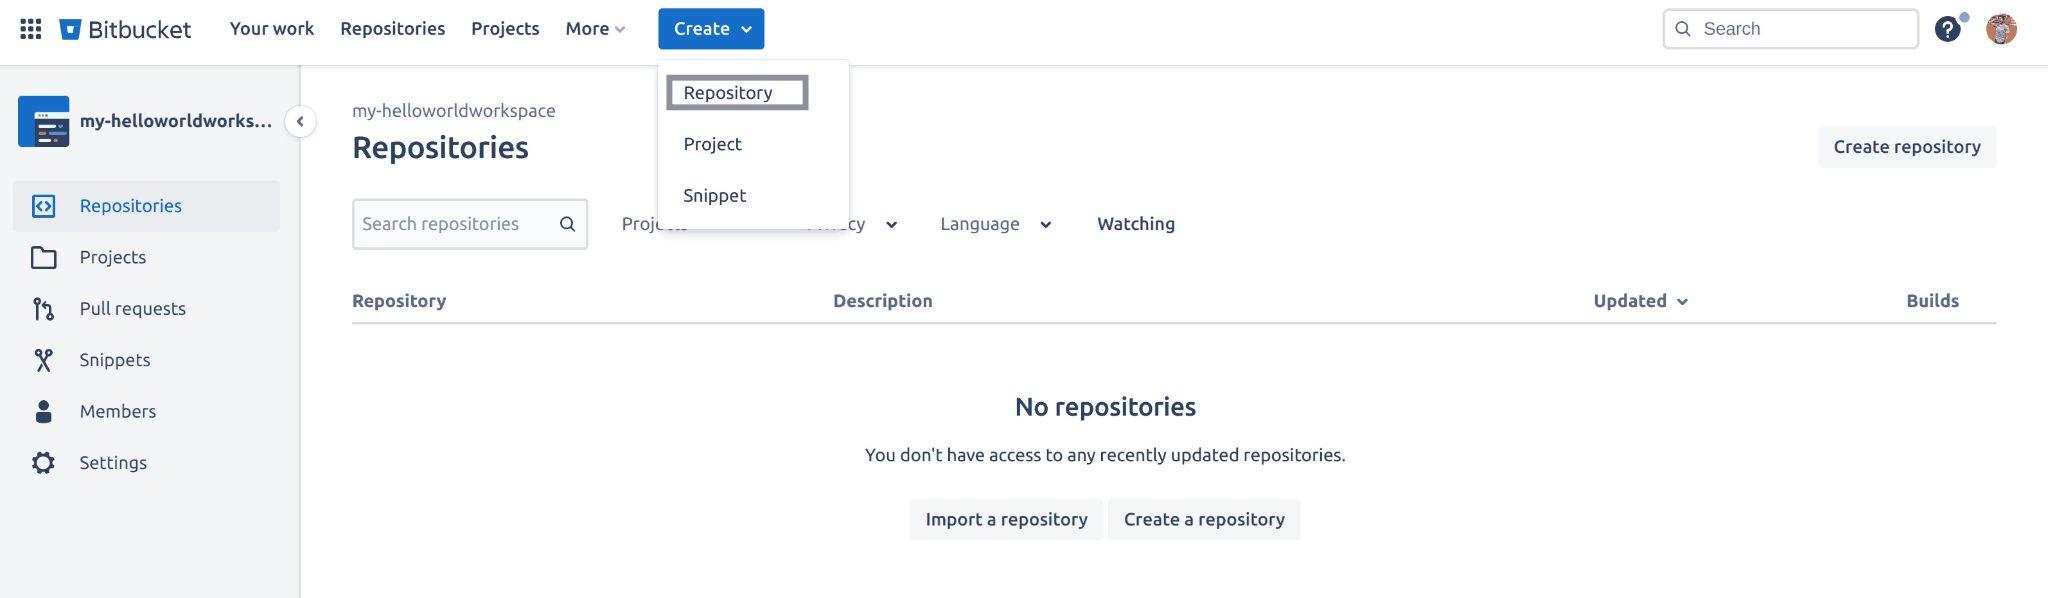
Fig 5: Initialising creating a Bitbucket repository
The page will then redirect to where you’ll need to provide some information about the repository you are trying to create which is as follows:
- Workspace: This field will be automatically populated for you if you need to select a different workspace click on the dropdown icon.
- Project name: Projects are a way to organize and manage repositories within a Bitbucket workspace. Provide a project name – this tutorial uses a project name First-bitbucket-project.
- Repository name: Give your repository a name, this tutorial sets the repository name to – hello-world.
- Access level: This field requires you to either make your repository private or public. This tutorial sets this field to – public.
- Include a README: Just like GitHub, you have the option to create a
ReadMeas you create your repository. This tutorial sets this field to Yes. - Default branch name: This field requires you to specify the default branch you’d like to push your code to. This tutorial selects the main branch as the default branch.
- Include .gitignore: This field asks you if you’d like to add a
*.gitignore*file to your repository, this tutorial selects Yes.
You have the option to add a description and select the language your project comprised of. These settings are located in the advanced settings option.
Go ahead and create this repository. This should take less than a minute:
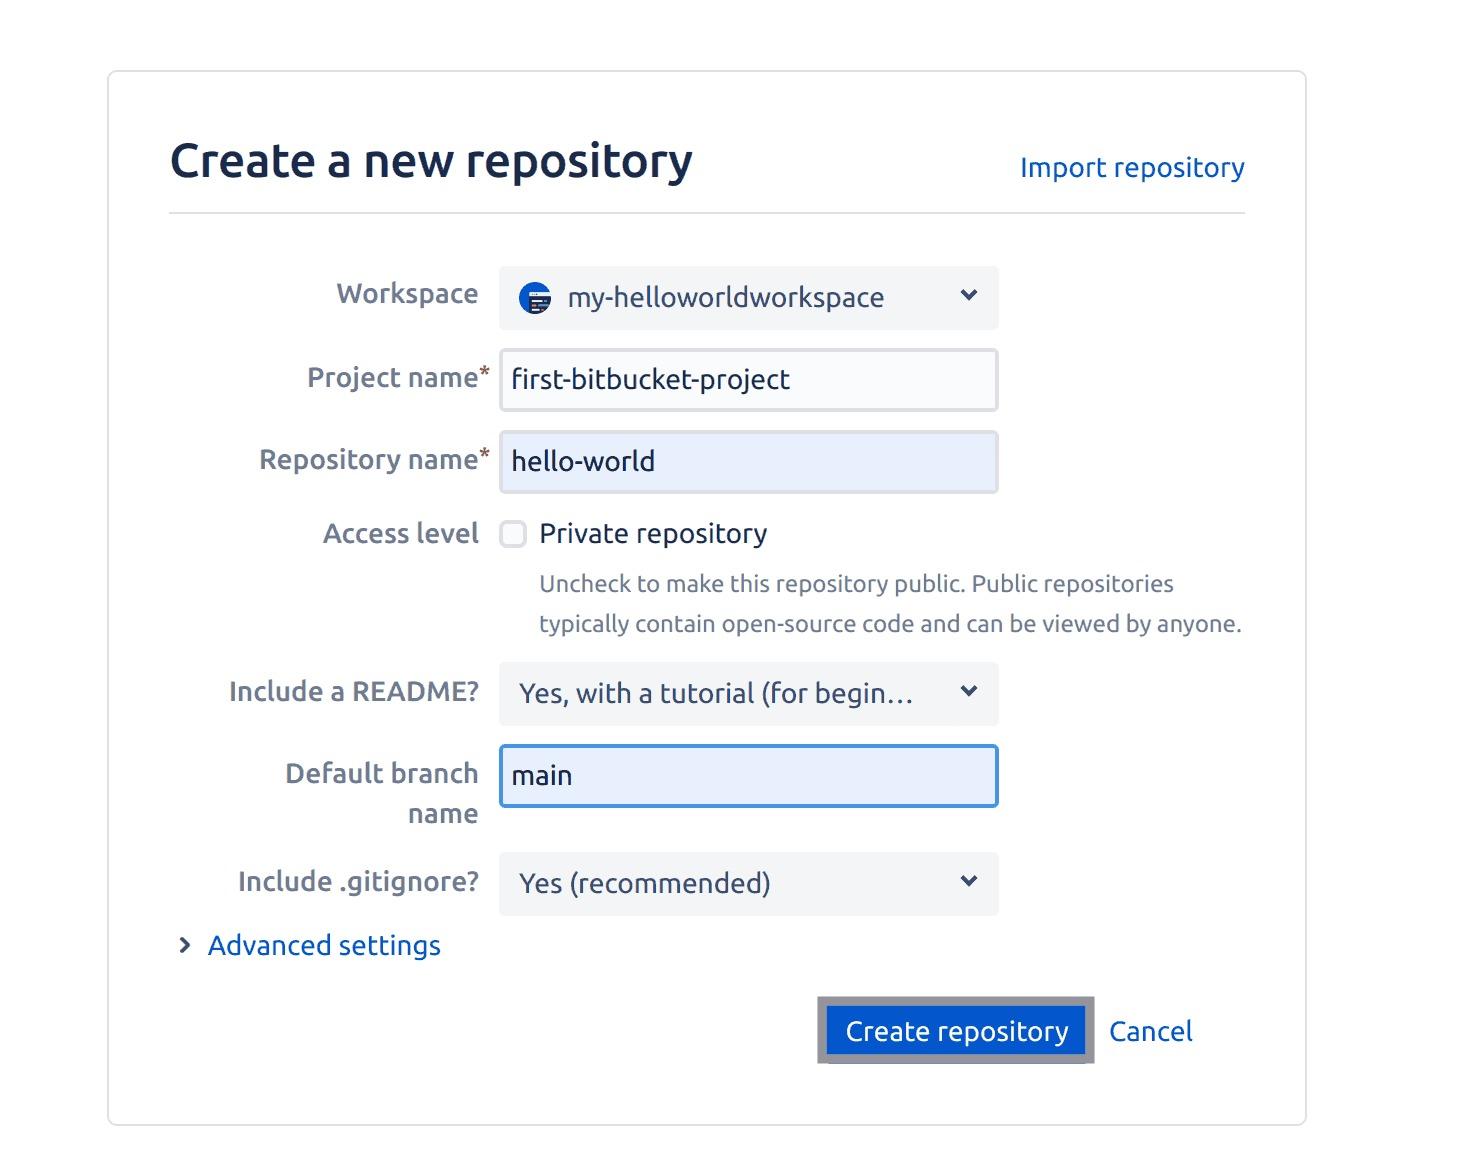
Fig 6: Creating a Bitbucket repository
Once your repository has been created successfully, you should see your repository presented to you on your Bitbucket dashboard like the output below:
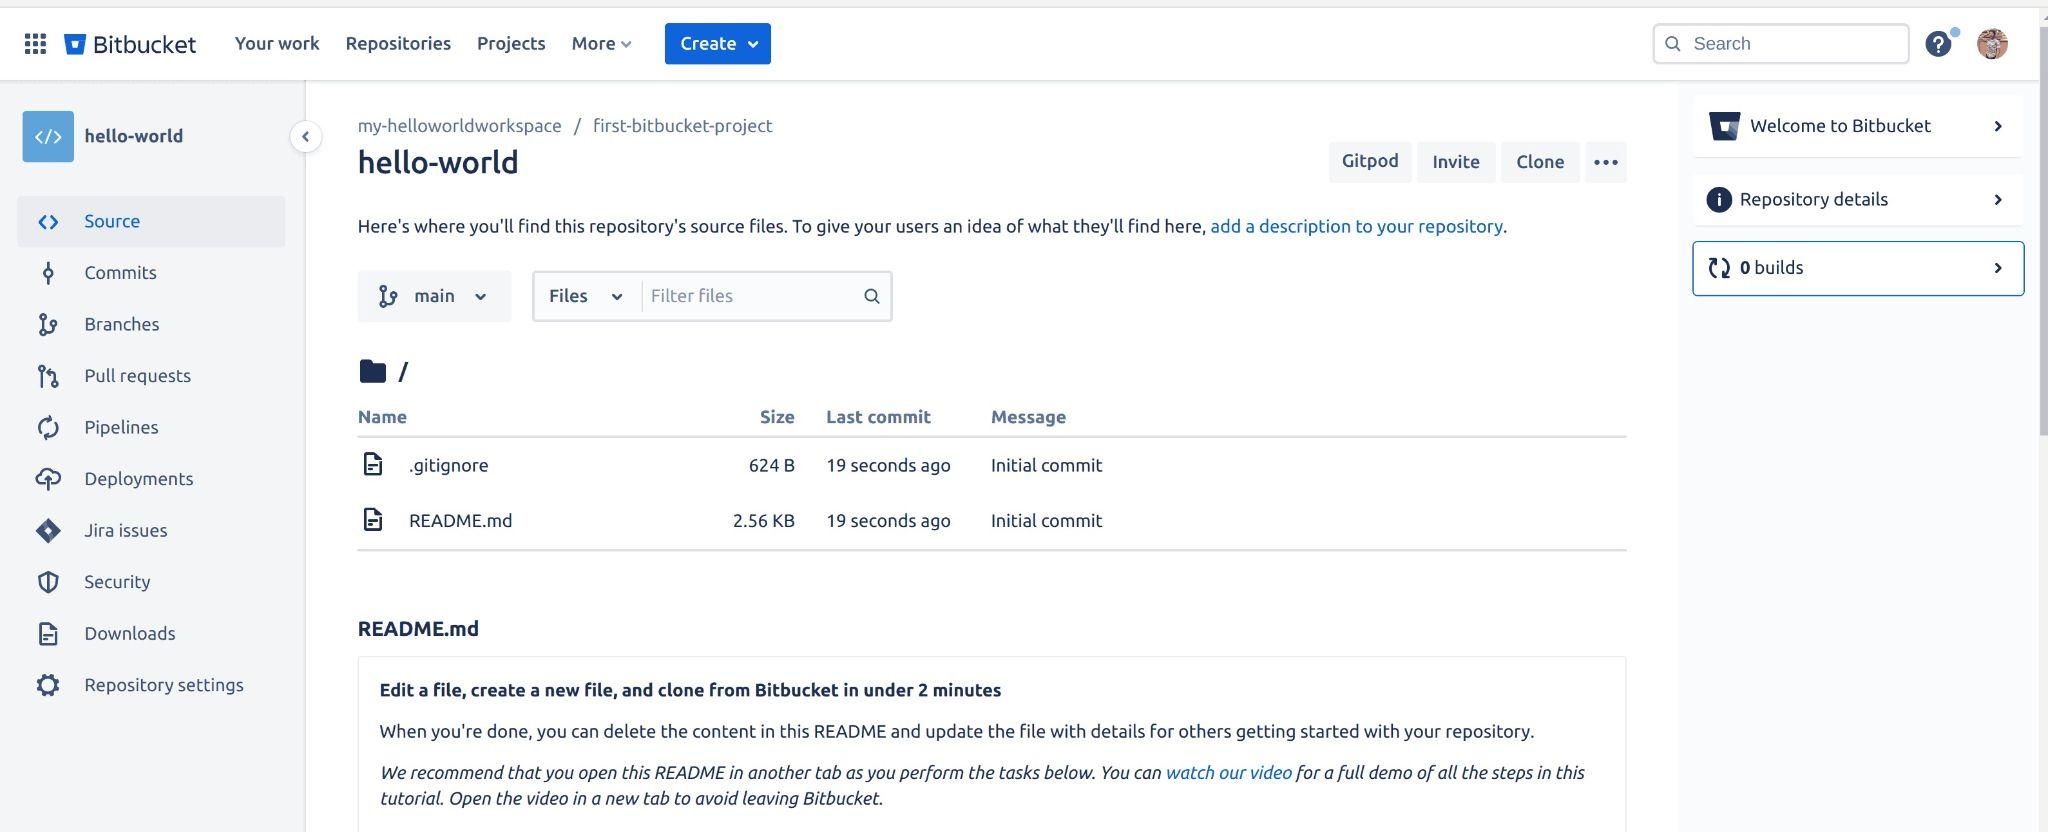
Fig 7: Viewing Bitbucket repository
Pushing your code to your Bitbucket repository
Since Bitbucket supports the Git version control system, you can upload and transfer the code from your local machine up to your Bitbucket remote repository using Git commands.
Open up your project directory via a terminal or command prompt and execute the following Git commands to commit your changes and push your project up to your Bitbucket repository.
First, execute the command below to initialize a new Git repository in the current directory, This command will create a new directory named ".git" within the current directory, which contains all the necessary metadata and objects to manage version control for the project:
|
1 |
git init |
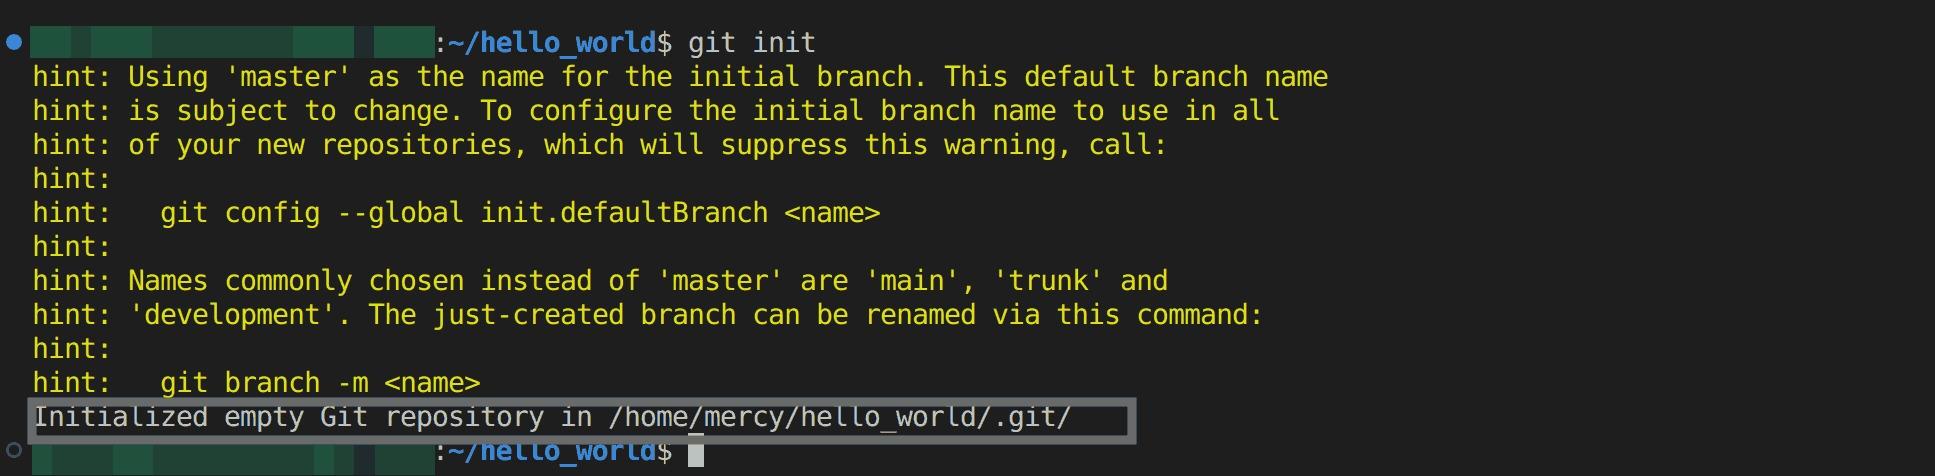
Fig 8: Initialising a new Git repository
Display the current status of the local repository, including information about changed files that have not yet been committed to the repository, untracked files, and the current branch using the following command:
|
1 |
git status |
From the output below, you can see that you are on the master branch and haven’t made any commits yet.
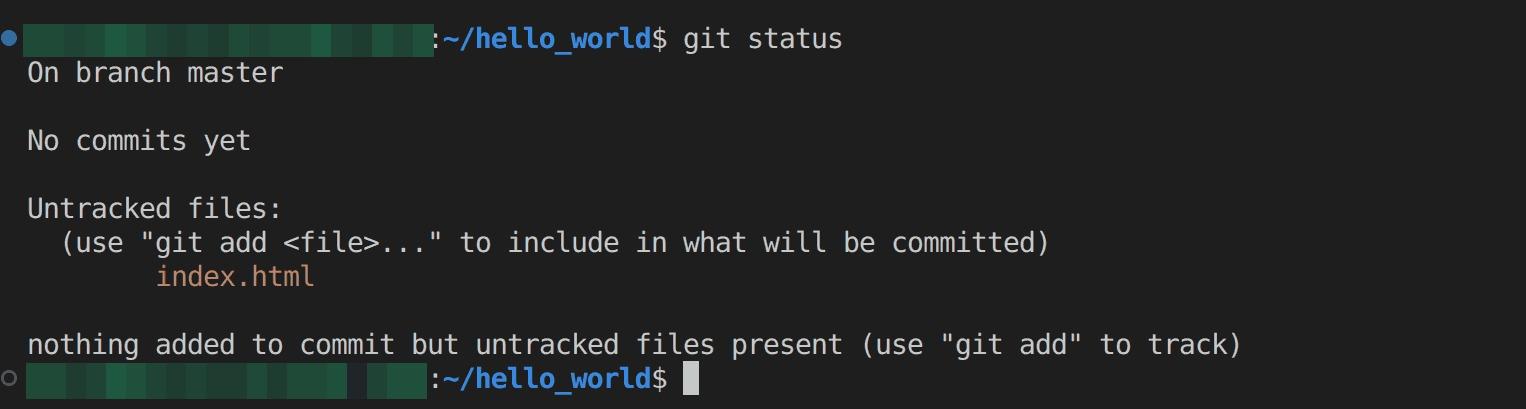
Fig 9: Viewing current branch, commits and untracked files
Now execute the following Git command to track the files in your current directory. This prepares them to be committed to the Git repository:
|
1 |
git add . |
Record changes to the local repository by specifying commit, which describes the changes being committed using the following Git command:
|
1 |
git commit -m "my first commit" |
The commit message provides context and helps to understand the purpose of the changes.

Fig 10: Making a commit message
Since you already have the Main branch as your default branch for your BitBucket remote repository, execute the Git command below to rename the current branch to "main".
The "-M" option specifies that it’s a branch rename operation.
This can be useful if you want to change the name of your branch to better reflect the work you’re doing, or to align with best practices or conventions within your organisation.
|
1 |
git branch -M main |
Create a new remote named origin and set its URL to a specified URL using the Git command below. This allows you to push and pull changes from the remote repository located at the specified URL, which in this case is your repository on Bitbucket.
|
1 |
git remote add origin "YOUR_BITBUCKET_REPOSITORY_HERE" |
To get the URL of your Bitbucket repository, Click on the clone button from the top right side, and copy the URL after the `git clone` command highlighted below:
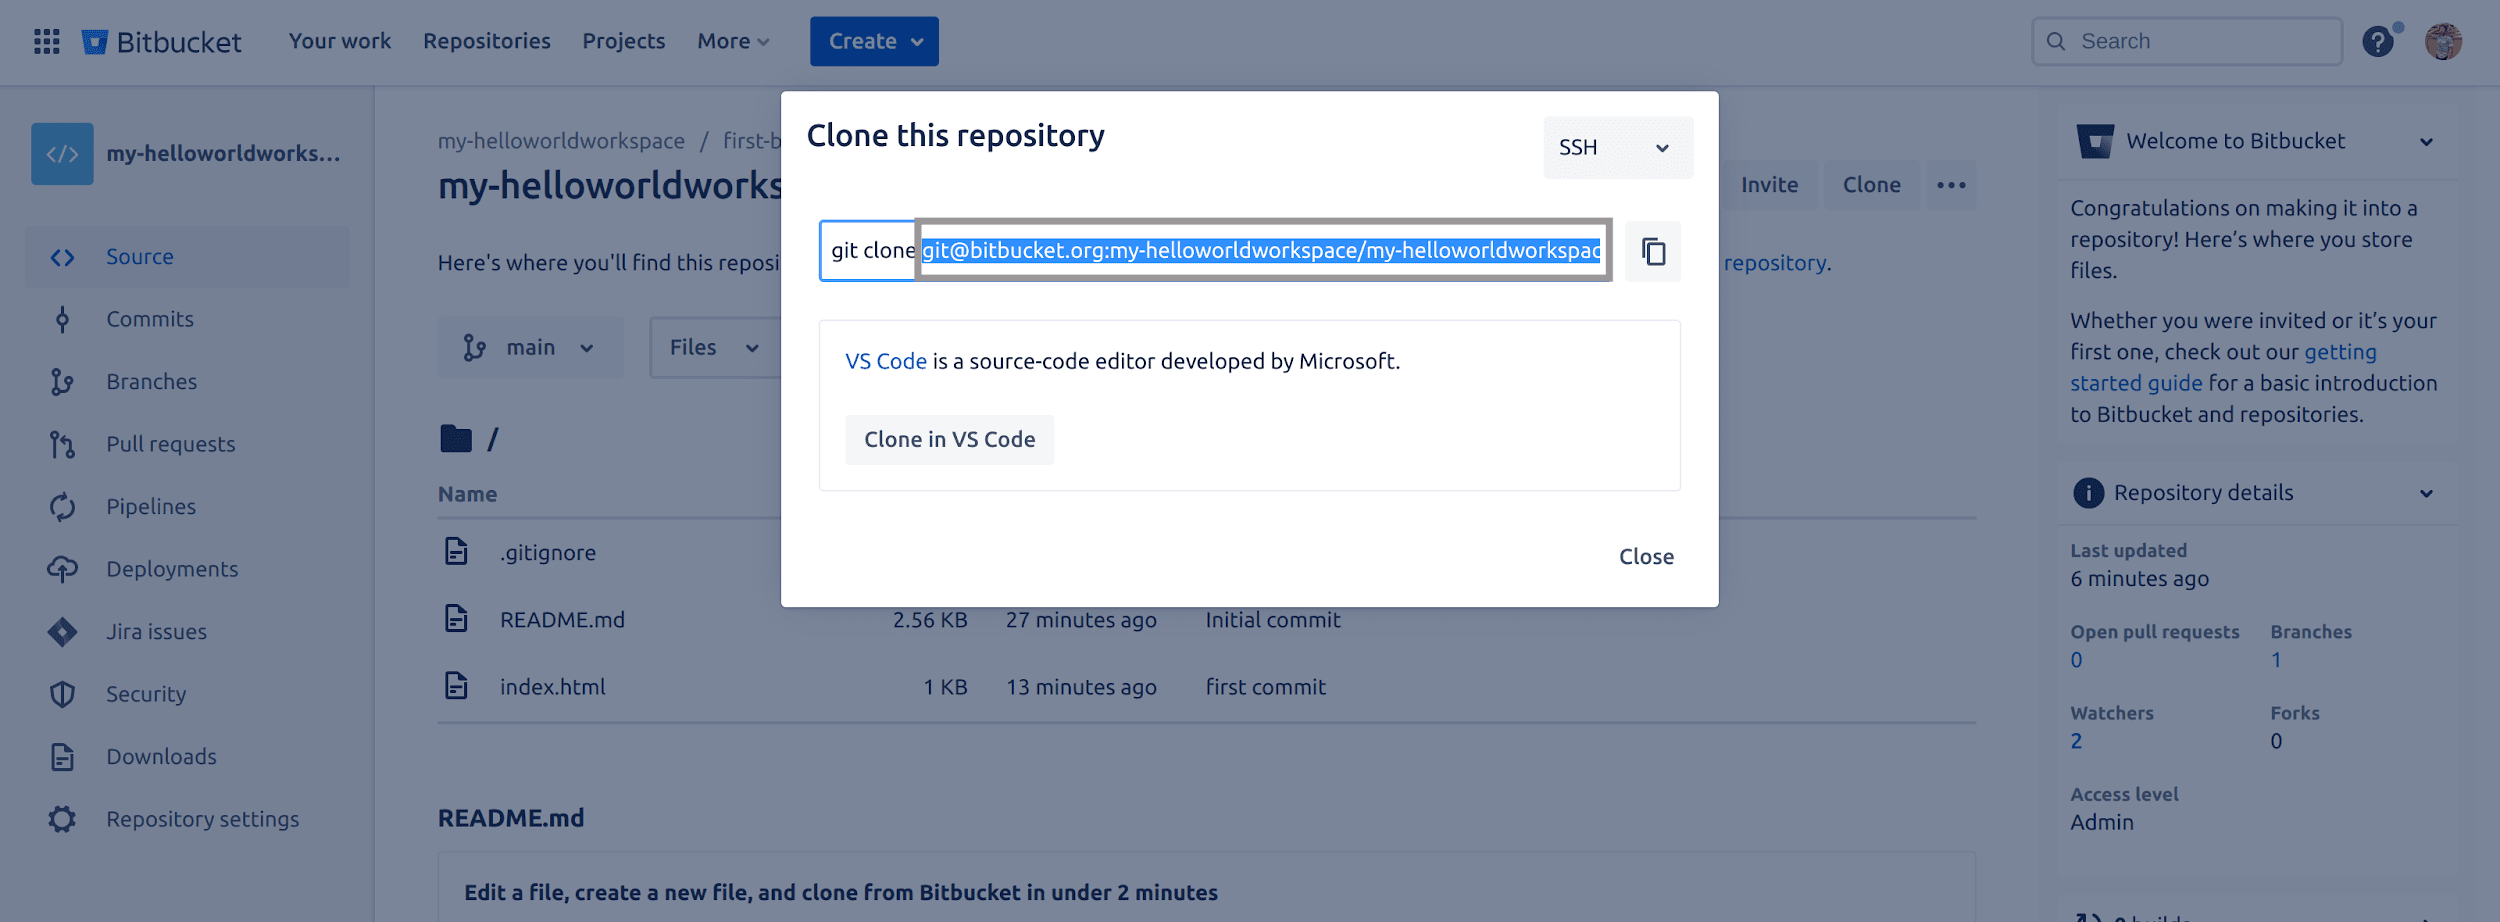
Fig 11: Copying Bitbucket repository URL
Since you allowed Bitbucket to add a ReadME and a .gitignore file while creating your repository, you’ll need to execute the following Git pull command to fetch and download the content from the remote repository and merge it with your local repository:
|
1 |
git pull --rebase origin main |
You should have the ReadME and the .gitignore file as shown in the below screenshot:
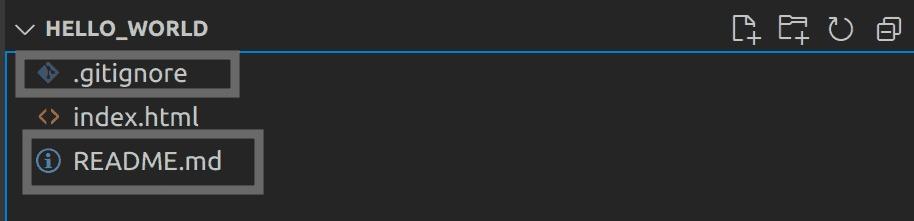
Fig 12: Viewing pulled files from remote Bitbucket repository
Create an App password on your Bitbucket account that you will use when you want to push your code up to your Bitbucket repository. Click on your avatar from your repository page and select personal settings from the dropdown menu:
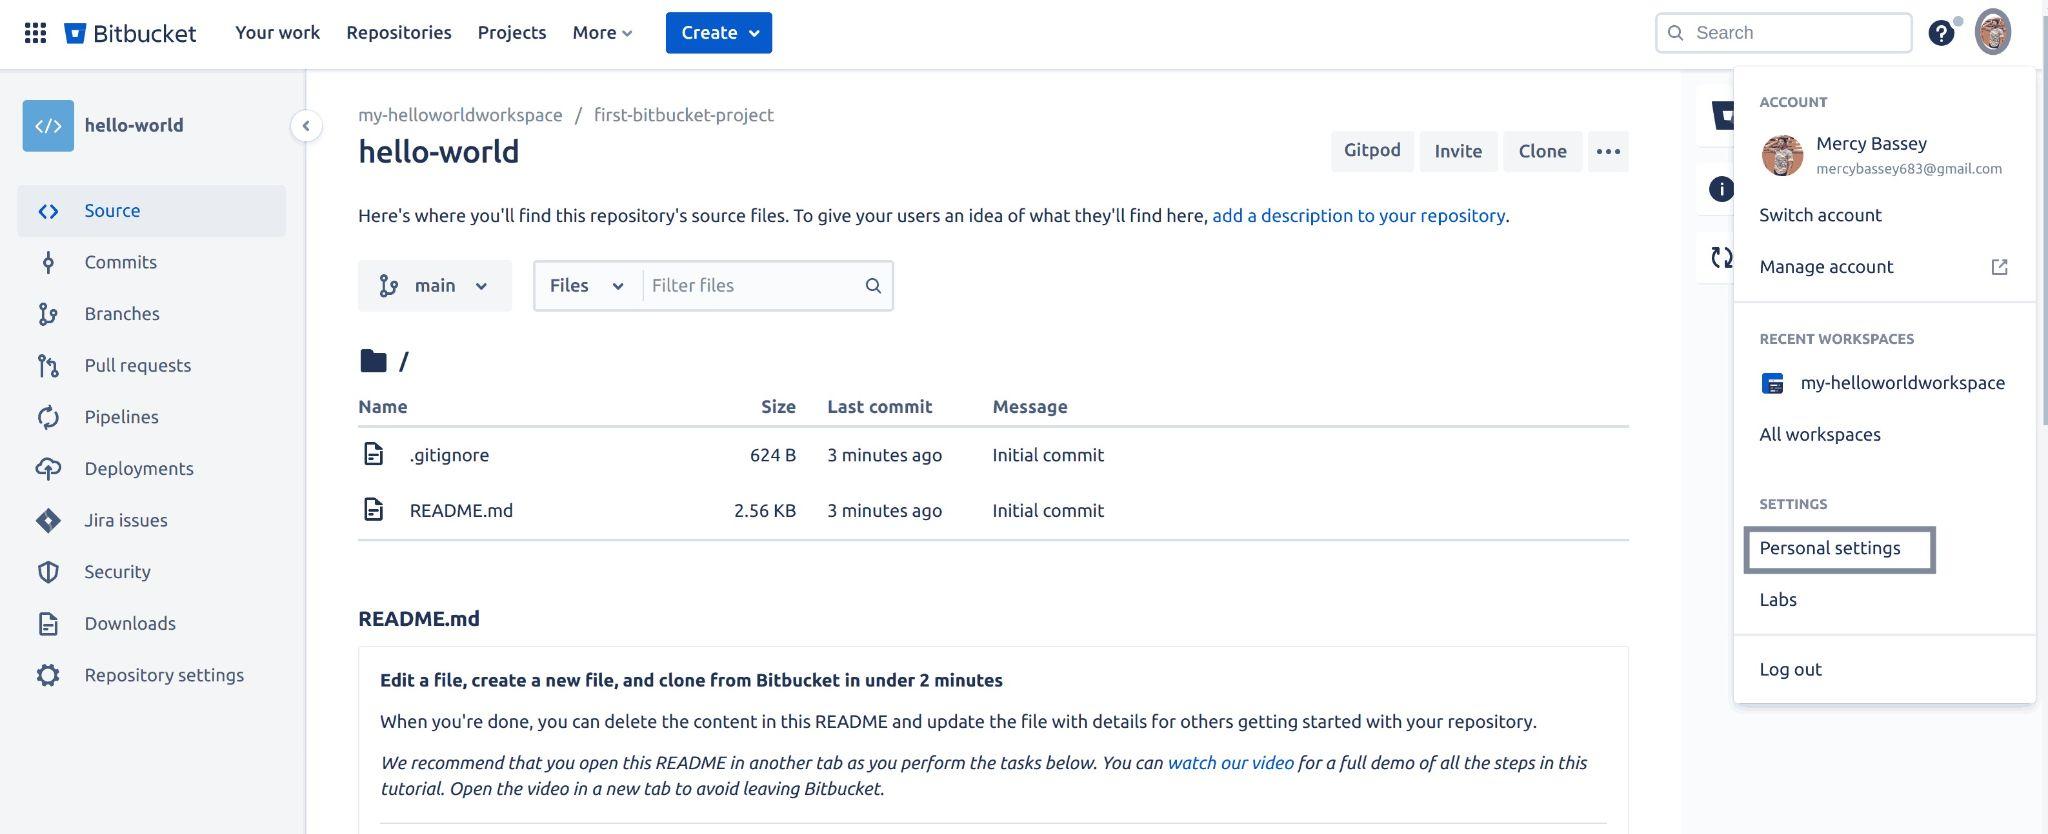
Fig 13: Initialising creating an app password
The page will redirect to the personal settings page. On this page, select the App passwords tab from the left panel. A new screen will be shown to you, click on the create app password button to create an app password:
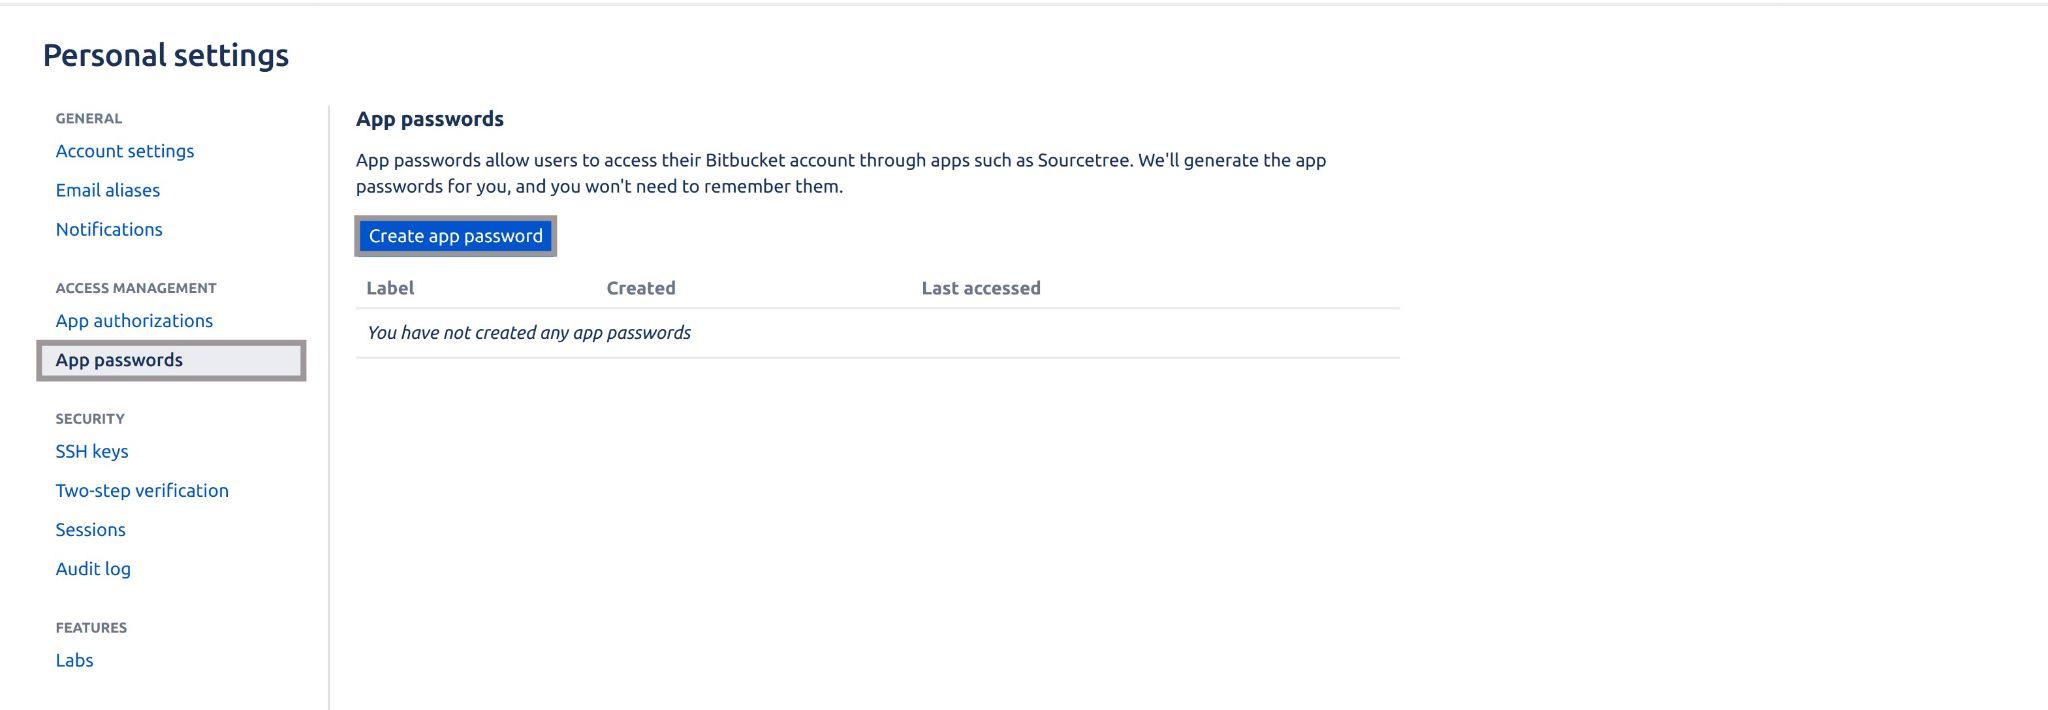
Fig 14: Creating app password
Give your app password a label (this tutorial uses hello-world) as the label, check all the check-boxes under the permissions section and click on the create button to create this password.
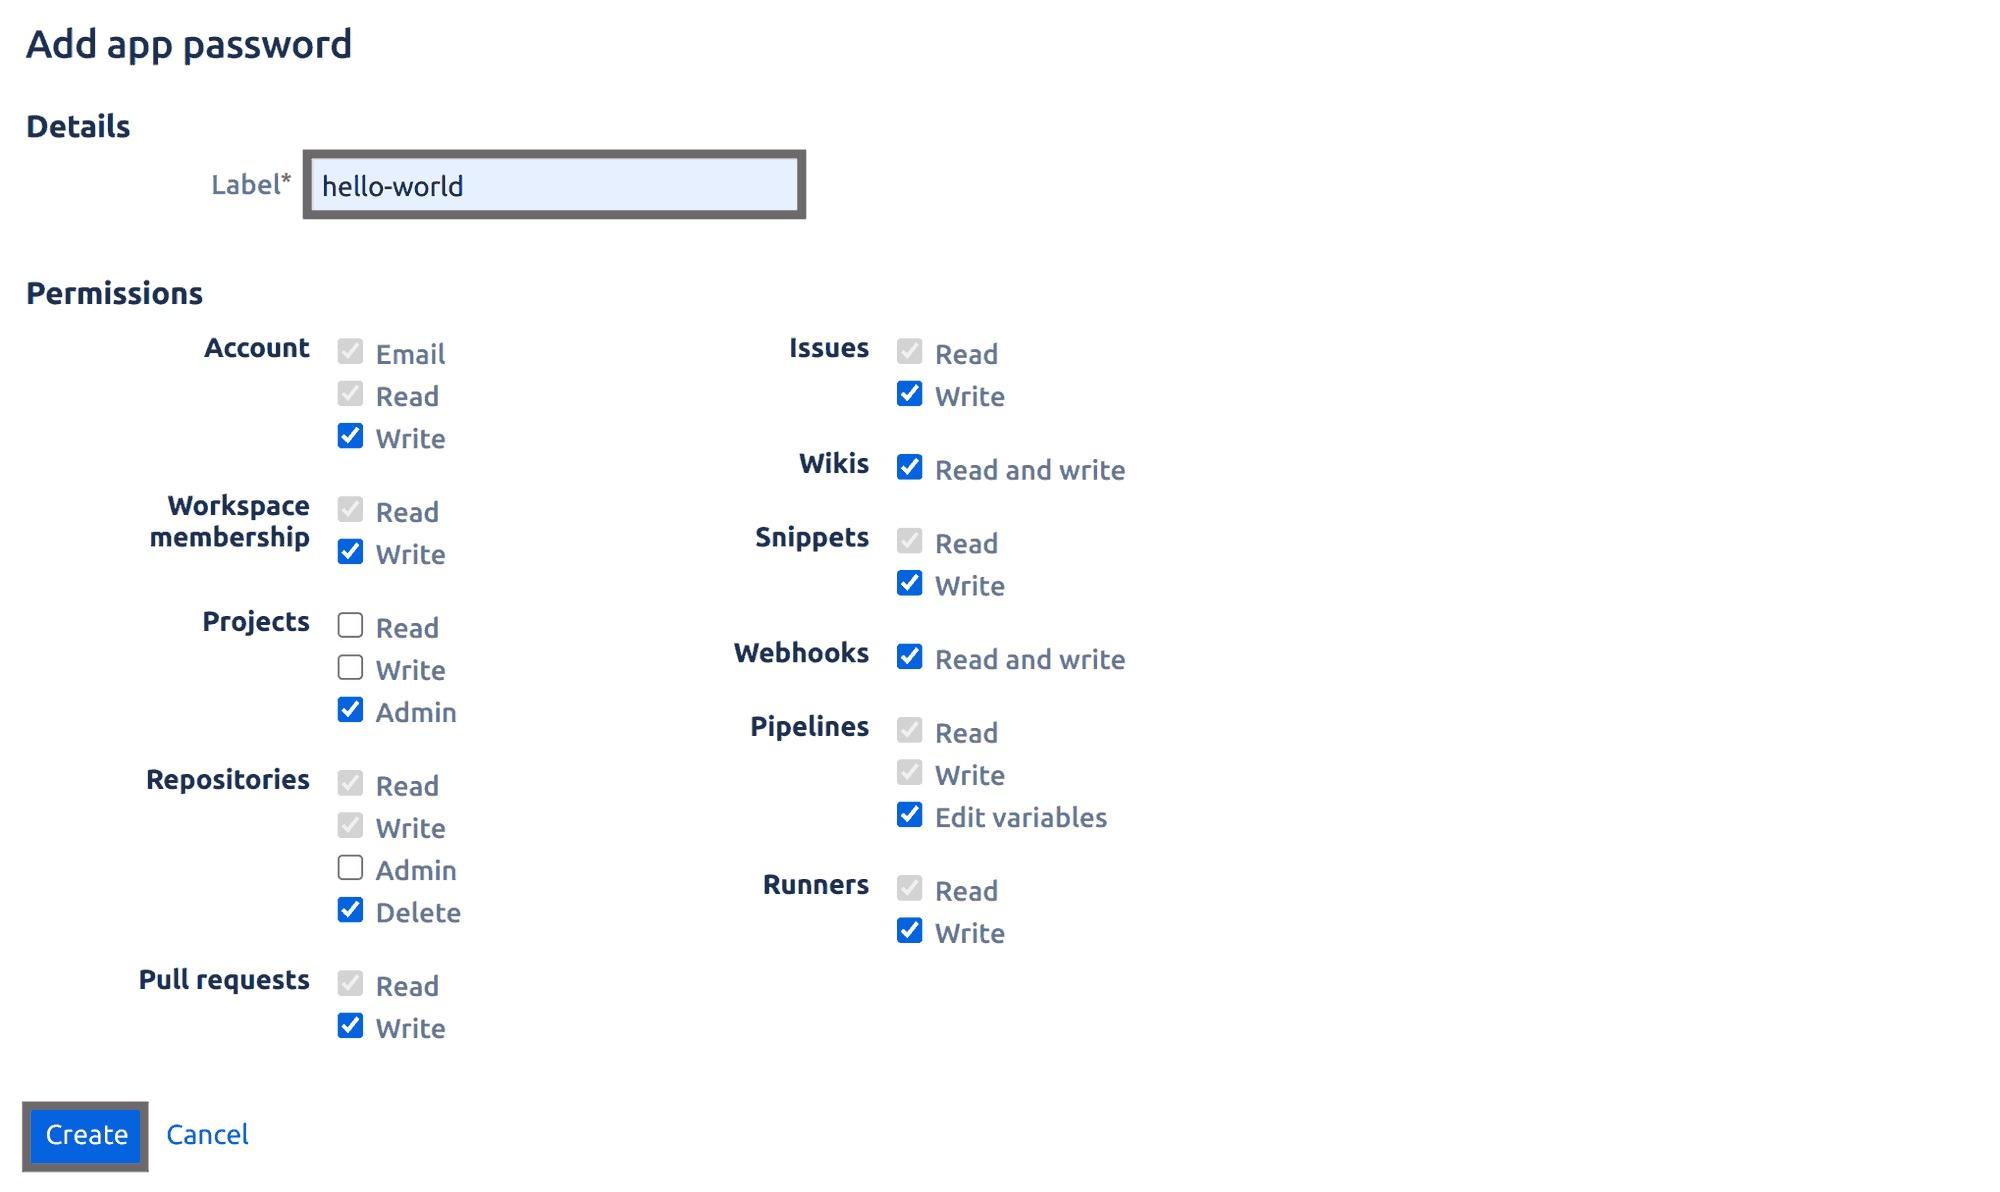
Fig 15: Adding app-password label and permissions
A pop-up window will be shown to you containing your app password, copy the app password. Be sure to save this password somewhere you can access it, you will always need it whenever you try to push your code to any repository on your Bitbucket account.
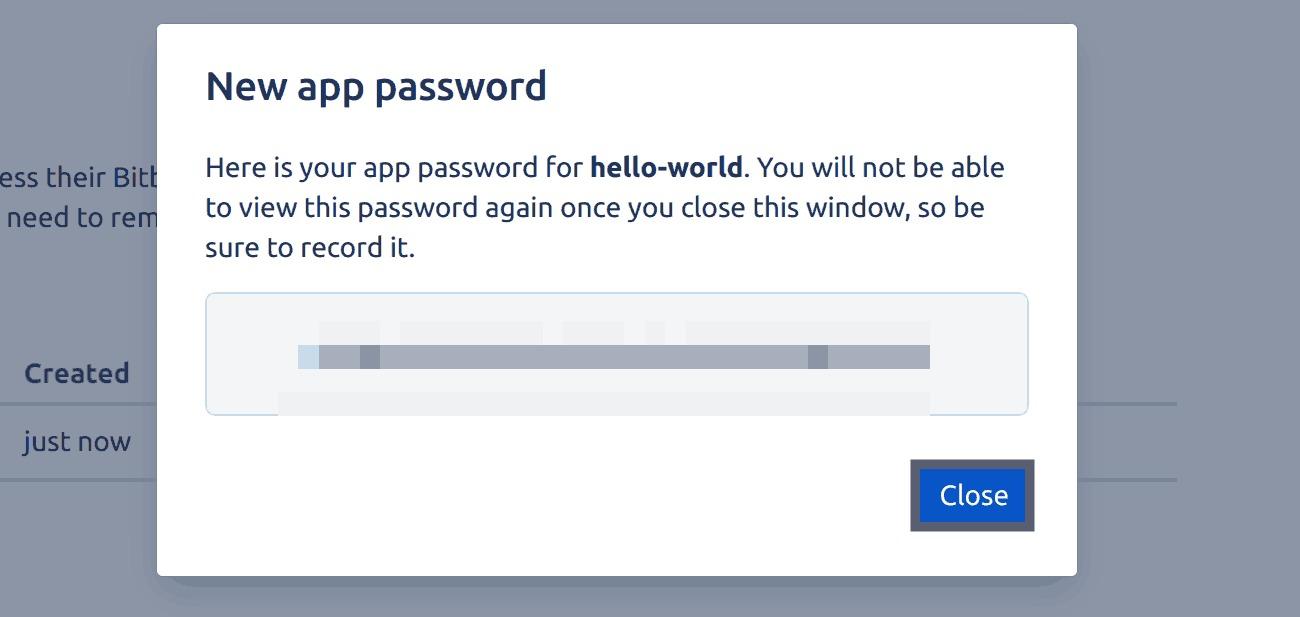
Fig 16: Copying app password
Close the pop-up window once you have successfully copied the app password for your repository. You should be redirected to the below screen:
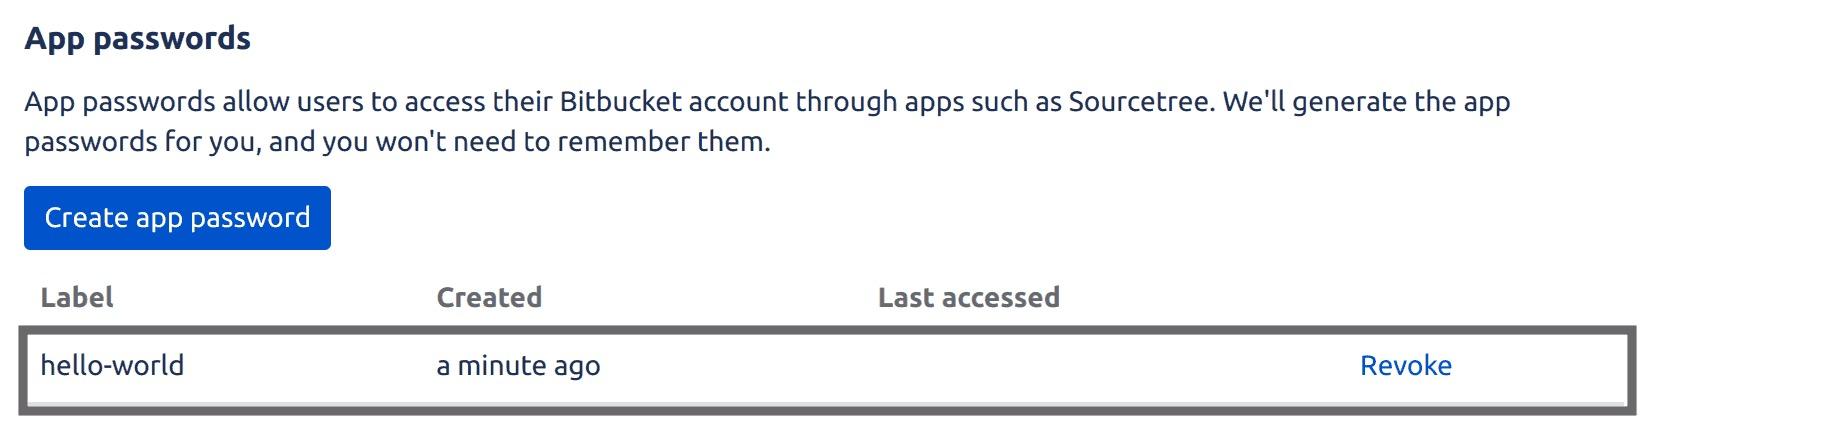
Fig 17: Viewing app-passwords
Last, execute the following Git command to push the local main branch to a remote repository. This command pushes the local main branch to a remote repository named "origin" with the "u" option set to track the remote branch as the local main branch.
|
1 |
git push -u origin main |
This command will prompt you to input your Bitbucket username and password. Make sure you provide the correct username and app password as your password.
Once you have successfully pushed to your remote Bitbucket repository, all you now have to do is refresh your Bitbucket repository page. You should see the latest push:
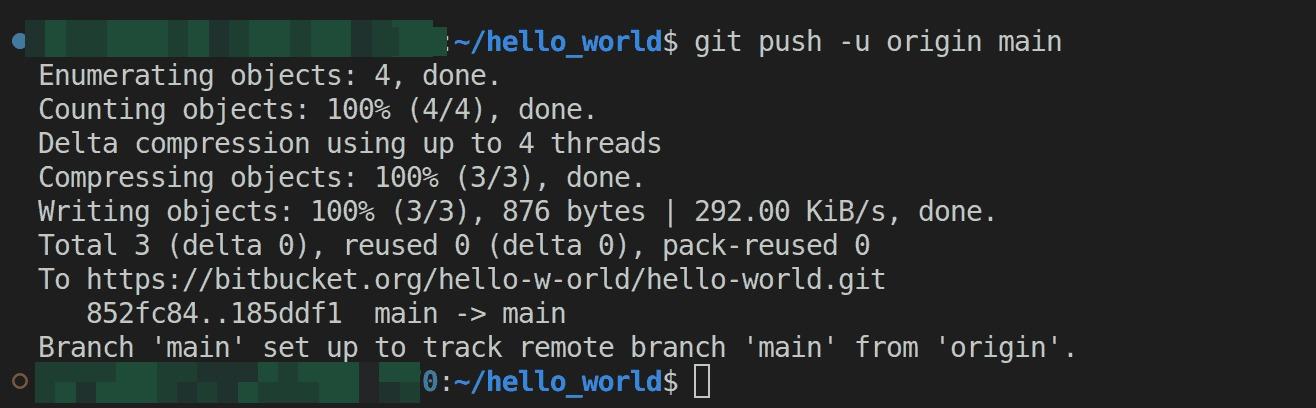
Fig 18: Pushing commits to remote Bitbucket repository
Hosting repository with Bitbucket pages
Bitbucket has a pages feature that allows you to host static websites directly from your Bitbucket repository. Bitbucket Pages provides a simple, fast, and flexible way for developers, teams, and organizations to create and host websites without the need for dedicated hosting infrastructure.
First, you will need to rename your repository to include the following naming convention – username/workspaceID.bitbucket.io. This is the required naming convention to setup pages for your Bitbucket repository.
On your repository page, select the repository settings tab from the left panel:

Fig 19: Viewing repository settings
Edit the name of your repository to follow the naming convention stated above and scroll down to the bottom of the page to save this setting:
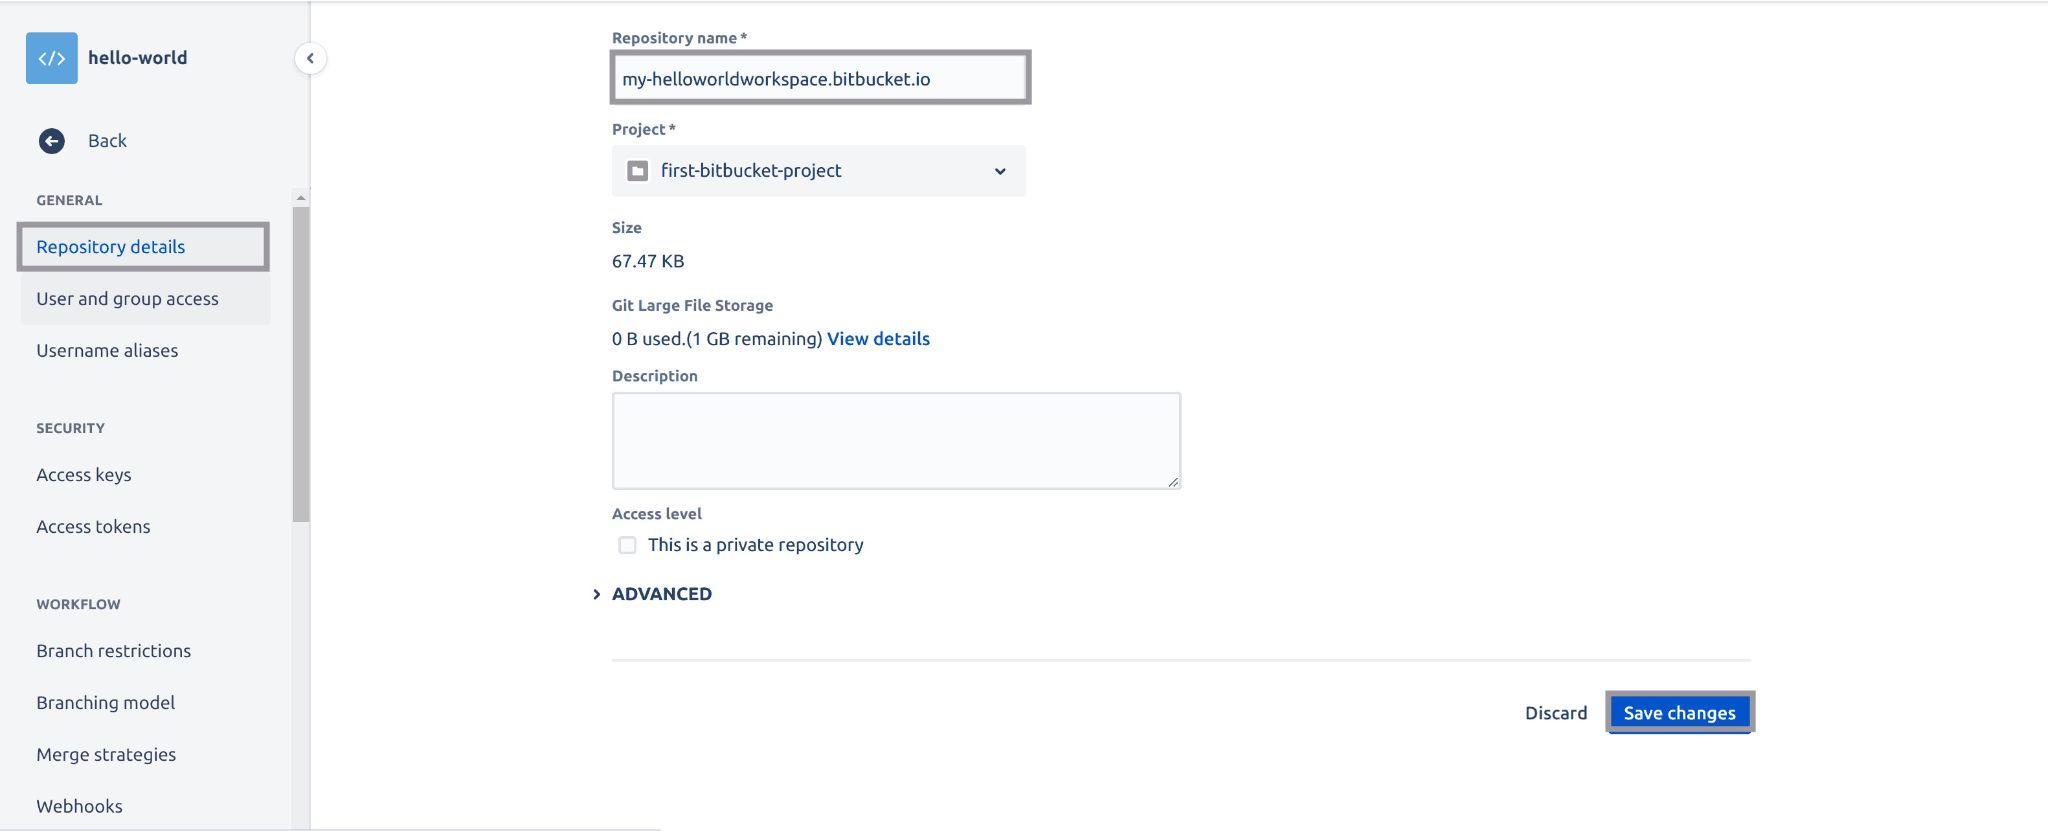
Fig 20: Renaming repository name
Once the change has been saved, navigate to the following web address over your preferred browser to see your static site:
|
1 2 |
https://workspace_ID.bitbucket.io https://my-helloworldworkspace.bitbucket.io/ |

Fig 21: Viewing repository
Using a third-party CI tool with Bitbucket
As I mentioned earlier Bitbucket integrates very well with third-party continuous integration and delivery tools. For this tutorial, you’ll be integrating Bitbucket with Circle CI.
First, execute the Git command below to create an orphan branch – you can name this branch whatever you like. This tutorial uses circle-ci as the branch name. This branch will contain a VueJS project, this is the project we will be using for this demo. The reason you’ll need to create this branch is that we only want to configure continuous integration and delivery for only the circle-ci branch.
|
1 2 |
git checkout --orphan circle-ci git rm -rf . |
This will result in something like the following.

Fig 22: Checking out to orphan branch (circle-ci)
Create a VueJS project using the following command. This command creates a VueJS project using the Vite build tool.
npm create vue@3
This command outputs some questions, you’ll provide the following answers:
- Project name: type in (.) so it builds the project in the current directory. (type in enter to continue)
- Package name: vue (you can name it whatever you like)
- Add TypeScript? … No / Yes (NO is the default so, type enter)
- Add JSX Support? … No
- Add Vue Router for Single Page Application development? … No
- Add Pinia for state management? … No
- Add Vitest for Unit Testing? … Yes (Use your left-arrow key to select yes)
- Add an End-to-End Testing Solution? › No
- Add ESLint for code quality? … No
Once the VueJS project has been created successfully, you should have the following output:
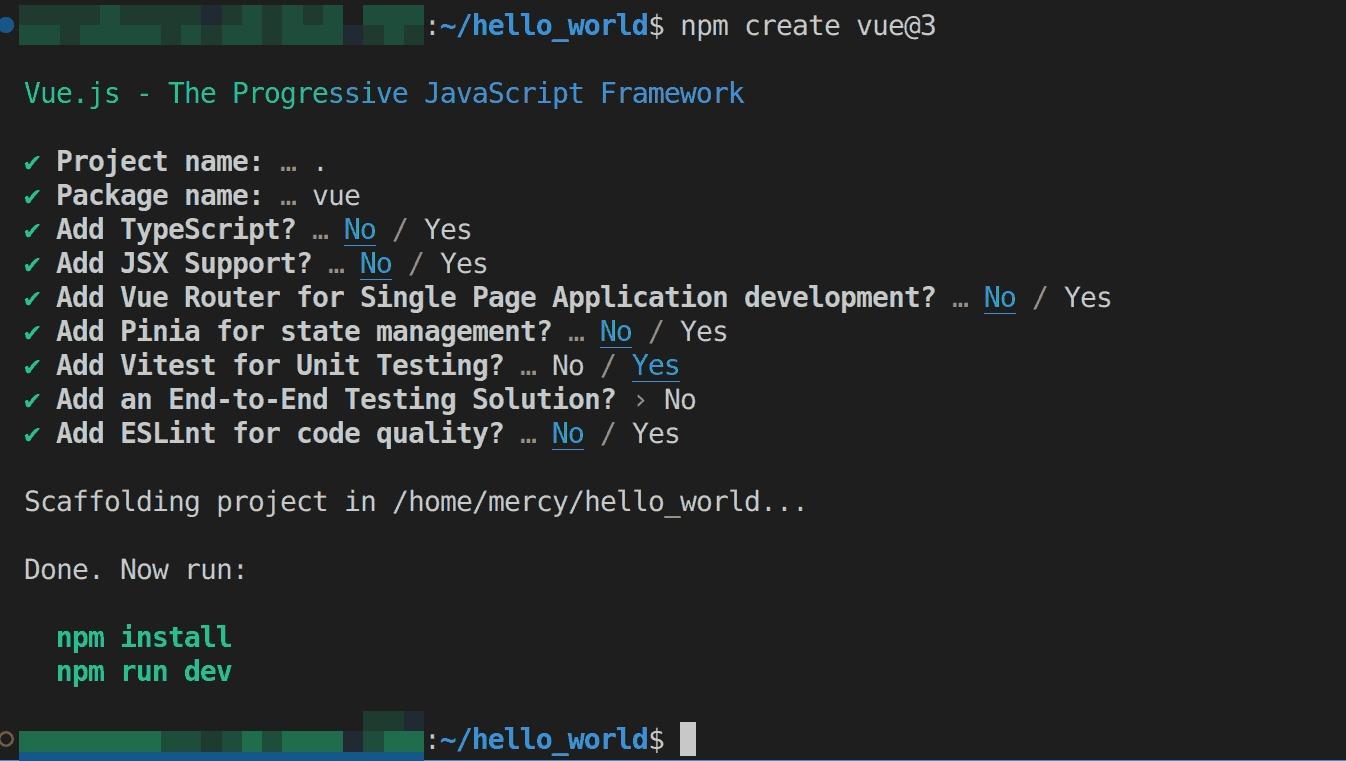
Fig 23: Creating VueJS project with Vite
Run the below command to install all the dependencies needed for the project:
|
1 |
npm install |
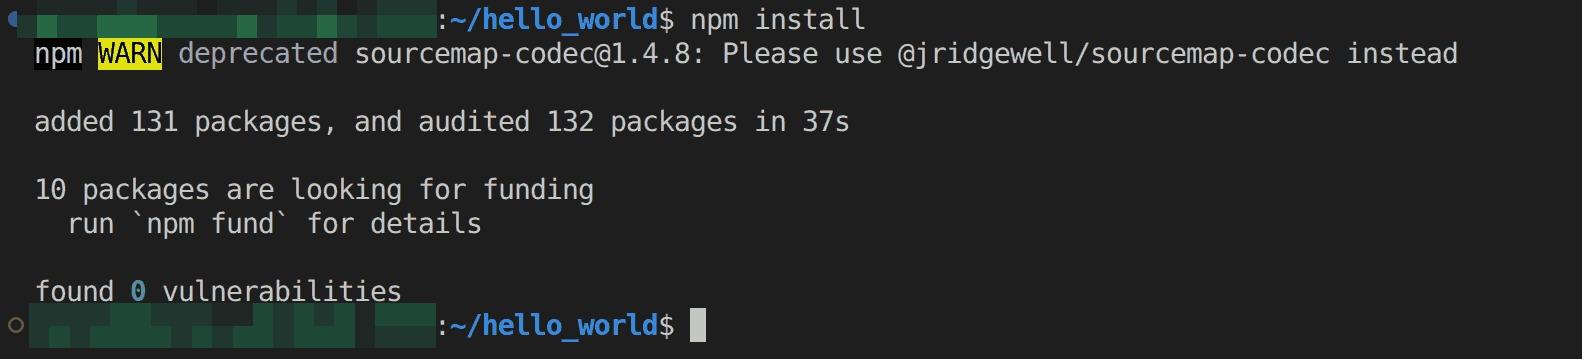
Fig 24: Installing all project dependencies
Since you accepted to add Vitest for unit testing, you have an already configured example test in the project src folder, named HelloWorld.spec.js. This is the sample test we will instruct CircleCI to check for before pushing our code up to our Bitbucket repository:
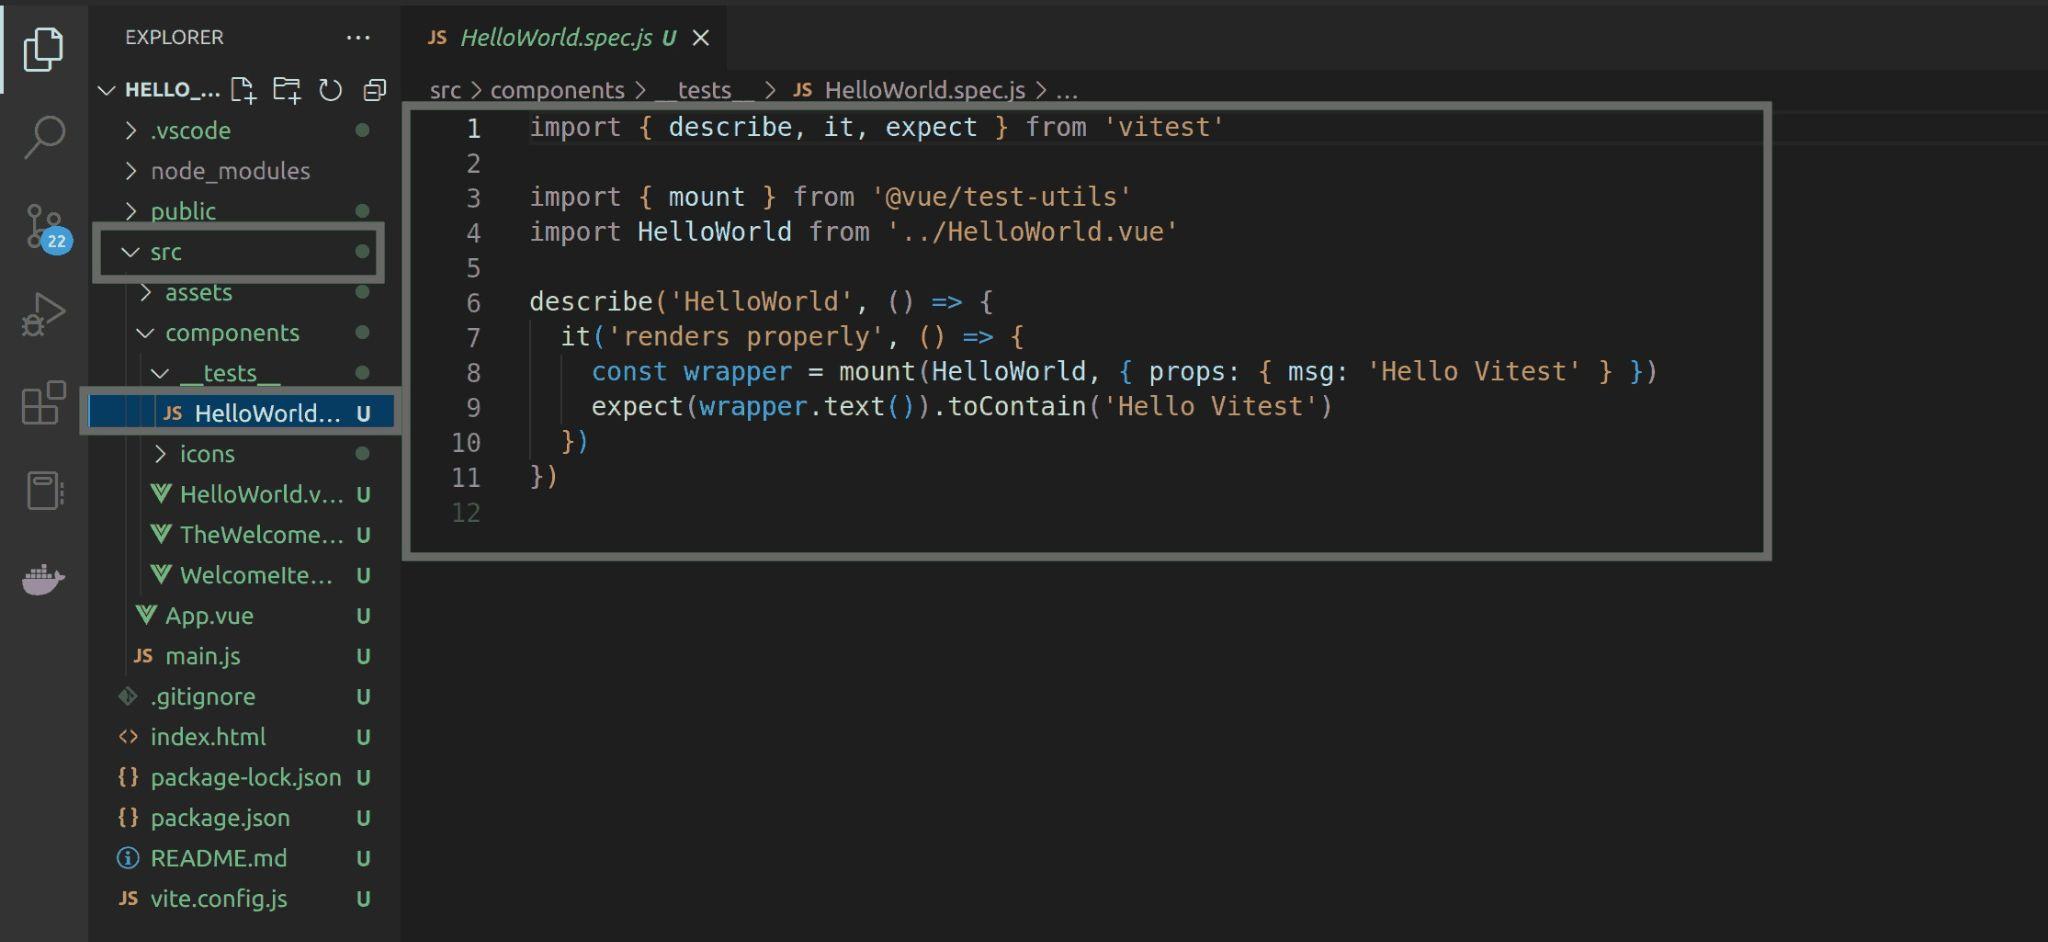
Fig 25: Viewing sample test (HelloWorld.spec.js)
Run the following command below to check if this test passes:
|
1 |
npm run test:unit |
If it passes you should have output similar to below:
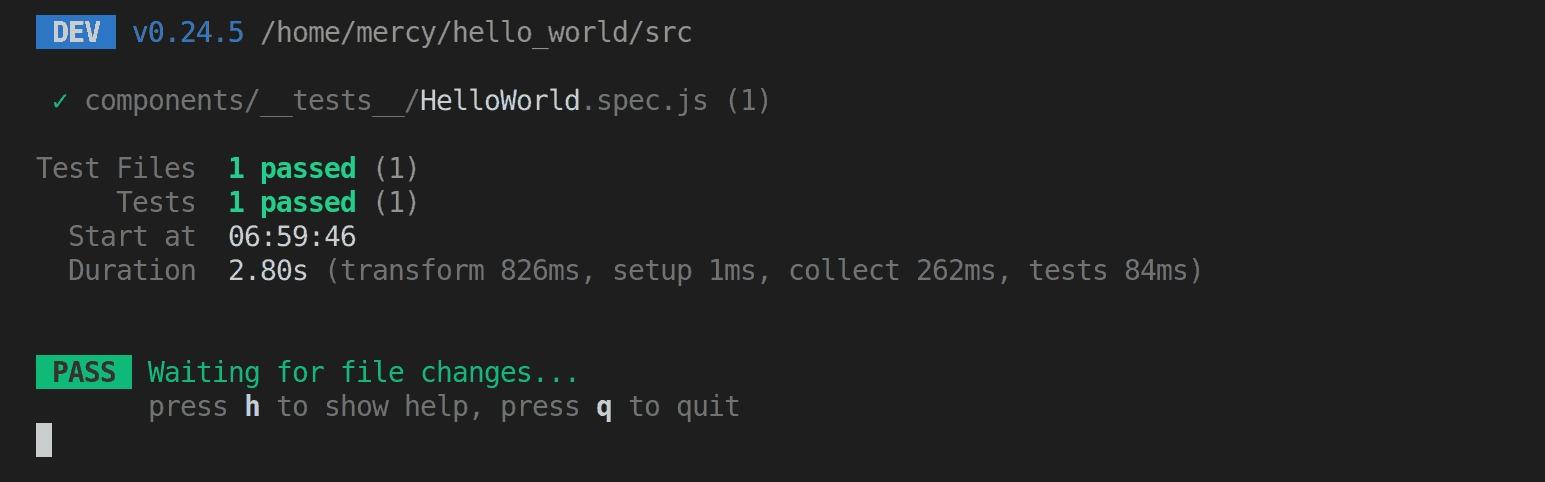
Fig 26: Viewing successful test
Create a folder in the current directory called .circleci, in there, create a file called config.yml This is the exact naming style for the CircleCI configuration file.
Add the below code snippets:
|
1 2 3 4 5 6 7 8 9 10 11 12 13 14 15 16 17 18 19 20 21 22 23 24 25 26 27 28 29 |
version: 4.0 jobs: build: working_directory: ~/repo branch: circle-ci docker: - image: cimg/node:19.4.0 steps: - checkout - run: name: update-npm command: sudo npm install -g npm@latest - restore_cache: key: dependency-cache-{{ checksum "package-lock.json" }} - run: name: install-all-packages command: npm install - save_cache: key: dependency-cache-{{ checksum "package-lock.json" }} paths: - ./node_modules - run: name: run tests command: npm run test:unit - run: name: generate static files #dist command: | npm run build echo "Pushed to Bitbucket" |
Now push your changes up to the circle-ci branch using the below commands:
|
1 2 3 4 5 6 7 |
git add . git commit -m 'first commit for the circle-ci branch' # you'll need to do this since your renamed your Bitbucket repository git remote remove origin # Be sure to add your own repository url git remote add origin "git@bitbucket.org:my-helloworldworkspace/my-helloworldworkspace.bitbucket.io.git" git push origin circle-ci |
Once you have successfully pushed your code to the circle-ci branch, when you select the Branches tab from the left panel on your Bitbucket repository, you should see that you now have two branches. The main branch and the circle-ci branch:
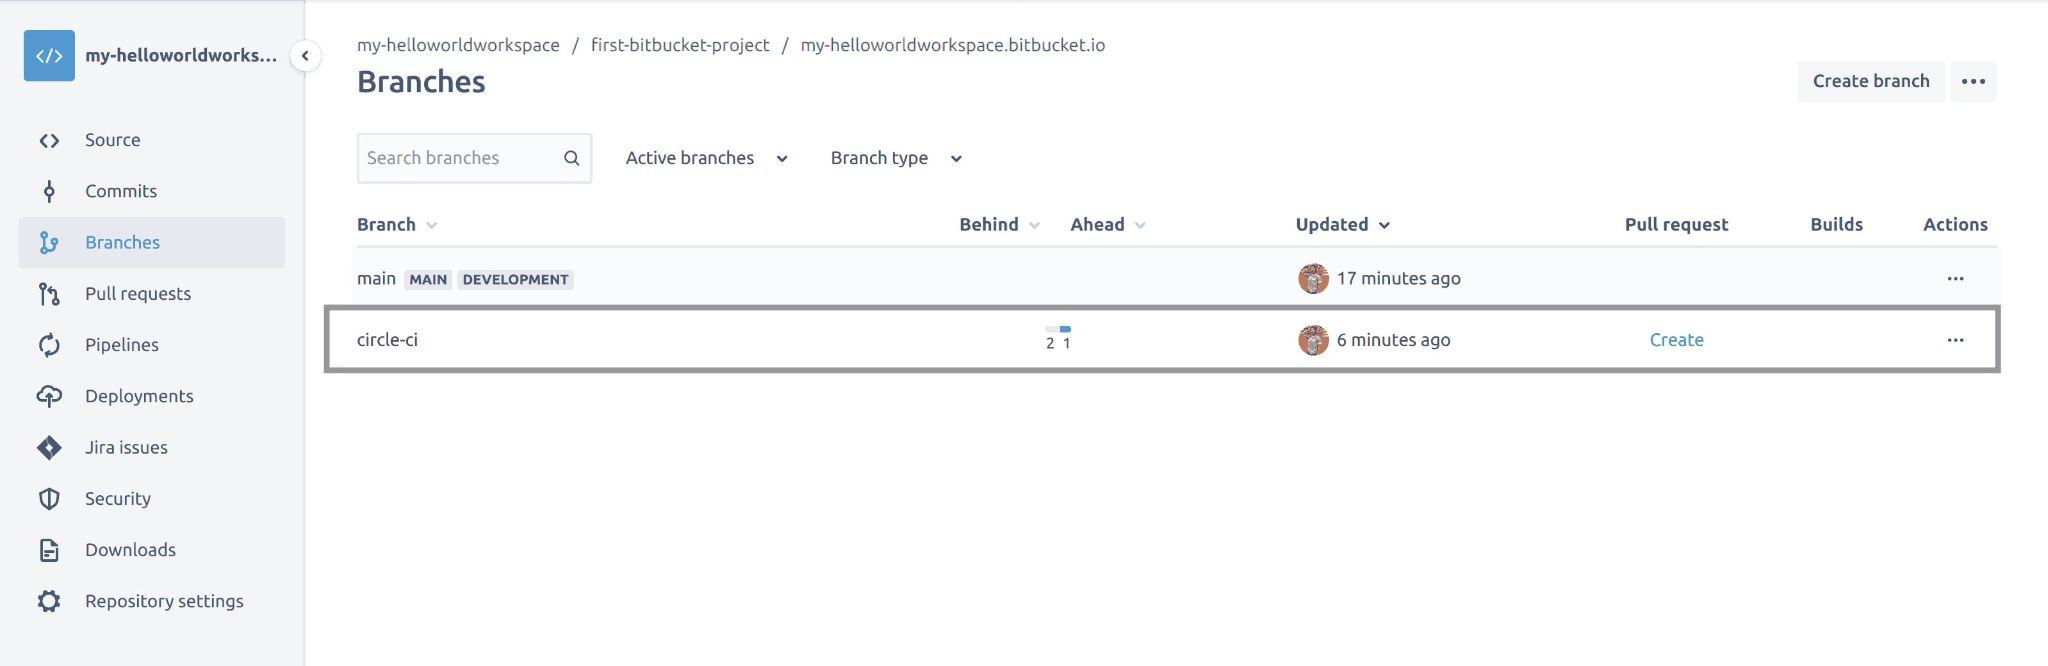
Fig 27: Viewing branches on Bitbucket repository
Select the Source tab from the left panel to confirm that you also have the circle-ci branch created:
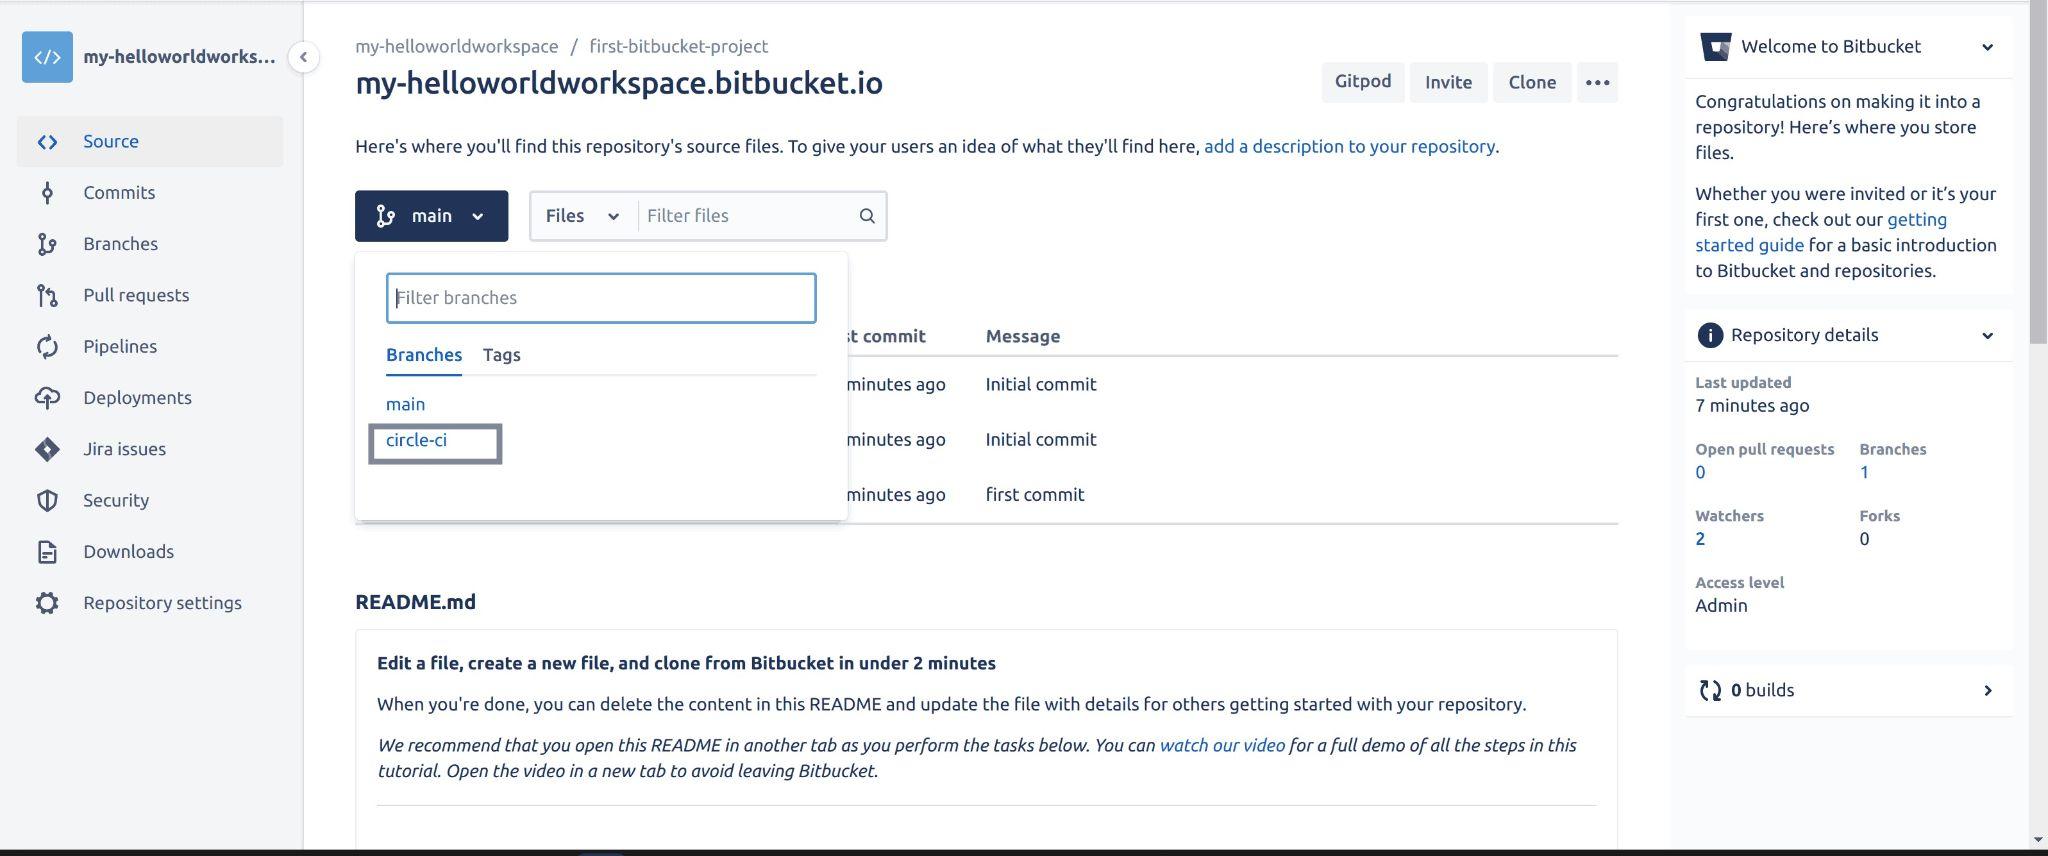
Fig 28: Viewing branches on Bitbucket repository
Now you can view the code pushed by selecting the circle-ci branch, from the above image:

Fig 29: Viewing source code on circle-ci branch
Since you are using CircleCI as the CI/CD tool, you’ll need to generate an SSH key pair and add the public key in your Bitbucket repository else your build will fail. To achieve this, click on your avatar and select the personal settings from the dropdown menu:
Run the following command to generate a ssh key pair - ssh-keygen -t rsa -b 4096 -C YOUR_BITBUCKET_EMAIL
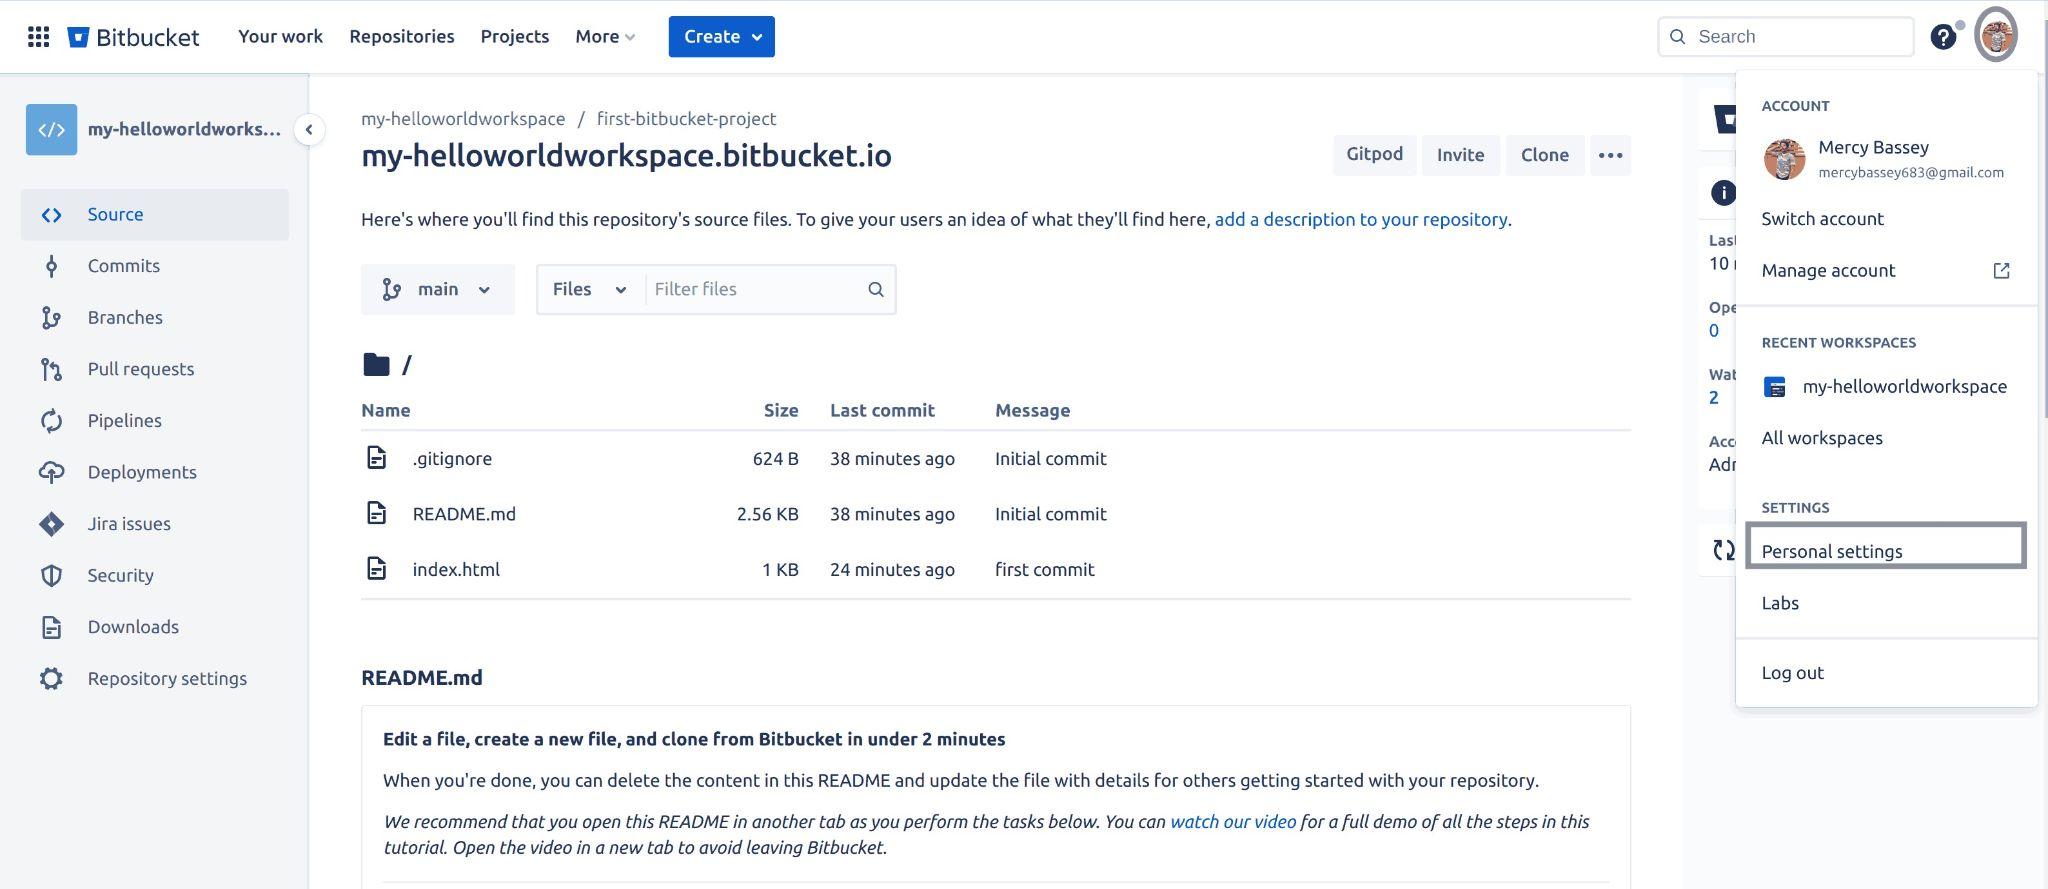
Fig 30: Selecting personal settings to add ssh key on bitbucket
Select the SSH keys from the left panel and click on the Add key button:
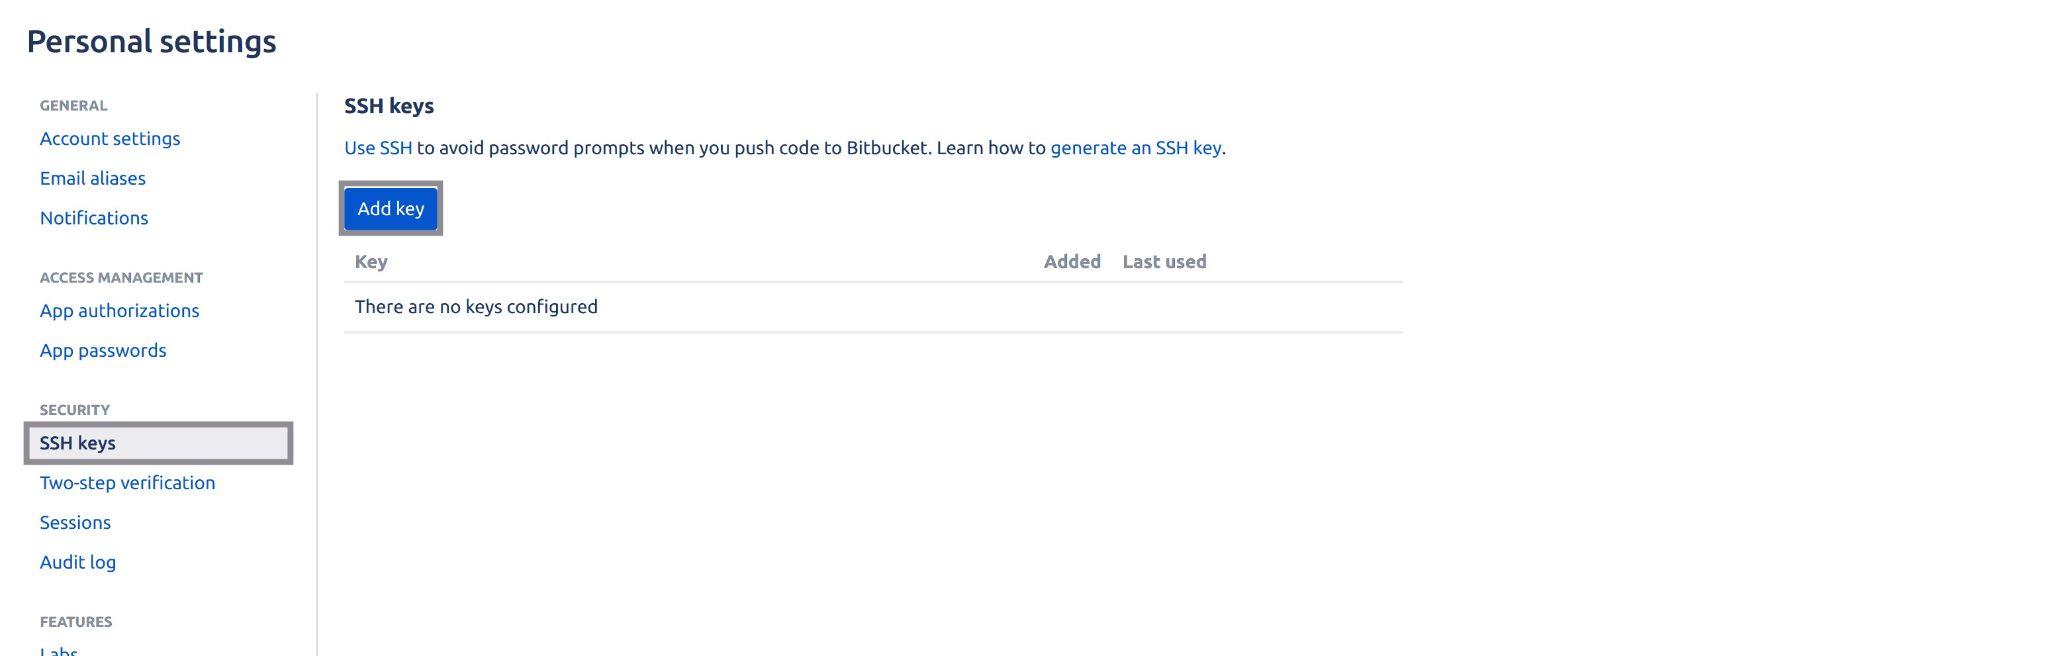
Fig 31: Initialising add ssh key on bitbucket
A pop-up window will be shown to you, input the name of the key as the label, add the public key and then click on the Add key button to add this key.

Fig 32: Adding ssh key to Bitbucket (circle ci)
Head over to CircleCI and sign up with your Bitbucket account and be sure to select the Bitbucket workspace housing the repository you are trying to build with CircleCI:
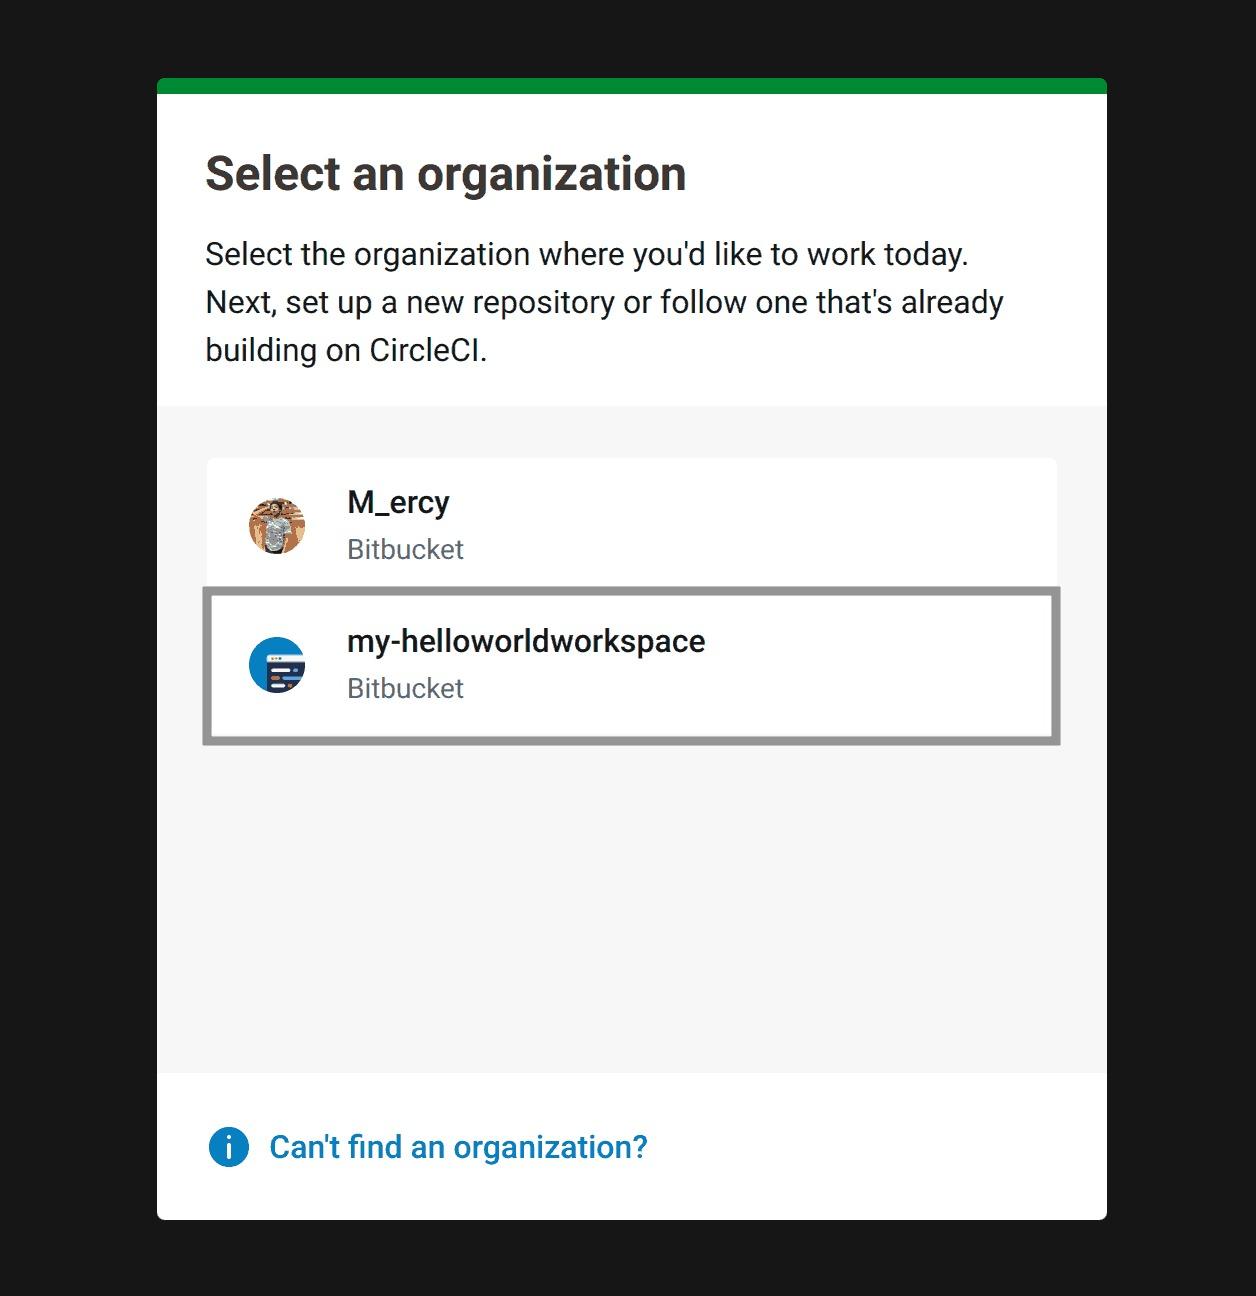 Fig 33: Selecting Bitbucket workspace
Once you have selected your workspace you should be taken to your dashboard to set up a project. From your dashboard, click on the Add project button highlighted below, to add a project:
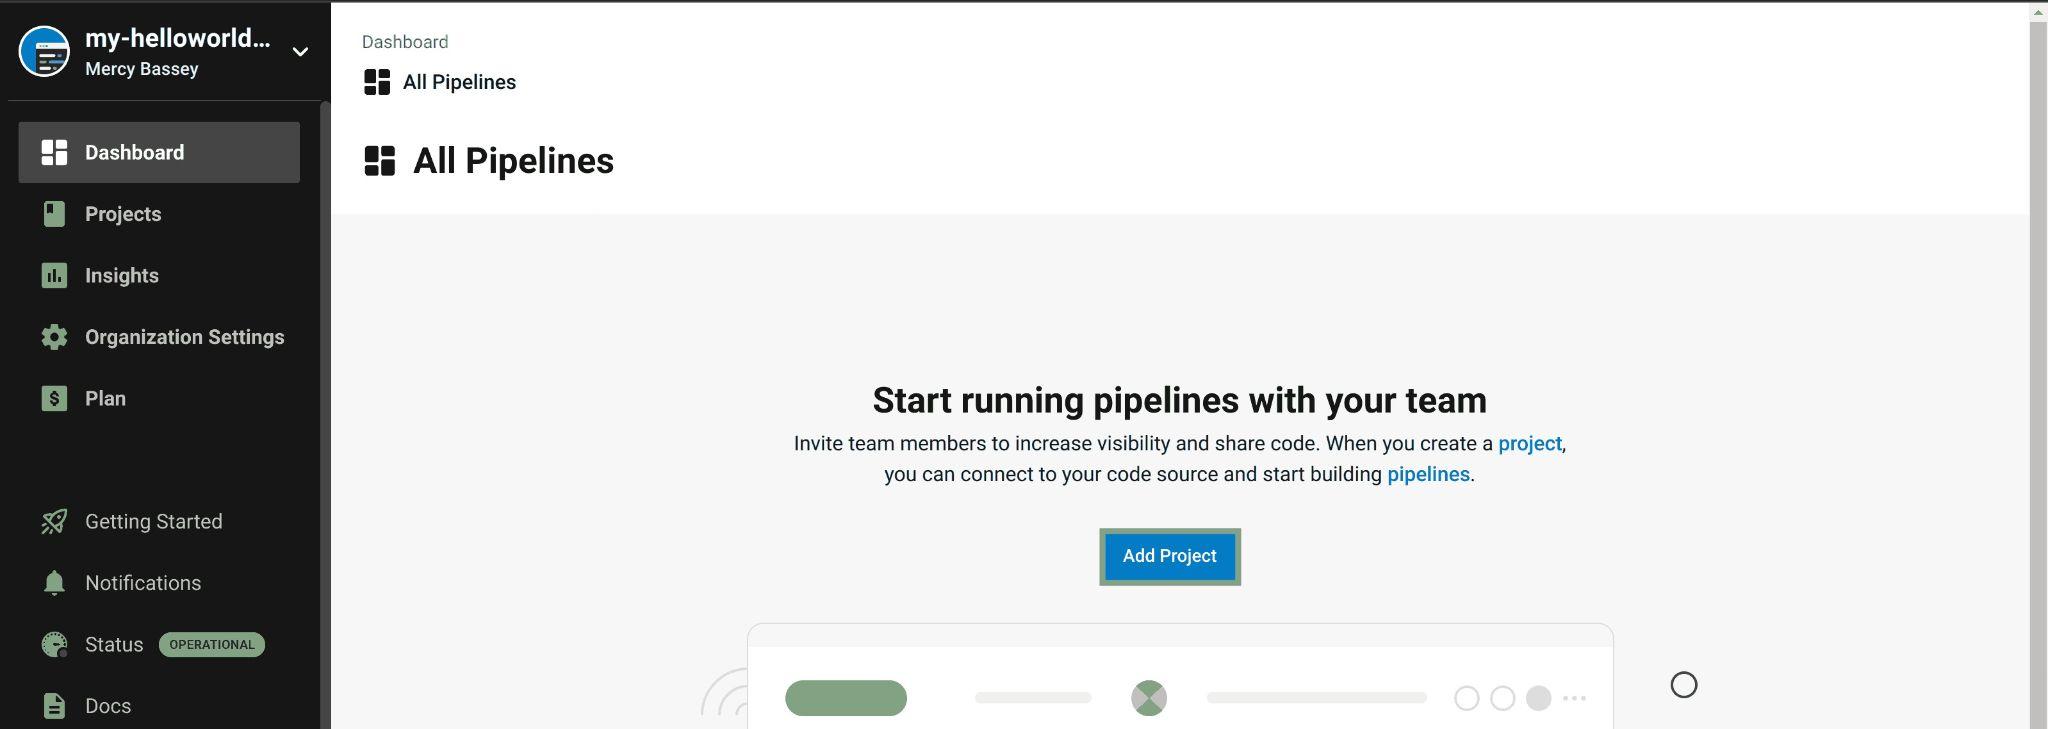
Fig 34: Viewing CircleCI dashboard
Since CircleCI has access to your Bitbucket workspace, it will automatically output all the repositories you have on that workspace. In this case, the only repository available in the my-helloworldworkspace is my-helloworldworkspace.bitbucket.io. So, click the Set up project button beside the repository to set up a CircleCI project for that repository:
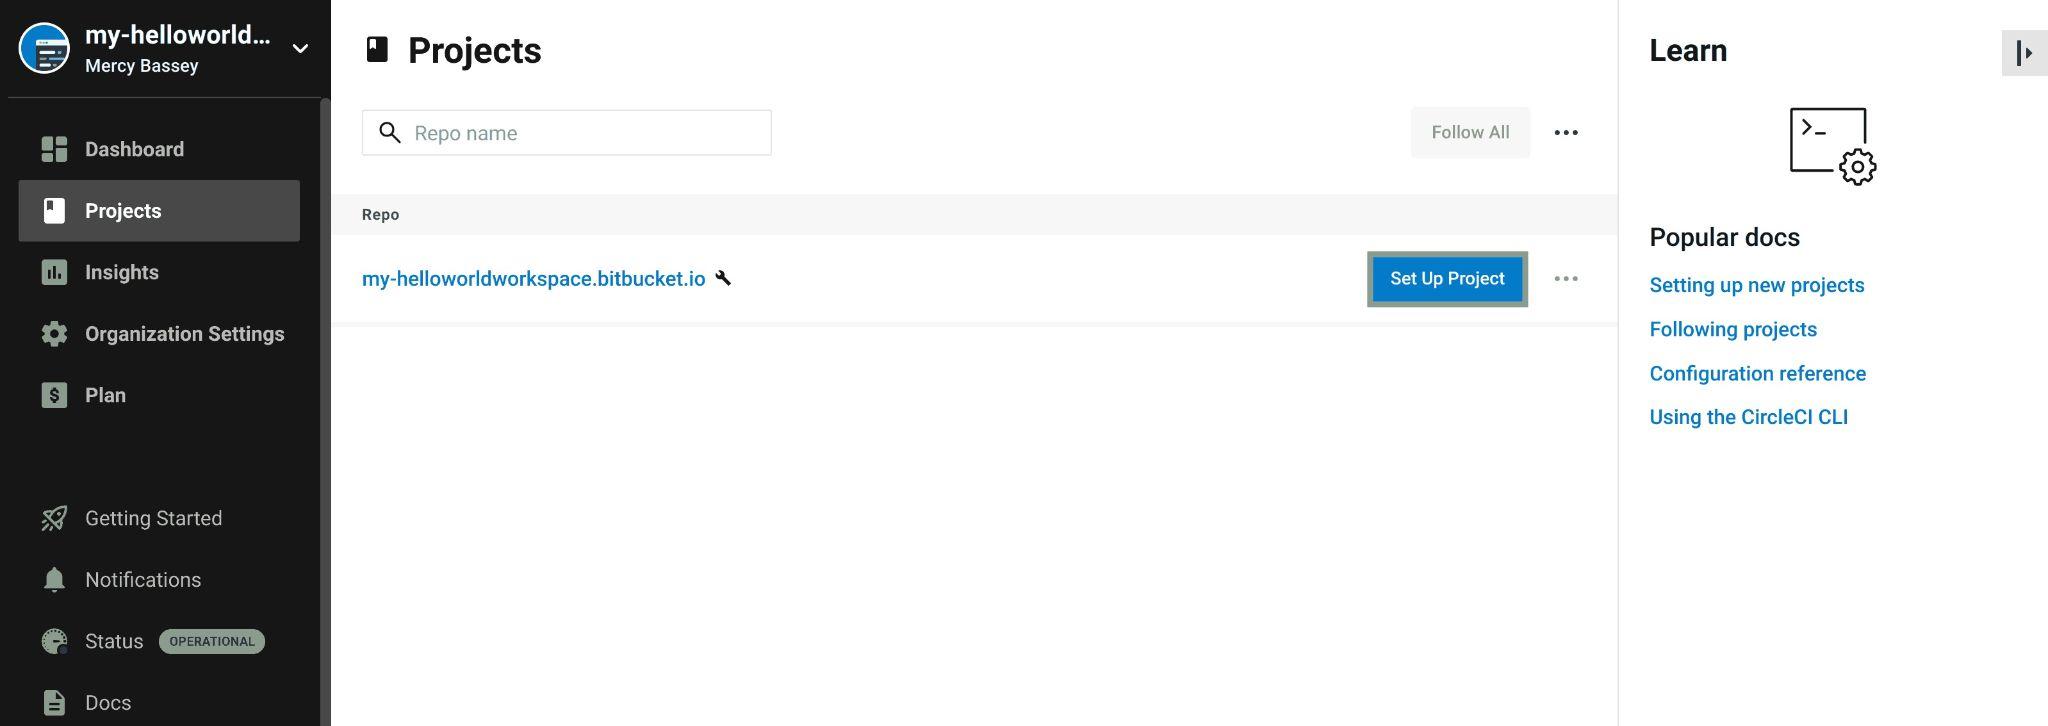
Fig 35: Setting up a CircleCI project
This will output a pop-up asking you to select the branch you would like to build, it also checks if there is a .circleci/config.yml file available in that branch and if there’s you’ll have a green check mark indicating it has found the .circleci/config.yml file , else it provides you with other options to create a .circleci/config.yml file for it to use.
Now type in circle-ci as the branch and click on the Set up project button to proceed:
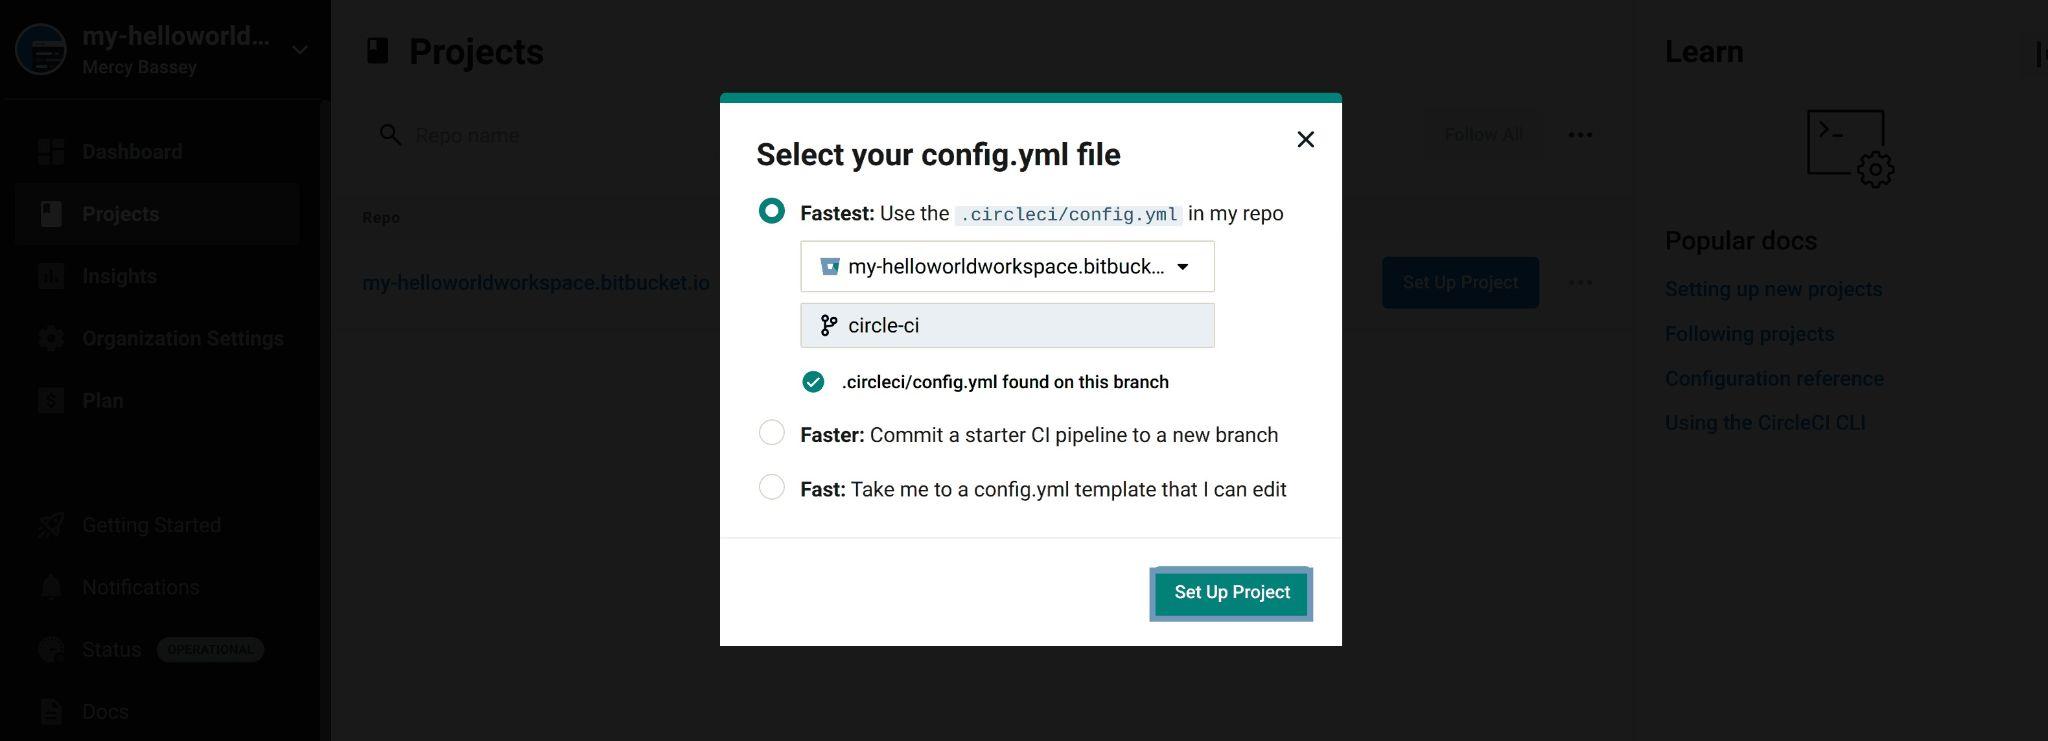
Fig 36: Selecting config.yml file for CircleCI
The page will then navigate to your dashboard for you to view your pipeline. The following output shows that the pipeline was successful:
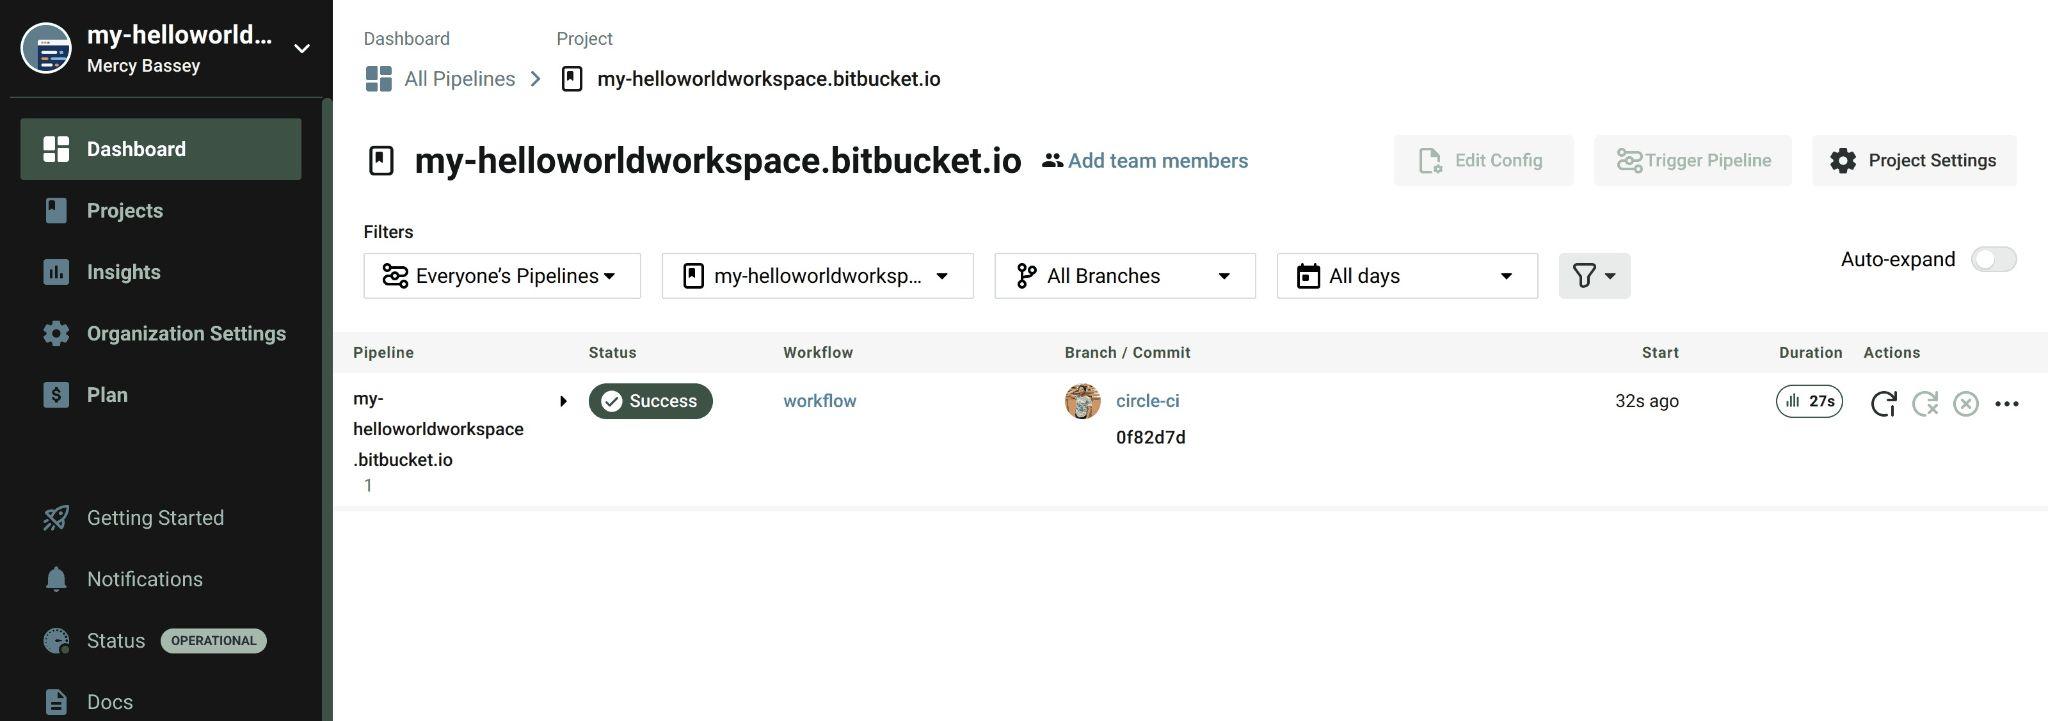
Fig 37: Viewing successful pipeline
If you also head to your Bitbucket branches page for your repository, you will see the below output showing that the build on CircleCI was successful:
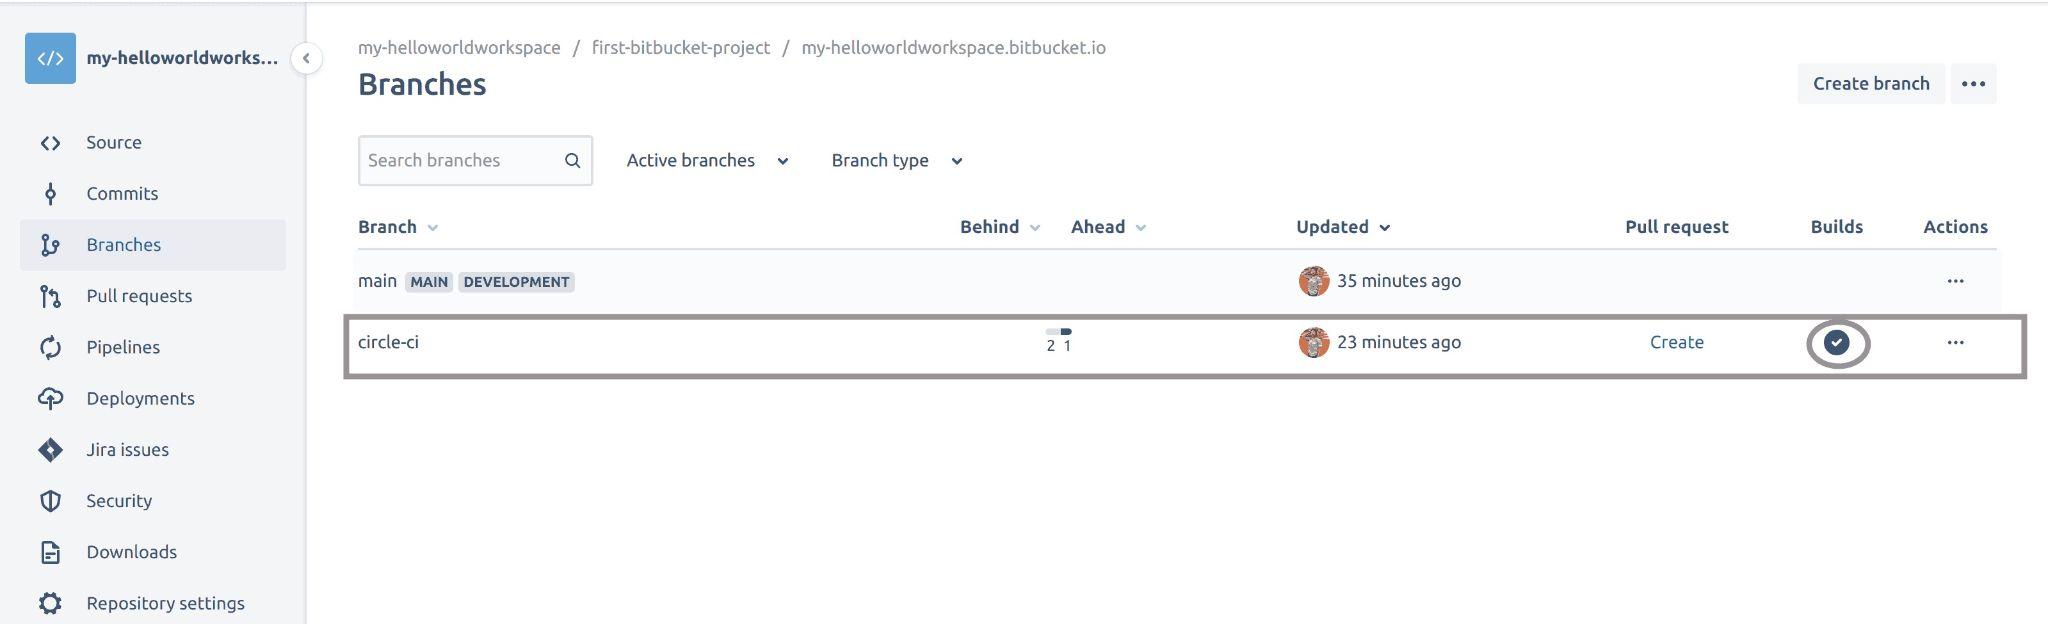
Fig 38: viewing build on Bitbucket repository
Conclusion
Bitbucket is as you have seen just like GitHub, you can do the basic things you do on GitHub on Bitbucket too. You have seen how to create a workspace, project, and repository on Bitbucket. You have also seen how to use Bitbucket pages to view your repositories over a browser and ultimately seen how to integrate Bitbucket with CircleCI.
I believe you can agree with me that Bitbucket is easy to use out of the box just like GitHub. You can take a tour to test other Bitbucket features like pull requests, Bitbucket pipelines, and more.
This document contains proprietary information and is protected by copyright law.
Copyright © 2026 Red Gate Software Limited. All rights reserved


Load comments