
Executive Summary
Diesel is Rust’s most widely-used ORM for SQL databases – supporting PostgreSQL, MySQL, and SQLite. It provides type-safe query building through a derive-macro system where Rust structs are mapped to database tables at compile time, catching schema mismatches before runtime. This article walks through using Diesel for SQL database access in Rust: setting up a database connection via an .env file, defining struct mappings with Diesel’s Queryable and Insertable derive macros, and performing CRUD operations – insert, query, update, delete – with Diesel’s API. PostgreSQL is used throughout, but the same patterns apply to MySQL and SQLite with driver changes.
Rust is emerging as a frontrunner for ensuring memory safety without sacrificing performance. Its growing popularity isn’t solely based on the “fearless concurrency” mantra but also on its expanding ecosystem that fosters integration with various technologies. A domain Rust proves to be formidable is database interaction, and a pivotal player in this realm is the Diesel ORM. Diesel is an ORM and query builder designed with the philosophy of type safety and a simple API that primes application performance.
In this article, I will demonstrate how to get up and running with Rust, connecting to SQL databases using the Diesel ORM.
Getting Started Using SQL Databases With Rust
You’ll need to download and install Rust and your preferred SQL database management system to interact with SQL databases through Rust. Diesel. In this tutorial, we will use SQLite as the DBMS, but you can use your preferred relational database
After you’ve installed Rust and a preferred SQL DBMS that Diesel supports, you can proceed to create a new Rust project with Cargo’s init command:
|
1 |
cargo init |
The cargo init command initializes the new project and adds a cargo.toml file in the root directory for dependency management.
Next, you’ll add Diesel as a dependency and install the diesel_cli tool to start working with databases.
|
1 2 3 4 5 6 7 8 9 10 11 |
# add diesel to dependencies with sqlite feature cargo add diesel --features "sqlite" # install diesel_cli cargo install diesel_cli change to: cargo install diesel_cli --no-default-features --features sqlite #note: may get errors about “note: LINK : fatal error LNK1181: cannot open input file 'sqlite3.lib'” if so, go to: https://github.com/diesel-rs/diesel/issues/487 # add dotenv to dependencies cargo add dotenv |
You need these tools to set up and use an SQL database with Diesel.
Database Setup With Diesel
Setting up a database and connecting to a database with Diesel is a straightforward process.
First, create an environment variables .env file in the root directory of your project and add your database connection string with the KEY DATABASE_URL.
|
1 2 |
#database connection string example DATABASE_URL=sqlite:///database.sqlite |
Then, run the diesel setup command to set up the database for your project.
|
1 |
diesel setup |
On running the command, Diesel creates a migrations directory, validates the connection to the database, and runs existing migrations.
Here’s how you can setup migrations with the diesel migrations generate command:
|
1 |
diesel migration generate create_human |
The command will generate two SQL files in the migrations directory: up.sql and down.sql.
You can write the SQL for your database table definitions in the up.sql file and the SQL query to drop the tables in the down.sql file.
Here’s an example of content for the up.sql file:
|
1 2 3 4 5 6 7 8 9 10 11 |
-- Your SQL goes here CREATE TABLE "human" ( "id" INTEGER NOT NULL PRIMARY KEY AUTOINCREMENT, "first_name" TEXT NOT NULL, "last_name" TEXT NOT NULL, "age" INTEGER NOT NULL, "username" TEXT, "email" TEXT, "location" TEXT ); |
Then your down.sql file should look like this:
|
1 |
DROP TABLE "human" |
After writing the SQL files, you can run the migration run command to run migrations.
|
1 |
diesel migration run |
You can use the migration redo command to revert previous migrations:
|
1 |
diesel migration redo |
Diesel generates a schema.rs file in your src folder, and you can print the contents of the file with the diesel print-schema command:
|
1 |
diesel print-schema |
The output of the command should match the contents of your src/schema.rs file as thus:
You can connect to your SQLite database with Diesel’s SqliteConnection::establish function that takes in the database URL and connects to the database:
|
1 2 3 4 5 6 7 8 9 10 11 12 13 14 |
//src/model.rs use std::env; use diesel::prelude::*; use dotenv::dotenv; pub fn establish_connection() -> SqliteConnection { dotenv().ok(); let database_url = env::var("DATABASE_URL").expect( "DATABASE_URL must be set"); SqliteConnection::establish(&database_url) .unwrap_or_else(|_| panic!( "Error connecting to the database: {}", database_url)) } |
The establish_connection() function connects to the database and returns an SQLite connection instance that you can use for operations on the database.
Basic CRUD Operations
CRUD (Create, Read, Update, Delete) operations form the basis for most database operations, so you’ll need to understand how to perform those operations to grasp the fundamentals of working with Diesel.
Here’s the list of imports and statements you’ll need throughout the CRUD operations.
|
1 2 3 4 5 6 |
#![feature(proc_macro_hygiene, decl_macro)] extern crate diesel; mod schema; mod database; use crate::database::establish_connection; use diesel::prelude::*; |
The diesel::prelude::* statement imports most of Diesel’s functionalities.
Creating (Inserting) Records into a Database
Diesel provides aninsert_into function that you can use to insert data into your database.
Here’s a struct that matches the data you’d want to insert. Notice the macro definitions for the operation Insertable and table_name = schema::human.
|
1 2 3 4 5 6 7 8 9 10 |
// Specify the fully-qualified path for the table_name attribute#[derive(Insertable)] #[diesel(table_name = schema::human)] pub struct NewHuman { pub first_name: String, pub last_name: String, pub age: i32, pub username: String, pub email: String, pub location: String, } |
You’ll initialize the NewHuman struct and use the instance to insert data into the database as thus:
|
1 2 3 4 5 6 7 8 9 10 11 12 |
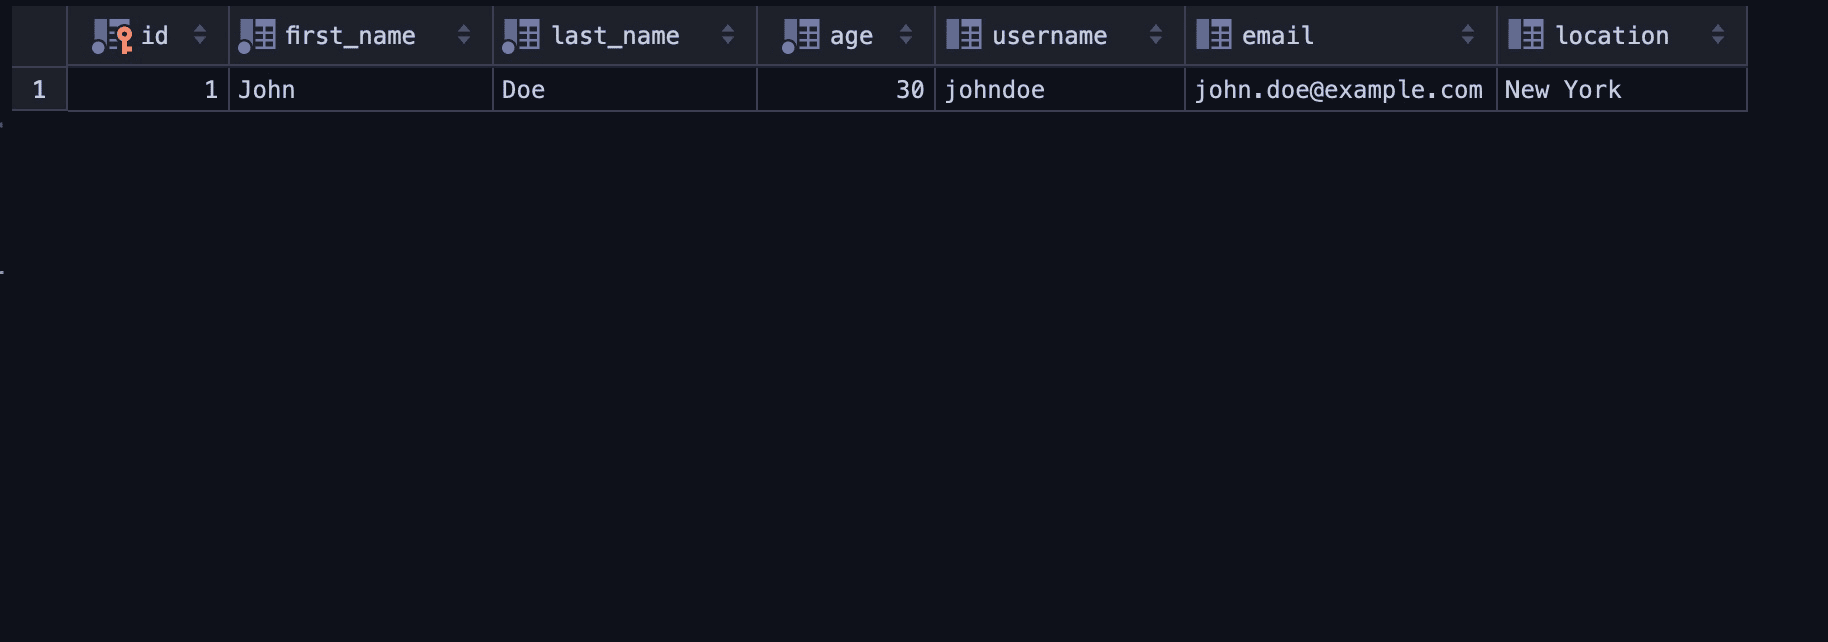
fn main() { let mut connection = establish_connection(); let new_human = NewHuman { first_name: String::from("John"), last_name: String::from("Doe"), age: 30, username: String::from("johndoe"), email: String::from("john.doe@example.com"), location: String::from("New York"), }; diesel::insert_into(schema::human::table).values(&new_human).execute(&mut connection).expect("Error saving new human"); } |
The main function establishes a connection to the database with the establish_connection function and inserts the new_human struct instance into the database with the insert_into function’s values function.
Here’s the result of the insert operation:
Querying (Reading) Data From the Database
The struct for query operations will differ from the struct for insert operations, especially the Derive macro.
Here’s the struct for an insert operation into the Human table:
|
1 2 3 4 5 6 7 8 9 10 11 12 13 |
#[derive(Debug, Queryable)] pub struct Human { pub id: i32, pub first_name: String, pub last_name: String, pub age: i32, pub username: Option<String>, // Use Option for nullable columns pub email: Option<String>, // Use Option for nullable columns pub location: Option<String>, // Use Option for nullable columns } |
You can use the load method on the table to load all the entries in the human table:
|
1 2 3 4 5 6 7 |
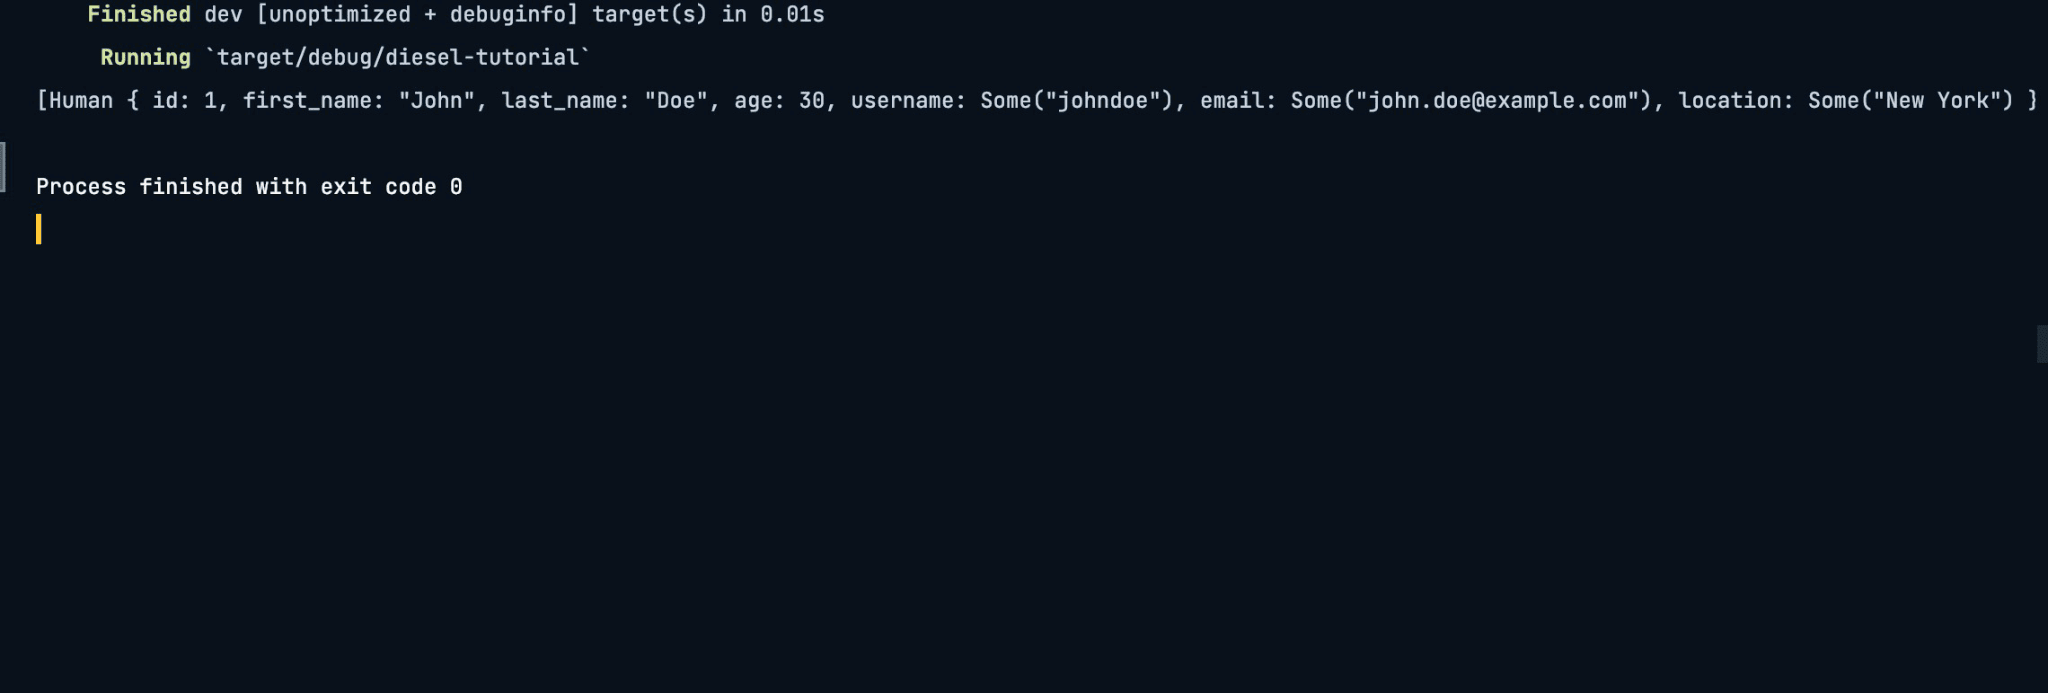
fn main() { let mut connection = establish_connection(); let humans = human::table .load::<Human>(&mut connection) .expect("Error loading humans"); println!("{:?}", humans); } |
Here, the main function loads all the entries in the database with the load method after establishing a connection to the database. The main function prints the entries to the console.
Updating Database Entries
You’ll need to implement the AsChangeset derive macro for your update struct to update entries in the database.
|
1 2 3 4 5 6 7 8 9 10 11 |
#[derive(Queryable, AsChangeset, Identifiable)] #[diesel(table_name = schema::human)] struct UpdateHuman { pub id: i32, pub first_name: String, pub last_name: String, pub age: i32, pub username: Option<String>, pub email: Option<String>, pub location: Option<String>, } |
The UpdateHuman struct is the struct for update operations on the human table.
You’ll use the update function to update entries in your database tables:
|
1 2 3 4 5 6 7 8 9 10 11 12 13 14 15 16 17 18 19 20 |
fn main() { use crate::schema::human::dsl::*; let mut connection = establish_connection(); let id_to_update = 1; // Replace with the ID of the human you want to update let human_update = UpdateHuman { id: 2, first_name: "Janeen".to_string(), last_name: "Elixir".to_string(), age: 30, username: Some("elixir".to_string()), email: Some("jelixir@example.com".to_string()), location: Some("Pars".to_string()), }; let updated_rows = diesel::update(human.find(id_to_update)) .set(&human_update) .execute(&mut connection) .expect("Failed to update student"); println!("{:?}", updated_rows); } |
The main function uses an id to search the database with the find function on the table instance before proceeding with the update operation if the entry exists. The diesel::update function updates the table with the new entry with the set function.
Deleting Entries From the Database
You can use the delete function to delete database entries based on an ID.
|
1 2 3 4 5 6 |
fn main() { let id_to_delete = 1; let mut connection = establish_connection(); let deleted_rows = diesel::delete(human.find(id_to_delete)).execute(&mut connection)?; println!("Deleted {} rows.", deleted_rows); } |
The main function searches for the entry with the id through the find function that the delete function takes in and executes the delete operation through the established connection.
Popular Database Operations With Diesel
Diesel supports more operations than just CRUD operations. You can also work with multiple tables and perform more complex operations like storing a list of entries in the database:
Storing a List of Entries into the Database
One of the ways you can store a list of entries in the database is using a vector of structs that you’ll iterate over and insert the values.
Here’s how you can insert a vector of three structs (three entries) into the database:
|
1 2 3 4 5 6 7 8 9 10 11 12 13 14 15 16 17 18 19 20 21 22 23 24 25 26 27 28 29 30 31 32 33 34 35 36 |
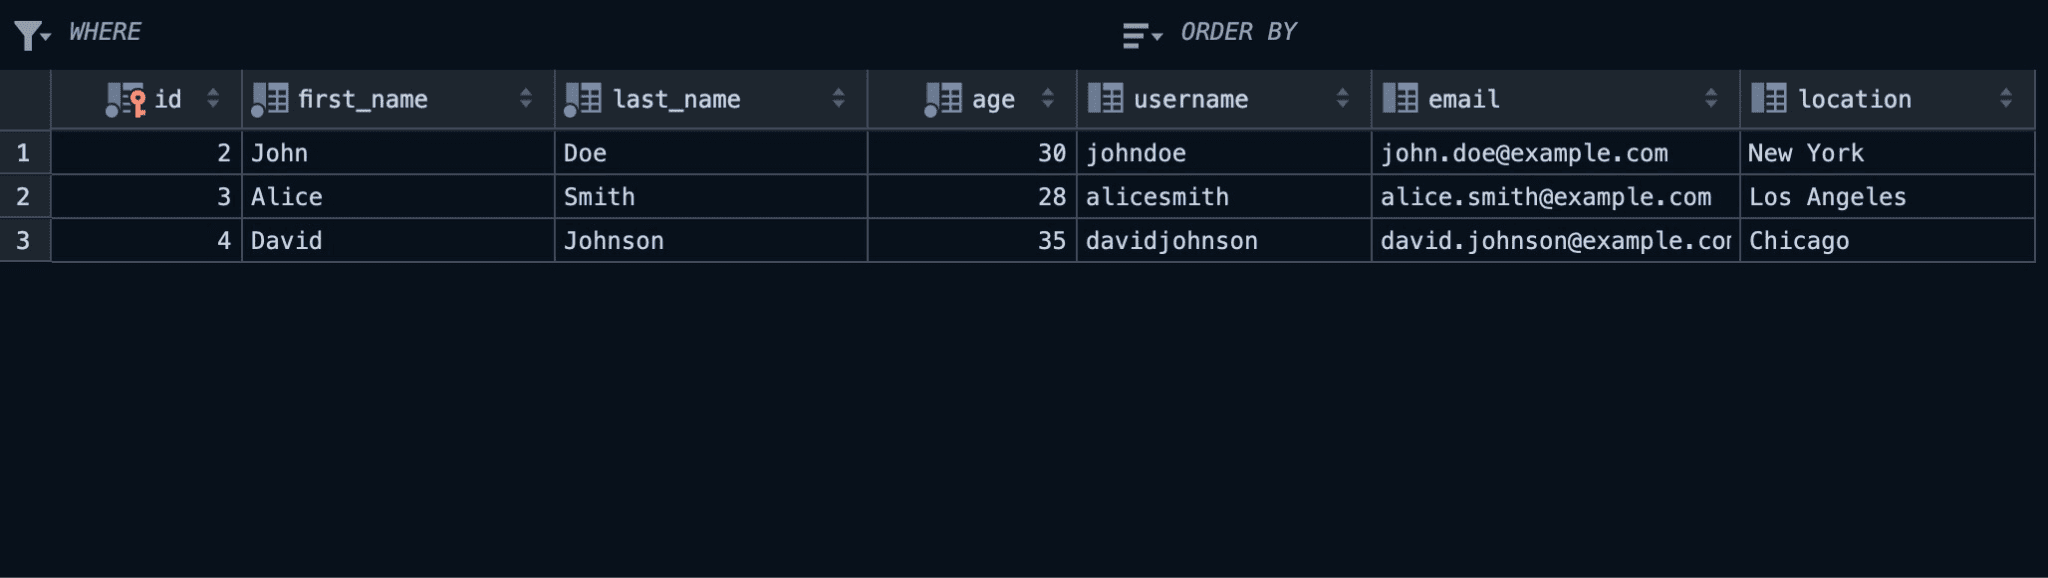
fn main() { let mut connection = establish_connection(); let new_humans = vec![ NewHuman { first_name: String::from("John"), last_name: String::from("Doe"), age: 30, username: String::from("johndoe"), email: String::from("john.doe@example.com"), location: String::from("New York"), }, NewHuman { first_name: String::from("Alice"), last_name: String::from("Smith"), age: 28, username: String::from("alicesmith"), email: String::from("alice.smith@example.com"), location: String::from("Los Angeles"), }, NewHuman { first_name: String::from("David"), last_name: String::from("Johnson"), age: 35, username: String::from("davidjohnson"), email: String::from("david.johnson@example.com"), location: String::from("Chicago"), }, ]; // Insert the new_humans vector into the database for new_human in new_humans { diesel::insert_into(schema::human::table) .values(&new_human) .execute(&mut connection) .expect("Error inserting human"); } } |
After declaring three struct instances in the new_humans vector, the main function uses a for-range loop to loop through the structs and insert the values into the database with the insert_into function.
Working with multiple tables is similar to working with single tables, except you’ll have to set up migrations for the tables individually.
Here’s how you can generate migrations for two tables named item and item_type, respectively.
|
1 2 3 |
diesel migration generate item diesel migration generate item_type |
Now you can fill each table’s up.sql and down.sql files as usual to create and then drop the structures.
|
1 2 3 4 5 6 7 8 9 10 11 12 13 14 15 16 17 18 19 20 21 22 23 24 25 |
-- migrations/2023-09-23-145306_item -- Your SQL goes here -- Table definition for items CREATE TABLE IF NOT EXISTS items ( id INTEGER PRIMARY KEY AUTOINCREMENT, item_name TEXT NOT NULL, item_type_id INTEGER NOT NULL, acquired_time DATETIME NOT NULL, FOREIGN KEY (item_type_id) REFERENCES item_types (id) ); -- code to drop items DROP TABLE items -- migrations/2023-09-23-145316_item_type -- Your SQL goes here CREATE TABLE IF NOT EXISTS item_types ( id INTEGER PRIMARY KEY AUTOINCREMENT, name TEXT NOT NULL ); -- code to drop item_types DROP TABLE item_types |
Now run the diesel migration run command to complete the setup process. Your schema.rs file should look like this:
|
1 2 3 4 5 6 7 8 9 10 11 12 13 14 15 16 17 18 19 |
diesel::table! { items (id) { id -> Integer, item_name -> Text, item_type_id -> Integer, acquired_time -> Timestamp, } } diesel::table! { item_types (id) { id -> Integer, name -> Text, } } diesel::joinable!(items -> item_types (item_type_id)); diesel::allow_tables_to_appear_in_same_query!( item_types, items, ); |
Now that you’ve set up your database migrations, you can proceed to other operations, like inserting data into the tables.
Here’s the list of imports you’ll need for the insert operation.
|
1 2 3 4 5 6 7 8 9 10 |
extern crate diesel; use chrono::prelude::*; use diesel::prelude::*; use diesel::dsl::now; use diesel::sql_types::Timestamp; use crate::database::establish_connection; // Import the table and schema macros. use crate::schema::{item_types, items}; |
Additionally, here are the structs you need for the insert operation:
|
1 2 3 4 5 6 7 8 9 10 11 12 |
#[derive(Insertable)] #[table_name = "item_types"] struct NewItemType<'a> { name: &'a str, } #[derive(Insertable)] #[table_name = "items"] struct NewItem<'a> { item_name: &'a str, item_type_id: i32, acquired_time: NaiveDateTime, } |
Notice that the structs implementInsertable for Diesel to be able to insert their instances into the database.
You can use Diesel’s insert_into function to insert entries in the tables on instantiation as usual:
|
1 2 3 4 5 6 7 8 9 10 11 12 13 14 15 16 17 |
fn main() { let mut connection = establish_connection(); let new_item = NewItem { item_name: "Book", item_type_id: 1, acquired_time: Utc::now().naive_utc(), }; diesel::insert_into(items::table) .values(&new_item) .execute(&mut connection) .expect("Error saving new item"); let new_item_type = NewItemType { name: "Education" }; diesel::insert_into(item_types::table) .values(&new_item_type) .execute(&mut connection) .expect("Error saving new item type"); } |
The main function inserts data into the item and item_type tables with the insert_into function that takes in the table declarations from the schema.rs file.
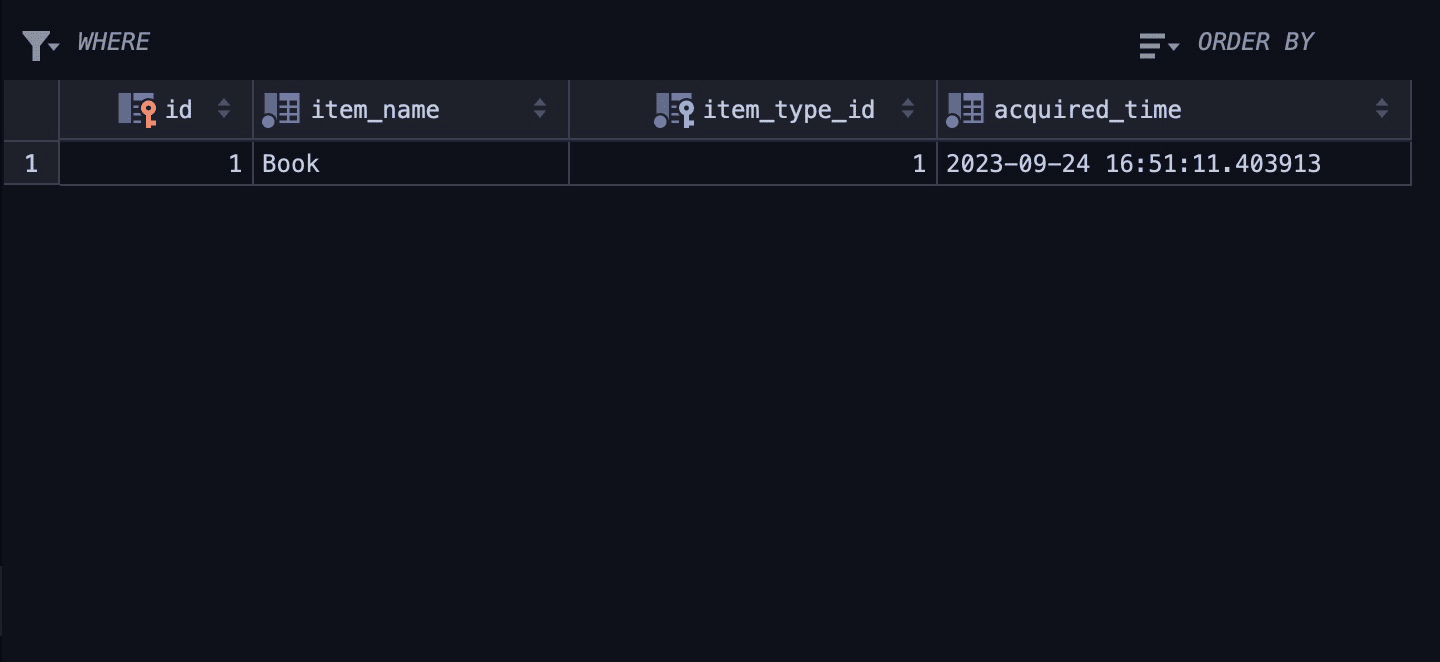
Here’s the result of the insert operation on the item table:
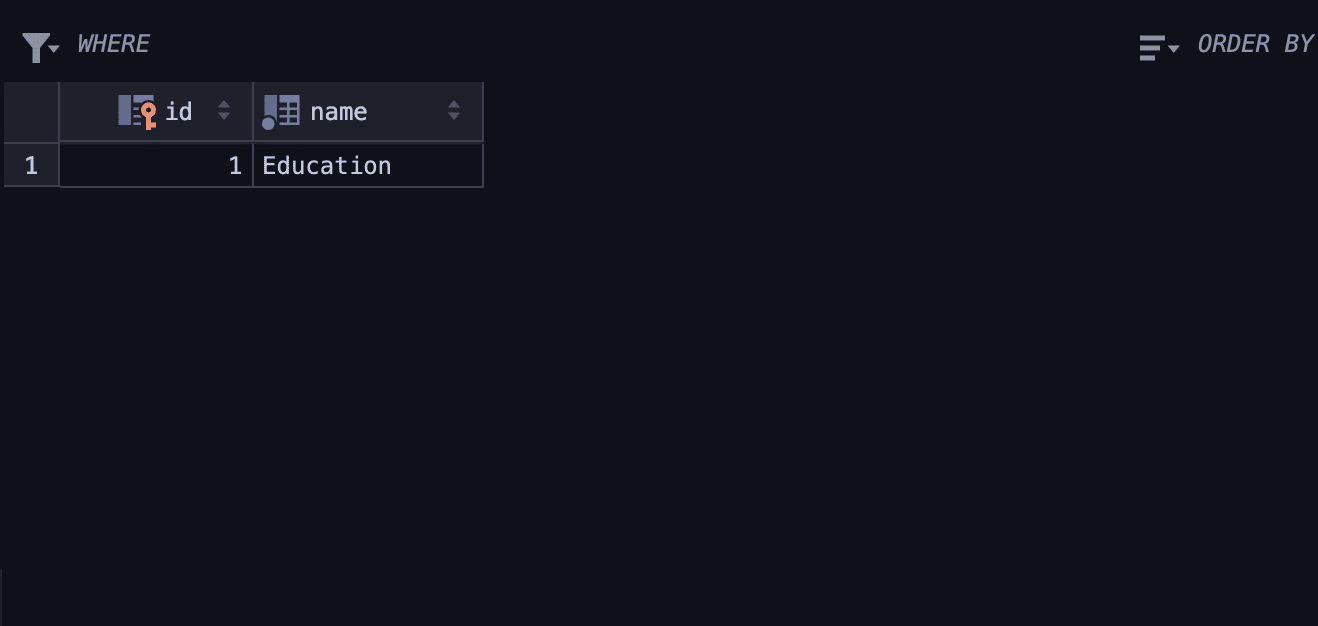
Also, here’s the result of the insert operation on the item_type table:
You can query the database for the data from the item and item_type tables.
Diesel provides robust support for writing raw SQL in its sql_query function that you can use for functionalities Diesel doesn’t support.
Here are the imports you need for the query operation, including Diesel’s sql_query function import:
|
1 2 3 4 5 6 |
extern crate diesel; mod schema; mod database; use crate::database::establish_connection; use diesel::prelude::*; use diesel::sql_query; |
You can declare a struct that matches your schema to query the database with a struct as thus:
|
1 2 3 4 5 6 7 8 9 10 11 12 13 14 15 |
#[derive(Debug, QueryableByName)] #[diesel(table_name = schema::item_types)] struct ItemType { id: i32, name: String, } #[derive(Debug, QueryableByName)] #[diesel(table_name = schema::items)] struct Item { id: i32, item_name: String, acquired_time: chrono::NaiveDateTime, // Assuming you use chrono for datetime fields item_type_id: i32, } |
The structs implement Debug and QueryableByName for the query operation using raw SQL.
Here’s how you can query the tables with the item ID using raw SQL:
|
1 2 3 4 5 6 7 8 9 10 11 12 13 14 15 16 17 18 19 20 21 22 23 24 25 |
fn main() { let mut connection = establish_connection(); let item_type_id_to_retrieve = 1; // Using raw SQL to retrieve the ItemType let item_type: ItemType = sql_query("SELECT * FROM item_types WHERE id = $1") .bind::<diesel::sql_types::Integer, _>(item_type_id_to_retrieve) .get_result(&mut connection) .expect("Failed to find item type by ID"); // Using raw SQL to retrieve items of //the specified item type let items_of_type: Vec<Item> = sql_query( "SELECT * FROM items WHERE item_type_id = $1") .bind::<diesel::sql_types::Integer, _>(item_type.id) .load(&mut connection) .expect("Failed to load items of item type"); println!("Items of type '{}':", item_type.name); for item in items_of_type { println!( "Item ID: {}, Name: {}, Acquired Time: {:?}", item.id, item.item_name, item.acquired_time ); } } |
The main function connects to the database with the establish_connection function before the item_type_id_to_retrieve declaration. The string in the sql_query function is the SQL statement for the operation, and you can bind the result to structs with the bind function.
The main function uses a for-range loop to print the fields of the struct instance.
Here’s the result of the operation:

Diesel also provides functionality for code-first relationships on the Relations page that you can check out.
Note: building SQL to execute can lead to errors. Another name for this is dynamic SQL, which can sometimes allow someone to form a string that can cause harm to your database.
Conclusion
You’ve deeply explored how to use Diesel to interact with SQL databases in your Rust apps. You learned how to set up your database, connect to databases, perform CRUD operations, and work with multiple tables, amongst other operations.
You can do so much with Diesel, including building REST APIs. You can use tools like Actix and Rocket to build APIs with Diesel. Since Diesel provides an interface for writing RAW SQL and has excellent community support.
Read also: Entity Framework performance patterns for SQL database access in .NET
FAQs: How to Use Any SQL Database With Rust
1. What is Diesel and how does it compare to other Rust database libraries?
Diesel is a compile-time safe ORM for Rust supporting PostgreSQL, MySQL, and SQLite. It generates type-safe SQL queries using Rust’s type system – column type mismatches or missing tables produce compile errors rather than runtime panics. Main alternatives: sqlx (async-first, raw SQL queries with compile-time checking, broader database support), Rusqlite (SQLite-specific, lower-level), and sea-orm (async ORM inspired by ActiveRecord). Diesel is a good choice when you prefer a traditional ORM model with struct-based mapping; sqlx is better when you want to write raw SQL and still catch errors at compile time.
2. How do I connect Rust to a PostgreSQL database with Diesel?
Add diesel = { version = “2.0”, features = [“postgres”] } and dotenvy to your Cargo.toml. Create a .env file with DATABASE_URL=postgres://user:password@localhost/dbname. In code: use diesel::prelude::*; use dotenvy::dotenv; let database_url = std::env::var(“DATABASE_URL”).expect(“DATABASE_URL must be set”); let connection = PgConnection::establish(&database_url)?; Run diesel setup and diesel migration run to create and apply migrations. Define your table schema in schema.rs using Diesel’s table! macro.
3. How do I perform a SELECT query with Diesel in Rust?
Define a struct with the Queryable derive macro, matching the column types in your table. Use Diesel’s query DSL: let results = users.filter(age.gt(18)).limit(10).load::<User>(&mut conn)?; The filter, order, limit, and select methods build a type-safe query – Diesel validates column names and types at compile time against the schema.rs definitions. For raw SQL when you need query features Diesel’s DSL doesn’t support, use diesel::sql_query(“SELECT * FROM users WHERE …”).load::<User>(&mut conn)?
4. Does Diesel support async Rust database access?
Diesel’s core API is synchronous. For async Rust applications (Tokio, async-std), use diesel-async, a separate crate that provides async versions of Diesel’s connection and query methods. Alternatively, sqlx is built async-first and may be a better fit for async-heavy applications. If using Diesel in an async context without diesel-async, run blocking Diesel calls in a Tokio spawn_blocking task to avoid blocking the async runtime thread.
This document contains proprietary information and is protected by copyright law.
Copyright © 2026 Red Gate Software Limited. All rights reserved
Load comments