
In this article, you will learn how to create a Visual Studio Code (VS Code) extension using TypeScript. VS Code is a cross platform lightweight development environment from Microsoft. The article begins with a high-level overview of each of the core components needed and walks through how to get a development environment set up, a template configured, and how to write some code to get started. VS Code extensions enable you to easily extend the VS Code development environment to meet whatever needs you have.
What is TypeScript?
TypeScript is a superset of JavaScript. It compiles to JavaScript so the output from the compile process is plain JavaScript. It checks for types, etc., when TypeScript is compiled rather than when the code is executed. TypeScript can be any valid JavaScript but if it is any TypeScript then it must be compiled to JavaScript, hence JavaScript is valid TypeScript, but TypeScript is not valid JavaScript.
Why TypeScript?
TypeScript compiles to JavaScript. It provides a safe environment for writing large applications as well as to scale up small applications written in JavaScript. JavaScript does not support any ‘type checking’ or ‘type definitions’ for 3rd party components and hides bugs until runtime. In short, TypeScript is safer than JavaScript. If you just have JavaScript, then you do not have any type checking or type definitions for 3rd party components. Scaling up from a very simple small application is hard with JavaScript and safer with TypeScript. You could say that using JavaScript for larger projects is hard because of the dynamic nature of JavaScript types – the thing that makes it so powerful also holds it back by hiding bugs until runtime.
What are TypeScript Typings?
TypeScript typings are the type information that the TypeScript compiler needs to identify JavaScript libraries correctly. Without the ability to add ‘Type Information’ to an existing package, it would be difficult to validate the code of any object from a package. It holds true for your own existing JavaScript package as well as for a public one.
Dependency Management
VS Code is an application that runs on electron which is a mixture of Chromium, Google’s open source version of Chrome and node.js. If you want to make use of any dependencies, then you will use npm which is the ‘node package manager’. Npm is like NuGet but for JavaScript packages. Npm contains packages in JavaScript as well as TypeScript. As you are going to be writing in TypeScript, you can use either plain JavaScript packages or JavaScript packages with the TypeScript typings. Typically, packages are published in plain JavaScript no matter which language they are written in with any corresponding typings that TypeScript needs published to a GitHub repo called DefinetlyTyped. The DefinetlyTyped repo has, as of today, over 4000 sets of type information for packages you can use in TypeScript.
What Types of Extensions Can Be Run?
There are three main types of extensions that you can write for VS Code:
- Extensions
- Language Server
- Debug Adapter
An extension allows you to add a window or a command that lets you take some action. A language server allows you to provide language information to VS Code, such as IntelliSense for C#. A debug adapter allows you to use the VS Code debugger UI to debug different types of applications, for example, PowerShell or C#. In this article, you will learn how to write an extension.
Writing an Extension
The first thing to do is to create the project skeleton. You will use a tool to create the default files and configuration which will let you press F5 in VS Code and start a development instance with the extension loaded. There is a tool that runs on node.js called the ‘Yeoman generator’. Yeomon has a template to create a sample VS Code extension project. To get this to run you first need node.js, npm, and VS Code install those together from here.
The installer for node.js includes npm, and then, if you need VS Code, you can download it from here.
Once node.js and npm are installed, to validate that they are installed correctly, open a command prompt and run:
|
1 |
npm --version |
If that gives you a version number, then you can use npm to install the Yeoman generator by running:
|
1 |
npm install -g yo generator-code |
This means npm will download and install the two packages, yo and generator-code the -g option means install it globally to the machine.
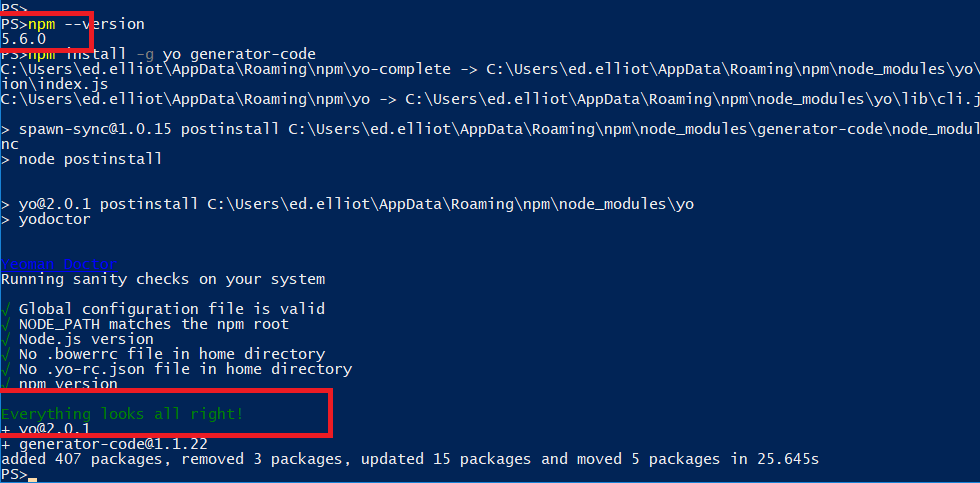
Installing the yo generator globally means you can execute it at a command prompt using:
|
1 |
yo code |
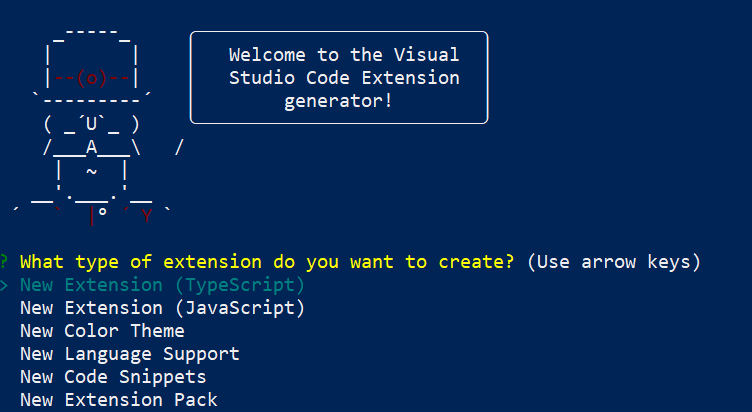
Follow the prompts to create a new extension using:
– New Extension (TypeScript)
– Give your extension a name
– Accept the default for the remaining options. You can put in a dummy publisher name if you do not have one, and you will see how to get the name later on.
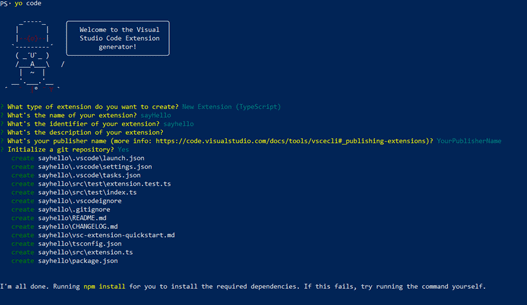
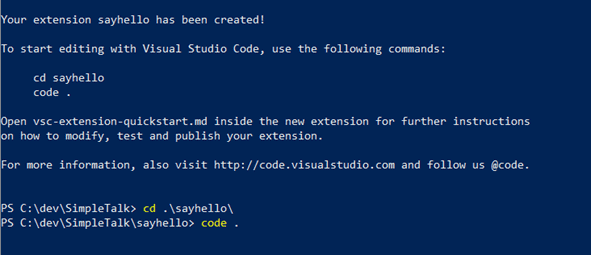
This will create a barebones extension and run the npm install which downloads all the required dependencies for you. When the npm install finishes, you can type code . into the prompt and it will start VS Code in the correct place (Note if you have just installed VS Code you will need to restart to get the correct path settings configured for code . to work):
When you open the package.json file in VS Code, you will see that this contains the information that npm needs to download the correct dependencies and to build the project, as well as the information required by VS Code to create the extension:
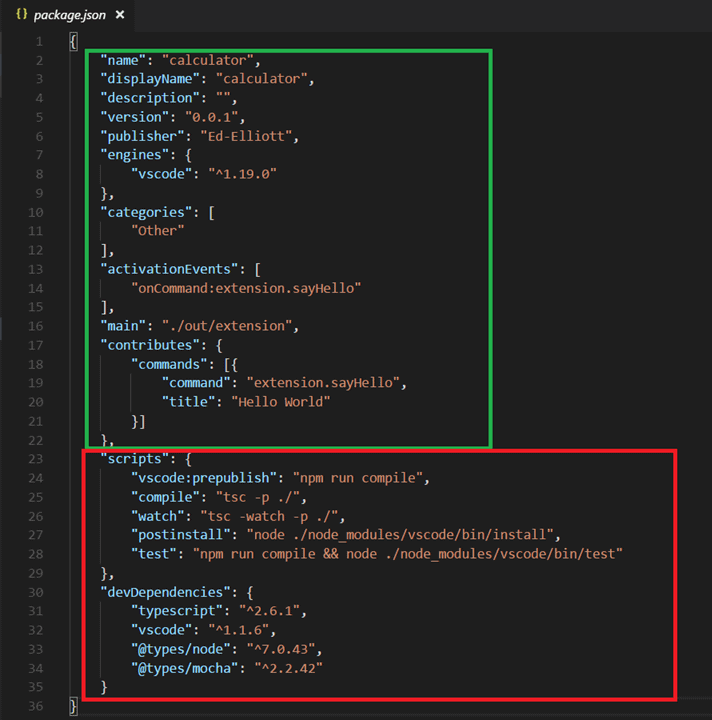
The top section surrounded by the green box is the information required by the VS Code extension packager to create a package that can be shared and loaded in VS Code. Ignore this for the moment and look at the second section, surrounded by the red box.
There are two sections: Scripts and devDependencies, though in real-life scenarios there would be one more dependency called dependencies. The devDependencies are the dependencies that are required to build the project, as opposed to the dependencies required to run the project. Typically, the devDependencies will have several more dependencies than the production dependencies, and when you deploy without the devDepenedencies, the size of the deployment becomes a lot smaller.
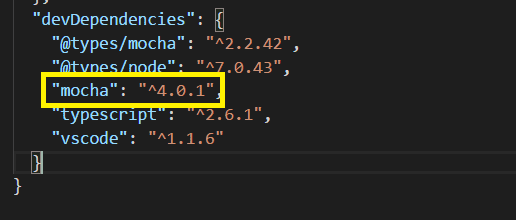
Here you can see that you have devDependencies on typescript, VS Code which are packages, and then typings for node and mocha. You can tell the difference because node and mocha begin with @types/. If you look in your node_modules folder (please don’t be scared by the number of dependencies), you will see that you have a @types/mocha and a mocha. The @types/mocha is the typing information for the package mocha. You don’t need to specify mocha in the package.json file as it is included by the reference to VS Code. If you want to explicitly include mocha, then you could run:
|
1 |
npm install mocha --save-dev |
If it was a production dependency required at runtime, you could run:
|
1 |
npm install mocha –save |
These commands will both update the package.json and install mocha, if required.
The scripts section contains tasks that npm can run such as compiling the TypeScript code into JavaScript or running the unit tests.
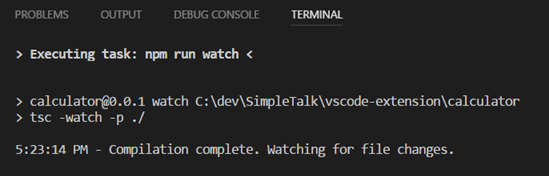
In the scripts section, there are a couple of useful tasks which you can run such as watch which runs in the background. While watch is running, as you save your TypeScript files, the watcher calls compile so you don’t need to press CTRL+B every time you want to build the project.
While in VS Code, you press CTRL+SHIFT+P (or whatever it is on your operating system) to bring up the command palette and choose Tasks: Run Task followed by npm:watch.
It will start the watcher in the background. To see it actually running, re-open the command palette and select Tasks: Show running tasks and choose npm:watch. You will see the terminal window and, hopefully, it should say Compilation complete or something similar:
If you decided you no longer wanted the watch task you previously ran, you could open the command palette and choose Tasks: Terminate Task. VS Code provides a nice way to run these npm tasks, but what I personally find useful is to split the screen into VS Code and either one or two background PowerShell windows running tasks. Then, perhaps run the build watcher in one and some tests in another window rather than keeping everything inside VS Code such as:

Whether you choose to use VS Code as your task runner or use a separate window, you get quite a bit of flexibility either way.
If you now go back to the top section of the package.json file, you have:
|
1 2 3 4 5 6 7 8 9 10 11 12 13 14 15 16 17 18 19 20 21 22 23 |
"name": "calculator", "displayName": "calculator", "description": "", "version": "0.0.1", "publisher": "Ed-Elliott", "engines": { "VS Code": "^1.19.0" }, "categories": [ "Other" ], "activationEvents": [ "onCommand:extension.sayHello" ], "main": "./out/extension", "contributes": { "commands": [ { "command": "extension.sayHello", "title": "Hello World" } ] } |
The name, displayName, description, and version should be self-explanatory. The publisher is the unique name of your VSTS publisher. VS Code uses VSTS to host its extensions so you need a free VSTS account established. My publisher name is Ed-Elliott, so you will need to use your own VSTS publisher account. If you are not sure about your publisher name, go to the Marketplace.
Login using your VSTS account. If you don’t have a VSTS account, go to my.visualstudio.com and signup for Dev Essentials. Once you are logged in, you click Create New Publisher. Later, when you publish the extension, you will need to logon to VSTS and generate a PAT which gives you access to publish, so do make sure you have a VSTS account with the email address associated with the publisher name.
The engines section states which versions of VS Code that your extension supports. I don’t see any reason not to choose the latest as the upgrade is so simple, but you could change it here.
The categories property lets you configure the type of extension. In this case, choose Other, but it could be one of:
|
1 |
[Languages, Snippets, Linters, Themes, Debuggers, Formatters, Keymaps, Other, Extension Packs] |
The activationEvents section lists all the things that should cause VS Code to load the extension. By default, VS Code will only load an extension when something happens to warrant it. If you have no PowerShell code, then you don’t get the PowerShell extension, for example. The activationEvent added by yo code is :extension.sayHello. The first part, onCommand, means that when someone opens the command palette and runs the command helloWorld, the extension is called for the first time in that instance of vs code.
The main property tells VS Code where to find the extension, in this case, ./out/extension. What this means is that you will need to have a JavaScript file in the directory out called extension.js. If you have run the watcher task or the build task, then you should indeed have that as the ts file will be compiled into the .js file. The .js file should also export a function called activate:

Back in the package.json file, you will see the contributes section. In this example, there is just a single command.:
|
1 2 3 4 5 6 7 8 |
"contributes": { "commands": [ { "command": "extension.sayHello", "title": "Hello World" } ] }, |
This has a single command here, but you could contribute multiple commands or something else such as a window. This is an example I used to create a window in another extension I wrote for VS Code:
|
1 2 3 4 5 6 7 8 9 10 11 12 13 14 15 16 17 18 19 20 21 22 23 24 25 26 27 28 29 30 31 32 |
"contributes": { "commands": [ { "command": "armJsonOutline.showGraph", "title": "ARM: Show Dependency Graph", "when": "resourceLangId == 'json'" }, { "command": "armJsonOutline.openArmOutline", "title": "ARM: Start Outliner", "when": "resourceLangId == 'json'" }, { "command": "armJsonOutline.stopArmOutline", "title": "ARM: Stop Outliner" }, { "command": "armJsonOutline.testExpression", "title": "ARM: Test Expression" } ], "views": { "explorer": [ { "id": "armJsonOutline", "name": "ARM Template Outline", "when": "resourceLangId == 'json'" } ] }, "menus": {} }, |
The things to notice here are that the commands and views should only be visible when a JSON document is open, so, as well as the command definitions, I have also included a when property. This really contributes to the goal of having VS Code as lightweight as possible; if you don’t need something then, it isn’t loaded. This is a great benefit over Visual Studio where everything is loaded unless you explicitly disable it.
Now that the package.json file has been discussed, you can explore the sample application. If you open the file src/extension.ts you will can see you first glimpse of TypeScript code:
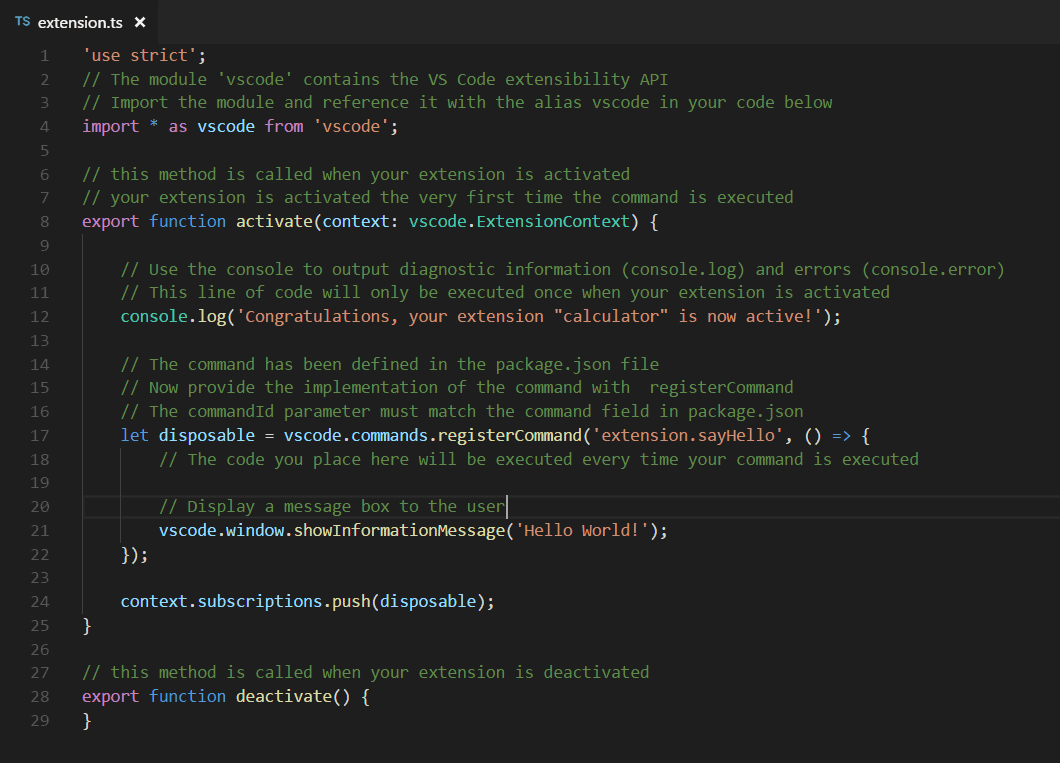
There is function called activate which is being exported. This will be executed because in the package.json file, you have:
|
1 |
"main": "./out/extension", |
It will be called when someone runs the command sayHello. When the activate function is called, debug line is logged, console.log, and then it registers a command using:
|
1 |
VS Code.commands.registerCommand |
This takes two parameters, the first is the name of the command to register. In this case, it is extension.sayHello. The second parameter is a function that will get executed when the command is run. The sequencing is a little odd here but to clarify what happens:
- A user runs a command or event that is in the activationEvents section in the package.json file.
- If the activate function has not been executed since VS Code was launched, then activate is called.
- The activate function then registers any commands it would like to and does any initialization work it needs.
- If the command the user called is registered by the activate function, then that command itself is executed.
This means you can have multiple commands all registered using the same activate function without having to pre-register them before the extension is required.
Then when the activate function returns, the registered handler is executed, because the user originally ran the extension.sayHello command:

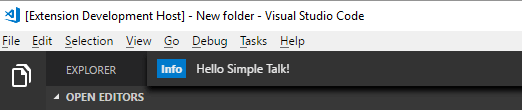
In the example, the command displays a message saying Hello World!. I will change this to Hello Simple Talk and then press F5 so VS Code should build and run the extension in a development version of VS Code.
Once you start the development version, you can open the command palette and run Hello World. When you do that, VS Code calls the activate function which registers the extension.sayHello command. When activate completes, the sayHello command is executed and displays the message Hello Simple Talk.

Debugging
Even though the code that gets executed is that compiled from TypeScript to JavaScript, you can still debug the TypeScript using the debugger. You can set a breakpoint in the TypeScript function where you display the message box by either, highlighting the line you are interested in and choosing Toggle breakpoint from the Debug menu or pressing F9, or just clicking the space to the left of the line numbers.
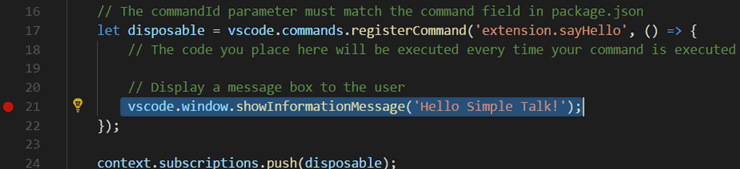
When you run the extension under the debugger and execute Hello World, the VS Code debugger stops at the breakpoint, and you can do the standard things like evaluating any variables or viewing a stack trace:
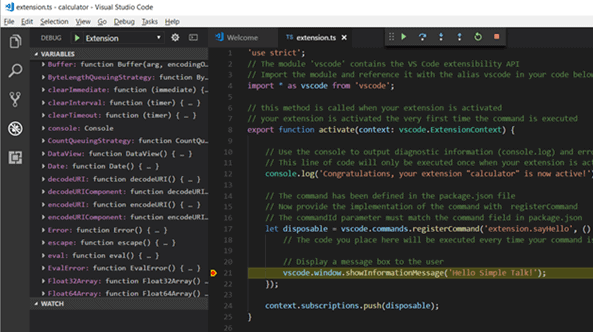
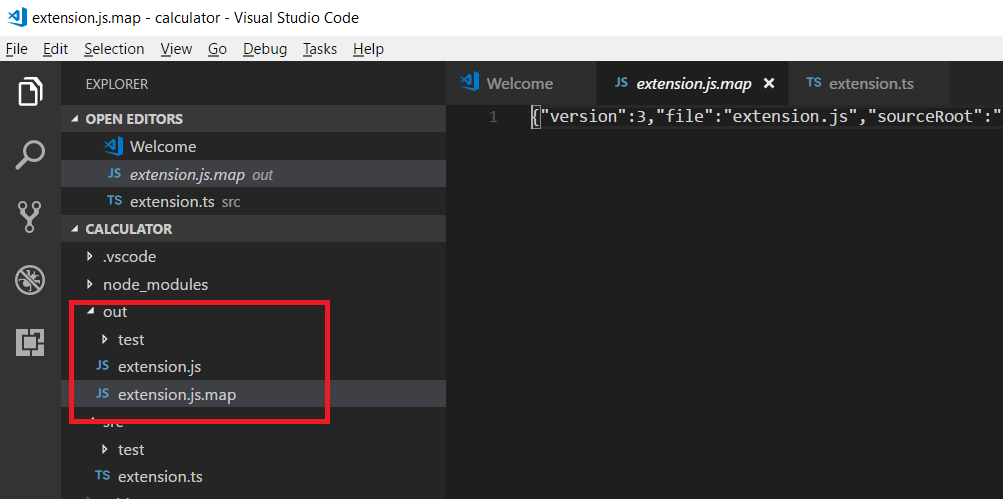
This ability to execute JavaScript code and debug the TypeScript is made possible because, when the TypeScript compiler outputs the JavaScript file, it also outputs a map file which contains all the information the debugger needs to translate the JavaScript locations and objects back to the TypeScript locations and objects:
Extending the example and using tests
So far, the example doesn’t really do that much, so it’s time to expand the extension to count the number of words in the active document. The first thing to do is to add a new command to package.json by adding the extension.countWords to the commands array:
|
1 2 3 4 5 6 7 8 9 10 |
"commands": [ { "command": "extension.sayHello", "title": "Hello World" }, { "command": "extension.countWords", "title": "Count Words" } ] |
Note, the commands are configured with extension. This is effectively the namespace. To keep this from clashing with anything else, I normally use the name of the extension instead of extension. If you are going to publish your extension, you should choose a different prefix.
Once you have a new command, you should also tell VS Code that it should call the activate function if the new command is called. Otherwise, unless someone happens to run Hello World, the command won’t have been registered, and VS Code will show an error to the user. Update activationEvents so that it includes the new command:
|
1 2 3 4 |
"activationEvents": [ "onCommand:extension.sayHello", "onCommand:extension.countWords" ], |
Now, you must implement the command, so go back to the src/extension.ts file. After registering extension.sayHello, add a new VS Code.commands.registerCommand for the new command. To test that package.json has been set up correctly, just copy and paste helloWorld (changing the variable name that is returned from registerCommand so that you can save both of the subscriptions) and test it to make sure that when you call extension.countWords, you get a message box:
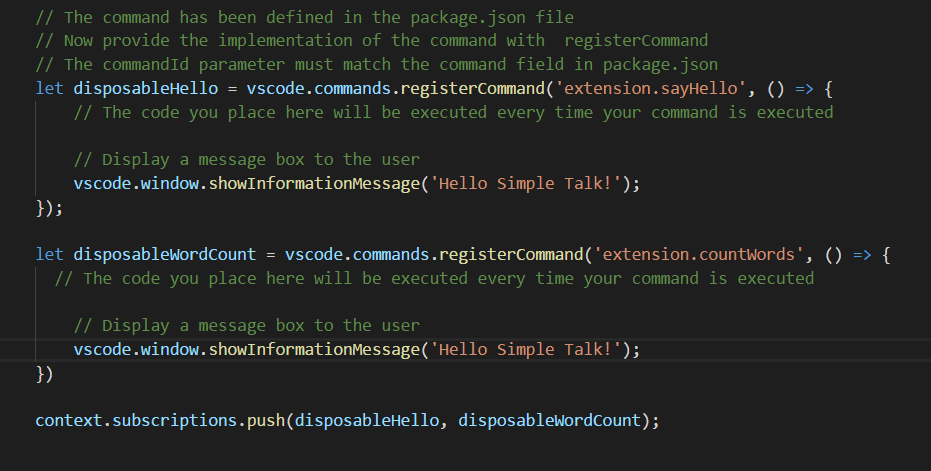
Now you know that you have package.json set up correctly, you can expand the code to read the current document, count the words, and display the word count:
|
1 2 3 4 5 6 7 8 9 10 11 |
if(vscode.window.activeTextEditor === undefined || vscode.window.activeTextEditor.document === undefined){ return; } let text = vscoode.window.activeTextEditor.document.getText(); function countWords(str) { //from https://stackoverflow.com/questions/18679576/counting-words-in-string return str.trim().split(/\s+/).length; } vscode.window.showInformationMessage(`Document contains: ${countWords(text)} words`); |
The code will first check to see if there is an active document. If there isn’t, then it will fail to read the text. If there is an extension that throws an exception, it doesn’t crash VS Code, but the user gets an error message to say the extension died which isn’t very nice. By using the when facility, you could just get the command to show when a document is chosen, but there is still a chance a user could choose the command and then close the active window.
|
1 2 3 4 5 6 |
"commands": [ { "command": "armJsonOutline.showGraph", "title": "ARM: Show Dependency Graph", "when": "resourceLangId == 'json'" }, |
This would still throw an exception, so it’s best to check that it is still valid:
|
1 2 3 4 |
if(VS Code.window.activeTextEditor === undefined || VS Code.window.activeTextEditor.document === undefined){ return; } |
The next line grabs a copy of the text from the active window:
|
1 |
let text = VS Code.window.activeTextEditor.document.getText(); |
Once it has the text, it uses a function downloaded from Stack Overflow to count the words:
|
1 2 3 4 |
function countWords(str) { //from https://stackoverflow.com/questions/18679576/counting-words-in-string return str.trim().split(/\s+/).length; } |
Note that this was straight JavaScript. You could turn it into a safer version if you add type information to it:
|
1 2 3 4 |
function countWords(str : string) : number { //from https://stackoverflow.com/questions/18679576/counting-words-in-string return str.trim().split(/\s+/).length; } |
You now know that str is a string, and the function returns a number. Finally, it shows a message box with the results of calling the countWords function:
|
1 |
VS Code.window.showInformationMessage(`Document contains: ${countWords(text)} words`); |
You can use ${} to embed TypeScript commands inside a string. This only works where you use backticks ` to surround the characters.
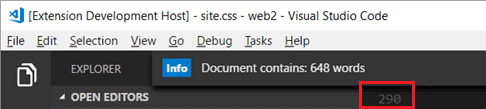
If you run this and open a document, you will get a message about how many words there are in the document:
Unit Testing
Included in the sample extension are some tests in: src/test/extension.tests.ts. If you take the code that counts the words in the document and make it testable by putting it into its own file which you could call from either the tests or the extension code, you could write some tests to verify that it works.
The first thing to do is to create a new wordCounter.ts file under src. In this file, you will export the wordCounter function so that you can call it from other places. In TypeScript, if you do not export a function, it is like making it private to the file. Add this text to the new file:
|
1 2 3 4 5 |
'use strict'; export function countWords(str : string) : number { //from https://stackoverflow.com/questions/18679576/counting-words-in-string return str.trim().split(/\s+/).length; } |
If you wanted to, you could have created a TypeScript ‘class’ to do this work for you. In this case, a ‘function’ is more than enough. Save the new file, and, if you have a watcher task running or you run the build command in the out folder, you should see a wordCount.js and map file created automatically:

Open the src/tests/extension.tests.ts file and add a new suite at the bottom:
|
1 2 3 |
suite("wordCounter Tests", () => { }); |
To use the wordCounter code, you must add an import to it under the other imports:
|
1 |
import {countWords} from '../wordCounter'; |
In this case, you just want the single function, but you could import all the exported functions and classes from a file. You will note the ../. This is used because the tests are being compiled in a subdirectory of the src directory, so the tests need to navigate up a level to get to the code. When you import the wordCounter function in the extension, because they are in the same folder, you won’t need the .. part.
Now that you have imported the code, you can add a test:
|
1 2 3 |
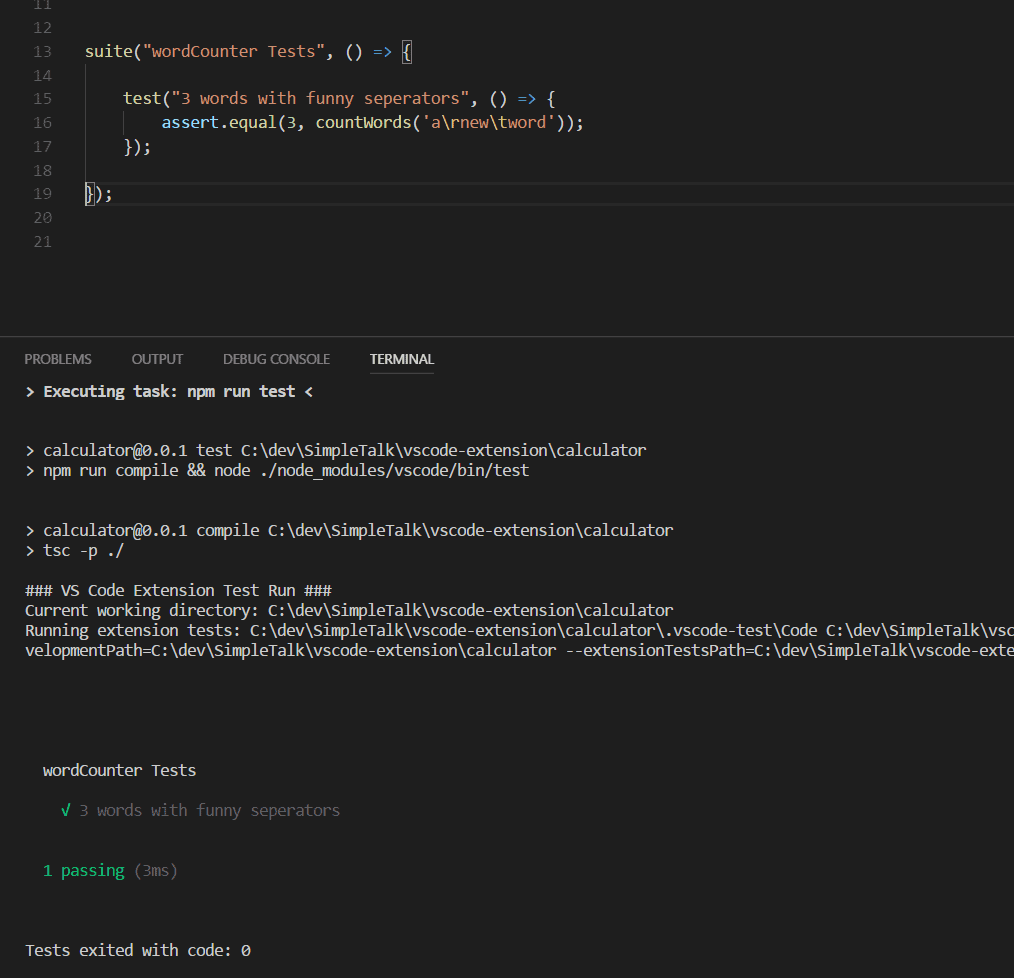
test("3 words with funny separators", () => { assert.equal(3, countWords('a\rnew\tword')); }); |
You can run the tests by opening the command palette and running Tasks: Run Test Task and choosing npm:test. Hopefully, you should see the test passing:
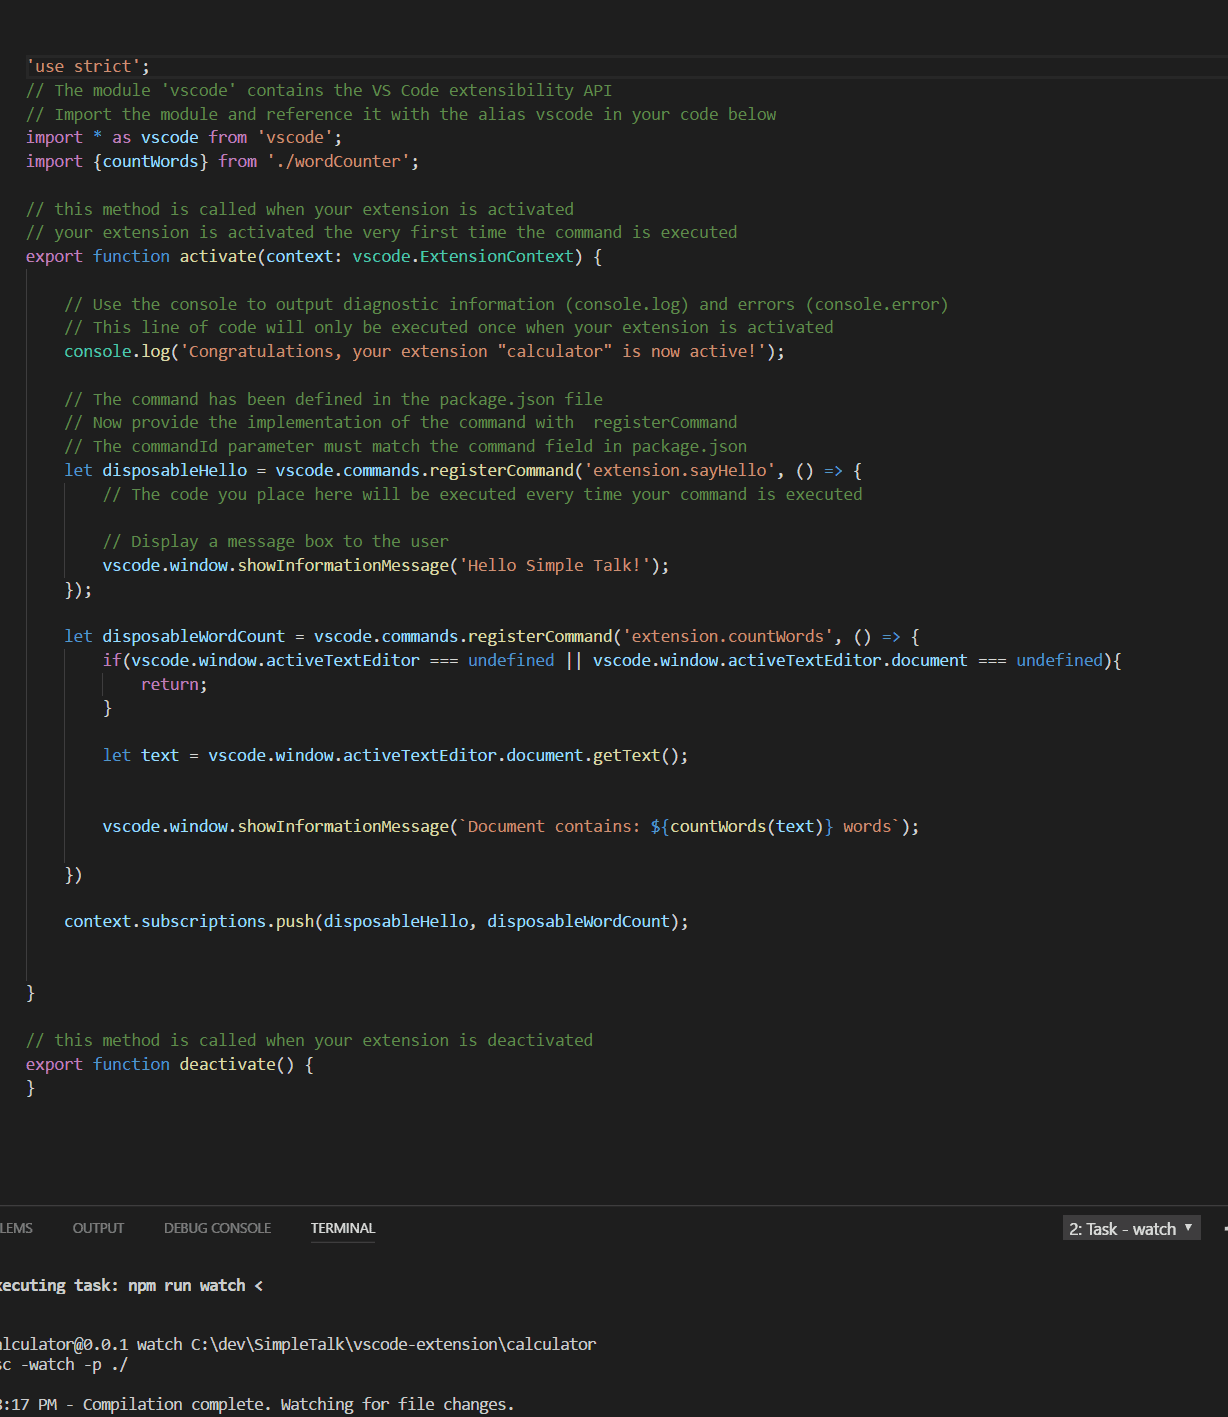
You can now modify the actual code to use the new shared wordCounter function. Open sec/extension.ts and add this import underneath the existing VS Code import:
|
1 |
import {countWords} from './wordCounter'; |
Delete the local function, and then the aliased function should already be available. If you have a build watcher, you will see if this has succeeded or if there were any errors:
Publishing the Extension
Now that you have the extension, you will want to share it with others. You have two choices: you can create a VSIX (deployment package) and keep it private, or you can publish it to the Visual Studio Marketplace to share it with the world. Either way, you will need the vsce command line tool, so install that using:
|
1 |
npm install -g vsce |
vsce performs some basic checks. One of them is that the README.md file doesn’t contain the default text, so delete it all and write a nice README for your extension. When you are ready to run execute this from the same directory that holds package.json:
|
1 |
vsce package |
If this succeeds, you will get an extension-version.vsix file which can be loaded into VS Code using the command Extensions: Install from VSIX.
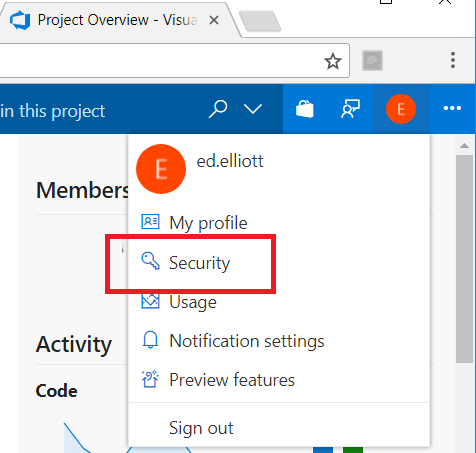
To publish to the marketplace, you will need a personal access token or PAT which you can get from VSTS. To find a PAT that can be used to publish your extension, you need to go to any VSTS account that you log in using the same email that you used to create the publisher account. When you open VSTS, click on your name icon in the top right corner and choose security:
Then click on Personal Access Tokens and Add. You will see the Create personal access token screen. Give it a name, a length of time the token lasts for and most importantly, choose All Accessible Accounts, under the scopes you need, Marketplace (publish):
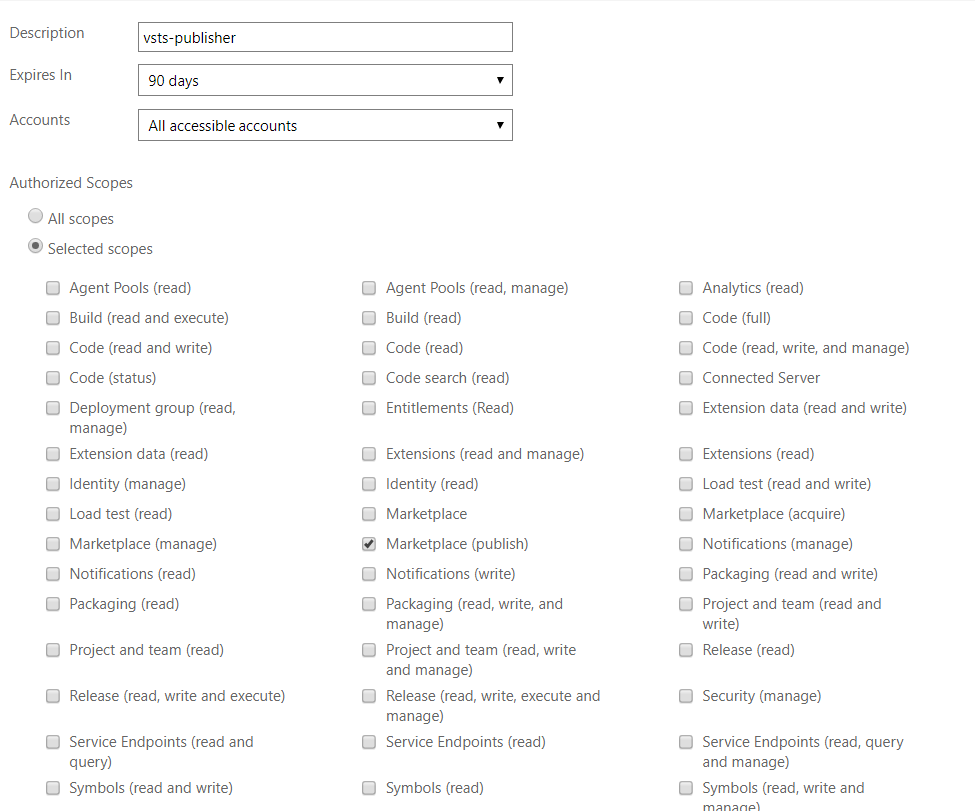
If you click Create Token at the bottom of the page, you will be given a token. Make a note of it as you will need to re-generate a new one if you lose it.
When you run vsce publish, it will ask you for your Personal Access Token. Add the token you just saved, and the extension should be published and available to everyone in the market place.
Conclusion
VS Code is a refreshing development experience, and the ability to quickly write extensions is a real benefit. Many users are actively downloading extensions from the marketplace. If you write a useful extension, then it can potentially be used by a considerable amount of people easily and efficiently. TypeScript and JavaScript have been given quite a bad reputation, but they are reasonably straightforward languages with plenty of help and tutorials available online.
References
https://code.visualstudio.com/docs/extensions/example-hello-world
https://code.visualstudio.com/docs/extensions/overview
https://www.typescriptlang.org/
This document contains proprietary information and is protected by copyright law.
Copyright © 2026 Red Gate Software Limited. All rights reserved
Load comments