
React is a library gaining traction in the enterprise. For large solutions, it is good to have a set of reusable components. Often, back-end APIs written in C# can feed data to a front-end UI. This is where React comes in; it is the UI layer that presents the information to the user. The React library then renders markup using React components. React shops can reuse components to maintain consistent branding across a large suite. This reduces code duplication and increases team velocity. In this take, I’ll delve into working with React components and what it means for .NET developers.
React can live outside Visual Studio. For React development, Visual Studio Code or WebStorm are recommended. The canonical way to begin is through Create React App. Be sure to have Node 8.1+ and NPM 5.6+ installed before working with React.
To fire up a React app:
|
1 |
npx create-react-app work-with-react-app |
The contents of the new project will be under the work-with-react-app folder. You can test this new project by running npm start in the project folder.
Think of a React component as an abstraction layer. A component encapsulates HTML/CSS/JavaScript in a single module. This makes it easier to conceptualize a complex UI into many components. This enables plug-and-play of many components to gain rich functionality.
The React library prefers component composition over inheritance. Components are often in a hierarchy of components. To use a baseball analogy, a player has a bat, or a glove, or both. In this analogy, think of the player as a parent component that has many children. For example, a player component might hit, and/or catch a ball. This is how React components unlock functionality through a relational hierarchy. The parent component gains functionality simply by increasing its children. Composition has a lot of flexibility, which improves code reusability.
Each React component has its own lifecycle. The component wraps around methods useful for managing state and the component state tells React when it’s time to make updates. The library then finds an optimal way to update the tree hierarchy to reduce repaints. Each lifecycle method can control how updates might occur in the component. To see how React components maintain state, it is essential to understand this lifecycle.
The component lifecycle is broken up into these four phases:
- Mounting
- Updating
- Unmounting
- Error Handling
With each phase, the component fires a set of lifecycle methods. Error handling only happens when there’s an exception. React treats error handling as a separate and independent phase. Error handling must exclude any logic that belongs in any other phase.
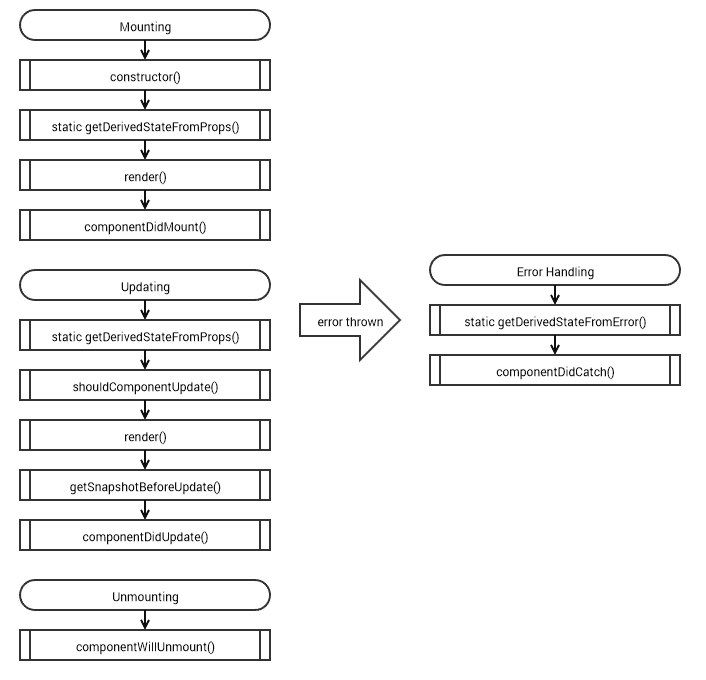
To help visualize the component lifecycle, take a look at this diagram:
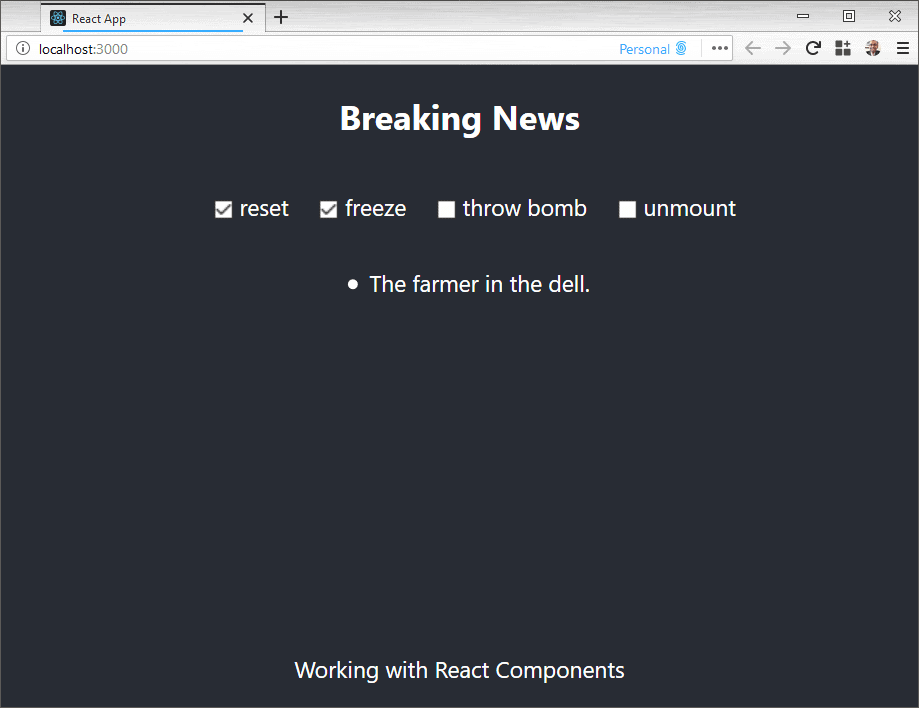
To explore each phase, I’ll create a news ticker component. The ticker will update its breaking news every two seconds and show only one headline at a time. To exploit each lifecycle, I’ll freeze, reset, unmount, and throw an error in the component.
Start small by declaring a React component. This can go in a separate file inside the Create React App project. (You can find the completed code for the project here.)
|
1 2 3 4 |
import React from 'react'; class NewsTicker extends React.Component { } |
Mounting
Mounting occurs when the component is created and inserted into the tree hierarchy. This lifecycle executes these methods in the following order:
- constructor()
- static getDerivedStateFromProps()
- render()
- componentDidMount()
React components have the following method signature in the constructor:
|
1 |
constructor(props) |
If the constructor does not initialize state, then the component does not need this. The constructor is called before the component is mounted. For this reason, avoid calling this.setState() but initialize this.state directly. Avoid any side-effects in the constructor that mutate state. Because components subclass React.Component, be sure to call super(props) before any other statement. Else, this.props will be undefined in the constructor which can be problematic.
For the news ticker, put in place a constructor that initializes state. The state will begin with an empty news list and initial index:
|
1 2 3 4 5 6 7 8 9 10 |
constructor(props) { super(props); this.state = { news: [], tickerIndex: 0 }; this.timer = 0; } |
I’ll skip getDerivedStateFromProps() for now since it is unlikely to be useful during the mounting phase. I’ll come back to this lifecycle method during component updates.
React components have the following method signature when it renders:
|
1 |
render() |
This is the only method that is required in a React component. The render() method is pure, meaning it should not mutate component state. Instead, it should use this.props or this.state to render the component. This keeps the component predictable and easier to think about. The render method can return React elements, typically via JSX. For example, <div /> or <NewsTicker />. It can return a string or a number which gets rendered as simple text. Returning a Boolean or null renders nothing because this can unmount components from the hierarchy.
The news ticker will render a list with a single item based on the index:
|
1 2 3 4 5 6 7 8 9 |
render() { return ( <ul> <li> {this.state.news[this.state.tickerIndex % this.state.news.length]} </li> </ul> ); } |
The modulus operator allows the news item to iterate as the index increases.
After the component mounts, it calls the following lifecycle method:
|
1 |
componentDidMount() |
This is called immediately after the component is inserted into the tree hierarchy. Mutating component state after the initial render goes here. For example, when initiating network requests to fetch back-end data. This method can set and initialize timer intervals. When setting an interval, be sure to clear it in the unmounting phase. Calling this.setState() will trigger another render which goes through the update phase. When using this pattern, be careful as this can cause performance issues. One alternative is to set the initial state through the constructor instead.
The news ticker will grab the latest breaking news with a fetch request. Then, mutate state with the latest data and set up an interval. The interval will update the ticker index as it iterates through each news item.
For example:
|
1 2 3 4 5 6 7 8 9 |
async componentDidMount() { const payload = await fetch('/news.json'); const data = await payload.json(); this.setState({news: data}); this.timer = setInterval(() => this.setState( {tickerIndex: this.state.tickerIndex + 1}), 2000); } |
The interval is set to update the news item every two seconds. Using async/await makes awkward async code more readable. This method returns a void type, but it can also return Promise<void>. Prefixing this method with async makes this return a promise that returns void.
This wraps up the mounting phase. So, what happens when the component mutates state through this.setState()?
Updating
An update occurs when there are changes to the component’s props or state. This re-render lifecycle executes these methods in the following order:
- static getDerivedStateFromProps()
- shouldComponentUpdate()
- render()
- getSnapShotBeforeUpdate()
- componentDidUpdate()
React components spend the bulk of their time updating and re-rendering components. This is what makes the components come alive as state mutates through the tree hierarchy.
The getDerivedStateFromProps() lifecycle method has the following signature:
|
1 |
static getDerivedStateFromProps(props, state) |
This is called before the render method, both during mounting and updating phases. It returns an object that mutates state or null to change nothing. This method is unlikely to be useful for most use cases. Deriving state from parent components leads to tight coupling, which is hard to understand. A single state change might ripple unpredictable behavior down the component hierarchy. Be sure to look at other alternatives first before going down this path. For example, mutating state can go in componentDidUpdate(). Or, better yet, wrap the component around a state machine like Redux. This method does not have access to the component instance, so it has no side-effects. Extracting pure functions from this method leads to reusable code that can live outside the component. A cleaner way is to abstract state management and unify the tree hierarchy from a single store. This is one problem a library like Redux, for example, attempts to solve.
For the news ticker, reset the component by setting the index back to its initial state. This illustrates how a parent component can alter state with this method.
For example, say there’s a prop to reset state in the component:
|
1 2 3 4 5 6 7 8 9 |
static getDerivedStateFromProps(props, state) { const {reset} = props; if (reset) { return {...state, tickerIndex: 0}; } return null; } |
The ES6 spread, for example, …state, sets current values because all I want is to reset the index. Any existing property gets overridden by what’s on the right in the new object. This method is prefixed with static, which means it does not have access to the instance.
The ShouldComponentUpdate() lifecycle method has the following signature:
|
1 |
shouldComponentUpdate(nextProps, nextState) |
This is an optimization method to see if the component is affected by the current change in state and props. This method defaults to true and runs right before rendering. For most use cases, it is good enough to rely on the default behavior. Keep in mind preventing rendering can lead to subtle bugs. Consider using a pure component, not a stateless component, for optimization. Pure components do a shallow comparison of props and state to reduce the risk of skipping updates. To create a pure component, subclass React.PureComponent. A stateless component does not subclass any component class. For example, HelloComponent = ({name}) => <p>Hello {name}<p/>. This does not have any lifecycle methods useful for optimization. Avoid deep comparisons with JSON.stringify() because it is inefficient.
Here a freeze prop determines if the news ticker should update:
|
1 2 3 4 5 6 7 8 9 10 11 |
shouldComponentUpdate(nextProps, nextState) { const {freeze} = nextProps; if (freeze) { console.log('Ticker frozen at: ' + nextState.news[nextState.tickerIndex % nextState.news.length]); return false; } return true; } |
The ES6 destructuring assignment is used to grab the freeze prop variable. Then, log nextState.news and block re-render.
The render method executes as it did during the mounting phase. I’ll move on to the next method lifecycle so as not to repeat myself.
The getSnapshotBeforeUpdate() lifecycle method has the following signature:
|
1 |
getSnapshotBeforeUpdate(prevProps, prevState) |
This method is called right before the most recent rendered output is committed. This enables the component to snapshot existing information before any changes. Any return value from this method will go as a parameter to componentDidUpdate(). The use case is rare; the one benefit is gaining access to the raw output. For example, capturing what the DOM has before committing changes. React components do a good job at abstracting away the raw DOM. Striping away useful abstractions can be an anti-pattern.
For the news ticker, say I want to grab a snapshot of the current news item. I only want to capture this information when the news list changes after the initial load.
For example:
|
1 2 3 4 5 6 7 8 |
getSnapshotBeforeUpdate(prevProps, prevState) { if (prevState.news.length > 0 && prevState.news.length !== this.state.news.length) { return this.newsRef.current.textContent; } return null; } |
This needs refs which gains access to the DOM. To make this work, this needs to be set in the constructor():
|
1 |
this.newsRef = React.createRef(); |
Then, set which DOM element this has access to in render():
|
1 2 3 |
<li ref={this.newsRef}> … </li> |
The snapshot itself can be of any type. I’m returning a simple string with raw text content.
The last lifecycle method during update has the following signature:
|
1 |
componentDidUpdate(prevProps, prevState, snapshot) |
This method is called after all updates are committed. Mutating state here must be wrapped in a condition, else, run the risk of an infinite loop. Keep in mind calling this.setState() causes re-rending which can affect performance. The snapshot parameter comes from the previous lifecycle method. This is the method where the snapshot might be useful for mutating state.
With this lifecycle method, you can check for any news updates from the back-end data. If so, call this.setState() with the latest breaking news. To avoid too many network requests delay this by a factor of two. This method only mutates state when it detects actual changes. To keep it performant, it’s only checking for differences in news length. Also, if there’s a snapshot available then go ahead and log it in the console.
Here’s the method:
|
1 2 3 4 5 6 7 8 9 10 11 12 13 14 15 16 |
async componentDidUpdate(prevProps, prevState, snapshot) { if (this.state.tickerIndex % 2 === 0 // delay network calls && prevState.news.length === this.state.news.length) { const payload = await fetch('/news.json'); const data = await payload.json(); if (data.length !== this.state.news.length) { console.log('Breaking news update detected.'); this.setState({news: data}); } } if (snapshot !== null) { console.log('DOM snapshot before update: ' + snapshot); } } |
A modulus delays network calls by a factor of two. Then, it’s checking if both previous and current state are the same to further optimize calls. There is no need to check anything right after a breaking news update.
Unmounting
The unmount lifecycle method has the following signature:
|
1 |
componentWillUnmount() |
This is called right before a component is removed from the tree hierarchy and destroyed. Do any necessary cleanup, such as cleaning up intervals created in componentDidMount(). Avoid calling this.setState() because the component will never re-render. In React components, re-mounts are not allowed.
For the news ticker, all I care about is clearing the timer interval. To do this place a log in the console to note an unmount and clear the interval:
|
1 2 3 4 |
componentWillUnmount() { console.log('Unmount component.'); clearInterval(this.timer); } |
Error Handling
React components catch JavaScript errors using error boundaries. This catches errors during render or any other lifecycle method. Because it is a boundary, it can only handle errors in the tree below them. Also, one gotcha is it doesn’t catch asynchronous errors, only synchronous errors.
An error boundary has the following lifecycle methods:
- static getDerivedStateFromError()
- componentDidCatch()
The getDerivedStateFromError() method has the following signature:
|
1 |
static getDerivedStateFromError(error) |
The lifecycle method is called right after an error is thrown. This receives the error thrown in the tree hierarchy as a parameter. Then, it should return a value to update state in the component. This method is called during render and does not have access to the instance, so side-effects are not permitted.
The next method in the error phase has the following signature:
|
1 |
componentDidCatch(error, info) |
This lifecycle method does have access to the instance, so feel free to use this.setState(). This method gets two parameters, error, and info. The error parameter has the actual error thrown. Info is an object containing the component stack, which is where the error got thrown. This method is called during the commit phase, so side-effects are permitted. When it’s not mutating state, it can be useful for logging error information. Keep in mind, when an error is thrown, a fallback UI can render with this.setState(), but this might be deprecated soon. A better approach is to return the new state from getDerivedStateFromError().
For the news ticker, create an error boundary around the NewsTicker component. In the child component, set a prop that throws a bomb so the error boundary can catch it. Once the error boundary diffuses the bomb, it’ll gracefully show a fallback UI.
Here’s the error boundary component:
|
1 2 3 4 5 6 7 8 9 10 11 12 13 14 15 16 17 18 19 20 21 22 23 |
class ErrorBoundary extends React.Component { state = { hasBomb: false }; static getDerivedStateFromError(error) { return error ? {hasBomb: true} : {hasBomb: false}; } componentDidCatch(error, info) { console.log('Caught error: ' + error.message); console.log('Component stack - ' + info.componentStack); } render() { if (this.state.hasBomb) { // Diffuse bomb with a user-friendly message return <p>Unable to show news ticker.</p>; } return this.props.children; } } |
In the child NewsTicker component, change render() so it can throw a bomb:
|
1 2 3 4 5 |
const {throwBomb} = this.props; if (throwBomb) { throw new Error('Bomb!'); } |
Putting It All Together
Both ErrorBoundary and NewsTicker are ready to go into a parent component. The error boundary wraps around the news ticker. The ticker needs props such as reset, freeze, and throw a bomb.
Begin by creating a parent component:
|
1 2 3 4 5 6 |
class App extends React.Component { render() { return <> </>; } } |
Then declare state as a class property:
|
1 |
state = { reset: false, freeze: false, throwBomb: false, unmount: false }; |
The unmount state property allows components to be removed from the tree hierarchy. This will need a set of checkboxes so you can flip between states. Put these between the empty tags in the render method:
|
1 2 3 4 5 6 7 8 9 10 11 12 13 14 15 |
<input type={"checkbox"} onChange={() => this.setState({reset: !this.state.reset})} /> <label>reset</label> <input type={"checkbox"} onChange={() => this.setState({freeze: !this.state.freeze})} /> <label>freeze</label> <input type={"checkbox"} onChange={() => this.setState({throwBomb: !this.state.throwBomb})} /> <label>throw bomb</label> <input type={"checkbox"} onChange={() => this.setState({unmount: !this.state.unmount})} /> <label>unmount</label> |
Then, lay down the components:
|
1 2 3 4 5 6 7 |
{!this.state.unmount && ( <ErrorBoundary> <NewsTicker reset={this.state.reset} freeze={this.state.freeze} throwBomb={this.state.throwBomb} /> </ErrorBoundary> )} |
Once you fire this up, it’ll look like this in the browser:
Conclusion
React components are reusable and come in independent modules. They fit within a tree hierarchy using relationships to reuse functionality. Composition is what makes these components more natural to think about. Each component has its own lifecycle that works within the tree’s lifecycle. As components mutate state, the lifecycle is what makes these components come alive.
This document contains proprietary information and is protected by copyright law.
Copyright © 2026 Red Gate Software Limited. All rights reserved


Load comments