
Contents
Some testing categories, such as unit testing, are well-supported by tools. User-Interface (UI) testing, however, has challenges all its own, and is often looked upon with trepidation because it is difficult to automate. So each new release of a product requires hoards of manual testers clicking and typing away to regression test the UI. Automation attempts to replace humans with programs that do the clicking and the typing. Automated UI testing would be great-if the UI never changed but, particularly during development of a new product, the user interface frequently and constantly changes; that is just the nature of the beast. Even small changes in a UI, though, can easily break automation testing. It is of no consequence to a human if an input field has moved a few pixels or a label has changed from “UserName” to “Username”, but even innocuous changes such as those can cause automation to no longer find what it expects in the window, requiring tremendous effort to maintain automated tests.
Broadly speaking, applications with a graphical user interface fall into two types: client applications, those that run on a user’s computer, and web applications, those that run on a remote server and are accessed with a client browser. Automating UI testing for client applications requires overcoming the burdens outlined above, but for web applications the problems are even more severe. A web application must run in many different browsers on different operating systems with different user settings (e.g. javascript enabled/disabled). The permutations are compounded with having to support different versions of each browser (e.g. Internet Explorer 8 vs. Internet Explorer 9). But there is hope-there are a lot of web testing tools available. But unlike some technologies where market dominance has gone to either a single player or a small pool of major players, the collection of web testing tools is a gallimaufry, a patchwork of utilities, plugins, and add-ons each focusing on their own favorite piece of the web. Wikipedia usually has great listings and comparisons of utilities in various categories, but their list of web testing tools is surprisingly sparse. Following the link from there to their list of GUI testing tools produces a slightly longer list, though not limited to just web testing. However, a link from there to SoftwareQATest.com opens the floodgates wide to reveal this huge list of web test tools. I have used only a handful of these tools so I certainly do not claim to be an expert in which tools are better than others, but one I have been using recently that stands out as a very good tool-and appears on all 3 web pages listed above-is Selenium.
I measure goodness in a software package by using a simple yardstick against the three aspects, features, documentation, and support. Selenium is a functional web page tester that lets you:
- Record and playback actions (primarily typing and mouse clicks).
- Manage tests by organizing into test cases and test case suites.
- Exercise tests against multiple browsers and platforms.
- Convert tests to your favorite language (C#, Ruby, PHP, Perl, Python, Java) for full customization.
That short but powerful list of features is one of the main reasons I became enamored with this free product. Another is its 160-page user manual: good documentation, as I am sure you know, is a rarity for software products and the folks behind Selenium did a reasonable job. How do I measure the quality of the documentation? First let me touch upon the third quality of my software judging triumvirate: support. As yet, I have no judgment about Selenium’s support-because I have had no call to use it. That is how I judge the documentation to be good. In the interests of full disclosure I have had questions not answered by the documentation, but a quick web search has revealed the answers thus far.
Any software package, however, has defined boundaries. This article illustrates how to stretch Selenium’s boundaries with Selenium Sushi[1], providing both a support library and a .NET project framework, to make Selenium more useful and make you more productive. Skip down to Table 3 to see at a glance what Selenium Sushi brings to the table; the table is not right here because it helps if you have some understanding of Selenium first.
Selenium Basics
Selenium IDE
Selenium provides several packages; the first piece you should install is the Selenium IDE, a Firefox add-on. This IDE lets you record and playback tests, but in Firefox only. Once installed, launch the IDE from Firefox’s tools menu and you can immediately start recording actions and familiarizing yourself with Selenium commands. The IDE lets you playback what you record against your currently focused browser window. So if you happen to switch tabs to look up something then try to run your tests against a now “foreign” web page, you will get an outpouring of errors.
The IDE is deceptively simple looking (which I think is a mark of a good design). You can play back an entire test case or an entire suite, which is just a collection of test cases). But you can also set both break points and start points within a test case. You could then, for example, run from the start of a test case to the middle by setting a break point. Alternately, execute from the middle to the end by setting a start point. Set both to run several lines in the middle. Or open the context menu on a single command to execute just that one line. Finally, you can even run a portion of a line. That is, a typical command specifies a target on the web page (a button, a link, a piece of text, etc.) Use the Find button at the bottom of the command pane to highlight that target to make sure you have specified it correctly. (This realm of locators, as Selenium calls them, is one of Selenium’s best features, allowing you to specify web elements with XPath or CSS or DOM, among other syntaxes. I hope to have a separate article just focusing on locators.)
 Within the IDE you can retarget your test to a different server without modifying the test case at all-simply edit the Base URL field at the top of the IDE window. This lets you, for example, run the same test against your QA server and again against your staging server. But be careful-changes to the Base URL are not saved when you save the test case! If you want to permanently change it in the test case, you must open it up in an external text editor to do so.
Selenium Remote Control
Running tests in other browsers requires the next Selenium package, Selenium Remote Control. This package includes a server that you run on your local machine and libraries to interface to your preferred language. This RC package, as it is called, is just a zip file; to mesh with the examples I use in this article, unpack it into C:\Program Files\Selenium. The server itself is just a jar file, so launch it with a simple java command:
java -jar selenium-server.jar -multiwindow
The -multiwindow option specifies that when it launches browsers Selenium should use two windows, one for your application and one for its control window. The alternative is -singlewindow, where Selenium uses frames; be aware that some web applications may not render properly embedded in a frame, though.
Once your server is running you can then execute tests against it (in this case, unit tests from a .NET project). You can also write tests from scratch using Visual Studio’s unit test framework, but starting off I recommend using Selenium IDE to record tests, then export to source code and edit as needed. Selenium natively supports NUnit so that is what I focus on here. Once you understand the mechanics it is a simple matter to use your own favorite test framework, though.
Natively, Selenium stores test cases as HTML. The IDE editor has two tabs, Table and Source. The Table tab is where you work with recording steps and fine tuning locators. The Source tab, by default shows the HTML code-behind. To move code from Selenium IDE to .NET, you have several choices.
- In-Place Conversion
Select Options >> Format >> C# to convert the current test case to C# format in the IDE window itself. You could then copy and paste into Visual Studio. As soon as you change the format in this manner, however, you no longer have access to the Table tab nor to the playback controls. To regain access, simply convert back to HTML format. - Export to File
Select File >> Export to convert the current test case to C# format and store in a file. On the export menu you directly select from the same set of language choices. Your editor format remains unchanged. - Single Line Export to Clipboard
After you do an initial conversion using (1) or (2) above you will usually tweak and customize the code to your needs. Thus, you do not want to come back later and re-export the whole test case again, but you may want to use the IDE to update specific tests within the test case. Selenium IDE provides a convenient way to convert a single test, again in the format of your choice. First, under Options >> Clipboard Format select your language. Your IDE format (Options >> Format) should remain at HTML. In the Table tab of the IDE editor, click on the line you want to migrate. Convert and copy the line in one action either by keyboard (the standard Control-C on Windows) or by context menu. Invoking Paste in Visual Studio emits the test in the language you selected.
Simple Selenium Sample
IDE Context
Before delving into Selenium Sushi, take a look at the sample described here. Figure 1 shows the Selenium IDE with one test case containing 18 commands: 16 tests and 2 actions. Tests can be identified by the assert, verify, or wait command prefix, as in verifyText, or waitForTextPresent. Any other command performs an action, such as open or click. (Technically, the clickAndWait command in Figure 1 is both an action and a test.)
|
Command Type |
Description |
|
Wait. . . |
Look for the element until it appears; abort if timeout is exceeded. |
|
Verify. . . |
Look for the element; continue whether found or not. |
|
Assert. . . |
Look for the element; abort if not found. |
Table 1 Basic Differences among Selenium Test Commands
Note the difference between assert and verify in Table 1. One typical scenario is to use an initial assert as a sanity check (to make sure you are on the right web page, for example). If you do not find the header or the logo or certain text to indicate this, there is no point in testing further on the page. If you get past your assert commands, then you know you are on the right page, so then do a series of verify commands to validate various page elements. Verify is better than assert so you can see all the errors rather than just stop at the first one.
Figure 1 shows the result of actually running the test case-note the green and red bars highlighting the individual tests. Green means a test passed; red means it failed. The lower panel shows the log of the execution with errors marked prominently in red. Careful observation reveals that the rule about assert/abort and verify/continue does not always hold true! Since I used only verify commands the test case should have run to completion, yet the last six lines are white, indicating they have not been executed.
The final error in the log shows why: the specified element in the verifyText command was not found; this is apparently a condition considered serious enough by Selenium that it felt compelled to abort. I do not agree with that design decision-hence my bug indicator at left. The workaround for this: change the verifyText to verifyElementPresent, which specifically tests for whether or not the locator points to something on the page. As you can see in the earlier red-marked lines in Figure 1, execution does continue beyond failing commands of that type.
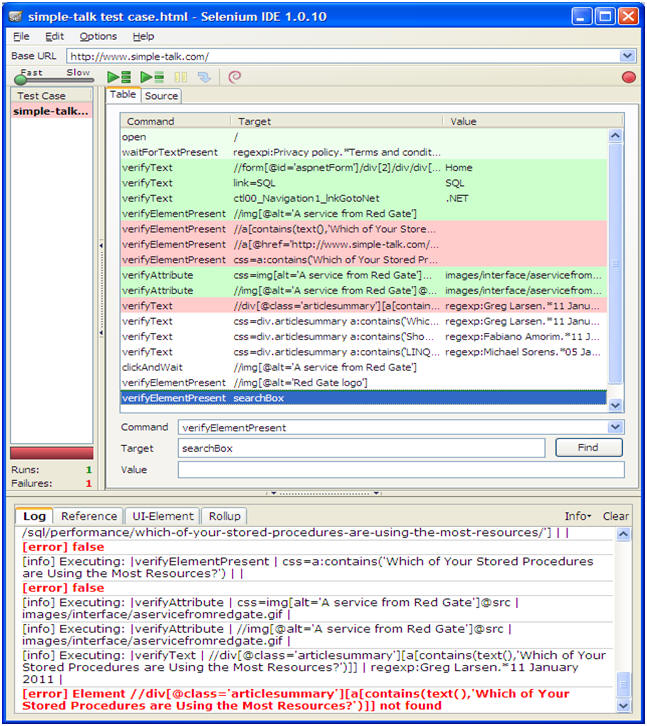
Figure 1 Selenium IDE Showing Results of a Test Case
RC Context
The IDE provides a nice GUI for initial test development but you will quickly find you want to customize or to exercise different browsers or different web servers (i.e. a QA server vs. a development server). For these, you need to move from the GUI to code. Use the IDE’s export command as described earlier, I took the test case above and created a file called ExportedTestCase.cs. I imported this into a new Visual Studio project called ExportedRawSample, available in the code archive accompanying this article. To resolve references in the generated code, I added the RC libraries-all the DLLs in C:\Program Files\Selenium\selenium-dotnet-client-driver-1.0.1. After successfully compiling, you can then launch the selenium server, as described earlier, in preparation for processing requests from your tests.
The next step is to confirm that you get the same results as from the IDE, as a baseline, by running the unit tests in code. Since Selenium’s tests are NUnit tests rather than native Visual Studio unit tests, you cannot run these tests from Visual Studio’s Test menu. Here are just a few choices to run these tests:
- With ReSharper, the outstanding code quality analysis, refactoring, and productivity plug-in for Visual Studio, you can run the tests directly from Visual Studio (ReSharper >> Unit Tests >> Run Unit Tests). If you want to debug, choose Debug Unit Tests as the final menu choice. Alternately, you can right-click a file name in the solution explorer and select Run Unit Tests or Debug Unit Tests.
- Another good alternative is TestDriven.NET, a plug-in dedicated to running NUnit tests from within Visual Studio. Run your unit tests by right-clicking either in the code editor or on a file name in the solution explorer and selecting Run Test(s) or, if you want to debug, Test With Debugger.
- The GUI from NUnit itself runs tests independent of Visual Studio. This is most appropriate to use after you have debugged your tests and rolled them out, and are ready to focus on what the tests may uncover from your application under test. Once you launch the NUnit GUI, you first create a new project (File >> New Project), add.dll or .exe files to the project (Project >> Add Assembly), select the test(s) of interest from the navigation pane, and press the Run button.
(Note that NUnit is free, but ReSharper and TestDriven.NET are not-unless you are a student or an open-source developer.)
When I used ReSharper to launch the tests in ExportedTestCase.cs it opened two Firefox windows as expected, ran through the tests and reported just a single error, the final error reported by Selenium IDE earlier (Figure 2). The other errors shown by Selenium IDE were not reported here due to a Selenium bug. I ran the same tests with the NUnit GUI and the results were the same: only the final error was reported.[2]
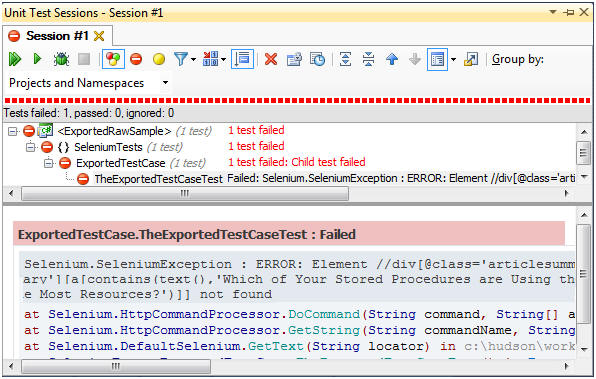
Figure 2 ReSharper Results of a Test Case
Selenium RC is also afflicted with the same defect mentioned earlier for Selenium IDE for verifyText tests: if the locator fails to find an element, the test case aborts even though it is a Verify test, not an Assert test. (Technically it is the selenium.GetText method, used as an argument to verifyText, that throws an exception.)
Finally, take a look at the code generated by the export from Selenium IDE. Here is the first portion of the test case with my comments added to show the IDE command corresponding to each chunk of code. Note the massive code repetition because each IDE command always expands to the same chunk of code.
|
1 2 3 4 5 6 7 8 9 10 11 12 13 14 15 16 17 18 19 20 21 22 23 24 25 26 27 28 29 30 31 32 33 34 35 36 37 38 39 40 41 42 43 44 45 46 47 48 49 50 51 52 53 54 55 56 57 58 59 60 61 62 63 64 65 66 67 68 69 |
[Test] public void TheExportedTestCaseTest() { selenium.Open("/"); // * * * * * * waitForTextPresent * * * * * for (int second = 0;; second++) { if (second >= 60) Assert.Fail("timeout"); try { if (selenium.IsTextPresent("regexpi:Privacy policy.*Terms and conditions")) break; } catch (Exception) {} Thread.Sleep(1000); } // * * * * * * verifyText * * * * * try { Assert.AreEqual("Home", selenium.GetText("//form[@id='aspnetForm']/div[2]/div/div[2]/div[1]/span")); } catch (AssertionException e) { verificationErrors.Append(e.Message); } // * * * * * * verifyText * * * * * try { Assert.AreEqual("SQL", selenium.GetText("link=SQL")); } catch (AssertionException e) { verificationErrors.Append(e.Message); } // * * * * * * verifyText * * * * * try { Assert.AreEqual(".NET", selenium.GetText("ctl00_Navigation1_lnkGotoNet")); } catch (AssertionException e) { verificationErrors.Append(e.Message); } // * * * * * * verifyElementPresent * * * * * try { Assert.IsTrue(selenium.IsElementPresent("//img[@alt='A service from Red Gate']")); } catch (AssertionException e) { verificationErrors.Append(e.Message); } // * * * * * * verifyElementPresent * * * * * try { Assert.IsTrue(selenium.IsElementPresent( "//a[contains(text(),'Which of Your Stored Procedures are Using the Most Resources?')]")); } catch (AssertionException e) { verificationErrors.Append(e.Message); } . . . |
This brief introduction to Selenium RC revealed several defects that I found just during my initial explorations with the product, as well as the major code smell of an overabundance of repeated code. My initial impetus for developing Selenium Sushi was to clean up these code smells, but it addresses the defects mentioned here as well.
Just one final note that applies to Selenium RC and Selenium Sushi: The first time you try to test your application on Internet Explorer you will find it excruciatingly slow. There are two key pieces of information needed to alleviate this. First, use -singlewindow rather than -multiwindow when invoking the Selenium server unless your application requires its own window (i.e. it is “frame busting” by using frames itself or having pop-ups). See Hacking Selenium to improve its performance on IE. Second, change the XPath engine used by Internet Explorer from the default ajaxslt to javascript-xpath. Search for useXpathLibrary on the Selenium Reference page or, for a nicer API format, look in your selenium installation at …/javadocs/com/thoughtworks/selenium/Selenium.html. To make this change, there is nothing to download-just add one line of code in your C# library as described in this StackOverflow post How to use javascript-xpath. With Selenium RC you need to add this yourself; with Selenium Sushi, it is already supplied in the Common\Setup.cs file. Table 2 shows the effects of these two configuration changes running against Internet Explorer 8 on Windows XP (All configurations ran very fast against Firefox 3.6).
|
Window Layout |
XPath library |
Relative Performance |
|
-multiplewindow |
ajaxslt |
Extremely slow |
|
-multiplewindow |
javascript-xpath |
Moderate |
|
-singlewindow |
ajaxslt |
Moderate |
|
-singlewindow |
javascript-xpath |
Fast |
Table 2 Performance Differences on Internet Explorer Due to Windowing and XPath Libraries
Introducing Selenium Sushi
 Selenium Sushi supplements Selenium IDE and Selenium RC, providing an assortment of productivity enhancements allowing you, for example, to: retarget different browsers and different application servers without recompiling, handle file URLs automatically and, most importantly, convert a standard code file emitted by the IDE into a substantially smaller piece of source code. (Table 3 itemizes all the enhancements.) You generate code from the IDE and you run the Selenium server, just as described above. You modify the code file emitted by the IDE to use the Selenium Sushi library, letting you hide all the code that is not directly related to your test at hand. Finally, you plug the code file into the provide Visual Studio project template to provide the requisite infrastructure and then you run the tests just as you did with RC. Plus, you get workarounds for a couple Selenium bugs I discovered along the way.
|
Feature |
Selenium IDE |
Selenium RC |
Selenium Sushi |
|
Generate web page locators |
â |
||
|
Confirm web page elements from locators |
â (via Find button in table view) |
||
|
Record test case |
â |
||
|
Execute test case/suite in Firefox |
â |
â |
â |
|
Execute test case/suite in other browsers |
â |
â |
|
|
Execute a single test |
â (via context menu) |
||
|
Execute a portion of a test case |
â (via start points and break points) |
||
|
Execute a subset of test cases in a test suite |
â (via NUnit GUI) |
â (via NUnit GUI) |
|
|
Execute data-driven test cases (or other iterative test cases) |
â (via custom programming) |
â (via custom programming) |
|
|
Retarget browser without recompiling |
â (via .NET config file) |
||
|
Retarget web server without recompiling (e.g. QA vs. development vs. staging) |
â (via .NET config file) |
||
|
Report diagnostics: browser, environment, and other details |
â (e.g. in NUnit GUI output tab) |
||
|
Provides one-line to one-line mapping of IDE’s Verify… and WaitFor… commands (vs. multiple line code fragments repeated many times throughout the auto-generated code) |
â (requires manual editing) |
||
|
Handles file URLs automatically (RC allows file URLs, but must be coded differently than non-file URLs) |
â |
||
|
Supports relative file URLs (to allow different team members to have their local file tree in different locations on disk) |
â |
||
|
Provides Visual Studio project template |
â |
Table 3 Enhancements Provided by Selenium Sushi
Selenium Sushi is an open-source project that is, at the moment, available exclusively as a download from this article on Simple-Talk.com. The development team (namely, me 🙂 has gone the extra mile to package up all the bits and pieces into an easily digestible form for you, the reader. I welcome your questions (either at the bottom of this article or via email) but if you like Selenium Sushi, I welcome your contributions even more! The accompanying code archive contains the following:
- SeleniumTest folder: Visual Studio solution containing 4 projects (the library, the RC sample, the template, and the RC sample sprinkled with sushi) plus complete API documentation for the library (SeleniumTest\API\Index.html).
- Test Cases folder: contains the Selenium IDE test case from which all the samples in this article derive.
- Sample Web Page folder: used by the ExportToSushi sample, this contains an offline copy of a tiny fragment of the Simple-Talk.com home page as the Local environment target in contrast to the Production environment target of Simple-Talk.com itself.
Focus Your Visual Studio Qi[3]
Before transforming the raw, unadorned Selenium RC code into enhanced Selenium Sushi code, you need to prepare your Visual Studio project. Start by copying the project template into your solution and naming it as you see fit. In the accompanying code, I have named the new project ExportToSushi. Next, you need to customize the template to your needs. The Common\Setup.cs file lists all the values for the TestEnvironment enum: Local, QA, Development, Staging, or Production. Comment out the ones you do not wish to use; uncomment the ones you want. Then go into the project settings (Properties >> Settings page) and add or delete settings for home page and connection to match your selected TestEnvironment values. The template includes settings for Development and Production just as a sample. Once you have done those simple customizations, check that the (essentially empty) project compiles before proceeding further.
If you prefer to create your project from scratch, the additional steps are:
- Create a new class library project.
- Add all RC DLLs from C:\Program Files\Selenium\selenium-dotnet-client-driver-1.0.1 as project references.
- Add a reference to my open-source library (CleanCode.TestSupport.Selenium.DLL).
- Copy the Common folder and the MainTests folder from SeleniumSushiTemplate into your project and adjust the namespaces in Setup.cs and SuiteSetup.cs, respectively.
- Just as above, edit the clearly marked region in Common\Setup.cs to enable or disable the environments you want.
- Create project settings (Properties >> Settings page) for general settings (Environment, BrowserType, SeleniumPort) and environment-specific settings to match your Common\Setup updates (HomePage_* and Connection_*) where you replace the wildcard with any or all of the TestEnvironment choices (Local, QA, Development, Staging, or Production).
- If you plan to use the NUnit GUI, add a post-build event (Properties >> Build Events page) to copy your application’s config file to the project’s top-level directory (or wherever you plan to store the NUnit project file); here is the parameterized line I use verbatim in each project-Visual Studio takes care of plugging in the correct macro values:
copy “$(TargetDir)\$(TargetFileName).config” “$(ProjectDir)\$(TargetName).config”
Initial File Integration
Now you have a project framework that compiles, ready to accept tests. To migrate the sample file:
- Copy the ExportedTestCase.cs file into the MainTests folder of the ExportToSushi project and adjust its namespace to match (ExportToSushi.MainTests).
- Delete the designated Setup and TearDown methods, plus the two variable declarations, at the top of the file.
- Rename the class to MyTests to match the class name in SuiteSetup.cs. You may, of course, use a name of your own choice but also rename it in SuiteSetup.cs.
- Make the class partial since it is now split between SuiteSetup.cs and this file.
- Delete the [TestFixture] attribute on the class because it is already present in SuiteSetup.cs and may only appear once.
- Remove the first line of the test case (the selenium.Open(“/”) call); that is subsumed into the Setup.StartSelenium method.
- If you have recorded steps to login and/or to navigate to the page that your tests target, those should appear next in the code. Move those lines of code into the Login and Preliminaries methods in Setup.cs. The template project includes a few sample lines-replace those with your real lines. Update the values for username and password if you need to use them. Finally, in SuiteSetup.cs enable or disable the calls to Login and Preliminaries, as your needs dictate.
- What remains of the code should now be test commands interspersed with supporting action commands; all of the preliminary action should now appear in Setup.cs. The final step is to replace code chunks corresponding to test commands with Selenium Sushi library calls (as detailed next), restoring the simplicity and clarity of Selenium IDE within your code.
Restore the Balance between Selenium IDE and Selenium RC
Referring back to Figure 1, the IDE shows the first test command is waitForTextPresent. That command emitted this code:
|
1 2 3 4 5 6 7 8 9 10 |
for (int second = 0;; second++) { if (second >= 60) Assert.Fail("timeout"); try { if (selenium.IsTextPresent("regexpi:Privacy policy.*Terms and conditions")) break; } catch (Exception) {} Thread.Sleep(1000); } |
Replace that chunk of code with this Selenium Sushi call to restore a clean, simple, IDE-test-to-line-of-code mapping. This WaitForTextPresent method is an extension method encapsulating the above code to let you exactly mirror the test command from Selenium IDE in code:
|
1 |
selenium.WaitForTextPresent("regexpi:Privacy policy.*Terms and conditions"); |
The next test in Figure 1 is verifyText. The emitted code is this:
|
1 2 3 4 5 6 7 8 9 |
try { Assert.AreEqual("Home", selenium.GetText("//form[@id='aspnetForm']/div[2]/div/div[2]/div[1]/span")); } catch (AssertionException e) { verificationErrors.Append(e.Message); } |
If that had been an assertTest command instead of verifyText, you would have seen just this:
|
1 2 |
Assert.AreEqual("Home", selenium.GetText("//form[@id='aspnetForm']/div[2]/div/div[2]/div[1]/span")); |
The behavioral differences of assert vs. verify (see Table 1) account for the code difference. The static methods of NUnit’s Assert class throw exceptions that cause the current method to abort. In order to circumvent the abort when a verify command is used, Selenium code includes a trap for the exception wherein it postpones reporting the error until the end of the test case. Selenium Sushi encapsulates that functionality to eliminate clutter in your test case. The bottom line: replace the whole try-catch chunk of code with this, making both assert and verify commands symmetric:
|
1 2 |
Verify.AreEqual("Home", selenium.GetText("//form[@id='aspnetForm']/div[2]/div/div[2]/div[1]/span")); |
Repeat this cleanup for each test supported by Selenium Sushi, shown here with example arguments:
|
1 2 3 4 5 |
selenium.WaitForTitle("title text"); selenium.WaitForTextPresent("some text"); selenium.WaitForElementPresent("//div/table/tr/td"); Verify.AreEqual("some text", selenium.GetText("//td/font/b/i")); Verify.IsTrue(someBool); |
Since I have used only verify commands and no assert commands in the sample, this means all of them need cleanup. The net result: the original ExportedTestCase.cs file shrinks from 176 lines to 32 lines – a reduction of over 80%! (Note this is probably close to a best-case scenario; actually savings in your code will vary.) Figure 3 illustrates the entire test case (chopped off only on the right edge to fit publishing requirements). By encapsulating unnecessary details into library calls, the logic and intent of each test in the test case now reveals itself with the same clarity as in the Selenium IDE!
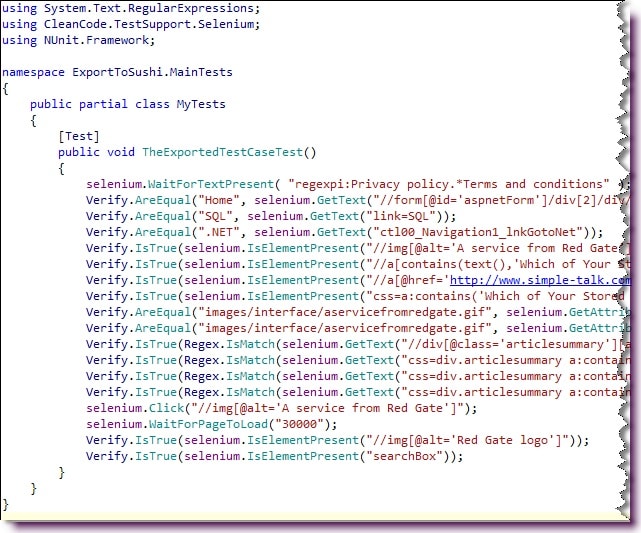
Figure 3 Sample Project’s Code Reformulated with the Selenium Sushi library
Running with Selenium Sushi
Just as with moving from IDE to RC, the next step is to confirm that you get the same results with Selenium Sushi. Open the NUnit project file (ExportToSushi.nunit) and-making sure you have the Selenium Server still running-run the tests. The test result comes much faster this time, almost instantly. No, Selenium Sushi does not have the capability of speeding of web testing a hundred-fold! Rather it is just telling you you forgot to initialize your configuration file. Figure 4 shows the NUnit output: the error shown in the top panel indicates that you have not specified an environment type.

Figure 4 NUnit GUI showing Selenium Sushi Has Not Yet Been Configured
If you open the ExportToSushi.config file in the root directory of the ExportToSushi project, look for the Environment setting (XPath: //ExportToSushi.Properties.Settings/setting[@name=’Environment’]). Change the None value to one of the valid values shown in Figure 4. Note that you could adjust the default value in your project settings so that upon compiling, your config file has a valid value but that is not advised. Setting the default value to None, as the SeleniumSushiTemplate does, has an important advantage: if you mistype a value at some later date when you are changing the value in your config file, NUnit will immediately report this to you, just as in Figure 4. This happens because if the .NET framework attempts to load an invalid value for a setting it assigns your default, in this case None. None is a special value that, while valid, is unusable so the system reports the problem. If, on the other hand, you set a default to Staging, for example, then later want to change to Development but you misspell it, the system would use the default Staging without reporting any problem so you would be testing on the wrong host!
Update the Environment setting in the config file to Production for the purpose of this test, because the home page for production is set to the same URL that the Selenium RC and Selenium IDE tests used-http://www.simple-talk.com. Also update the BrowserType setting in the config file to your browser of choice, otherwise NUnit will similarly balk that no browser has yet been specified. Be aware that when you recompile, the config is regenerated with the default values, effectively overwriting the changes you just made, so you should probably keep it open in an editor and just save it again with your non-default values. (If you are instead running from ReSharper inside Visual Studio, it uses your actual application settings rather than the root-level config file used by the NUnit GUI. So to run Selenium Sushi with ReSharper you must set your Environment and BrowserType in the settings (Properties >> Settings page) to a value other than None. (Be sure to set them back to None when you are ready to roll out your tests for the reason explained above.)
Go back to the NUnit window and reload the project (File >> Reload project); otherwise, NUnit will not see your updates to the config file. Run again and this time the tests should all execute. Unlike Selenium RC, which has a defect noted earlier for Assert.IsTrue results, the final report from Selenium Sushi matches all the errors from the original Selenium IDE test run.[4] (Per the footnote, the output for Assert.IsTrue and Verify.IsTrue is lacking context, so on my “to do list” is an item to add in overloads to those methods to provide context.)
But in this case, matching all the errors is not good enough! Recall that both IDE and RC had a defect-they aborted the test case if a locator in a verify command did not find its target on the web page. So far, Selenium Sushi is replicating that behavior. To remedy the bug, replace all GetText calls with the Selenium Sushi extension method, GetTextSafely. That is, change this:
|
1 2 3 4 5 6 7 |
Verify.IsTrue( Regex.IsMatch( selenium.GetText( "css=div.articlesummary a:contains('LINQ Lycanthropy: Transformations into LINQ')~div.articledetail2"), "Michael Sorens.*05 January 2011")); |
. . .to this:
|
1 2 3 4 5 6 |
Verify.IsTrue( Regex.IsMatch( selenium.GetTextSafely( "css=div.articlesummary a:contains('LINQ Lycanthropy: Transformations into LINQ')~div.articledetail2"), "Michael Sorens.*05 January 2011")); |
With that in place you eliminate the premature test case exit and you expose all such locator errors that Selenium Sushi includes in the final error report shown by either ReSharper or NUnit. It separates errors into two sections as shown; I have highlighted them in red here for clarity:
|
1 2 3 4 5 6 7 8 9 10 11 12 13 14 15 16 17 18 19 20 21 22 23 |
TearDown : NUnit.Framework.AssertionException : ******** Verify Errors: ******** [false] [false] [false] [false] [false] [false] [false] [false] [ String lengths differ. Expected length=4, but was length=3. Strings differ at index 3. expected:<"SQLx"> but was:<"SQL"> --------------^ ] ******** Selenium Errors: ******** [ERROR: Element //div[@class='articlesummary'][a[contains(text(),'Which of Your Stored Procedures are Using the Most Resources?')]] not found] [ERROR: Element css=div.articlesummary a:contains('Which of Your Stored Procedures are Using the Most Resources?')~div.articledetail2 not found] [ERROR: Element css=div.articlesummary a:contains('Showplan Operator of the Week - Merge Interval')~div.articledetail2 not found] [ERROR: Element css=div.articlesummary a:contains('LINQ Lycanthropy: Transformations into LINQ')~div.articledetail2 not found] |
The Verify Errors section reports errors from Verify commands-note this still suffers from the lack of context problem mentioned earlier. The Selenium Errors section reports the locator failures from GetTextSafely commands. Technically this latter group indicates problems with your test code itself rather than your application under test. If you wish to confirm that a locator points to an existing element, it is more appropriate to use the VerifyElementPresent command.
A final note about the NUnit GUI: It does not correctly render strings with embedded newlines; when the true generated output was the two dozen or so lines shown above, the NUnit GUI only shows the first couple lines! With another test I got perhaps 50% of the actual output. Thus, the amount of output you see varies with the text of the output. All is not lost, though, as there is a workaround: select all and copy it then paste into a text editor and the entire text reappears! (So the output is apparently present yet unseen; Heisenberg would be proud…) )
Retargeting Environments with Selenium Sushi
You have actually already seen how to retarget either your environment or your browser-just edit the project’s configuration file and change the Environment and BrowserType settings. To test against Internet Explorer instead of Firefox, simply change the BrowserType value in the config file from Firefox to IExplorer.
You can change the Environment setting in a similar fashion but it serves a somewhat different purpose. Think of the Environment setting as a routing mechanism; it reroutes both your application’s home page and its database connection, if any. This is quite handy to ensure that you get the same results in QA as you do on your staging server, for example.
To use this capability, you must specify in the config file where these values point to when switched. Then, in the Common\Setup.cs file you activate the corresponding data entries, choosing from any or all of the provided locations: Local, QA, Development, Staging, and Production. The sample project shows just two of these activated: Development and Production. In the initial Selenium Sushi tests you ran above, you set the value to Production. From the Setup file, you can see that this maps the home page to the HomePage_Prod setting.
|
1 2 3 4 5 6 7 8 9 10 11 12 13 14 15 16 17 18 19 20 21 22 23 24 |
/************************************************************************/ // adjust as needed for your supported environments private static Dictionary<TestEnvironment, string> HomePageMap = new Dictionary<TestEnvironment, string> { // { TestEnvironment.Local, Properties.Settings.Default.HomePage_Local }, // { TestEnvironment.QA, Properties.Settings.Default.HomePage_QA }, { TestEnvironment.Development, Properties.Settings.Default.HomePage_Dev }, // { TestEnvironment.Staging, Properties.Settings.Default.HomePage_Staging}, { TestEnvironment.Production, Properties.Settings.Default.HomePage_Prod } }; private static Dictionary<TestEnvironment, string> ConnectionStringMap = new Dictionary<TestEnvironment, string> { // { TestEnvironment.Local, Properties.Settings.Default.Connection_Local }, // { TestEnvironment.QA, Properties.Settings.Default.Connection_QA }, { TestEnvironment.Development, Properties.Settings.Default.Connection_Dev }, // { TestEnvironment.Local, Properties.Settings.Default.Connection_Staging}, { TestEnvironment.Production, Properties.Settings.Default.Connection_Prod } }; /************************************************************************/ |
With this setup you could also switch to Development, mapping to the HomePage_Dev setting. Observe in the settings that the value for HomePage_Dev looks like a file URL-except it is a relative file URL:
|
1 |
file: / / /.. /.. /.. /.. /.. /Code /Sample Web Page /simple-talk.htm |
These beasts do not exist in nature, as you may know. Selenium Sushi supports relative file URLs for convenience in your development environment. Typically your source code will be in source control and each developer on your team is free to check out the source tree in an arbitrary location. You might prefer C:\stuff\projects\priority_projects\here while your teammate might prefer it to be just at C:\. If a standard, absolute file URL was all you could use, that means each person has to customize-and leave checked out-a copy of the config file. So Selenium Sushi supports file URLs relative to your test case DLL. To make it even easier to find the right relative path, Selenium Sushi provides diagnostic output to guide you. Test output appears on the Errors and Failures tab. Switch over to the Text Output tab after you have executed a test to see Selenium Sushi’s diagnostic information for the test (Figure 5). Here you see your browser and environment settings. Of particular interest is the Home Page and the Current Dir lines. The current directory is the location of your test case DLL file. The relative URL for the home page is relative to that directory. The diagnostic output shows both the relative URL and the absolute URL that it resolves to, based on that current directory. By the way, if you get the relative URL wrong, NUnit will abort the test immediately and report the problem-there is no overhead waiting for Selenium to initialize, open a browser, then attempt to open the file URL and find it missing.
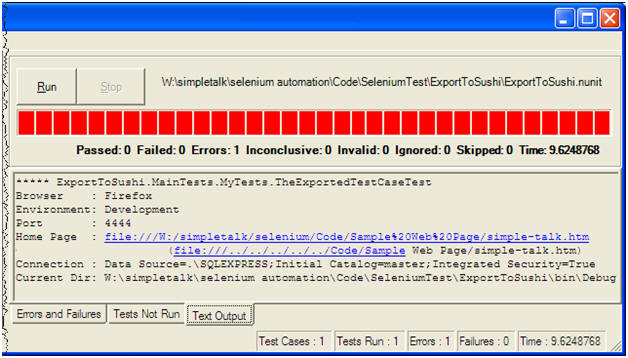
Figure 5 Diagnostics in NUnit GUI showing details of a Relative File URL Resolution
Selenium RC supports absolute file URLs so once Selenium Sushi has translated the relative URL to an absolute URL and confirmed it is a valid path, it only uses the absolute URL from that point on. A minor point to be aware of is that Selenium RC does not allow you to specify a file URL in the selenium constructor, where standard (non-file) URLs are specified; you must defer that to a later open call. You will see the chunk of code in Selenium Sushi’s StartSelenium method to handle this automatically for you.
Conclusion
In the short time I have been using Selenium I have found it to be an exciting tool; nevertheless, I quickly developed Selenium Sushi as I went along to make it more effective and efficient to work with. My intent was to make it a general enough platform enhancement to be a timesaver for others as well.
It is a work in progress but I felt Selenium Sushi was complete enough that it could be useful to people now. Some items that would be yet be worthwhile:
- Create a better Assert.IsTrue and Verify.IsTrue. As mentioned above, these have context in IDE, but no context in RC or Selenium Sushi, so need to provide some context.
- Add additional extension methods to support more IDE commands to avoid massive code duplication.
- Add support for SqlConnections; currently supports just OleDbConnections.
- Automation, possibly leveraging Selenium Grid.
- Properly document the CleanCode.TestSupport.Selenium code and publish the API on my open-source web site.
I will address some or all of these as time allows. If you would like to contribute, you are most welcome to-drop me a line.
If you are intrigued by Selenium, be sure to also take a look at Selenium Grid, an enhancement to drastically reduce test time by running tests on a grid of computers in parallel. Also, be aware of the Selenium Conference coming up soon in San Francisco!
Fine Print:
This article was developed with Visual Studio 2010, ReSharper 5.1, NUnit 2.5.9, Selenium IDE 1.0.10, and Selenium RC 1.0.3. The bug icon used several times is courtesy of Microsoft’s free clip art repository at http://office.microsoft.com/en-us/images/results.aspx?qu=insects.
Footnotes
[1]Traditional sushi is rice commonly topped with a wide variety of other ingredients. In the same vein, I chose Selenium Sushi to convey the variety of enhancements this library and template provides for Selenium. (Also because of its alliterative appeal. 🙂
[2]Upon further investigation I determined that when Assert.IsTrue fails, it throws an AssertionException with an empty Message! On the other hand, Assert.AreEqual correctly fills in the exception Message detailing the discrepancy. To see this change the first “SQL” in this line to “SQLx” to make it fail, then rerun the test:
|
1 |
Assert.AreEqual("SQL", selenium.GetText("link=SQL")); |
[3]Qi, also spelled in English as chi or ch’i, is the energy force of all living things. Perhaps it is silly to wax philosophic about code design and development, but developing reliable, clean code is more of an art than a science. Raw Selenium RC code is frequently not harmonious with its repetitive chunks of code. Selenium Sushi really does restore its balance.
[4]Selenium Sushi’s results are better than RC’s results by reporting “Error:false” when Verify.IsTrue fails. Unfortunately, it still suffers from an unavoidable artifact: the IDE output shows each test line being executed providing context for the terse “Error: false” message. Here, you do not have context, just the error message. As a contrast, again change the first “SQL” in this line to “SQLx” to make it fail, then rerun the test, so you can see that this, at least, gives sufficient detail:
|
1 |
Verify.AreEqual("SQLx", selenium.GetText("link=SQL")); |
This document contains proprietary information and is protected by copyright law.
Copyright © 2026 Red Gate Software Limited. All rights reserved
Load comments