
About two and a half years ago I wrote a series of blog posts documenting the work my team had done to automate our build process. We had completed a migration from VSS to SVN and used a combination of nAnt and CruiseControl to facilitate continuous integration and push-button deployments to any of our environments including production.
Over the last couple months, I’ve had the opportunity to put together an automated deployment process for my current organization at Microsoft. Throughout my career, I’ve worked on a few projects that were essentially a rewrite of a similar project that I had worked on in the past for a different employer. What I love about this type of project is that it is a great opportunity to do so many things better. I can remember those architectural decisions I had made and regretted; but was too far in to easily change (usually a smell of an architectural weakness itself). Well now I can avoid them and approach it from the angle I wished I had before. This was an opportunity to do the same thing with the system for automating our builds.
Although I was pleased with the system that I had put together previously, I now had better tools at my disposal. I still think nAnt and CruiseControl are fine tools, but now I’m using PowerShell with PSake instead of nAnt, TeamCity instead of CruiseControl and our source code is now in Mercurial instead of SVN. The other major difference between the system I’m building now and the one I had worked on before is that this system also includes the automation of server setup and configuration, bringing a clean OS to a full functioning application node serving any tier in the app (web, database, admin, etc.)
This article is intended to provide an overview of the new system without diving into the detail.
Do you really need an automated build and deployment system?
Yes. You do.
You may be thinking that, while an automated system sounds neat, you simply don’t have time to build one. While I tend to be very pragmatic in my approach to software architecture, I definitely see automated deployments as being essential rather than a luxury. The reason I say this is that by using manual, rather than automated, deployments, you will cause more time to be lost in the mechanics of deploying and there is far more risk of a bad deployment and there is more difficulty and time spent in troubleshooting deployments.
Often, teams do not recognize the value of automated deployments until they experience them. Once they work with one, they can’t imagine going back. With automated build and deployments, the drama of deployments is reduced to a simple routine task and teams have more time to focus on building features. The business has more confidence that their features will move forward reliably and consistently. If you want to release more often and perhaps extend continuous integration to continuous deployment, you simply must automate the deployment process.
If they are so important, why did it take you over two years to start building one?
This is a fair question. I don’t intend to enumerate the political reasons, of which there are many. That will have to wait for my memoire due out in 2042, “My life, a love song,” please keep an eye out for that one.
Throughout my tenure in the MSDN/Technet organization at Microsoft, deployments have been managed by a combination of test and a “build team” in the Ops group. Although I have certainly been vocal in pushing for more automation, I was wary of forcing the pace of change because other people do most of the work and that there was resistance from some to the idea of automating the process. There were certainly pain points along the way. There was a lot of ceremony involved in preparing for a deployment and in scheduling “hot fixes” with the build team. When there were problems with a deployment, it could sometimes be difficult to determine where things went wrong.
Recently, we made a transition to a new offshore vendor company. One of their responsibilities would be deployments and setting up new environments. Because these were mostly done manually, the logistics involved were often communicated verbally and via large step by step Word documents.
Without going into the details, a lot fell through the cracks as the new team came on-board. I do not fault the people on this team, I wouldn’t expect anyone to be able to build an environment for a complex app that they have never worked on before based on a few phone conversations and a SharePoint wiki. Our environment setups and deployments suddenly started having problems. Because a large part of the code I am involved with spans over several apps, I am often approached when things go wrong here and before long I found myself spending most of my time troubleshooting and fixing environments and their deployments. It soon became crystal clear that, until an automated system was in place, this would continue to stand in the way of me getting real feature work done; and instead of whining and complaining about it, I decided to just do it.
What exactly does a automated build and deployment system do?
For the system I set out to build, the following key components are included:
- Application compilation and packaging
- Deployment of application packages to various environments
- Bootstrap scripts for setting up a new server or environment
The last one has inspired a new personal side project, Autobox, that sets out to automate the building of a developer machine (or any kind of personal machine) from bare OS via a single command line. After all, if I can create a test server with SQL Server, app fabric caching, various Windows services, and web applications along with all the file permissions and firewall rules involved, certainly I can create my own machine with all my preferred apps and settings ready to go.
Lets examine each of these individually.
Application compilation and packaging
This is, essentially, the process that transforms the raw application bits with all of its code files, static assets, SQL scripts, configuration files, and other application-specific files into a zip file that can be consumed by the deployment scripts. This package, in our case, is typically composed of a directory for each application tier. Here is the package for our Galleries application:
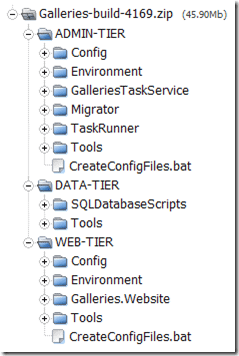
The packaging process is responsible for the actual compilation which typically involves a call to MsBuild and which invokes the appropriate MsBuild tasks from the original Visual Studio solution. In addition to transforming the source files to compiled DLLs, the packaging process copies everything that is needed in order to deploy the application into a coherent directory structure and nothing more. This typically includes PowerShell scripts and various command line tools that run SQL scripts to update the database with any schema changes, adds metadata to lookup tables or migrates old data to conform to new schema or logic. It may also include scripts responsible for transforming web.config and app.configs with settings that are appropriate for the environment.
This first step of the build and deployment process had been in place for quite some time, so I just had to make some minor tweaks here and there. The individual application teams in my group are responsible for keeping the packaging scripts up to date and it is wired into our continuous Integration process. Every push of source code to the central Mercurial repository forces our build server, Teamcity, to invoke a set of scripts that include compilation, running unit tests and finally packaging. TeamCity then saves the zipped package and makes it available to the deployment scripts. If you are familiar with Teamcity, you know that this is the build “Artifacts.”
Deployment of application packages to various environments
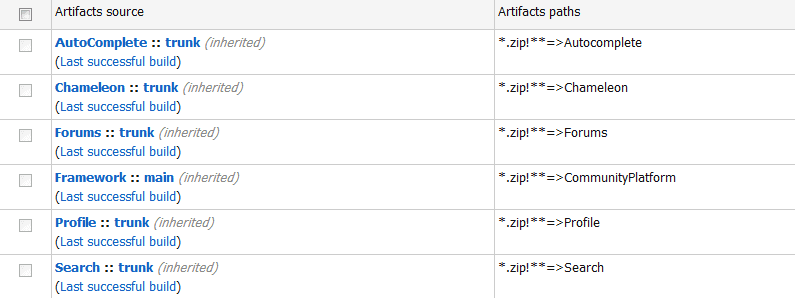
Here is where my work largely started. Until recently, we had a script that TeamCity would invoke twice a day which would collect the packages of each app and aggregate them into another package for each deployable environment. This uses the “dependencies” feature of TeamCity. In your TeamCity build settings, you can state that your build is dependent on another build or group of builds. In our case and as illustrated below, we had six depedent builds that would be aggregated into a master build package. The “artifacts” of the last successful build of each dependent build is unzipped and placed in a named directory relative to the working directory of the master build. For example, the deployable artifacts of the Forums application are unzipped and placed in a directory named Forums that the master build script can reference via “forums\…”
So in our case, we would have application packages for Forums, Search, Profile and various internal services as seen above and these would all be rolled into a single 7z file for each environment including test, staging, production, etc. This packaging script was also responsible for the final transformation of the configuration files. It would merge those settings that are specific to each environment into the web and app configs so that the final package, say prod-7791.7z (7791 being the build number), had the exact web and app configs that would end up in production.
Well this would take two and a half hours to run. Back in the day, it was fairly fast; but as environments got added, the process took longer and longer. It would then take the build team a couple hours to take this package and deploy its bits to each server, run the database upgrade scripts, stop and restart services, smoke test, etc. This could become more and more painful the closer we got to release. This was because, as or when the developers would fix bugs, it could take one to two days before they received feedback from test on those bugs.
Revamping this was fairly straightforward. I rewrote this script to transform the configs for only a single environment which it would receive via a command parameter from TeamCity. I created a separate build config in TeamCity to make this very clear:
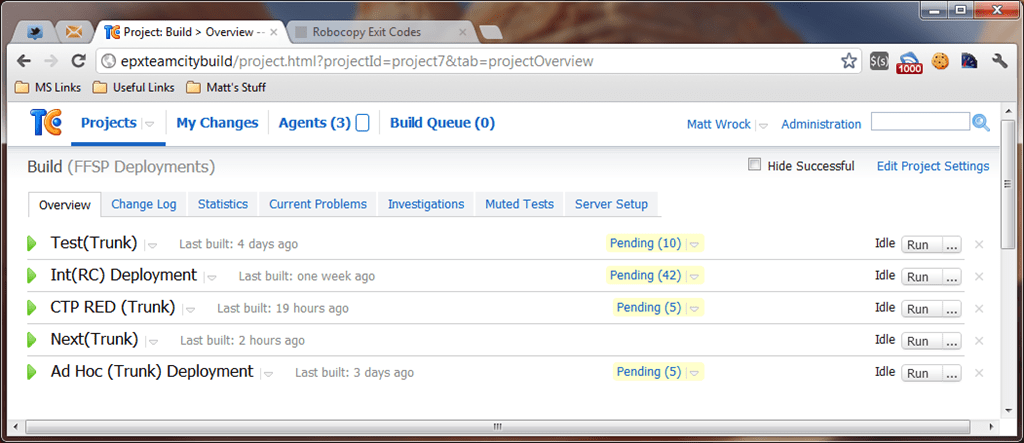
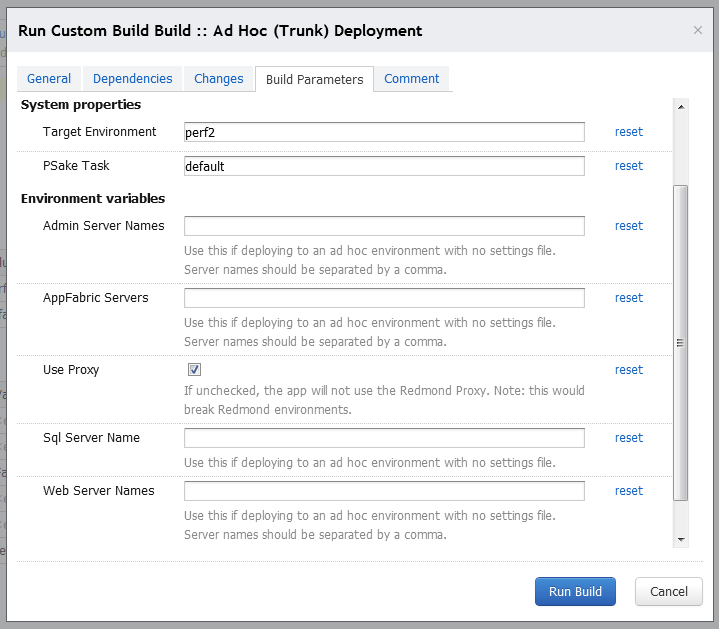
Each of these build configurations run the exact same script but they each pass different command line arguments to the build script so as to indicate their environment. Also, some are wired to different Version Control branches. For example, our Int (Integration) environment builds off of the Release Candidate branch while the others build off of Trunk. Finally there is an “Ad Hoc” config where anyone can run a custom build with custom command line parameters. If the Ad Hoc build fails no one is notified and we don’t get particularly alarmed. Here is how the command line parameters are wired up for custom builds in TeamCity:
The script is a normal PowerShell script that gets called via psake. Psake provides a very nice PowerShell-based container for running builds. Think of it as an alternative to writing an MSBuild script. While MSBuild is more XML-based and very declarative in nature, PSake allows you to script out all of your build tasks in PowerShell. This makes a lot of sense for the type of things that a build script does – such as copying files around. I’m not going to dive into a PSake tutorial here but here is a snippet of my PSake script:
|
1 2 3 4 5 6 7 8 9 10 11 12 13 14 15 16 17 18 19 20 21 22 23 24 25 26 27 28 29 30 31 |
properties { $current = Resolve-Path .\default.ps1 | Split-Path $path = $current $BuildNumber = 0 $ConfigDrop = ".\_configs" $WebDrop = "HTTP" $Environment = "DEFAULT" $configVariables = New-Object System.Collections.Queue } Include .\psake\teamcity.ps1 task default -depends Package task Configs -depends Copy-readme, SetupEnvironment, Configure-Social, Configure-StoApps, Configure-Services, Configure-SocialServices task Package -depends SetupEnvironment, Clean, Configs, Database, preparesearch, SocialSites, StoApps, SocialServices, StopServices, Services, CopyConfigs, StartServices, FlushRequestReduce, RestartIIS, RestartAppFabric, TestPages, CleanEnvironment TaskSetup { TeamCity-ReportBuildStart "Starting task $($psake.context.Peek().currentTaskName)" } TaskTearDown { TeamCity-ReportBuildFinish "Finishing task $($psake.context.Peek().currentTaskName)" } Task SetupEnvironment { .\Utilities\EnvironmentSetup.ps1 $current $Environment $configVariables } |
This is not any kind of special scripting language. It is normal PowerShell. PSake provides a PowerShell module which exposes several functions like Task, Properties, etc. Many of these take script blocks as parameters. The PSake module really is not very large and therefore it does not take much investment to understand what it does and what functionality it provides. It really does not provide much “functionality” at all, in terms of utility methods, but it provides a very nice framework for organizing the various parts of your build script and for specifying dependencies.
The snippet above is the beginning of my deployment script. The Properties section defines and sets script-wide variables that can be overridden via command line parameters when calling PSake. Next are my tasks. Tasks might actually do something like the SetupEnvironment task at the bottom. Or they might alias a group of tasks to be run in a specific order like the default, Configs and Package tasks. If you are familiar with MSBuild, these are simply the equivalent of MSBuild targets.
When you call PSake, you can tell it to run a specific task or, if you do not, it will run the default task. Even though I am only including a small part of my script here, it is easy to tell what the deployment script does by simply looking at the dependencies of the default task. It first sets up the environment by calling another PowerShell script that will set a bunch of global environment variables specific to the Environment property. It performs a task to clean traces of any previous build, it transforms the configs, and runs the database scripts. Then it executes several tasks that copy different directories to the web server, stops some windows services, copies the services code, starts the services, restarts IIS, runs some quick tests to make sure the apps are loading and finally cleans up after itself.
One nice thing about this script is that it does not use any kind of remoting. This can be important in some environments. The script can be run directly from the build agent (the server running the TeamCity Build Agent service) and target any environment. Instead of remoring, it requires that the Service Identity under which TeamCity runs is an administrator on the target web servers and SQL Servers. To give you a glimpse into what is going on here, I specify all of the server names that are specific to each environment in a config file named after the environment. So our Next (daily build) environment has a file called Next.ps1 that among many other things contains:
|
1 2 |
$global:WebServers = "RR1STOCSAVWB18", "RR1STOCSAVWB17" $global:ServicesServer = "RR1STOCSAVWB17" |
Then my RestartIIS task looks like this:
|
1 2 3 4 5 6 7 8 9 |
Task RestartIIS { Restart-IIS $global:WebServers } function Restart-IIS([array] $servers) { foreach ($server in $servers) { .\Utilities\RemoteService.ps1 ($server -split "\\")[0] restart -service "W3SVC" } } |
RemoteServices.ps1 contains a bunch of functions to make working with services on remote servers less painful.
Did the deployment succeed?
At any point in the scripts, if an error occurs, the build will fail. However, I also want to have some way to quickly check each application and ensure they can at least load. It is very possible that the build script will complete just fine, but there may be something in the latest app code or some change to the environment that would cause an application to fail. If this happens, I want to know which app failed, fail the build and provide straight forward reporting to testers to discover where things broke down. Yes, each app build has its own set of unit tests. Most apps have thousands but there are a multitude of issues, both code-related and server or network-related, that can slip through the cracks and cause the app to fail.
At the end of every deployment, a series of URLs are “pinged” and expected to return a 200 HTTP status code. Currently we have 28 URLs in our tests. Now a big reason for overhauling this system was to make it faster. This meant that we were concerned that we would profoundly slow the build process by launching a bunch of app URLs. To try to make this as efficient as possible, we use PowerShell jobs to multi-thread the HTTP requests and set a 5 minute timeout that will automatically fail all tests that do not complete before the timeout.
Here is the testing script:
|
1 2 3 4 5 6 7 8 9 10 11 12 13 14 15 16 17 18 19 20 21 22 23 24 25 26 27 28 29 30 31 32 33 34 35 36 37 38 39 40 41 42 43 44 45 46 47 48 49 50 51 52 53 54 55 56 57 58 59 60 61 62 63 64 |
task TestPages -depends SetupEnvironment { . .\tests.ps1 Wait-Job -Job $openRequests -Timeout 300 foreach ($request in $openRequests) { TeamCity-TestStarted $request.Name $jobOutput = (Receive-Job $request) if($jobOutput -is [system.array]) {$jobOutput = $jobOutput[-1]} $testParts = $jobOutput -split " ::: " if($testParts.Length -eq 2) { $testMessage=$testParts[1] $testTime=$testParts[0] } else { $testMessage=$testParts[0] $testTime=300 } if($request.state -ne "Completed") { TeamCity-TestFailed $request.Name "Timeout" "Test did not complete within timeout." } Remove-Job $request -Force if ($testMessage -like "Failed*") { TeamCity-TestFailed $request.Name "Did not Recive a 200 Response" $testMessage } TeamCity-TestFinished $request.Name $testTime } } function Ping ([string] $pingUrl) { $jobArray = @() $job = Start-Job -scriptblock {param($url) $host.UI.RawUI.BufferSize = New-Object System.Management.Automation.Host.Size(8192,50) $ms = (Measure-Command { $web=[net.HTTPwebrequest]::create($url) $web.AllowAutoRedirect = $true $web.PreAuthenticate = $true $web.Timeout = 300000 $systemWebProxy = [net.webrequest]::GetSystemWebProxy() $systemWebProxy.Credentials = [net.CredentialCache]::DefaultCredentials $web.Proxy = $systemWebProxy $web.Credentials = [net.CredentialCache]::DefaultCredentials try { $resp=$web.GetResponse() } catch [System.Net.WebException]{ $resp=$_.Exception.Response $outerMessage = $_.Exception.Message $innerMessage = $_.Exception.InnerException } }).TotalMilliseconds $status = [int]$resp.StatusCode if ($status -ne 200) { $badServer = $resp.Headers["Server"] Write-Output "$ms ::: Failed to retrieve $url in $ms ms with status code: $status from server: $badServer" Write-Output $outerMessage Write-Output $innerMessage } else { Write-Output "$ms ::: Succeeded retrieving $url in $ms ms" } } -name "$pingUrl" -ArgumentList $pingUrl $jobArray += $Job return $jobArray } |
The individual test URLs are in the dot sourced tests.ps1:
|
1 2 3 4 5 6 |
$openRequests += Ping "HTTP://$global:ServicesUrl/ChameleonService/Api.svc" $openRequests += Ping "HTTP://$global:AdminUrl/ChameleonAdmin/" $openRequests += Ping "HTTP://$global:ServicesUrl/SearchProviderServices/SearchProviderService.svc" $openRequests += Ping "HTTP://$global:ProfileApiUrl/ProfileApi/v1/profile/displayname/vamcalerts" $openRequests += Ping HTTP://$global:UserCardLoaderUrl ... |
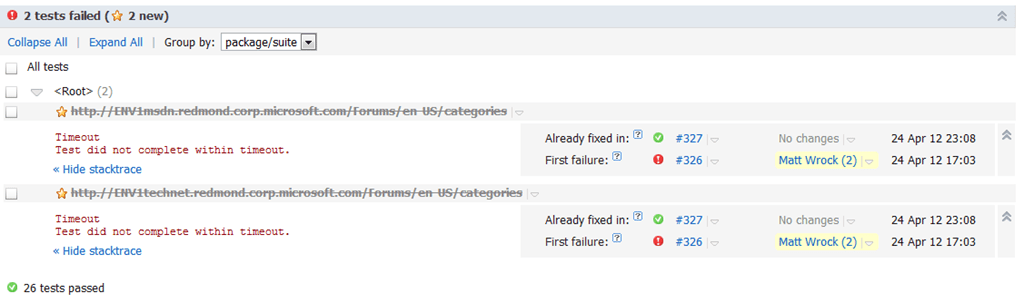
An interesting thing to note here is the use of the functions beginning with TeamCity-. These are functions coming from a module provided by the pake-contrib project that exposes several functions that allow you to interact with TeamCity’s messaging infrastructure. The functions I am using here create standard output messages formatted in such a way that TeamCity will treat them like test output reporting when a test starts and finishes, as well as if it succeeded or failed, and how long it took. What is really nice about all of this is that now these tests light up in TeamCity’s test reporting:
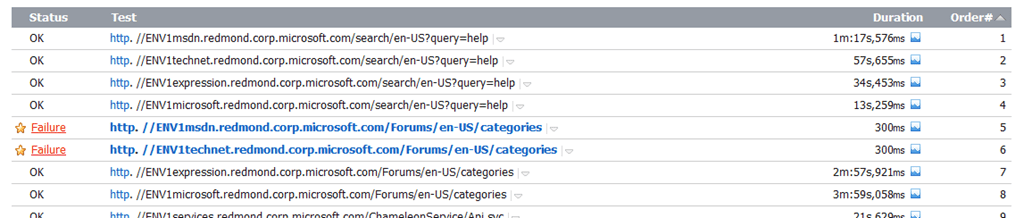
I can zoom in on my failed tests to see why they failed:
Pretty slick eh?
Bootstrap scripts for setting up a new server or environment
In my original Perfect Build series of blog posts, I did not include automation around setting up servers or environments. However one of the habits I picked up from the teams I work with at Microsoft is the inclusion of a build.bat file at the root of every source code repo that can build a development environment from scratch. In the past I had never followed this practice. I had not really used PowerShell and was not aware of all the possibilities available. Basically, you can do pretty much anything in PowerShell. I’ll admit that there is a learning curve involved but it is well worth climbing it. Being able to fire up a development environment for an app with a single command has proven to be a major time saver and a great way to “document” application requirements.
Now, it’s one thing to get a development environment up and running, but getting a true server environment up can be more challenging. Since many organizations don’t give developers access to the server environments, setting these up often becomes a responsibility of server operations. This may involve dev sending ops instructions, or sitting down with an ops engineer to get a server up and running. A lot of time can be lost here and it’s easy to forget to properly update these instructions. I have, personally, spent an aggregate of weeks troubleshooting environments that have not been set up correctly.
One solution that is commonly employed here is to use VM images. Once you get an environment set up the way it is supposed to be inside of a VM, take a snapshot and simply apply that snapshot whenever you need to setup a new server. I don’t like this approach. It is too easy for VM images to become stale and they don’t serve well to “document” all of the requirements of an application. The fact is, just about anything can be scripted in PowerShell and, in my opinion, if it cannot be scripted then you have probably made a poor choice in technology. PowerShell scripts can replace “deployment documents” or server setup documents. They should be readable by both developers and server support engineers. Even if one is not well versed in PowerShell, I believe any technical professional should at least be able to read a PowerShell script and deduce the gist of what it is doing.
For my applications, I put together a script, again in psake format, that can build any application tier from a bare OS. It can also build a complete environment on a stand alone server. To provide an idea of what my script can do, here is the head of the psake script:
|
1 2 3 4 5 6 7 8 9 10 11 12 13 14 15 16 17 18 19 20 21 22 23 24 25 26 27 28 29 30 31 32 33 34 35 36 37 38 39 40 41 42 43 44 45 46 47 48 49 50 51 52 |
properties { $currentDir = Resolve-Path .\cleansetup.ps1 | Split-Path $profile = "$currentDir\CommApps\Profile" $forums = "$currentDir\CommApps\Forums" $search = "$currentDir\CommApps\Search" $chameleon = "$currentDir\CommApps\Chameleon" $configVariables = New-Object System.Collections.Queue IF ( TEST-PATH d:\) { $HTTPShare="d:\HTTP" } else { $HTTPShare="c:\HTTP" } $env = "test" $appFabricShareName = "velocity" $buildServerIdentity = "Redmond\Idiotbild" $domain = "redmond.corp.microsoft.com" $buildServer = "EpxTeamCityBuild.redmond.corp.microsoft.com" $buildServerQueue = "bt51" $doNotNeedsBits = $false $addHostFileEntries = $false $sqlServer = $env:computername $appFabricServer = $env:computername $AdminServer = $env:computername $restartSuffix = "" $noProxy = $true } Include .\psake\teamcity.ps1 task default -depends standalone task standalone -depends Setup-Proxy, Set-EnvironmentParams, Pull-Bits, Setup-Roles, Disable-InternetExplorerESC, Database-server, Install-IIS-Rewrite-Module, Install-Velocity, Setup-MSDTC, Install-Event-Sources, Install-Certificates, Setup-Response-Headers, Register-ASP, Wait-For-Bits, Setup-IIS, Add-DB-Perms, Configure-Velocity, Install-WinServices, Set-Queue-Perms task WebAppCache-Server -depends Setup-Proxy, Set-EnvironmentParams, Pull-Bits, Setup-Roles, Configure-Group-Security, Install-IIS-Rewrite-Module, Install-Velocity, Setup-MSDTC, Install-Event-Sources, Install-Certificates, Setup-Response-Headers, Register-ASP, Wait-For-Bits, Setup-IIS, Add-DB-Perms, Configure-Velocity, Install-WinServices, Set-Queue-Perms task AppFabric-Server -depends Setup-Proxy, Set-EnvironmentParams, Setup-Roles, Configure-Group-Security, Install-Velocity, Configure-Velocity task Web-server -depends Setup-Proxy, Set-EnvironmentParams, Pull-Bits, Setup-Roles, Configure-Group-Security, Install-IIS-Rewrite-Module, Setup-MSDTC, Install-Event-Sources, Install-Certificates, Setup-Response-Headers, Register-ASP, Wait-For-Bits, Setup-IIS, Add-DB-Perms task Admin-Server -depends Setup-Proxy, Set-EnvironmentParams, Pull-Bits, Setup-Roles, Configure-Group-Security, Install-IIS-Rewrite-Module, Setup-MSDTC, Install-Event-Sources, Setup-Response-Headers, Register-ASP, Wait-For-Bits, Setup-IIS, Add-DB-Perms, Install-WinServices, Set-Queue-Perms task Database-Server -depends Set-EnvironmentParams, Configure-Group-Security, Install-SqlServer, Create-Databases task Post-Restart-Full -depends Set-EnvironmentParams, Remove-Startup, Configure-Velocity, Install-WinServices, Set-Queue-Perms task Post-Restart -depends Remove-Startup, Configure-Velocity task Get-Bits -depends Set-EnvironmentParams, Pull-Bits, Wait-For-Bits |
By looking at the tasks, you can get a feel for all that’s involved at each tier. First let me say that this script took about 20x more effort to write than the deployment script. I’m proud to report that I mastered file-copying long ago. Once I finally managed to figure out the difference between source and destination, it’s been smooth sailing ever since. This script really taught me a lot about not only PowerShell but also a lot about how the windows OS and many of the administrative apps work together.
If I had to identify the step that was the biggest pain in the butt to figure out, by far and away it was installing and configuring AppFabric. This is Microsoft’s distributed caching solution formerly known as Velocity. One thing that makes it tricky is that, at least in my case, it requires a reboot after installation and before configuration. I certainly do not want to include our entire server setup script here but let me include the AppFabric portion. Again keep in mind this is coming from a psake-consumable script. So the tasks can be thought of as the “entry points” of the script while the functions serve as “private” helper methods to those from more formal programming languages.
|
1 2 3 4 5 6 7 8 9 10 11 12 13 14 15 16 17 18 19 20 21 22 23 24 25 26 27 28 29 30 31 32 33 34 35 36 37 38 39 40 41 42 43 44 45 46 47 48 49 50 51 52 53 54 55 56 57 58 59 60 61 62 63 |
task Install-Velocity -depends Install-DotNet4 { $global:restartNeeded = $false Start-Service -displayname "Windows Update" if (!(Test-Path "$env:windir\system32\AppFabric")){ $dest = "appfabric.exe" if (Is64Bit){ $url = "HTTP://download.microsoft.com/download/1/A/D/ 1ADC8F3E-4446-4D31-9B2B-9B4578934A22/WindowsServerAppFabricSetup_x64_6.1.exe" } else{ $url = "HTTP://download.microsoft.com/download/1/A/D/ 1ADC8F3E-4446-4D31-9B2B-9B4578934A22/WindowsServerAppFabricSetup_x86_6.1.exe" } Download-File $url (join-path $currentDir $dest) ./appfabric.exe /i "cachingservice,cacheclient,cacheadmin" Start-Sleep -s 10 $p = Get-Process "appfabric" $p.WaitForExit() $global:restartNeeded = $true } else { Write-Host "AppFabric - Already Installed..." -ForegroundColor Green } } task Configure-Velocity -depends Create-Velocity-Share, Install-Velocity { if($global:restartNeeded -eq $true -or $global:restartNeededOverride -eq $true) { RebootAndContinue } Load-Module DistributedCacheConfiguration $clusterInfo = Get-CacheClusterInfo "XML" "\\$env:computername\$appFabricShareName" if( $clusterInfo.IsInitialized -eq $false ) { new-CacheCluster "XML" "\\$env:computername\$appFabricShareName" "Medium" Register-CacheHost -Provider XML -ConnectionString "\\$env:computername\$appFabricShareName" -CachePort 22233 -ClusterPort 22234 -ArbitrationPort 22235 -ReplicationPort 22236 -HostName $env:computername -Account "NT AUTHORITY\Network Service" Add-CacheHost -Provider XML -ConnectionString "\\$env:computername\$appFabricShareName" -Account "NT AUTHORITY\Network Service" Load-Module DistributedCacheAdministration use-cachecluster -Provider XML -ConnectionString "\\$env:computername\$appFabricShareName" New-Cache ForumsCache -TimeToLive 1440 Set-CacheClusterSecurity -SecurityMode None -ProtectionLevel None start-cachecluster netsh firewall set allowedprogram $env:systemroot\system32\AppFabric\DistributedCacheService.exe APPFABRIC enable } } function Is64Bit { [IntPtr]::Size -eq 8 } function Download-File([string] $url, [string] $path) { Write-Host "Downloading $url to $path" $downloader = new-object System.Net.WebClient $downloader.DownloadFile($url, $path) } function RebootAndContinue { $global:restartNeededOverride = $false Copy-Item "$currentDir\post-restart-$restartSuffix.bat" "$env:appdata\Microsoft\Windows\Start Menu\programs\startup" Restart-Computer -Force } |
Now there are several ways to configure AppFabric and this just demonstrates one approach. This uses the XML provider and it only installs the caching features of AppFabric.
Installing applications with Chocolatey
One “rediscovery” I made throughout this process is an open source project built on top of Nuget called Chocolatey. This is the brain child of Rob Reynolds who is one of the original creators of what we know of as Nuget today and was once called Nu before development was handed off to Microsoft and Outercurve. I say “rediscovery” because I stumbled upon this a year ago but didn’t really get it. However it really makes sense when it comes to build/setup automation whether that is an application server or your personal machine.
Chocolatey is a framework around the processes of installing and setting up applications via silent installations. Many of the apps that you and I are accustomed to manually download then launch the installer and click next, next, next, finish, are available via Chocolatey’s public feed. In addition to its own feed, it exposes the web platform installer’s command line utility so that any application available via the web platform installer can be silently installed with Chocolatey. Since it really just sits on top of Nuget, you can provide your own private feed as well.
So lets look at exactly how this works by exploring my setup script’s bootstrapper:
|
1 2 3 4 5 6 7 8 9 10 11 12 13 14 15 16 17 18 19 20 21 22 23 24 25 26 27 28 29 30 31 32 33 34 35 36 37 38 39 40 41 |
param( [string]$task="standalone", [string]$environment="test", [string]$sqlServer = $env:computername, [string]$appFabricServer = $env:computername, [string]$AdminServer = $env:computername, [string]$domain = "redmond.corp.microsoft.com", [switch]$doNotNeedBits, [switch]$addHostFileEntries, [switch]$skipPrerequisites, [switch]$noProxy ) iex ((new-object net.webclient).DownloadString('HTTP://bit.ly/psChocInstall')) if(-not $skipPrerequisites) { .$env:systemdrive\chocolatey\chocolateyinstall\chocolatey.cmd install hg if( test-path "$env:programfiles\Mercurial" ) { $mPath="$env:programfiles\Mercurial" } else { $mPath = "${env:programfiles(x86)}\Mercurial" } if( -not( test-path $env:systemdrive\dev )) { mkdir $env:systemdrive\dev } set-location $env:systemdrive\dev if( test-path socialbuilds ) { set-location socialbuilds .$mPath\hg pull .$mPath\hg update } else { .$mPath\hg clone HTTPs://epxsource/SocialBuilds set-location socialbuilds } } if($task -eq "standalone") {$addHostFileEntries=$true} if($task -ne "AppFabric-Server") {$restartSuffix="Full"} ./psake/psake.ps1 cleansetup.ps1 -tasklist $task -properties @{env=$environment;sqlServer=$sqlServer; appFabricServer=$appFabricServer;AdminServer=$AdminServer;domain=$domain; doNotNeedBits=$doNotNeedBits;addHostFileEntries=$addHostFileEntries; restartSuffix=$restartSuffix;noProxy=$noProxy} |
Notice these key lines:
|
1 |
iex ((new-object net.webclient).DownloadString('HTTP://bit.ly/psChocInstall')) |
This Downloads and installs Chocolatey and then here is an example of using chocolatey to download the Mercurial source control client:
|
1 |
.$env:systemdrive\chocolatey\chocolateyinstall\chocolatey.cmd install hg |
I should point out that under most circumstances, the above line could simply be:
|
1 |
cinst hg |
Chocolatey’s install puts itself in your path, and creates some aliases that makes this possible; but because I use Chocolatey here in the same script that installs Chocolatey, the environment variables it sets are not available to me yet. I’d need to open a new shell.
As a side note, I use chocolatey all the time now. If I need to hop on a random box and install a tool or set of tools, I now just launch a few lines of PowerShell and its all there. At Microsoft I often get asked for source code to my repos by fellow employees who are unfamiliar with Mercurial. I have found that sending an email like this is very effective:
“Hi Phil,
You can get that from HTTPs://epxsource/Galleries. We use Mercurial. The easiest way to get everything you need is to launch this from PowerShell as admin:
|
1 2 3 |
iex ((new-object net.webclient).DownloadString('HTTP://bit.ly/psChocInstall')) .$env:systemdrive\chocolatey\chocolateyinstall\chocolatey.cmd install hg $env:programfiles\Mercurial\hg clone HTTPs://epxsource/Galleries |
This will install Mercurial and clone the galleries repo.
Matt”
How cool is that? No Mercurial tutorial needed and sometimes I get a reply back telling me what a cool script that is. I should really forward the compliment to Rob Reynolds since he was the one who, basically, wrote it.
So this really makes the consumption of my server setup script simple. As you can see, it basically clones (or updates) my script repo on the target machine where the script runs. This also means that, if I commit changes to my script, rerunning this script on the box will automatiucally pull in those changes. To simplify things further, I provide a batch file wrapper so that the script can be launched from any command line:
|
1 2 3 4 |
@echo off PowerShell -NonInteractive -NoProfile -ExecutionPolicy bypass -Command "& '%~dp0bootstrap\bootstrap.ps1' %*" |
The only thing this does is to call the PowerShell bootstrap.ps1 script (the one listed before) but key to this call is:
|
1 |
-ExecutionPolicy bypass |
Without this and assuming this script is being run on a fresh box, the user would get an error trying to run most PowerShell scripts. This prevents any scripts from blocking and suppresses all warnings regarding the security of the scripts. Often you will see advice that suggests that you use “unrestricted”. However, I have found that “bypass” is better especially since I have had issues with setting the execution policy to ‘unrestricted’ on Windows 8. According to the documentation on execution policies:
Bypass
– Nothing is blocked and there are no warnings or prompts.
– This execution policy is designed for configurations in which a Windows PowerShell script is built in to a a larger application or for configurations in which Windows PowerShell is the foundation for a program that has its own security model.
This seems to match the use case here.
The one liner setup call
So now, as long as I put my batch file and bootstrap.ps1 on a network share accessible to others who need to use it, simply typing this at any command prompt will kick off the script:
|
1 |
\\server\share\bootstrap.bat |
By default, with no command line parameters passed in, a standalone setup will be installed. In my case, it takes about an hour to complete and I have a fully-functioning set of applications when finished.
Making this personal
I’ve been very impressed with what I can get done in PowerShell, and by the ease with which I can install many applications using Chocolatey. This has inspired me to create a personal bootstrapper which I have been tweaking over the past several weeks. It is still very rough and there is much I want to add but I’d like to craft it into a sort of framework allowing individuals to create sort of “recipes” that will serve up an environment to their liking. We are all VERY particular about how our environments are laid out and there really is no ‘one size fits all’.
If you are interested in seeing where I am going with this, I have been keeping it at Codeplex here. Right now this is really about setting up MY box, but it does do some interesting things such as to download and install windows updates, turn off UAC (that dialog box that you may have never clicked “no” on) and makes Windows Explorer usable by changing the defaults and showing me hidden files and known extensions. Here is the script for the windows explorer “fix”:
|
1 2 3 4 5 6 7 8 9 |
function Configure-ExplorerOptions([switch]$showHidenFilesFoldersDrives, [switch]$showProtectedOSFiles, [switch]$showFileExtensions) { $key = 'HKCU:\Software\Microsoft\Windows\CurrentVersion\Explorer\Advanced' if($showHidenFilesFoldersDrives) {Set-ItemProperty $key Hidden 1} if($showFileExtensions) {Set-ItemProperty $key HideFileExt 0} if($showProtectedOSFiles) {Set-ItemProperty $key ShowSuperHidden 1} Stop-Process -processname explorer -Force } |
So I hope you have found this helpful.
See also Matt’s blog posts in the same vein…
The Perfect Build Part 3: Continuous Integration with CruiseControl.net and NANT for Visual Studio Projects
A couple months after migrating to subversion, Matt’s team took another significant step to improve their build...
The Perfect Build Part 1
A year ago, Matt’s team was using Visual Source Safe as their version control repository...
The Perfect Build Part 2: Version Control
Over a year ago, Matt’s team was using Visual Source Safe (VSS) for version control!.
This document contains proprietary information and is protected by copyright law.
Copyright © 2026 Red Gate Software Limited. All rights reserved
Load comments