
Contents
- Part 2: File Operations and Subversion Filtering
- File Operations in Subversion-space
- Filtering and Selection
Introduction
This is the second part of the TortoiseSVN and Subversion Cookbook series, a collection of practical recipes to help you navigate through the occasionally subtle complexities of source control with Subversion and TortoiseSVN, its ubiquitous GUI front-end. This part begins with recipes on managing files: adding, deleting, renaming, and moving, all from a Subversion perspective. The second major section focuses on adding files, providing tools and techniques for determining what to include in source control and how to quickly and efficiently filter out the “noise”.
Reminder: Refer to the Subversion book and the TortoiseSVN book for further reading as needed, and as directed in the recipes below.
Part 2: File Operations and Subversion Filtering
TortoiseSVN adds Subversion-awareness to Windows Explorer (or equivalent) by the addition of cleverly implemented context menus. In fact, context menus constitute almost the entirety of the user interface for TortoiseSVN. Enigmatically, TortoiseSVN installs a shortcut in your start menu simply labeled “TortoiseSVN”. But if you select it all you get is the pop-up in Figure 2-1.
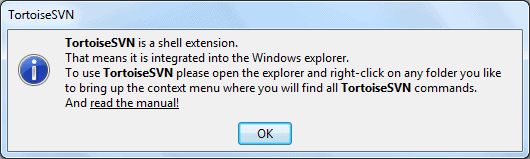
Figure 2-1 The informative pop-up displayed if you attempt to overtly execute TortoiseSVN
In practice, TortoiseSVN actually exists as a duality. You can work locally where your operations fall under the two-stage process documented in Part 1 (see Understanding the two-stage process of Subversion). Thus, moving, copying, renaming, adding, etc., done in Windows Explorer, are not published until you do a commit to synchronize your local changes with the repository. Or you can work in the repository, done with the repository browser (repo-browser for short), where each operation is committed as you perform it. (Though you have a safeguard: you are prompted for a commit reason each time and you can cancel the operation if you wish.)
The repo-browser looks quite similar to Windows Explorer except you are operating on the repository. And there are no toolbars. You perform any of the operations shown below either by context menu or by drag-and-drop, as indicated:
|
Action |
Context menu |
Context menu |
Drag-and-drop |
|
Open |
• |
||
|
Edit |
• |
||
|
Show log |
• |
• |
|
|
Blame |
• |
||
|
Checkout |
• |
• |
|
|
Delete |
• |
• |
|
|
Rename |
• |
• |
|
|
Copy |
• |
• |
Ctrl + left drag |
|
Move |
left drag |
||
|
Copy/move and rename |
Ctrl + right drag |
||
|
Save unversioned copy |
• |
• |
|
|
View/edit properties |
• |
• |
|
|
Create new |
• |
||
|
Import |
• |
||
|
View differences |
• |
(The information in this table is just a clever re-organization of the text in The Repository Browser section of the TortoiseSVN book.)
The choices you get on the context menu depend on whether you are operating on files or folders, and how many of them you have selected (Figure 2-2).
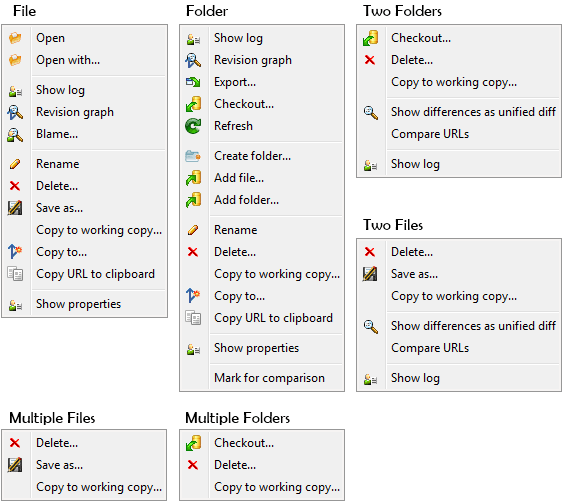
Figure 2-2 All the context menu permutations depending upon, well, context.
File Operations in Subversion-space
Adding a file or folder to source control
You can add files or folders in a number of ways.
If your files are within a versioned directory then you just select the files, open the context menu, and select SVN Add.
If your files are outside your working copy tree, then drag them with the right mouse button and select SVN Copy and add files to this WC from the resulting context menu. Note that, as of version 1.6, this works only for files, not for folders. If you try this with a folder you will get an error stating Access is denied. In version 1.7, the operation works for a folder-but only for the folder, none of its contents! (That is as of version 1.7.1, but it smells like a defect to me.)If you want to add a folder and its contents, however deep, first copy the folder into your working copy, if it is not there already. Right-click on the folder and select SVN Add. The Add dialog displays the folder and all of its descendants (Figure 2-3). Just check or uncheck the items you want to include.
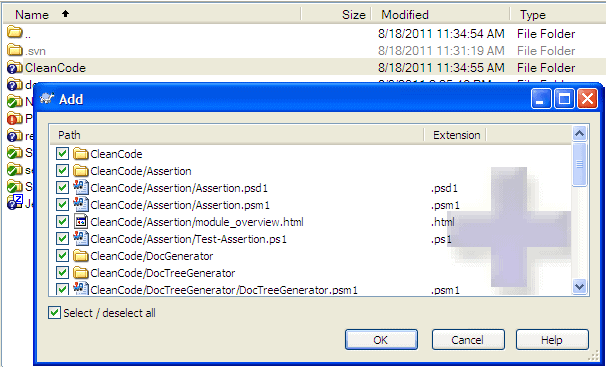
Figure 2-3 The Add dialog in TortoiseSVN allows refining the set of files to add to the repository.
Whichever way you add the files, follow this with SVN Commit to publish your results to the repository. (See Understanding the two-stage process of Subversion for more details.)
Deleting a file or folder from source control
To remove the selected objects from your working copy, select one or more files or folders in Explorer before you select SVN Delete from the context menu. Just as when adding a file, there is a second step that performs a commit, which then deletes the object from the repository. If you are deleting a folder then the next step is exactly analogous: Once again, open the context menu on the folder (now marked with a delete icon overlay) and select SVN Commit. If, on the other hand, you are deleting a file, you cannot open its context menu to commit it-the file is no longer present! It was removed when you did the SVN Delete. Instead, you must go to the containing directory (or any ancestor) and commit the deletion(s) from there. Figure 2-4 illustrates this for a single folder and a single file. The folder remains, with only its icon changed while the file disappears.
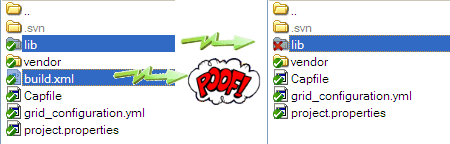
Figure 2-4 Item Deletion: Folders remain visible but files disappear from your local file system (so committing the delete must be done on a parent).
You’ll notice that this recipe removes a file from both your working copy and from the repository. To leave your working copy untouched but still delete from the repository, see Unversioning Specific Files.

“Deleting… without using the SVN Delete command… likely will produce unexpected results [for both files and folders, but more so for folders].”
Though there is nothing to prevent you from deleting a file or folder within Windows Explorer (or equivalent) without using the SVN Delete command, it adds unnecessary complication and likely will produce unexpected results. If you delete a file and then invoke SVN Commit, it is likely to do what you expect: delete the file from the repository. But if you do an SVN Update before you commit, Subversion restores the file: This happens because, as far as Subversion is concerned, the versioned file is simply absent from your working copy and the job of Update is to synchronize you with the repository; if you had used SVN Delete this restore would not happen. If, on the other hand, you delete a folder without using SVN Delete, you will not be able to commit. The only thing you can do is an SVN Update to correct the linkages and restore the folder. See Deleting, Moving and Renaming in the TortoiseSVN book for more.
Moving or copying a file
Open Windows Explorer, or equivalent, so that you have access to your source location and your destination location at the same time: This will allow you to drag from the source to the destination. Typically you could do this by enabling the folders pane and expanding the folder structure to expose your destination while setting the files pane to show your source. Alternately, you could use two separate Explorer windows, one for source and one for destination.
Select one or more files or folders from your source and drag them over the target by depressing the right-mouse button rather than the left. Upon releasing the mouse button, besides the standard copy, move, and shortcut buttons, the context menu will also include several Subversion commands, as shown in Figure 2-5. Note that your target folder must be part of your working copy; if you right-click and drag to a plain folder, then the Subversion commands will not be present!
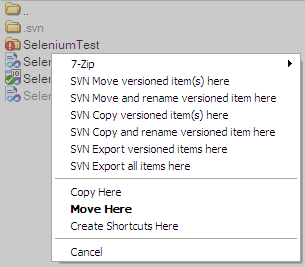
Figure 2-5 TortoiseSVN’s context menu upon dragging and dropping with the right mouse button, displaying a variety of ‘move’ and ‘copy’ options.
Depending on your selection you may see a subset of the 6 commands here:
- If you have selected multiple objects, you will not see the …and rename choices.
- If you have not included any folders in your selection, you will not see the export choices. (I find it slightly odd that TortoiseSVN does not allow you to export just files when, if you include a folder in the selected group, then it exports the files just fine!)
Selecting either Move command is almost as if you are doing two separate steps: an Add operation in the target and a Delete operation from the source. The difference is that doing a move (or copy) in Subversion preserves the object’s history across the move.
Just as with the Add or Delete recipes earlier, you must then commit the changes you have made to complete the move. Ideally, find a common parent of the source and target so that you can commit both the addition and the deletion in the same revision and enter a single log message. It is better to show this:
19653 Moved file xyz from \here to \there.
…than this:
119653 Deleted file xyz from \here as part of a move.
19654 Added file xyz to \there as part of a move.
You can also move or copy files in your working copy with traditional cut-and-paste. As described at Copying/Moving/Renaming Files and Folders in the TortoiseSVN book, use the standard Windows Cut (or Copy) command to put the items on the clipboard, then open the context menu in your destination folder and select TortoiseSVN >> Paste to move (or copy) the items. You should not use the standard Windows Paste command here; it will paste the file but not as a Subversion-aware file.
One caveat: do not use SVN Move on a folder referencing an external object; that would delete the external object from its parent repository. Rather, in this case use standard Windows operations to move the file, then adjust its svn:externals property.
Renaming a file
Normally you can just use SVN Rename on the context menu. This is analogous to the Move command described in the Moving or Copying a file recipe. It is almost as if you are doing two separate steps: an Add operation with the new name and a Delete operation of the old name. The difference is that doing a rename in Subversion preserves the object’s history across the rename. Because there are two portions-a delete and an add-it is imperative that you commit on the parent folder (or above) rather than just committing the newly added file. Otherwise, you leave the supposedly deleted file still present in the repository and thus still present to everyone else on your team.
“Because there are two portions [to a move or a rename]-a delete and an add- it is imperative that you commit on the parent folder … rather than just committing the newly added file.”
If you want to move the file to a different directory in addition to renaming it, you can do this in one step as detailed in the Moving or Copying a file recipe using the SVN Move and Rename command.
For the special case of renaming where you are in reality only changing the case of one or more letters, your operating system determines what you need to do. On a case-sensitive system (e.g. Linux) there is no complication so you can use the standard SVN Rename from the context menu. On a case-insensitive system such as Windows, however, you must use the repo-browser. First make sure the file is committed to the repository. Then open the repo-browser and rename the file there. Close the repo-browser and do an SVN Update to refresh your working copy with the new casing. (See the info from the TortoiseSVN FAQ.)
As with deleting, moving, and copying, a rename of a file should be done with TortoiseSVN commands. Not only does this preserve the history as mentioned above, but it saves you several steps. If you rename outside of TortoiseSVN you would then have to SVN Add the “new” file, commit that, plus commit the deletion of the now obsolete “old” file. An IDE that is properly integrated with Subversion will likely do a proper rename. But some IDEs will probably allow you to rename files but they will be plain renames, not Subversion-aware renames. TortoiseSVN provides a graceful way to handle this: within either the Commit or Check for Modification dialogs. Firstly select the old name-showing a missing status-and the new name-showing a non-versioned status then secondly open the context menu and select Repair move (reference: Repairing File Renames). As shown in Figure 2-6, TortoiseSVN does all the bookkeeping corrections to convert these to a linked delete-add pair, the way a rename or move should appear. And note that this is all local-nothing goes to the repository until you do an explicit commit, so you can revert everything if you like. Just a couple caveats: To see the non-versioned file in the list you must check the Show unversioned files in the bottom left corner of the dialog. Also, the Repair move option will only appear if the first file is missing and the second file is not versioned. If you, for example, do a separate SVN Add on the “new” file, you will not see the repair option on the context menu.
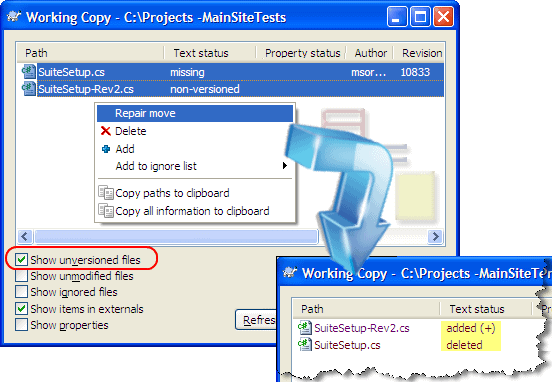
Figure 2-6 TortoiseSVN provides a convenient shortcut for repairing a non-Subversion-aware move.
Filtering and Selection
Determining what to keep in source control
The question of what files to add to your repository is hotly debated and will not be resolved anytime soon. Nonetheless, here is a general guideline:
Include everything to recreate a given release but no more.
That is, you should include enough items in source control so that you are able to do a clean checkout from your repository and successfully rebuild your project. By being overly parsimonious with your inclusions, you may make it impossible to revert to an earlier release.
Translating the above straightforward guideline into practice makes it seem a bit less straightforward:
- Include all the source code files written by you (or other team members). If, for example, you are developing in C# with Visual Studio then include all the *.cs files included in your solution/project.
- Include files that are generated by your IDE at design-time. For example, when creating a WinForms form in Visual Studio called MainForm, you will create MainForm.cs and the IDE will spawn an associated MainForm.designer.cs that should also be included in source control.
“…you should include enough items in source control so that you are able to do a clean checkout from your repository and successfully rebuild your project. Overly parsimonious inclusions may make reverting to an earlier release impossible.”
- Exclude those files that are generated at compile-time. A Visual Studio project, for example, puts all compiler-generated files in two presumably binary directories, obj and bin. Anything under those directories should be excluded.
- It is worth repeating the last point for a special case: exclude files generated at compile-time even if they are source files! A WPF project in Visual Studio, for example, where you have a XAML file IntroForm.xaml that spawns an associated IntroForm.g.i.cs, which is technically a source code file. This file is created in the obj directory, though, a good indicator that you should not include it in source control.
- Include third-party libraries. If you have source to your third-party libraries, treat it as if it was your source, and follow point (1). If you do not have source, include the third-party binaries. Point (3) indicates you should not include your own binaries, but it is quite appropriate to include third-party binaries.
- Include or exclude IDE settings files on a case-by-case basis.
- A Visual Studio solution, for example, consists of two settings files, name.sln (solution) and name.suo (solution user options). The name.sln file is an XML file that specifies what constitutes your project and is absolutely vital to be included. The latter is a binary file that records ephemeral settings including breakpoints and so forth. You can safely delete the file at any time (when the solution is closed!) and it will be automatically recreated the next time you open the .sln file. The .suo file should not be included in source control both because of its dynamic nature and more importantly because your copy will surely differ from your team member’s copy and, if you commit it to your repository, you will overwrite your neighbor’s settings with your settings the next time he/she does an SVN Update.
- For a perspective on the Eclipse IDE, see the StackOverflow question Do you keep your project files under version control? that discusses things like .project, .classpath, and more. The contributor VonC makes a particularly salient point that IDE settings “…often includes static code analysis rules which are vitally important to enforce consistently…”
- Do not include files which contain absolute paths because those paths will assuredly vary between team members. If you find you need to include such a file see if there is a way to use relative paths instead.
- Avoid including files personal preferences such as tab size, color schemes of your IDE windows, and so forth. In Visual Studio, this includes files with a *.user suffix. As mentioned above, these types of files will cause problems for other team members.
- Include your build tools. This recommendation is controversial, but as you are likely very well aware a new version of a tool can sometimes break your build. The conservative approach to guarantee the ability to recreate a release suggests including the build tools.
- Review the StackOverflow question What to put under version control? and its tendrils for more ideas and a healthy debate on the controversies.
Subversion has a powerful facility for ignoring files once you decide they are extraneous. See the next few recipes.
Ignoring files locally and/or globally and what’s the difference
TortoiseSVN Settings affect your private view with the global ignore pattern (global to all your working copies, not global in the sense of affecting your other team members). Thus, the global ignore pattern always applies to all folders you have checked out. The global ignore pattern is a set of file or folder name patterns (i.e. no paths!) separated by spaces. Specific names may be used as well as wildcard syntax. See Global ignore pattern and Pattern Matching in Ignore Lists in the TortoiseSVN book for more. As a way to jumpstart the task of defining your global ignore pattern, here are a couple technology-specific guidelines: see the StackOverflow question Best general SVN Ignore Pattern for.NET projects or What should I configure SVN to ignore in my Delphi projects? for, well, Delphi projects.
When you update your ‘global ignore’ pattern and close the settings dialog you will probably expect it to just work, of course, meaning that the objects in question should no longer have the unknown icon overlay (a question mark) but should now have no icon overlay. The first thing you will notice is that the icon overlays still appear in Windows Explorer. You might naturally assume then that the objects were not correctly specified in the ‘global ignore’ list but, that is not the case. TortoiseSVN has honored your request where it counts (just not with the icon overlays), in that you will not see the objects you that indicated should be ignored if you open the Commit dialog or the Check for Modifications dialog and select show unversioned files. TortoiseSVN will eventually re-sync the icon overlays to be correct as well. If you want to give that little nudge, though, you should execute TortoiseSVN >> Clean Up on the parent directory to resynchronize your icon overlays so it will show you the same information as the other dialogs I’ve already mentioned.
The second method of ignoring objects is via the ignore list property of each folder. In contrast to the global ignore list affecting everything on your local machine privately, this affects the public view-what your team members see, but it applies to a single, specific file or folder.
To muddle the distinction just a bit, at the time you define the ignore list you can choose to apply it to just the current folder or (recursively) to the current folder plus all child folders. Either way, you may elect to target a specific file or a file pattern (specifying all files with a particular extension).
It is important to be aware that ignoring files is only relevant to unversioned files. To put that another way, ignoring files is a one-time event at the time that you add a file. Ignoring Unversioned Items in the Subversion book describes this succinctly:
“Subversion’s support for ignorable file patterns extends only to the one-time process of adding unversioned files and directories to version control. Once an object is under Subversion’s control, the ignore pattern mechanisms no longer apply to it. In other words, don’t expect Subversion to avoid committing changes you’ve made to a versioned file simply because that file’s name matches an ignore pattern-Subversion always notices all of its versioned objects.”
See Ignoring Files and Directories in the TortoiseSVN book for more information.
So what should be global to you (‘global ignore’ pattern) and what should be global to your team (‘published ignore’ lists) ? In theory, a file that every team member has-but should always ignore-should be on a ‘published ignore’ list. That way, you never have to worry about a new team member coming along and forgetting to configure his/her settings correctly and thus inadvertently committing such a file. Except, of course, that when you add a new directory to source control you have to remember to add the ‘ignore’ property to that directory since ignore rules are directory-specific (e.g. for something like thumbs.db, which could potentially be created by the OS in any directory). You might want to be extra-cautious and ignore certain file extensions with both ignore mechanisms.
Ignoring files in a single directory
TortoiseSVN provides a convenience menu command to add either a specific file or all files with a certain extension: TortoiseSVN >> Add to Ignore List >> file.ext or *.ext. Invoking that command modifies the Subversion properties of the parent directory. (Like all Subversion commands, this affects your working copy only. You must then commit the parent to publish those changes to the repository.)
Ignoring files throughout your working copy
In order to ignore, for example, all files in your working copy tree ending with .bak, you would modify Subversion properties just like in the previous recipe, but you do it through a different route, and you apply it to more than one directory simultaneously.
Open the subversion properties (TortoiseSVN >> Properties) of the root of the subtree that you wish to affect. This may be your working copy root if you want to apply the change throughout your entire working copy. Add or edit an entry for the svn:ignore keyword. Figure 2-7 shows an example where I have specified to ignore an obj subfolder as well as all files with a .user or .bak extension.
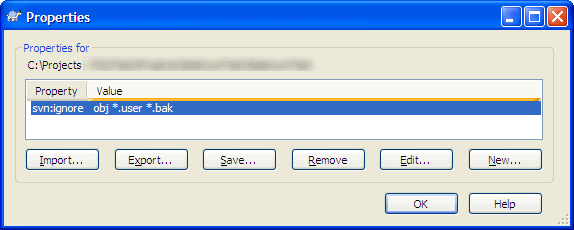
Figure 2-7 The TortoiseSVN Properties menu item reveals the current properties set on a particular file or folder.
The secret, though, is in the specification–when you define the patterns to ignore, select the recursive choice as indicated in Figure 2-8.
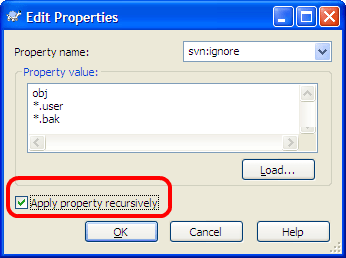
Figure 2-8 Apply an svn:ignore filter to every child folder when you enable the recursive checkbox indicated.
Unfortunately, there is one catch to this method: In my example, I had previously specified to ignore obj and *.user and I was adding just the *.bak pattern. When I apply recursively, it does not apply just the change (*.bak) but everything in the svn:ignore keyword (obj, *.user, and *.bak) to all subfolders. At first glance, that seems perhaps a bit cumbersome but not necessarily harmful. But wait! It can, in fact, be detrimental-if you have already established svn:ignore values on one or more child objects. The recursive action in the above dialog does not add to any existing svn:ignore values-it replaces them! Say, for example, your target root is C:\one\two and you want to ignore *.bak files. But if you are already ignoring *.tmp files in C:\one\two\three, the recursive application wipes out the existing svn:ignore value on C:\one\two\three and replaces it with the new set which, in this case, is *.bak.
You can use the following PowerShell script to report any child folders have non-empty ignore lists:
|
1 2 3 4 5 6 7 8 9 |
Import-Module CleanCode/EnhancedChildItem Get-EnhancedChildItem . -Recurse -ContainersOnly -Svn | % { if ($p = (svn propget svn:ignore $_.FullName)) { $_.FullName + " => " + $p } } |
This script uses a module from my open-source CleanCode PowerShell library that adds useful options to Get-ChildItem. You can select just the folders that are under Subversion source control so the code in the (implicit) loop merely has to check for existing svn:ignore values.
This document contains proprietary information and is protected by copyright law.
Copyright © 2026 Red Gate Software Limited. All rights reserved
Load comments