
Sandcastle Help File Builder (SHFB) generates professional API documentation from the XML comments in your .NET source code. You write documentation using XML doc-comment elements (like <summary>, <param>, <returns>, and <example>) directly in your C# or VB.NET code, and SHFB compiles these into navigable help files in formats including HTML websites, CHM files, and Microsoft Help Viewer. This guide covers the complete workflow: writing effective XML comments, automating comment creation with tools like GhostDoc, configuring SHFB for your project, embedding HTML and code samples, resolving common issues, and integrating documentation generation into your build process.
Contents
- XML Documentation Comments: First Look.
- Doc-Comment Elements.
- Automate Your Doc-Comment Creation.
- The Problem of Documentation Generation.
- Sandcastle Help File Builder
- Running Sandcastle Help File Builder
- Sandcastle Help File Builder Configuration: First Look.
- Rules for Embedding HTML..
- Sandcastle for NDoc Users.
- Sandcastle Considerations.
- Browser Flexibility.
- Storage Requirements.
- Performance and Inheritance.
- Issues Deploying on Linux/Unix.
- Disambiguating and Resolving <see> References.
- Verbosity of <see> Elements.
- Referencing Generic Types in <see> Elements.
- Displaying Sample Code.
- Style Choices and Code Display Issues.
- Using Favicons in Your Generated Web Site.
- Rendering Issue with Unresolved Links.
- File Naming Conventions.
- Specifying Debug or Release Configuration.
- Finding What You Missed.
- Documenting Namespaces.
- Conclusion.
- Read also: .NET debugging without Visual Studio
Imagine it: You’ve spent months developing your new .NET application. At some point, you want to take an action within your application whenever files in a certain directory are changed by another process external to your program. You think about coding this “directory watcher” from scratch but, just as you are about to get started with the design, you come across the System.IO.FileSystemWatcher class. The hyperlink I have attached to that class name takes you to one entry point into the vast MSDN documentation collection for the API of .NET itself. The FileSystemWatcher does just what you need. Yet another building block from .NET now saves you substantial time, money, and effort towards reaching your goal. But having the building block is only half the story-the information on how to use it-the API-is the other half. If that comprehensive MSDN documentation wasn’t there to provide usage details, then most of you would find ways to cope: You might, for example, fire up .NET Reflector, examine class and method signatures or do some experimentation. Essentially what you would be doing-whether you write it down or not-is “documenting” the API for your own needs. Now, if you multiply the time you spend doing so by hundreds or thousands of other developers duplicate your effort, you’ll understand the scale of the wasted time. Because Microsoft took the time and effort to create and publish the API for all of the .NET libraries, this saves a huge amount of man-hours of work for you and other .NET developers. You want to extend the same courtesy to your potential user community, or fellow team-members.
The process to do this is quite poorly documented!
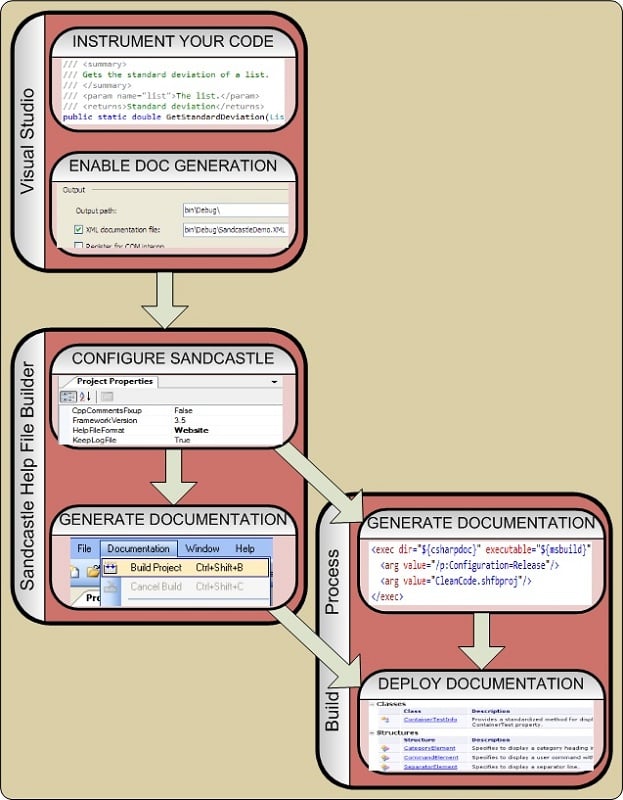
Figure 1 Integrating Sandcastle into your Build Process
The bulk of your work is documenting your code in Visual Studio. You then use SHFB to configure your documentation set and build it either from the GUI or from your build process to realize your finished documentation.
XML Documentation Comments: First Look
Documentation comments (or doc-comments) are comments in your code formatted with special markup to allow machine recognition during the build to propagate the information to two important consumers: the code editor’s Intellisense and the API generation that is the focus of this article.
Figure 2 illustrates how doc-comments support Intellisense for your custom classes. Say, for example, you have started typing “clo” in either the “before” or “after” frame. Intellisense pops up and indicates the first such item is ClockBackColor. Before doc-comments were added to the source code, the tooltip for ClockBackColor does not provide much additional information, just the base type Color. But after adding comments to the library and recompiling, the tooltip in this code that uses the library now shows a description.

Figure 2 How Doc-Comments Integrate into Intellisense
The top frame shows how Intellisense recognizes your library component but nothing more. Once you have it documented, Intellisense can give the user more information as shown in the bottom frame.
This added description came from adding special comments to the source code. Here’s the relevant code I typed in:
|
1 2 3 4 5 6 7 8 |
/// <summary> /// Sets the background color of the clock display. /// </summary> public Color ClockBackColor { get { return clockBackColor; } set { clockBackColor = value; clockLabel.BackColor = clockBackColor; } } |
The contents of that <summary> element appear in the Intellisense tooltip-and only the contents of the <summary> element-other elements you add for your external documentation set will not appear in Intellisense. For the doc-comments to contribute either to Intellisense or to external documentation, however, you must explicitly enable XML documentation generation in your project properties-see Figure 3 (Note that you are enabling the XML documentation generation for your library project, not for your application that consumes the library.)
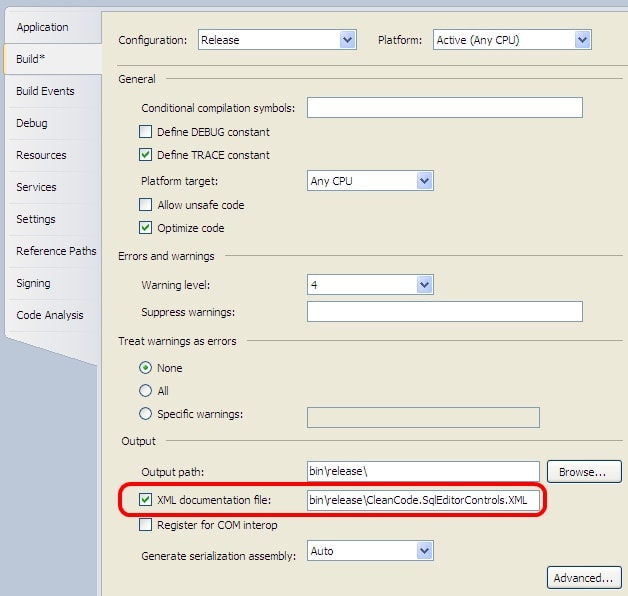
Figure 3 Enabling Documentation Generation in Visual Studio
Doc-Comment Elements
The example above showed just the <summary> doc-comment tag, which is the most used tag because virtually every member (class, method, property, event) you create must have one. The table below shows all the other tags you need to create effective and complete documentation.
|
Tag |
Usage is… |
Purpose |
|
Main Sections |
||
|
<summary> |
Required |
A short (usually one-line) description of the member. This appears at the top of the member’s web page as well as on its parent summary pages. For example, the <summary> of a method appears on its parent Methods page while the <summary> of a class appears on its parent Namespace page. Also used to populate an Intellisense tooltip for the object when embedded in a larger project. |
|
<remarks> |
Optional |
A detailed description of the member. |
|
<example> |
As needed |
A substantial example in its own section; trivial examples could be included in the <remarks> section. |
|
<seealso> |
As needed |
Adds a link to associated documentation. |
|
Member Descriptions |
||
|
<param> |
Required for each parameter |
Describes a parameter of a method. Also displayed in Intellisense. |
|
<typeparam> |
Required for each generic type parameter |
Describes a type parameter of a generic type or method. |
|
<returns> |
Required for each method that returns a value |
Describes the return value of a method. |
|
<exception> |
Optional |
Describes an exception that could be thrown by a method. |
|
<value> |
Required |
Describes the value that a property represents. |
|
<permission> |
Optional |
Documents the access level of a method. |
|
Text Elements |
||
|
<include> |
As needed |
Block-level element. Embed all or part of another file into the current doc-comments. |
|
<para> |
As needed |
Block-level element. Defines a paragraph. |
|
<list> |
As needed |
Block-level element. Creates a list in one of several different formats. (Note that the MSDN page lists bullet, number, or table lists, but does not include the definition list. See discussion here). |
|
<code> |
As needed |
Block-level element. Specifies to format the content as code. |
|
<c> |
As needed |
Inline element. Specifies to format the content as code. |
|
<see> |
As needed |
Inline element. Defines a link to a page within the same documentation set (cref attribute) or to an external web page (href attribute). |
|
<paramref> |
As needed |
Inline element. References a parameter of a method. |
|
<typeparamref> |
As needed |
Inline element. References a type parameter of a generic type. |
For more details, see MSDN’s Recommended Tags for Documentation Comments and Dynicity’s excellent XML Documentation Comments Guide.
Documentation comments:
- Begin with a triple virgule rather than a double virgule (///) for single-line comments or, for multi-line comments, include a double-asterisk after the opening virgule (/** . . . */ ). See Delimiters for Documentation Tags.
- Are written in a specific XML dialect.
- Are syntactically validated at compile time.
Automate Your Doc-Comment Creation
The objective of this article is to describe how to go about automating the process of generating a finished documentation set. However I must mention, in passing, some powerful techniques to assist the process of doc-comment writing without which the task of writing all those doc-comments would be overwhelming.
There are several levels at which you can get assistance in the documentation process.
Level 1: Word-level Assist: Intellisense
The first tool is Intellisense, which recognizes basic doc-comment syntax. Once you are inside a doc-comment type an opening left angle bracket (<). Visual Studio displays XML tags valid for the context. Referring back to the previous code example, place your cursor after the closing tag of the <summary> element, press return, then type an opening angle bracket. Intellisense pops up several possible keywords; typically <result> is the element to use here. Type “r”, then press tab to fill in the word. Type “>” to close the tag and Visual Studio adds the closing tag.
Level 2: Foundation-laying Assist: Smart Comment Editing
The next step up is also built-in to Visual Studio: smart comment editing. On the line just above a method, property, or class declaration, type a triple virgule and Visual Studio automatically supplies an empty <summary> element (where you describe the member’s purpose in one line) followed by other relevant doc-comment elements. (Note that if you have attributes on the given member you must be positioned just above those rather than above the member name.) Say, for example, you have a method that returns a value and takes several parameters:
|
1 2 3 4 5 6 7 8 9 |
public int DeterminePageBufferSize( int initialPageBufferSize, string host, int port, int timeout, bool smartTrace) { // code here . . . } |
Place your cursor on the line above the first line of code shown, press three virgules (///), and Visual Studio inserts boilerplate commentary for all the required doc-comment elements:
|
1 2 3 4 5 6 7 8 9 |
/// <summary> /// /// </summary> /// <param name="initialPageBufferSize"></param> /// <param name="host"></param> /// <param name="port"></param> /// <param name="timeout"></param> /// <param name="smartTrace"></param> /// <returns></returns> |
Note that you can control whether smart comment editing is enabled via the Options dialog for C# (see Figure 4).
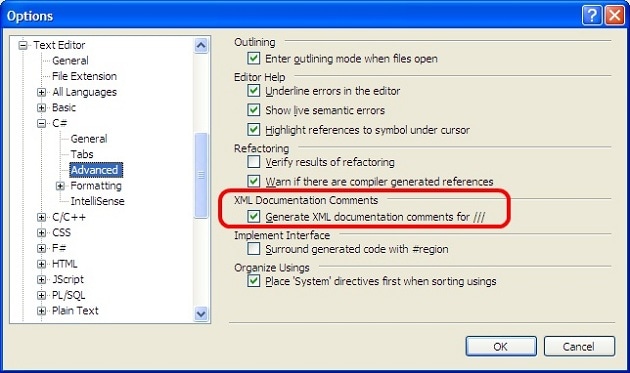
Figure 4 Enabling Smart Comment Editing in Visual Studio
Level 3: Supercharged Assist: GhostDoc
Smart comment editing can save you substantial amounts of typing. But a third-party plug-in called GhostDoc-available for Visual Studio 2005, 2008, and 2010-not only provides the boilerplate that smart comment editing does, it also fills in the boilerplate!
Consider again the previous DeterminePageBufferSize method:
|
1 2 3 4 5 6 7 8 9 |
public int DeterminePageBufferSize( int initialPageBufferSize, string host, int port, int timeout, bool smartTrace) { // code here . . . } |
Place your cursor on the first line of the method and press Control-Shift-D (or other key combination you may have selected) to invoke GhostDoc and you get this:
|
1 2 3 4 5 6 7 8 9 10 11 12 13 14 15 16 17 18 |
/// <summary> /// Determines the size of the page buffer. /// </summary> /// <param name="initialPageBufferSize">Initial size of the page buffer.</param> /// <param name="host">The host.</param> /// <param name="port">The port.</param> /// <param name="timeout">The timeout.</param> /// <param name="smartTrace">if set to <c>true</c> [smart trace].</param> /// <returns></returns> public int DeterminePageBufferSize( int initialPageBufferSize, string host, int port, int timeout, bool smartTrace) { // code here . . . } |
GhostDoc has not only enumerated each required element, it has filled them in. Notice how it parses the Pascal-casing of the names to separate and re-arrange words, deriving “Determines the size of the page buffer” from the “DeterminePageBufferSize” name. Items that it knows need polishing or correction are marked in square brackets, as in the smartTrace parameter comment above. It describes its Boolean nature but does not quite know what to say it does. GhostDoc has a complex-and configurable-set of rules to do this seeming magic. It does not always guess correctly, but it does remarkably well. The better names you use, the more success you will have with this timesaving tool.
Overridden and subclassed members are handled particularly nicely by GhostDoc as well. This next method exists inside a subclassed System.Windows.Controls.UserControl. I generated the method with just a couple keystrokes: “o”, “v”, space, “o”, “n”, “i”, tab. Then I generated the complete doc-commentary with GhostDoc’s single keystroke command: Control-Shift-D.
|
1 2 3 4 5 6 7 8 9 10 11 12 |
/// <summary> /// Raises the <see cref="E:System.Windows.FrameworkElement.Initialized"/> event. /// This method is invoked whenever /// <see cref="P:System.Windows.FrameworkElement.IsInitialized"/> is /// set to true internally. /// </summary> /// <param name="e">The <see cref="T:System.Windows.RoutedEventArgs"/> /// that contains the event data.</param> protected override void OnInitialized(EventArgs e) { base.OnInitialized(e); } |
Note that GhostDoc also installs a submenu under the Tools menu, so you can invoke its function through the menu sequence Tools >> GhostDoc >> Document This if you prefer.
The Problem of Documentation Generation
Once you have completed the considerable, but important, task of documenting your entire code base, and then building your solution so that it compiles cleanly with Visual Studio, you should now have an XML file for each project that you instrumented. Until recently, that was the easy part. The more arduous task was to use these intermediate files to provide documentation. Several years ago, a third-party tool called NDoc (authored by Kevin Downs) let you convert these intermediate XML files to a finished documentation set. NDoc, however, was designed for .NET version 1 and was not compatible with subsequent .NET releases! There was a port for .NET 2.0 (authored by Jonas Lagerblad), but the hyperlinks for that have dried up completely at the time of writing. Even so, NDoc did persevere until 2006, according to Wikipedia, just at the time that Sandcastle succeeded it.
Sandcastle was developed by Microsoft and is, in fact, what they use to generate the MSDN documentation. Sandcastle wasn’t easy to use. According to Wikipedia, “Sandcastle is a set of command line programs, configuration files, build components and XSLT transformation files that work together to convert XML-based documentation into help topics that are fit for viewing in a help system.” As that description suggests, it is not a tool with a simple interface. Using Sandcastle was such a challenge that several independent developers created wrapper applications. Here are the ones I know about.
|
Product |
Version |
Latest release |
Downloads |
|
1.9.1.0 |
July 2010 |
9,000* |
|
|
1.11.0 |
June 2008 |
29,000 |
|
|
1.54 |
March 2010 |
?? |
|
|
?? |
August 2006 |
?? |
*This download count refers only to the current version. Counts for prior versions are not included.
The first two are evidently packaged as industrial strength products, while the other two are more informal. If you search the web you will see that both Eric Woodruff’s Sandcastle Help File Builder (SHFB) and David Sexton’s DocProject are well-respected. I chose SHFB some time ago and have not been disappointed. It has a clean interface, does the job well, and has great support. While I was converting a good size documentation repository from NDoc to Sandcastle I encountered a number of issues and was able to communicate easily and effectively with the author who either told me what I was doing wrong, or promptly enhanced or fixed SHFB with the deficiencies I identified. To help you decide which of these might work best for you, take a look at the individual websites at the links above. Ideally I could point you to several articles that compare the two-I found only two of any substance, a blog entry by Ben Hall and this post by SHFB’s creator Eric Woodruff (it takes a very fair approach). If you elect to use SHFB, then the remainder of this article should be of even greater interest!
Read also: PowerShell automation for build processes
Sandcastle Help File Builder
SHFB provides a GUI front end to Sandcastle in the guise of a file navigator in combination with a large property pane. You use the file navigator to add projects to your configuration and you use the property pane to adjust the numerous settings of Sandcastle. Once you set those you do a build and SHFB directs Sandcastle to generate your completed documentation set.
Figure 5 The Sandcastle Help File Builder GUI Window
Even with this helpful wrapper, I still cannot call Sandcastle “easy” to use, but it is easier! A case in point-installation. You actually need to install at a minimum these three separate components, each from a different website:
-
Sandcastle – the core components
-
Sandcastle Styles – patches to presentation style files for bug fixes and enhancements
-
Sandcastle Help File Builder – the GUI
The Sandcastle Styles package is a collection of patches to the core Sandcastle’s presentation component. If you don’t install it you may get either poor or even faulty rendering of your output, possibly without realizing it. The SHFB Installation Instructions certainly mention this, but you might miss that. You should read these instructions, along with Sandcastle Style’s Getting Started, to guide you in your installation. Also, go to the SHFB Documentation and view the FAQ page and the Known Issues and Limitations page. This base installation of Sandcastle generates documentation as a web site, just like MSDN. If you want a different form (chm, Hxs, or mshc help files) you must install some additional components that Sandcastle will use to generate the documentation.
I mentioned, at the beginning, the irony that .NET documentation generation is itself poorly documented. I am not the only one who noticed this. There is a user-posted comment at the bottom of Sandcastle’s main documentation page musing over the fact that most of the documentation links on the site point to empty content. That is why Sandcastle Help File Builder exists, I suppose! SHFB is, by contrast, well documented. Sandcastle Styles also is well documented. Its architecture page includes both a very good architectural diagram of Sandcastle and its modes of operation. Other useful links to remember include the MSDN Sandcastle page and the Sandcastle blog. Tim Stanley’s interesting blog entry covers the history and future of NDoc and Sandcastle.
Running Sandcastle Help File Builder
Once you do all the preparation work, get Sandcastle installed, and finish reading this article, then running SHFB is quite straightforward.
- In the project explorer, open the context menu on Documentation Sources, then add your project files (*.csproj)
- Set SHFB properties to your preferences-these are the key ones that are discussed elsewhere in this article:
- Select the type of documentation set you wish to build (Project Properties >> Build category >> HelpFileFormat): HtmlHelp1, MSHelp2, MSHelpViewer, or Website. Except for the Website choice, you will need to install additional external components that SHFB needs to invoke.
- Select the presentation style (Project Properties >> Help File category >> PresentationStyle): vs2005 (the default), hana, or prototype. See Style Choices and Code Display Issues.
- Select the file naming method (Project Properties >> Help File category >> NamingMethod): Guid (the default), MemberName, or HashedMemberName. The middle choice-MemberName-is typically the most useful. See File Naming Conventions.
- Select the configuration to match your Visual Studio build: debug (the default) or release. See Specifying Debug or Release Configuration.
- Build.
- View your output. You could do this manually by just opening up the correct file from Windows Explorer. For the website format, this is Index.html in your output directory. But SHFB lets you do this easily from within the application. The Documentation >> View Help File menu provides several choices to open the formats you have built. You can even set a property to auto-open upon a successful build.
Also see the SHFB documentation page then drill down to Getting Started >> Walkthrough: Creating Your First Project.
As I was finishing this article my editor suggested one other product I might want to mention. Help and Manual is a documentation management tool that lets you take Word, help, text or Sandcastle files as input and generate PDF, e-Book, help (and other) formats as output. As just mentioned, SHFB lets you natively generate four different formats, but neither PDF nor e-Book is among them, so my interest was piqued. Help and Manual looks promising: I was able to import a compiled Html help file (.chm) generated by SHFB in a couple clicks then generate a PDF or e-Book from that with a couple more clicks. These output formats retained the structure of the original reasonably well. I do not (yet) support their claims on how easy it is to use Help and Manual, though, since I ran into some issues importing from a couple different sources (chm and HTML) and was not able to do import from my Sandcastle configuration. As it is a sophisticated product, and I spent just a short time with it, I attribute this to the learning curve needed to use the product effectively.
Sandcastle Help File Builder Configuration: First Look
It helps to have a concrete example in order to explain a documentation generator. I use illustrations from my open source .NET library because you have immediate access to the finished, generated documentation here (Figure 6 shows the top-level page).
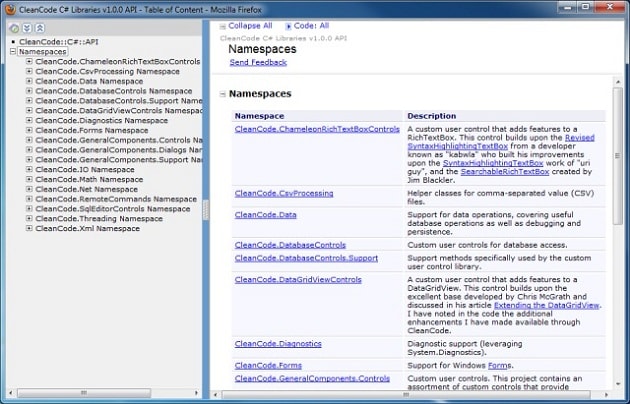
Figure 6 Top-Level Documentation Page Generated by Sandcastle
Download the CleanCode C# library and you have the fully instrumented source files to examine the doc-comments for anything you want to review in detail. Furthermore, you can examine my build file (I use ant) in several visualizations. The raw XML file is here with an XSL-stylized mask on it (just do View Source in your browser to see the raw XML if you prefer). A more API-style view of it is available here. The build file is (overly) complex; the documentation generation is controlled by the csharp.doc target in the ant file. That runs through an assortment of bookkeeping details but eventually gets to this step that does the actual Sandcastle processing:
|
1 2 3 4 5 6 7 8 9 10 |
<target name="csharp.doc.main" depends="csharp.doc.checkIfRequired" unless="csharpdocBuild.notRequired"> <property name="csharpdoc.log" value="${csharpdoc}/msbuild.log" /> <delete dir="${mirror.api}/csharp"/> <exec dir="${csharpdoc}" executable="${msbuild}" output="${csharpdoc.log}"> <arg value="/p:Configuration=Release"/> <arg value="CleanCode.shfbproj"/> </exec> </target> |
Or, if you do not “speak” ant, here is the essence from the command line:
|
1 2 3 |
\WINDOWS\Microsoft.NET\Framework\v3.5\MSBuild.exe /p:Configuration=Release CleanCode.shfbproj |
You’ll have noticed that the build step is nothing more than calling the standard .NET msbuild utility with the SHFB configuration file. It is not as complicated as you might think. Here is the raw file for my libraries-the only thing I have omitted is the content of the FooterText element because that is quite convoluted (not because of SHFB, but rather because of all the stuff I want to put in the footer of my HTML pages):
|
1 2 3 4 5 6 7 8 9 10 11 12 13 14 15 16 17 18 19 20 21 22 23 24 25 26 27 28 29 30 31 32 33 34 35 36 37 38 39 40 41 42 43 44 45 46 47 48 49 50 51 52 53 54 55 56 57 58 59 60 61 |
<Project DefaultTargets="Build" xmlns=http://schemas.microsoft.com/developer/msbuild/2003 ToolsVersion="3.5"> <PropertyGroup> <Configuration Condition=" '$(Configuration)' == '' ">Debug</Configuration> <Platform Condition=" '$(Platform)' == '' ">AnyCPU</Platform> <SchemaVersion>2.0</SchemaVersion> <ProjectGuid>{3fc75268-b8f2-4dd5-85a1-0706307c060}</ProjectGuid> <SHFBSchemaVersion>1.8.0.3</SHFBSchemaVersion> <!-- AssemblyName, Name, and RootNamespace are not used by SHFB but Visual Studio adds them anyway --> <AssemblyName>Documentation</AssemblyName> <RootNamespace>Documentation</RootNamespace> <Name>Documentation</Name> <!-- SHFB properties --> <OutputPath>C:\usr\tmp\CleanCode doc\</OutputPath> <HtmlHelpName>CleanCode C# Libraries API</HtmlHelpName> <HelpTitle>CleanCode C# Libraries v1.0.0 API</HelpTitle> <HelpFileFormat>Website</HelpFileFormat> <RootNamespaceContainer>True</RootNamespaceContainer> <MissingTags>Summary, Parameter, Returns, Value, AutoDocumentCtors, Namespace, TypeParameter</MissingTags> <DocumentationSources> <DocumentationSource sourceFile= "..\CleanCode\CleanCode.csproj" /> <DocumentationSource sourceFile= "..\ChameleonRichTextBoxControls\ChameleonRichTextBoxControls.csproj" /> <DocumentationSource sourceFile= "..\CsvProcessing\CsvProcessing.csproj" /> <DocumentationSource sourceFile= "..\DatabaseControls\DatabaseControls.csproj" /> <DocumentationSource sourceFile= "..\DataGridViewControls\DataGridViewControls.csproj" /> <DocumentationSource sourceFile= "..\GeneralComponents\GeneralComponents.csproj" /> <DocumentationSource sourceFile= "..\RemoteCommands\RemoteCommands.csproj" /> <DocumentationSource sourceFile= "..\SqlEditorControls\SqlEditorControls.csproj" /> </DocumentationSources> <NamespaceSummaries> <NamespaceSummaryItem name="(global)" isDocumented="False" xmlns="" /> </NamespaceSummaries> <FooterText>. . .</FooterText> <NamingMethod>MemberName</NamingMethod> <FeedbackEMailLinkText>the developer</FeedbackEMailLinkText> <VisibleItems> InheritedMembers, Protected, SealedProtected </VisibleItems> </PropertyGroup> <PropertyGroup Condition= " '$(Configuration)|$(Platform)' == 'Debug|AnyCPU' "> </PropertyGroup> <PropertyGroup Condition= " '$(Configuration)|$(Platform)' == 'Release|AnyCPU' "> </PropertyGroup> <ItemGroup> <Content Include="overview.html" /> </ItemGroup> <!-- Import the SHFB build targets --> <Import Project="$(SHFBROOT)\SandcastleHelpFileBuilder.targets" /> </Project> |
Rules for Embedding HTML
Generally, you can edit the SFHB configuration directly if you want to, but it is both simpler and safer to do it inside the GUI of SHFB. In particular, the elements-like FooterText-that contain embedded HTML must be edited with the GUI to get proper character encodings. My SHFB discussion thread documents how I became aware of this, but I can quickly drive the point home:
This is what I wanted for my footer text-a combination of literal HTML elements and an admittedly jarring jumble of self-writing code:
|
1 2 3 4 5 6 7 8 9 10 11 12 13 14 15 16 17 18 19 20 21 22 23 24 25 |
<div> Copyright (C) 2001-2010 Michael Sorens -- Revised 2010.05.31 <a href='http://sourceforge.net/projects/cleancode'> <img src='http://sflogo.sourceforge.net/sflogo.php?group_id=101363&type=9' width='80' height='15' border='0' alt='Get CleanCode at SourceForge.net. Fast, secure and Free Open Source software downloads'/> </a> </div> <script type='text/javascript' src='/js/MenuArchive.js'></script> <script type='text/javascript'>setTrack();</script> <script type='text/javascript'src='http://tcr.tynt.com/javascripts/Tracer.js?user=djcAab7jrHtB;s=71'></script> <script type="text/javascript"> var gaJsHost = (("https:" == document.location.protocol) ? "https://ssl." : "http://www."); document.write(unescape("%253Cscript src='" + gaJsHost + "google-analytics.com/ga.js' type='text/javascript'%253E%253C/script%253E")); </script> <script type="text/javascript"> try {{ var pageTracker = _gat._getTracker("UA-10---0-1"); pageTracker._trackPageview(); }} catch(err) {{}} </script> |
Inside the GUI, I could just paste in this messy-but still readable-code fragment. SHFB rewrites it into the configuration file encoded in this virtually unreadable text:
|
1 2 3 4 5 6 7 8 9 10 11 12 13 |
<FooterText>&lt%3bdiv&gt%3bCopyright %28C%29 2001-2010 Michael Sorens -- Revised 2010.05.31 &lt%3ba href=%27http://sourceforge.net/projects/cleancode%27&gt%3b&lt%3bimg src=%27http://sflogo.sourceforge.net/sflogo.php%3fgroup_id=101363&amp%3bamp%3btype=9%27 width=%2780%27 height=%2715%27 border=%270%27 alt=%27Get CleanCode at SourceForge.net. Fast, secure and Free Open Source software downloads%27/&gt%3b&lt%3b/a&gt%3b&lt%3b/div&gt%3b &lt%3bscript type=%27text/javascript%27 src=%27/js/MenuArchive.js%27&gt%3b&lt%3b/script&gt%3b &lt%3bscript type=%27text/javascript%27&gt%3bsetTrack%28%29%3b&lt%3b/script&gt%3b &lt%3bscript type=%27text/javascript%27 src=%27http://tcr.tynt.com/javascripts/Tracer.js%3fuser=djcAab7jrHtB%3bs=71%27&gt%3b&lt%3b/script&gt%3b &lt%3bscript type=&quot%3btext/javascript&quot%3b&gt%3b var gaJsHost = %28%28&quot%3bhttps:&quot%3b == document.location.protocol%29 %3f &quot%3bhttps://ssl.&quot%3b : &quot%3bhttp://www.&quot%3b%29%3b document.write%28unescape%28&quot%3b%25253Cscript src=%27&quot%3b + gaJsHost + &quot%3bgoogle-analytics.com/ga.js%27 type=%27text/javascript%27%25253E%25253C/script%25253E&quot%3b%29%29%3b &lt%3b/script&gt%3b &lt%3bscript type=&quot%3btext/javascript&quot%3b&gt%3b try {{ var pageTracker = _gat._getTracker%28&quot%3bUA-10---0-1&quot%3b%29%3b pageTracker._trackPageview%28%29%3b }} catch%28err%29 {{}} &lt%3b/script&gt%3b</FooterText> |
There are just a couple important rules you need to be aware of when pasting code through the GUI.
-
If you need curly braces, double them. That is, use {{ for { and }} for }.
-
If you need a percent character, URL-encode it. That is, use %25 for %.
Peruse the first code fragment above-the readable one-and you will see where I have applied both of these rules. There are several instances, for example, of %253C and %253E, which become %3C and %3E when rendered. (These are angle bracket characters < and >.) And in the final <script> element there are two sets of doubled braces in the JavaScript.
Sandcastle for NDoc Users
I started with NDoc some years back; almost a year ago I decided to modernize and convert to Sandcastle. Thinking that others might find some notes on this conversion useful, I am including my notes here along with a few comparison screen shots. In each screen shot in this section, Sandcastle output is on the left, NDoc on the right. The first one shows a namespace page, itemizing classes, structures, and interfaces that the namespace contains. In this comparison, and those that follow, I think you will agree that Sandcastle provides a better look and feel. Also observe that they both contain essentially the same information, though not in the same order.
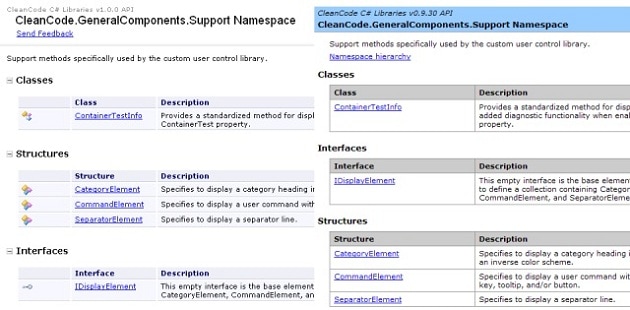
Figure 7 Sandcastle vs. NDoc Namespace Pages
On other pages, Sandcastle provides considerably more useful material than NDoc. Here is a page documenting a single method. It is necessarily small and challenging to read due to the confines of the medium you are reading, but if you squint you might make out these additional elements from Sandcastle (from top to bottom in Figure 8):
-
Collapse all button
-
Code all button
-
the namespace
-
the assembly
-
method signature in C#, VB, and C++ (compared to just C# in NDoc)
-
parameter type
The Collapse all button lets you take advantage of the outline structure of the page, collapsing all main sections of the page (in this case the Syntax, Remarks, and See Also sections). The Code all button, on the other hand, is a drop-down where you may select any of the 3 default languages or the default, all. (See Style Choices and Code Display Issues for more on this.)
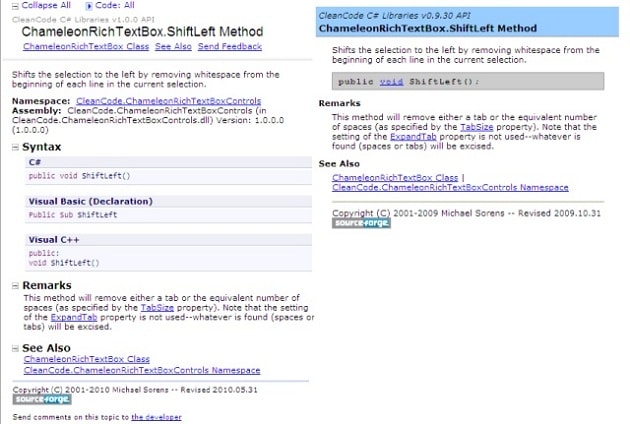
Figure 8 Sandcastle vs. NDoc Method Pages
Here is another example showing the benefit of collapsible sections. On this members page, the ‘constructors’, ‘methods’, fields, properties, events, and ‘See Also’ are all collapsible sections in Sandcastle. NDoc, on the other hand, separates elements in sections but there is no way to filter the list to focus on just one section. Note that at the very top, the Sandcastle page on the left has not just a Code all button but also a Members show all button, giving you additional flexibility to display or suppress protected members and inherited members. (And this dropdown suffers the same fate as the Code all button-it does not display in Firefox.) One other useful feature from Sandcastle is the set of jump links near the top (highlighted in red) for. If you do not have any sections collapsed, some classes could have a lengthy page full of methods, properties, etc. These jump links let you jump directly to any of the main sections on the page without having to do a lot of scrolling.
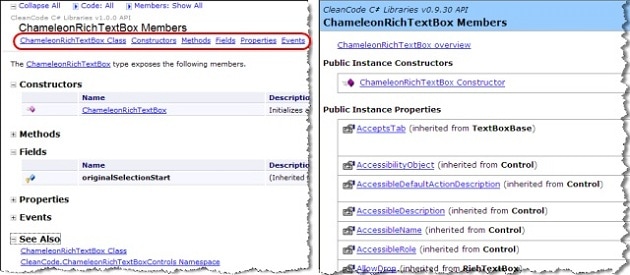
Figure 9 Sandcastle vs. NDoc Members Pages
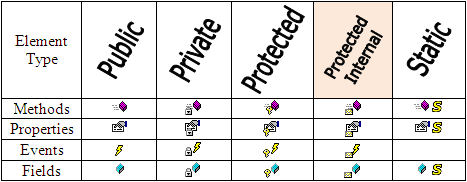
On this page note that both Sandcastle and NDoc include icons next to each element to provide a visual cue as to its type. These are somewhat universal icons in the .NET world-you find them not just in MSDN documentation but Visual Studio uses them in the Object Browser, the member dropdown at the top of the editor window, and probably other places as well.
In the screen shots above, the meaning of each icon is evident because all the elements are grouped and labeled. But in other uses (e.g. Visual Studio) you have only the icon and it is not always obvious what they mean. Furthermore, in my experience, I have never seen a legend for these, so I include one here. I have highlighted the Protected Internal column to call attention to a difference between NDoc and Sandcastle. Protected Internal elements are documented in NDoc but I have not been able to find any combination of properties that enables you to document them in Sandcastle.
There is one feature I found appealing in NDoc that is absent in Sandcastle-the list of classes that implement an interface. In a sense this violates design principle since a class should not know or care about its consumers, but I like the idea of making an exception when the classes are defined in the same library as the interface as is the case here. I inquired about this on the SHFB forum here; Eric indicated that Sandcastle does not do this by default but that it could be added as a transformation. Translation: it is left as an exercise for the reader!
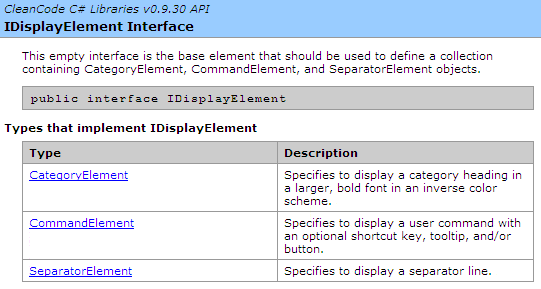
Figure 10 Documenting Implemented Interfaces
Sandcastle documents known implementations of an interface. It technically violates design principles but it is convenient!
Sandcastle Considerations
Browser Flexibility
An NDoc-generated website runs only in Internet Explorer. Sandcastle-generated content can also run in other browsers. I currently use Firefox and IE and both work with Sandcastle content, with the exception of the one small Firefox glitch noted above.
Storage Requirements
For my libraries, NDoc content filled about 11MB with 1100 files; Sandcastle content fills 34MB with 1700 files.
Performance and Inheritance
When I used NDoc it required about 2 to 3 minutes to run; Sandcastle takes 5 to 20 minutes depending on your configuration file and your network speed. Sandcastle weaves a tight and thorough web of links into your content but it has to access internet resources to do this. In my experience the DocumentInheritedFrameworkMembers property makes the most impact on performance. On my home computer, enabling this property increased the runtime from about 5 minutes to more than 15 minutes. So while I was working through documentation issues I turned it off to decrease turnaround time, then turned it back on when I was finished tweaking.
Figure 11 illustrates how this property actually manifests in the finished content. Here I show just the navigation panels from the documentation set, generated three different ways. The leftmost includes inherited framework members. The middle panel excludes those, but still includes inherited local members, i.e. inheritance of my own classes, controlled with the DocumentInheritedMembers property. The rightmost disables both the DocumentInheritedFrameworkMembers property and DocumentInheritedMembers properties. It also happens to be what you get from NDoc so the rightmost panel is actually an NDoc screenshot.
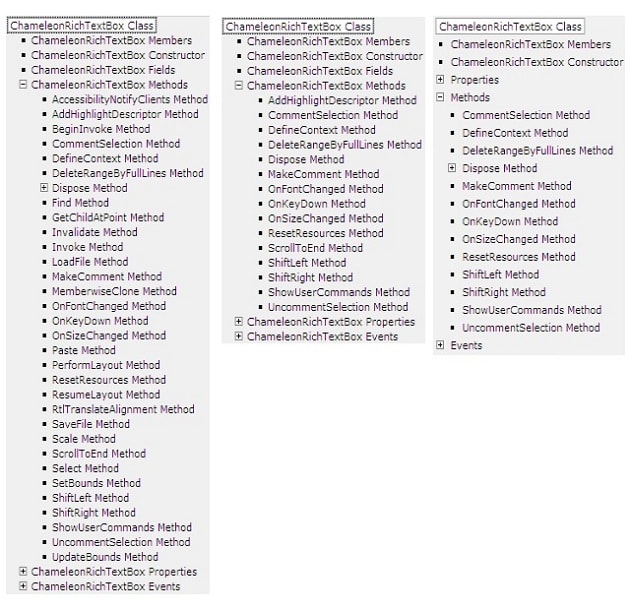
Figure 11 Effect of Setting Different Inheritance Levels
The leftmost panel includes inherited framework members and inherited local members; the middle excludes inherited framework members; the rightmost excludes all inherited members.
Issues Deploying on Linux/Unix
Internet Information Server (IIS) is case-insensitive but Linux/Unix systems are not. I needed to deploy to a Linux system running Apache (SourceForge) so ran into a couple issues-see my post here.
Sandcastle generates the master documentation page for a web site as Index.html–with a capital “I”. Apache looks for a default web page from a standard list: index.html, index.htm, default.html, etc. But this list is case-sensitive so Index.html will not be a match. The workaround is either to rename the generated Index.html to index.html or to add a .htaccess file to the same directory containing the Index.html file with just one line of text to direct Apache to use the file as it was created by Sandcastle:
|
1 |
DirectoryIndex Index.html |
Another problem that was due to case-sensitivity issues involves the copy button on code samples that you embed in your documentation. The copy button includes an attached icon that changes when you mouse over it, but the “inactive” icon appears as broken link. This requires a two-part workaround:rename …/icons/CopyCode_h.gif to copycode_h.gif and replace all occurrences of CopyCode.gif with copycode.gif.
Here are the relevant commands from my ant build file that I use to correct these (the intent should be clear even if you are unfamiliar with ant):
|
1 2 3 4 5 6 7 8 9 10 11 12 13 14 |
<echo>Applying patch for Sandcastle to find correct index file.</echo> <copy preservelastmodified="true" file="${csharpdoc}/.htaccess" todir="${mirror.api}/csharp" /> <echo>Applying patch for Sandcastle due to case sensitivity.</echo> <replaceregexp flags="g" match="CopyCode.gif" replace="copycode.gif"> <fileset dir="${mirror.api}/csharp/html" includes="*.htm" /> </replaceregexp> <move file="${mirror.api}/csharp/icons/CopyCode_h.gif" tofile="${mirror.api}/csharp/icons/copycode_h.gif" /> |
Disambiguating and Resolving <see> References
The <see> markup element is equivalent to the HTML <a> element, letting you specify a link to another page, either internal to your documentation set with the cref attribute or external with the href attribute. For external links, you supply a URL value to the href attribute. For internal links, you provide a local reference to the cref attribute by specifying a member name. Members are types, properties, fields, events, or methods. It is good practice to use <see> elements whenever you mention any of your own elements as you write your documentation comments. Assume, for example, you have a method GetPhrase() in your current class and in the <remarks> for the class you have a sentence such as:
Use GetPhrase to have the SuperWidget process your inputs.
You should actually type that in with the GetPhrase mention embedded in a <see> element:
Use <see cref= “GetPhrase”/> to have the SuperWidget process your inputs.
If the method is not overloaded, the simple name is all you need. If it is overloaded, you must uniquely identify which signature you intend to link to by supplying arguments. If you want to refer to a variant with no arguments use an empty parameter list:
Use <see cref=”GetPhrase()”/> to have the SuperWidget process your inputs.
If instead this sentence is in a different class you need to qualify the name. For good measure you should also add a reference to the SuperWidget class, too:
Use <see cref=”SuperWidget.GetPhrase”/> to have the <see cref=”SuperWidget”/> process your inputs.
Note that Visual Studio understands the markup language for your doc-comments, so Intellisense is available to guide you with entering your element names and attribute names. This does not apply to attribute values even though, for the <see> element, the values should always be members of your classes. However, Visual Studio does validate the attribute values (the member references) at compile time. Thus, by the time you fire up SHFB you can be completely confident that your references will work. Except that is not quite true-I found a couple scenarios where Visual Studio compiles cleanly but Sandcastle fails to identify link targets (here’s my original SHFB forum thread). A <see> element may also be written by specifying the member type as a prefix. Here I indicate a method (M) and a type (T):
Use <see cref=”M:SuperWidget.GetPhrase”/> to have the <see cref=”T:SuperWidget”/> process your inputs.
But this will not work! Sandcastle renders it as:
Use [M:SuperWidget.GetPhrase()] to have the [T:SuperWidget] process your inputs.
MSDN lists the valid member type characters under Processing the XML File. In the fine print on that page, it indicates that this notation requires fully qualified paths. Visual Studio is able to resolve the path from your context; you would think that when it recognizes this situation while building the intermediate XML documentation files it could add whatever else is needed. (Then again, I am not quite sure why Sandcastle does resolve the links without the member prefix, so it is not a simple issue.) So the workaround to allow Sandcastle to resolve the links is:
Use <see cref=”M:SandcastleDemo.SuperWidget.GetPhrase”/> to have the <see cref=”T:SandcastleDemo.SuperWidget”/> process your inputs.
I found one more problem with using member type prefixes: when referencing methods you cannot supply an argument list. If the target method takes no arguments, or the method has no overloads, that simply means using <see cref=”M:SuperWidget.GetPhrase”/> instead of <see cref=”M:SuperWidget.GetPhrase()”/>. But if your target method has overloads (with different method signatures) you must specify the argument signature to disambiguate your reference. Since this article is not discussing quantum computing you cannot do both at the same time :-). Your only recourse is to remove the member type prefix; then you can specify argument signatures.
So with all these pernickety behaviors, why do I even mention these member-type prefixes? When GhostDoc-that helpful utility that automatically writes out a good portion of your doc-comments-creates fully specified references, they include both a member type prefix and a fully qualified path. See the example in Automate Your Doc-Comment Creation. The GhostDoc-created content, being fully qualified, should work just fine. But it will pepper your files with these member type prefixes. And some day you may copy one of these generated doc-comments for a new method, forgetting that you have to use a fully qualified path or that you cannot use an argument signature, thereby inadvertently introducing a lost reference.
Verbosity of <see> Elements
When you have a single, non-overloaded method and reference it with, for example
|
1 |
<see cref="DefineContext"/> |
Sandcastle renders this with its full signature, as in:
|
1 |
<a href="...">DefineContext(string,int)</a> |
while NDoc renders it as the more palatable <a>DefineContext</a>. By providing additional information, you can direct Sandcastle to have the hyperlink text be just the name (without the argument signature). The above <see> element did not include any content. Just add content to the element with the text you want to display. The vast majority of the time it will be the very method name that you have specified in the cref attribute so the finished element will appear redundant:
|
1 |
<see cref="DefineContext">DefineContext</see> |
But the content of the <see> element is directly transferred to the content of the <a> element in HTML:
|
1 |
<a href="...">DefineContext</a> |
Since the content of the <see> element is just text, you could specify one particular signature of an overloaded method as the target of the link but still use a non-specific text string.
|
1 |
<see cref="DefineContext(string,int)">DefineContext</see> |
Visual Studio requires you be unambiguous in your references. If your method is overloaded, then you must specify an argument signature, but by manipulating the content of the <see> element you have the flexibility to render it in your documentation however you wish.
Referencing Generic Types in <see> Elements
Maybe not today, maybe not tomorrow, but soon (with apologies to Casablanca) you will eventually want to reference a method that takes a generic argument, perhaps an argument like List<double>. If you put that inside a cref attribute Visual Studio will balk when you build, indicating badly formed XML. The workaround for this is to substitute curly braces for the angle brackets, as in:
|
1 |
<see cref="DefineContext(List{double},int)">DefineContext</see> |
Accompanying this article is a SandcastleDemo solution (for Visual Studio 2010) that illustrates all of the complexities of the <see> element discussed above. The solution also include an SHFB project file. Once you build in Visual Studio then build in SHFB, you can see how the doc-comments render on the finished webpage. If you do not have Visual Studio 2010 and wish to compile the project, just import the two c# files into a new project in Visual Studio 2008. But note that you do not need to build to see the results of the demo; the project archive includes the intermediate XML file that results from a Visual Studio build plus the finished HTML output from an SHFB build.
Displaying Sample Code
SHFB provides flexible and powerful support for displaying sample blocks of code, be they in .NET languages or a variety of others. Code renders in a fixed-width font. The area is shaded to set it off from your main text. It gets a title if you have specified it, and a Copy button to make copying more convenient than having to manually mouse over a region. Most significantly, Sandcastle recognizes and syntax-highlights code from more than a dozen languages. The list of supported languages is available at the SHFB documentation page; drill down to Custom Build Components >> Code Block Component.
My SandcastleDemo project includes a class Language.cs that demonstrates just a small portion of the code block support-each of the samples shown next is included so you can see how they appear in the generated documentation.
To insert a block of code, place it inside a <code> element: the minimum required is just the element name:
|
1 2 3 4 5 |
/// <code> /// ChameleonRichTextBox crtb = new ChameleonRichTextBox(); /// crtb.DefineContext("MyContext", "C:\usr\tmp\stuff.xml"); /// crtb.EditorContextName = "MyContext"; /// </code> |
Sandcastle defaults to C# but it is better practice to explicitly specify your language:
|
1 2 3 4 5 |
/// <code lang="C#"> /// ChameleonRichTextBox crtb = new ChameleonRichTextBox(); /// crtb.DefineContext("MyContext", "C:\usr\tmp\stuff.xml"); /// crtb.EditorContextName = "MyContext"; /// </code> |
Other .NET languages are available, of course:
|
1 2 3 4 5 6 7 8 |
/// <code lang="VB"> /// Public Sub SomeMethod() /// Dim x As Integer /// For x = 1 To 10 /// Console.WriteLine(x) /// Next x /// End Sub /// </code> |
Other commonly used languages, such as XML may also be specified:
|
1 2 3 4 5 |
/// <code lang="xml" title="Example Macro Template"> /// <Keyword alias="SELECT-FULL" whiteSpace="preserve"> /// <stuff/> /// </Keyword> /// </code> |
Note that this last example specifies a title. This appears at the top of the block flush left, with a button to copy the text of the code block placed flush right. If you do not specify a title, the language name is used instead.
The code block component further lets you include the contents of an external file as the content of a <code> element via the source attribute. You can even grab just a portion from a live, working code file to completely eliminate duplicating code in an example! All you need to do this is to use the standard .NET #region markup notation. Here is an example from a live XAML file-note the #region and #endregion tags:
|
1 2 3 4 5 6 7 8 9 10 |
<Grid> <!-- #region XAML Snippet --> <StackPanel Height="128" HorizontalAlignment="Left" Margin="38,93,0,0" Name="stackPanel1" VerticalAlignment="Top" Width="200"> <Label Content="Label" Height="28" Name="label1" /> <TextBlock Height="23" Name="textBlock1" Text="TextBlock" /> </StackPanel> <!-- #endregion --> </Grid> |
In your doc-comments you specify the file name and region name along with providing a title, identifying the language, and any other attributes you prefer. Again, this is included in the demo project so you can try it and see it really works! Note that the path in the source attribute is relative to the location of the SHFB project file, not the file containing the doc-comments:
|
1 2 3 |
/// <code source="SandcastleDemo/UserControl1.xaml" /// region="XAML Snippet" lang="XAML" title="Live Code Example" /> |
In a <code> block, you may even specify a non-supported language-Sandcastle treats the content just like a supported language except for the syntax highlighting. I commonly use “text” as a pseudo-language label to designate blocks of not-quite-code that I want in my documentation. Because SHFB performs syntax highlighting for any supported languages, a side effect of this is that you may not use any additional HTML markup in your block of code (for example, to italicize a word you want to emphasize). If the language is not supported then you may use additional HTML markup in the code block. (The Language.cs file in the demo project illustrates this for both a supported and an unsupported language.)
Style Choices and Code Display Issues
Three languages get special treatment in Sandcastle: C#, Visual Basic, and C++. Each of these appears in the language selector at the top of each page of your documentation set (labeled, as a default, as the Code all button mentioned earlier). You can filter the page to include any subset of these three languages using this dropdown button. This applies to automatically generated code, such as for a class constructor, as well as for your own code blocks. For the latter, the DHTML that supports this is driven by the language you specify in the lang attribute of the <code> element. So you could turn off displaying C# or Visual Basic or C++ but you cannot turn off displaying an XML block, if you happen to have included one. SHFB also provides an option to ignore this filtering for a specific block by adding a filter attribute with a value false.
Unfortunately (unlike MSDN) this language selection does not carry over from page to page! That is apparently a lot more challenging to fix than it might appear (per this thread). I believe it is also connected to a defect that includes, among other Firefox issues, failure of the Code all button to render properly in Firefox with the latest Sandcastle/SHFB release from June 2010. Because of this I am sticking with the prior release for the time being.
The last couple paragraphs apply to Sandcastle’s vs2005 presentation style. That is the style that you have seen on all the screen shots so far. But Sandcastle provides two other presentation styles, called hana and prototype. (Do not try to read too much into the choice of these style names-this post by Ben Hall, for example, describes how hana was simply an internal code name for the Sandcastle sub-project and this Sandcastle blog entry talks about hana’s introduction.)
The following tabbed display shows the same page rendered in the three styles in as close to a side-by-side display as this web page format allows.
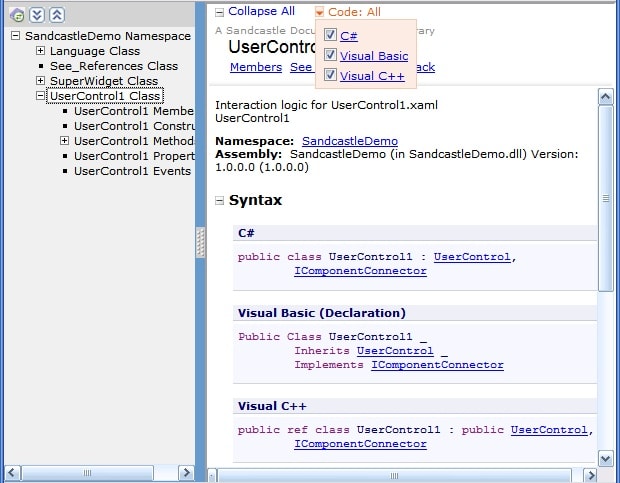
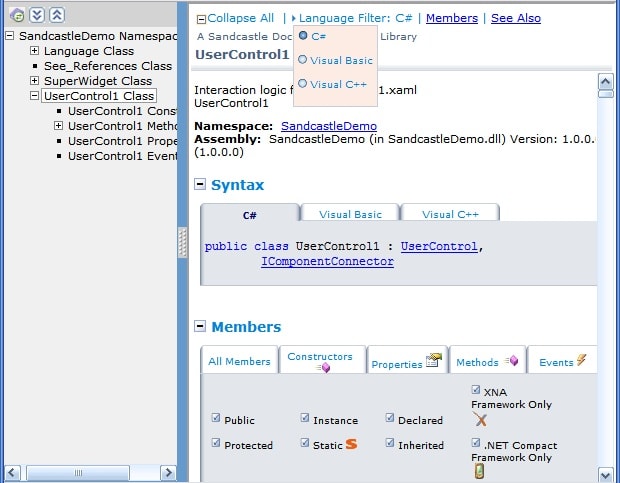
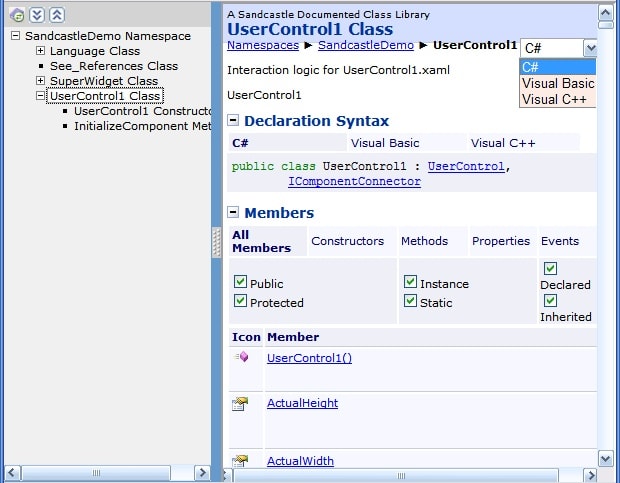
Figure 12 Three Styles of Sandcastle Output
Notice the language selector. It appears at the top of each page, but in different positions (I have highlighted it on each page). In the vs2005 style, you have checkboxes in the dropdown, allowing you to select any combination of the three key languages. In both hana and prototype styles, however, you have radio buttons: you may only select one language at a time. That is a necessary design constraint because those styles show the 3 languages in separate tabs so you could not see two at the same time (just like the tabs in Figure 12).
The hana and prototype styles give you other benefits: they put class members in tabs plus they let you interactively filter members based on properties (public, protected, instance, static, and so forth). But these two styles also have a defect: unlike the vs2005 style where your own code blocks are filtered by the language selector, these styles do not apply the language filter to your code blocks. So the only thing the language selector affects is automatically generated code (such as class constructors).
Using Favicons in Your Generated Web Site
A favicon is a logo displayed in the favorites menu, address bar, and page tabs adjacent to your page name. It is just one more element that makes your web pages more polished. Sandcastle does not provide a property hook or other mechanism to add a favicon to your generated web pages (see this SHFB discussion thread) so I added a post-processing step to my build file to embed a favicon on the generated web pages. MSDN’s How to Add a Shortcut Icon to a Web Page provides all the details of how to do this yourself, but the gist of it is that you need to add a line like this to the <head> element of your web page:
|
1 |
<link rel="SHORTCUT ICON" href="http://www.mydomain.com/myicon.ico"/> |
There are potential pitfalls with specifying the favicon, but I have tested this flavor in both Internet Explorer 8 and Firefox 3.6. In my ant build file I embed this just before the closing tag of the <head> element for all the generated web pages, which includes the master page (Index.html) and all the child pages (html/*.htm). Since the ant file is itself an XML file, the opening angle brackets are encoded as XML entities (<). Here is the fragment that does that:
|
1 2 3 4 5 6 7 8 |
<echo>Activating favicon for documentation set.</echo> <replaceregexp match='</head>' replace='<link rel="SHORTCUT ICON" href="/icon/CleanCode_C_csharp_32x32.ico"/></head>'> <fileset dir="${mirror.api}/csharp" includes="Index.html,html/*.htm"/> </replaceregexp> |
Rendering Issue with Unresolved Links
With a <see cref=”class.property”/> doc-comment where the class.property resolves to a valid reference but there is no documentation to link to, the text renders as property() rather than the correct property. That is, there are extraneous trailing parentheses almost as if Sandcastle got confused and thought this was a method. If the reference resolves to a valid reference and there is also documentation to link to, then Sandcastle correctly omits the parentheses and attaches a hyperlink.
As a concrete example I have a doc-comment containing this line:
|
1 |
/// The <see cref="SyntaxHighlightingTextBox.EnableHighlighting"/> property. . . |
The class containing that doc-comment inherits from SyntaxHighlightingTextBox so it is a valid reference. However, the code for SyntaxHighlightingTextBox comes from an external library whose DLL is not included in the documentation source set. When Sandcastle cannot resolve the link target, it does not balk but just emboldens the text and does not attach a link. The final generated HTML for the above line, however, renders with extraneous parentheses:
|
1 |
The EnableHighlighting() property. . . |
Though I did get a general idea on how to work around this issue in this SHFB forum thread, I have not pursued the fix so you will find some of these incongruous constructs in my released documentation.
File Naming Conventions
Say you have a fully qualified class name CleanCode.Data.OdbcDsnInfo.cs. Particularly while you get up to speed with documentation generation you may often wish to examine the generated documentation for a given file. NDoc makes this trivial; the above source file yields this set of documentation files:
-
CleanCode.Data.OdbcDsnInfo.AllDsnElements.html
-
CleanCode.Data.OdbcDsnInfo.AllDsnNames.html
-
CleanCode.Data.OdbcDsnInfo.GetDriver.html
-
CleanCode.Data.OdbcDsnInfo.html
-
CleanCode.Data.OdbcDsnInfo.IsMySql.html
-
CleanCode.Data.OdbcDsnInfo.IsOracle.html
-
CleanCode.Data.OdbcDsnInfo.IsSqlServer.html
-
CleanCode.Data.OdbcDsnInfo.IsWindowsAuthentication.html
-
CleanCode.Data.OdbcDsnInfo.OdbcTarget.html
-
CleanCode.Data.OdbcDsnInfoMembers.html
-
CleanCode.Data.OdbcDsnInfoMethods.html
-
CleanCode.Data.OdbcDsnInfoProperties.html
NDoc creates the class-level file (highlighted in red) as well as other aggregate pages (highlighted in blue) as needed, plus a page for each individual member. The default SHFB configuration, however, yields a set of files something like 36c0419d-28d0-d7b5-94ee-89ca55cd14b2.htm, which is a bit harder for us mere humans to readily map back to the source! Fortunately, SHFB provides the NamingMethod property to let you tailor this behavior (see this SHFB forum thread). Switch from the default value of Guid to the more useful MemberName and you get this set of files:
-
AllMembers_T_CleanCode_Data_OdbcDsnInfo.htm
-
M_CleanCode_Data_OdbcDsnInfo_GetDriver.htm
-
M_CleanCode_Data_OdbcDsnInfo_IsMySql.htm
-
M_CleanCode_Data_OdbcDsnInfo_IsOracle.htm
-
M_CleanCode_Data_OdbcDsnInfo_IsSqlServer.htm
-
M_CleanCode_Data_OdbcDsnInfo_IsWindowsAuthentication.htm
-
M_CleanCode_Data_OdbcDsnInfo_OdbcTarget.htm
-
Methods_T_CleanCode_Data_OdbcDsnInfo.htm
-
P_CleanCode_Data_OdbcDsnInfo_AllDsnElements.htm
-
P_CleanCode_Data_OdbcDsnInfo_AllDsnNames.htm
-
Properties_T_CleanCode_Data_OdbcDsnInfo.htm
-
T_CleanCode_Data_OdbcDsnInfo.htm
The colors map between the Sandcastle files and NDoc files. There are a couple subtle but important differences to note here. NDoc uses a format of namespace.class.member.html while Sandcastle uses MemberTypePrefix_Ânamespace_class_member.htm. You read about member type prefixes earlier; they are the same set of codes. Thus, T (short for Type) represents the class; P represents property; M represents method. So just from the file names, you can tell whether the documented member is a property or method or event or class. This can come in handy if, for example, you want to search for something in all files documenting methods, or perhaps you want to add a post-processing step to add something to all files documenting properties.
Specifying Debug or Release Configuration
A common error (that I still make on occasion) is to forget to set the configuration in SHFB to match the configuration in Visual Studio. Just as Visual Studio gives you a dropdown to select debug or release builds, SHFB provides the very same feature. If your SHFB selection does not match your Visual Studio selection, it will abort the Sandcastle build quite early on (unless you have some older, probably obsolete build in the other configuration still present!). The dropdown in SHFB appears in the top toolbar, highlighted in Figure 13.
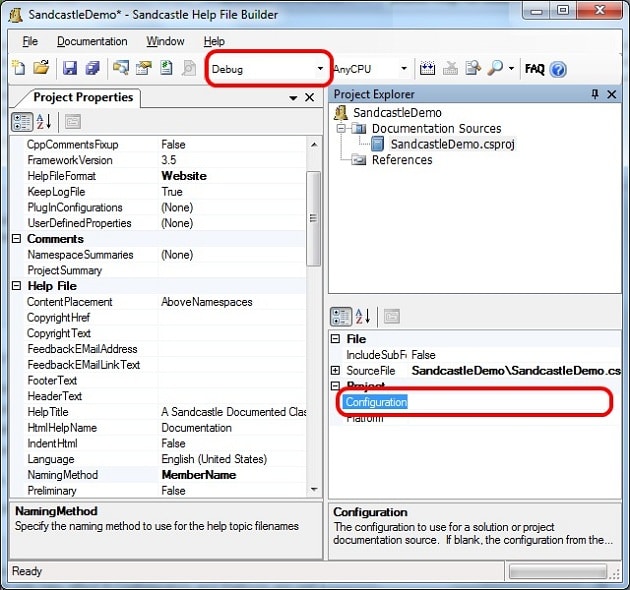
Figure 13 Selecting Configuration in SHFB
You can set a global setting (top) or a per-project setting (bottom-right) from the GUI.
There are several other ways to specify configuration, though. The dropdown in the top toolbar is a global (i.e. solution) setting. You could override this on a per-project basis though, by selecting a project in the project explorer (top right) then setting the configuration property in the property pane (bottom right).
If you run the Sandcastle build from the command line, it defaults to the debug configuration. You may change that, or just make it explicit, specifying either debug or release for the value of the configuration parameter:
|
1 |
msbuild -p:Configuration=nnnn . . . |
Note that the per-project settings will override the command-line just as they did in the GUI.
Finally, you can set the configuration by editing the SHFB configuration file itself. The value there will only be used if you build from the command line and only if Configuration and Platform are undefined. (See this SHFB forum thread for a recap of this section.)
Finding What You Missed
A generated documentation set in web page format can easily run into the hundreds of pages or more. It is important, therefore, to verify that you have documented everything that needs documenting. There are a few techniques you can use to do this. Start with the Error List panel when you build your projects in Visual Studio. Any missing XML doc-comments are reported as warnings. But make sure you do a Rebuild Solution to check all your projects! As you likely know, any projects without errors (i.e. just warnings and/or informational messages) do not rebuild automatically if you just use Build Solution. It is easy to overlook this step so, depending on what you last built, you might miss some warnings.
SHFB reports rather verbose output during its build process including messages about missing doc-comments. Unfortunately, because of the sheer amount of messages it is difficult to identify the important messages. Your last resort, then, is Sandcastle’s output itself. As shown in Figure 14, the generated documentation indicates when items are missing. What Sandcastle reports here is configurable in SHFB. Under the Show Missing Tags category you can individually enable or disable displaying of missing include targets, namespaces, params, remarks, returns, summaries, typeparams, or values. By default, missing remarks and missing include targets are disabled; the remainder are enabled.
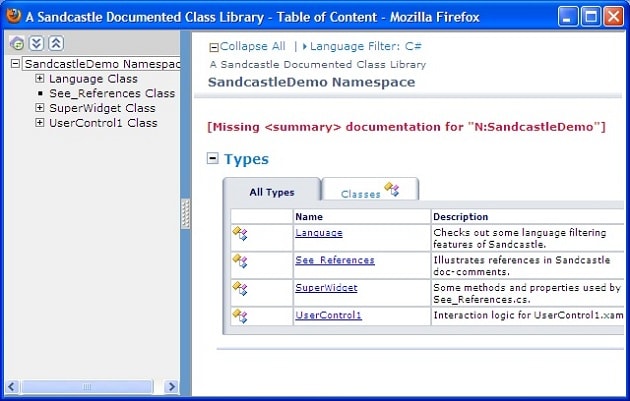
Figure 14 Example of a Missing Doc-Comment Element
Now you are back at finding the one or five or 17 reports of missing tags spanning the hundreds of pages of Sandcastle output. Rather than navigating through all the pages in your web browser(!) use your favorite regular expression search tool to find all occurrences in all the documentation pages with this regular expression.
|
1 |
\[Missing.*[Dd]ocumentation for .*?\] |
What you will get is a set of very long lines (because the generated HTML elements typically have few line breaks) plus the content will include HTML encoding of angle brackets and quotation marks. With just a bit of cleanup, though, you can remove the detritus to leave just the useful parts:
|
1 2 3 4 5 6 |
[Missing <returns> documentation for "M:SandcastleDemo.SuperWidget.GetStandardDeviation"] [Missing <returns> documentation for "M:SandcastleDemo.SuperWidget.GetPhrase"] [Missing <summary> documentation for "N:SandcastleDemo"] |
Here is a fragment from my ant build script that does the whole process: finds all relevant lines in all generated HTML files then isolates the key information and strips the HTML encoding-translate this to your favorite text manipulation tool:
|
1 2 3 4 5 6 7 8 9 10 11 12 13 14 15 16 17 18 19 20 21 |
<target name="csharp.doc.checkMissing"> <concat> <fileset dir="${mirror.api}/csharp/html" includes="*.htm"/> <!-- find the relevant lines--> <filterchain> <linecontainsregexp> <regexp pattern="\[Missing.*[Dd]ocumentation for .*?\]"/> </linecontainsregexp> <tokenfilter> <!-- isolate the key message --> <replaceregex pattern="^.*\[(Missing.*Documentation for .*?)\].*" replace="\1" flags="i"/> <!-strip the HTML encoding--> <replaceregex pattern="&lt;(.*?)&gt;" replace="<\1>"/> <replaceregex pattern="&quot;(.*?)&quot;" replace=""\1""/> </tokenfilter> </filterchain> </concat> </target> |
The above discussion describes how to find the list of things you missed that Sandcastle noticed and complained about. There is one more category of errors: things you missed that Sandcastle noticed and did not complain about. There is only one item I have identified in this category: invalid internal link targets. These emanate from <see> elements using the cref attribute to, in theory, point to some other spot in your documentation. When Sandcastle does not resolve the link, it wraps the link text in a <span> element with a class of nolink, as in
|
1 |
Initializes a new instance of the <span class="nolink">xyz</span> class. |
These do not show up as obvious errors in your documentation: they simply appear emboldened. In SHFB’s verbose output log, these also appear with the phrase Invalid reference link target.
Documenting Namespaces
The report of missing namespace documentation displayed in Figure 14 is one of the most common, and often the last error you need to clean up, the reason being that Visual Studio’s error checking does not look for it. Only when you review Sandcastle output will you see the error showing up. (This is the one item I know which Sandcastle checks but Visual Studio does not; but there may be others!)
There are two ways to add namespace documentation: in your source tree as separate files, or via property assignment in the SHFB GUI.
To include namespace comments in your source tree, create a class called NamespaceDoc in each namespace. Decorate each of these classes with a CompilerGenerated attribute and omit the public keyword to suppress the NamespaceDoc class itself from appearing in the finished documentation set. (On the SHFB documentation page then drill down to Project Properties Window >> Comments Category Properties >> Using NamespaceDoc Classes for details.)
To add namespace comments with the GUI, select the value field for the NamespaceSummaries property in the Comments category and an ellipsis appears. Click on the ellipsis to open the Namespace Summaries panel. After it analyzes your source files for a minute or so, SHFB lists all your namespaces, each preceded with a checkmark. (You can uncheck a namespace if you want to exclude it from the Sandcastle build.) Select a namespace in the list at the top left then in the bottom pane enter the summary text for that namespace. Do this for each namespace you are including in your documentation set. The text you enter may be pure text or it may include HTML markup. (On the SHFB documentation page then drill down to Project Properties Window >> Comments Category Properties for details.)
Conclusion
Sandcastle, supplemented by the power of Visual Studio, is a formidable engine for generating documentation for your code. With it, your documentation can live where it is best, right with your code. When you update your code in order to delete a parameter, change a method name, or refactor some class, you are forced to update the documentation at the same time-or suffer a slew of Visual Studio warning messages. The main shortcoming of Sandcastle, such as the poor user-interface, was removed by the aptly named Sandcastle Help File Builder, thereby bringing professional quality documentation within the reach of the average developer. Even so, there are a variety of pitfalls and hurdles inherent in the process. This article provides a good resource for overcoming a good number of them but I’m sure that my limited experience with Sandcastle has not been enough to uncover them all!
The demo files are available as a zipped file from the downloads at the bottom of the article. Likewise, there is an ePub booklet version of this, which can be read on the iphone/Android/iPad as well as any PC using any ePub-compatible reader such as iBooks or Adobe Digital Edition. You can also get the accompanying wall chart, providing a compact one-page reference to XML documentation comments with Sandcastle and Sandcastle Help File Builder, and a PDF version of this article from here.
FAQs: Taming Sandcastle: A .NET Programmer's Guide to Documenting your Code
1. What is Sandcastle Help File Builder and how does it work?
Sandcastle Help File Builder (SHFB) is a free, open-source tool that generates API documentation from the XML documentation comments embedded in your .NET source code. You enable XML documentation output in your Visual Studio project settings, write doc-comments using standard elements like <summary>, <param>, and <returns>, and then SHFB processes the XML output file along with your compiled assembly to produce formatted documentation as HTML websites, CHM help files, or Microsoft Help Viewer content.
2. What are XML documentation comments in .NET?
XML documentation comments are special triple-slash (///) comments in C# (or triple-apostrophe in VB.NET) placed directly above code elements like classes, methods, and properties. They use structured XML elements such as <summary> for descriptions, <param> for parameter explanations, <returns> for return value descriptions, <example> for code samples, and <see> for cross-references. Visual Studio uses these for IntelliSense tooltips, and documentation generators like SHFB and DocFX use them to produce formatted API documentation.
3. What is the difference between Sandcastle and DocFX for .NET documentation?
Sandcastle Help File Builder (SHFB) is the older tool that generates documentation from XML comments and compiled assemblies. DocFX is Microsoft’s newer, actively developed alternative that supports both API documentation from source code and conceptual content in Markdown. DocFX produces modern, responsive HTML documentation and integrates better with CI/CD pipelines. Both tools consume the same XML documentation comments, so your source code documentation works with either.
Load comments