
This article is intended to be of interest to you in two different ways. If you just wish a practical guide on creating a system tray, then head straight for the section ‘The Tray Application Framework’, but if you’re more interested in actually using the application that we provide to illustrate the article, then click on ‘Introducing HostSwitcher’. If you enjoy, and learn best by, following the whole process of how a particular system tray application was designed and built, then read on!
Contents
- Introducing HostSwitcher: A Tray App for Some of You
- The Tray Application Framework
- Ensuring Only One Instance Executes: Mutual Exclusion
- Conclusion
If you are a .NET developer, you will probably be used to creating several different types of application. You’ll be familiar with either WPF or WinForms as the primary technology for desktop applications with a graphical user interface (GUI). You may also have required a console application for special needs such as batch processing or automated workflow. Finally, for more advanced applications, you may have needed to create a Windows service application, a type that, technically, does not even have a user interface.
There is one interesting type remaining: the system tray application.
This type of application is a kind of hybrid: it acts like a service, in that it sits in the background until you give it focus, then it acts like a GUI, allowing you to interact with it like a WinForms or WPF application.
You can find quite a number of articles on tray applications, just as I did when I needed to create my first one. I hit two problems during my self-edification: first, I did not find any single article that had all the necessary details. I collected bits and pieces from several to achieve a useful and usable solution. Second, many of these articles provide a kludge disguised as a solution: it is workable but certainly not the best way to create a system tray application.
In this article I’ll describe the best practice for creating a tray application, complete with a tray application framework in C# that you can put to immediate use.
Because I didn’t like being told by one source that tray applications could exist only in WinForms, but not WPF, I’ll show you how you may choose to use either WinForms, WPF or both together with this framework. For those WPF purists, it turns out that there are also independently developed libraries created by industrious developers that allow you to create strictly a WPF solution.
As I believe it is easier to learn with real code rather than study academic exercises, I present in this article a complete, open-source, tray application built on my framework. While it is possible that only a fraction of the readership needs this particular utility, you should still find it valuable as a real-world example.
Introducing HostSwitcher: A Tray App for Some of You
My tray application, HostSwitcher, lets you re-route entries in your hosts file with a single click on the context menu attached to the icon in the system tray. I needed this myself because my work involved a network application that communicated with several servers at any given time. Frequently, sometimes several times a day, I need to reroute entries in my host file among several sets of servers: one set of servers is for production, one for the current development effort, one for the legacy development effort, and one for scratch work. Thus, several times a day I edit the hosts file, commenting out one group of lines and uncommenting a second group. Each developer on the project has to do this same silly procedure. I wanted a simple, easy, and fast way to do that automatically.
Requirements
I needed two things to make this work: Firstly, a tray application framework (that I could tailor to access servers from its context menu), and, secondly, a mechanism to drive the generation of the contents of the context menu from the hosts file. I did not find any plug-and-play library components for the tray application framework so I needed to craft my own. My requirements were:
- First and foremost, the app must exist as a tray application. Many of the solutions, as I hinted earlier, are really WinForms applications coerced into being tray applications (akin to forcing a square peg into a round hole!).
- Only one instance of the app may run. Attempting to start a second instance immediately terminates.
- The app, from the icon in the system tray, must be able to open a WinForms or WPF window as needed.
- Closing the tray application also closes any open windows.
- The system tray icon must easily support dynamic context menus.
The last requirement in the list directly supports the second facet of this application, converting hosts file data to context menu choices. I quickly settled on adding meta-comments to overlay on existing hosts file entries. Since these are comments, they are completely transparent to other consumers of the hosts file. Because there is markup on IP addresses right in the hosts file, this reduces maintenance by avoiding duplication with some external resource, and makes it very simple to modify hosts entries and groupings at any time.
Instrumenting Your Hosts File
HostSwitcher is simple to operate; almost everything you need to know is on the one-page introduction (Figure 1) that appears automatically upon first launch if you have not yet decorated your hosts file. (You can also open that introduction page from the context menu.) As shown in the figure, you start with the servers listed in your host file. Organize these into server groups, where all servers in a group should operate in unison; that is, since each server group is bound to a single context menu entry they all are enabled or all disabled together. Next you can cluster your server groups with other related server groups to form a project where each server group in the project should be mutually exclusive of its sibling groups. (They are mutually exclusive within the perspective of HostSwitcher but there is, of course, nothing preventing you from editing your hosts file manually and corrupting it however you please. Projects appear as top-level entries in the context menu; server groups appear as children of their parent project.
In the example in Figure 1, only a small portion of the hosts file is shown. (I happen to have thousands of lines in this host file as a protective measure on my computer.) HostSwitcher is only aware of these 16 lines, though, because they are the ones I have decorated with meta-comments (shown in green). Each meta-comment indicates a project/server group pair in brackets with a virgule separating them. You may use any other characters you please for both the project name and the server group name. Each time you open HostSwitcher’s context menu it rereads the hosts file. That way, if you do edit it externally it will pick up on your most current changes. Thus, as soon as you save the newly decorated hosts file you can open the context menu and it will correctly reflect your projects; no need to restart the application.
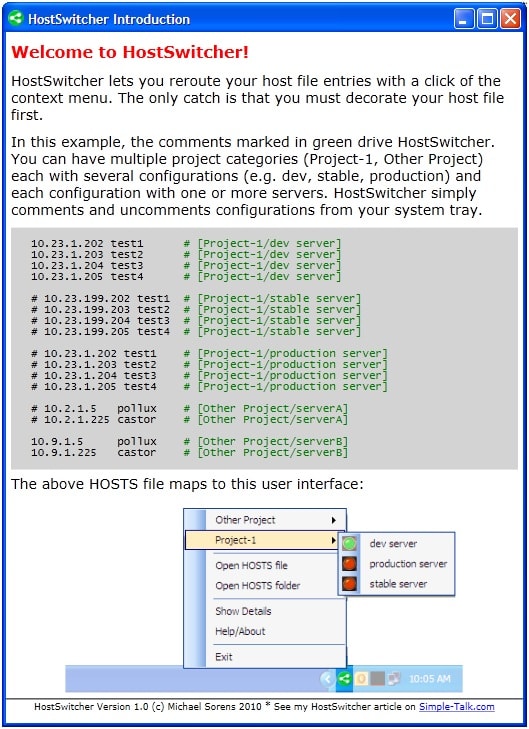
Figure 1 HostSwitcher Information Page
This shows how to decorate your hosts file and how that manifests in the context menu attached to the icon in the system tray.
Usage
HostSwitcher, as mentioned earlier, automates the process of commenting and uncommenting specific lines in your host file simply by selecting a server group from the context menu of the system tray icon. It operates on all the relevant host file lines of a project at once, resolved down to its constituent server groups. When it enables one server group it just uncomments the lines of the host file containing the servers in that group. Similarly, when it disables a server group it comments out the respective lines in the hosts file. At the user level, selecting a server group in the context menu enables that server group and disables all other server groups in the project.
The example in Figure 1 defines two projects: Project-1 and Other Project. The screen shot of the context menu at the bottom shows the Project-1 submenu opened and the three server groups contained therein. Observe how these come directly from the hosts file. Each server group has a colored icon indicating its state: green for enabled, red for disabled, and yellow for mixed. Technically speaking mixed is bad. You do not want a server group to have both enabled and disabled servers because that violates the cardinal rule of servers in a server group-they should always operate in unison. By the way, when you hover over a server group name without selecting it, its tooltip indicates how many individual servers are enabled and how many are disabled. So you may determine from the tooltips how many servers you have in any particular group.
Another bad condition is having more than one server group enabled within a single project; i.e. you should never have more than one green icon in a project. Remember the cardinal rule of server groups within a project: they are mutually exclusive.
Fortunately, it is trivial to clean up any bad states-just select a server group in a “corrupt” project on HostSwitcher’s context menu. Remember: selecting a server group enables that server group and disables all other server groups in the project. It follows, therefore, if you need to have “corrupt” entries (as far as HostSwitcher is concerned) for performing other tasks on your computer, when you want to come back to HostSwitcher just select your target server group and you are ready to go.
Features
Besides activating a server group, HostSwitcher’s context menu also allows you to:
- Open the hosts file itself (in Notepad).
- Open the folder containing the hosts file (in Explorer).
- View a server details page showing the results of parsing your hosts file (Figure 2)-this is handy to debug your hosts file setup.
- View the introductory page (Figure 1) to remind yourself how to instrument your hosts file.
- The HostSwitcher icon itself has these features:
- Double-clicking the icon in the system tray re-opens the introduction/help page.
- Hovering over the icon identifies the selected server group for your first few projects. (A .NET limitation restricts this tooltip to just 63 characters.)
Host Details View
Particularly when you first attempt to decorate your hosts file, the host details window comes in very handy to check the results of your work. As Figure 2 shows, you see both the actual host file entries and the meta-comments attached to them. Note that this includes all instrumented lines, whether or not the entire line is commented out or not. In fact, it tells you which lines are completely commented out in the Status column. Active (i.e. uncommented) lines are marked as enabled; commented lines are marked as disabled.
This window into your hosts file provides one additional feature that occasionally comes in quite handy: you can sort the table by clicking on any of the column headers. In Figure 1 notice that the entries are written sorted by server group. In Figure 2 I have clicked on the project name column header to resort the entries for a different perspective. Here you see for each host name the different IPs it will point to depending on your choice of server group.
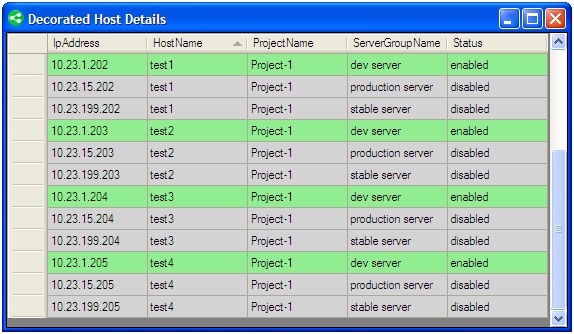
Figure 2 Host Details View
This window lets you check whether you have instrumented your hosts file correctly, showing you what HostSwitcher’s parsing ends up with.
Running on Windows 7
Just for completeness, here is a tip for running under Windows 7. A new tray icon is set by default to only appear when it “has something to say”, i.e. when it issues a notification. It is still in the tray, but you have to click the leftmost icon to reveal the hidden tray icons, then-in the case of HostSwitcher-right-click its icon to open its context menu (bottom left, Figure 3). All terribly cumbersome. You can adjust the properties easily, though. Click the Customize link at the bottom of the hidden icon panel to open the Notification Area Icons control panel. Scroll until you find HostSwitcher and change its setting from Only show notifications to Show icon and notifications (top, Figure 3) to migrate the icon down to the main tray (bottom right, Figure 3).

Figure 3 Adjusting the Tray Icon Properties
The new icon for HostSwitcher is hidden in the tray by default, but you can adjust it to sit in the main tray.
Execution Has Its Privileges
Because the Hosts file in Windows is in a protected, system directory you must have administrative privileges to run HostSwitcher. Even with administrator privileges, on Windows 7 you can still choose to run your applications normally or with administrative rights. HostSwitcher must be run as the latter. If you use the installer accompanying this article, or even if you compile the project in Visual Studio yourself, it automatically attempts to run with administrative rights. If for some reason you like to explicitly invoke Run as Administrator when you launch a program requiring it, you can turn off the automatic setting in the app.manifest file in the HostSwitcher project directory: comment out the line for requestedExecutionLevel then recompile the solution.
The Tray Application Framework
The Secret of the Tray
The secret to tray applications is… Well, it is obvious as soon as you read it. I found assorted articles on the web that were ignorant of it, and others that were not, but none realized the gem of knowledge they had to convey to their readers.
“I thought at first that you had done something clever, but I see that there was nothing in it, after all.”
The Red-Headed League, A. Conan Doyle
Many of the articles you find on tray applications use a form-centric focus: you start with your form, then minimize it to the system tray and hide it from the taskbar. That approach mostly works but it is backwards. The key to applying best practices to designing a tray application is shifting your perspective to a tray-centric focus: instead of thinking of your form (be it WinForms or WPF) as the master controller of your application, think of the little tiny tray icon as the master controller. It runs right in the system tray, spawning child windows only when needed.
As I was experimenting with the form-centric approach I found one significant deficiency: it is challenging to start an application in the tray. You could click a button on the form to send it to the tray, but actually starting it there-with the form completely hidden-is difficult. Either way you need to make sure to remove your app from the taskbar when you go to the tray and rematerialize it when you restore your app. This bookkeeping hassle is not even relevant in the tray-centric approach: you start in the tray, which has no taskbar presence, and only open a form at an appropriate point. Opening the form puts it in the taskbar; closing it again removes it, all automatically.
The Master Controller of a Tray App: The NotifyIcon
With either a form-centric or a tray-centric approach, you still use the same mechanism-the NotifyIcon. Instantiating a NotifyIcon creates your tray icon. You do not have to hook up the NotifyIcon to anything; simply instantiating it is all you need. This method, then, is the entire code to create a system tray icon with a custom icon, tooltip, (empty) context menu, and a couple event handlers:
|
1 2 3 4 5 6 7 8 9 10 11 12 |
private void InitializeContext() { components = new System.ComponentModel.Container(); notifyIcon = new NotifyIcon(components) { ContextMenuStrip = new ContextMenuStrip(), Icon = new Icon(IconFileName), Text = DefaultTooltip, Visible = true }; notifyIcon.ContextMenuStrip.Opening += ContextMenuStrip_Opening; notifyIcon.DoubleClick += notifyIcon_DoubleClick; } |
Tailoring Your Program Entry Point: The ApplicationContext
When you create a normal WinForms application, Visual Studio auto-generates part of the code for the form itself (stored in YourForm.designer.cs) but it also generates an even more crucial portion of code that is less exposed, stored in Program.cs. This file provides an entry point for your entire application-the Application object. For a form-centric application, the key line of code that launches your form as the mainstay of the application is:
|
1 |
Application.Run(new Form1()); |
Jessica Fosler, in her article Creating Applications with NotifyIcon in Windows Forms, breaks down that single statement into this equivalent code to provide a better understanding of what happens:
|
1 2 3 |
Form1 form1 = new Form1(); ApplicationContext applicationContext = new ApplicationContext(); applicationContext.MainForm = form1; Application.Run(applicationContext); |
This sequence reveals the hidden intermediary component between your Form and the central Application.Run method-the ApplicationContext object. Attaching the form to the MainForm property of the ApplicationContext does two things. First, calling Application.Run invokes the form’s Show method, opening your form to begin processing events. Second, it ensures the entire application terminates when the form closes. Those two actions describe just how a form-centric application behaves. For a tray-centric application, on the other hand, the entry point code is just as simple but significantly different:
|
1 |
ApplicationContext applicationContext = new CustomApplicationContext(); Application.Run(applicationContext); |
This code creates a custom ApplicationContext, which you will see next. Notably there is no mention of any Form here. It (or they) will be instantiated as needed by the custom ApplicationContext. When you pass the custom ApplicationContext to the Run method, rather than open a form, here you are just passing control to the ApplicationContext. The final bit of code you need to get from there to the InitializeContext method shown earlier is just the constructor for the custom ApplicationContext:
|
1 2 3 4 5 |
public CustomApplicationContext() { InitializeContext(); hostManager = new HostManager(notifyIcon); hostManager.BuildServerAssociations(); if (!hostManager.IsDecorated) { ShowForm(); } |
The first statement materializes the user interface-in this case, the icon in the system tray. The remaining lines of the constructor are specific to the HostSwitcher application; yours will be tailored to your own application. For this application, the code creates a HostManager (the workhorse of HostSwitcher) and does an initial pass of parsing the hosts file. Finally, if the parsing step indicated that the file has no decoration-probably indicating this is the first time the application has been launched-it displays the form showing basic program operation (see Figure 1).
Rounding Out the ApplicationContext
The web of connections is starting to materialize: the ApplicationContext constructor is called from the Main method in Program.cs. The constructor in turn invokes InitializeContext, which creates the NotifyIcon. InitializeContext also adds a couple event handlers to the NotifyIcon, notably the one that fires when the user opens the context menu. This event handler code, shown here, is specific to HostSwitcher, except for the important first line. Whenever you are dynamically generating a context menu you must set the e.Cancel flag to false: that allows the context menu to continue opening even if it is empty at the moment of clicking. (By the time it opens, the code in the event handler should have populated it, of course.)
|
1 2 3 4 5 6 7 8 9 10 11 12 13 14 15 16 17 |
private void ContextMenuStrip_Opening( object sender, System.ComponentModel.CancelEventArgs e) { e.Cancel = false; hostManager.BuildServerAssociations(); hostManager.BuildContextMenu(notifyIcon.ContextMenuStrip); notifyIcon.ContextMenuStrip.Items.Add(new ToolStripSeparator()); notifyIcon.ContextMenuStrip.Items.Add(hostManager .ToolStripMenuItemWithHandler("Show &Details", showDetailsItem_Click)); notifyIcon.ContextMenuStrip.Items.Add(hostManager .ToolStripMenuItemWithHandler("&Help/About", showHelpItem_Click)); notifyIcon.ContextMenuStrip.Items.Add(new ToolStripSeparator()); notifyIcon.ContextMenuStrip.Items.Add(hostManager .ToolStripMenuItemWithHandler("&Exit", exitItem_Click)); } |
For HostSwitcher, I reread the hosts file each time the user opens the context menu (BuildServerAssociations) to keep it current. The hostManager then builds the custom portion of the context menu and the remaining lines here finish up the menu with commands to open different child windows.
These next methods comprise the rest of the generic portion of the custom ApplicationContext, mostly verbatim from Fosler’s Creating Applications with NotifyIcon in Windows Forms. They take care of proper cleanup in the class:
|
1 2 3 4 5 6 7 8 9 10 11 12 13 14 15 |
private void exitItem_Click(object sender, EventArgs e) { ExitThread(); } protected override void Dispose(bool disposing) { if ( disposing && components != null) { components.Dispose(); } } protected override void ExitThreadCore() { if (mainForm != null) { mainForm.Close(); } notifyIcon.Visible = false; // should remove lingering tray icon! base.ExitThreadCore(); } |
Customizing WinForm Connections
The only remaining portions of the custom ApplicationContext involve hooking up any child forms you may need. First you need a method to display the form if it already exists, or create one if it does not. You should use the code shown here as a template for your own child forms, changing the one line that indicates the Form name and optionally, its arguments. You may also want to change the variable name; I use detailsForm here because it shows the details view for HostSwitcher.
|
1 2 3 4 5 6 7 8 9 |
private void ShowDetailsForm() { if (detailsForm == null) { detailsForm = new DetailsForm {HostManager = hostManager}; detailsForm.Closed += detailsForm_Closed; detailsForm.Show(); } else { detailsForm.Activate(); } } |
With this method in hand you need to invoke it from your tray icon’s context menu and clean it up when closed:
|
1 2 3 4 5 |
// attach to context menu items void showDetailsItem_Click(object sender, EventArgs e) { ShowDetailsForm(); } // null out the forms so we know to create a new one. void detailsForm_Closed(object sender, EventArgs e) { detailsForm = null; } |
WPF Can Play, Too!
The NotifyIcon, as neutral as it may seem, exists in the WinForms namespace. I was wondering if it could play well with WPF too since WPF does not have its own. In my previous article on WPF and WinForms interoperability (Mixing WPF and WinForms) I came to appreciate the enormous size and complexity of making these two technologies play well together and kudos to Microsoft for making it a reality. Because of the support from the Framework, it is trivial to use a WPF window instead of a WinForms window. First, create a WPF window. (Do this in a new, separate project because Visual Studio does not let you put a WPF window in a WinForms project. The project should be a WPF Custom Control Library. See Johan Danforth’s blog entry Open a WPF Window from WinForms that shows you the step by step procedure in a very clear and concise article!) With that in hand you then use this slightly different method to display the form:
|
1 2 3 4 5 6 7 8 9 10 |
private void ShowIntroForm() { if (introForm == null) { introForm = new WpfFormLibrary.IntroForm(); introForm.Closed += mainForm_Closed; ElementHost.EnableModelessKeyboardInterop(introForm); introForm.Show(); } else { introForm.Activate(); } } |
The only difference from the WinForms version, discounting names, is the additional line invoking the EnableModelessKeyboardInterop method. Danforth explains that this line is important to properly handle keyboard input; further details are available in the MSDN forum post Windows Form opening WPF window as well.
Then, just as with the WinForms version, you need to hook up the child form with event handlers. The first line is unique here only because I chose this child form to respond to double-clicking the tray icon; you could just as easily let it display the WinForm child.
|
1 2 3 4 5 6 |
void notifyIcon_DoubleClick(object sender, EventArgs e) { ShowIntroForm(); } // attach to context menu items void showHelpItem_Click(object sender, EventArgs e) { ShowIntroForm(); } // null out the forms so we know to create a new one. void mainForm_Closed(object sender, EventArgs e) { introForm = null; } |
As you can see, it is just as easy to use a WPF window as it is a WinForms window, even though the NotifyIcon is a WinForms class. While WPF does not have a NotifyIcon native to the .NET framework, thanks to Philipp Sumi (the same industrious developer who created Sketchables for SketchFlow), there is a NotifyIcon available in pure WPF, enhancing the display capabilities of your tray icon with rich tool tips instead of just text, WPF context menus, flexible data binding, and rich balloon messages. It looks so enticing I am eager to convert HostSwitcher over to it at some point! Read Philipp’s article, simply titled WPF NotifyIcon, and download his code to try it out.
Ensuring Only One Instance Executes: Mutual Exclusion
There are three commonly used techniques for enforcing only one instance of your application may execute. Regardless of the technique, though, the algorithm is the same: very early in its startup each instance checks to see if any other instances are running and terminates if there are. The first instance, finding none, continues initialization while any subsequent ones obediently disappear.
Technique 1: Native .NET Support
The .NET framework includes a class (WindowsFormsApplicationBase) that you subclass to create a single instance manager. It is relatively simple to hook up. The only odd thing about it is that it exists in a Visual Basic namespace even though you are free to use it in other .NET languages just as readily. Thus, you must include a reference to Microsoft.VisualBasic.dll. Michael Kuehl has a good article on this approach which may be used for WinForms or WPF despite the title: “WPF – Writing a Single Instance Application”. This is his code sample; I refer you to his article for details on what it does:
|
1 2 3 4 5 6 7 8 9 10 11 12 13 14 15 16 17 18 19 20 21 22 23 24 25 |
public sealed class SingleInstanceManager : WindowsFormsApplicationBase { [STAThread] public static void Main(string[] args) { (new SingleInstanceManager()).Run(args); } public SingleInstanceManager() { IsSingleInstance = true; } public ExampleApplication App { get; private set; } protected override bool OnStartup(StartupEventArgs e) { App = new ExampleApplication(); App.Run(); return false; } protected override void OnStartupNextInstance( StartupNextInstanceEventArgs eventArgs) { base.OnStartupNextInstance(eventArgs); App.MyWindow.Activate(); App.ProcessArgs(eventArgs.CommandLine.ToArray(), false); } } |
Technique 2: The Process Table
With this technique you check if your application appears in the list of running processes on your machine. This takes only a few lines of code in your Main() method. Bob Powell describes this technique succinctly in The Single Instance Application. This is his code sample:
|
1 2 3 4 5 6 7 8 9 10 11 12 13 14 15 16 17 18 |
static void Main() { string appProcessName = Path.GetFileNameWithoutExtension(Application.ExecutablePath); Process[] RunningProcesses = Process.GetProcessesByName(appProcessName); if (RunningProcesses.Length == 1) // just me, so run! { Application.EnableVisualStyles(); Application.SetCompatibleTextRenderingDefault(false); Application.Run(new CustomApplicationContext()); } else // switch to the first instance and exit { ShowWindowAsync(RunningProcesses[0].MainWindowHandle, (int)ShowWindowConstants.SW_SHOWMINIMIZED); ShowWindowAsync(RunningProcesses[0].MainWindowHandle, (int)ShowWindowConstants.SW_RESTORE); } } |
Technique 3: The Mutex Primitive
This technique uses the .NET Mutex (short for mutual exclusion) synchronization primitive. A mutex object allows you to obtain a resource and then lock it so that others may not obtain it until you release the lock. The application is obvious: here you want to allow the first instance of your application to run, and then create a lock so that other instances may not run. In this code sample the Mutex object is embedded in the SingleInstance class: the Start method requests the mutex lock while the Stop method releases it. If the lock is not obtainable, i.e. this is not the first instance, the program terminates. Otherwise it continues to run and upon conclusion releases the lock.
|
1 2 3 4 5 6 7 8 9 10 11 12 13 14 15 |
static void Main() { if (!SingleInstance.Start()) { return; } // mutex not obtained so exit Application.EnableVisualStyles(); Application.SetCompatibleTextRenderingDefault(false); try { Application.Run(new CustomApplicationContext()); } catch (Exception ex) { MessageBox.Show(ex.Message, "Program Terminated Unexpectedly", MessageBoxButtons.OK, MessageBoxIcon.Error); } SingleInstance.Stop(); // all finished so release the mutex } |
This technique-the one I chose to apply to HostSwitcher-is thoroughly detailed in C# Single Instance App With the Ability To Restore From System Tray written by a developer with the moniker of “devzoo”. This has the clear benefit of only a couple lines of code added to your application once you reference the MutexManager library included in the HostSwitcher solution as a separate DLL. (My MutexManager library is a simple repackaging of devzoo’s nicely encapsulated classes.) Note that the all-encompassing error trapping is important here-you want to ensure that you release the mutex even if your program throws an exception.
Strengths and Weaknesses of Mutex Techniques
There are a variety of factors to consider in deciding which technique to use to enforce the single instance principle. The WindowsFormsApplicationBase seems a bit more complex in instrumenting your code. The process list approach requires very simple coding and no additional libraries, but it does have some weaknesses, as K. Scott Allens describes in the blog entry on The Misunderstood Mutex. Because of those weaknesses I prefer the Mutex approach.
On the other hand, notice in the code samples that the Mutex technique is the only one of the three where you cannot activate the first instance from subsequent instances. For a form-centric application, re-activating the first instance when the user attempts to launch a second instance is clearly a good usability goal. But for a tray-centric application like HostSwitcher there is little benefit-the “application” is in the system tray so there is not even a concept of bringing it to the foreground. I will admit, though, that some tray-centric applications would find it a benefit-those where the user operates primarily in child windows (e.g., a firewall or antivirus program). These typically live in your system tray but at any time you can open up a main window as long lasting as any normal desktop application.
I have a solution in mind to strength the Mutex approach (though I have not yet implemented it): use the standard Mutex for enforcing a single instance, but then use the process table technique to find the first instance and activate it as demonstrated in the code sample above.
Conclusion
When I first had the thought “I need a small application to manage my host routing” I had little notion of the nuances and trade-offs involved in creating a well-designed tray app. And, just like the oft-stated comment that “If one person has a question, probably many others in the audience do, too,” I believe that if one developer realizes “Oh, that’s how it is done,” then there are probably many other developers who may appreciate the knowledge as well.
About the only thing I could not come to a good resolution when designing this application is its name. HostSwitcher seems like a reasonable choice but I am not convinced it is the best choice. Thus, I would like to encourage you, dear reader, to post a comment at the bottom to state whether you think HostSwitcher succinctly conveys the intent of the program or to offer an alternative if you have something else in mind. SoftSwitch? HostRouter? HostOnToast? IpHop? NetSpinner? Let me hear from you!
Update: 18th November 2010
After this article was published I continued to improve the HostSwitcher code a bit–version 1.1 of both the installer package and the source package are now attached to the top of this article. Improvements include:
-(Internal) Enhanced LINQ code.
-(User-facing) Left-click on tray icon now opens the context menu just like a right-click. (Thanks to Hans Passant’s StackOverflow post for the technique to do this.)
-(User-facing) Selecting a new server group from the context menu now produces positive feedback in the form of a balloon tip in the tray.
This document contains proprietary information and is protected by copyright law.
Copyright © 2026 Red Gate Software Limited. All rights reserved
Load comments