
Executive Summary
Liquid is a templating language that renders dynamic content from data models – similar to Razor, but safe to use with user-defined or externally stored templates. Unlike Razor (which compiles to C# and can execute arbitrary code), Liquid is sandboxed – users can write and edit templates without security concerns. The Fluid library is the .NET implementation of Liquid for ASP.NET Core. Use it when templates need to be stored in a database, edited by end users through a CMS, or generated dynamically at runtime – any scenario where Razor’s code execution would be a security risk. This article covers adding Fluid to an ASP.NET Core project, defining a model, and rendering a Liquid template from a view.
Templating has been an essential feature for quite a while. At the heart of the problems that software development often attacks, creating simpler ways of dealing with and eliminating repetition is very important. Templates are, in fact, an old way of dealing with something that modules, packages and component libraries do today. It allows the famous “reuse”.
In the ASP.NET world, many template engines have come and gone. The most famous, Razor, is the standard used by most of the industry today, under the microscope of Microsoft. From NHaml, Spark View Engine to RazorEngine, everyone has (and some still have) a large space in the community.
However, this article deals with Liquid. Liquid is an open-source template language created by Shopify and written in Ruby. As you may have noticed, it is broadly used by Shopify and some of the correlated projects and companies. It’s very mature as well, being out there since 2006.
With Liquid, you can run code directly from a database, for the cases when you have a remote client that needs to update part of the code, for example. It also offers a good error handling system, while it’s very clean and performs well.
Take a look below at the final example you will have created by the end of this article. Figure 1 shows the listing page of a single CRUD operation (that will only add new data) of employees, while Figure 2 displays the registration page. You can find the completed project here.
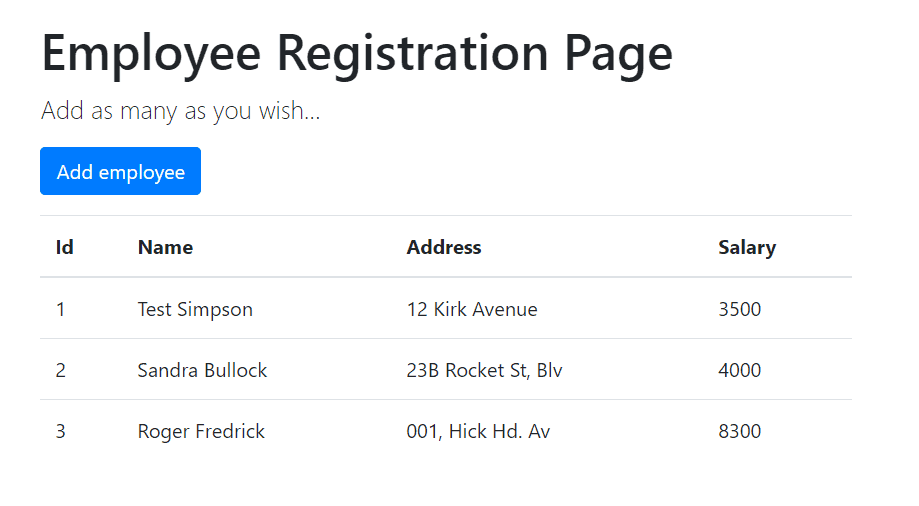
Figure 1. Listing the employee’s records.

Figure 2. Registering new employees.
Creating the project
The first thing to do is to create a new project via Visual Studio. Although this type of resource works with other versions of ASP.NET web projects, this example will be an ASP.NET Core Web Application project, because it will give more comparative inputs between the Razor model and the current model with Liquid.
To do this, go to the option that creates a new project, and select the option as shown in Figure 3, and click Next.
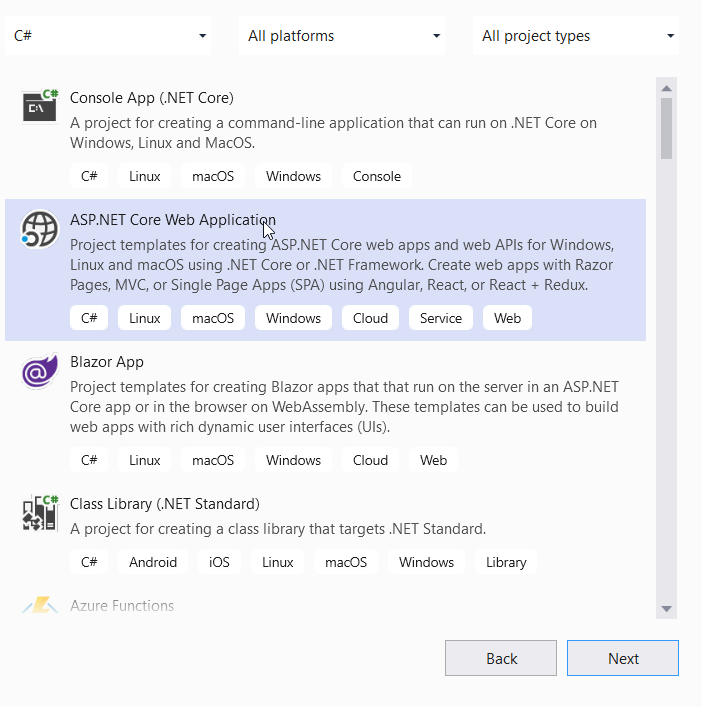
Figure 3. Creating a new ASP.NET Core Web Application.
The next screen will ask you to fill the project name, the location and the solution name, respectively. Fill all of them according to Figure 4 and click Create.
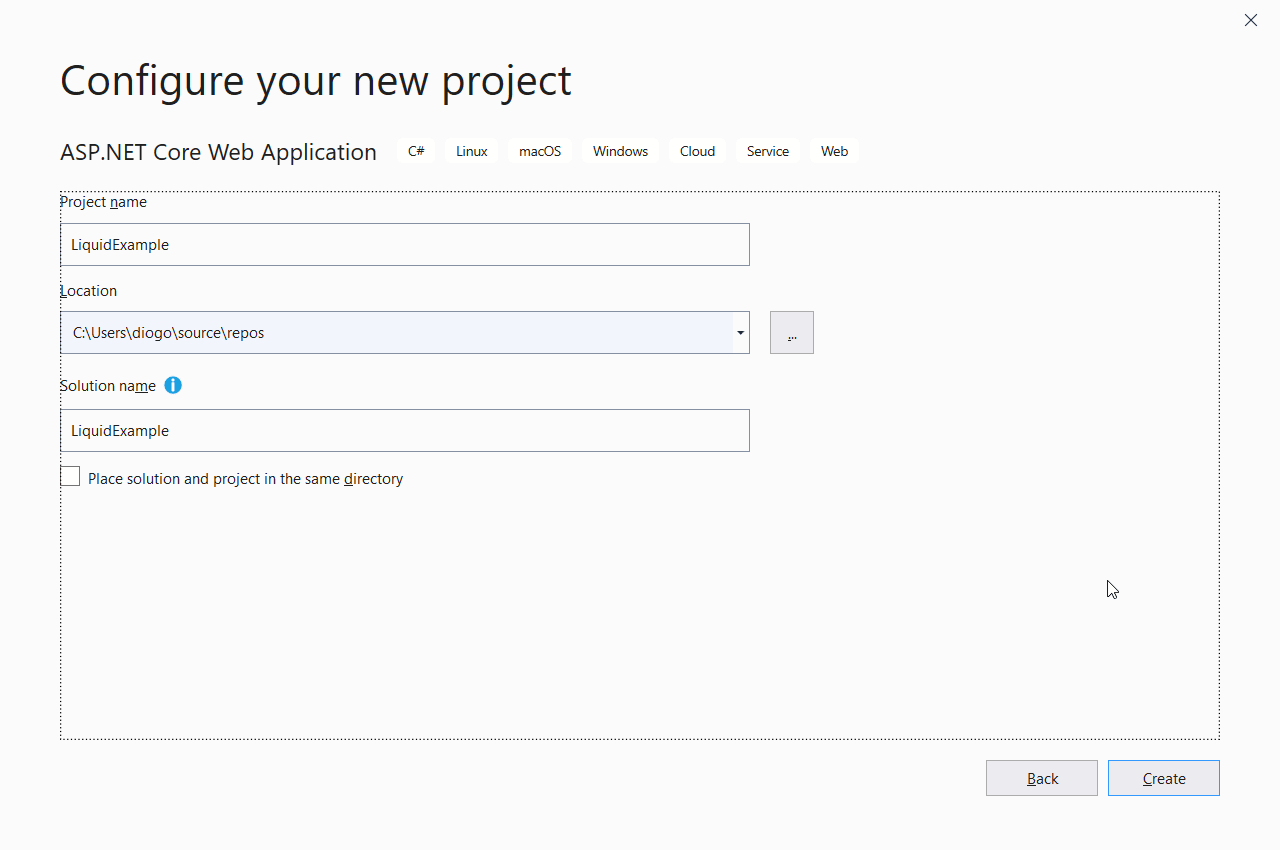
Figure 4. Configuring project’s definitions.
The project will take a while to load and, then, open a new window like that shown in Figure 5.
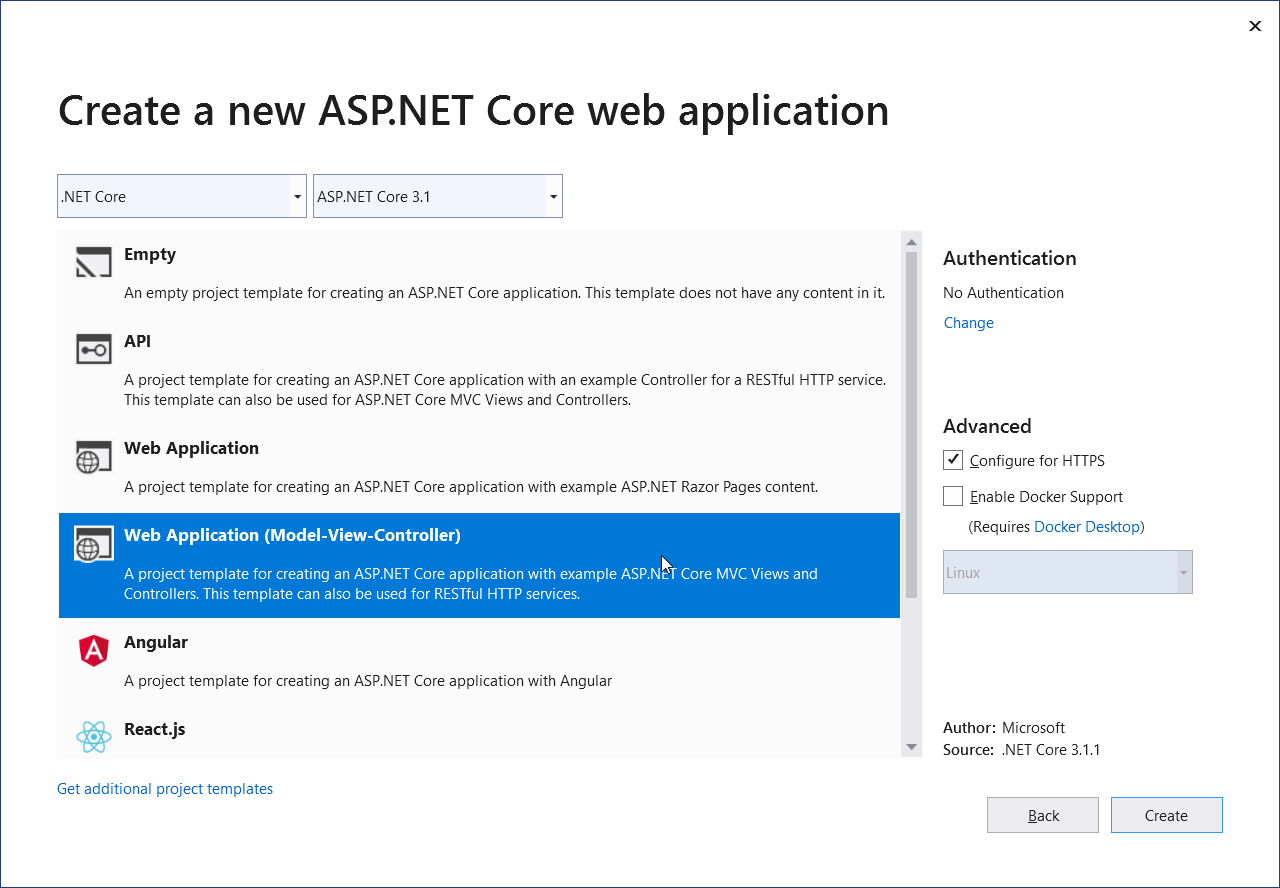
Figure 5. Selecting the proper project template.
You can also perform this whole process through the command line, by the use of the dotnet command.
Once you have finished, it’s time to install the NuGet package regarding the Liquid dependency. For this, run the following command by going to the menu Tools > NuGet Package Manager > Package Manager Console:
|
1 |
Install-Package Fluid.MvcViewEngine -Version 1.0.0-alpha-9637 |
This example will use the Fluid.MvcViewEngine version 1.0.0-alpha-9637. You can check for the latest available option here.
Startup settings
Before you begin coding, you need to create the template for the Employee class. To do this, create a class in the Model directory called Employee.cs. Its content will be very simple, containing only the attributes that will be used in the CRUD commands for the Employee object:
Listing 1. Code of the Employee class.
|
1 2 3 4 5 6 7 8 9 10 |
namespace LiquidExample.Models { public class Employee { public int Id { get; set; } public string Name { get; set; } public string Address { get; set; } public double Salary { get; set; } } } |
Next, you need to configure the Startup class. It is here that you should define the service configuration for the Fluid API, as well as register the new employee model.
Listing 2. Code of the Startup class.
|
1 2 3 4 5 6 7 8 9 10 11 12 13 14 15 16 17 18 19 20 21 22 23 24 25 26 27 28 29 30 31 32 33 34 35 36 37 38 39 40 41 42 |
using Fluid; using Fluid.MvcViewEngine; using LiquidExample.Models; using Microsoft.AspNetCore.Builder; using Microsoft.AspNetCore.Hosting; using Microsoft.Extensions.Configuration; using Microsoft.Extensions.DependencyInjection; using Microsoft.Extensions.Hosting; namespace LiquidExample { public class Startup { public Startup(IConfiguration configuration) { Configuration = configuration; TemplateContext.GlobalMemberAccessStrategy.Register<Employee>(); } public IConfiguration Configuration { get; } // This method gets called by the runtime. Use this method to add services to the container. public void ConfigureServices(IServiceCollection services) { services.AddControllersWithViews().AddFluid(); } // This method gets called by the runtime. Use this method to configure the HTTP request pipeline. public void Configure(IApplicationBuilder app, IWebHostEnvironment env) { if (env.IsDevelopment()) { app.UseDeveloperExceptionPage(); } app.UseHttpsRedirection(); app.UseStaticFiles(); app.UseRouting(); app.UseEndpoints(endpoints => { endpoints.MapControllerRoute( name: "default", pattern: "{controller=Employee}/{action=Index}/{id?}"); }); } } } |
The using statements at the beginning of the class are already optimized without unnecessary imports. The Fluid API provides the tools to register as many models as you need to work in the templates. If your application needs several different models, all of them must be set here.
If you have decided to go with an MVC version of the web project, make sure to compare the distinctions between both files.
Next, you need a repository layer to provide a storage mechanism. For instance, this project won’t make use of any database or API-like resource for data saving. A simple in-memory list of employees will do the job to avoid outer complexities (Listing 3). Put this class into a new folder called Repositories.
Listing 3. Code of the EmployeeRepository class.
|
1 2 3 4 5 6 7 8 9 10 11 12 13 14 15 16 17 18 19 |
using LiquidExample.Models; using System.Collections.Generic; using System.Linq; namespace LiquidExample.Repositories { public class EmployeeRepository { private static Dictionary<int, Employee> employees = new Dictionary<int, Employee>(); public List<Employee> GetAll() { return employees.Values.ToList(); } public void Add(Employee employee) { employee.Id = employees.Count + 1; employees.Add(employee.Id, employee); } } } |
Feel free to adjust this layer to your own needs. Next, you need to create a new employee’s controller or, if you want, to adapt the then-created home controller. It will handle the operations regarding the endpoints that will communicate with the Liquid templates.
Listing 4 shows the code for the EmployeeController. You must maintain the same name since you’ll call it this way in the templates.
Listing 4. Code of the EmployeeController class.
|
1 2 3 4 5 6 7 8 9 10 11 12 13 14 15 16 17 18 19 20 21 22 23 |
using LiquidExample.Models; using LiquidExample.Repositories; using Microsoft.AspNetCore.Mvc; namespace LiquidExample.Controllers { public class EmployeeController : Controller { public readonly EmployeeRepository repository; public EmployeeController() => repository = new EmployeeRepository(); public IActionResult Index() { var employees = repository.GetAll(); return View(employees); } public IActionResult Create() => View(); [HttpPost] public IActionResult Create([FromForm] Employee employee) { repository.Add(employee); return RedirectToAction(nameof(Index)); } } } |
The controller is straightforward; it keeps the repository that was created as a global variable to be used below by the other listing and creation methods. Later, it’d be interesting to add the other equivalent CRUD operations. I’ll leave it as homework for you.
The views
Now to move on to the views. You’ll see that you already have some Razor view files there that can all be deleted. You won’t need any of them. Liquid views always end with the .liquid extension. Here, you’ll need four Liquid view files following this hierarchy:
– Employee
– Create.liquid
– Index.liquid
– _Layout.liquid
– _ViewStart.liquid
Make sure to create the same structure accordingly. Listing 5 shows the code that composes the Employee/Create.liquid file.
Listing 5. Code of the Create.liquid file.
|
1 2 3 4 5 6 7 8 9 10 11 12 13 14 15 16 17 18 19 20 21 22 23 24 |
<div class="row"> <div class="col-md-12"> <form action="/Employee/Create" method="post"> <div class="form-group"> <label for="Name" class="control-label">Name:</label> <input name="Name" id="Name" class="form-control" /> </div> <div class="form-group"> <label for="Address" class="control-label">Address:</label> <input name="Address" id="Address" class="form-control" /> </div> <div class="form-group"> <label for="Salary" class="control-label">Salary:</label> <input name="Salary" id="Salary" type="number" step="0.01" class="form-control" /> </div> <div class="form-group"> <input type="submit" value="Save" class="btn btn-primary" /> </div> </form> </div> </div> <div> <a href="/Employee/Index">< Back to Index</a> </div> |
This is basic Bootstrap HTML content. A single form that maps to the POST method created in the controller and a link that drives the user back to the index page. A similar template file could be used for the edition page, for example.
The Index.liquid file (shown in Listing 6), in turn, is a composition of a link to call the form just created and, second, the listing of all employee’s data into an HTML table.
Listing 6. Code of the Index.liquid file.
|
1 2 3 4 5 6 7 8 9 10 11 12 13 14 15 16 17 18 19 20 21 22 23 24 25 26 27 28 29 30 31 32 33 34 35 36 37 38 39 |
<p> <a href="/Employee/Create" class="btn btn-primary">Add employee</a> </p> <table class="table"> <thead> <tr> <th> Id </th> <th> Name </th> <th> Address </th> <th> Salary </th> </tr> </thead> <tbody> {% for emp in Model %} <tr> <td> {{ emp.Id }} </td> <td> {{ emp.Name }} </td> <td> {{ emp.Address }} </td> <td> {{ emp.Salary }} </td> </tr> {% endfor %} </tbody> </table> |
Look how Liquid deals with loops, specifically with a foreach. It’s very similar to other languages and close to a language that resembles React, for example. In other words, by using Liquid templates, you have a cleaner and more beautiful HTML setup.
Next, comes the code for the_Layout.liquid file. See it at Listing 7.
Listing 7. Code of the _Layout.liquid file.
|
1 2 3 4 5 6 7 8 9 10 11 12 13 14 15 16 17 18 19 20 21 22 23 24 25 26 |
<!DOCTYPE html> <html lang="en"> <head> <meta charset="utf-8" /> <meta name="viewport" content="width=device-width, initial-scale=1.0" /> <title>{{ ViewData['Title'] }}</title> <link rel="stylesheet" href="https://getbootstrap.com/docs/4.0/dist/css/bootstrap.min.css"> <link rel="stylesheet" href="https://getbootstrap.com/docs/4.0/examples/sticky-footer/sticky-footer.css"> </head> <body> <main role="main" class="container"> <h1 class="mt-5">Employee Registration Page</h1> <p class="lead">Add as many as you wish...</p> {% renderbody %} </main> <footer class="border-top footer text-muted"> <div class="container"> © 2020 - RedGate - <a asp-area="" asp-controller="Home" asp-action="Privacy">Privacy</a> </div> </footer> <script src="https://code.jquery.com/jquery-3.4.1.slim.min.js"></script> <script src="https://cdn.jsdelivr.net/npm/popper.js@1.16.0/dist/umd/popper.min.js"></script> <script src="https://stackpath.bootstrapcdn.com/bootstrap/4.4.1/js/bootstrap.min.js"></script> </body> </html> |
In the code above, it is important to emphasize the {% renderbody%} tag. It indicates the point where the content of the views will be rendered in the template, working like Razor’s @RenderBody().
Note this snippet as well: <title>{{ ViewData['Title'] }}</title>. In it, you are using two keys. These keys are used to indicate objects to be rendered. In this way, when this template is processed, the content of ViewData['Title'] will be displayed in the generated HTML.
Finally, here you have the content of the last Liquid file, _ViewStart.liquid file:
|
1 |
{% layout '_Layout' %} |
It’s that simple! This tag is used to define the standard template used in the views of the current folder and all subfolders, functioning as a “master page”.
Testing time! To test the application, you just need to hit the ISS Express button, to the right of the Debug options or press the F5 button.
Summary
Liquid’s support for ASP.NET does not mean you should use it in all your applications. As stated in the beginning, Razor is a powerful tool, which should not be replaced unnecessarily.
Liquid is a more accessible template engine for people with little programming knowledge. When working on a project where the people who will be dealing with the templates have these characteristics, you should take a look at this template engine.
Read also: The Result pattern for structured error handling when template rendering fails
FAQs: Creating Templates with Liquid in ASP.NET Core
1. What is Liquid templating and when should I use it in ASP.NET Core?
Liquid is an open-source templating language created by Shopify. It renders dynamic content from data models using a safe, sandboxed syntax – no arbitrary code execution. Use Liquid in ASP.NET Core when: templates need to be user-editable (email templates, CMS page layouts, notification formats) where giving users access to Razor would be a security risk; templates need to be stored in a database or external file system and rendered at runtime; or you are building a multi-tenant application where each tenant has their own template configuration. For standard server-rendered views compiled with the application, Razor is the better choice.
2. What is the Fluid library for ASP.NET Core?
Fluid is a .NET implementation of the Liquid templating language, available as a NuGet package (Fluid.Core). It parses Liquid template strings, binds them to .NET model objects, and renders the output. Fluid integrates with ASP.NET Core’s view rendering pipeline via the Fluid.MvcViewEngine package, allowing you to use .liquid files as view templates in an MVC application. Templates are rendered at request time from stored strings or files – not compiled with the application.
3. How do I add Liquid template support to an existing ASP.NET Core app?
Install the Fluid.MvcViewEngine NuGet package. In Program.cs, add .AddFluid() to the MVC builder: builder.Services.AddControllersWithViews().AddFluid(). Create .liquid files in the Views folder alongside or instead of .cshtml Razor files. In controller actions, return View() as normal – the routing system will find the .liquid template. Pass model data as usual; in the template, access it with {{ model.PropertyName }} syntax. The Fluid library handles the binding automatically.
4. What is the difference between Liquid and Razor templates in ASP.NET Core?
Razor (.cshtml) compiles to C# code executed on the server – powerful and performant but requiring trust in the template author. Liquid templates run in a sandboxed interpreter that allows only safe operations – no file access, no arbitrary method calls. Razor is the right choice for application views developed by your team. Liquid is the right choice for any template that external users, admins, or CMS editors will write or modify. Razor views are compiled at startup; Liquid templates can be loaded from any string source at request time.
This document contains proprietary information and is protected by copyright law.
Copyright © 2026 Red Gate Software Limited. All rights reserved
Load comments