In any given game, artificial intelligence (AI) is often needed to interact with the user, usually as a force against the player. There are some scenarios where the AI is there to help, and others where it’s both fighting and helping you, but at the end of the day there is some resemblance of intelligence controlled by the computer in games. AI can be made to have simple or complex behaviours, depending on a project’s requirements. Such requirements may include needing to conduct diplomacy with another player, or just simply walking back and forth on a platform. Whatever it may be, it’s important to make an AI that does its job well.
In this project, a very simple AI will be demonstrated. Suppose you wanted to make a game where the player must sneak around enemy headquarters. The moment a camera spots the player, enemies can swarm in on the location and give chase to the player for a brief period of time. This project will do exactly that on a basic level. By the time this project is finished, you’ll have a player object that you can control, a circle that acts as a camera for the enemy, and an enemy object that will give chase to the player once they have been alerted of their presence via the camera object.
Setting up
First, you’ll need to create a 3D project. Start by clicking the New button at the top of the window after launching Unity as shown in Figure 1.

Figure 1: Creating a new project
Name your project AI and make sure the project is a 3D project. Once you’ve done that and set a location on your computer for the project, click the Create Project button near the bottom shown in Figure 2.
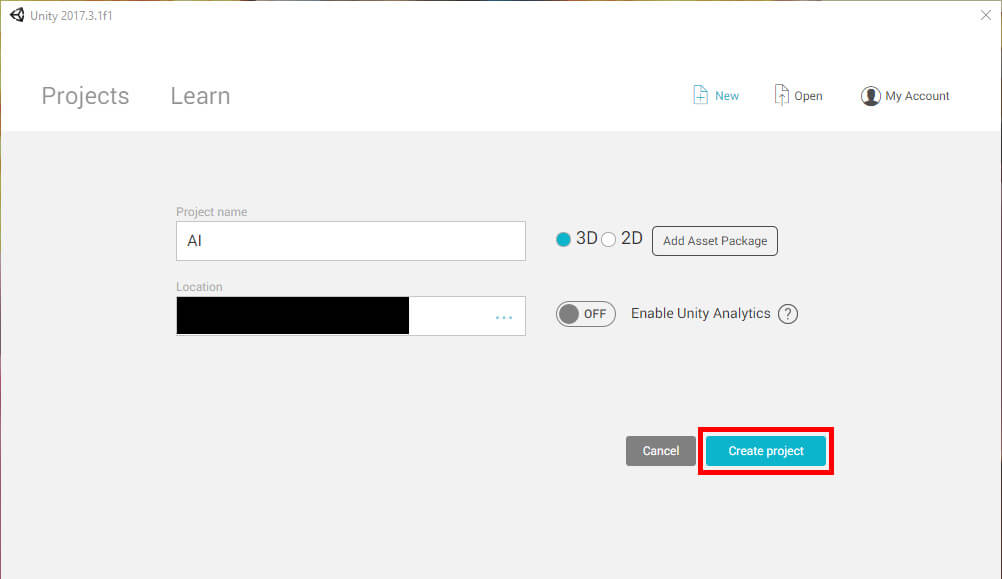
Figure 2: Project setup screen
With the project created, you’ll first want to set up some folders in the Assets window for the sake of organization. Right click in the Assets window and select Create->Folder to create a new folder. Call this folder Materials. Then, create a second folder and name it Scripts. Figure 3 shows how this should look.
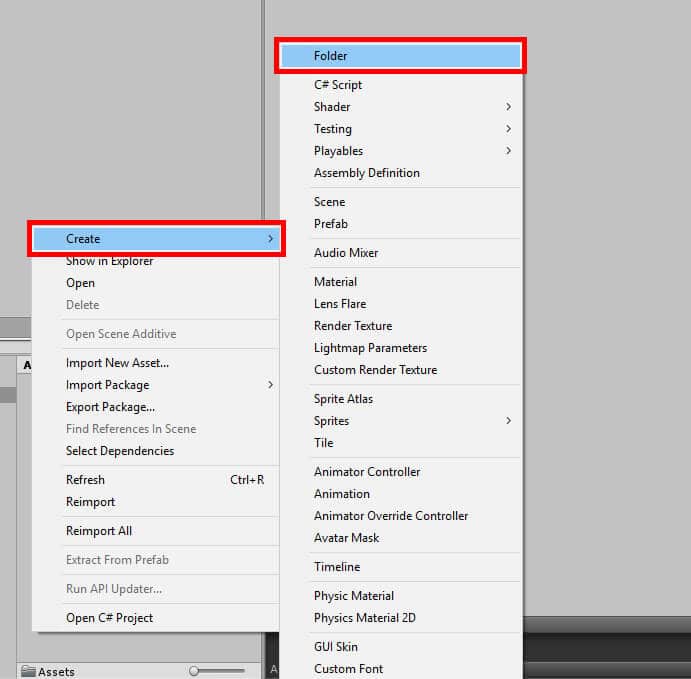
Figure 3: Creating a new folder
When you’re done, the Assets window should look like the one seen in Figure 4.
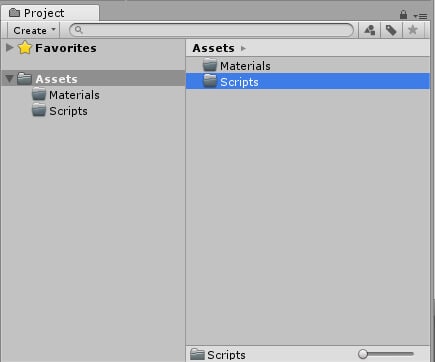
Figure 4: The Assets window so far.
Next, create a floor for all the objects to stand upon. In the Hierarchy window, select Create->3D Object->Plane to create a plane object that will act as your floor as shown in Figure 5.
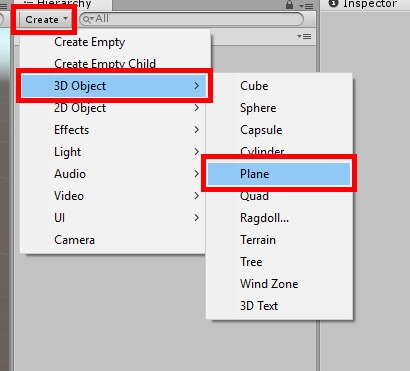
Figure 5: Creating a plane object.
Name this object Floor and give it an X Scale of seven and a Z Scale of three. Once you’ve finished that, the Inspector window with the Floor object selected should look like the one seen in Figure 6.

Figure 6: Setting Floor object properties.
Now you’ll want to create a new material for the Floor to help distinguish it from other objects that will be placed in your scene. Under the Materials folder in the Assets window, create a new material by right clicking in the Assets window and selecting Create->Material shown in Figure 7.
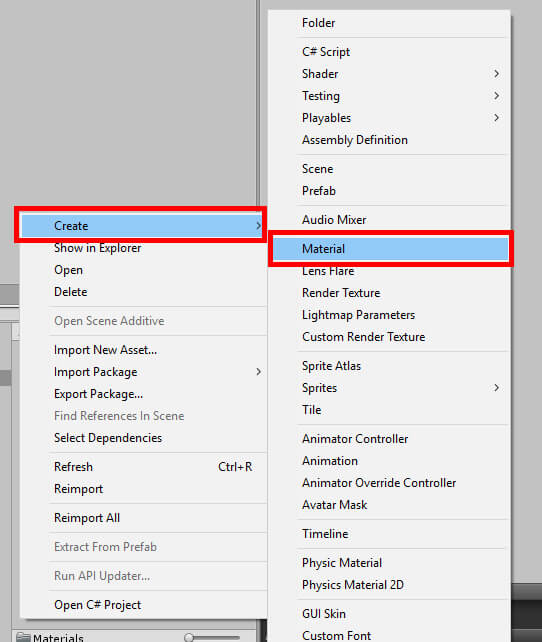
Figure 7: Creating a new material
Once complete, name the material Floor as shown in Figure 8.
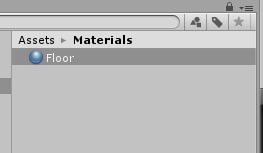
Figure 8: The Floor material
Near the top of the Inspector window with the Floor material selected, select the color picker seen in Figure 9.
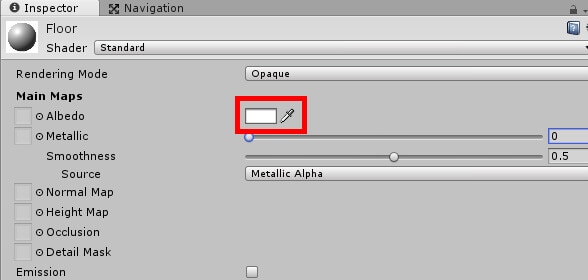
Figure 9: Selecting the color picker.
Of course, the floor can be any color you wish, but in this example it will be set to a brown-red like color as shown in Figure 10.
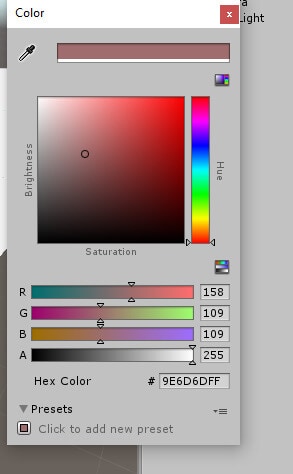
Figure 10: The Unity color picker
Select the Floor object from the Hierarchy window, then under the Mesh Renderer component select the small arrow next to Materials as shown in Figure 11.
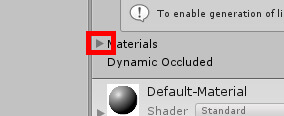
Figure 11: Preparing to change the material.
Click and drag the Floor material from the Assets window to the Element 0 field under the Mesh Renderer component in the Inspector window like in Figure 12.

Figure 12: Setting the Floor material as the Floor object’s material
With the Floor object finished, you will need to create some walls around the area to prevent the player from falling off the edge. Once again, go to Create->3D Object->Plane to create a new plane. Name this plane Wall and give it the same scale as Floor, that being an X Scale of 7 and a Z Scale of 3. Then, create three more walls by selecting the object and pressing Ctrl + D three times. Once that’s done, place the walls around the floor using Table 1 as a reference.
|
Name |
Position X |
Position Y |
Position Z |
Rotation X |
Rotation Z |
|
Wall |
-35 |
21 |
0 |
0 |
-90 |
|
Wall (1) |
-1 |
11 |
-15 |
90 |
0 |
|
Wall (2) |
-1 |
11 |
13.5 |
-90 |
0 |
|
Wall (3) |
34 |
21 |
0 |
0 |
90 |
Table 1: Position and rotations of all Wall objects.
In the example images, the walls have been left at their default color. However, if you wish you may give it a new color by creating a new material. Once this is all in place, you should reorient the camera so that it’s facing down at the floor, in a bird’s eye view. With the Main Camera object selected set its Y Position to thirty, Z Position to zero, and X Rotation to ninety as shown in Figure 13.

Figure 13: Setting up the camera object.
The scene is now set, so it’s time to make the player character. In the Hierarchy window click Create->3D Object->Sphere to create a sphere object. Name this object Player, then click the Add Component button near the bottom of the Inspector window with the Player object selected as shown in Figure 14.
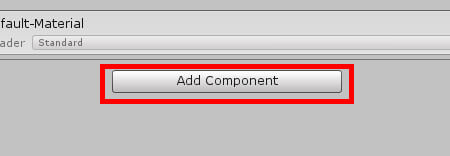
Figure 14: Adding a new component.
Now, like in Figure 15, search for Rigidbody. Once found, select the Rigidbody component from the list to add the Rigidbody to the Player object.
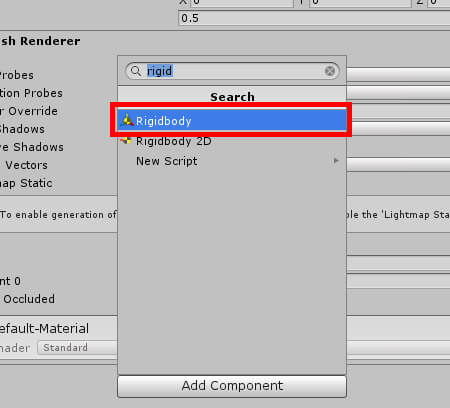
Figure 15: Adding a Rigidbody component.
Next, you need to assign the player a tag that will come in handy later on in the code. Click the Tag drop down menu in the upper left corner of the Inspector window and choose the Player tag as shown in Figure 16.
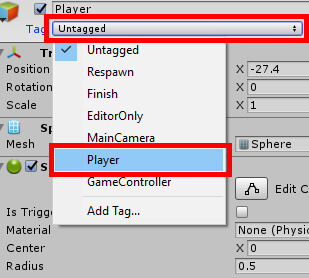
Figure 16: Setting a new tag.
You’ll need to set a position for the player so it’s not underneath the Floor. The example image places the player in the upper left corner, with an X position of 26, Y Position of 1, and Z position of -9 as shown in Figure 17.
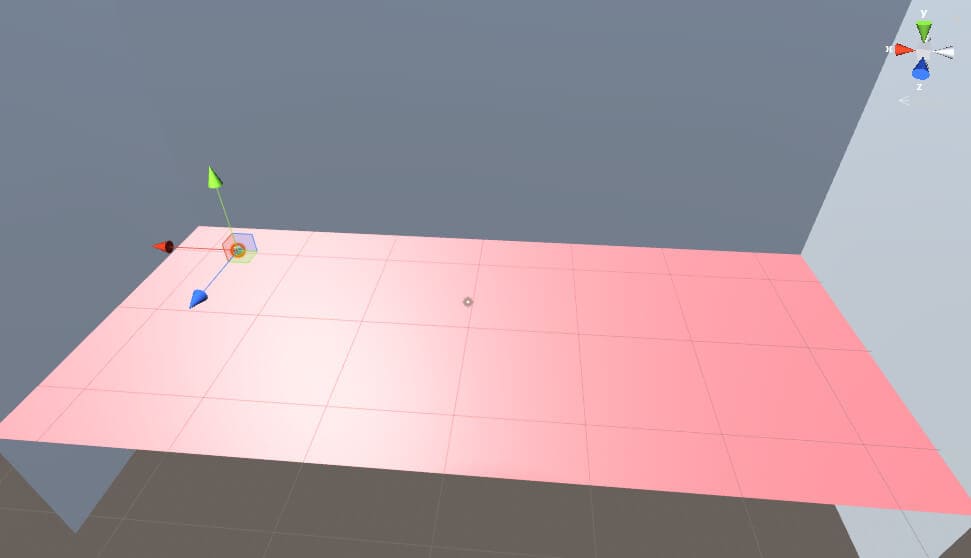
Figure 17: Positioning the player.
In order for your upcoming code to work properly you’ll of course need an object to attach it to. Once again, go to the Hierarchy window and this time choose Create->3D Object->Cube. Name this object Guard, and add a Rigidbody component and a NavMesh Agent component using the Add Component button in the Inspector window. Then, set it somewhere near the upper left corner of the scene. When done, the Inspector window for your Guard object should look like the one in Figure 18.
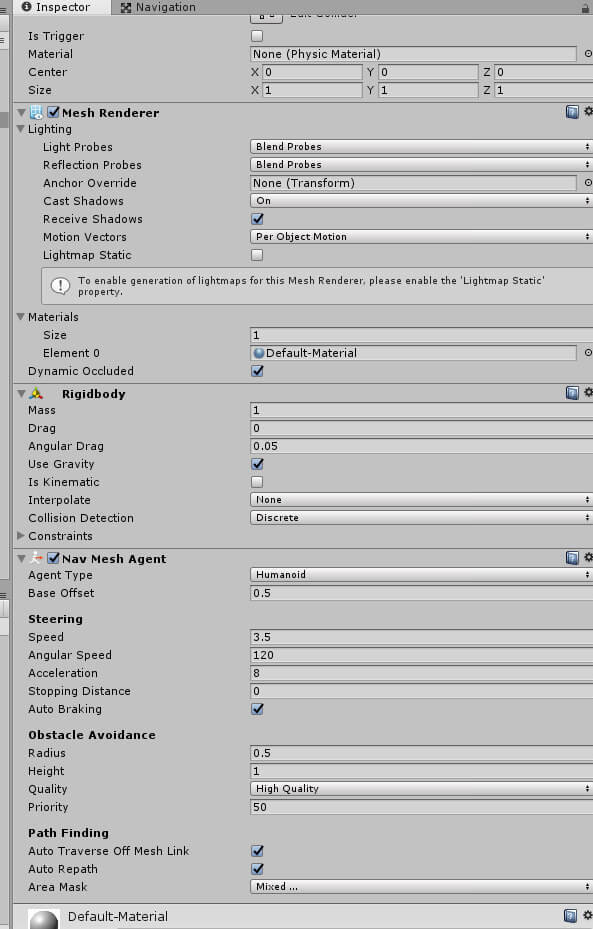
Figure 18: The Guard object as seen in the Inspector window.
And the object in question should be placed in a similar position to the one seen in Figure 19.
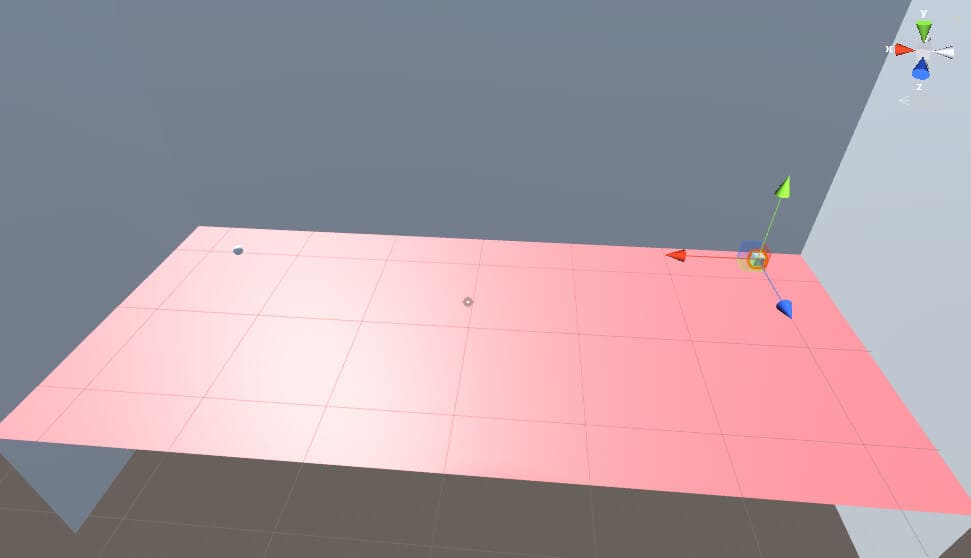
Figure 19: Positioning the Guard object.
Finally you’ll need an object to act as the Guard object’s “eyes” that will alert the Guard whenever the player touches it. One last time, go to the Hierarchy window and choose Create->3D Object->Sphere to create another sphere object. Name this object Looker. From there you have no other components to add to it at this time. However, you’ll want to change the size of the object. With Looker selected, change the following variables in the Transform component under the Inspector window.
- Scale X to 9.
- Scale Y to 0.5.
- Scale Z to 9.
Once you’ve done that, position the Looker object so it sits in the upper middle part of the floor as shown in Figure 20.
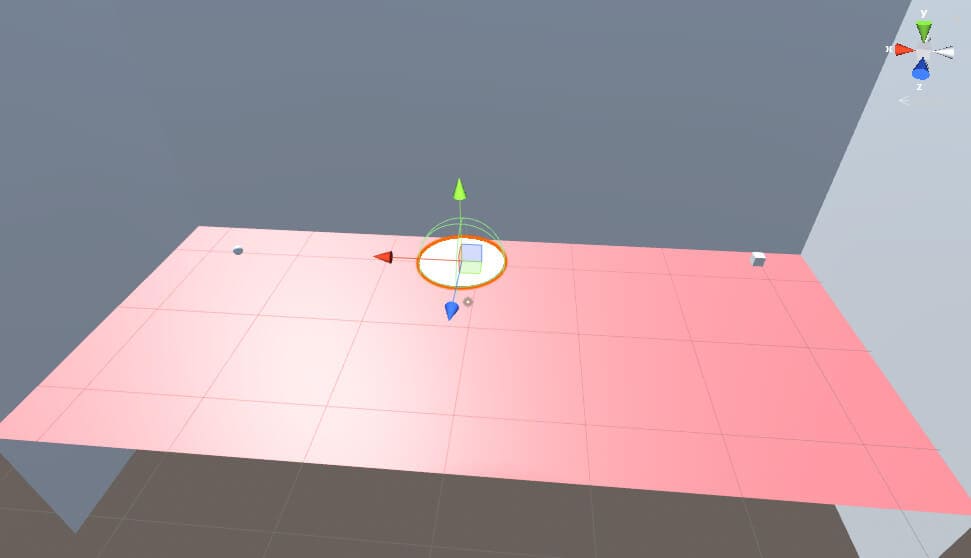
Figure 20: Positioning the Looker object.
Now is a good time to give Looker a unique material to help make it more like something you should avoid. In the Materials folder in the Assets window, right click and create a new material. Name this one Looker and give it a bright red color. Once you’ve done that set this material as the Looker object’s material to change its color. When finished the scene should now look similar to the one in Figure 21.
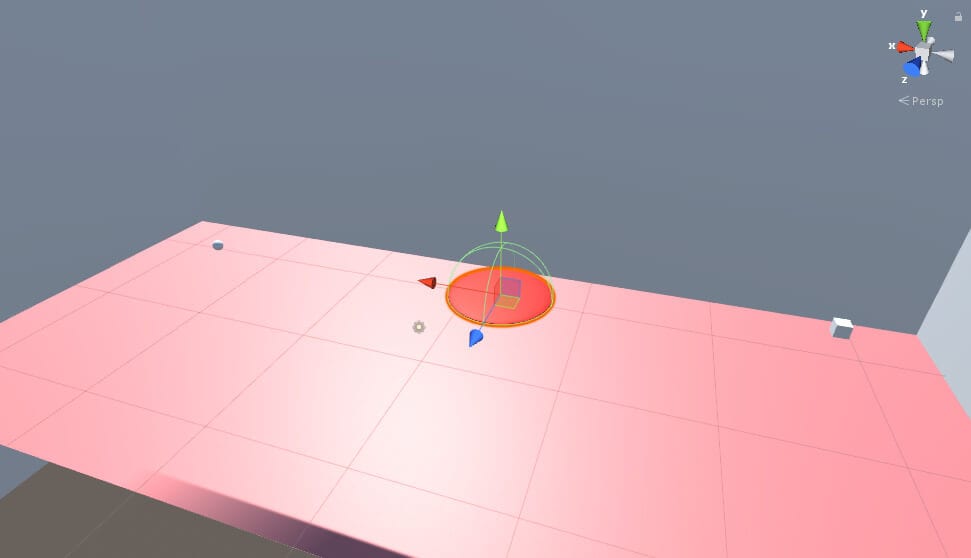
Figure 21: The Looker object with the new material attached.
The only task left now is to create a navigation mesh for the Guard to navigate with. At the top of the Unity editor lies the Window menu. Select Window->Navigation to open the Navigation window as shown in Figure 22.
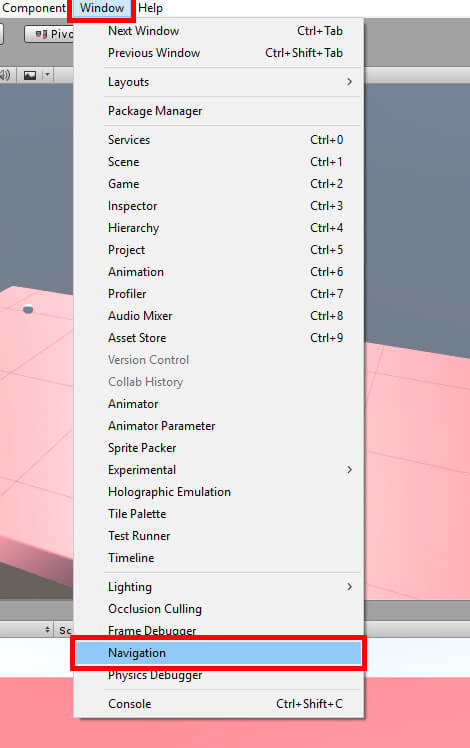
Figure 22: Opening the Navigation window.
Select the Floor object in the Hierarchy, then in the Navigation window select the Navigation Static checkbox as shown in Figure 23.
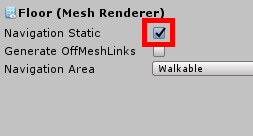
Figure 23: Setting Navigation Static to true.
Next, select the Bake option near the top of the window as shown in Figure 24.
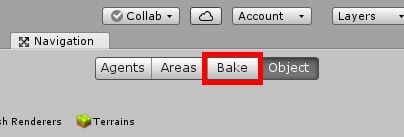
Figure 24: Switiching to the Bake menu.
You’ll be taken to the Bake menu where you can edit properties of the navigation mesh you’re about to create. In this example, there’s no need to edit anything. All you need to do is click the Bake button near the bottom right as shown in Figure 25.
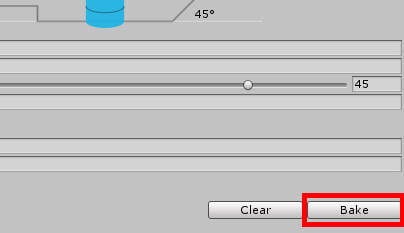
Figure 25: Creating a new navigation mesh.
At this point, Unity will request that you save your scene. Do so, and then the navigation mesh will be created. Now your scene will look like the one in Figure 26.
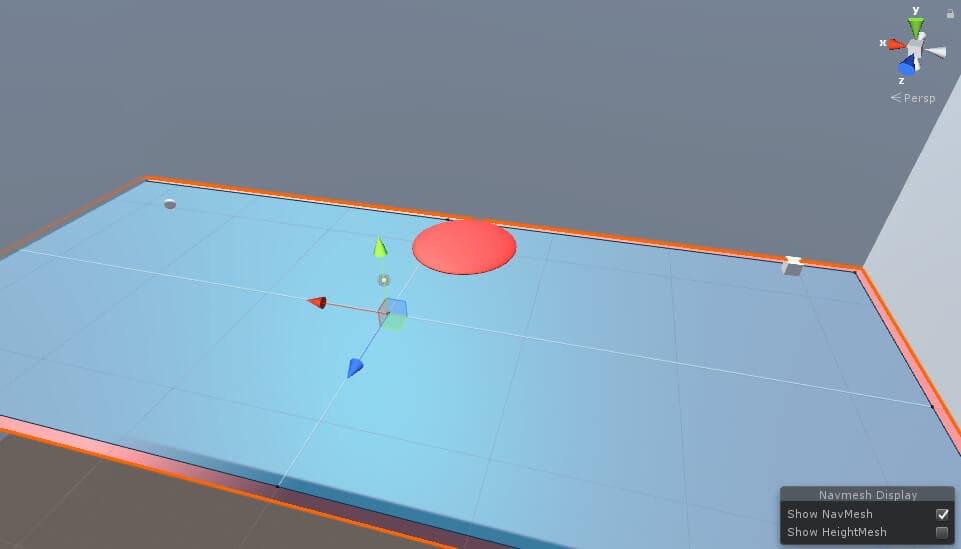
Figure 26: The current scene with the navigation mesh added.
Everything in Unity is now set, so it’s time to create the scripts needed to make this project work. In the Assets window, right click and select Create->C# Script and name this script Player. Do this two more times, creating a script named Guard and another named Looker as shown in Figure 27.
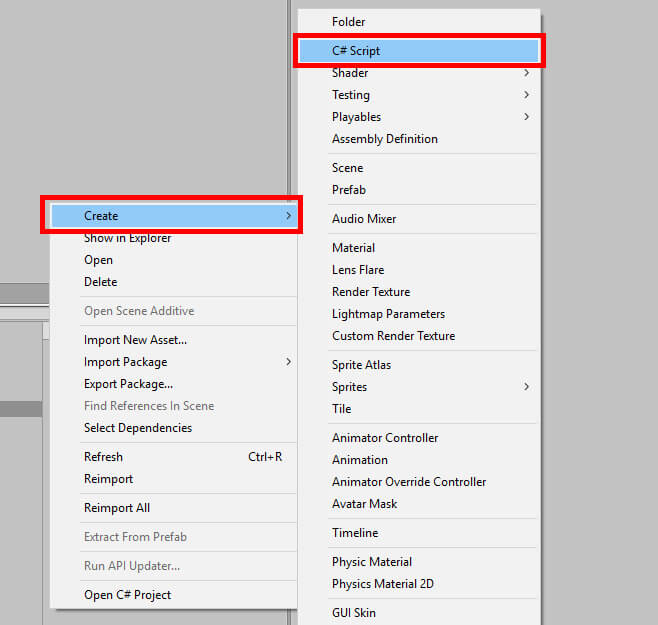
Figure 27: Creating a new script.
When you’re done, the Scripts folder in the Assets window will look like the one in Figure 28.
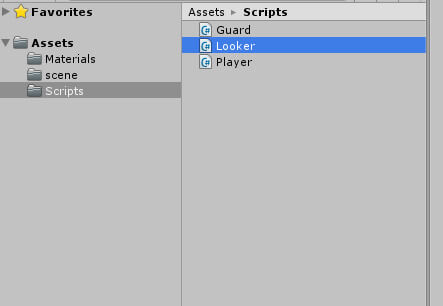
Figure 28: The Scripts folder.
The Player script will be the first script to be coded. Double click the Player script in the Assets window to open Visual Studio and begin coding!
The Code
The Player script is fairly simple, as all it’s doing is allowing the user to move the ball object around. Underneath the class declaration, you’ll need to get a reference to the Rigidbody component you created earlier in the project.
|
1 |
private Rigidbody rb; |
Right after that, in the Start function, you’ll command Unity to assign the Player object’s current Rigidbody component as the value of rb.
|
1 |
rb = GetComponent<Rigidbody>(); |
With all this done, the Player script will look like the one seen in Figure 29.
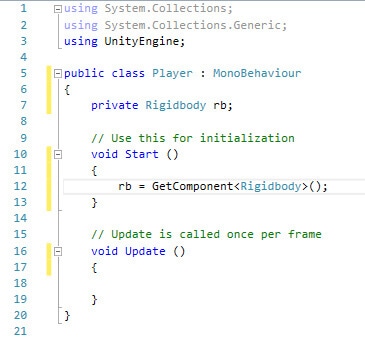
Figure 29: The Player script so far.
Now that the value of rb is assigned, you’ll need to allow the Player object to move whenever any of the arrow keys is pressed. You’ll be using physics to move the object around, applying force to the object whenever the user presses any of the four arrow keys. To do this, just add the following code to the Update function:
|
1 2 3 4 5 6 7 8 |
if (Input.GetKey(KeyCode.UpArrow)) rb.AddForce(Vector3.forward * 20); if (Input.GetKey(KeyCode.DownArrow)) rb.AddForce(Vector3.back * 20); if (Input.GetKey(KeyCode.LeftArrow)) rb.AddForce(Vector3.left * 20); if (Input.GetKey(KeyCode.RightArrow)) rb.AddForce(Vector3.right * 20); |
You now have a complete Player script. The finished script will look like the one shown in Figure 30.
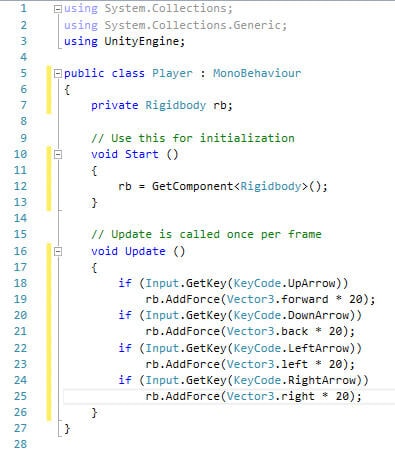
Figure 30: The complete Player script.
Save your work and go back to Unity. This time, select the Guard script from the Assets window. In order to make the code for Guard work you’ll need to add a using statement at the top of the script.
|
1 2 3 4 |
using UnityEngine.AI; Next, declare the following variables just underneath the class declaration. public GameObject player; private NavMeshAgent navmesh; |
The Guard object will have the Player object as the value of the player variable. This will be needed later when you tell the Guard object to pursue the player. Later on, the navmesh variable is declared to get the object’s NavMeshAgent component. This will be later put to use when the Guard pursues the player after they’ve been alerted of the player touching the Looker object. In the Start function, you’ll need to set the navmesh variable to the object’s NavMesh Agent component by inputting the following:
|
1 2 3 |
navmesh = GetComponent<NavMeshAgent>(); Then, in the <em>Update </em>function, just add a single line of code: navmesh.destination = player.transform.position; |
This line will set a destination point for the Guard object. In this case, it will get the Player object’s current position and move towards that point. It will constantly pursue the player once it has been alerted. So now the question is, how does the alert process work? It won’t be coded in the Guard script, but rather in the Looker script. Before moving on to the Looker script, take a look at Figure 31 to review your code for the Guard script.
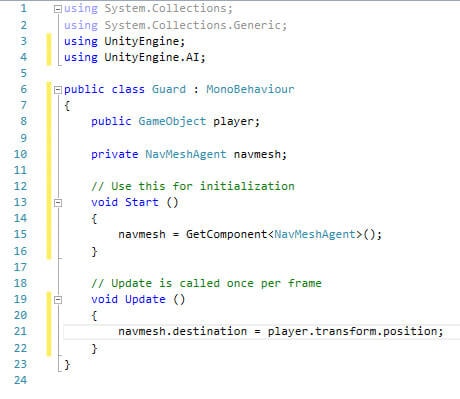
Figure 31: The complete Guard script.
Inside Looker, you’ll need to once again declare the following variables.
|
1 2 3 |
public GameObject guard; private float reset = 5; private bool movingDown; |
After that, go ahead and comment out the Start function as it will not be needed for this script. Jump down to the Update function and add the following code:
|
1 2 3 4 5 6 7 8 9 10 11 12 13 14 |
if (movingDown == false) transform.position -= new Vector3(0, 0, 0.1f); else transform.position += new Vector3(0, 0, 0.1f); if (transform.position.z > 10) movingDown = false; else if (transform.position.z < -10) movingDown = true; reset -= Time.deltaTime; if (reset < 0) { guard.GetComponent<Guard>().enabled = false; GetComponent<SphereCollider>().enabled = true; } |
This is where the bulk of the project’s action is happening, so let’s break it down. First, depending on the value of the movingDown boolean, the object this script is attached to will either be moving up or down. Once it reaches a certain point, it will change direction. Next, the Looker will lower the value of reset based on real time. Once that timer is below zero, it will get the Guard script on the Guard object and disable it, whereupon the Guard object will move to the last known player position before that point and then stop moving. Looker will also reenable its collider so that the whole process can start again. By this point, the script should look like the one shown in Figure 32.
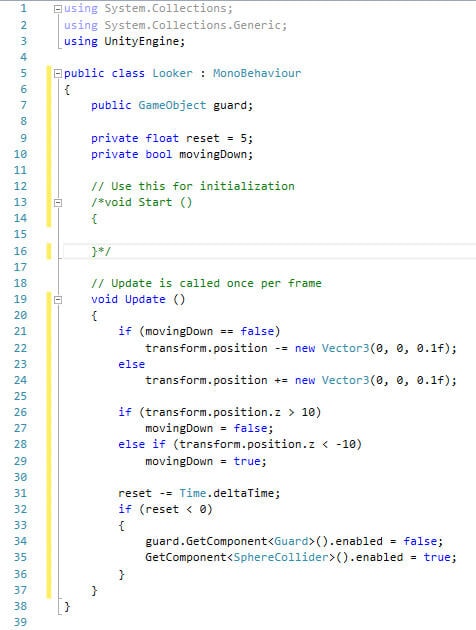
Figure 32: The Looker script so far.
Speaking of collisions, it’s time to create the collision code that will reset Looker’s timer and enable the Guard script. Underneath the Update function, create the following code:
|
1 2 3 4 5 6 7 8 9 |
private void OnCollisionEnter(Collision collision) { if (collision.gameObject.tag == "Player") { guard.GetComponent<Guard>().enabled = true; reset = 5; GetComponent<SphereCollider>().enabled = false; } } |
OnCollisionEnter is something Unity automatically recognizes as collision code, and thus will execute said code whenever collision with another object occurs. In this case, you first check if the object collided into ha the tag Player. If it doesn’t, it will ignore the rest of the code, like in any other if statement. Otherwise, it will enable the Guard script, set the reset timer to five (which essentially sets our timer to five seconds), and disable its collider so that the player can still move through the object and not accidentally get stuck on the Looker object. The function can be seen in figure 33.
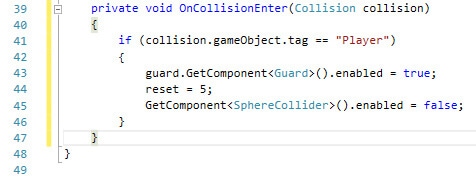
Figure 33: Collision code for Looker.
All the code to make this project is now complete! There’s a couple other tasks to do before the project is finished. Save all your work and go back to Unity.
Finishing The Project
You just need to attach the scripts to their respective objects and assign a few variables to finish the project. First, make sure you switch from the Navigation window to the Inspector window like in Figure 34.
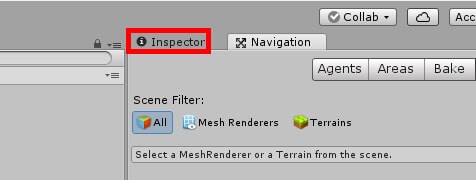
Figure 34: Switching to the Inspector window.
Once that’s done, start with the Player object. Select it in the Hierarchy window, then at the bottom of the Inspector window click the Add Component button and add the Player script. With this added, the Player object is complete. Figure 35 shows the added script.
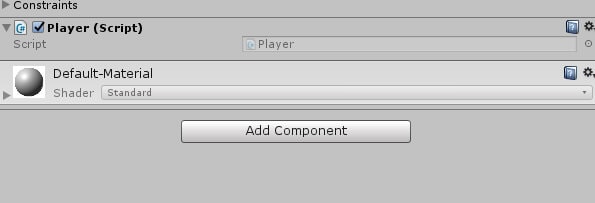
Figure 35: The Player script component.
Next, select the Guard object. Like before, attach the Gaurd script to the object. This time, you need to let the Guard know who the player is. To do this, click and drag the Player object from the Hierarchy into the the Player field in the Guard script component as shown in Figure 36.
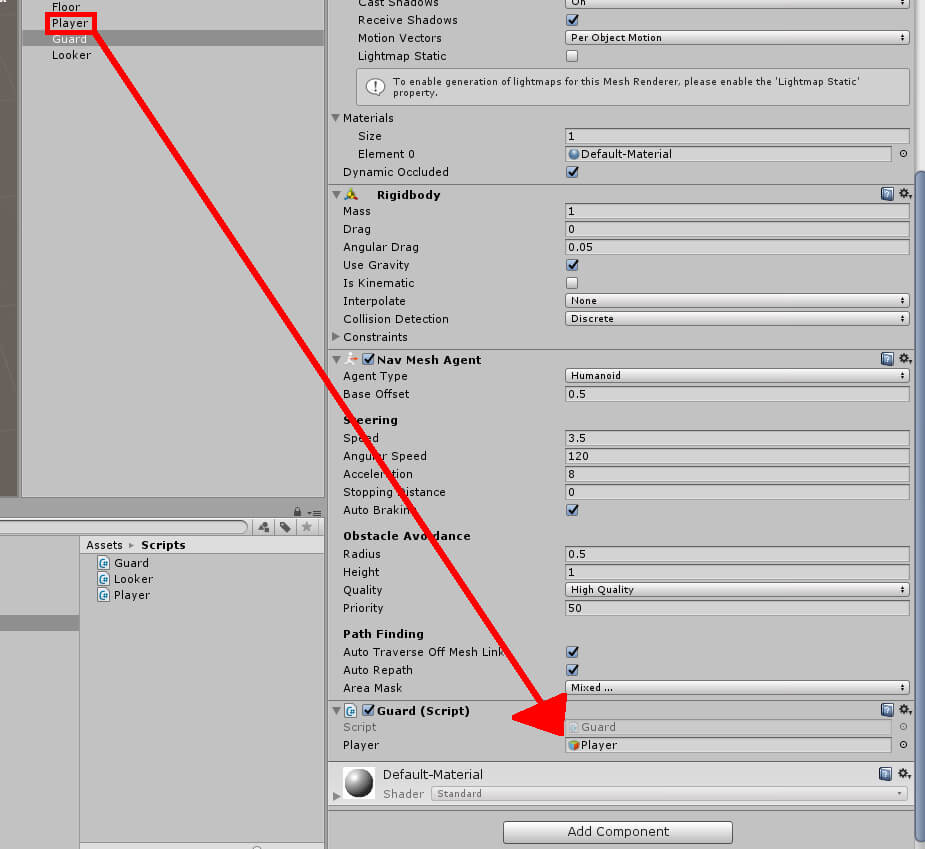
Figure 36: Setting the Player object as the value of the Player field.
You’ll also want to go ahead and disable the Guard script. The way this project is set up, the Guard will pursue the player once its script is enabled. This Guard script should only be enabled after the player touches the Looker object. All you need to do here is simply uncheck the checkbox next to the Guard (Script) text in the component as shown in Figure 37.
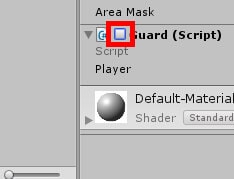
Figure 37: Disabling the Guard script.
Finally, move on to the Looker object and give it the Looker script. This time, the Looker object will need the Guard object as the value of its Guard variable. Just like when you assigned the Player object to the Guard script’s Player variable, you’ll want to do the same with the Guard object and the Looker script. Click and drag Guard from the Hierarchy into the Guard field in the Looker script component. Once you’ve done this, the project will be complete! Click the play button at the top of the Unity editor to try out your project as shown in Figure 38.
Figure 38: Testing the project.
Try moving the Player object into the Looker object (remember to move with the arrow keys!). Notice that once this is done, the Guard object will begin pursuing the player. It will continue its pursuit for about five seconds before giving up chase. Figure 39 shows how the game will look.
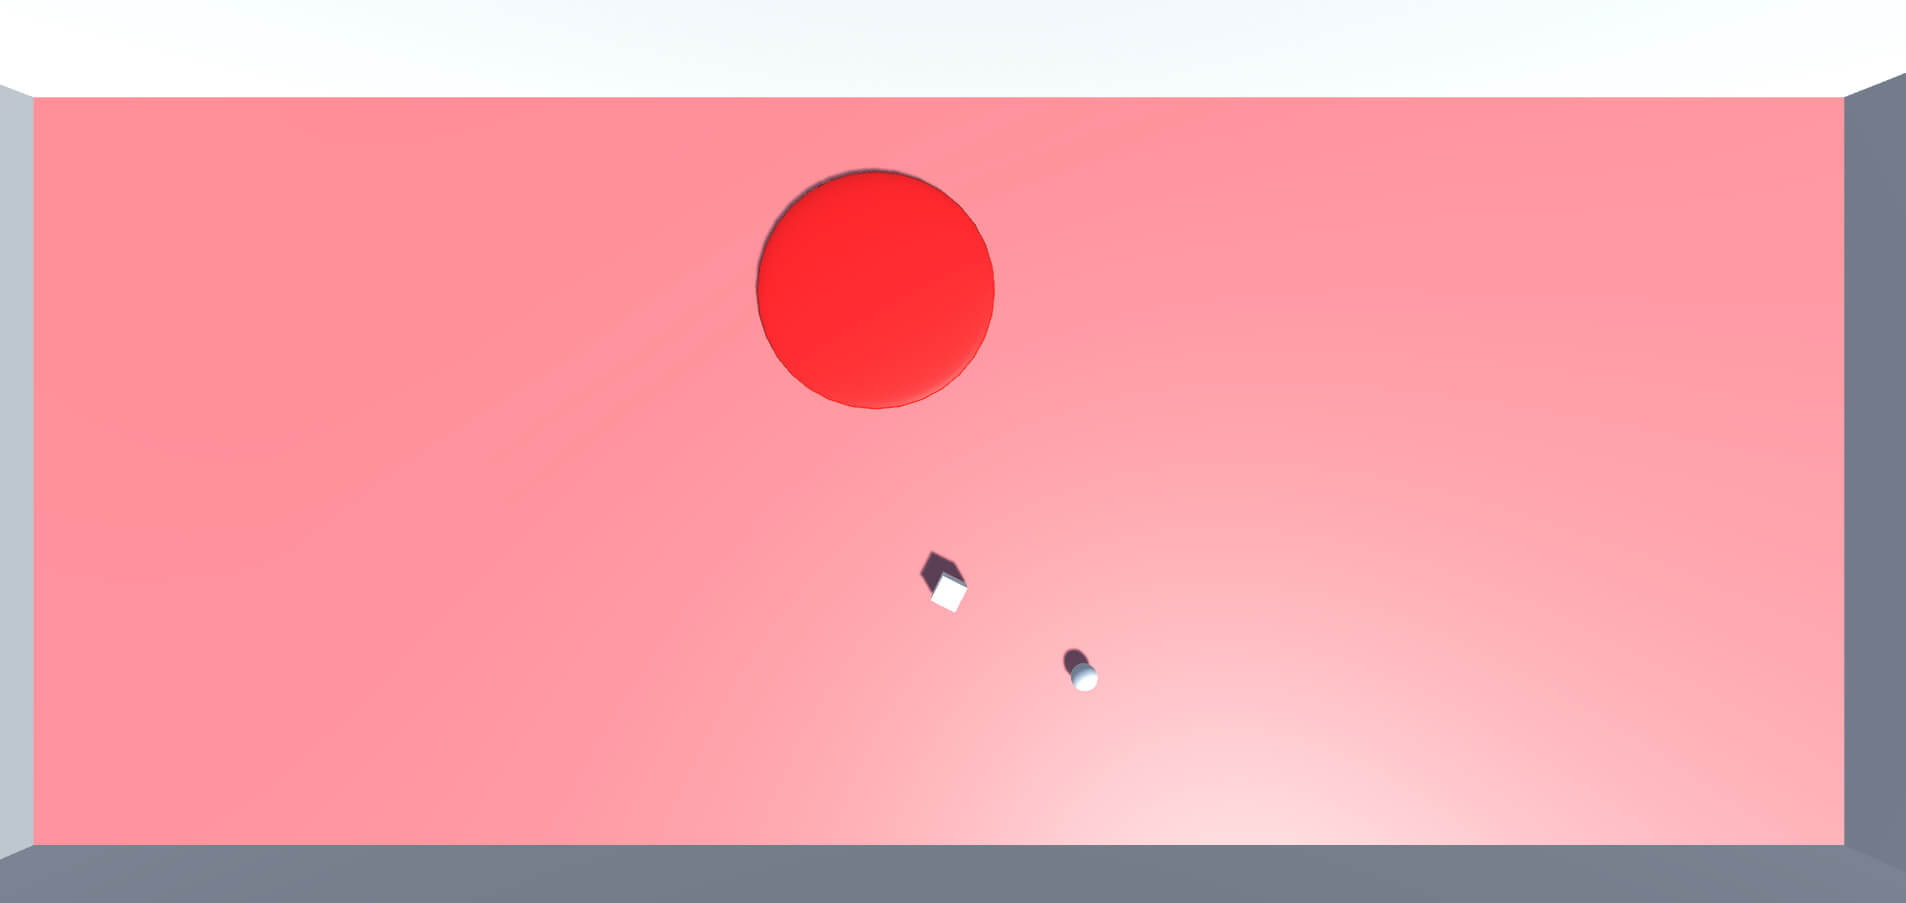
Figure 39: The complete project in action.
Conclusion
This is AI at perhaps its most basic. It can easily be expanded on from here. For example, if we are pretending that the Looker object is a camera, a guard is looking through to spot you, then it would be reasonable to assume you could give the Guard object its own pair of eyes as well. A player can get past cameras, but they will still need to account for a guard’s own eyes, adding more to the game. You can also combine this project with the concept of pathfinding to give the guard a path to follow, thus creating a more interesting environment for the player to navigate.
There are many directions you can take with a basic AI like this. Perhaps you don’t even want to do any of the above and do your own thing. I would encourage you to do just that and experiment with what you have available to you. For all you know, you could come up with an idea for an interesting project that you’d like to see to completion.


Load comments