
You might occasionally hear about a game that can be ‘modded.’ But what does that mean? For starters, a mod is simply a short version of the word ‘modification.’ In the context of video games, this means someone has taken time to modify a certain aspect of the game they are playing. This modification can occur by changing the model a character normally uses, editing text in the game, or changing out a music track. Some mods take it a step further by completely overhauling entire systems in the game such as the user interface or the character’s leveling mechanics.
The power of a community and the ability to mod a game cannot be overstated. Mods allow players to tweak a game to their liking, add more things to do in the game, or just provide a laugh by replacing the dragon with a cartoon pony. However, it should also be noted that allowing mods is a difficult task. There’s a reason so few games allow mods. In this article, you won’t learn how to make your game moddable to the level of a game like Skyrim, but you can learn some of the basics of implementing modding capabilities. Within Unity, you’ll be shown simple methods of allowing users to change the text in your game as well as changing the current mesh an object is using.
Setup
There’s nothing you need to do ahead of project creation, so just open Unity and make a new project as shown in Figure 1.

Figure 1: Creating a new project.
Name your project BasicMod, specify a file path, and make sure it’s a 3D project. Once you’ve done all that, create the project. The form should resemble Figure 2.
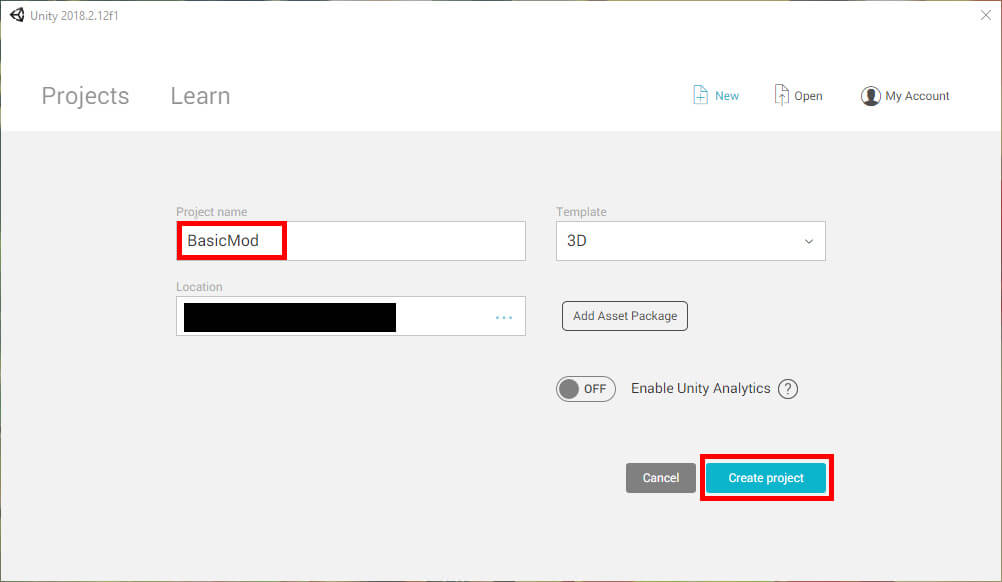
Figure 2: Naming the project.
Of course, without any objects to modify there’s no game to mod at all. Start by creating some text on the screen. Go to the Hierarchy window and click the Create button. Choose UI->Text to make a text object like Figure 3.
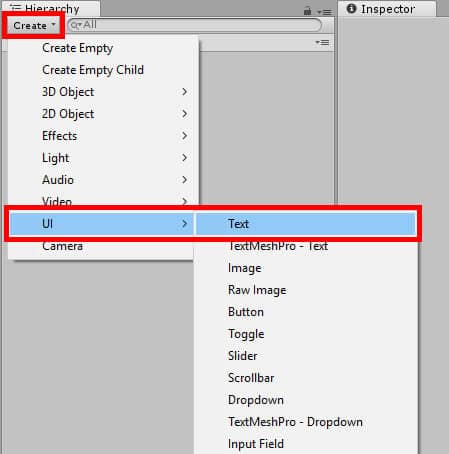
Figure 3: Creating some text
Next, you’ll need to position the text in a position where it can be easily seen. The location can be wherever you choose, but Figure 4 shows how to place the text in the upper-middle of the screen. In the Inspector window set Pos X to -10 and Pos Y to 125. Then set the Width variable to 500 and Height to 150, this way there’s plenty of space for whatever text you wish to enter.
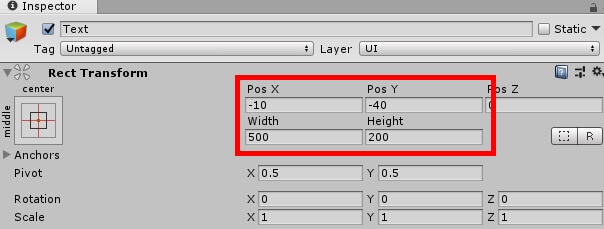
Figure 4: Setting Text to the correct position and size
After this, create some placeholder text in the Text field. It can be whatever you wish. Finally, change any of the text properties you wish to make it easier to read. The below example in Figure 5 places the font size variable at 30 and sets the alignment to the center.

Figure 5: Setting up the text
This will do for the game’s text object. Next, you’ll need a 3D object. The user may wish to change the object from a simple cube to something else. Start by clicking the Create button again in the Hierarchy. Navigate to 3D Object-Cube to create a cube object in the world. Set both its Position X and Position Y fields to 0. Change its Rotation Y field to 45 and set the scale to 5 for all three axes as shown in Figure 6.
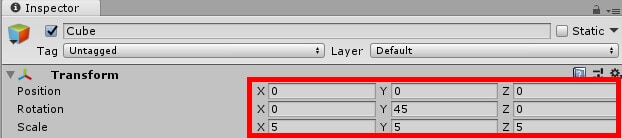
Figure 6: The Cube object’s Transform component
Finally, create an empty object by selecting the Create button then navigating to Create Empty. Name this new object GameManager. This is the object that will hold the script that makes this project run. There’s nothing more to do here in the Unity editor. Navigate to your Assets window and create a new C# Script as shown in Figure 7. Name this script ModScript.
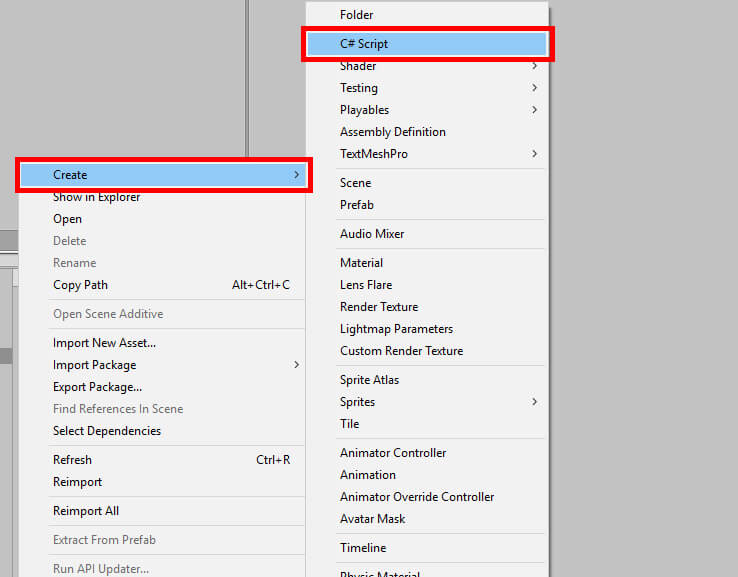
Figure 7: Making a new C# script
Once created, double click ModScript to open Visual Studio and begin the coding process.
The Code
To get started, add using UnityEngine.UI; and using System.IO; to the top of the script as shown in Figure 8. System.IO is going to be very important for this project. You’ll use it to create a folder named Resources as well as employ StreamReader to read data from a file that the user creates. It will also be responsible for gathering file names, so the rest of the program knows which file to use. UnityEngine.UI also has an important job but just has less going on. This will allow you to edit the text on the Text object you created earlier.
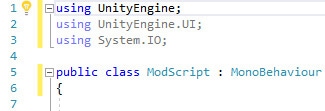
Figure 8: All require using statements.
Only a few global variables will need to be declared for this project. Those variables are:
|
1 2 3 |
public Text messageText; public MeshFilter mf; private string pathToMods; |
Finally, for the sake of cleanliness, you’ll have three function calls that make up the Start function. Write the following:
|
1 2 3 |
DirectoryCreation(); TextModding(); MeshModding(); |
The Update function will not see any use in this project, so you may delete it or comment it out. Once finished, the variable declarations and the Start function should look like Figure 9.
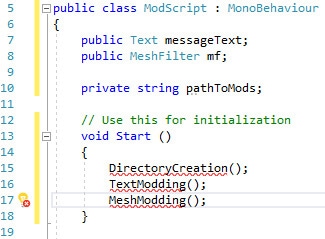
Figure 9: The code so far…
Of course, the compiler doesn’t like the fact that those three functions don’t exist. Fortunately for Visual Studio, it won’t stay that way. Start with the DirectoryCreation function.
|
1 2 3 4 5 6 |
void DirectoryCreation() { pathToMods = Application.dataPath + "/Resources"; if (!Directory.Exists(pathToMods)) Directory.CreateDirectory(pathToMods); } |
Time for a little breakdown of what’s happening. First, the code sets the value of pathToMods. This value is a file path, and the path in question is the Resources folder within the path of the game. Of course, none of that will matter if the folder doesn’t exist. The next two lines check to see if there is a Resources directory. If there isn’t, the folder will be created for you.
Up next is where the fun begins. TextModding is the function that will allow a user to modify the text in the game. The function goes like this:
|
1 2 3 4 5 6 7 8 9 10 11 12 13 14 15 |
void TextModding() { string[] textMods = Directory.GetFiles(pathToMods + "/", "*.txt"); if (textMods.Length == 1) { StreamReader reader = new StreamReader(textMods[0]); messageText.text = reader.ReadToEnd(); } else if (textMods.Length > 1) { int file = Random.Range(0, textMods.Length); StreamReader reader = new StreamReader(textMods[file]); messageText.text = reader.ReadToEnd(); } } |
First, you create an array of strings called textMods. What do you fill this array with? You gather a list of all files with the txt extension and get their paths. Next, a check is performed to see if there’s more than one text file. This is done in case the user has more than one txt file. If there’s only one txt file, then you simply take that file, read the text inside it, and then apply that text to the Text object in the game. If there’s more than one txt file to choose from, Unity will choose one at random.
So far, your two new functions, DirectoryCreation and TextModding, should look like Figure 10.
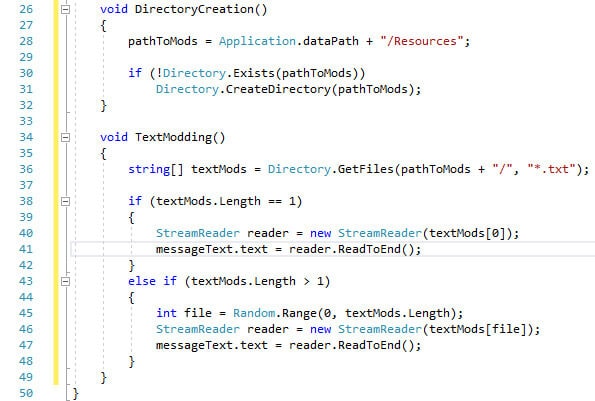
Figure 10: DirectoryCreation and TextModding
Next comes the ability to modify the current mesh on the Cube object using a function called MeshModding. Like before, it will find all files with the fbx extension. If there’s more than one file, the program will randomly select one to use. However, this is where the similarities between this function and TextModding end.
|
1 2 3 4 5 6 7 8 9 10 11 12 13 14 15 16 17 18 19 |
void MeshModding() { string[] meshModPaths = Directory.GetFiles(pathToMods + "/", "*.fbx"); string modToUse = "mod"; string extensionToRemove = ".fbx"; if (meshModPaths.Length == 1) { modToUse = Path.GetFileName(meshModPaths[0]); modToUse = modToUse.Replace(extensionToRemove, ""); mf.mesh = Resources.Load<Mesh>(modToUse); } else if (meshModPaths.Length > 1) { int file = Random.Range(0, meshModPaths.Length); modToUse = Path.GetFileName(meshModPaths[file]); modToUse = modToUse.Replace(extensionToRemove, ""); mf.mesh = Resources.Load<Mesh>(modToUse); } } |
The basic idea is still intact, but the execution is somewhat different. Notice the two additional string variables declared alongside the string array. Your modToUse variable is simply the name of the mod to use, and you just give it a placeholder name. After this comes another string variable named extensionToRemove. As it turns out, a function you use later doesn’t like having extensions in the name of the file to search for. To get around this, you just specify which part of the text you wish to remove from the variable and use Replace to rid the variable of the extension.
At the last line, you call Resources.Load to load the fbx file into the game. Recall the Resources folder you had the program create thanks to DirectoryCreation. This function will specifically search the Resources folder in your game for whichever file you tell it to load. In this case, it’s whatever the name of the file stored in modToUse would be minus the extension. As expected, you also specify that it will be loaded as a mesh to make Unity happy. Figure 11 shows the function.
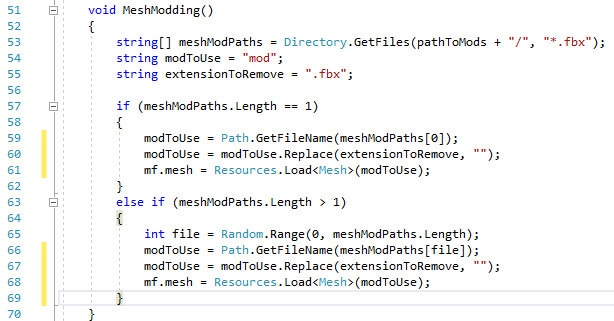
Figure 11: MeshModding function
This concludes the coding section of this project. To summarize, you have granted a user the ability to modify text by reading a txt file that they create. You also allowed them to change the mesh of the object in the scene by placing an fbx file in the Resources folder. Close Visual Studio and head back to the Unity project.
Finishing the Project
Select the GameManager object in the Hierarchy and drag ModScript from the Assets window into the Inspector, attaching the script to the object as shown in Figure 12.
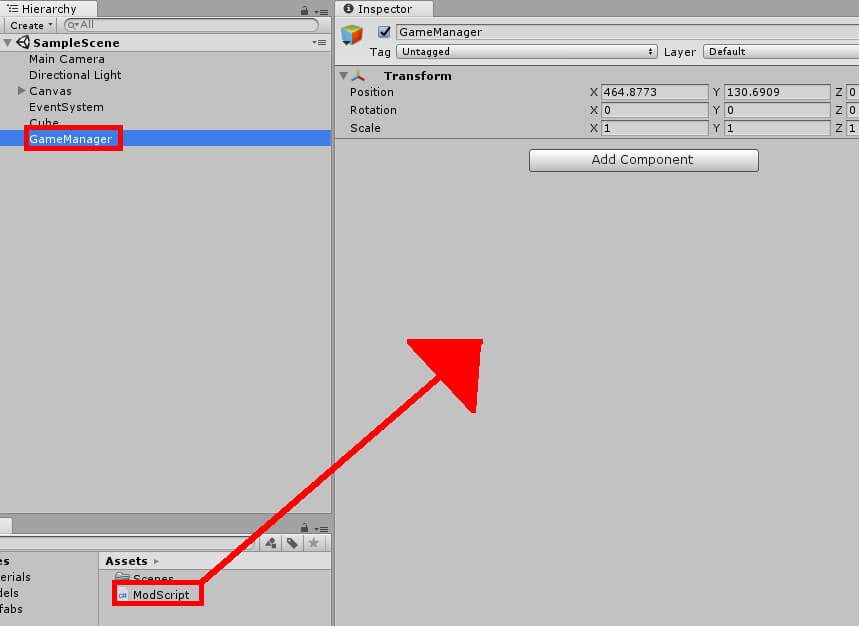
Figure 12: Attaching ModScript to GameManager
Next, comes the assignment of the Message Text and Mf variables. Find your Text object that you created earlier and drag that to the Message Text field in the newly created ModScript component. Then take the Cube object and drag it to the Mf field. Once you have these in place, the Inspector should look like Figure 13.
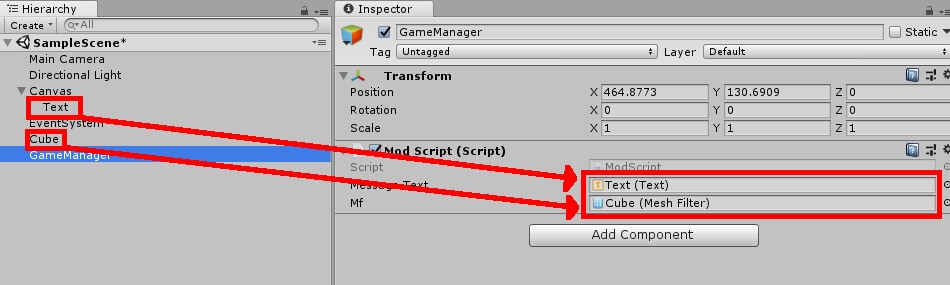
Figure 13: Applying Text and Cube to their corresponding variables
There’s nothing else that needs to be done now. Does this mean the project is finished? Well, yes and no. You can and should run the project in Unity to create the Resources folder, but the project itself won’t do anything you haven’t already set up. But that’s the point. The idea is you create your base game, and then somebody else can come in later and modify certain aspects of it. In this case, go ahead and pretend to be that somebody. But first be sure to run the program so the Resources folder is created as shown in Figure 14.
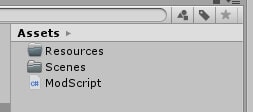
Figure 14: That folder wasn’t there before…
Begin by adding a mesh for the game to pull from. So long as the mesh is an fbx file, the program will work just fine. This example will use a model of a barrel found here. Once you’ve got your model, whether it be the barrel example or something else entirely, use Windows Explorer to navigate to the Resources folder of your project. Place that fbx file in this folder.
The text modding functionality is even simpler. Simply create a new txt file and place it somewhere in the folder. You may name the text file anything you like. Open the file and enter whatever text you wish as shown in Figure 15.
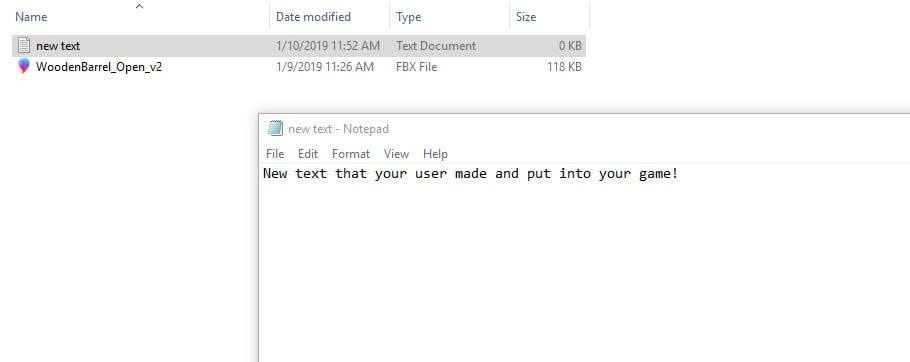
Figure 15: Adding files to the Resources directory and writing text to a txt file
Now enter Unity once again. Your users wouldn’t normally see this, but Unity will detect these files and update the Assets window. Now try running the game again. You should see the text change and the basic mesh of the Cube object replaced with whatever you placed as shown in Figure 16. Note: you may need to edit the scale value of the object to better see the modded mesh.
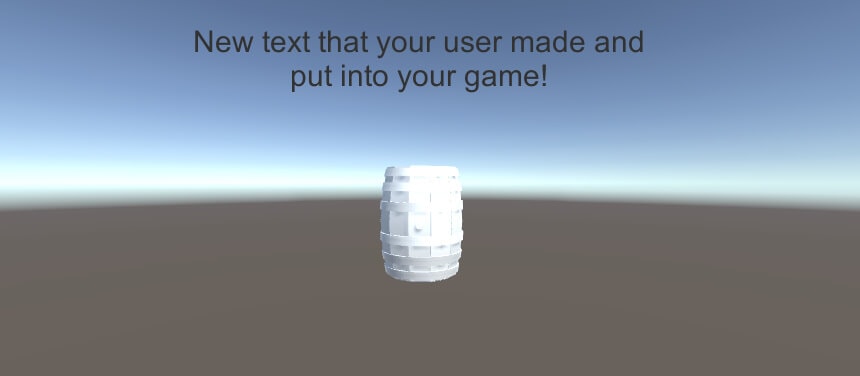
Figure 16: The (modified) game in action!
Conclusion
As pointed out in the introduction, this is only meant to be a simple intro to the absolute basics of modding. But feel free to pat yourself on the back, for this small project you created has more modding capabilities than many games get, officially or otherwise. This example introduced you to allow other users to change some of the game text and meshes your game might use. Furthermore, it was simple too. If you’ve ever tried to mod a game yourself, you might find that it can be somewhat difficult. Here, the process has been simplified so those who wish to mod the project can do so quickly.
Of course, how much further you would take this is up to you, and it all depends on if you even want to build your game with modding in mind. To do that you’ll need to create a system that works for you as well as other users. Perhaps you should have the game search for specific filenames? What about texturing a mesh? In this example, the mesh that you modded into your game used the texture the Cube object did. If you can change out a 3D object, it stands to reason you can also change the texture attached to that object. Experiment and see what you can discover, both for yourself and your users.
This document contains proprietary information and is protected by copyright law.
Copyright © 2026 Red Gate Software Limited. All rights reserved
Load comments