
The SQL Server query optimizer uses distribution statistics when creating a query plan. The statistics provide information about the distribution of column values across participating rows, helping the optimizer better estimate the number of rows, or cardinality, of the query results.
The statistics provide the optimizer with clues on the best ways to process the query and consequently maximize performance. For example, the statistics might lead the optimizer to choose an index seek over an index scan, a potentially more resource-intensive operation. Without statics, it would be difficult for the optimizer to determine the best processing strategy in advance.
The query optimizer, for the most part, takes care of generating and updating the distribution statistics, creating them on certain columns within a table or indexed view. Each set of statistics is stored as a table-level object that tracks the distribution of values across the first column in any given set. If a statistics object is defined on multiple columns, the object also stores details about the correlation of values across the columns. These correlation statistics, referred to as densities, are based on the number of distinct rows of column values.
Although densities play an important role in query optimization, this article is concerned primarily with distribution statistics as they are accessed through the statistics object. SQL Server provides the statistics in the form of a histogram that shows how data is distributed within a column.
When the query optimizer is doing its job and your queries are performing as you would expect, you don’t need to worry too much about histograms, statistics objects, or distribution statistics in general. On the other hand, if you’re trying to maximize query performance or track down performance-related issues, it can be worth investigating how the statistics are being used and generated and perhaps making adjustments accordingly.
Before you can do that, however, you must have a basic understanding of how statistics are implemented in SQL Server, how to track down their related histograms, and how to make sense of the information, which is what we address in this article.
Getting started
As with many areas of SQL Server, distribution statistics can be easier to understand if you see them in action, rather than simply reading about them in the abstract. To help with that process, this article includes a number of examples that demonstrate how distribution statistics get generated and how to access information about them.
For these examples, I used the following T-SQL script to create the AWSales table and populate it with data from the AdventureWorks2014 sample database:
|
1 2 3 4 5 6 7 8 9 10 11 12 13 14 15 16 17 18 |
IF OBJECT_ID (N'dbo.AWSales', N'U') IS NOT NULL DROP TABLE dbo.AWSales; GO CREATE TABLE dbo.AWSales ( OrderID INT PRIMARY KEY IDENTITY(101, 1), SalesOrderID INT NOT NULL, OrderDetailID INT NOT NULL, ProductID INT NOT NULL, LineTotal MONEY NOT NULL ); INSERT INTO dbo.AWSales (SalesOrderID, OrderDetailID, ProductID, LineTotal) SELECT SalesOrderID, SalesOrderDetailID, ProductID, LineTotal FROM AdventureWorks2014.Sales.SalesOrderDetail WHERE SalesOrderDetailID < 60000; |
That’s all the set-up you need to do to try out the examples for yourself. I created the examples on a local instance of SQL Server 2014, but you should be able to apply the principles we cover here to any version of SQL Server from 2008 onward, as well as to Azure SQL Database, Azure SQL Data Warehouse, and Parallel Data Warehouse.
Retrieving information about a statistics object
SQL Server generates a statistics object automatically when you create an index on a table or indexed view. For example, when we created the AWSales table, SQL Server generated a statistics object based on the OrderID column. Because the column is defined as the primary key, SQL Server automatically created a clustered index on that column and generated the associated statistics object.
SQL Server provides the following two system views for retrieving high-level information about the statistics objects associated with a table or indexed view:
-
sys.stats:Returns the ID of the table or indexed view, name and ID of the statistics object, filter expression (if applicable), and a number of bit flags that indicate such information as whether the statistics object was auto-generated or user-defined. -
sys.stats_columns:Returns the parent object ID, statistics object ID, ordinal position of each column included in the statistics object, and the column ID, as it is listed withinsys.columns.
You can join the two views based on the object and statistic IDs in order to retrieve specific types of information. You can also add the sys.columns view to retrieve the actual column names, as shown in the following example:
|
1 2 3 4 5 6 7 8 9 10 11 |
SELECT s.stats_id StatsID, s.name StatsName, sc.stats_column_id StatsColID, c.name ColumnName FROM sys.stats s INNER JOIN sys.stats_columns sc ON s.object_id = sc.object_id AND s.stats_id = sc.stats_id INNER JOIN sys.columns c ON sc.object_id = c.object_id AND sc.column_id = c.column_id WHERE OBJECT_NAME(s.object_id) = 'awsales' ORDER BY s.stats_id, sc.column_id; |
In this case, all I’m interested in the table ID and statistics ID, along with the columns on which the statistics are based. As the following results show, the table currently includes only one statistics object and that object is based on only one column, OrderID.
|
StatsID |
StatsName |
StatsColID |
ColumnName |
|
1 |
PK__AWSales__C3905BAF9E58F2FD |
1 |
OrderID |
When a statistics object is generated as a result of creating an index, the object receives the index name. In addition, if the statistics object had been based on multiple columns, the SELECT statement would have returned a row for each column.
Column-based statistics objects
SQL Server also generates a statistics object when you include a column in a query predicate such as a WHERE clause. For example, suppose we query the AWSales table based on a ProductID value:
|
1 2 3 4 |
SELECT * FROM AWSales WHERE ProductID = 898 OPTION(RECOMPILE); |
I tagged on the RECOMPILE query hint to force the optimizer to discard the query plan and ensure fresh results each time I ran the SELECT statement and viewed the execution plan, which we’ll discuss shortly.
On my system, the query returned nine rows. I then reran the following SELECT statement to see an updated list of statistics objects:
|
1 2 3 4 5 6 7 8 9 10 11 |
SELECT s.stats_id StatsID, s.name StatsName, sc.stats_column_id StatsColID, c.name ColumnName FROM sys.stats s INNER JOIN sys.stats_columns sc ON s.object_id = sc.object_id AND s.stats_id = sc.stats_id INNER JOIN sys.columns c ON sc.object_id = c.object_id AND sc.column_id = c.column_id WHERE OBJECT_NAME(s.object_id) = 'awsales' ORDER BY s.stats_id, sc.column_id; |
The SELECT statement is the same as in the preceding section, only now we have a new statistics object, as shown in the following results.
|
StatsID |
StatsName |
StatsColID |
ColumnName |
|
1 |
PK__AWSales__C3905BAF9E58F2FD |
1 |
OrderID |
|
2 |
_WA_Sys_00000004_6C5905DD |
1 |
ProductID |
SQL Server automatically created the _WA_Sys_00000004_6C5905DD statistics object based on the ProductID column. In this case, the name of the auto-generated object is prefixed with _WA, the two-letter code for Washington state in the US. For SQL Server to generate the column-based objects, the AUTO_CREATE_STATISTICS database option must be enabled, which it is by default.
Index-based statistics objects
As we discussed earlier, when we defined a primary key on our table, SQL Server generated a statistics object based on the clustered index key (the OrderID column). SQL Server will also generate a statistics object if we create an index manually, such as the one shown in the following script:
|
1 2 3 4 5 |
IF EXISTS (SELECT name FROM sys.indexes WHERE name = N'ixOrders') DROP INDEX ixOrders ON dbo.AWSales; GO CREATE INDEX ixOrders ON dbo.AWSales(SalesOrderID, OrderDetailID); |
In this case, we’ve created the ixOrders nonclustered index on the SalesOrderID and OrderDetailID columns. If we were to now query the sys.stats and sys.stats_columns system views, using the same SELECT statement as before, we would find that a third statistics object has been added to the AWSales table, as shown in the following results.
|
StatsID |
StatsName |
StatsColID |
ColumnName |
|
1 |
PK__AWSales__C3905BAF9E58F2FD |
1 |
OrderID |
|
2 |
_WA_Sys_00000004_6C5905DD |
1 |
ProductID |
|
3 |
ixOrders |
1 |
SalesOrderID |
|
3 |
ixOrders |
2 |
OrderDetailID |
The results include two rows for the new statistics object, one for each column in the ixOrders index. Notice that the StatsColID values are incremented for each column, but the name and ID of the statistics object are the same in each row, along with the object name being the same as the index name.
Statistics histograms
Up to this point, we’ve seen only how statistics objects are added. Although the sys.stats and sys.stats_columns system views are useful for retrieving high-level information, they provide us with no insight into the actual distribution statistics. For that, we must turn to the DBCC SHOW_STATISTICS statement.
By default, the DBCC SHOW_STATISTICS statement returns the following three types of information:
-
Header: Name of the statistics object, date and time it was last updated, number of rows in the participating columns, actual number of sampled rows, number of steps within the histogram, and other information
-
Densities: Density vector of the indexed columns based on the formula 1/#_distinct_values. The number of distinct values help to determine the selectivity of the column values. The more unique values, the higher the selectivity and the more effective the index. The number of rows in this section depends on the number of participating columns.
-
Histogram: Value distribution across the column data, incremented in steps based on the number of rows, up to 200 steps per statistics object.
At a minimum, when running the DBCC SHOW_STATISTICS statement, you must specify the target table or indexed view and the target index, column, or statistics object. For example, the following DBCC SHOW_STATISTICS statement specifies the AWSales table and the ixOrders statistics object:
|
1 |
DBCC SHOW_STATISTICS (AWSales, ixOrders); |
The DBCC SHOW_STATISTICS statement supports several other options as well, such as the ability to specify that the results include only the histogram, but for now, we’ll stick with the most basic form of the statement, which returns the results shown in the following figure.
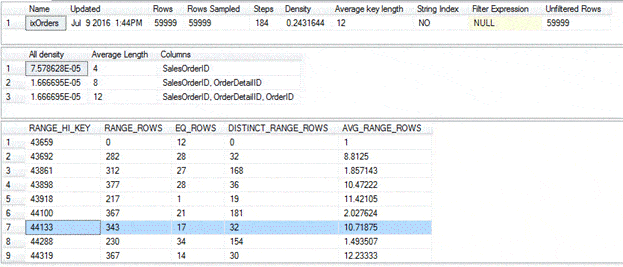
The first section provides the header information, the second section shows the densities, and the third section gives us our histogram.
In this case, the histogram is broken into 184 steps, based on ranges of data in the first indexed column, SalesOrderID. Each step is listed in its own row in the histogram and represents a range of values. For example, the value in the RANGE_HI_KEY column of row 7 (the highlighted row) is 44133. This value represents the highest value in a data range that includes all values from 44101 (row 6 + 1) through 44113.
The histogram also includes the RANGE_ROWS column, which provides the number of rows within the range, excluding the rows associated with the RANGE_HI_KEY value, the upper end of the range. In this case, there are 343 rows in the range, excluding the upper range value. However, the EQ_ROWS value indicates the number of rows that are associated with the upper end value. That means 17 rows have a the SalesOrderID value of 44133.
The DISTINCT_RANGE_ROWS column shows the number of unique values within the current range, once again excluding the upper range value. As a result, the range of values from 44101 through 44132 includes 32 unique values.
Finally, the AVG_RANGE_ROWS column shows the average number of rows for each distinct value, based on the formula range_rows/distinct_range_rows, once again excluding the upper end rows. This gives us an average of over 10 rows for each distinct value within the range.
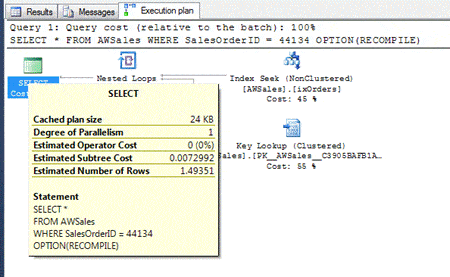
The query optimizer uses these values in various ways to estimate the number of rows that will be in the result set. For example, suppose we run the following SELECT statement, which limits the result set to rows with a SalesOrderID value of 44133 (row 7 in our histogram).
|
1 2 3 4 |
SELECT * FROM AWSales WHERE SalesOrderID = 44133 OPTION(RECOMPILE); |
Now let’s look at the execution plan used for the query. The following figure shows the pop-up details for the SELECT node of the execution plan, as it appeared in my local installation of SQL Server Management Studio (SSMS).

Notice that the Estimated Number of Rows amount shows 17. This figure corresponds exactly to the EQ_ROWS value in the statistics histogram for row 7. This is also the number of rows that the query returned.
Now suppose we specify the SalesOrderID value of 44134 in our query:
|
1 2 3 4 |
SELECT * FROM AWSales WHERE SalesOrderID = 44134 OPTION(RECOMPILE); |
This time, the query returns only one row, but the execution plan indicates something other than 1, as shown in the following figure.
Because we’ve reference a SalesOrderID value that is within the next range, but is not its own row, the execution plan uses the AVG_RANGE_ROWS value from row 8, which in this case is 1.493507, the average number of rows per distinct values with that range. (The optimizer rounds the figure up to 1.49351.)
Although this is not a big deal when returning one row, it could make a difference when returning multiple rows from a large data set, leading you to consider creating statistics or updating them. (More on that in a bit.)
Let’s look at one more example. This time, we’ll specify a range of SalesOrderID values:
|
1 2 3 4 |
SELECT * FROM AWSales WHERE SalesOrderID < 43861 OPTION(RECOMPILE); |
The statement returns 634 rows, which are all the rows with a SalesOrderID value less than 43861 (row 3 in the histogram). The execution plan also comes up with an Estimated Number of Rows value of 634, as shown in the following figure.
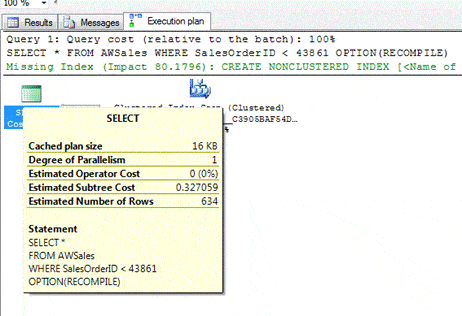
To arrive at 634, optimizer added together statistics from rows 1, 2, and 3, giving us the following formula:
12 + 282 + 28 + 312 = 634
As this last example demonstrates, the query optimizer can use the distribution statistics in various ways to estimate the number of rows to expect in the result set. Be aware, however, that the logic can become much more complex than what we’ve shown here, depending on how the data is being queried. The point is, the distribution statistics play a pivotal row in calculating the query plan, and knowing how to access those statistics is vital in order to make sense of them.
Creating statistics
At times, the statistics automatically generated by SQL Server won’t be optimal for the type of queries you’re performing, in which case, you can create your own statistics. Microsoft recommends that you create statistics under the following circumstances:
-
The Database Engine Tuning Advisor recommends it.
-
A query retrieves only a subset of data from a targeted column or index.
-
A query’s predicate references multiple correlated columns in separate indexes.
-
The query optimizer is missing the statistics it needs to generate an effective query plan.
For example, suppose we want to query data in the AWSales table based on the values in the LineTotal columns, but our queries generally target only rows with a LineTotal value greater than $100. We can create a filtered statistics object based on those values, as shown in the following example:
|
1 2 3 4 5 6 7 8 9 |
IF EXISTS(SELECT name FROM sys.stats WHERE name = N'TotalStats' AND object_id = OBJECT_ID(N'dbo.AWSales')) DROP STATISTICS dbo.AWSales.TotalStats; GO CREATE STATISTICS TotalStats ON dbo.AWSales(LineTotal) WHERE LineTotal > 100 WITH FULLSCAN; |
The CREATE STATISTICS statement lets us create a statistics object on one or more columns in a table or indexed view. In this case, we’re targeting the LineTotal column in the AWSales table, but only for values over 100, as indicated in the WHERE clause. This is our filter, thus the term filtered statistics.
The CREATE STATISTICS statement also includes the WITH FULLSCAN clause, which specifies that all rows should be scanned when creating the statistics. However, you can instead specify that a percentage of the data be sampled, rather than every row.
If we were to now query the sys.stats and sys.stats_columns system views, using the same SELECT statement as before, we would find that a fourth statistics object, TotalStats, has been added to the AWSales table, as shown in the following results.
|
StatsID |
StatsName |
StatsColID |
ColumnName |
|
1 |
PK__AWSales__C3905BAF9E58F2FD |
1 |
OrderID |
|
2 |
_WA_Sys_00000004_6C5905DD |
1 |
ProductID |
|
3 |
ixOrders |
1 |
SalesOrderID |
|
3 |
ixOrders |
2 |
OrderDetailID |
|
4 |
TotalStats |
1 |
LineTotal |
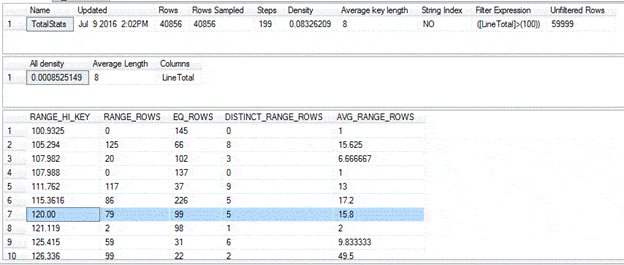
We can also run a DBCC SHOW_STATISTICS statement against the new statistics object to see how the histogram has been mapped out:
|
1 |
DBCC SHOW_STATISTICS (AWSales, TotalStats); |
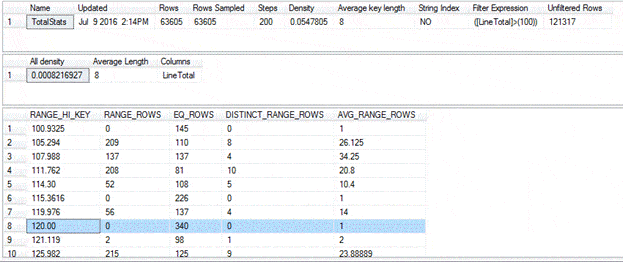
The following table shows the statement results. Notice that line 7, highlighted in the histogram, has a RANGE_HI_KEY value of 120 and an EQ_ROWS value of 99.
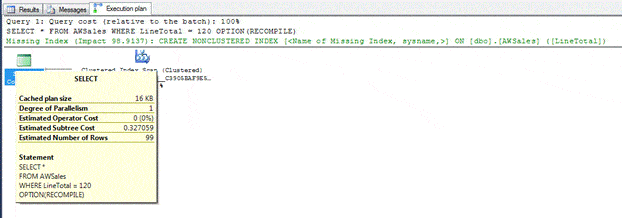
Now let’s query the AWSales once again, this time including a WHERE clause that specifies that the LineTotal value should equal 120:
|
1 2 3 4 |
SELECT * FROM AWSales WHERE LineTotal = 120 OPTION(RECOMPILE); |
The statement returns 99 rows, which is the same value in the EQ_ROWS column of the histogram and the same value as the Estimated Number of Rows value in the execution plan, as shown in the following figure.
You can, of course, play with your queries and compare the execution plan estimates with the histogram. In fact, this is a good way to get a better sense of how execution plans relate to the statistics. Just know that some of the optimizer’s calculations can be a bit complex, with the logic of how it got from point A to point B less than apparent.
Updating statistics
As with generating statistics, SQL Server usually does a good job keeping them up-to-date. In some cases, however, you will need to intervene and update the statistics manually. Microsoft recommends that you update statistics under the following circumstances:
-
Your queries are running slower than you would expect.
-
You insert data into ascending or descending key columns such as
IDENTITYcolumns. -
You perform certain maintenance operations, such as truncating a table or performing a bulk insert.
For example, suppose we add another chunk of data to the AWSales table, using the following INSERT statement:
|
1 2 3 4 5 |
INSERT INTO dbo.AWSales (SalesOrderID, OrderDetailID, ProductID, LineTotal) SELECT SalesOrderID, SalesOrderDetailID, ProductID, LineTotal FROM AdventureWorks2014.Sales.SalesOrderDetail WHERE SalesOrderDetailID >= 60000; |
If we were to run the following DBCC SHOW_STATISTICS statement again, we would receive the same results as when we ran it in the previous section:
|
1 |
DBCC SHOW_STATISTICS (AWSales, TotalStats); |
On my system, the Updated column in the header results showed the date as July 9, 2016 and the time as 2:02 PM, a time before I ran the preceding INSERT statement, indicating that the histogram remained unchanged, despite the addition of over 60,000 rows.
To make certain our queries have the most up-to-date statistics, we can run an UPDATE STATISTICS statement against the AWSales table:
|
1 2 |
UPDATE STATISTICS dbo.AWSales WITH FULLSCAN; |
I’ve included the WITH FULLSCAN clause to tell SQL Server to scan the entire column in each statistics object when updating the statistics. By default, SQL Server uses only a sample of the data, rather than calculating the statistics based on all data. A full scan normally provides more accurate statistics, but it can result in more resource-intensive operations.
After updating the statistics, we can re-run the DBCC SHOW_STATISTICS statement, which gives us the results shown in the following figure.
Notice that the time has been updated and that the histogram steps define slightly different ranges. For a small data set, these differences might not seem like much, but when you start talking billions of rows, updating statistics after certain operations can be integral to maintaining your query’s performance.
More on statistics
There’s a lot more to statistics than what we’ve covered here, but this should give you a general sense of how you can start working with them if you find your query performance lagging. The key is in knowing where to look and how to correlate what you find to the optimizer’s execution plans.
To this end, the DBCC SHOW_STATISTICS statement will likely be one of your best tools, along with the ability to view execution plans in SSMS. However, also be sure to refer to SQL Server documentation for more details about the DBCC SHOW_STATISTICS statement, the sys.stats and sys.stats_columns system views, and distribution statistics in general. The better you understand how statistics work, the better you can optimize your queries to ensure their maximum performance.
This document contains proprietary information and is protected by copyright law.
Copyright © 2026 Red Gate Software Limited. All rights reserved


Load comments