
Always Encrypted is a new feature included in SQL Server 2016 for encrypting column data at rest and in motion. This represents an important difference from the original column-level encryption, which is concerned only with data at rest. Always Encrypted also differs from Transparent Data Encryption (TDE), which is also limited to data at rest. In addition, TDE can be applied only to the database as a whole, not to individual columns.
With Always Encrypted, the client application handles the actual data encryption and decryption outside of the SQL Server environment. In this way, you can better control who can access the data in an unencrypted state, allowing you to enforce separation of roles and minimize the risks to sensitive data.
To be able to encrypt and decrypt the data, the application must use an Always Encrypted-enabled driver that interfaces with SQL Server 2016. It is this driver that carries out the actual encryption and decryption processes, rewriting the T-SQL queries as necessary, while keeping these operations transparent to the application.
To implement Always Encrypted on a column, you need to generate a column encryption key and a column master key. The column encryption key encrypts the column data, and the master key encrypts the column encryption key.
The database engine stores the column encryption key on the SQL Server instance where Always Encrypted is implemented. For the master key, the database engine stores only metadata that points to the key’s location. The actual master key is saved to a trusted external key store, such as the Windows certificate store. At no time does the database engine use or store either key in plain text.
You’ll get a better sense of how all this works as we go through the article’s examples, which walk you through the process of implementing Always Encrypted in the test database. The article focuses primarily on the SQL Server side of the equation, demonstrating how to create the two encryption keys and encrypt the columns.
Note that this is the third article in a series on SQL Server encryption. The first two cover basic column-level encryption and TDE. You can access the articles through the following links:
- Encrypting SQL Server: Using an Encryption Hierarchy to Protect Column Data
- Encrypting SQL Server: Transparent Data Encryption (TDE)
For information about enabling Always Encrypted in client applications and their drivers, refer to the MSDN article Always Encrypted (client development), which points you to details about several drivers, including .NET Framework Data Provider for SQL Server, Microsoft JDBC Driver for SQL Server, and ODBC Driver for SQL Server.
Prepare for Always Encrypted
When SQL Server 2016 was first released, the Always Encrypted feature was available only to the Enterprise and Developer editions, but with the release of SQL Server 2016 Service Pack 1, Always Encrypted is now available to all editions.
There’s not much you need to do to prepare a database for enabling Always Encrypted, other than to be running an instance of SQL Server 2016, with SP1 installed if necessary. However, before you try to implement Always Encrypted, you should be aware of the many limitations that come with this feature.
To begin with, you cannot use Always Encrypted to protect columns configured with the following data types:
- XML
- ROWVERSIONTIMESTAMP
- IMAGE
- TEXTNTEXT
- SQL_VARIANT
- HIERARCHYID
- GEOGRAPHY
- GEOMETRY
Always Encrypted also comes with a number of other restrictions. For example, you cannot encrypt columns that use aliases or user-defined data types or are configured with default constraints or the ROWGUID property. And you’ll find other limitations as well. A good place to start for understanding when you can and cannot use Always Encrypted is with the MSDN article Always Encrypted (Database Engine).
For the examples in this article I created a database that contains one table and populated the table with data from the AdventureWorks2014 database (installed on a local instance of SQL Server 2016). To create these objects, I used the following T-SQL script:
|
1 2 3 4 5 6 7 8 9 10 11 12 13 14 15 16 17 18 19 20 |
USE master; GO CREATE DATABASE EmpData3; GO USE EmpData3; GO CREATE TABLE EmpInfo( EmpID INT PRIMARY KEY, JobTitle NVARCHAR(50) NOT NULL, LoginID NVARCHAR(256) NOT NULL, NatID NVARCHAR(15) NOT NULL); GO INSERT INTO EmpInfo(EmpID, JobTitle, LoginID, NatID) SELECT BusinessEntityID, JobTitle, LoginID, NationalIDNumber FROM AdventureWorks2014.HumanResources.Employee WHERE NationalIDNumber IS NOT NULL; |
You do not need to create this database and table to try out the examples. You can use whatever environment you want. Just substitute the target database and table as appropriate when going through the examples.
That said, you do need to be working in SQL Server Management Studio (SSMS) to follow along. The reason we’re using SSMS is because of additional limitations with Always Encrypted. To carry out all the tasks that go with enabling Always Encrypted, we must use either the SSMS interface or PowerShell. We can carry out some of these tasks with T-SQL alone, but not all of them, and even SQL Server Data Tools (SSDT) can’t help us here.
For this reason, the article focuses primarily on how to use the SSMS interface to implement Always Encrypted, with a smattering of T-SQL thrown in for good measure. We’ll leave PowerShell for a different article. Note that Microsoft strongly recommends you configure Always Encrypted on a computer separate from where the database resides to prevent the keys from leaking to the server environment. For testing purposes, however, we can use a single machine, as I’ve done for these examples.
Run the Always Encrypted wizard
The simplest way to implement Always Encrypted is to run the SSMS Always Encrypted wizard, which steps you through the process of applying encryption to one or more existing columns within a database’s tables. To launch the wizard, right-click the database in Object Explorer, point to Tasks, and then click Encrypt Columns. By default, when you first launch the wizard, it displays the Introduction page, as shown in the following figure.
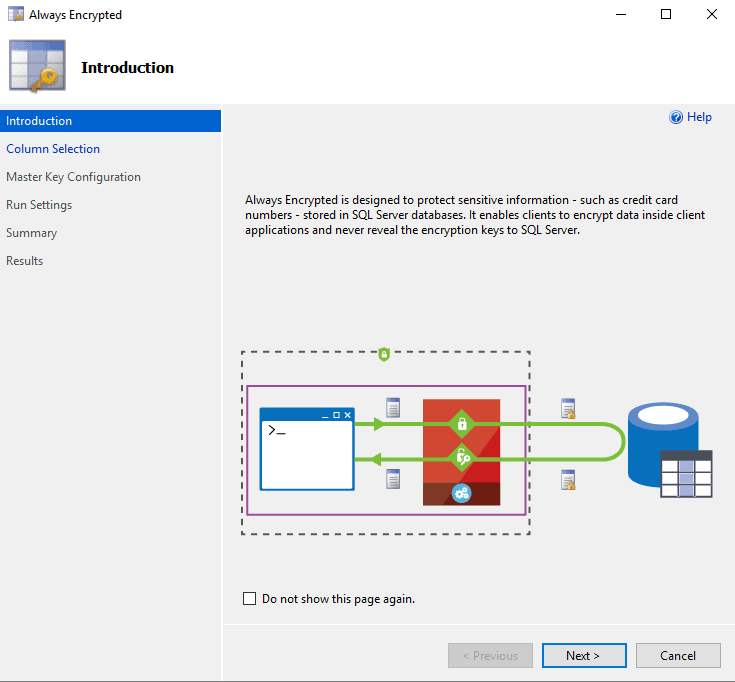
There’s nothing you need to do on this page, unless you don’t want it to appear next time you launch the wizard. In that case, you can select the Do not show this page again check box. When you’re ready to continue, click Next.
On the Column Selection page, you select the check box associated with each column you want to encrypt, as shown in the following figure. For this example, we’ll be encrypting the LoginID and NetID columns.
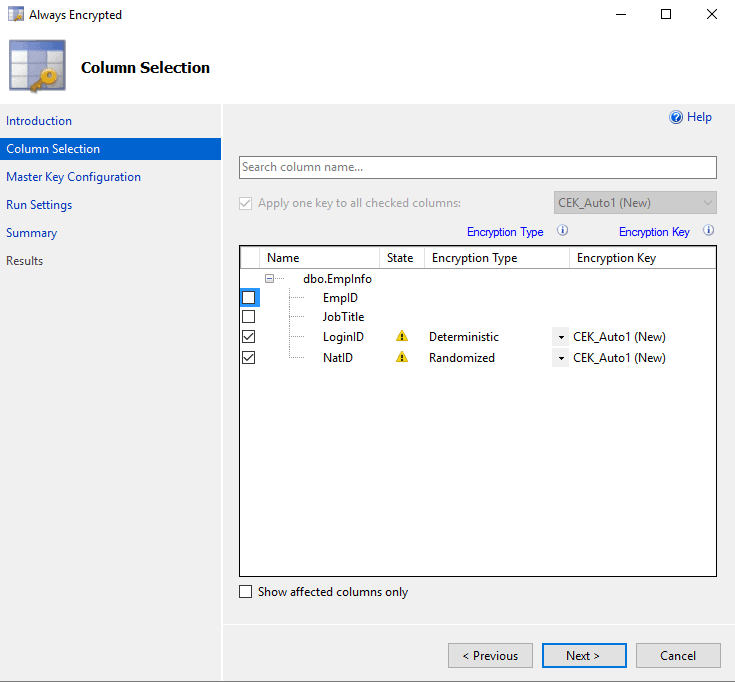
For each column that will be encrypted, we must select the encryption type, which can be one of two options:
- Deterministic: Always generates the same encrypted value for a given plain text value, making it possible to use the column for equality joins, point lookups, grouping, and indexing. This method is not as secure as randomizing the values because an unauthorized user might be able to guess the encrypted values by examining data patterns, especially for columns that support a small set of possible values, such as True and False.
- Randomized: Generates encrypted values in a less predictable manner, making it more difficult for users to infer values from the data patterns. However, this also means you cannot use the column for such operations as equality joins, point lookups, grouping, or indexing.
In addition to the encryption type, we must also specify the column encryption key for each column. For this, we can use one that has already been created, or we can have the wizard do the work. Because we haven’t yet defined an encryption key on this database, we’ll let the wizard create the key, which means sticking with the default option, CEK_Auto1 (New).
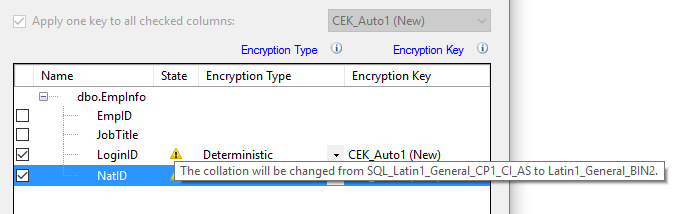
You might have noticed that when you configured your columns, a warning icon appeared with each one. If you hover over the icon, you’ll see the message in the following figure, which informs you that the collation will be changed to Latin1_General_BIN2. We must use this collation when encrypting string data.
After you’ve configure the columns you want to encrypt, click Next to advance to the Master Key Configuration page, shown in the following figure. Here you specify the details the column master key, which is used to protect the column encryption key.
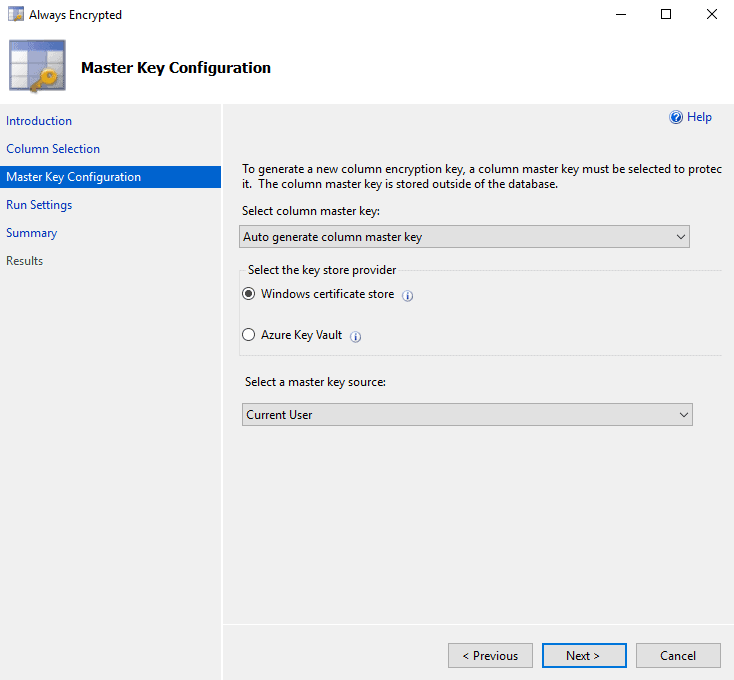
Once again, we’re going to let the wizard do the work by allowing it to create the master key, which we’ll save to the Windows certificate store for the current user. If we have already created a master key, we can use that. We can also make use of the Azure Key Vault, instead of the local Windows certificate store. To use the Azure Key Vault service, we must provide the necessary login credentials.
For now, however, we’re keeping things simple by letting the wizard generate the key and adding it to the local certificate store, so click Next to advance to the Run Settings page, where you can choose to set up encryption immediately or generate a PowerShell script to run later, as shown in the following figure.
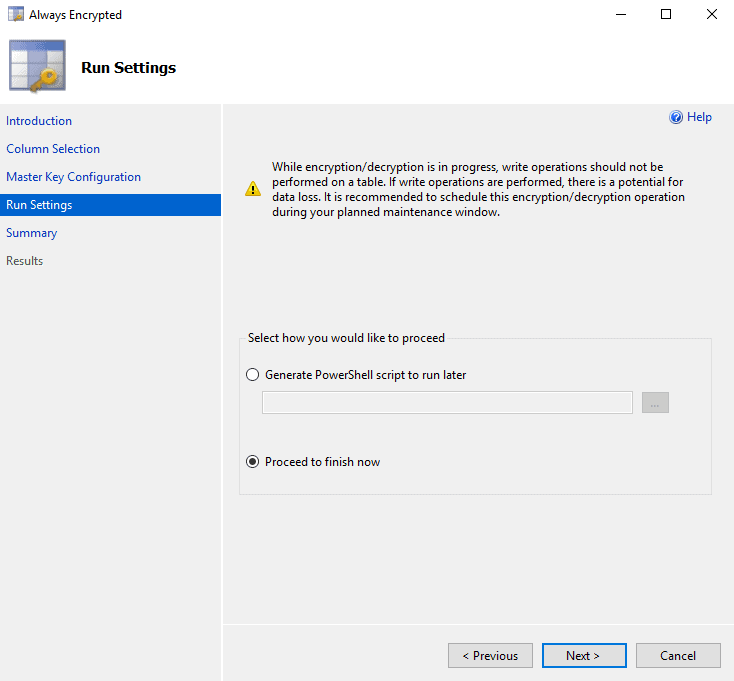
In this case, we’re going to stick with the default option, Proceed to finish now, but just so you know what you’d be getting with the PowerShell script, I’ve included a copy here:
|
1 2 3 4 5 6 7 8 9 10 11 12 13 14 15 16 17 18 19 20 21 22 23 |
# Generated by SQL Server Management Studio at 12:33 PM on 1/31/2017 Import-Module SqlServer # Load reflected assemblies [reflection.assembly]::LoadwithPartialName('System.Data.SqlClient') | Out-Null [reflection.assembly]::LoadwithPartialName('Microsoft.SQLServer.SMO') | Out-Null [reflection.assembly]::LoadwithPartialName('Microsoft.SQLServer.ConnectionInfo') | Out-Null # Set up connection and database SMO objects $sqlConnectionString = 'Data Source=localhost\sqlsrv16;Integrated Security=True;MultipleActiveResultSets=False;Encrypt=False;TrustServerCertificate=False;Packet Size=4096;Application Name="Microsoft SQL Server Management Studio"' $sqlConnection = New-Object 'System.Data.SqlClient.SqlConnection' $sqlConnectionString $serverConnection = New-Object 'Microsoft.SqlServer.Management.Common.ServerConnection' $sqlConnection $smoServer = New-Object 'Microsoft.SqlServer.Management.Smo.Server' $serverConnection $smoDatabase = $smoServer.Databases['EmpData3'] # If your encryption changes involve keys in Azure Key Vault, uncomment one of the lines below in order to authenticate: # * Prompt for a username and password: #Add-SqlAzureAuthenticationContext -Interactive # * Enter a Client ID, Secret, and Tenant ID: #Add-SqlAzureAuthenticationContext -ClientID '<Client ID>' -Secret '<Secret>' -Tenant '<Tenant ID>' # Change encryption schema $encryptionChanges = @() # Add changes for table [dbo].[EmpInfo] $encryptionChanges += New-SqlColumnEncryptionSettings -ColumnName dbo.EmpInfo.LoginID -EncryptionType Deterministic -EncryptionKey AEColumnKey $encryptionChanges += New-SqlColumnEncryptionSettings -ColumnName dbo.EmpInfo.NatID -EncryptionType Randomized -EncryptionKey AEColumnKey Set-SqlColumnEncryption -ColumnEncryptionSettings $encryptionChanges -InputObject $smoDatabase |
The script loads the SqlServer module and provides the commands necessary to implement Always Encrypted on your target database. Although we’re not getting into the specifics of PowerShell in this article, know that anything we do in SSMS related to Always Encrypted, we can also do in PowerShell.
With that in mind, let’s return to the wizard. Click Next to advance to the Summary page, which should look similar to the one shown in the following figure.

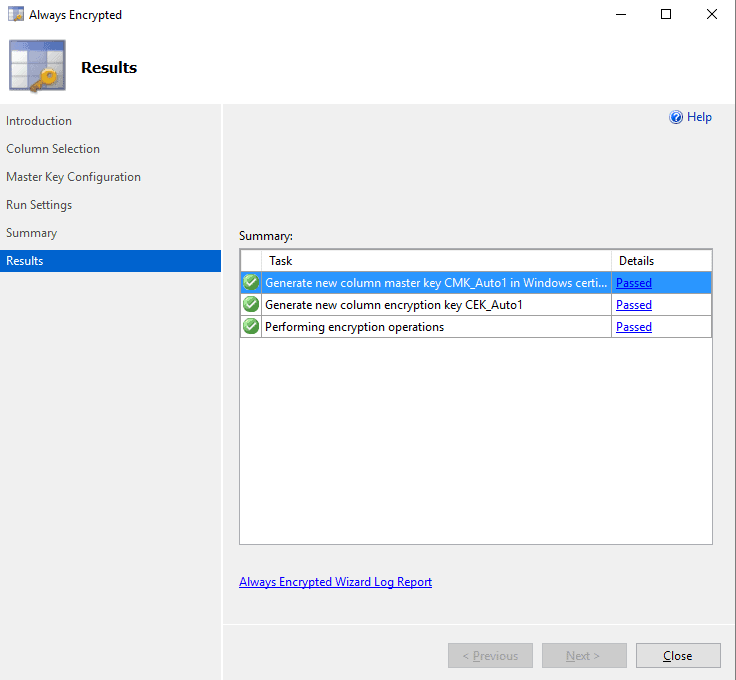
The page describes the steps that will be taken to implement Always Encrypted: creating the master key, creating the encryption key, and encrypting the two columns. Click Finish to complete the process.
If all goes well, your Results page should eventually look like the one in the next figure, with each step having successfully completed.
That’s all there is to implementing Always Encrypted on our columns. Keep in mind, however, that we were working with a very small set of data. Applying encryption to existing data in this way can take a fair amount of time, depending on the amount of data. In addition, you should not perform write operations against the table during the encryption process because of the potential for data loss.
View encrypted data
Now that we have our columns encrypted, let’s look at what happens when we try to run the following SELECT statement within an SSMS query tab:
|
1 2 3 |
USE EmpData3; GO SELECT TOP 5 * FROM EmpInfo; |
As it turns out, the LoginID and NatID columns are returned as encrypted values, as shown in the following table.
| EmpID | JobTitle | LoginID | NatID |
| 1 | Chief Executive Officer | 0x015B48DB2AE3AB143C4F61DEB44F2CDF53A23EBABBA71117C1AD29D7FEE6A9EF0E6715749613B219D870C3826C6C32C80DFDEB95986EA6F3120B164F71811614A4F44FECF2CB875A8B1DCC79DC6696DB397A458826E4C0F78E3FEC50A21CE826E6 | 0x01334FD67127650B72E06A627A0C07B96181B912EC63994044730AACB0EDA4F2C30B10BAEBEDC9ADAA75D4B2101B9D2F28D7B0552F3A2D054D5631B87D7519AAE529E9645FECADD3E0D371851E8A57E144 |
| 2 | Vice President of Engineering | 0x01B1EC7731FB28D28D752C1DCACE8C5DB14E3F0374B80EFEF14893C78E098C07D80F0907984EC249D456B4EFA5AE416B93D4CFF09B0CEE3615A57A2C3424753E86FE37042D14157A5420EC88CD6486B8B4A3C3E0CACB85F943F64143E9AB5484D9 | 0x017C8987711ECF4B9C1C3FC06895B3DFA044F1EA055E826BA6696618F7CD3B3336DC3910BD4A71FDC3082F6BB7AF021B883266A1CB457400F4CC26E51676FF90E7263508D5CB69D130E7BF163742DBC6EA |
| 3 | Engineering Manager | 0x01C7F7DB8AB66D08B3C3F5EA1C71A46B6A5F15364D47AB15ED97BE93D867EF91D783B263AFF72FC2B9730C85F105280A071225CF3376D693CD2AF9D39EEA63D6EC02D896D712C95FAEF9478D5D8F1EDFDAE42AE255B5E1E60F9563FF4BA9AC40390438FF87BC1AAEEC72CEE6AE4A026665 | 0x019F6BFABF4BB6A153E4A36208527CF120FF199E29322A0406C1B023C11B4B78E65EC5ED37B23514F847EB2D1C30392BFD6EA315EE3DC8F58428399A2DD3E33C2DE987AF0F6FD92B72572FD6B98233B5EF |
| 4 | Senior Tool Designer | 0x018177E520A82993F8A7D995FB73E757B5971B3E39EB65AF8BD2C6C90F1C2841A074586C9CEAAEB087FA5CA0E7F895EE1A737A846CA4559C70C7E6F5EDC61F4FAA5DEE81D745F096CF16465C96B2E1087A6389EDCA4F51B00D2274F4035D69FAA2 | 0x01E4AAC5D85F398DD922FB9DCF25B075F31E280C7740E1DF28C89AC1288DB81C6B778C27175B5CC4D718A8C044E81EB55131066AA4892898B210663204263CEBF7328DD479D9BCF4C9E18C813A9036912D |
| 5 | Design Engineer | 0x01C4D0486D164ED495516C15F56437C69D084DE1AAC9F8DC2CCB2040B30DCF87BD88A8E3BBECC4EEB71FF9EE3937EAE2B00FA8D998CFFC521A9F2C772543988E90B5CD17E89CBA6C0711F22DC99E6780F406147E79A9D29774D6037BBA2CF70568 | 0x011E0F5E4C3B53EE699BC8DF7FA945EEA20E647033B260B24C482B6C58A483A7D91140ACF5CB08DC239D6427FF1992714ADAC13BCCEB8C59EFD31AADA5D70BD7913796899D88D043B6412A711D12CEF67D |
You might have expected the values in the LoginID and NatID columns to have been returned as clear text because of the built-in support for Always Encrypted in SSMS. However, we must take another step: enable Always Encrypted on the connection itself.
To enable the connection, right-click the query tab in SSMS, point to Connection, and then click Change Connection. This launches the Connect to Database Engine dialog box. Here you must click Options and then go to the Additional Connection Parameters tab, as shown in the following figure.
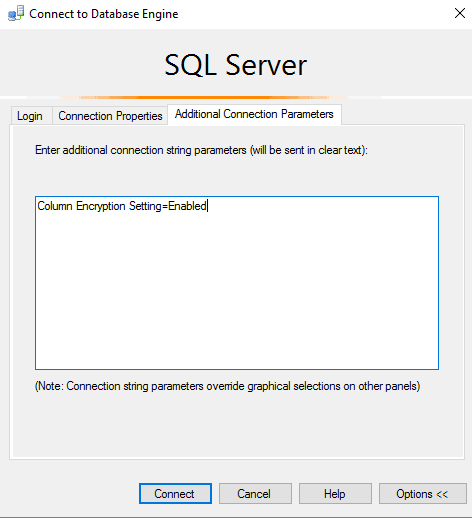
On this tab, type the following value in the large text box:
|
1 |
Column Encryption Setting=Enabled |
After you type the setting, click Connect, and then rerun the SELECT statement. Your results should now look similar to those in the following table.
| EmpID | JobTitle | LoginID | NatID |
| 1 | Chief Executive Officer | adventure-works\ken0 | 295847284 |
| 2 | Vice President of Engineering | adventure-works\terri0 | 245797967 |
| 3 | Engineering Manager | adventure-works\roberto0 | 509647174 |
| 4 | Senior Tool Designer | adventure-works\rob0 | 112457891 |
| 5 | Design Engineer | adventure-works\gail0 | 695256908 |
What all this points to is that any client application you use to access encrypted data must incorporate a driver that supports Always Encrypted. In addition, that driver must be enabled to handle the encryption and decryption operations.
For example, SSMS uses the .NET Framework Data Provider for SQL Server driver, which has been updated to support Always Encrypted. However, we still need to explicitly enable encryption on the connection for the driver to be able to view the data as clear text. The data remains encrypted within the database and in transit until the driver decrypts it on behalf of the SSMS client, making it possible to view the data on our query tab.
View key and certificate information
After we’ve created our column master key and encryption key, we can view information about them in the target database. For example, the following SELECT statement retrieves data about the master key from the sys.column_master_keys catalog view:
|
1 2 3 4 5 |
SELECT name KeyName, column_master_key_id KeyID, key_store_provider_name KeyStore, key_path KeyPath FROM sys.column_master_keys; |
The query returns the key name and ID, the name of the certificate store, and the path within the store, as shown in the following table.
| KeyName | KeyID | KeyStore | KeyPath |
| CMK_Auto1 | 1 | MSSQL_CERTIFICATE_STORE | CurrentUser/my/B27A4A9FCC37F2C5B1807249FE1285CD4A40B88F |
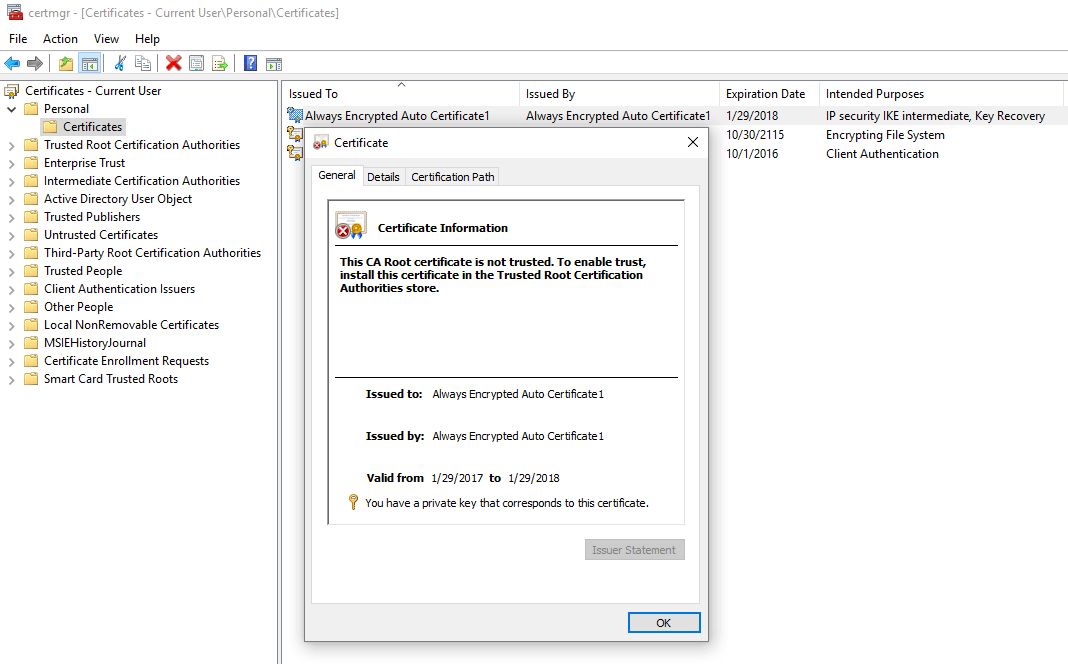
The first thing to note is that the database stores only metadata about the master key. The key itself is saved to the Windows certificate store, as indicated by the MSSQL_CERTIFICATE_STORE value.
The format of the KeyPath value is specific to the type of certificate store and tells us where to find the key within the store. In this case, the path specifies that the certificate is saved to the personal section of the Current User store and provides the key’s thumbprint, a hexadecimal string that uniquely identifies the certificate. The following figure shows how the certificate is listed on my system, with the Certificate dialog box opened.
Now that we’ve verified the existence of the master key certificate, let’s move on to the column encryption key. One way we can view information about the encryption key is to use the sys.column_encryption_keys catalog view:
|
1 2 3 |
SELECT name KeyName, column_encryption_key_id KeyID FROM sys.column_encryption_keys; |
In this case, all we’re pulling from this view is the name and ID, as shown in the following results, but we can also retrieve the created and modified dates if we need them.
| KeyName | KeyID |
| CEK_Auto1 | 1 |
Another catalog view we can use to get information about our column encryption keys is the sys.column_encryption_keys_values view:
|
1 2 3 4 5 |
SELECT column_encryption_key_id ColumnKeyID, column_master_key_id MasterKeyID, encrypted_value EncryptValue, encryption_algorithm_name EncryptAlgorithm FROM sys.column_encryption_key_values; |
This view provides us with the IDs of both the encryption key and the master key used to encrypt the encryption key. The view also returns the algorithm used to encrypt the column encryption key (which is always RSA_OAEP) and the actual encrypted value of that key, as shown in the following table.
| ColumnKeyID | MasterKeyID | EncryptValue | EncryptAlgorithm |
| 1 | 1 | 0x016E000001630075007200720065006E00740075007300650072002F006D0079002F003600310032003600320033003200360065003300320063006200380030003900390030003300340063003000640031003400630030003500610036006300630062006300360035006100340065003500BF3F003560F5F19C01E23A2AAEE9B4883C4E653A69012DDCB859246AE7B05E0DE98A2A71D2490990D65828A4A0354A163B0F96AB4F8C9B9437D71F28D084B934001EE50893B10E5949EBC506450C3BB5D57F5152532D7A9EF752E6E010E6AC7110913CC5A17D6958D66AE5F1ABA65881BF5295AEE58B3B1BA9DD22B20566492B03EAD1D84BDC43190B5135119791D0C7CBA6D08886544C191DE52D6CD64669826396AC7A41A0C8EA29483D0140196F6DCB3620EF5B02680F9483F6E734DE1345D33ABBD2EF3778D79B5560FF3AD4475F21650390C3C83C7800D2F5F1F25B43DEB9927B9329BAD256138C6E9179D849DC234F289D887B6AEE193C56665EA76E467312DD842C1D3E16C418667EE5B4B38ECE782DEE325F5929AF722244E2845CBCCE65FBF99585C891904038DB45B2FF72403312B67C0BD716C51244A4AD128830990A82F7D543834E1D36147299FD804E0787ABB2B97AF8CDEF38326C7944501AE8CDD09774F4AC6DD999099D628D57F97CCD296279214A7CB758AC416CF8D2D208D232946013FBC865560174D532F5913613DA756C4293C131C02C8F7DDABEDCD3E13E147C7D0DF92C4C77B7CA68C643FD78402CE73D2EA34C8279F051818F81DD4F3DCF4200ADA3CE6FC8FA2550C74274E7F91C692CE0DE95F5723C704D991D6E3202099015B4A46804034E7155D34A5828E1C8AC6F785468D424113BDF7331 | RSA_OAEP |
As noted earlier, the column encryption key is itself always encrypted within SQL Server, but we can use the sys.column_encryption_keys_values view to get at that value.
Create a column master key
Earlier in the article, when we applied Always Encrypted to our columns, we used the SSMS Always Encrypted wizard, which not only made it easy, but also allowed us to do something we cannot do with T-SQL statement, that is, apply Always Encrypted to existing data.
However, we can use T-SQL to create a column master key. For example, suppose we had not used the wizard and were starting from scratch in our shiny new database. We can use a CREATE COLUMN MASTER KEY statement to create a master key, as shown in the following example:
|
1 2 3 4 |
CREATE COLUMN MASTER KEY AEMasterKey WITH ( KEY_STORE_PROVIDER_NAME = 'MSSQL_CERTIFICATE_STORE', KEY_PATH = 'CurrentUser/my/B27A4A9FCC37F2C5B1807249FE1285CD4A40B88F'); |
In this case, we’re again specifying that we use the Windows certificate store. However, unlike the Always Encrypted wizard, the CREATE COLUMN MASTER KEY statement also allows us to create a master key that points to a store, such as a hardware security module (HSM), that supports the Microsoft CryptoAPI or Cryptography API: Next Generation, in addition to Azure Key Vault.
If we were to run the above statement as is, we would create a master key named AEMasterKey that points to an existing certificate in the Windows certificate store. The KEY_PATH value provides a pointer to the certificate within the store.
The implication of this is that a certificate must exist within the certificate store prior to running the statement. If you don’t have a certificate in place and are looking for a simple way to get around this (at least for testing purposes), you can once again turn to the SSMS interface.
In Object Explorer, expand the Security node under the EmpData3 database, and then expand the Always Encrypted Keys node. Right-click Column Master Keys and then click New Column Master Key. This launches the New Column Master Key dialog box shown in the following figure
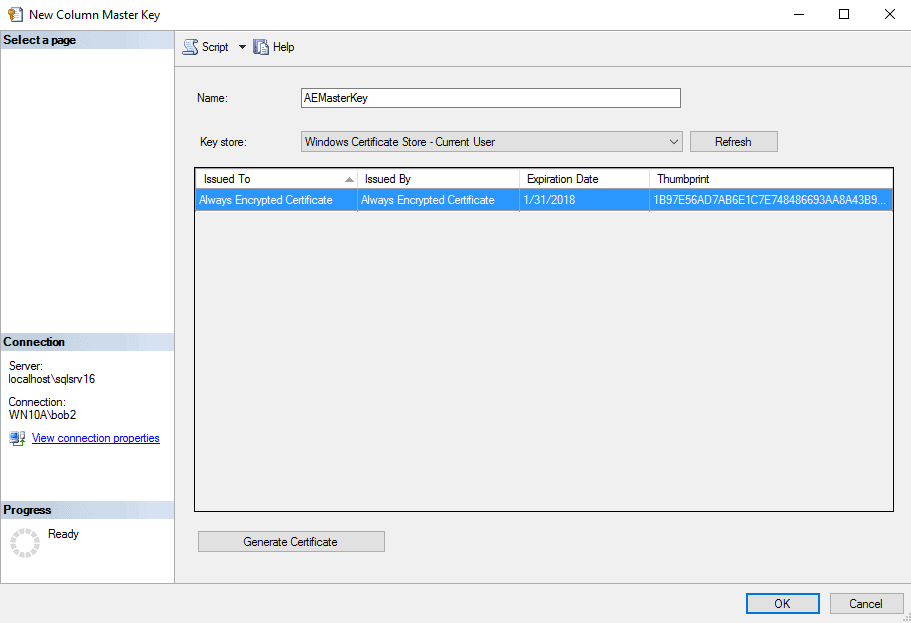
To create the master key, you need only provide a name for the key, select the certificate store, and select a certificate. The nice part about this feature is that it provides more certificate store options than the wizard, such as being able to a store that uses an HSM. Plus, you can generate a certificate simply by clicking the Generate Certificate button.
That’s all there is to creating a master key. You can then query the sys.column_master_keys catalog view to verify the key was created:
|
1 2 3 4 5 |
SELECT name KeyName, column_master_key_id KeyID, key_store_provider_name KeyStore, key_path KeyPath FROM sys.column_master_keys; |
The statement should return at least one row that contains the master key metadata, as shown in the following table.
| KeyName | KeyID | KeyStore | KeyPath |
| AEMasterKey | 1 | MSSQL_CERTIFICATE_STORE | CurrentUser/my/B27A4A9FCC37F2C5B1807249FE1285CD4A40B88F |
Once you have your master key, you can use it when you run the Always Encrypted wizard or when creating a columns master key, which is our next task to tackle.
Create a column encryption key
As with the master key, we can use T-SQL to create a column encryption key, using the CREATE COLUMN ENCRYPTION KEY statement, as shown in the following example:
|
1 2 3 4 5 6 7 |
CREATE COLUMN ENCRYPTION KEY AEColumnKey WITH VALUES ( COLUMN_MASTER_KEY = AEMasterKey, ALGORITHM = 'RSA_OAEP', ENCRYPTED_VALUE = 0x016E000001630075007200720065006E00740075007300650072002F006D0079002F00620032003700610034006100390066006300630033003700660032006300350062003100380030003700320034003900660065003100320038003500630064003400610034003000620038003800660053FD933BC3E3E6E5FFD935F452A5C4113FF56E4D946D78B22A69415FF8EF69D9B3A5541F2463BBC32D06AC88AE95B4CDBBEE7A9D1DD80043D7C900F28917637F4414565CB3F2B29CEEE5C03DF182C4F62395CDAD59A59BFCBD421889DB9EFB2B5250AA597268011B8ACCFFA7A1B5D846BD476BBD8F8239D2681C800E3BCD848485AEC6E69FE76D06D2E213FB36FCBCA5E8B75FE67D21C1C05EB7CF819AD9F96701116A2B642F690455FC7DC48AEEB1825BB20ECD428F910C002EE3D186706E00F76C608EF78FBB147ABA798309092517A39C9C4031B3857C599B238174AA1E8433A649D63D194278B0A4EFBF15DF4E4B5B4468FB73FC8992B3E34606AB306E2E19BADEE4B38288FF77B9A8E45A56BB321091EF0CF3567076ED27D875286CB2232177F610B9A0DAEBFA34ABA9856A094E26E995987AD050D27954DDB08BED9A34C6D19CBE6B2271A7E716C33850DB8781C9D3B762C0920EED57BB9D2BA581F7AC1A46EA55962200FD26405FE31005D413BA5B624E5AF2770377A13EB68FB681242B8B719499175113E84073013BDC6E03E5F82EC070B9151705F1C564106B93E3C7566E41BAD00209AB4587278640FE225F797DD9BB83284E8A674DFC7F48558441E00BC856161FC93A38E337B050915450E7B0ED848CDB63272B65319B26B45119ED081852DEBE53DFF7A6CD21935FC3CBF2C4852AD01CFF0153B76C196F7667 ); |
In addition to specifying the master key and algorithm when creating the encryption key, you must also provide the encrypted value for the key, which is where things get a little tricky. You must come up with a method for encrypting the encryption key value and then passing it into the CREATE COLUMN ENCRYPTION KEY statement.
Microsoft documentation is not very helpful in terms of explaining the best way to go about getting the encrypted value. One MSDN blog has this to say: “The encrypted value is assumed to be produced by encrypting the plaintext of the column encryption key using the specified column master key and the specified algorithm.”
Assumptions aside, you still need a way to generate that value. One approach is to use the SSMS or PowerShell to generate another column encryption key and then copy its value. An easier approach is to again turn to the SSMS interface.
Once again, go into Object Explorer, expand the Security node under the EmpData3 database, and then expand the Always Encrypted Keys node. Right-click Column Encryption Keys and then click New Column Encryption Key. This launches the New Column Encryption Key dialog box, shown in the following figure.
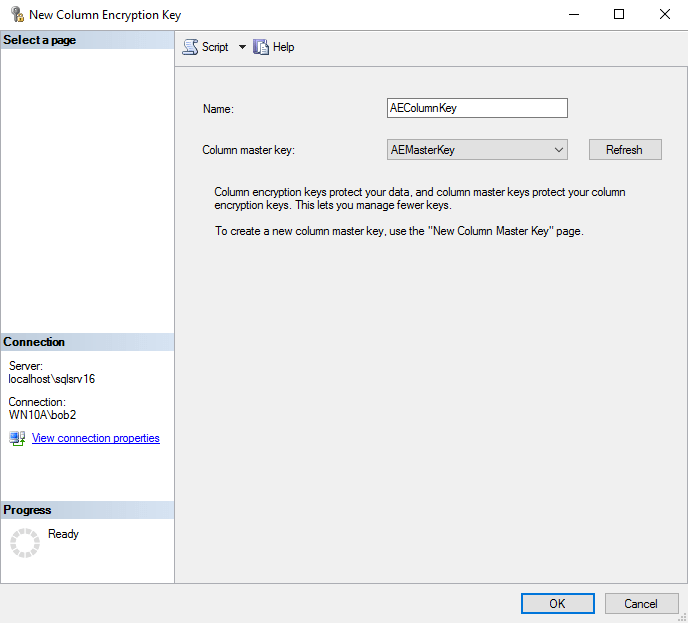
All we need to do here is provide a name for the encryption key and specify the master key to use to encrypt the encryption key, which in this case, is AEMasterKey, the key we just created. SSMS takes care of generating the encrypted key value.
After you finish with this, you can run the sys.column_encryption_keys or sys.column_encryption_keys_values catalog view to verify that you key has been created. You can then use the key in the Always Encrypted wizard to encrypt existing data, or you can create a table that uses the key, which is what we’re going to do next.
Create a table with an encrypted column
Although you cannot use T-SQL to encrypt existing data, you can use T-SQL to define a column that incorporates Always Encrypted protection. For example, the following CREATE TABLE statement uses Always Encrypted to encrypt the NatID column:
|
1 2 3 4 5 6 7 8 9 |
USE EmpData3; GO CREATE TABLE EmpNatID( EmpID INT PRIMARY KEY, NatID NVARCHAR(15) COLLATE Latin1_General_BIN2 ENCRYPTED WITH (COLUMN_ENCRYPTION_KEY = AEColumnKey, ENCRYPTION_TYPE = Randomized, ALGORITHM = 'AEAD_AES_256_CBC_HMAC_SHA_256') NOT NULL); |
As you can see, the column definition specifies the collation (Latin1_General_BIN2), name of the column encryption key (AEColumnKey), encryption type (Randomized), and algorithm (AEAD_AES_256_CBC_HMAC_SHA_256), which is the only algorithm we can use when applying Always Encrypted to a column. After you run the CREATE TABLE statement, you should be good to go.
But here’s where things get tricky in SSMS. You cannot simply insert data into the encrypted column. For example, if you were to try to run the following statement, you would generate an error, whether or not you enabled Always Encrypted on the connection:
|
1 2 3 |
USE EmpData3; GO INSERT INTO EmpNatID(EmpID, NatID) VALUES(1, '295847284'); |
The error message you’ll receive takes the following form:
|
1 |
Operand type clash: varchar is incompatible with varchar(8000) encrypted with (encryption_type = 'RANDOMIZED', encryption_algorithm_name = 'AEAD_AES_256_CBC_HMAC_SHA_256', column_encryption_key_name = 'AEColumnKey', column_encryption_key_database_name = 'EmpData3') collation_name = 'SQL_Latin1_General_CP1_CI_AS' |
According to Microsoft, any value that targets an encrypted column must be encrypted inside the client application, otherwise you’ll get an error. The application must perform that encryption based on the requirements of the Always Encrypted architecture. In other words, it is up to the client application to prepare the data before sending it off to SQL Server, whether inserting or updating data. Again, refer to Microsoft documentation for details about the client side of the equation.
If you get desperate and need to add a row from within SSMS, you can add values directly through the SSMS interface. To do so, right-click the table in Object Explorer and then click Edit Top 200 Rows. You’ll then be presented with a grid, where you can manually add one row at a time. Not a great solution, but it’s something.
You can also use T-SQL in SSMS to delete rows with encrypted data, as well as view that data. But that’s about all you can do.
The brave new world of Always Encrypted
Always Encrypted helps you ensure that only approved applications and individuals can access sensitive data. The encryption and decryption processes remain outside of SQL Server’s purview. Only those with access to the column master key in the certificate store can access the data as plain text.
For the most part, implementing Always Encrypted on the SQL Server side is a relatively straightforward process. The real work happens in the client application, which must use an approved driver and be configured to use that driver before making use of the Always Encrypted feature.
The best part of Always Encrypted is that it is now available to all editions of SQL Server 2016, starting with SP1. That means organizations interested in this feature can give it a try without having to license a product they don’t want. Again, it comes down to the client application and the investment needed to modify the application. Even so, for organizations already invested in the SQL Server universe, Always Encrypted might be worth a try, especially if they’ve already made the SQL Server 2016 leap or plan to do so in the near future.


Load comments