
One of the better-known features in the release of SQL Server 2012 Enterprise Edition is AlwaysOn. This has been designed to meet the ever-increasing need for ‘High Availability’ (HA). AlwaysOn does not use entirely new technologies but makes more effective use of existing technologies that are tried and tested. It aims to provide more granular control to achieve High Availability. Currently, depending on your environment, you could already be using one or more of the following HA components that existed in previous versions of SQL Server:
- Single Site Windows Server Failover Clustering
- Multi-Site Windows Server Failover Clustering
- San level Block Replication
- Transaction Log Shipping
- Database Mirroring
- Transactional Replication
- Peer-to-Peer Replication
Some of these can take time and resources to implement, and may therefore not be meeting your current requirements. This is where SQL Server 2012 AlwaysOn can help, because it provides the benefits of:
- Using the WSFC APIs to perform failovers. Shared storage is not required
- Utilizing database mirroring for the data transfer over TCP/IP
- providing a combination of Synchronous and Asynchronous mirroring
- providing a logical grouping of similar databases via Availability Groups
- Creating up to four readable secondary replicas
- Allowing backups to be undertaken on a secondary replica
- Performing DBCC statements against a secondary replica
- Employing Built-in Compression & Encryption
We’ll need to explain some of these components of AlwaysOn
Windows Server Failover Clustering (WSFC)
Clustering technology has been around for quite some time, starting with Microsoft Clustering Services (MCS) back in NT 4.0 days.. The technology for WSFC is part of the backbone of AlwaysOn. A WSFC cluster is a group of independent servers that work together to increase the availability of applications and services. It does this by monitoring the health of the active node and failing over to a backup node, with automatic transfer of resource ownership, when problems are detected.
Although the WSFC is able to span multiple subnets, a SQL Server which is cluster-aware has not, until now, been able to support a clustered instance of SQL Server across multiple subnets: It has therefore been quite expensive to set up clustering across multiple data centres due to the WSFC requiring shared storage in both data centres as well as the block level SAN replication. This has required a lot of work with your storage vendors to get your setup correct.
Database Mirroring
Database mirroring gives you the ability to fully-synchronise databases from one instance of SQL Server to another, whether the second instance is located on the same server, a different server in the same data centre or to a server in another data centre. It can then switch roles with the mirrored database on failover. One of the problems with database mirroring is that it cannot automatically failover a group of databases that are inter-related. If you have several databases residing in an instance of SQL Server and one of those databases is failed over to the secondary location via your database mirroring setup, this database may be dependent on one or more of the other databases in the instance as well. In this case, your application may not operate correctly. Another downside is that the mirrored database is not accessible. You can get around this by using database snapshots to give you a ‘read only’ copy.
AlwaysOn Nodes
The nodes that you will use in your SQL Server 2012 AlwaysOn solution have to be part of a WSFC. The first step we need to undertake in preparing our AlwaysOn nodes is to add the Failover Cluster Feature to each node. I’ll go into detail later on in this article.
AlwaysOn Storage
SQL Server versions prior to SQL Server 2012, being setup as clustered instance on a WSFC require the storage to be presented as shared storage. This requirement leads to the storage being more expensive and a little bit more complicated to configure and administer. With SQL Server 2012 AlwaysOn your solution does not have to utilise shared storage, but can use SAN, DAS, NAS or Local Disk depending on your budget and requirements. I suggest working with your storage providers to come up with the solution you need.
Synchronous & Asynchronous Mirroring
AlwaysOn uses SQL Server’s existing mirroring technology. Synchronous Mirroring, as its name indicates, requires the transactions to be written at both sites for the transaction to be completed. Whereas this can lead to increased latency in your system, it gives you zero data loss. AlwaysOn will support up to two secondary replicas synchronously replicated per availability group. Asynchronous Mirroring, on the other hand, is faster but increases the risk of data loss as it does not have the requirement to complete the transaction at the secondary site. One advantage that AlwaysOn has over mirroring is that it allows multiple usable secondaries of the database. Another advantage is the ability to have a combination of Synchronous & Asynchronous Mirroring in your setup so as to reach the best compromise between performance and reliability. Depending on your HA/DR requirements you possibly could have a synchronous setup to a server in your local data centre and an asynchronous setup to a server in a secondary data centre.
Availability Groups
SQL Server 2012 AlwaysOn allows for the more granular control of your environment with the introduction of AlwaysOn Availability Groups (AAG’s). AAG’s allow you to configure groups of databases that you would like to failover all together when there is a problem with the host server. When configuring your AAG’s you:
- Configure your AAG on the Primary Replica (Your AAG contains the group of DBs that you wish to group together to failover to your secondary replicas)
- You will need to configure between one and four secondary replicas, with any combination of Synchronous (Maximum of two) and Asynchronous Mirroring (Your primary replica is available for read and write connectivity, while your secondary replicas can be configured for read-only, read intent or no access)
More in-depth information on Availability Groups is covered later.
Maintenance Tasks/ Reporting
AlwaysOnallows you to use the secondary replicas that you would have created when you setup your AAGs to undertake some regular database maintenance tasks to remove some of the performance overheads from your primary production server. Some of the tasks that you could look at undertaking on a secondary replica are:
- Database Backups
- Full Backup With Copy_Only
- Transaction Log Backups
- DBCC CheckDB
- Reporting
- Database Snapshots
Licensing
SQL Server 2012 has been released with a new license model. With SQL Server 2012 AlwaysOn’s ability to have multiple secondaries you need to take into account the licensing when you are going to be implementing multiple secondaries. The license model requires you to license your Active (Primary) SQL Server in your AlwaysOn Cluster. You are allowed one Passive (Secondary) server that you do not need to license. If you have more than one secondary server, you need to license that server whether it is active or passive. For more information on licensing have a look at the SQL Server 2012 Licensing Reference Guide and talk to your licensing reseller.
What is Active and what is Passive? Your Primary is active because you are accessing it and using the database. If you setup a secondary server to perform any of the tasks listed above in Maintenance Tasks/Reporting, then this secondary is also active and needs to be licensed. Remember; if you access it, it is active. For example: If we were to have one Primary Server (Active), three Secondary Servers (one Active, two Passive) we would be required to license three of the four servers.
Security & Performance
To give you the full benefits of high availability, there will be a lot of movement of data. This brings with it security risks and higher bandwidth demands. To minimise these requirements Transparent Database Encryption (TDE) as well as Backup Compression, are both shipped with the Enterprise Edition,
Implementing AlwaysOn
Now that we have covered off the basics of what an AlwaysOn solution could possibly look like we are ready to start and plan for implementing this solution to meet your ever increasing High-Availability requirements and DR needs.
Your final solution could look something like this:
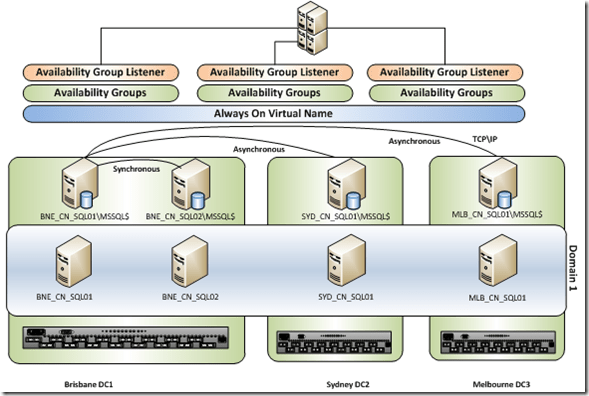
Image 1 – SQL Server 2012 AlwaysOn Solution
Building your AlwaysOn Cluster
In this scenario we are going to build a two-node SQL Server 2012 AlwaysOn Cluster. To achieve this, all of the nodes that are going to participate in the SQL Server AlwaysOn Cluster need to have .NET Framework 3.5.1 and the Failover Clustering feature enabled.
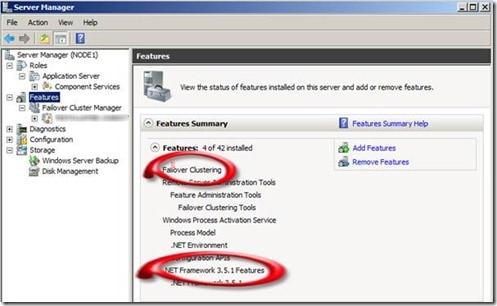
Image 2 – Required features
Now that we have enabled both of these features we can build our WSFC. From the Control Panel | Administrative Tools | Failover Cluster Manager | Validate a Configuration, we can validate whether our servers are okay to participate in a WSFC.
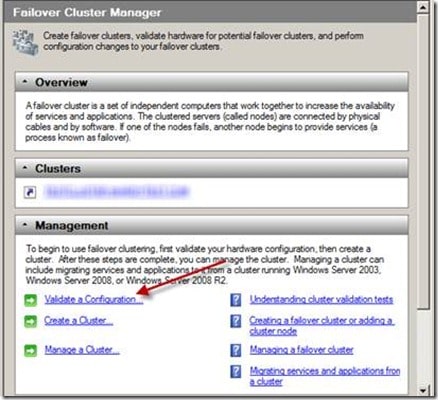
Image 3 – Validate Cluster
The ‘Validate a Cluster Configuration’ Wizard will start. Click through this wizard and you will be asked which tests you would like to run. I have selected all tests for this validation. You will need to add all of the nodes that you are going to add to your WSFC.
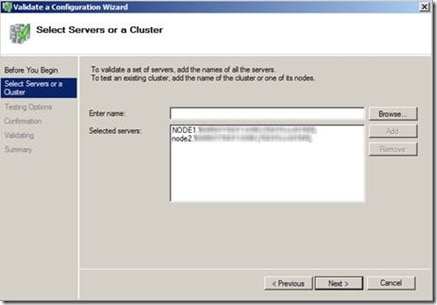
Image 4 – Cluster Nodes
At the end of the Validation, as long as everything has passed, you should get the following notification:
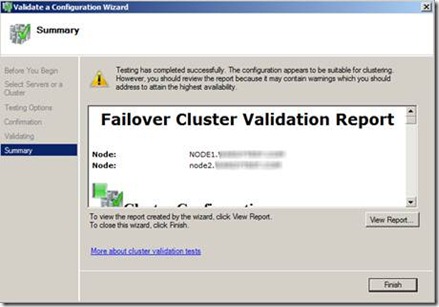
Image 5 – Cluster Validation Success
Building your Windows Server Failover Cluster
There is no difference between the task of building your WSFC for use with SQL Server 2012 AlwaysOn and your previously built WSFC for SQL Server 2008 R2. If you have never built a WSFC before, you can read more on this here Failover Cluster Step-By-Step Guide. In this article, I am not going to go through the WSFC build, but I need to mention that your WSFC build needs to pass all of the validation rules in order to give you a supported WSFC.
SQL Server 2012 Setup
Now that we have our two nodes in our WSFC, we are ready to start the build process for our SQL Server 2012 AlwaysOn Cluster. We need to make sure that we have our installation media which is available for download from Microsoft SQL Server 2012 Downloads.
On Node1, we start the setup.exe to begin the installation process. We are greeted with the initial screen. You should navigate to the Installation Tab to start the installation, selecting ‘New SQL Server stand-alone installation or add features to an existing installation’.
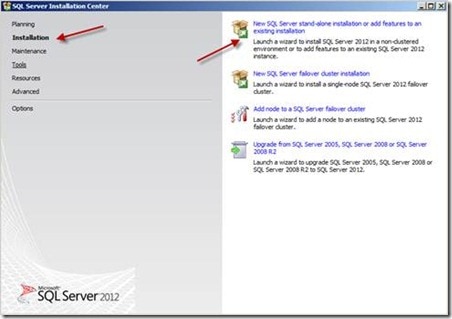
Image 6 – Stand-Alone Installation
The Setup Rules should all complete successfully and you can then click ‘OK’ to continue. Once your Product Update scan has completed click ‘Next’.
Follow the prompts until you get to the Installation Type screen, ensure you select ‘Perform a new Installation of SQL Server 2012’, click ‘Next’.
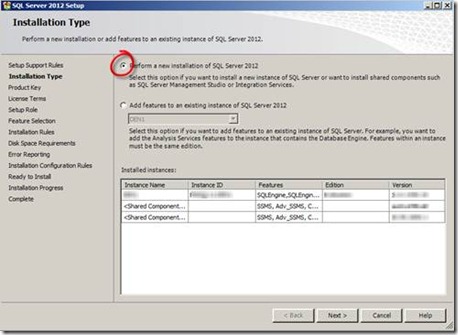
Image 7 – New Installation
Enter your product key, click ‘Next’.
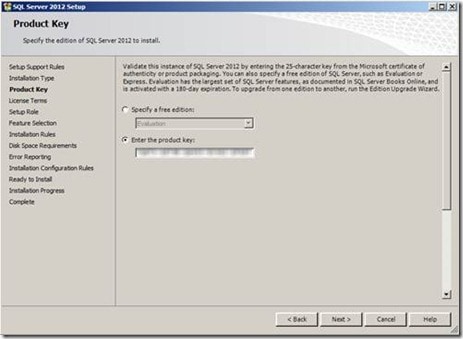
Image 8 – Product Key
Accept the Terms and Conditions, click ‘Next’.
Ensure you select ‘SQL Server Feature Installation’, click ‘Next’.
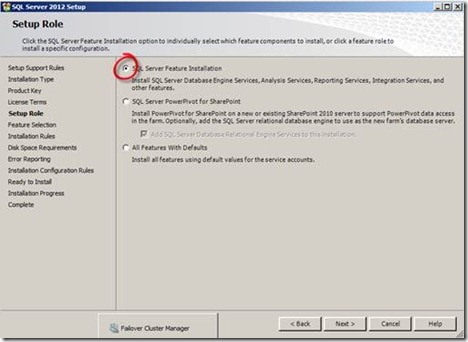
Image 9 – SQL Server Feature Installation
Choose the features you need to install, click ‘Next’.
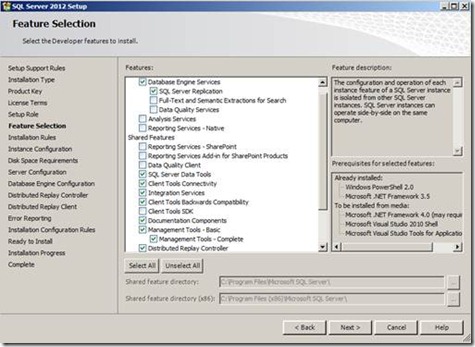
Image 10 – SQL Server Features
Your installation rules will be checked and, as long as there are no issues, you can continue with the installation by clicking ‘Next’.
Enter your SQL Server 2012 Instance Name for the Instance that you are building, click ‘Next’.
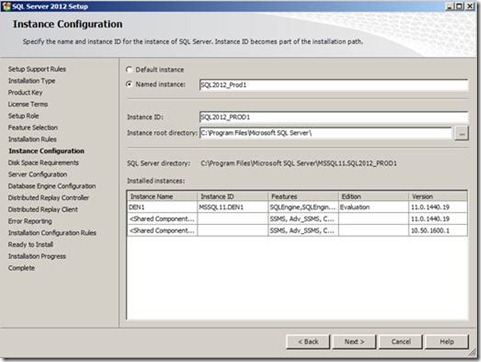
Image 11 – Instance Name
Normally I would recommend having different service accounts for each of the SQL Services that you are installing. However, in this installation I am just using the default local accounts. You will need to have your Domain service accounts created and set the passwords on this Server Configuration screen in the installation. Once you have set the passwords, make sure you click on the Collation Tab so as to configure your Collation for the Instance, click ‘Next’.
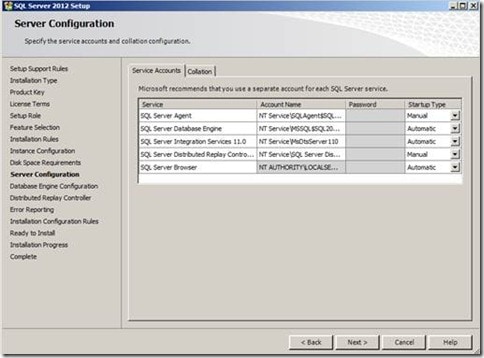
Image 12 – Service Account Details
On the Database Engine Configuration screen there are three tabs that we need to pay attention to. The Server Configuration Tab is where you set your security mode – Either Windows (recommended) or Mixed Mode. Remember to add the current account you are running the installation as, as well as any other individuals or groups that need to be members of the SysAdmins group.
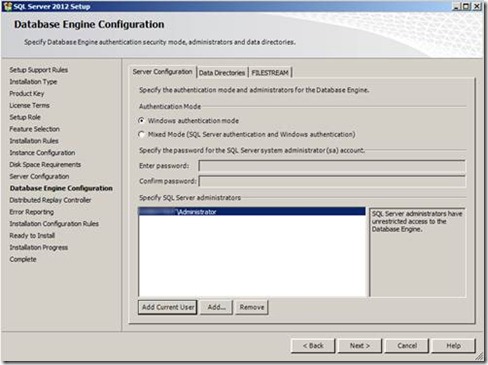
Image 13 – Server Configuration Details
The Data Directories Tab allows you to specify where you want to have your User Databases, TempDB and backup locations to be stored. Traditionally you would have four separate drive locations depending on your storage for Data files, Log Files, TempDB and Backups.
The FileStream Tab allows you to Enable Filestream if this is a required option that you need in your environment. Click on this link for further reading on FileStream.
Click ‘Next’ until you get to the ‘Ready to Install‘ screen. At this point in time you should review what is going to be installed and, if you are happy, then Click the Install button.
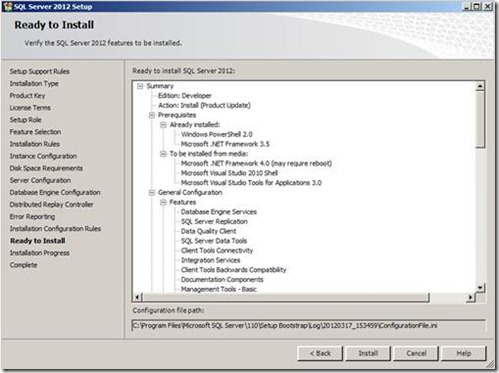
Image 14 – Ready to Install
Remember that these same steps need to be completed on the second node that you are including into your SQL Server 2012 AlwaysOn Cluster.
Configuring SQL Server 2012
Now that we have installed two stand-alone instances of SQL Server 2012 on our two servers in the WSFC we need to undertake some post-installation configuration. This is achieved by using the SQL Server Configuration Manager which is available from Start | All Programs | Microsoft SQL Server 2012 | Configuration Tools.
Because the data transfers by SQL Server 2012 AlwaysOn are done via TCP/IP we need to enable this in the Network Configuration Protocols. By default this will be disabled. Change the value to Enabled and click ‘OK’.
We are now at the main point with configuring our SQL Server 2012 AlwaysOn Cluster. Previously, we were creating a Clustered SQL Server Instance and we had to undertake the Clustered Build Option. You will have noticed that we have installed stand-alone instances of SQL Server on each of the nodes participating in the WSFC. We need to enable AlwaysOn Availability Groups. In the ‘SQL Server Configuration Manager‘ select the Instance of SQL Server, right click, Select Properties. On the ‘AlwaysOn High Availability’ Tab tick the ‘Enable AlwaysOn Availability Groups‘ check box.
Click ‘OK’. The changes will not take effect until the Instance is restarted. You will need to repeat this step on the second instance we installed. (This will need to be done on every instance in your SQL Server 2012 AlwaysOn Cluster)
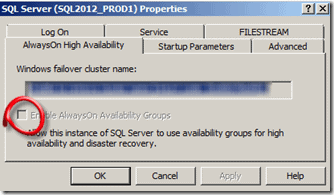
Image 15 – Enable AlwaysOn Availability Groups
We are now ready to start configuring our Availability Groups.
Configuring SQL Server 2012 AlwaysOn Availability Groups
Before SQL Server 2012, one of the options available for you to use to build your High Availability (HA) solution was to utilise Database Mirroring. The Database Mirroring technology is very good at what it was created for. However, it has some limitations when it comes to your HA solution. The limitations include:
- A Single Secondary database
- Mirrored database is accessible via db snapshot only until failover occurs
- Lack of support for MSDTC (distributed transactions)
- Related databases are not able to be grouped together
SQL Server 2012 AAG’s resolve most of these issues giving you more flexibility over your environment and more granular control over your environment to meet your ever growing complex HA requirements.
With implementing SQL Server 2012 AAG’s, which is still utilising the Database Mirroring technology to transfer your data via TCP/IP either synchronously or asynchronously to one or more replicas but giving you the added advantage of being able to access these replicas. It still does not support transactional consistency for those databases participating in a availability group.
Availability Groups
As its name suggests, an Availability Group is a grouping of related databases. When you were setting up Database Mirroring Before SQL Server 2012, you could set up multiple mirrors, but you were only able to set up to mirror a single database at a time. If you have multiple databases that are reliant on each other for the application to work, there is no simple way of ensuring that all of the databases failed over together. Availability Groups now allow you to group appropriate databases together. You can setup, up to 10 AAG’s on a per instance level. Across these 10 Availability Groups you can have up to 100 replica databases participating.
The benefits given by an Availability Group are that it:
- Supports Alternative Availability Modes
- Supports Multiple forms of AAG Failover
- Supports Configuring Secondary Replicas in Read-Only Mode
- Supports Configuring Secondary Replicas to perform Backups
- Supports Automatic Page Repair
- Supports Encryption and Compression
- Supports Management via
- TSQL
- PowerShell
- GUI Wizards
- Dashboard
- Management Studio
- Fast application Failover through the use of AlwaysOn Availability Group Listeners (AAGLs)
Availability Replicas
Availability replicas provide you the ability to setup:
- A primary replica which allows you to undertake read and write capabilities against those databases that have been configured in the AAG
- Up to four secondary replicas which allow you to have read-only capabilities against those databases that have been configured in the AAG. Also allows you to setup the ability to perform backups on these secondaries.
Availability Modes
As mentioned above, when configuring your SQL Server 2012 AlwaysOn Availability Groups, there are some considerations that need to be taken into account when determining what type of availability mode you can use.
If you are wanting to use AAGs for a reporting process, you could have your secondary replica located in the same physical data centre and implement synchronous-commit mode to give you a read only near time group of databases to report against without impacting the performance of the primary databases with reporting overheads. You probably would not consider this type of availability mode where there are large distances between data centres.
If you have the requirement for a reporting process, that does not require the data to be near real time, you could consider implementing your secondary replica in a separate data centre that may be more than 30-40 Kilometers away. If this is the case, you would look at implementing asynchronous-commits for your AAG. By implementing an asynchronous-commit method, you would reduce the latency of the transactions on the primary site but it would open you up to the possibility of data loss.
As you can set up several secondary replicas, you are able to setup different availability modes in your environment. Each AAG is configured separately; for example: you may have two synchronous implementations and two asynchronous implementations.
In this example you would have your primary databases in AAG1 residing in DC1. You then set up a secondary replica that is also located in DC1 in a synchronous-commit mode, thereby allowing you to run your reporting requirements without the reporting overhead impacting on your primary database. This also provides for your HA requirements, by having a secondary environment that is transactionally consistent with the ability to failover to in the event of an issue with your primary databases. You could then setup secondary replicas in DC2, DC3 & DC4 in asynchronous-commit mode. These asynchronous secondary replicas allow you to meet your DR requirements by having multiple copies in multiple geographical dispersed locations, with the ability to failover to in the event of an issue on the primary site.
Failing Over
As with Database Mirroring and Windows Server Failover Clustering, AlwaysOn Availability Groups provide the ability to failover between the primary and secondary replicas that you have setup. There are three forms of failover which can be undertaken with AAG’s:
- Automatic – Supported by Synchronous-Commit Mode – No Data Loss
- Manual – Supported by Synchronous-Commit Mode – No Data Loss
- Forced – Supported by Asynchronous-Commit – Possible Data Loss
The Availability Mode that is in use will depend on whether you are implementing High Availability or Disaster Recovery. This affects the failover setup that you are going to implement in your SQL Server 2012 AlwaysOn environment.
Availability Group Listener
In order to take advantage of the various solutions that we have stepped through in this article, we need to set up and allow for the applications to maintain connectivity to the SQL Server Databases after a failover. This is where the AlwaysOn Availability Group Listeners (AAGL’s) come into use.
An Availability Group Listener is a Virtual Server Name that applications connect to. From the applications point of view it does not matter where the Availability Database is active and available for use. The AAGL consists of:
- Virtual Network Name (VNN)
- Listener Port
- One or more Virtual IP Addresses (VIPs)
For your application to connect, you can either set up a connection string for your AAGL or connect directly to your SQL Server Instance. However, a direct connection does not give the failover support which this technology has been built for.
When a failover occurs for an AAG, the connection from the client is terminated. To gain access again, the client needs to reconnect to the AAGL. To achieve this, the application must be designed and built to poll for the AAGL. Depending on the connection that you are utilising:
- Primary database
- Secondary read replica
You will need to configure your ‘ApplicationIntent‘ in your AAGL connection string appropriately.
With these points in mind, we are now able to create our first AAG in several ways, which are to
- Create Availability Group Wizard
- TSQL
- PowerShell
Expanding the AlwaysOn High Availability tree | right click Availability Groups | New Availability Group Wizard
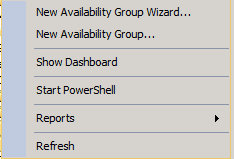
Image 16 – New AlwaysOn Availability Group Wizard
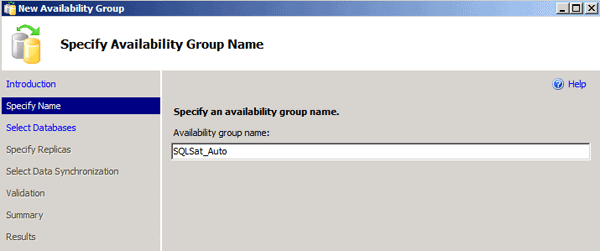
Name your AAG, click ‘Next’.
Select the databases that you need to include in the AAG, click ‘Next’.
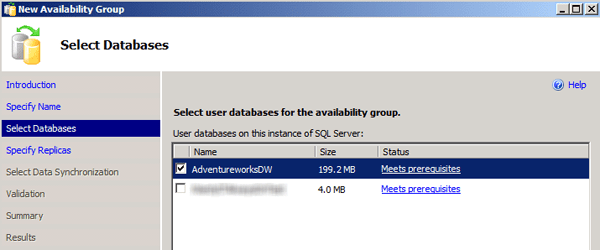
Image 17 – Availability Databases
Your primary replica will automatically be available for you to configure. Choose the Availability Mode, Failover strategy and Readable secondary requirements. Click ‘Add Replica’, connecting to your appropriate secondary servers. Ensure that you set your secondary the same as your primary.
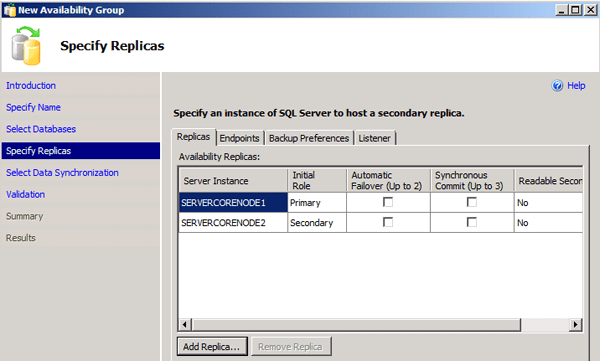
Image 18 – Availability Replicas
Selecting the Listener Tab, give your AAGL a name, port number and the appropriate IP Addresses, click ‘Next’.
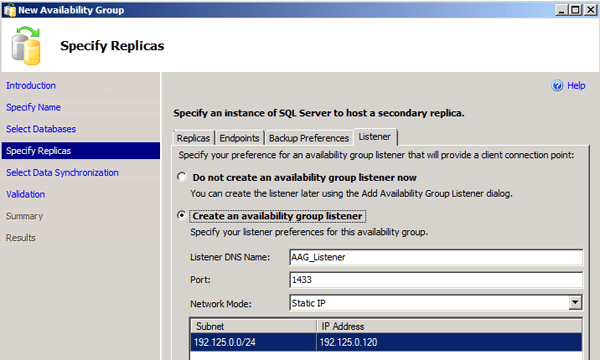
Image 19 – Availability Replicas
Every replica needs to have access to a shared location to access the database backups created and used for synchronising the secondary databases. Enter your share path, click ‘Next’.
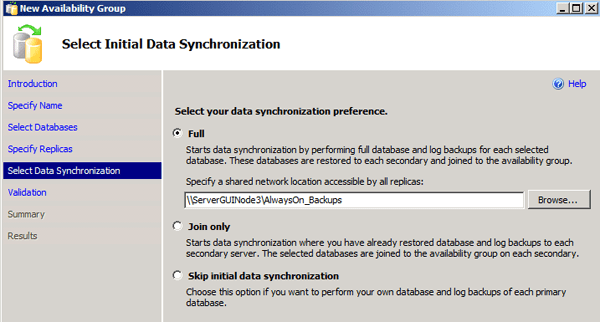
Image 20 – Initial Data Synchronization
Ensure that you receive all green ticks for your validation, click ‘Next’.
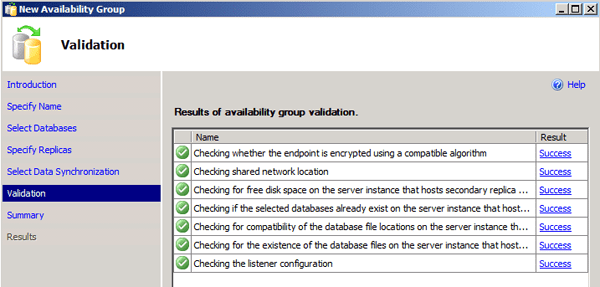
Image 21 – Validation
Review the summary, click ‘Finish’.
Image 22 – Finish
Enjoy configuring your new SQL Server 2012 AlwaysOn environment.
Further Reading
- Windows Server Failover Clustering
- Database Mirroring
- Transparent Data Encryption
- Backup Compression
- Database Backups
- SQL Server 2012 AlwaysOn High Availability and Disaster Recovery Design Patterns
- Microsoft SQL Server AlwaysOn Solutions Guide for High Availability and Disaster Recovery
Reference Material
- http://sqlcat.com/sqlcat/b/whitepapers/archive/2011/12/22/sql-server-2012-alwayson_3a00_-multisite-failover-cluster-instance.aspx
- http://www.brentozar.com/archive/2010/11/sql-server-denali-database-mirroring-rocks/
- http://www.sqlmag.com/article/sqlserverdenali/sql-server-2012-configure-alwayson-141127
- http://msdn.microsoft.com/en-us/library/ms189134.aspx
Load comments