
The amount of data that we generate and work with daily keeps increasing in volume. We are responsible for keeping this data clean so we can get the most value out of its analysis. For example, we can imagine how hard it would be to perform aggregations on sales per vendor if the vendor is identified by name, and most of the vendors are entered with several different spellings in their name, depending on the data source. Here is where Data Quality Services come in, as a necessary part of our ETL processes.
Data Quality Services (DQS) is a fairly new part of SQL Server (available in Enterprise, Business Intelligence and Developer editions since SQL Server 2012), which performs the tasks of monitoring and maintaining the new coming data in good condition.
There are several challenges in the way of the perfect dataset. The incoming data can be:
- Inconsistent
- Invalid
- Incomplete
- Inaccurate
- Non-uniform
- Duplicate
These flaws can easily be caused either by incorrect data entry, system failure, data corruption, or when Master Data Services are not used within the enterprise.
DQS is here to provide us with a fairly flexible solution to these problems, and save us a lot of tedious work; it gives us the chance to work interactively (on demand) or in a batch mode (as part of the pipeline of the daily data loads in the ETL process).
DQS works by deduplicating the data based on rules-based matching, where you need to set up the rules. The more you can inform the system, the more effectively it can improve the quality of the data. It can also veriify, profile and monitor the data quality activities. Furthermore, DQS can use third party reference-data providers via the Windows Azure Marketplace. (This article will not go in detail on how to use the Azure data sources to clean data, visit this link for further reading: http://msdn.microsoft.com/en-us/library/hh213066%28SQL.110%29.aspx)
How to get started with DQS
For the purpose of this article, we will be working with a dataset of Vendors names, and we will strive to keep the list clean, regardless of what datasources we use for our data.
Let’s start with setting up and configuring the DQS first.
Installing and setting up the DQS
DQS components are installed as part of the SQL Server instance installation. During the installation we need to install Data Quality Services as part of the Instance Features, and Data Quality Client and Integration Services as part of the Shared features.
This is not enough, though, and if we try to use the DQS directly after the install we will get an error like the following:
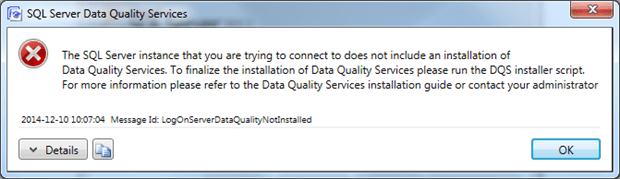
This means that we have not yet configured the Data Quality Services and we need to do so.
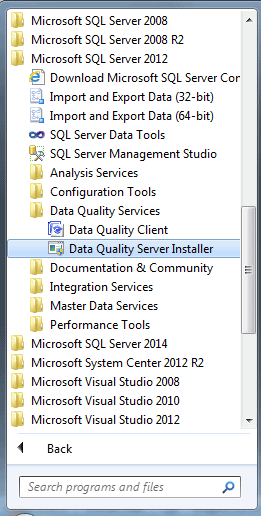
We need to run the DQSInstaller.exe, which can be easily found in the SQL Server’s installation folder, or by clicking the Data Quality Server Installer as shown below:
If we run this executable, we will then get a command line prompt that will ask us to enter a master key, and will install the DQS environment for us.
There is a bit more work to be done with granting roles to those users that will be working and managing the DQS, and also we might need to configure the networking components of the TCP/IP if we are to have the DQS data available in a distributed environment. For further instructions on how to configure the environment, follow this article: http://msdn.microsoft.com/en-us/library/gg492277%28SQL.110%29.aspx
After the script has executed successfully we have three new databases created in our SQL Server instance: DQS_MAIN, DQS_PROJECTS and DQS_STAGING_DATA.
Creating a Knowledge Base
The next step is to create a DQS Knowledge Base. This knowledge base is used to contain information about our data and how it can be used for cleaning purposes later on. The knowledge base is actually an object which can be inherited by knowledge bases created later on.
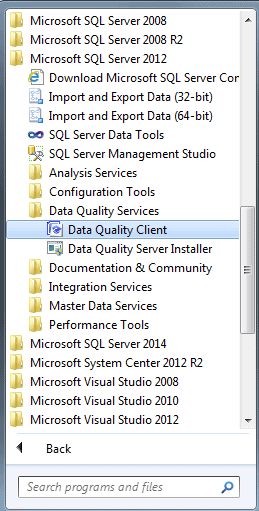
We access the configuration screen by clicking on the Data Quality Client in the SQL Server installation folder.
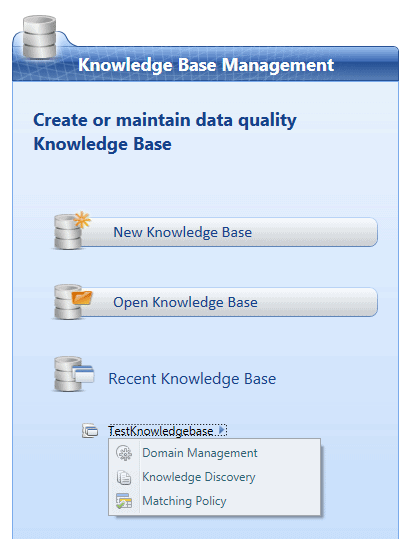
We get to the following screen:
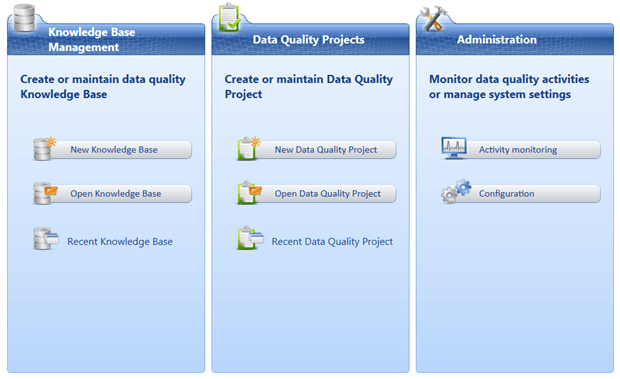
Here is a short description of this screen:
- Knowledge Base Management, mentioned earlier, is where we can create a new knowledge base or open a knowledge base for further development
- Data Quality Projects are used for data cleansing or data matching by mapping the source columns to the domains in the knowledge base and providing a set of rules for the further modification
- The Administration tab gives us an opportunity to monitor the data cleaning activities and to configure the DataMarket account we would like to use (if we have one)
To create a new knowledge base, we need to click on the ‘New knowledge Base’ button and go through the wizard. This is how the first screen looks like:
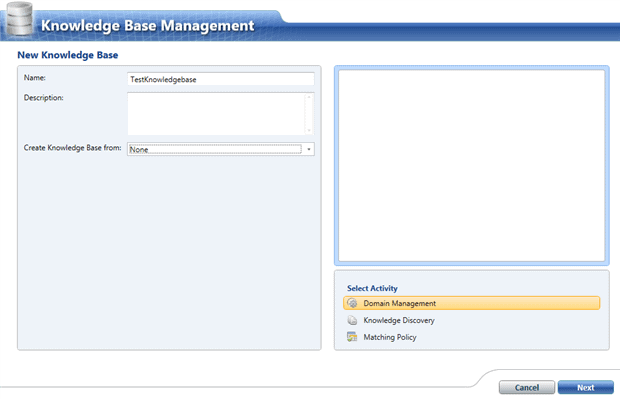
In this case I have named it TestKnowledge base and it will be brand new knowledge base. There are two other options under the ‘Create knowledge base from’ tab:
- Existing knowledge base – there is a built-in DQS Data knowledge base which comes with the installation and it contains some data about countries / regions and US states. If we had some other knowledge bases created before, they would also be available in this list
- Import from DQS file – we can use this functionality to import a previously exported knowledge base. This way we can share and reuse knowledge bases between servers.
In the next screen of the wizard, we are asked to create a domain. In our case we are going to be maintaining data cleanliness of our Vendors, so we create an appropriate domain.
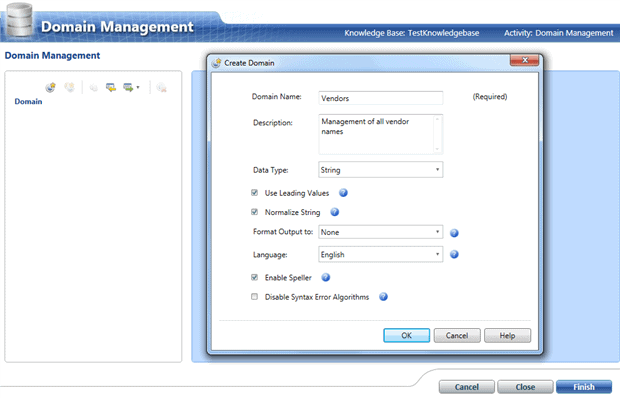
After we accept the above screen, we are presented with a new screen with five tabs, which gives us the opportunity to train our knowledge base.
Training the knowledge base
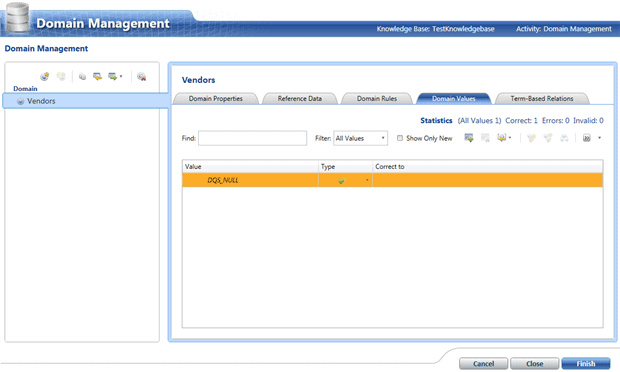
To train our knowledge base, we first need to import a list of our vendors. In reality this list may take a while to compose. It is a very bizarre fact that the only way we can import the list is if we have it in Excel format. This means that there is no way for us to use a SQL Server database table or any other data source – as you can imagine, this problem has been raised with Microsoft.
For the purpose of this article I am using a very small list of Vendors (just some random company names I put in an excel sheet).
After importing the excel list into the Domain Values, we can see that there are a few vendors which have been spelled differently, for example ‘1347 Capital Corp.’.
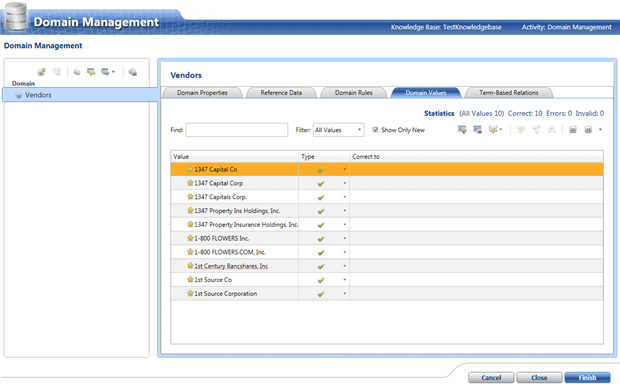
In this case I want ‘1347 Capital Corp.’ to be the correct display of the data and the other two versions to be marked as synonyms. I mark the first three rows, right-click and select ‘Set as synonyms’. Then I click on the row containing ‘1347 Capital Corp.’, right-click and select ‘Set as leading’.
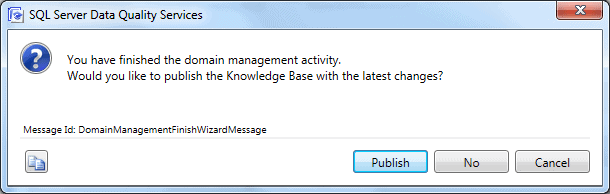
After we have gone through all values and identified the synonyms and the correct spelling, we click on the ‘Finish’ button and we are asked whether we want to Publish the knowledge base.
Knowledge discovery
Now it is time to use the knowledge base we just created and see how it performs on larger datasets of incoming data.
In the main screen we click on the ‘Knowledge discovery‘ button under our newly created knowledge base and we are prompted with options to connect to a data source.
In this case we can use SQL Server table as a data source. We point to our database and table which contains the vendors and we map the column, containing the vendor name to the knowledge base domain.
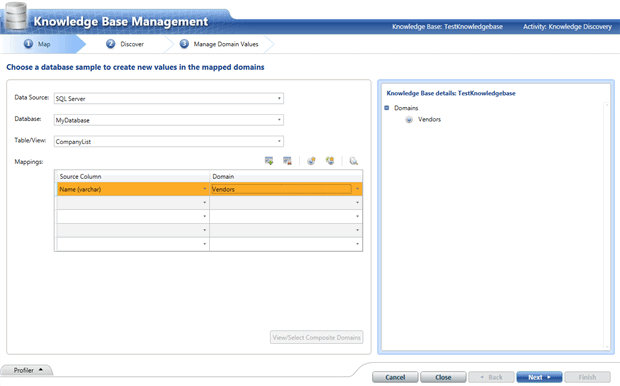
We click ‘Next‘, and in the next screen we get to analyze the data mapping we did.
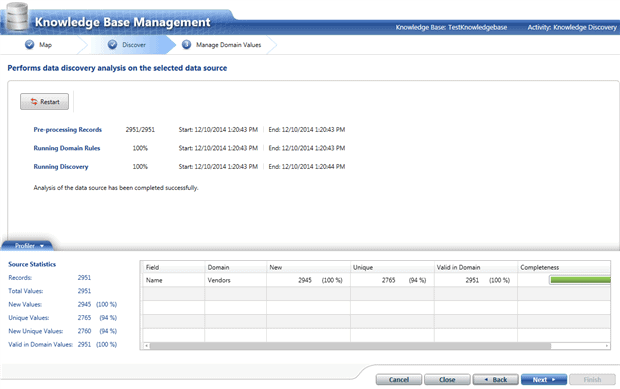
We see by these statistics that our data if fairly clean. We click ‘Next‘ and in the next screen we see what was corrected and we also get a chance to correct data further manually.
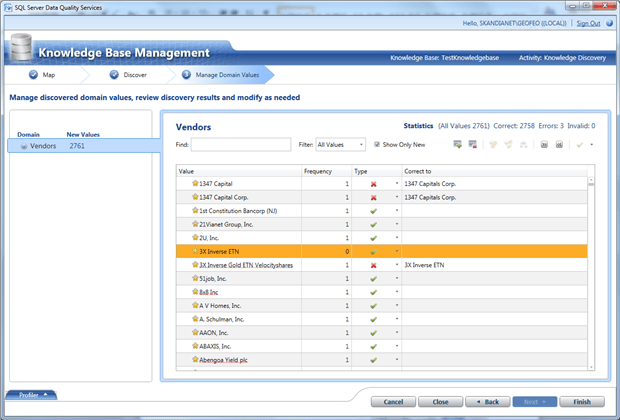
In this case, ‘1347 Capitals Corp.’ was automatically corrected and ‘3X Inverse ETN’ was corrected manually.
As we click ‘Finish‘, we are asked whether we want to publish the knowledge base.
Matching policy
The third part of our data cleaning process is to define the percentage of certainty which defines a correct record vs. incorrect record. This process will look at DQS statistics and tell us what DQS considers to be a valid record.
We start again from the home screen, click on our knowledge base and this time we select ‘Matching policy‘. We connect to our data source in the same way as in the previous section, we click ‘Next‘ and in the ‘Create matching policy‘ screen we are asked to create at least one domain element in the rule editor.
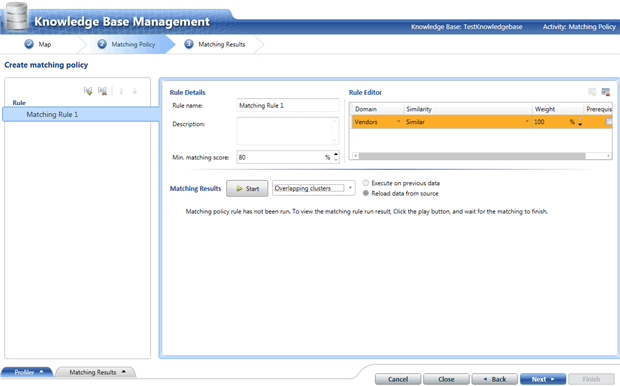
In real world cases, we would be considering composite evaluations, let’s say of Vendor, Product, etc. And in such cases the attributes can have any percentage weight, but they have to amount to 100%.
In this case I am looking only at the vendor name, which means that it must have 100% weight in order to be correct, otherwise it is not correct.
We click the ‘Start‘ button and we evaluate the results.
We click ‘Finish‘ and we publish the results.
Data Quality project
So far we have created, managed and trained our knowledge base and now it is time to see how we can apply it towards our production data or towards our daily data flows.
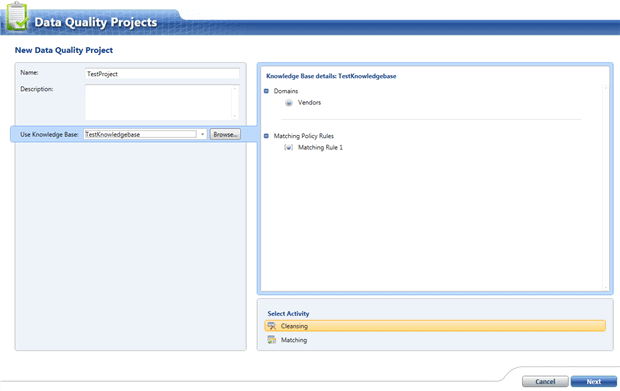
For this we need to create a Data Quality Project from the home screen.
We give the project a name and we select our newly created knowledge base and we select data cleansing, like in the screen below:
The same screen as before appears, where we need to connect to the database:

We click ‘Next‘, and in the next screen we click ‘Start‘ to begin the cleansing process.
In this case, DQS indicates that there were 60% correct records and 40% corrected.
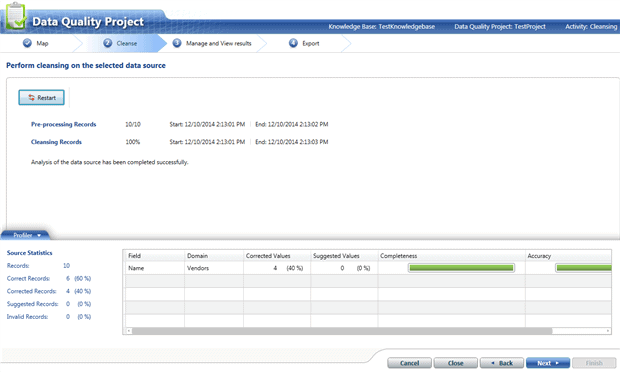
In the next screen we see more details about what was correct and what was corrected, and even at that point we have the opportunity to approve or disapprove changes.
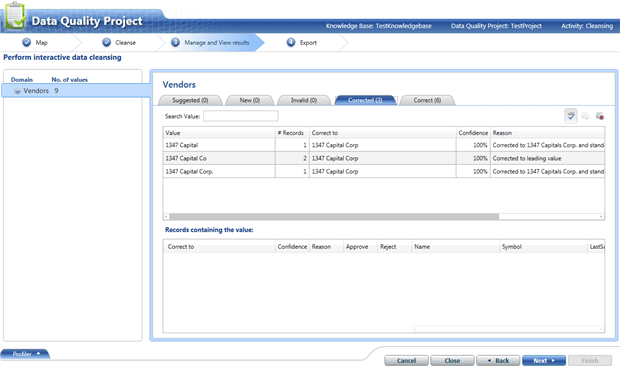
We click ‘Next‘ and in the following screen we have the opportunity to save the cleansed data to a database table and to save our project.
In this case we performed interactive cleaning of our data and saved the results for further use. The saved results can be used to be loaded in other systems, or to be looked into further.
Let’s see how we can automate the daily data loads.
Automating the daily load of data (batch mode)
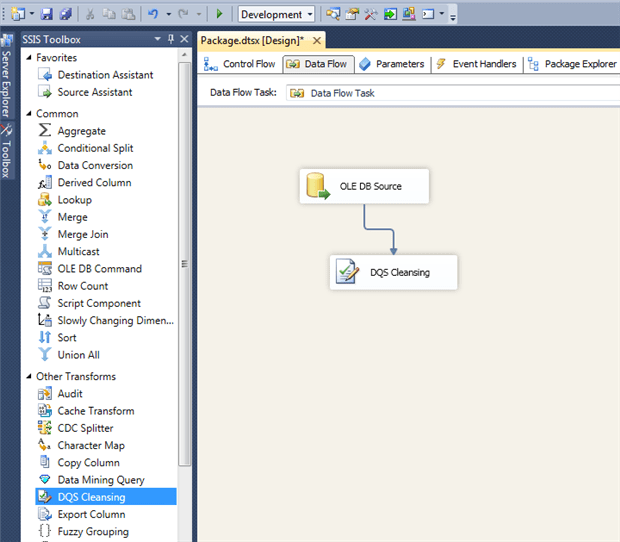
For this example we need to create a new SSIS project, and configure a datasource connection.
The pipeline, in our case, will consist of a single data flow component, in which we will have a datasource, followed by a DQS cleansing component.
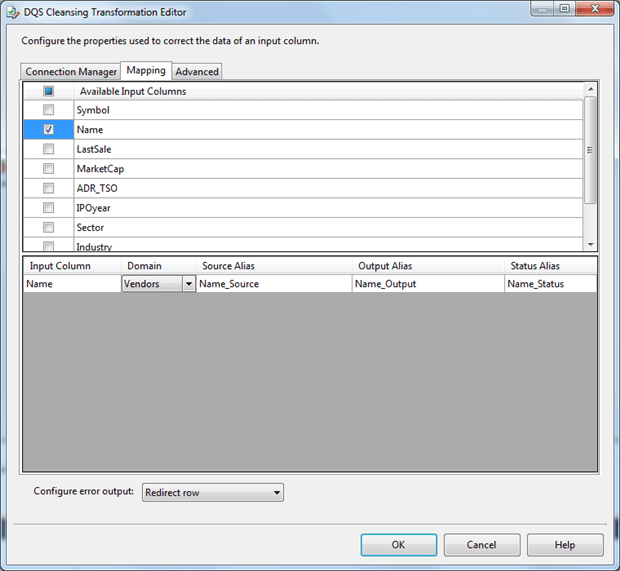
When we configure the DQS component, we have to indicate which DQS server we want to use, as well as which Data Quality knowledge base.
After that, in the Mapping tab, we need to specify which input column we want map to which Domain of our knowledge base.
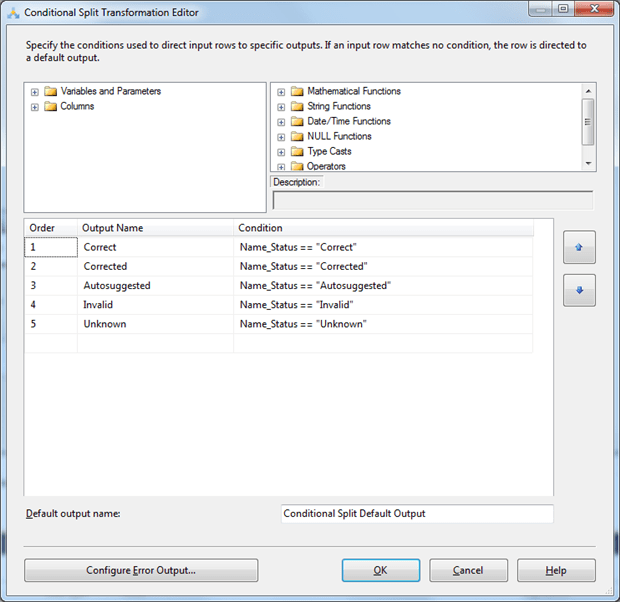
If we add a data viewer after the DQS Cleansing task, we will see that it adds a column called ‘Name_Status’.
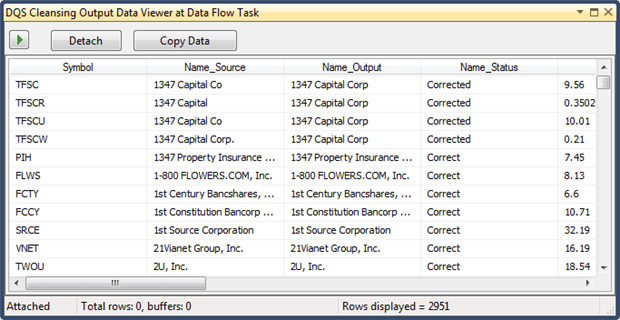
We will use this column in our pipeline to provide Conditional split and to redirect the rows after they are cleansed.
The conditional split component will look similar to this:
And our SSIS package will look like this:
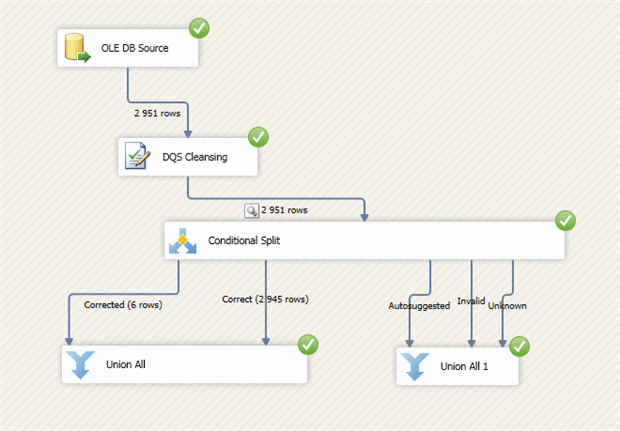
In this case I am using the Union All operator, but in reality we would use the proper destinations for the different types of rows.
Conclusion
Data Quality Services is a must for any company which values its data and data analytics. It requires, of course, constant attention and care to use, but it is worth the effort.
Data Quality Services is only the first step towards data cleansing, the next step being Master Data Services / Master Data Management.
This document contains proprietary information and is protected by copyright law.
Copyright © 2026 Red Gate Software Limited. All rights reserved
Load comments