
When attempting to streamline your work as a database professional, centralization is good. For the purposes of this article, I define the term centralization as keeping your tools and information about your server environment in as few places as possible, and using methods of completing work that scale efficiently as the size of the environment increases. For example, if we need to produce a report that shows the volumes that are attached to the servers hosting SQL that we administer, consider these two approaches:
- Log on to each computer manually via Remote Desktop, manually retrieve the necessary information, and enter it into a spreadsheet.
- Write a PowerShell script that accepts a list of computers to connect to, connects to them via a WMI query, retrieves the information required, and populates a spreadsheet or comma delimited value (CSV) file.
The second method is clearly the more centralized, as it involves only one action in one place (running the script from your desktop) and will scale better: No matter if you have one or one thousand servers, it’s still one command.
Centralization makes our work more efficient, by reducing the number of places we must go and the number of steps we must take. It also helps to ensure consistency across our server environment, because rules and processes are managed in one location. Information that is liable to change should be held in one place only.
Fortunately, there are three technologies that come standard with SQL Server and Windows that we can utilize towards accomplishing our goal of centralizing our work. Let’s go through them here one at a time.
CMS
Since SQL Server 2005, the Central Management Server (CMS for short) feature has given us an easy way to organize our servers into logical groups. Much like a filesystem, CMS lets us create nested folders, in which SQL Servers are “registered” (this means that they are added to the folder). We can organize them in whatever way we like, but here are two common ways to do so.
- By environment – have a folder for Production, QA / UAT, test, etc. If you have multiple geographic locations, then you could also have a higher level set of folders for each datacenter.
- By version – one folder per major SQL version, such as 2005, 2008, 2008 R2, etc.
The most important consideration when deciding on how to organize your servers is to put them in groups according to sets that you’re likely to need to execute queries against. For example, it’s extremely likely that you’ll need to run something against all your test servers at once, versus relatively unlikely you’d want to run something against a mix of test and production. The reason for this organizational style is that one of the main features and benefits of using CMS is that you can execute queries against one or more servers in a group with ease.
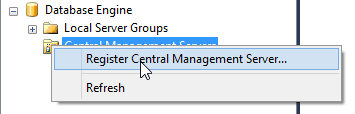
Setting up a central management server is a simple task; all you need is a server with SQL 2005 or higher installed. Most DBAs already have a utility server; something that has SQL installed, but doesn’t have any critical production databases on it. This is a perfect candidate for turning into a CMS hub. The process itself is easy. All you need to do is to connect to the server with SQL Server Management studio by using the “Register Central Management Server” option in the “Registered Servers” tab.
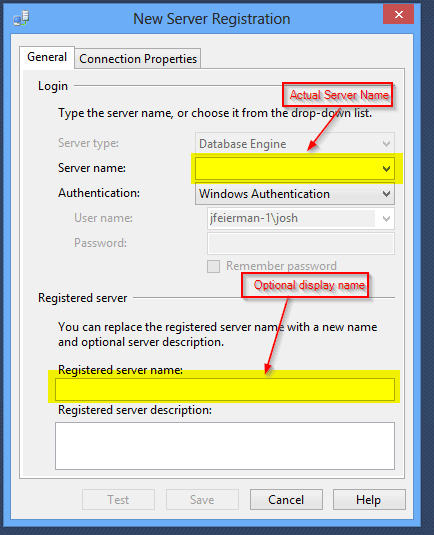
In the resulting dialog, you enter in the actual name of the server (including instance name if it is a named instance), as well as an optional display name and description.
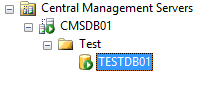
Once the server is registered, you can create folders and add servers to them.
You can create as many folders and add as many servers as you like. You can also move servers from one folder to another, though the process is somewhat painful, as you must first right click on the server, select Tasks->Move To, then select the folder in a dialog box. If someone from Microsoft is reading, it would be really nice if we could simply drag and drop the servers around!
For a more detailed description of how to set up a CMS server and register servers within it, you can read this Books On Line article.
Master / Target Agent
In SQL Server Agent, there is a piece of functionality known as “Master / Target Server”, which allows you to centrally define SQL Agent jobs centrally and have their definition (including schedules and other facets) pushed out to servers across your enterprise. This is remarkably useful, in that there are likely to be a number of jobs that need to be deployed in a standardized way across your environment. For example, you probably have routine maintenance jobs that backup the database, perform index and statistics maintenance, and other miscellaneous work. In many cases these must run on the same schedule across groups of servers, and the job definitions are identical. By leveraging the Master / Target Server feature, you can define these jobs once, and ensure that any changes made propagate down to subscribed machines.
This Books On-Line article has details on how to setup the Master server. The easiest (and most automation friendly) method is to simply connect to a Target server and execute the sp_enlist_msx stored procedure, designating the server you wish to use as the Master. Before doing that, however, there are a few pre-requisites.
Firstly the Windows account, that the SQL Agent service on the Targets runs under, must be a member of the “TargetServersRole” role in the ‘msdb’ database on the Master. Although you could create individual logins for each SQL Agent account, it is better to make each of those accounts members of a dedicated domain security group, and grant that group the appropriate access. As part of your provision process for new servers, the Agent accounts are added to the domain group, thereby automatically granting them the access they require. Obviously, this only works if you have SQL Agent running under domain accounts rather than local accounts.
Secondly, either the Master server must have encryption for connections enabled, or you must set a registry key that forces SQL Agent to use an unencrypted connection between the Master and Target servers. In some cases this may be acceptable, such as over an internal network, but in many cases it may be worth the effort to properly enable SSL.
Once one of more target servers are enlisted, you can create multi-server jobs. These are setup exactly the same as a regular SQL Agent job, with the exception that they are targeted at enlisted servers, rather than the local server. When you configure a job through the graphical interface, select the ” Target multiple servers” option on the “Targets” tab, then select the target servers you wish the job to be configured on. You can pick and choose which jobs target which servers, which is useful in cases where different sets of servers might have, for example, different schedules for maintenance: Sadly, at this time there does not appear to be a way to have the same job targeted to different servers with differing schedules, so you must potentially duplicate the job definition itself.
If you prefer to create jobs via Transact-SQL (or you script your jobs out, which is an excellent thing to do by the way), you target servers by using the sp_add_jobserver stored procedure, specifying the server name (as the computer name and instance name in short form) and the name of the job.
Note: If you make any subsequent changes to the job outside of the Management Studio graphical interface, in many cases you must execute the ” sp_post_msx_operation” stored procedure, which creates a record for the target servers to download. When you modify a job through the graphical interface, Management Studio does this for you. For more information on this and the specifics around which operations require this step, refer to this MSDN article.
PowerShell
PowerShell is a wonderful tool when it comes to centrally managing SQL Server. There are two main ways in which it can be used in this fashion:
- executing ad-hoc or manual work against multiple instances of SQL Server
- automated or scheduled “jobs” that execute against multiple instances.
Ad-hoc execution is easy, because PowerShell has been included in every desktop operating system since Windows 7. For scheduled executions, methods can range from using Windows Task Scheduler, to using SQL Agent (either via PowerShell job steps or by way of calling PowerShell.exe in a CMDEXEC step). The techniques for the actual PowerShell run are virtually the same in both cases, so let’s dig in.
When thinking about using PowerShell with SQL Server, there are two main things to consider. First, what is the work I need to execute? Do I need to:
- Collect information about or make changes to SQL itself
- Collect information about or make changes to the computer (virtual or physical) which hosts SQL Server
Let’s look at how to accomplish these goals.
Collecting data or making a change to SQL
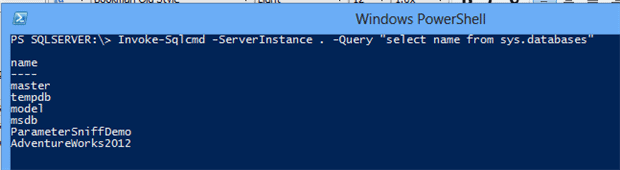
While there are many ways to gather information about SQL Server using PowerShell, the two best in my opinion are 1) using the SMO (Sql Management Object) library, and 2) executing queries directly against the server itself. Of these two, I personally prefer straight Transact-SQL in most cases. The easiest way to accomplish this is often the SQLPS module, which generally is installed as part of installing SQL Server’s client tools (though it is available as a stand alone download as part of the SQL Server Feature Pack). This module includes the highly versatile Invoke-Sqlcmd cmdlet, which functions in a way very similarly to the sqlcmd.exe command line tool.
The cmdlet outputs an array of DataRow objects, which can then be consumed for further processing. For example, let’s say you wanted to find all databases on a server that have not had a full backup in the last 24 hours. Here are a few lines of code that would accomplish this.
|
1 2 3 4 5 6 7 8 9 10 11 12 13 |
$sql = @" SELECT d.name AS DatabaseName, ISNULL(max(b.backup_finish_date),'1/1/1900') AS LastBackupDate FROM sys.databases d LEFT JOIN msdb.dbo.backupset b ON d.name = b.database_name GROUP BY d.name HAVING ISNULL(max(b.backup_finish_date),'1/1/1900') <= dateadd(hour,-24,current_timestamp); "@; $results = Invoke-Sqlcmd -ServerInstance localhost -Database master -Query $sql; foreach ($result in $results) { # Do something } |
Collecting data or making changes to the host computer
When interacting with the operating systems of remote computers hosting SQL Server, the best method you use to interact with a remote computer depends largely on one factor: whether or not there is an existing PowerShell module that allows you to accomplish your goal. In many cases, the answer to that question will be ‘yes’, because PowerShell’s capabilities have expanded quite a bit over the years.
When working with remote servers from desktop operating systems, the Remote Server Administration Tools (or RSAT) framework is the best logical starting point. This link lists a number of features and functionalities that may only be available with certain version of Windows when using RSAT. Not all of these are PowerShell-based, but many have some component that works with PowerShell. For example, RSAT includes tools to work with the Bitlocker drive encryption system, one of which is a PowerShell module.
In some cases these PowerShell modules provide a clean and easy way to both collect data and make changes to remote systems. For example, the FailoverClusters module makes it simple to get information about or modify Windows failover clusters. Let’s say you want to get a list of all the nodes in a cluster, and what resources currently reside on them. This can easily be accomplished with these commands:
Get-Cluster -Name “mycluster.mydomain.com” | Get-ClusterResource | Select Name,OwnerNode
For those times when no built in module serves our needs, there is a viable and reliable alternative: WMI. PowerShell makes executing WMI queries against remote computers extremely easy. For example, here is a command to get a list of all volumes on a remote computer:
|
1 2 3 4 5 6 7 |
Get-WmiObject -Class Win32_Volume -ComputerName $computer -Filter "DriveType = 3" | Select-Object @{ n = "Computer"; e = { $computer } }, @{ n = "DiskName"; e = { $_.Name } }, @{ n = "Label"; e = { $_.Label } }, @{ n = "CapacityMB"; e = { ($_.Capacity/1MB) } }, @{ n = "FreeSpaceMB"; e = { ($_.FreeSpace/1MB) } }, @{ n = "PercentFree"; e = { [Math]::Round((($_.FreeSpace / $_.Capacity) * 100), 2) } } |
Handling a list of computers
In both of the cases discussed above, PowerShell allows us to centralize operations by performing some action against a remote computer. This of course brings up the question: ‘How do we tell our commands which computers to connect to, without running them multiple times?’
One of PowerShell’s most powerful and useful features is its pipeline. As with other operating systems such as Linux, the pipeline allows you to direct output from one command into another. There’s a key difference though, in that (as described in this introduction to the PowerShell pipeline) “Windows PowerShell does not pipe text between commands. Instead, it pipes objects.” In other words, with PowerShell, what you are actually passing from one command to another are instances of .NET objects.
A full discussion of the pipeline is outside the scope of this article, but suffice it to say, it makes it easy to pass information from one PowerShell command to another easily. One of the most useful things about this is that you can have several ways of constructing the list of computers. You might have them listed in a text file, or you might have them in a database, or you might even use the aforementioned Central Management Server (as does a PowerShell based framework I built). You can even process computers in parallel, using features such as background jobs or PowerShell runspaces. The possibilities are endless.
For information on how pipelines in PowerShell work, and how to write commands that work with them, see this Technet article.
Conclusion
At the outset of this article, we laid out the advantages for centralizing our work as database professionals, such as increasing efficiency as well as ensuring consistent configurations throughout our server environments. We then looked at three ‘out of the box’ technologies that are available to help us towards this goal, namely:
- Central Management Server, or CMS;
- The Master / Target SQL Agent setup
- PowerShell.
All three offer useful features in our quest towards centralization, and all are readily available, robust technologies. By combining them, we can wield even more power, such as by using the Central Management Server from PowerShell as a repository to track the various servers in your server environment. With these tools alone, we can significantly reduce the number of places that we must touch when making changes or collecting data across our server environments, probably the most common tasks consuming our time. The question we must ask is not therefore whether to use them, but how, and then to get started.
This document contains proprietary information and is protected by copyright law.
Copyright © 2026 Red Gate Software Limited. All rights reserved
Load comments