
The Execute SQL task is one of the handier components in SQL Server Integration Services (SSIS) because it lets you run Transact-SQL statements from within your control flow. The task is especially useful for returning result sets that can then be used by other components in your SSIS package.
When using the Execute SQL task to return a result set, you must also implement the necessary variables and parameters to pass data into and out of the T-SQL statement called by the task. In this article, we look at how to use those variables and parameters in conjunction with the Execute SQL task in order to transfer that data. (In the previous article in this series, “Introducing Variables,” I explained how to work with variables, so refer back to that article if you need help.)
This article walks you through two different scenarios for working with variables, parameters, and result sets. In the first scenario, we’ll use two Execute SQL tasks. The first task retrieves a single value from a table in the AdventureWorks2008 database. That value is returned by the task as a single-row result set. The second Execute SQL task will pass that value into a stored procedure that inserts the row into a different table.
The second scenario uses a single Execute SQL task to retrieve a multi-row result set, also known as a full result set. This represents the third Execute SQL task we’ll be adding to our control flow. For now, all we’ll do is use this task to save the result set to variable. In articles to follow, you’ll see how you can use that variable in other SSIS components, such as the Foreach Loop container.
Setting Up Your Environment
Before adding components to your SSIS package, you should first add a table and two stored procedures to the AdventureWorks2008 database. The table will store the value that’s returned by the first Execute SQL task. Listing 1 shows the T-SQL necessary to create the SSISLog table.
|
1 2 3 4 |
CREATE TABLE SSISLog (ID INT IDENTITY, DateRun DATETIME, Result INT) |
Listing 1: Creating the SSISLog table
Next, we will add a stored procedure to insert data into the SSISLog table. Listing 2 provides the T-SQL script necessary to create the UpdateSSISLog stored procedure. Notice that it includes an input parameter. The input will be the data that will be retrieved via the first Execute SQL task.
|
1 2 3 4 5 |
CREATE PROCEDURE UpdateSSISLog @EmpNum INT AS INSERT INTO SSISLog (DateRun, Result) SELECT GETDATE(),EmpNum |
Listing 2: Creating a stored procedure that inserts data into the SSISLog table
Once you’ve set up the table and stored procedures, you can create your SSIS package, if you haven’t already done so. We’ll perform both exercises in a single package. Our next step, then, is to add a couple variables to our package.
Adding Two Variables to the SSIS Package
The first variable we’ll create is the EmpNum variable. If the Variables window is not open, right-click the Control Flow workspace, and then click V ariables. In the Variables window, add a new variable by clicking on the Add Variable icon.
Name the new variable EmpNum, and ensure that the scope is set at the package level, as indicated by the package name. (In my case, I’ve stuck with the default name, which is Package.) Next, set the data type to Int32 and the value to 0, as shown in Figure 1. The Execute SQL task will use the variable to store the value it retrieves from the database.

Figure 1: The new EmpNum variable
Now create a second variable named EmployeeList. This variable should also be at the package scope. However, set the data type to Object. We will be using this variable to store the full result set that we retrieve in our second scenario, and SSIS requires that the variable use the Object type to accommodate the multiple rows and columns.
Adding a Connection Manager to the SSIS Package
The next step is to create a connection manager that points to the AdventureWorks2008 database. Right-click the Connection Manager s window, and then click New OLE DB Connection, as shown in Figure 2.
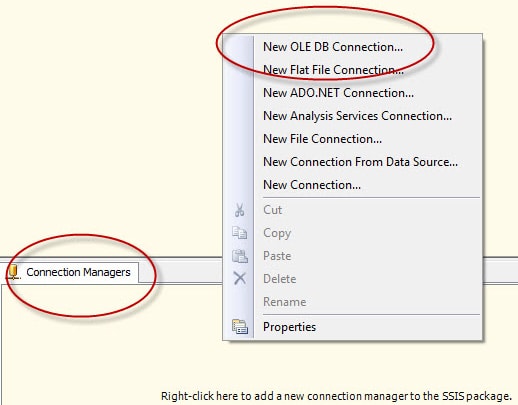
Figure 2: Creating a new OLE DB connection manager
When the Configur e OLE DB Connection Manager dialog box appears, click the New button to launch the Connection Manager dialog box, shown in Figure 3. From the Server name drop-down list, select the name of your SQL Server instance, and then select an authentication type. From the Select or enter a database name drop-down list, select your database. As you can see in Figure 3, I’m using 192.168.1.19/ Cambridge as my SQL Server instance, SQL Server Authentication as my authentication type, and the AdventureWorks2008 as my database.
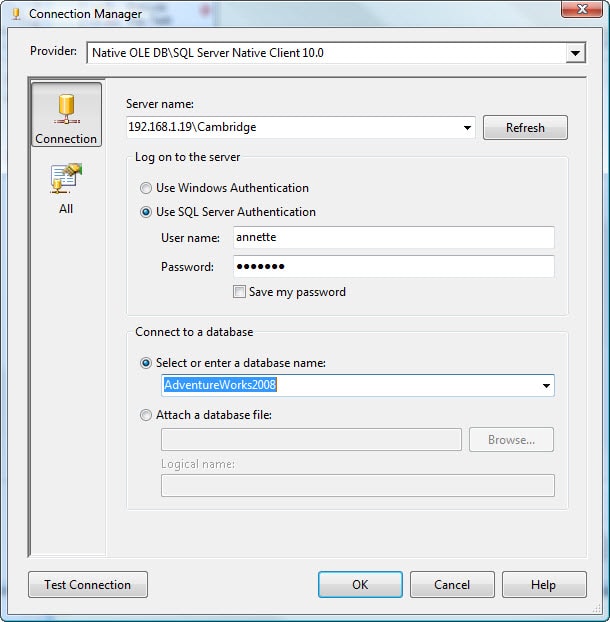
Figure 3: Configuring an OLE DB connection manager
Be sure to test the connection by clicking the Test Connection button. If the connection is good, click OK to close the Connection Manager dialog box.
When you’re returned to the Configure OLE DB Connection Manager dialog box, you’ll see that your new connection has been added to the Data connections section. Click OK to close the dialog box. Your connection should now be listed in Connection Managers window.
If you want, you can rename your connection manager to something more appropriate. To do so, right-click the connection, click R ename, and type in the new name. I renamed mine to AW2008, as shown in Figure 4.
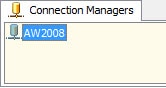
Figure 4: Renaming a connection manager
Returning a Single-Row Result Set
As mentioned above, our first example uses two instances of the Execute SQL task. The first Execute SQL task will return a single-row result set, which in this case, will contain only one value. Note, however, that this is not a real-world example. I simply want to show you how to get the result set and use it.
In this example, we’ll retrieve the highest BusinessEntityID value from the HumanResources.Employee table and insert it into the SSISLog table, along with the current date and time. We’ll start by using the first Execute SQL task to retrieve the value and pass it to the EmpNum variable.
To get started, drag the Execute SQL task onto the Control Flow design surface. Then double-click the task to open the Execute SQL Task Editor. The editor opens to the General page, as shown in Figure 5.
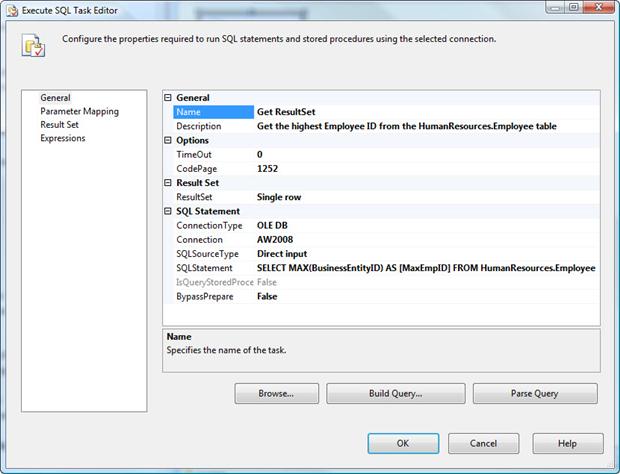
Figure 5: The General page of the Execute SQL Task Editor
Notice that the General section contains the Name property and the Description property. The Name property refers to the task name. You should name the task something suitable. On my system, I named the task Get ResultSet. I then added a description to the Description property to explain what the task does.
In the Options section, I stuck with the default property values.
The next section on the General page is Result Set. Notice that this section includes only the ResultSet property. The property lets you select one of the following four options:
- None: The query returns no result set.
- Singlerow: The query returns a single-row result set.
- Fullresultset: The query returns a result set that can contain multiple rows.
- XML: The query returns a result set in an XML format.
The option you select depends on the results of the query you pass into the Execute SQL task. For this exercise, our query will return only a single value. Consequently, we will choose the Single row option.
Next, we need to configure the properties in the SQL Statement section. Table 1 shows the values you should use to configure these properties.
| Property | Value |
| Connection | AW2008 (or whatever you named the connection manager you created earlier) |
| SQLSourceType | Direct input
This means we’ll type the code straight in and not use a stored procedure. |
| SQLStatement | Because we’ve selected the Direct input option, we need to enter a T-SQL statement for this option. I’ve used the following statement, which returns a single value:
SELECT MAX(EmployeeID) AS [MaxEmpID] |
| IsQueryStoredProcedure | This option is greyed out because we selected Direct input for the SQLSourceType property. Had we selected Stored Procedure, this property would be available and the SQLStatement property would be greyed out. |
| BypassPrepare | The property defaults to False. If you change the value to True, you can click the Parse Query button to verify that your T-SQL statement is valid. |
Table 1: Configuring the properties in the SQL Statement section
Our next step is to associate our result set value with a variable that will store the value we retrieve from the database. To do this, go to the Result Set page of the Execute SQL Task Editor.
The main grid of the Result Set page contains two columns: Result Name and Variable Name. Click the Add button to add a row to the grid. In the Result Name column, enter the column name returned by your query (MaxEmpID). In the Variable Name column, select the User:: EmpNum variable. Your Result Set page should now look similar to the one shown in Figure 6.
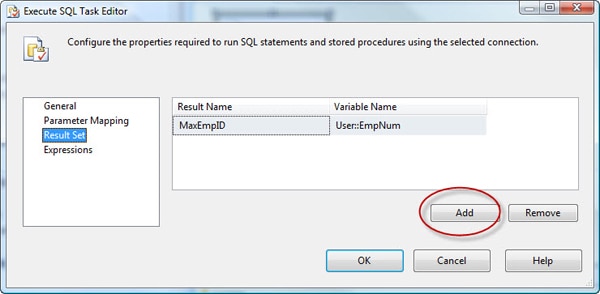
Figure 6: Associating your result set value with a variable
If our single-row result set contains multiple columns, we would have had to map a variable to each column. However, because we returned only one value, we needed only one mapping.
Once you’ve associated your result set value with a variable, click OK to close the Execute SQL Task Editor. You task should now be set up to return a single-row result set. Now we need to do something with that result set!
Working with a Single-Row Result Set
Our next step is to drag a new Execute SQL task onto our design surface so we can use the result set returned by the first Execute SQL task. So add the task, and then connect the precedence constraint (the green arrow) from the first task to the new one. Next, right-click the second task and click Edit to open the Execute SQL Task Editor, shown in Figure 7.
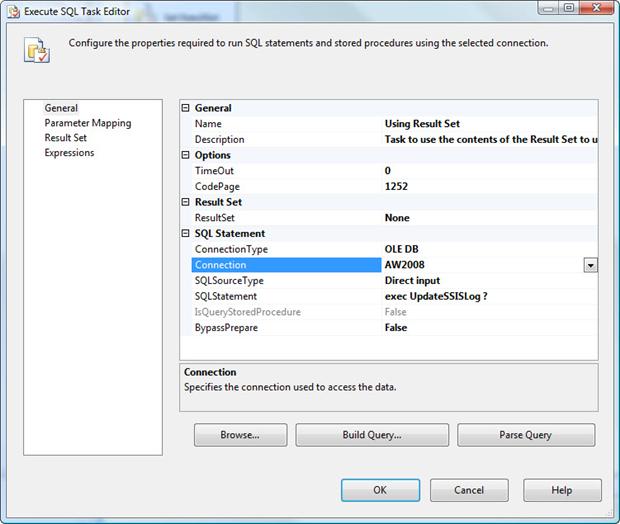
Figure 7: Configuring the Execute SQL Task Editor
In the General section, provide a name and description for the task. (I named the task Using Result Set.) For the ResultSet property, stick with the default value, None. In this case, the task won’t be returning a result set. Instead, we’ll be using the results returned by the previous task.
Now let’s look at the SQL Statement section shown in Figure 8. Notice that, for the SQLStatement property, I entered the following T-SQL code:
|
1 |
exec UpdateSSISLog ? |
As you can see, we’re executing the UpdateSSISLog stored procedure. Notice, however, that we follow the name of the stored procedure with a question mark (?). The question mark serves as a placeholder for the parameter value that the stored procedure requires. You cannot name parameters within the actual query, so we have to take another step to provide our value.
Go to the Parameter Mapping page of the Execute SQL Task Editor. On this page, you map the parameters referenced in your queries to variables. You create your mappings in the main grid, which contains the following five columns:
- Variable Name: The variable that contains the value to be used for the parameter. In this case, we’ll use the User:: EmpNum variable, which contains the result set value returned by the first Execute SQL task.
- Direction: Determines whether to pass a value into a parameter (input) or return a value through the parameter (output)
- Data Type: Determines the type of data provided from the variable. This will default to the type used when setting up the variable.
- Parameter Name: The name of the parameter. The way in which parameters are named depends on your connection type. When running a T-SQL statement against a SQL Server database through an OLE DB connection, as we’re doing here, we use numerical values to represent the statement’s parameters, in the order they appear in the statement, starting with 0. In this case, because there’s only one parameter, we use 0.
- Parameter Size: The size of the parameter if it can be a variable length. The default is -1, which lets SQL Server determine the correct size.
Once you’ve mapped your variable to your parameter, the Parameter Mapping page should look similar to the one shown in Figure 8.
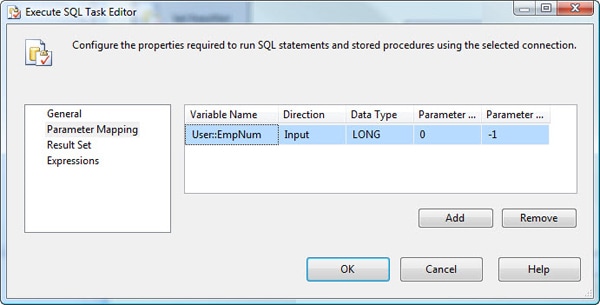
Figure 8: Mapping a variable to a parameter
When you’re finished configuring the Execute SQL task, click OK.
Your package should now be ready to run. Click the green Execute button. When the package has completed running, query the SSISLog table and verify that a row has been added that contains the expected results.
Returning a Full Result Set
Using the Execute SQL task to return a full result set is similar to returning a single-row result set. The primary differences are that your target variable must be configured with the Object data type, and the task’s ResultSet property must be set to Full result set.
Let’s run through an example to demonstrate how this works. This time, rather than retrieving a single value, we’re going to retrieve a result set that contains multiple rows and columns.
For this exercise, we can use the same SSIS package we used for the previous example, but keep in mind, if you execute the package, all components will run unless you specifically disable those that you don’t want to have run.
Drag an Execute SQ L task to the design surface. Open the task’s editor and configure the properties as necessary. Remember to set the ResultSet property to Full result set. For the SQLStatement property, use the SELECT statement shown in Listing 3. When entering a long SELECT statement into as the property’s value, it’s easier to click the ellipses button to the right of the property to open the Enter SQL Query dialog box and then entering the statement there.
|
1 2 3 4 5 6 7 8 9 10 11 12 |
SELECT DATEDIFF(YEAR, HireDate, GETDATE()) E.BusinessEntityID, P.FirstName , P.LastName , E.JobTitle , E.Gender FROM HumanResources.Employee E INNER JOIN Person.Person P ON E.BusinessEntityID = P.BusinessEntityID WHERE DATEDIFF(YEAR, HireDate, GETDATE()) >= 15 |
Listing 3: The SELECT statement used to return a full result set
After you enter your SELECT statement, close the Enter SQL Query dialog box. When you’re returned to the Execute SQL Task Editor, the General page should now look similar to the one shown in Figure 9.
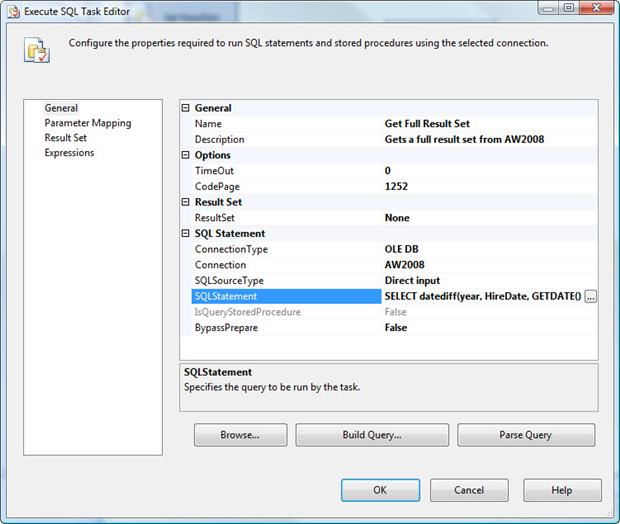
Figure 9: Configuring the Execute SQL task to return a full result set
Next, go to Result Set page and add a row to the main grid. Because we’re returning a full result set, you should enter 0 in the Result Name column. (The same is true if you’re returning an XML result set). Then, in the Variable Name column, select the User:: E mployeeList variable.
Once this is complete, click OK. Your Execute SQL task will now return a full result set and save it to the E mployeeList variable. (You should execute the task to make sure it runs.) You can then use that variable in other SSIS components. However, to do so is a bit more complicated than what we saw for a single-row result set, so I’ll save that discussion for another time. But feel free to try using the variable if your up for it. You might want to start with a Foreach Loop container.
Summary
In this article, I demonstrated how to use an Execute SQL task to return a single-row result set with a single value and save that value to a variable. I then showed you how to use the variable in a second Execute SQL task to insert data into a table.
In the second example, I demonstrated how to use an Execute SQL task to return a full result set and save it to a variable configured with the Object data type. Although I did not show you how to use the result set in other components, you should now have a good sense of the principles behind using the Execute SQL task to retrieve result sets and saving them to variables.
In future articles, I’ll demonstrate how you can use those result sets in other components, such as the Script task and the Foreach Loop container.
This document contains proprietary information and is protected by copyright law.
Copyright © 2026 Red Gate Software Limited. All rights reserved
Load comments