
In previous articles in the SSIS Basics series, I showed you how to set up a SQL Server Integration Services (SSIS) package. I also showed you how to add a Data Flow task that contains the components necessary to extract data from a SQL Server database, transform the data, and load it into an Excel spreadsheet.
In this article, I will show you how to use variables in your SSIS package. Variables are extremely important and are widely used in an SSIS package. A variable is a named object that stores one or more values and can be referenced by various SSIS components throughout the package’s execution. You can configure a variable so its value is updated at run time, or you can assign a value to the variable when you create it.
There are two types of variables in an SSIS package: system and user-defined. SSIS automatically generates the system variables when you create your package. Components can then reference the system variables as necessary, usually for debugging and auditing purposes. You create user-defined variables as needed when you configure your package.
Setting Up Your SSIS Package
To try out the examples in this article all you need to do is to create an Excel spreadsheet named Employee, for the purposes of this article it can be an empty file. This does follow on from the previous article in this series “SSIS Basics: Adding Data Flow to Your Package” however it is adviseable to start from a new package.
Creating Variables
In the following sections, I will show you how to create a user-defined variable and reference it within your package. Then I will show you how to create an expression that dynamically updates the variable value at run time. Our starting point is where my previous article left off; however, all you need to do is create an Excel spreadsheet named Employee, I have saved it in the root of my d:\ drive but you can save it wherever appropriate, once this is created you should have no problems working through these examples.
The Variables Window
The easiest way to create a user-defined variable is by using the Variables window. When you create a variable, you specify a name, data type, and scope.
The scope controls which package elements can use the variable. You can define a variable’s scope at the package level or at the level of a specific container, task, or event handler. For example, if you configure a variable at the scope of a ForeachLoop container, only that container and any tasks within the container can use the variable. However, if you configure the variable at the package level, any component within the package can reference the variable. One of the most common issues to arise when working with variables is for them to have been inadvertently created at the scope of a container or task, when they should have been created at the scope of the package.
To view the Variableswindow, right-click the design surface on the ControlFlow tab, and clickVariables. By default, the Variables window appears to the left of the design surface, as shown in Figure 1.
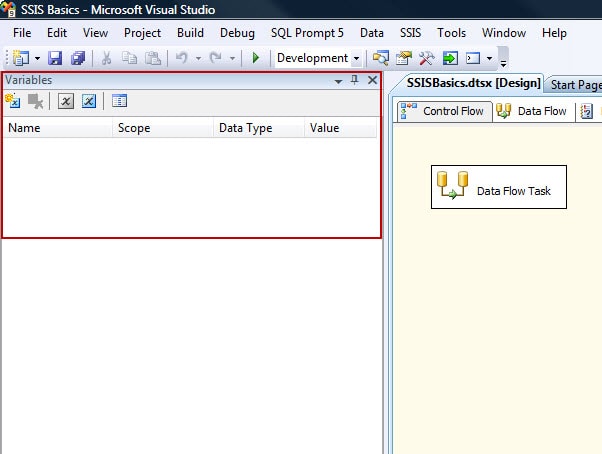
Figure 1: Variables window in SSIS Designer
At the top of the Variables window, you’ll find five buttons (shown in Figure 2) and, beneath those, column headings.

Figure 2: Buttons at the top of the Variables window
From left-to-right, the buttons let you perform the following tasks:
- Adding a user-defined variable
- Deleting a user-defined variable (available when a variable has been created)
- Showing system variables
- Showing all variables
- Choosing the variable columns to display
By default, the Variables window displays the following columns:
- Name: The name assigned to the variable. When you first create your variable, the value Variable is used. If there is already a variable named Variable, a number is added to the name.
- Scope: The scope at which the variable should be set. The majority of the time, you can go with a package-level scope, which means the scope should be the name of the package. To select a different scope, you must select the applicable task or container when you create your variable. It is very easy to inadvertently create a variable at an unintended scope. Before creating a variable, be certain that the correct task or container is selected or, if you want a package-level scope, that no components are selected.
- DataType: The type of data that the variable can store. SSIS supports the following variable types:
- Boolean
- Byte
- Char
- DateTime
- DBNull
- Double
- Int16
- Int32
- Object
- SByte
- String
- UInt32
- UInt64
- Value: The variable’s initial value. This can be populated here or left blank and populated at run time.
If you click the Choose Variable Columns icons, the Choose Variable Columns dialog box appears, as shown in Figure 3.

Figure 3: Additional columns available for variables
As you can see, the Scope, Data type, and Value columns are selected by default. You can also select one of the following columns to display:
- Namespace: Shows whether the variable is a system or user-defined variable.
- Raise event when variable value changes:Boolean (True/False) field that if selected will fire an OnVariableValueChanged event if the variable value is modified. This will be covered in more detail in a future article when looking at error handling and debugging.
You are now ready to create a variable.
Creating a User-Defined Variable
In this section, I demonstrate how to create a variable and assign a value to it, which in this case, will be a file path. Using the Excel spreadsheet created in the setup, I will save a copy of the spreadsheet to a new folder using a variable to re-name it.
To create a variable, click the white space on the Control Flow design surface to ensure that no components are selected, and then click the Add Variable button in the Variables window. A variable is added to the first row of the window’s grid, as shown in Figure 4.

Figure 4: A new variable in the Variables window
Notice in Figure 4 the blue button with the black X to the left of the variable name. You can use this button to delete the variable. Also notice that the scope is set to the package name, SSISBasics, which is the scope we want to use for this exercise.
By default, the variable is configured with the Int32 data type. However, for this exercise, we’ll use String. To change the data type, select String from the drop-down list in the Data Type column. When the data type is updated, the value in the Value column changes from 0 to an empty string.
You now need to enter the variable value. Simply type in the path name you plan to use for your Excel file. In this case, I used d:\Demo. I also changed the variable name to DestinationFilePath, as shown in Figure 5.

Figure 5: Configuring the new variable in the Variables window
You’re variable should now be ready to go. Because you created it with a package scope, any component in your package can use that variable.
Using the Variable
I am now going to show you how to reference the new variable from within a File System task. First, you must add the task to the control flow, as shown in Figure 6.
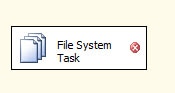
Figure 6: Adding a File System task to the control flow
Then double-click the File System task to open the File System Task Editor, as shown in Figure 7.
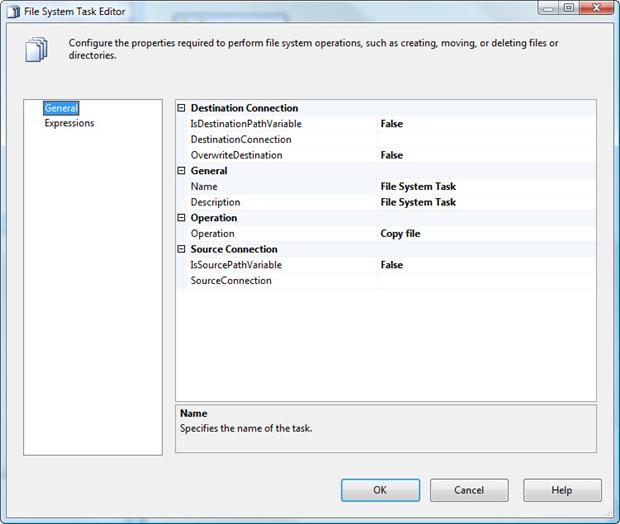
Figure 7: Accessing the File System Task Editor
You now need to configure the task’s properties. Table 1 describes how to configure each of these properties
| Property | Description |
| IsDestinationPathVariable | Change to True. |
| DestinationVariable | Select the variable you created earlier from the drop-down list associated with this property. When the variable is added to the property, it is preceded by the namespace name and two colons (User::). |
| OverwriteDestination | If you want to overwrite the destination every time the package runs, select True, otherwise leave it as False. However, if you select False and run the package more than once, SSIS will generate an error. As the name of the excel spreadsheet will not change, I suggest you select True. |
| Name | The default name is File System Task. You can rename the task to better reflect what it does. For this exercise, I renamed the task Copy to new folder. |
| Description | You can type a full description here. I used Copy the Employee’s excel spreadsheet to d:\Demo\. |
| Operation | The default option is Copy File. Because that’s what we’ll do in this exercise, you can leave this option selected. But note that other options are available, and I will cover some of them in future articles. |
| IsSourcePathVariable | Leave this option set at its default value, False. Although we’ll be setting the destination to a variable, the source path will directly reference the original Excel file. |
| SourceConnection | This is where you select the connection to the source file you want to copy. From the drop-down list associated with this property, select as currently we have no connections set up. The Usage type: defaults to Existing File which is correct, as we have already created the spreadsheet, select the Browse button and browse to the Excel spreadsheet created called Employee.xlsx and click OK to accept. |
Table 1: Configuring the File System task properties
Figure 8 shows what your File System Task Editor should look like after you’ve configured the properties. Review your settings, and then click OK.

Figure 8: Configuring properties in the File System Task Editor
The control flow should now show that the inverted red X has been removed from the FileSystem task and that the task has been renamed to Copy to new folder.
To verify whether the task works, run the package by clicking on the green arrow (the Run button) on the menu bar. Then open Windows Explorer and check that the file has been copied into the target folder correctly.
Using an expression to define a variable value
In some cases, you might want to generate a variable’s value at run time, rather than assign a specific value, as we did in the previous exercise. This can be useful if the variable value needs to change during the package’s execution or that value is derived from other sources or processes. For example, the Foreach Loop container might use a variable whose value must change each time the container loops through the targeted list of objects. (I’ll explain how to use a variable in this way in a future article.)
In this section, I demonstrate how to create an expression that dynamically generates a value for a String variable named DestinationFileName. The exercise uses the same test environment as the one in the previous exercise. We will again copy the original Excel file to the destination folder, only this time we’ll use an expression to define the path and file name. The expression will rename the file by tagging the date to the end of the filename, as in Employee_201265.xlsx.
Your first step, then, is to create a variable named DestinationFileName, Follow the same steps you used to create the DestinationFilePath variable in the previous exercise, but leave the value blank, as shown in Figure 9.

Figure 9: Creating the DestinationFileName variable
To populate the value, you’ll create an expression in the variable’s properties. An expression is a formula made up of elements such as variables, functions, and string values. The expression returns a single value that can then be used by the variable.
To create an expression for the DestinationFileName variable, open the Properties window to display the variable’s properties. You can open the window by clicking Properties Window on the View menu. You can also open the Properties window by pressing F4. The Properties window displays the properties for whatever component is selected in your SSIS package. To display the properties for the DestinationFileNamevariable, select the variable in the Variables window.
When the variable’s properties are displayed in the Properties window, you can create an expression that defines the variable’s value. To do so, first set the EvaluateAsExpression property to True. This enables the variable to use an expression to define its value. Then click the browse button (…) associated with the Expression property, as shown in Figure 10.
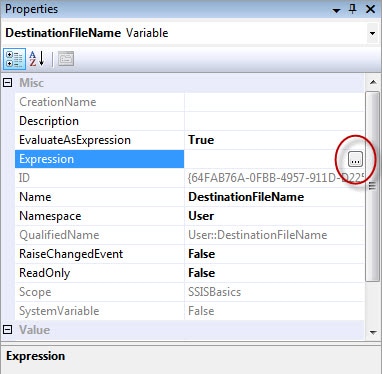
Figure 10: Launching the Expression Builder dialog box
Clicking the browse button opens the Expression Builder dialog box, which is divided into three sections, as shown in Figure 11.
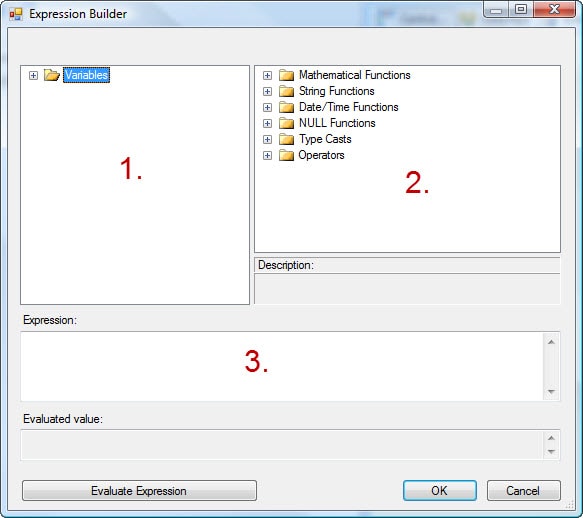
Figure 11: The Expression Builder dialog box
Notice in Figure 11 that I’ve labeled the three sections of the ExpressionBuilder dialog box as 1, 2, and 3:
- The variables available to use in your expression
- The functions and operators available to use in your expression
- The workspace where you create your expression
There is also a button at the bottom of the screen labeled Evaluate Expression. When you click this button, the expression is evaluated and, if a value can be returned, it is displayed in the Evaluated value area just above the button.
In the previous section, we created the DestinationFilePath variable, which held the target folder into which we copied the Excel file. In this exercise, we’ll again copy the original Excel file to the new folder as described earlier. To do this, we’ll use the DestinationFilePath variable as part of our expression to provide the path name for the new DestinationFileName variable.
As a result, the first step you should take to create your expression is to drag the DestinationFilePath variable to the Expression section, as show in Figure 12. If you click the Evaluate Expression button after you add the variable, the Evaluatedvalue field should show the value assigned to that variable, which is the path d:\Demo.
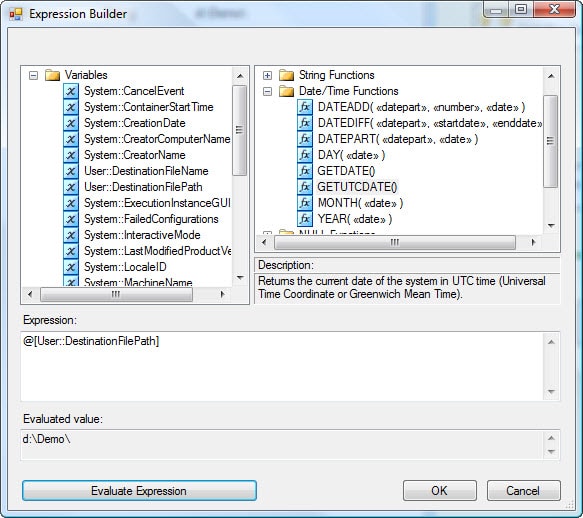
Figure 12: Adding the DestinationFilePath variable to your expression
Next, you’ll need to add to your expression the elements necessary to name the file. First, add a concatenation operator (+), and then add the string value Employee, enclosed in double quotes, as shown in the following script:
|
1 |
@[User::DestinationFilePath] + "Employee" |
You can evaluate your expression at any time by clicking on the EvaluateExpression button. For instance, if you evaluate your expression at this point, you should receive the following results:
|
1 |
d\Demo\Employee |
I will now show you how to include the date and time in the expression so that the variable can include them. To create this part of the expression, we’ll use the following functions:
- GETDATE: Returns the current date and time.
- YEAR: Returns the year component (as an integer) of a date value.
- MONTH: Returns the month component (as an integer) of a date value.
- DAY: Returns the day component (as an integer) of a date value.
- RIGHT: Returns the number of characters specified counting from the right of the string.
The GETDATE function returns data as a DT_DBTIMESTAMP value, which is made up of 29 characters that include integers, colons, dashes, a space, and a period. Consequently, using this function in conjunction with the other functions makes it easier to concatenate the values necessary to create the file name.
Note:
There are many ways to build the expression I am about to explain, but this is the method I use and find easiest.
When building the expression, we need to add the date parts one at a time – year, month, date, hours, and minutes.
After we add each component, we can use the EvaluateExpression button to see what the value looks like to ensure that we’re happy with it up to that point.
Because we want the year to appear before the other data parts, we’ll start with that element of the expression. To add the year, we’ll use the YEAR function along with the GETDATE function. This will return a four-digit integer, which we’ll convert to a string.
As noted above, the GETDATE function returns the current timestamp. But we can apply the YEAR function to that timestamp to extract only the year value, as shown in the following code fragment:
|
1 |
YEAR(GETDATE()) |
This will return only the year, but as an integer. However, because we will be concatenating that value with a string value, which need to convert the year to a string, as the following code shows:
|
1 |
(DT_WSTR,4)YEAR(GETDATE()) |
Notice that, to convert the year value to a string, we must precede the YEAR function with the target data type and length in parentheses. We can then append this code with our original code, as shown in the following script:
|
1 2 |
@[User::DestinationFilePath] + "Employee" + (DT_WSTR,4)YEAR(GETDATE()) |
Now if we use the Evaluate Expression button, the results should look like the following:
|
1 |
d:\Demo\Employee2012 |
Next, we need to add the month to our expression. We will use the MONTH function with the GETDATE function in similar to how we used the YEAR function above. However, we must take extra steps to accommodate the fact that the MONTH function returns a single digit for months prior to October and returns two digits from the other months. When the function returns a single digit, we need to precede the returned value with a 0 to ensure we always return two characters. That way, dates such as 15 June 2012 will be returned as 20120615, rather than 2012615, which makes it easier to manage files in such applications as Windows Explorer.
The trick in doing this is to add the 0 only when we need it. That’s where the RIGHT function comes in. The function takes two arguments. The first argument is an expression that returns a character value. The second argument is the number of characters we want to extract from that value. However, those characters are extracted from right-to-left.
Let’s look at a couple examples of the RIGHT function to demonstrate how it works. The first one includes a simple expression that concatenates 0 and 6:
|
1 |
RIGHT("0"+"6",2) |
The expression comprises everything before the comma. In this case, it concatenates the two values (rather than adding them) and returns the value 06. The second argument, 2, specifies that only the right two characters be returned by the function. Because the expression returned only two characters, the function will return both of them.
However, suppose your expression returns more than two characters. In the following example, a single digit is concatenated with two digits:
|
1 |
RIGHT("0"+"12",2) |
The expression in this case returns the value 012. However, the second argument specifies that the RIGHT function should return only the right two characters, so the function will return only 12.
Now let’s return to the expression we’re creating to generate the file name. At this point, we’re trying to add the month components. First, we need to extract the month and convert it to a string value, just like we did with the year:
|
1 |
(DT_WSTR, 2) MONTH(GETDATE()) |
As you would expect, this part of the expression will return a one-digit or two-digit integer that represents the month. We can then use this code within the RIGHT function to ensure that we always extract two digits:
|
1 |
RIGHT("0"+(DT_WSTR, 2) MONTH(GETDATE()) ,2) |
Notice that the first argument is an expression that concatenates a 0 with the month returned by the other part of the formula. That means the expression will also return a two or three characters, depending on the month. However, because 2 is specified as the second argument, the RIGHT function will return only the right two characters, thus ensuring that the outer expression always includes two characters for the month.
We can then concatenate this code with our original expression, as shown in the following script:
|
1 2 3 |
@[User::DestinationFilePath] + "Employee" + (DT_WSTR,4)YEAR(GETDATE()) + RIGHT("0"+(DT_WSTR, 2) MONTH(GETDATE()) ,2) |
After the month is added to our outer expression, we use the Evaluate Expression button to view the current value.. The results should look similar to the following:
|
1 |
d:\Demo\Employee201207 |
Next, we will add the day to our expression. Adding the day is similar to what we did to add the month, except that we use the DAY function, as shown in the following code:
|
1 2 3 4 |
@[User::DestinationFilePath] + "Employee" + (DT_WSTR,4)YEAR(GETDATE()) + RIGHT("0"+(DT_WSTR, 2) MONTH(GETDATE()) ,2) + RIGHT("0"+(DT_WSTR, 2) DAY(GETDATE()) ,2) |
As you can see, we’ve concatenated the day information with the rest of our expression. When you click the Evaluate Expression button, it should now return results similar to the following:
|
1 |
d:\Demo\Employee20120715 |
All that’s left to do is to add the Excel file extension. Simply add another concatenate operator, followed by .XLSX enclosed in double quotes. Our full expression should now be complete:
|
1 2 3 4 5 |
@[User::DestinationFilePath] + "Employee" + (DT_WSTR,4)YEAR(GETDATE()) + RIGHT("0"+(DT_WSTR, 2) MONTH(GETDATE()) ,2) + RIGHT("0"+(DT_WSTR, 2) DAY(GETDATE()) ,2) + ".XLSX" |
If we click the Evaluate Expression button one more time, we should see the results we’ve been looking for:
|
1 |
d:\Demo\Employee20120623.XLSX |
We’ve built this expression up in stages so you could better see how all the pieces fit together. The expression, as it appears in the Expression Building dialog box on your system, should now look similar to the one shown in Figure 13.
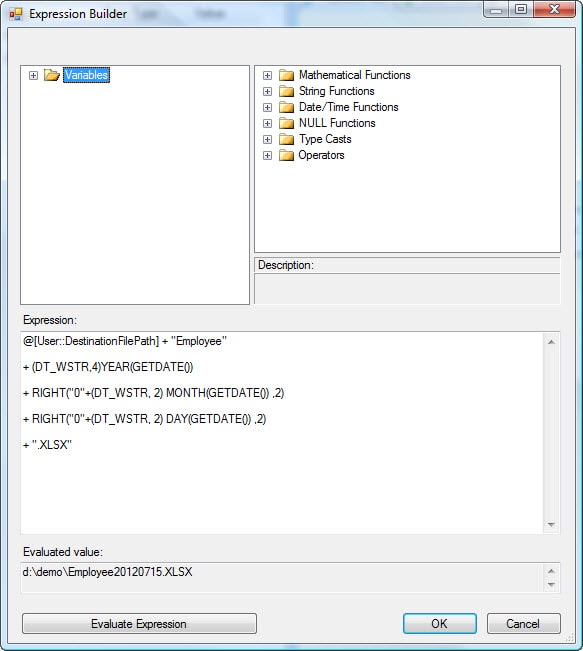
Figure 13: Your final expression in the Expression Builder dialog box
After you’ve evaluated your expression, click OK to close the ExpressionBuilder dialog box. The Variables window should now show the value of the DestinationFileName variable as the one generated by the expression, as shown in Figure 14.

Figure 14: The new value for the DestinationFileName variable
Your final step is to update the File System task so it uses the DestinationFileName variable. To do this, open the File System Task Editor for the task named Copy to new folder. Change the value of the DestinationVariable property to the DestinationFileName variable, as shown in Figure 15.
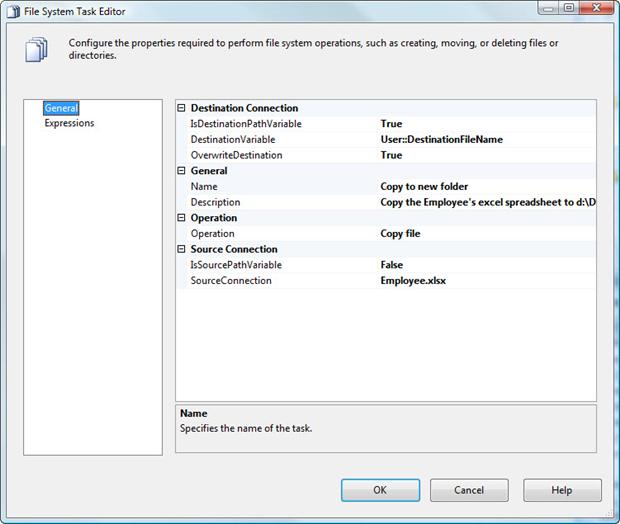
Figure 15: Using the DestinationFileName variable
Click OK to close the File System Task Editor. Then check that the new variable works correctly by running the package. When you’re finished, open Windows Explorer and verify that the new file has been created and that it uses the correct name.
System Variables
Each SSIS package includes a large number of system variables that you can use for debugging, error handling, change tracking, and other purposes. Figure 16 shows a list of system variables in our package.
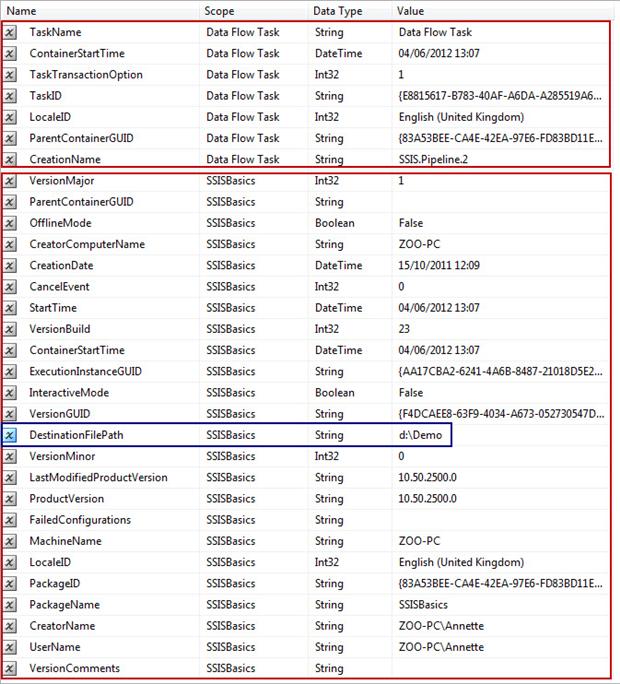
Figure 16: System variables in our SSIS package
Like user-defined variables, system variables are scope-specific. In other words, they are either related to a task, container, or package. The top red block in Figure 16 are system variables linked to the DataFlow task, and the bottom block are those related to the package as a whole. The variable in the blue box is the user-defined variable DestinationFilePath.
Summary
In this article, we created two variables. For the first variable, we assigned a static value, which is used by the variable whenever it is referenced during package execution. For the second variable, we used an expression to define the value. This way, the variable’s value is generated automatically at run time. The article also demonstrated how to use the Copy File function in File System task to copy a file and rename it. We have also looked briefly at system variables. In future articles, I will show you how to use these for error handling and debugging and how to work with user-defined variables when setting up your package’s configuration and deployment. I will also show you how to use variables more extensively.
This document contains proprietary information and is protected by copyright law.
Copyright © 2026 Red Gate Software Limited. All rights reserved
Load comments