

Along with its many other cloud services, Microsoft now offers Azure Database for PostgreSQL Flexible Server, a database-as-a-service platform based on the PostgreSQL open-source database system. DBAs, developers, analysts, and other users who are familiar with relational database management systems—whether on-premises or in the cloud—should have little trouble getting started with ADP flexible server. That said, both the ADP service and the PostgreSQL RDBMS come with their own unique characteristics, and those who are new to ADP might benefit from a little guidance.
This article and those to follow will introduce you to the ADP service and the various features it offers. The series will delve into different aspects of ADP, starting with an introduction to the service and how to create your first ADP server instance, which you’ll need to do before you can deploy any PostgreSQL databases. To follow along with this article and the rest of the articles in this series, you should have an Azure subscription in place and be able to sign up for the ADP service. If you already have access to the service, you should be good to go.
Note. If you’re new to Azure and ADP flexible server, you might be able to take advantage of an Azure free account and a 12-month free trial of the ADP service. To learn more about this offer, refer to the Microsoft article Use an Azure free account to try Azure Database for PostgreSQL flexible server for free.
Before we get started, be aware that Microsoft also offers a service called Azure Database for PostgreSQL single server, which preceded ADP flexible server and is not as robust. Microsoft is planning to retire ADP single server, although it’s not clear when that will happen. According to some Microsoft documentation, retirement should have already occurred. Microsoft recommends that customers using ADP single server should upgrade to ADP flexible server and not implement any new single server instances. For this article, and those in the series to follow, any references I make to ADP are specifically to Azure Database for PostgreSQL flexible server.
What is Azure Database for PostgreSQL flexible server?
ADP flexible server is a relational database cloud service that enables you to create one or more PostgreSQL server instances, each of which can host multiple user databases. The ADP service offers high availability features that can be applied within an availability zone, as well as across zones. You can also configure compute and storage resources separately to support your specific workloads. In addition, you can stop and start each server instance as needed to better control costs.
ADP flexible server runs the PostgreSQL community edition, with support for versions 11 through 17. The version 17 release on ADP is still in preview. According to ADP documentation, Microsoft plans to support each major PostgreSQL version from the time it is implemented on ADP until it is retired by the PostgreSQL community. The ADP service automatically performs minor version upgrades as part of its periodic maintenance. For example, an instance that’s been configured with PostgreSQL 16 will currently be running version 16.8.
Although ADP flexible server is a fully managed service, it still provides a fair amount of control and flexibility over the database environment. You can configure the service to meet your organization’s specific compute, storage and availability requirements, while taking into account issues such as performance and costs. For example, you can increase the compute or storage size, set backup and restore policies, configure network connection settings, and define custom maintenance windows. You can also set many of the instance’s server parameters, such as whether to log buffers usage or enable temporary connection throttling.
In addition, ADP flexible server includes a number of tools for controlling and optimizing the environment. For instance, you can set up monitoring and alerting, choosing from a wide assortment of metrics. You can also define automation tasks, build reports in Power BI Desktop, mirror data to Microsoft Fabric, assign tags to ADP resources, and do much more. Plus, you can configure authentication settings—using Microsoft Entra, PostgreSQL authentication, or both—and you can enable Microsoft Defender for Cloud. The ADP service also comes with tools and information for diagnosing and resolving problems.
The ADP environment comprises a number of components that work together to deliver database services. The PostgreSQL database engine runs in a container within a Linux virtual machine (VM), and the data resides in Azure storage, effectively separating the compute and storage resources. Azure-based clients can connect to PostgreSQL from within the same availability zone as the compute and storage resources, helping to optimize application performance. Clients can also connect to PostgreSQL over the internet, making it possible to support a variety of applications and workflows. The following figure provides a conceptual overview of how the ADP components fit together.
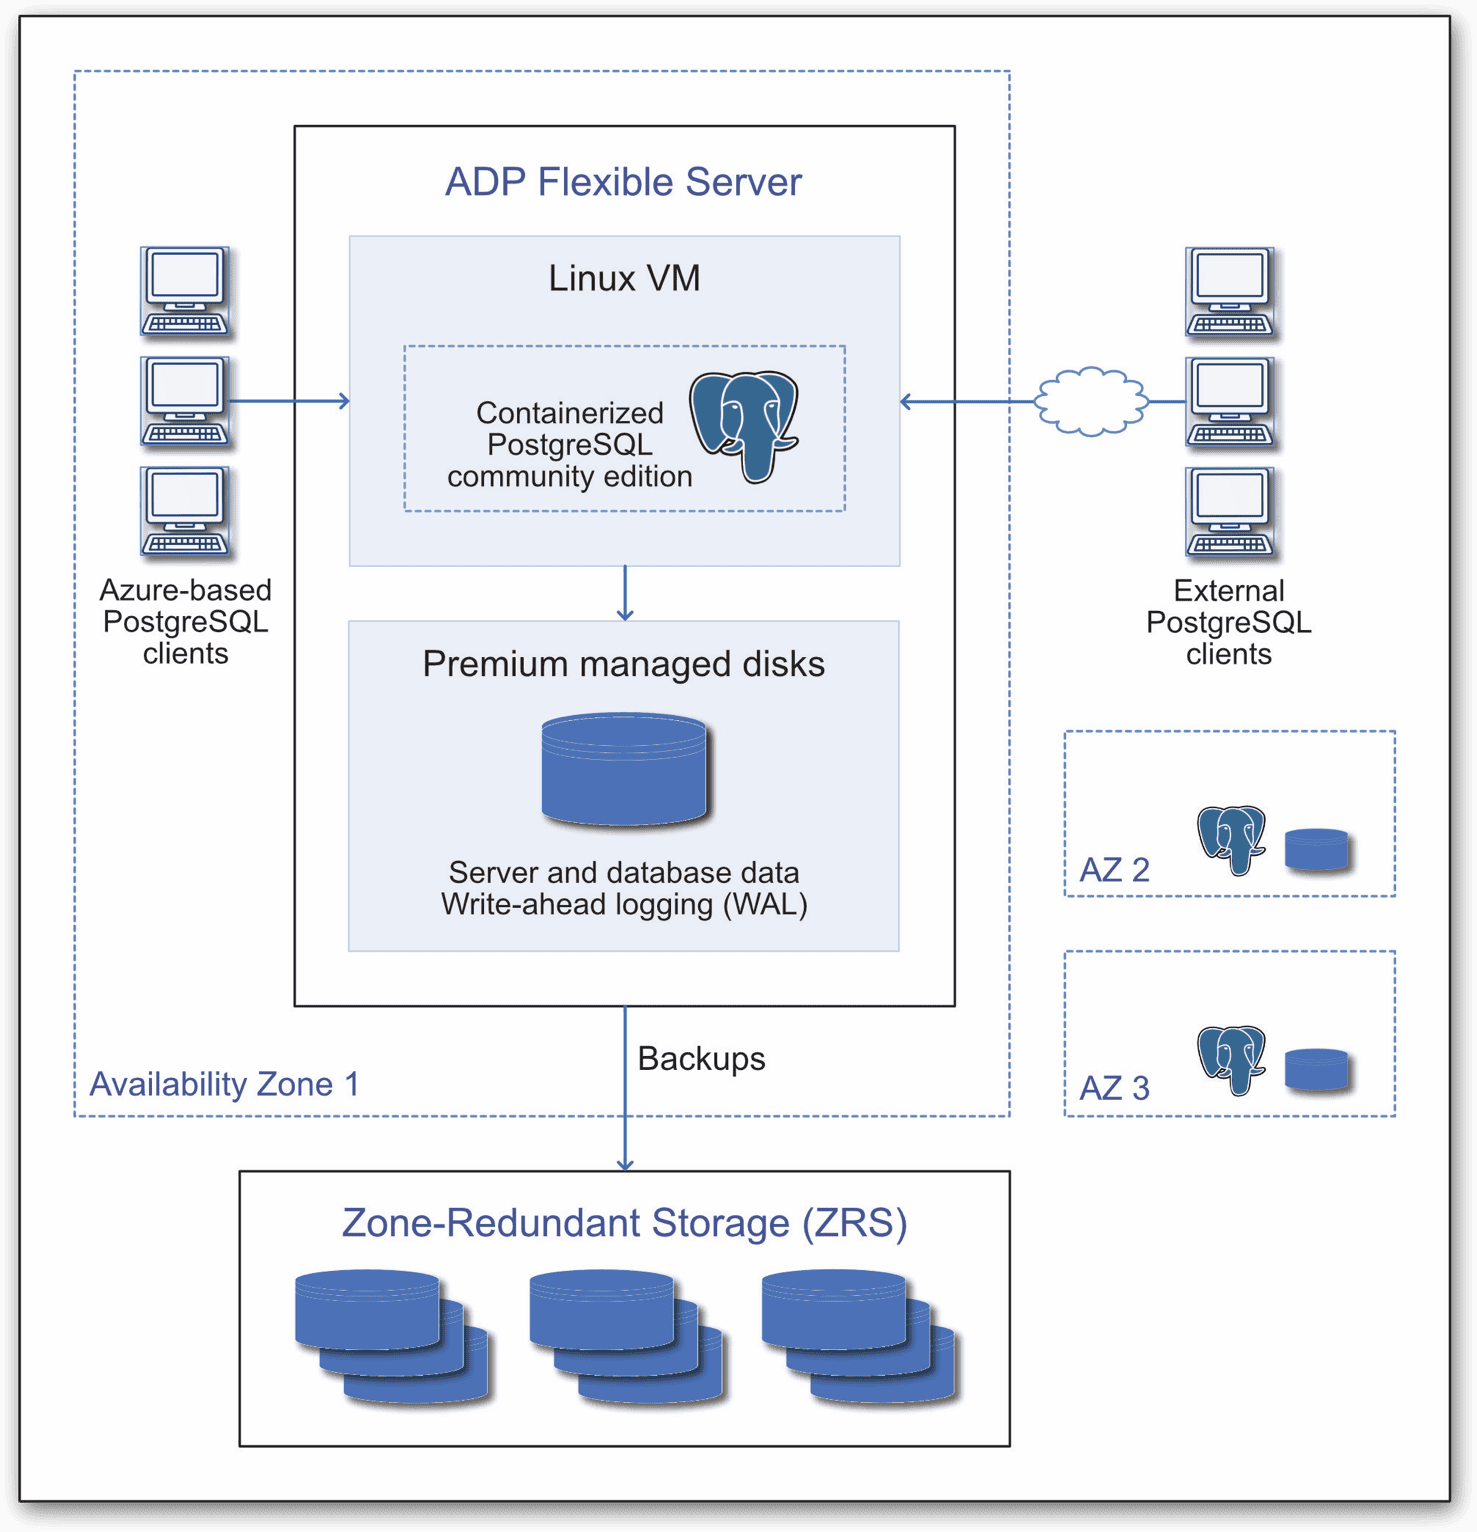
The ADP service automatically backs up the data to the region’s zone redundant storage (ZRS), where it maintains three synchronous copies, which are protected with AES 256-bit encryption. You can use the backups to restore a database to any point within the backup retention period. By default, this is seven days, but you can extend this period up to 35 days. If zone-redundant high availability is enabled, the ADP service also maintains a warm standby environment in a separate availability zone within the same region.
Creating an ADP flexible server instance
To get started with ADP, you’ll need to create an ADP flexible server resource and then create an ADP server instance. The easiest way to do both of these is to use the Azure portal. Although you don’t have to use the portal, it’s a good place to start when you’re first learning about ADP because you get a complete picture of the available options.
Before I explain how to create them, I want to point out two useful Microsoft articles:
- Use an Azure free account to try Azure Database for PostgreSQL flexible server for free. This is the article I referenced above, which explains how to get started with the free ADP service. The article describes how to use the Azure portal to create the ADP resource and server instance. It’s a useful article even if you’re not using the free service.
- Quickstart: Create an Azure Database for PostgreSQL flexible server. This article also describes how to use the Azure portal to create the ADP resource and server instance,. However, it provides more details about the options you’ll encounter when setting up an instance, and it’s not limited to the free ADP service.
You might want to keep these two articles at hand as you work through this section. One thing to note, however, is that Microsoft documentation and the Azure portal sometimes use the term Azure Database for PostgreSQL flexible server as a product name, while at other times it uses it to refer to an ADP flexible server instance. You might also see Azure Database for PostgreSQL flexible servers (plural), which confuses things even more. For this series, I try to always use the term instance or server instance when referring to the actual deployment, unless I’m referencing a UI feature.
Note: Cloud tools are apt to change some of their details in the future. Please leave a message or comment if there are changes that make this article no longer valid, other than basic look and feel changes.
Before we get started, you’ll need to sign into your Azure account. If you don’t have one, refer to the Azure topic Build in the cloud with an Azure account, which provides information about both the free account and pay-as-you-go account. Once you’re signed into your account, you should start with the following steps to create your ADP resource:
- On the Azure portal home page, click Create a resource.
- On the Create a resource page, search for Azure Database for PostgreSQL flexible server.
- In the search results, select the listing for Azure Database for PostgreSQL Flexible Server.
- On the Azure Database for PostgreSQL flexible server page, click Create.
When you create the ADP resource, Azure automatically launches the New Azure Database for PostgreSQL flexible server form, which you’ll use to set up your first ADP flexible server instance. The form is divided into multiple tabs: Basics, Networking, Security, Tags, and Review + create. The form opens on the Basics tab, which is where you’ll do most of your work. The following figure shows the top half of the Basics tab, with the options already configured.

Notice that the form includes a warning at the top that reads: “Server names, networking connectivity method and backup redundancy cannot be changed after server is created. Review these options carefully before provisioning.” Keep this message in mind whenever you create an ADP server instance.
The form also includes a price breakdown of the estimated costs. The estimates will change as you pick different options. If you qualify the free plan, the information will also include the free trial limitations (in green), as it does in the previous figure. Information about the free plan will appear only if you’ve selected the correct options, as described below.
Now let’s take a look at the first six options and how I’ve set them up in my environment:
- Subscription. I created an Azure free account specifically for this series, with the intent of using the ADP free trial. The subscription was automatically named Azure subscription 1, and it was the only one I could choose from when completing this form. You might have other options available to you when setting up your server instance.
- Resource group. You can choose from an existing resource group or create a new one. I created a new one named ADPResourceGroup.
- Server name. I named my server adpserver, but you can choose any name you like, as long as the server name is unique.
- Region. I selected Central US because that one happened to work. Some regions don’t support the ADP service, so you might need to try a couple different ones till you land on one that works for you. You can find details about supported regions in the ADP topic What is Azure Database for PostgreSQL?
- PostgreSQL version. When I set up my server instance, I chose PostgreSQL 16. I did not select PostgreSQL 17 because it is still in preview, and I didn’t want to run into any surprises.
- Workload type. I choose Development because it uses the fewest resources. You must select this option if you want to use the ADP free trial.
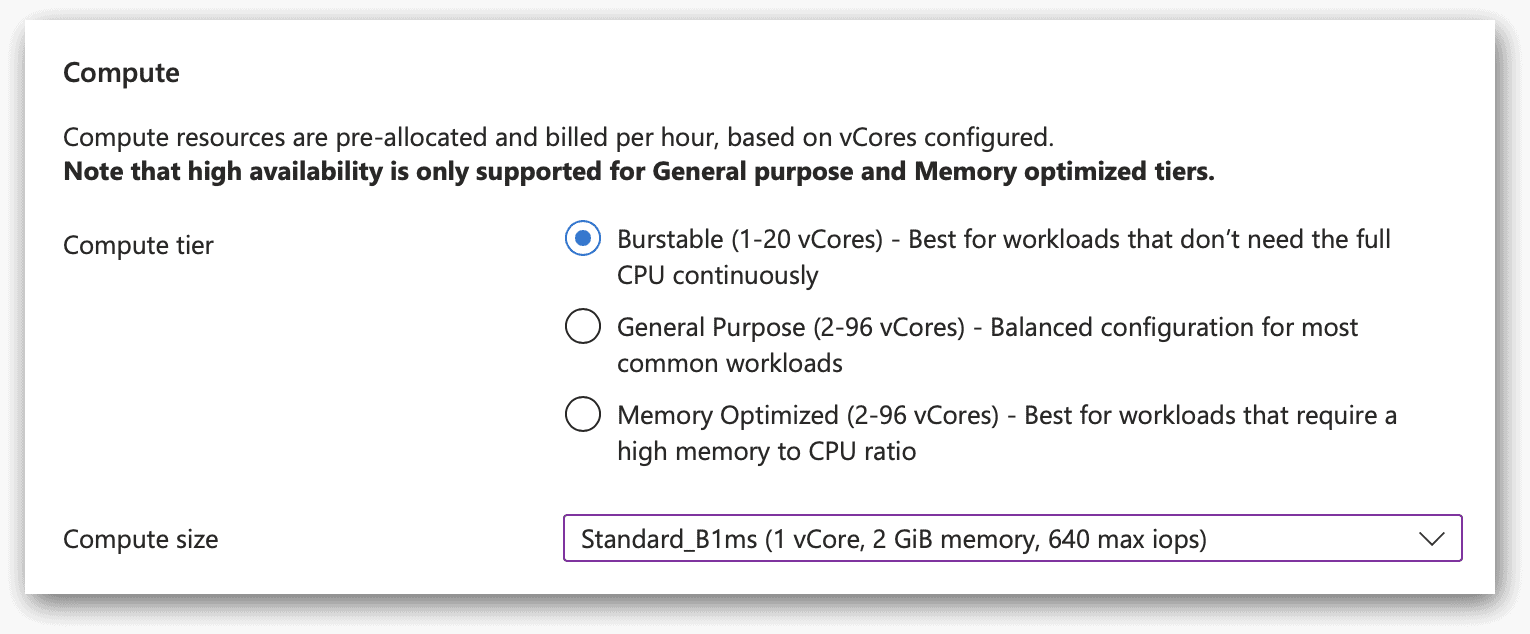
The next section in the form is Compute + Storage. To configure these settings, click the Configure server link. On the Compute + storage page, I configured the first three options as follows:
- Cluster options. I verified that the Server option was selected. It should have been selected by default.
- Compute tier. I verified that Burstable was selected. It should already be selected if you chose Development as your workload type.
- Compute size. From the drop-down list, I selected Standard_B1ms, which you must select if you’re using the ADP free trial. If you are not using the free license, you can not how different compute and storage settings may affect your costs.
The following figure shows how I set up the Compute section of the Compute + storage page.
I left the remaining options with their default values and clicked Save, which returned me to the Basics tab of the new server instance form. There I left High availability option disabled and moved onto the Authentication section, which is shown in the following figure.
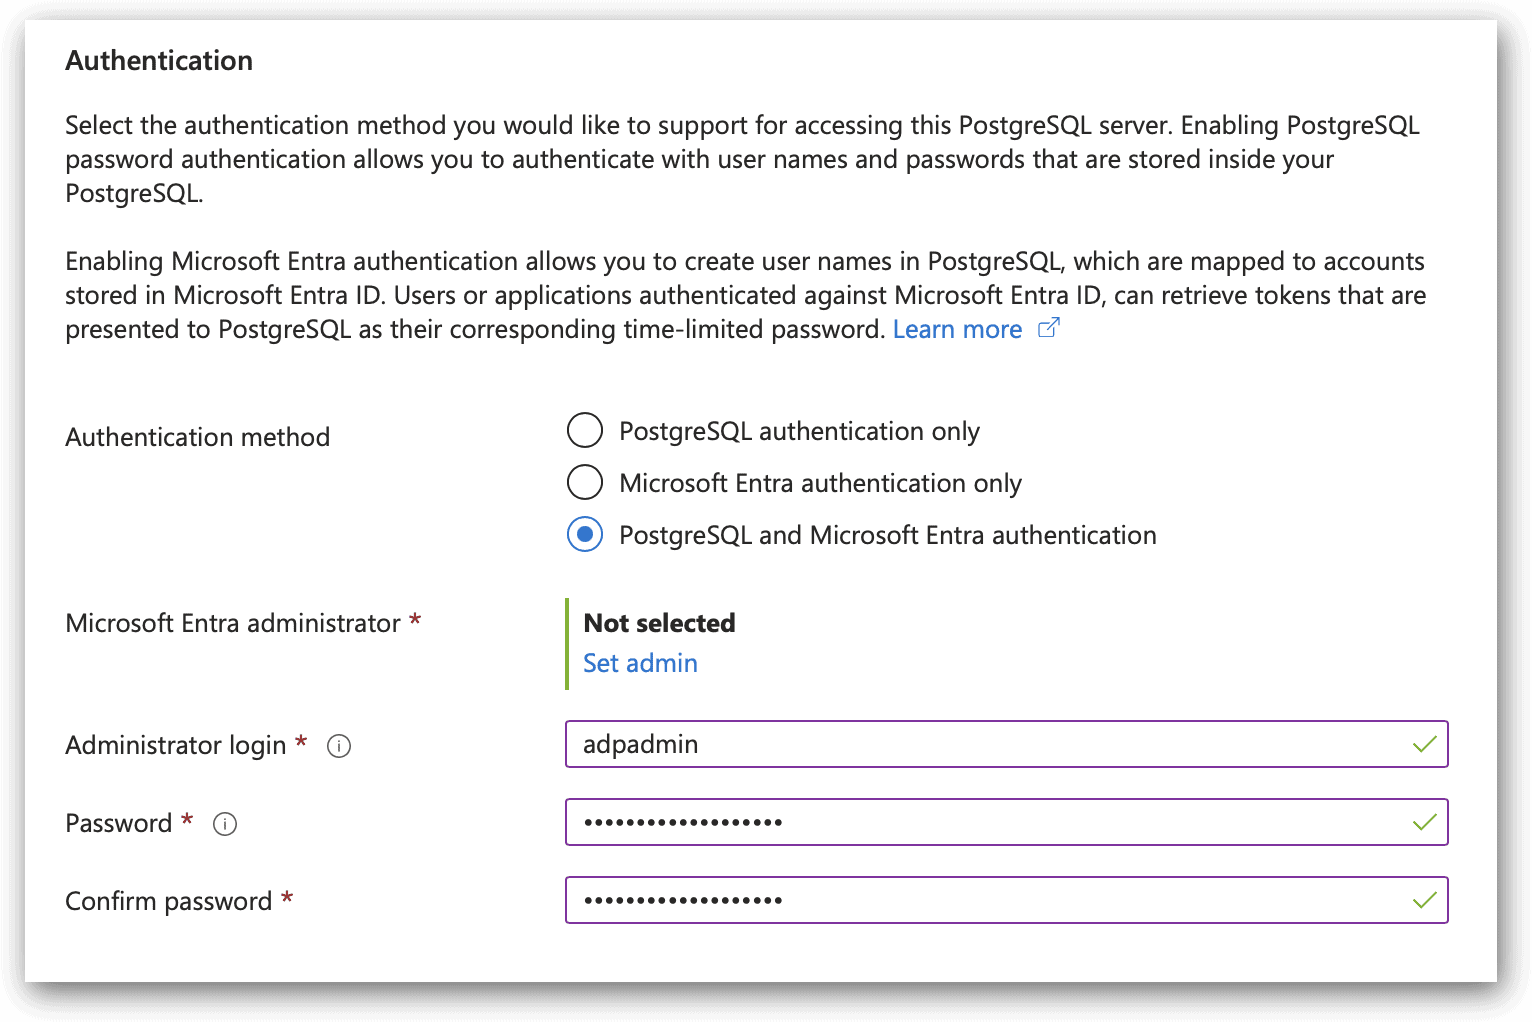
For the Authentication method section, I selected the third option, PostgreSQL and Microsoft Entra authentication. I thought this would give me the most flexibility to experiment with different features in ADP. If you want to keep things simple, you can select PostgreSQL authentication only. In either case, you’ll need to provide a PostgreSQL administrator login name and password. If you opt for both authentication methods, you’ll also need to set the Entra administrator by clicking the Set admin link.
At the bottom of the Basics tab, click Next: Networking, which takes you to the Networking tab. The following image shows the top of the page. I left these settings with their default values.
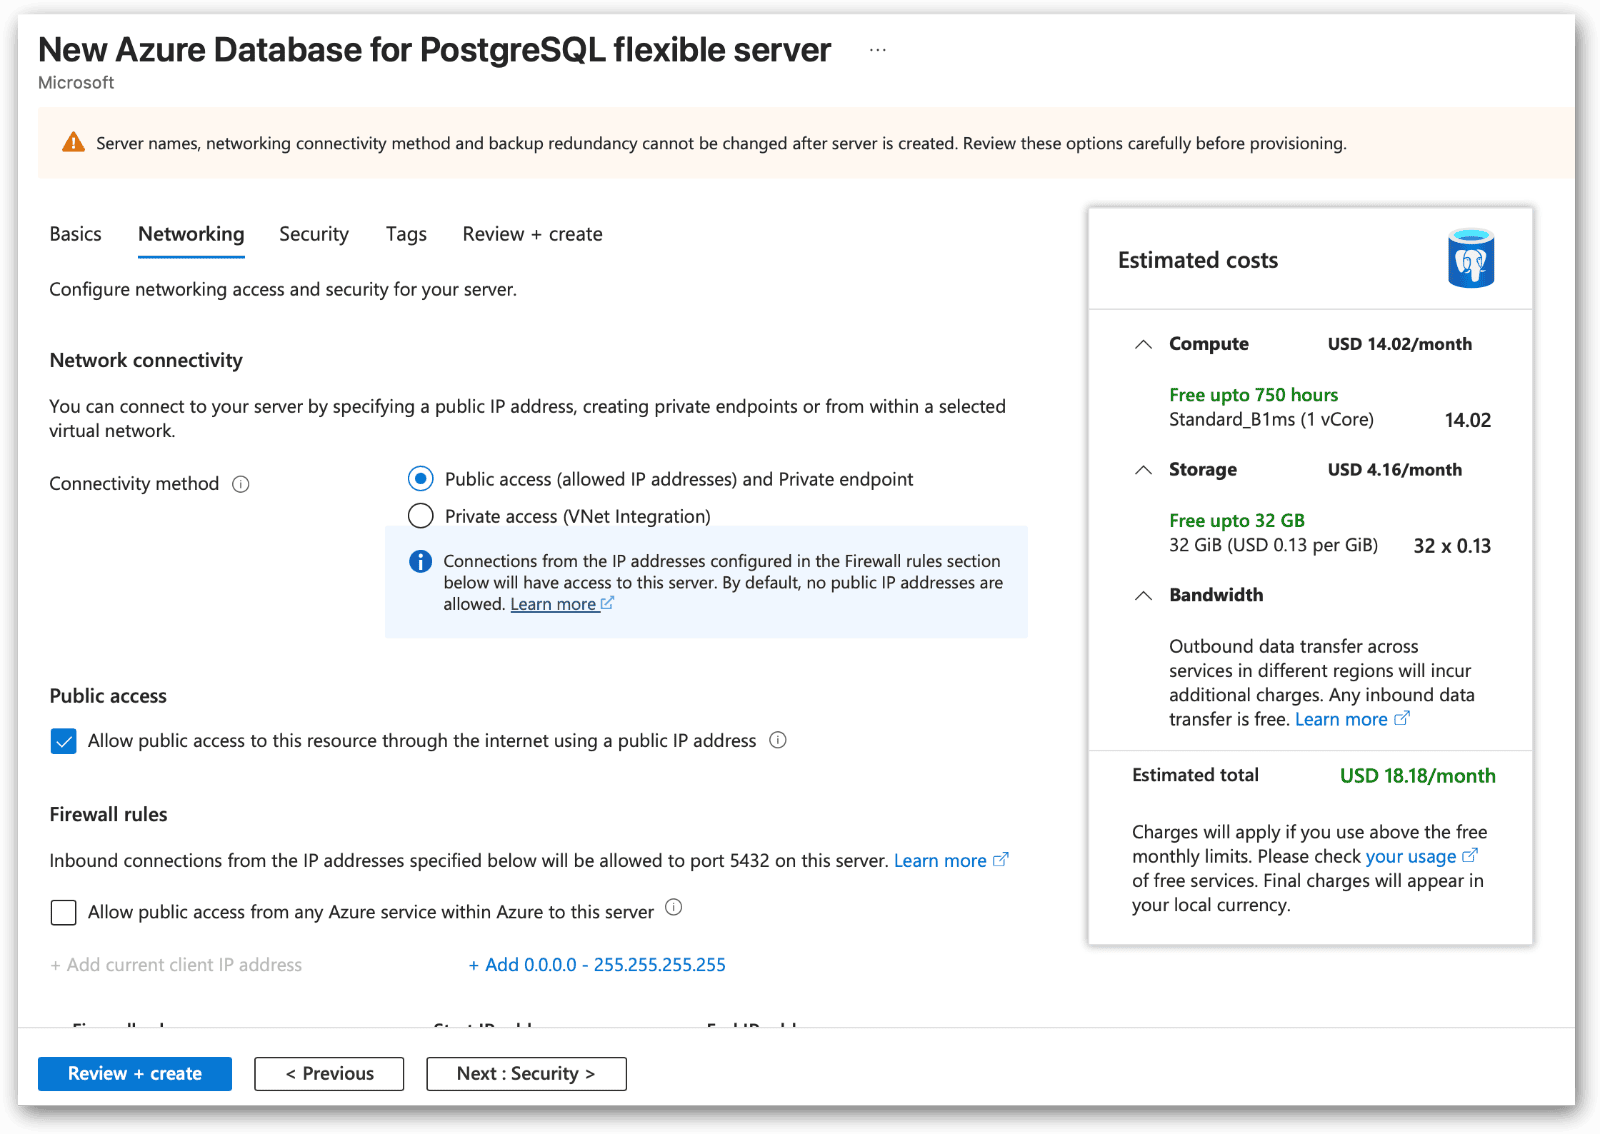
The only item I changed on the Networking tab was to add a firewall rule that allowed me to connect to the service from my local IP address. You can do this now or do it later when you’re ready to connect to the ADP service from a local client. (You may have to change this setting occasionally, if your IP address changes, like working from a different location.) I did not change any of the settings on the Security or Tags tab, although you might want to have a look at those for future reference.
At this point, you should be ready to create your ADP instance. Click Review + create at the bottom of the form. The portal will display a summary of your instance settings. Review all the information, and then click Create. If everything is working as expected, Azure will display a page that shows your deployment’s progress. When the process has finished, the page should indicate that the deployment has completed. The following figure shows the information I received for my deployment.
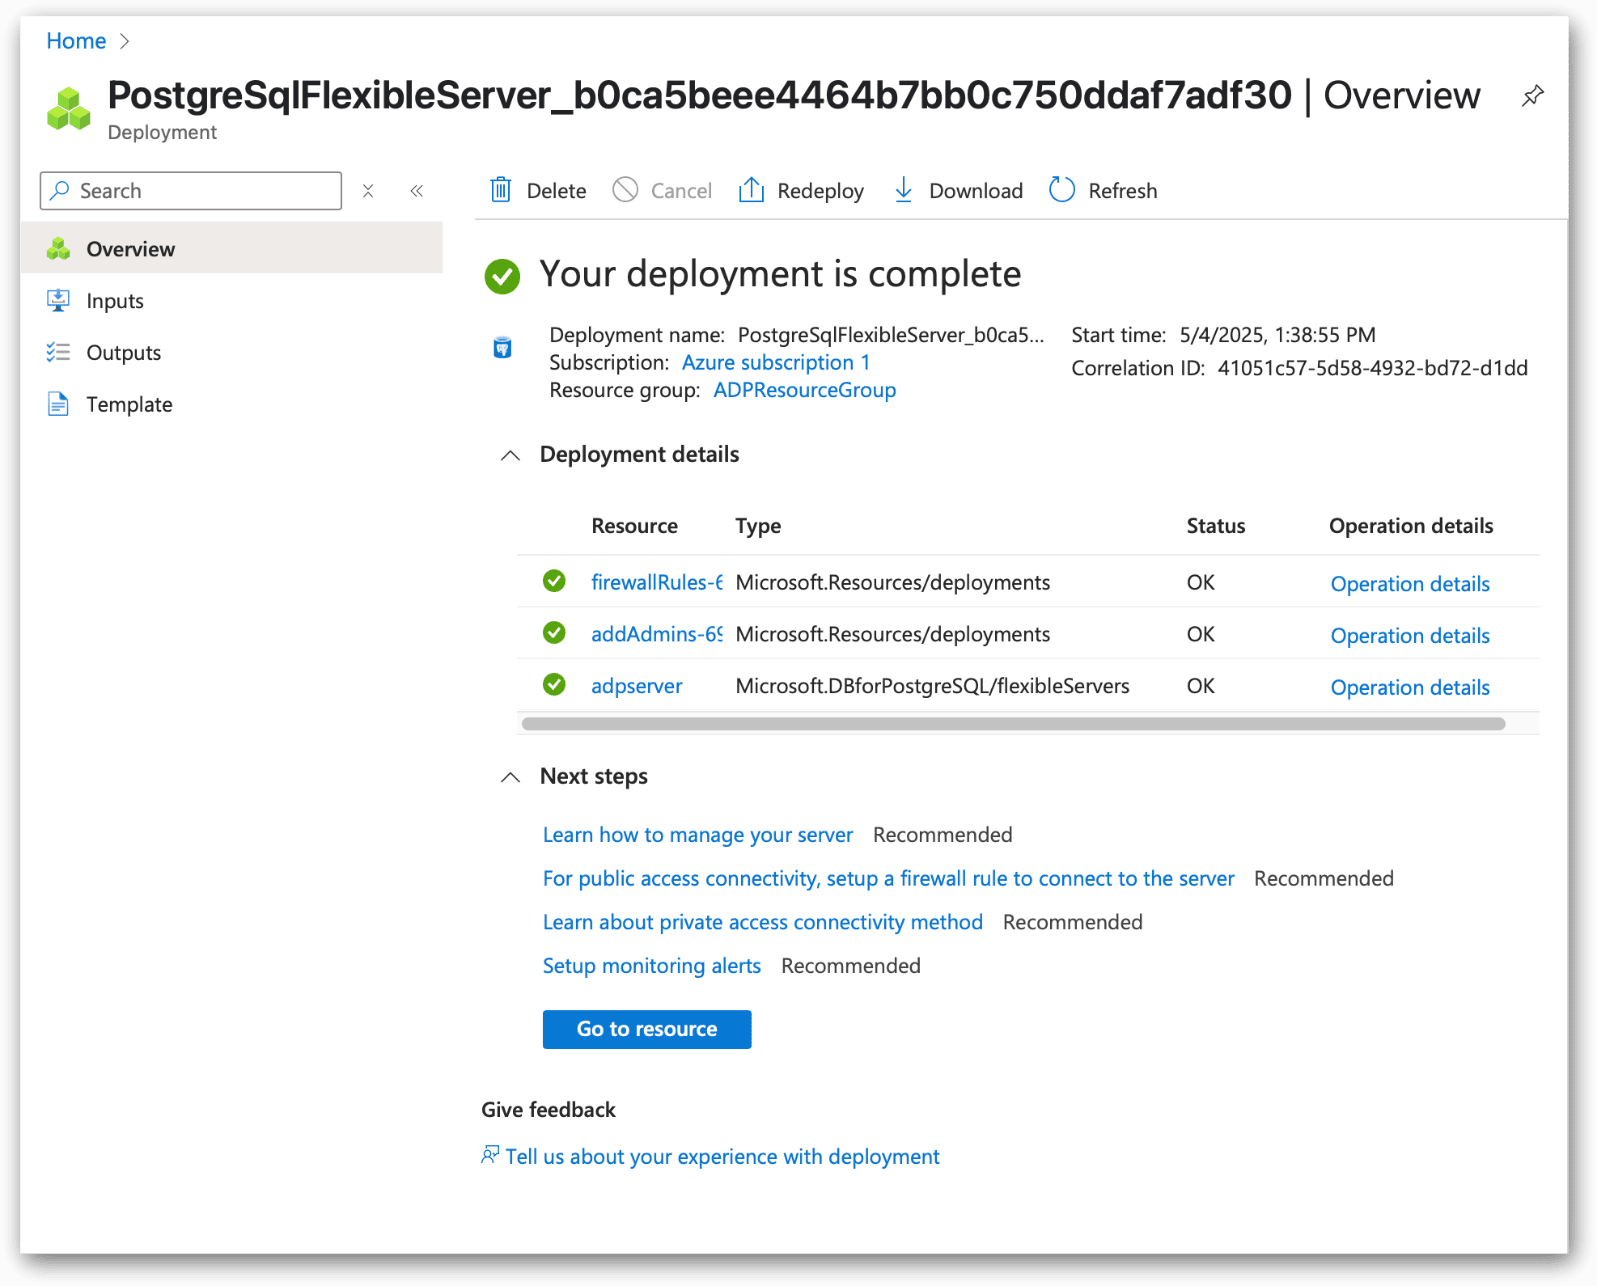
After the deployment is complete, you can click Go to resource to go to the page created for the new server instance—where you can view information, configure settings, or use other features—or you can go to other areas of the Azure portal.
ADP flexible server features
When you add a server instance to your ADP resource, the Azure Database for PostgreSQL flexible servers page in the Azure portal will display the new instance, along with any other instances you created. On my system, the only server instance I created was adpserver, so that is what appears on my ADP resource page, as shown in the following figure.
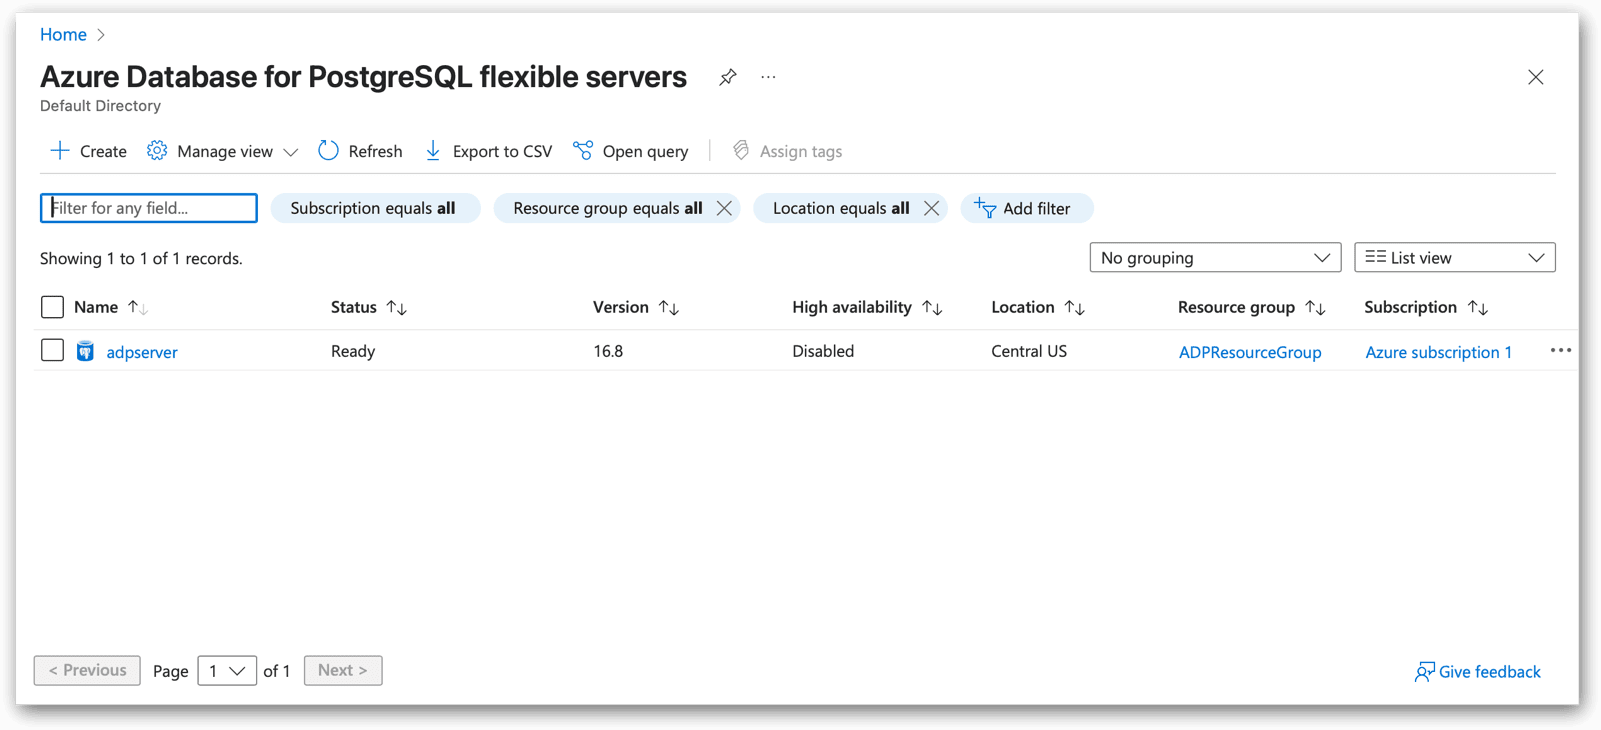
From the instance listing, you can access your instance’s management page, resource group, and subscription by clicking the appropriate item. This will take you to the detail page for that component. For now, let’s focus on the server instance. If you click the link, the portal takes you to that page, where you can view information about the instance and carry out a variety of tasks.
The following figure shows the adpserver page as it appears in my browser. The page opens on the Overview section, which is selected in the left panel. The main window displays details about the deployment, such as subscription, resource group, location, status, PostgreSQL version, and more.
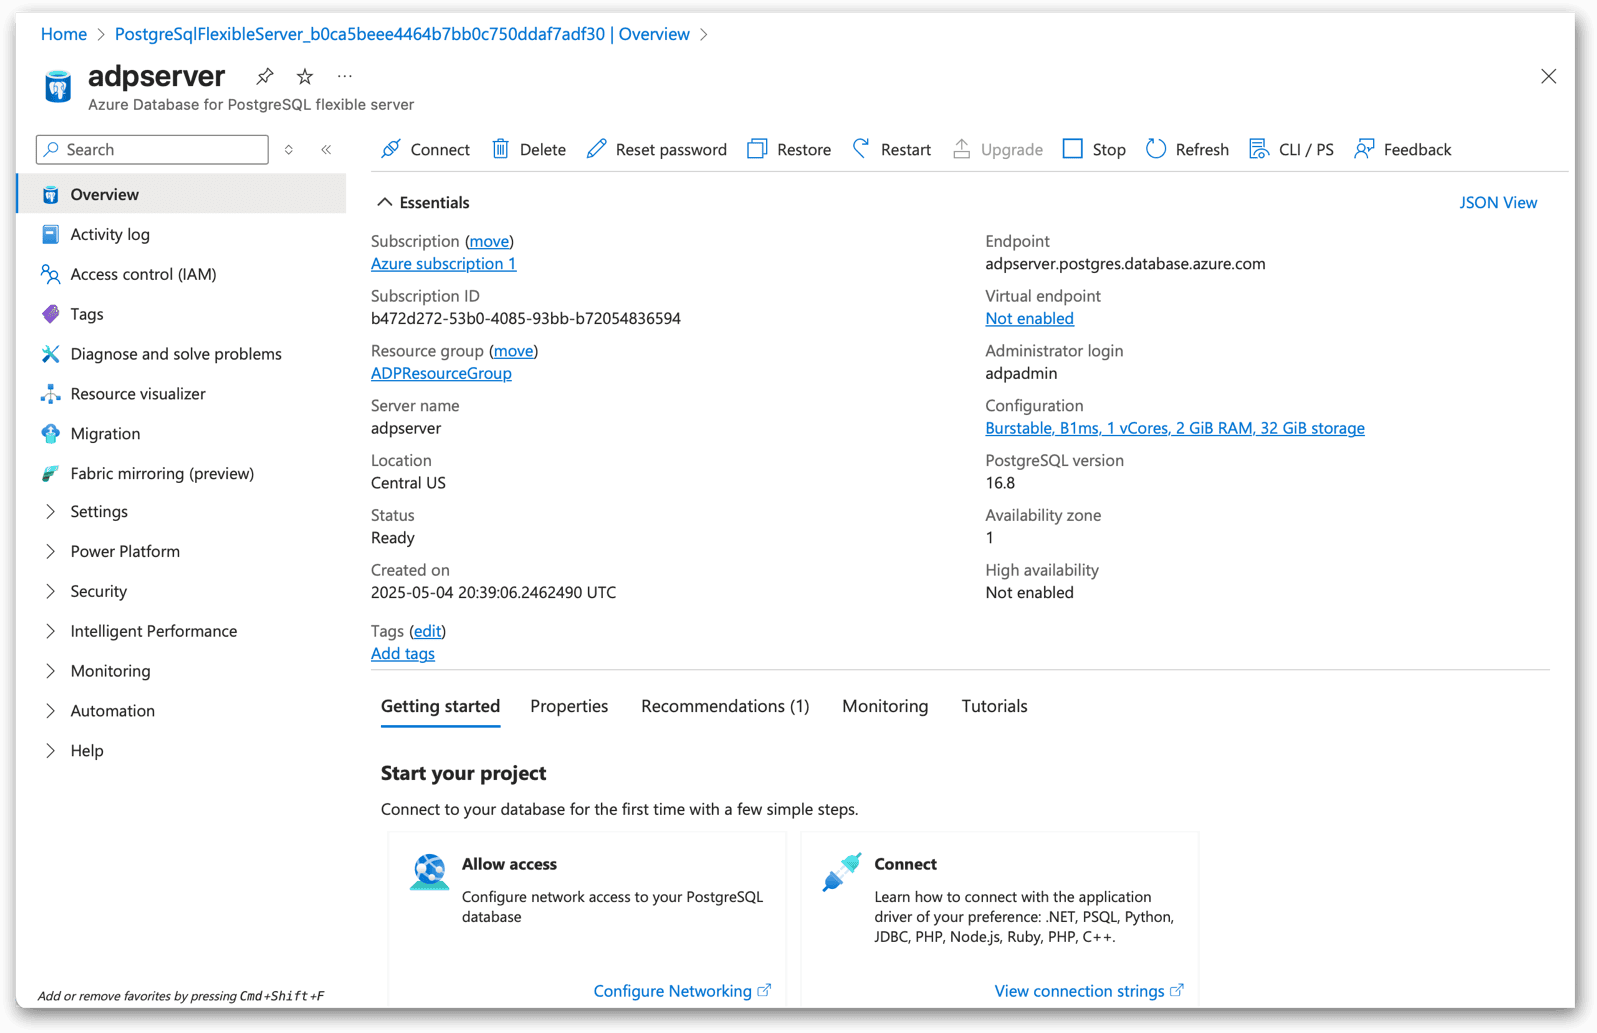
The left panel on the server instance page lets you navigate to a wide range of features and tools, which you can view by going to the individual sections. I encourage you to go through these sections to get a better sense of what’s available. In the meantime, here’s a summary of the individual sections:
- Activity log. An event log that records events such as stopping or starting the server instance, deleting the instance, or updating firewall rules. For each event, you can drill into details that are specific to the type of event, which can be useful when troubleshooting issues or optimizing operations.
- Access control (IAM). Provides identity and access management tools for viewing roles and role assignments specific to the server instance. You can also manage role assignments in this section.
- Tags. Name/value pairs that can be used to categorize resources. The tag names are case-insensitive, while the tag values are case-sensitive.
- Diagnose and solve problems. Tools for troubleshooting common problems that might occur with the ADP instance. Each tool helps address a specific problem area, such as security, extensions, server connectivity, or high availability. When using one of the tools, you’ll need to answer specific questions to help narrow down the focus.
- Resource visualizer. A tool that provides a graphical overview of the relationships between your ADP instance and other Azure resources and the dependencies between them.
- Migration. A tool for migrating data in a PostgreSQL database to an ADP flexible server instance. The source database can come from either on-premises or cloud-based deployments such as Amazon Aurora PostgreSQL or Google Cloud SQL for PostgreSQL.
- Fabric mirroring (preview). A tool for mirroring your ADP data to Microsoft Fabric, a platform for managing and analyzing data. ADP makes it possible to continuously replicate your PostgreSQL data into Fabric OneLake.
- Settings. An extensive set of server configuration settings for managing the server environment. The settings include those related to storage, networking, connectivity, replication, maintenance, high availability, and other aspects of the ADP environment. The settings also include a listing for databases, where you can view system and user databases, as well as create and delete user databases.
- Power Platform. A tool for integrating with Power BI Desktop, where you can use ADP data to create and share visualizations and reports.
- Security. A set of tools for managing security on the ADP instance. You can configure security settings related to features and services such as the administrator login, Microsoft Entra authentication, system assigned managed identity, and Microsoft Defender for Cloud.
- Intelligent Performance. Tools for tracking ADP query performance and for tuning ADP indexes. The query performance information includes details about long running queries, wait statistics, and the top queries. The index tuning feature analyzes read queries and recommends index changes.
- Monitoring. A set of tools for monitoring database activity and configuring alerts based on individually defined rules. The ADP service exposes a wide range of metrics for tracking activity across the server instance and its databases.
- Automation. Information and tools for automating tasks such as starting or stopping the server, scaling the service at a specific time of day, or tracking the monthly costs of a resource.
- Help. A set of resources for getting help and resolving issues. You can find information about recent health events as well as a collection of troubleshooting guides related to topics such as CPU, memory, and IOPS.
As we work though the articles in this series, we’ll dig into these features and tools in more detail. You’ll also find plenty of information in the ADP documentation. A good place to start is with the top-level topic, Azure Database for PostgreSQL documentation.
Create your first user database
After you create a ADP flexible server instance, you can use the Azure portal to add or delete user databases from that instance. The steps for adding a user database are fairly straightforward:
- Go to the ADP server instance page if you’re not already there. In my case, it is the adpserver page (If you named your server a different name, it will be that page instead).
- In the left panel, expand the Settings node and click the Databases node to go to that section. On the Database page, you should find three databases already listed:
- azure_maintenance. A system database used for administrative data. Users are granted minimal access to this database and can do little with it.
- azure_sys. A system database used by ADP tools such as query store and index tuning.
- postgres. A user database that provides an initial database environment for new deployments. You can use this database however you like.
- To add a new database, click the Add button near the top of the page.
- In the Create database window, type a name for the new database in the Name textbox and click Save.
Azure will create the database and add it to your list of databases on the Databases page. To delete the database, select the checkbox to the left of the database name, click the Delete button near the top of the page, and then click Delete again to confirm the deletion. The database will be removed from the list of databases.
Note. As you’ll see later in this series, you can also add or delete user database from your client interfaces, as well as define the individual tables that go into those databases.
In some cases, you might want to stop running a server instance to minimize resource usage. For example, if you create an instance for development and testing purposes, you can stop it when you’re not using it and then restart it when you’re ready to use it again:
- To stop the instance, go to the Overview section on the instance’s page and click the Stop button near the top of the page. When prompted to confirm your choice, click Stop again. The server will remain stopped for seven days, unless you restart it sooner.
- To start the instance, go to the Overview section on the instance’s page and click the Start button near the top of the page.
Stopping an instance when you’re not using it is a good habit to get into to help reduce costs, assuming that it doesn’t disrupt operations. Unfortunately, it doesn’t help reduce your storage usage, although you can delete any data or databases you don’t need to retain. Cloud services don’t come cheap, so anywhere you can reduce your footprint, the better, especially when you’re just learning about the service.
Making the most of ADP flexible server
Azure Database for PostgreSQL flexible server makes database deployment fast and easy, minimizing the administrative overhead that comes with on-premises deployments. At the same time, the ADP service offers a number of tools and configurable settings that enable organizations to deploy a relational database environment that best supports their application workloads. However, these features and settings come with their own learning curve, and users such as DBAs should invest the time necessary to make the most of the service.
In this article, I’ve introduced you to the ADP service and explained how to set up your first server instance. Throughout the rest of the series, I’ll dig more deeply into the different ways you can work with the ADP environment and its data. For many of the tasks you’ll be carrying out, you’ll likely rely on a client interface to connect remotely to the server instance. For example, you might use the psql command-line interface (CLI) or the pgAdmin graphical user interface (GUI), both of which you’ll learn about in subsequent articles. Even with these tools, there’s still a lot you can do in the Azure portal, so it pays to learn about multiple approaches to managing the ADP environment and working with its data, which is what we’ll be covering in this series.


Load comments