
The SELECT statement is used to retrieve information from a database. Following the execution of a SELECT statement, a tabular result is held in a result table (called a result set). It allows you to select the table columns depending on a set of criteria.
SELECT statements might be as straightforward as selecting a few columns from a single table. They can also be complex, with several columns and criteria and multiple tables. In this article, I will introduce the basic SELECT statement fetching data from just one table.
SELECT Syntax:
The SELECT statement contains 4 Parts:
SELECT >> COLUMNS >> FROM >>WHERE
The SELECT clause defines which table columns are retrieved. The FROM clause defines which tables are queried. The WHERE clause determines which table rows should be selected and if it is omitted, all table rows are selected.
The basic syntax looks like this:
|
1 2 3 |
SELECT Column_Name1, Column_Name2, Column_Name FROM Table_Name WHERE Criteria; |
A database consists of one or more tables. Each table is given a distinct name (e.g., “Employee”, “Department”, “Address”). Data records are stored in tables (rows).
Here’s an example of an “Employee” table: You can use the following SQL script to create “Employee” and load the data.
SQL script to create the “Employee” table.
|
1 2 3 4 5 6 7 8 9 |
CREATE TABLE Employee ( Employeeid Varchar(15) Primary Key, Name Varchar(15), LastName Varchar(15), FirstName Varchar(15), Department Varchar(15), Dob Date, Salary Number(8,0) ); |
The following INSERT statements will load data into the “Employee” table for the demos in this article.
|
1 2 3 4 5 6 7 8 9 10 11 12 |
INSERT INTO Employee (EmployeeId, Name, LastName, FirstName, Department, DOB, Salary) VALUES ('1001', 'Allen Cox', 'Cox', 'Allen', 'IT', TO_DATE('01-July-1982', 'DD-MM-YYYY'),75000); INSERT INTO Employee (EmployeeId, Name, LastName, FirstName, Department, DOB, Salary) VALUES ('1002', 'Dave Carry', 'Carry', 'Dave', 'Sales', TO_DATE('01-Jan-1992', 'DD-MM-YYYY'),70000); INSERT INTO Employee (EmployeeId, Name, LastName, FirstName, Department, DOB, Salary) VALUES ('1003', 'Amit Singh','Singh', 'Amit', 'Sales', TO_DATE('20-Oct-1991', 'DD-MM-YYYY'),50000); INSERT INTO Employee (EmployeeId, Name, LastName, FirstName, Department, DOB, Salary) VALUES ('1004', 'Rhonda Grant', 'Grant', 'Rhonda', 'Marketing', TO_DATE('15-May-1980', 'DD-MM-YYYY'),60000); INSERT INTO Employee (EmployeeId, Name, LastName, FirstName, Department, DOB, Salary) VALUES ('1005', 'Marvin Cox', 'Cox', 'Marvin', 'Marketing', TO_DATE('15-Jan-1985', 'DD-MM-YYYY'),62000); INSERT INTO Employee (EmployeeId, Name, LastName, FirstName, Department, DOB, Salary) VALUES ('1006', 'Dave Grant', 'Grant', 'Dave', 'Sales', TO_DATE('05-Oct-1980', 'DD-MM-YYYY'),90000); |
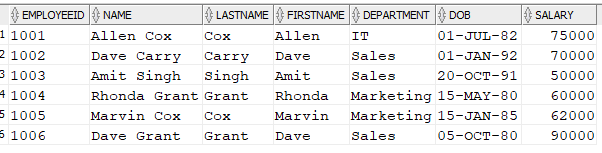
This is how the data in the table looks.
|
EmployeeId |
Name |
LastName |
FirstName |
Department |
DOB |
Salary |
|
1001 |
Allen Cox |
Cox |
Allen |
IT |
01-JUL-82 |
75000 |
|
1002 |
Dave Carry |
Carry |
Dave |
Sales |
01-JAN-92 |
70000 |
|
1003 |
Amit Singh |
Singh |
Amit |
Sales |
20-OCT-91 |
50000 |
|
1005 |
Marvin Cox |
Cox |
Marvin |
Marketing |
15-JAN-85 |
62000 |
|
1006 |
Dave Grant |
Grant |
Dave |
Sales |
05-OCT-80 |
90000 |
Let’s write SELECT statements on the above table.
Retrieve Data from a Single Table
The SELECT statement can retrieve data from single or multiple tables; however, all my examples in this article use a single table to focus on the parts of the SELECT statement itself. In a future article, I will cover multiple table queries and how JOIN operators can be used to connect data from multiple tables and then shaped into a single tabular data stream.
Select all columns
An asterisk following the word “SELECT” indicates that all fields that are available should be retrieved (columns).
Using SELECT * in SQL queries is great for doing quick ad hoc work, but for code that will be reused in production, this is a poor practice that should be avoided. Instead of SELECT *, it is recommended to provide the column names you want in the SELECT query. Using column names not only improves efficiency but also makes SQL code easier to understand.
Furthermore, if you use SQL with * in an application such as PeopleSoft code or .NET code and add any new columns to the table or reorder the existing columns, your code may break. It is however, what most people use when exploring data.
The following SELECT statement gets all the columns and rows from the given table. Note that the FROM clause is where you specify the set of data that your query will be using. I will discuss this more when covering JOIN operations.
|
1 2 |
SELECT * FROM Employee; |
This returns:
Selecting one or more columns by name
Any database object such as a column name can be named using either quoted or unquoted identifiers. Unquoted identifiers are not case-sensitive. Oracle classifies them as uppercase. Case is important when using quoted IDs. By enclosing names in double quotation marks, you can give the following names to different objects in the same namespace.
- “employees”
- “Employees”
- “EMPLOYEES”
It is important to note that Oracle reads the following names identically, therefore they cannot be used for various objects in the same namespace:
- employees
- EMPLOYEES
- “EMPLOYEES”
I prefer object names without quotation marks because they are easier for me to type. This implies that when I create a table, I don’t use quotation marks so that the columns can be entered in either capital or lowercase characters in a select statement The decision is entirely personal in this case. However, consistency is important. I like uppercase keywords and PASCAL case for things like column and table names, but it is up to you to define your style.
When selecting only certain columns from the table:
- Specify each column’s name when selecting multiple columns.
- Column names must be separated by commas.
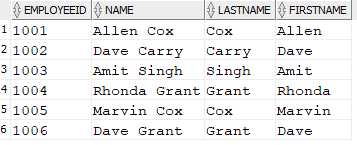
For example, the following SELECT statement retrieves particular columns and rows from the given table.
|
1 2 |
SELECT EmployeeId, Name, LastName, FirstName FROM Employee; |
This query, using the table provided, returns:
Sorting data: ORDER BY
The ORDER BY clause is used to sort the result set in ascending or descending order. When you execute a query with no ORDER BY clause, the order of the output is not guaranteed to be in any order.
For example, assume you wish to sort the data from lowest to highest date of birth.
|
1 2 3 |
SELECT * FROM Employee ORDER BY DOB; |
This returns the following, note that the data in the DOB column is sorted when the results are returned:
By default, ORDER BY sorts the rows in ascending order. Although it is the default, you may optionally add ASC to the end of the ORDER BY clause to explicitly state the sort is ascending. By adding DESC at the end of the ORDER BY clause, you can instruct SQL to return results sorted by that column in descending order (For numbers 100 to 1 and letters Z to A).
As a quick example, if you want to sort the data from highest to lowest date of birth, add DESC as a suffix to DOB in the ORDER BY clause.
|
1 2 3 |
SELECT * FROM Employee ORDER BY DOB DESC; |
Now you can see the DOB data goes from most recent to oldest data:
Sorting by Multiple Columns:
You can use more than one sort of level to order your data. The primary sort order is defined by the first field name, the secondary sort the second, and so on. You simply add more columns to the ORDER BY clause. Each column may be ascending or descending, as you wish.
|
1 2 3 4 |
SELECT Column_Name1, Column_Name2, Column_Name3 FROM Tablename ORDER BY Column_Name1 <desc>, Column_Name2 <desc>, Column_Name3 <desc>; |
For example, you may sort your data by salary and then by date of birth within salary:
|
1 2 3 |
SELECT * FROM Employee ORDER BY Salary DESC, DOB DESC; |
There are no duplicated values in our dataset, but this is the output.
Filtering rows from the output
The SQL SELECT statement’s WHERE clause specifies which rows to (or not to) return from your table or view by filtering rows based on a given condition.
When referring to literal character values in the WHERE clause, one must put the values in single quotes, for example, DEPARTMENT='Sales'; Other datatypes have different rules for how they are represented in code. For example, numeric values should not be surrounded by quotations.
This is the basic syntax:
|
1 2 3 4 |
SELECT <Column Name List> FROM Tablename WHERE <Comparison Expression> ORDER BY Column_Name <desc>; |
The <comparison expression> in the WHERE clause can most any expression returning a Boolean value. For example, you might compare a column value to a literal (Salary = 10000), a column value to another column (CurrentSalary = StartingSalary), or even if a column value has a NULL value (Salary IS NULL). A NULL value generally means that a value is unknown, in that you don’t have the value.
For comparing two values, most comparison operators can be used with a WHERE clause:
|
Operator |
Description |
|
|
Equal to any item on a list |
|
|
Not equal to any item on a list |
|
|
All conditions are true |
|
|
Any Condition is true |
|
|
Equal |
|
|
Not equal |
|
|
Greater than |
|
|
Less than |
|
|
Greater than or equal |
|
|
Less than or equal |
|
|
Between a range |
|
|
Search for a pattern |
|
|
Checks to see if the column value IS NULL |
The WHERE clause may also be quite complex depending on the necessary criteria, something that I will cover in a later article.
WHERE Clause Examples
In these next subsections, I will give a few examples of WHERE clauses using different comparison operators.
= (Equal) Comparison Operator
The most common comparison operator is =. It simply is used to compare that two values are equal. For example:
|
1 2 3 |
SELECT * FROM Employee WHERE Department ='Sales'; |
This returns the following, where the employee is in the Sales department:

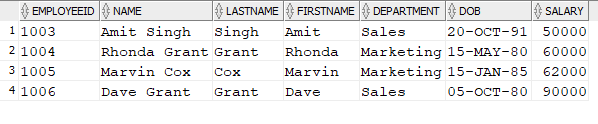
<> Not equal Comparison Operator
The following query shows all employees from Department Sales.
|
1 2 3 |
SELECT * FROM Employee WHERE DEPARTMENT <> 'Sales'; |
This returns:

There are also comparison operators for > (Greater than), < (Less than), >= (Greater than equal to), <= (Less than equal to), and more that work in a similar way.
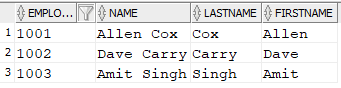
IN Comparison Operator
The following query returns all Employee rows with EmployeeId values in the range of ‘1001’,1002, or ‘1003’.
|
1 2 3 |
SELECT * FROM Employee WHERE EmployeeId IN ('1001',1002,'1003'); |
This returns:

If you want the rows that are not in a certain range, you need to use NOT IN. For example, the following query returns all Employee rows with EmployeeId values, not in the range of ‘1001’,1002, or ‘1003’.
|
1 2 3 |
SELECT * FROM Employee WHERE EmployeeId NOT IN ('1001',1002,'1003'); |
This returns the other rows in the table:

Note: be slightly careful with the NOT IN operator when NULL values could be involved. Column NOT IN (NULL, 1, 2) will never return any rows. NULL comparisons return NULL, and only rows with a TRUE comparison will be returned.

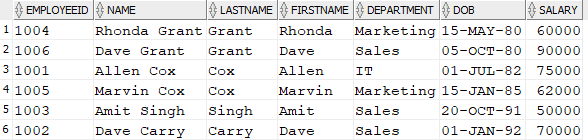
AND Boolean Operator
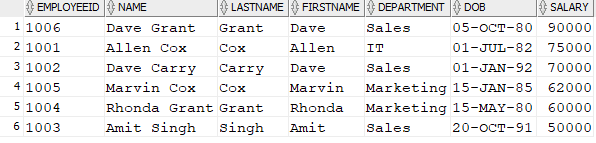
Boolean operators are used to create more complex filters by tying 2 or more conditions together. For example, say you need to find all employees from the “Sales” Department with the last name “Grant”.
The two conditions are equality operations, and then we tie them together with AND:
|
1 2 3 4 |
SELECT * FROM Employee WHERE Department ='Sales' AND LastName=<code>'Grant'</code>; |
The result is:
![]()
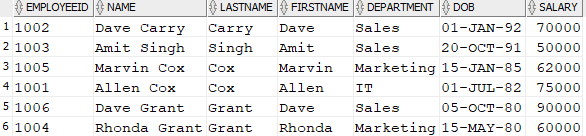
OR Operator
Much like and, but in this case, we want to find where any condition is met. For example, the following query finds all employees from the “Sales” Department or last name is “Grant”
|
1 2 3 4 |
SELECT * FROM Employee WHERE DEPARTMENT='Sales' OR LastName= 'Grant'; |
This returns:

It should be noted that when using AND and OR Boolean expression you need to take care when combining them. Use parenthesis to group together items. For example, if you want all employees from the “Sales” Department with the last name “Grant” as well as all employees not in the “Sales” Department, you will use the following:
|
1 2 3 |
WHERE (Department ='Sales' AND LastName='Grant') OR (Department <> 'Sales') |
Between Comparison Operator
The SQL BETWEEN operator is used to filter data based on a range of values. It allows you to select rows from a table where a column’s value falls within a specified range.
Note that the BETWEEN operator is inclusive, meaning it includes both the lower and upper bounds in the range. The following query returns all employees whose salaries are between $50000 and $70000.
|
1 2 3 |
SELECT * FROM Employee WHERE Salary BETWEEN 50000 And 70000; |
This returns:

In the output you can see that the two rows with 50000 and 70000 are in the output. If you want to exclude the bounds, you need to be specific in your comparison. For example, the previous BETWEEN expression could be re-written:
|
1 |
WHERE Salary >= 50000 AND Salary <=70000; |
If you didn’t want the endpoints, you could rewrite it as:
|
1 |
WHERE Salary > 50000 AND Salary <70000; |
And you may need to vary that based on exactly what you are trying to achieve. Some people do not like to use BETWEEN because it isn’t as expressive as using individual comparison operators.
The LIKE Comparison Operator
A very important operator that I want to introduce is the LIKE operator. It lets you find more complex matches using simple comparison operators.
The LIKE operator does a pattern match comparison, which means it compares a string value to a pattern string that contains wildcard characters.
Wildcards can be defined using a “%” or “_” symbol both before and after the pattern
In Oracle SQL, the escape character can be used in a LIKE statement to escape special characters and match their literal value instead of their special meaning. The escape character is specified using the ESCAPE clause, and its default value is the backslash (\) character. For more information about escape character or wild cards please refer to the Oracle link
Note: Oracle also supports a regular expressions LIKE operator too. For more information about this, check out this article.
The percent sign (%) represents many, multiple, or zero characters, while the underscore symbol (_) one and only one value.
For example. the SQL query below will return employees whose first names begin with the letter ‘A’:
|
1 2 3 |
SELECT * FROM Employee WHERE Name like 'A%'; |
This returns the following:

The SQL query below will return employees whose first names end with the letter ‘t’:
|
1 2 3 |
SELECT * FROM Employee WHERE Name like '%t'; |
Which you can see in the results:

The SQL query below will return employees whose first names include the letter ‘C’:
|
1 2 3 |
SELECT * FROM Employee WERE name like '%C%'; |
This returns the following:

Note: Be cautious when using LIKE expressions with leading wildcard values because normal indexes may not be particularly beneficial due to the way indexes are structured and prevent efficient index utilization that uses a leading wildcard. As a result, LIKE expressions with leading wildcards (for example, ‘%list’) should be avoided where possible.
Finally, the underscore symbol (_) specifies a single character. Hence, the SQL query below will return employees with the letter “l” in the second position in their first names.
|
1 2 3 |
SELECT * FROM Employee WHERE name like '_l%'; |
This returns the following:
![]()
Limiting the number of Rows in the output
It is sometimes a good idea or a requirement to display only a certain number of rows from a query. This can help improve performance when working with large tables containing millions of rows of data.
For instance, you may be creating a search application but just want to display a portion of the results. If your search query returns hundreds of rows but you just want to display ten at a time, you would use limit clauses to narrow down your set of results.
Another example would be if you wanted to show the top 10 or 20 highest-paid people from the employee table when your result set returned a thousand rows. The following clauses can be used with the Select statement to limit the number of rows.
FETCH FIRST or FETCH NEXT:
- Specify the
NEXTorFIRSTrow or rows to be returned. - Specify the number of rows to be returned.
The integer literal value must be 1 or greater for the fetch first clause. If the literal is missing, the value defaults to 1. This is the base syntax:
|
1 2 3 |
SELECT ColumnName1, ColumnName2, ColumnNameN FROM Tablename ORDER BY ColumnName1 FETCH FIRST/NEXT number ROWS/ROWS ONLY; |
The ORDER BY clause is not required here, but it may be helpful if you want to control the order in which the data is returned. This is especially important when retrieving large datasets.
The following SELECT statement returns the first row from the query of the employee table, sorted by the EmployeeId column.
|
1 2 3 |
SELECT EmployeeId, Name, LastName, FirstName FROM Employee ORDER BY EmployeeId FETCH FIRST 1 ROW ONLY; |
The result is the one row:
![]()
Next, the following SELECT statement returns the first 3 rows from the employee table, sorted by the EmployeeId columns:
|
1 2 3 |
SELECT EmployeeId, Name, LastName, FirstName FROM Employee ORDER BY EmployeeId FETCH FIRST 3 ROWS ONLY; |
Which returns:
In the next example, the SELECT statement returns the next 2 rows and skips the first-row employee table, sorted by the EmployeeId columns.
|
1 2 3 |
SELECT EmployeeId, Name, LastName, FirstName, Department, Dob, Salary FROM Employee ORDER BY EmployeeId FETCH NEXT 2 ROWS ONLY; |
In the result, you can see that this is still just the first 2 rows. The value of this will become more obvious in the next sections.

OFFSET:
The OFFSET clause allows you to skip the first N rows in a result set before returning any rows.
The value of the integer literal (or the dynamic parameter?) for the result offset clause must be either 0 (default if no clause is specified) or positive. If the number of rows is more than the number of rows in the main result set, no rows are returned.
|
1 2 3 |
SELECT ColumnName1, ColumnName2, ColumnName N FROM Tablename ORDER BY ColumnName1 OFFSET number ROWS/ROWS; |
The following SELECT statement skips the first two rows and returns the remaining rows sorted by the EmployeeId columns.
|
1 2 3 4 |
SELECT EmployeeId, Name, LastName, FirstName, Department, Dob, Salary FROM Employee ORDER BY EmployeeId OFFSET 2 ROWS; |
Now you can see in the following rows that 1001 and 1002 are not in the output, since they were the first two rows based on the sort order:
Using OFFSET together with NEXT/FIRST
The OFFSET clause may be used in combination with the NEXT or FIRST clauses to restrict the number of rows returned in the result set.
For example, the following SQL skips the first employee, employees are ordered by lowest salary to highest salary, and returns the next two employees.
|
1 2 3 4 |
SELECT EmployeeId, Name, LastName, FirstName, Department, Dob, Salary FROM Employee ORDER BY SALARY OFFSET 1 Rows FETCH NEXT 2 ROWS ONLY ; |
Result:

Eliminate duplicates using DISTINCT:
The SELECT command retrieves data from table columns. But what if we only want unique data? A column in a database frequently has many duplicate values, thus there are instances when you just want to show the unique values.
For example, a business user may require a list of the unique countries of birth of all employees of a company to assess the organization’s diversity. Because many employees may have the same birth country, we may prefer a separate count of employees by country of birth rather than a total count of employees. In this case, we can use DISTINCT keyword with a SELECT statement.
The DISTINCT keyword specifies that only distinct (unique) data should be returned. Using DISTINCT will remove duplicates from the results table.
|
1 2 |
SELECT DISTINCT ColumnName FROM Tablename; |
The following SELECT statement retrieves unique Department values from the Employee table. There are several employees with the same department, and you as a business user may require a distinct list of departments where employees work.
|
1 2 |
SELECT DISTINCT Department FROM Employee; |

While it is beyond this introduction to the SELECT statement topic, beware of using DISTINCT to cover duplicated data that you don’t understand. When querying more than one table it often is used to hide issues that are either a problem for the performance or correctness of a query.
Grouping Data for Aggregation
The GROUP BY clause in SQL is used to group rows of data in a result set based on the values in one or more columns. The purpose of using the GROUP BY clause is to aggregate data and obtain summary information.
|
1 2 3 4 5 |
SELECT fieldname1, fieldname2, ... fieldname_n, aggregate_function (aggregate_fieldname) FROM tables WHERE conditions GROUP BY fieldname1, fieldname2, ... fieldname_n; |
The aggregate function (aggregate fieldname) represents an the aggregate function that you want to apply to the data, such as SUM, AVG, MIN, MAX, or COUNT. This function will operate on the values in the aggregate fieldname column.
The data will be formed into groups based on the columns in the GROUP BY clause. The values that are not in the GROUP BY clause then are collapsed into scalar values by the aggregate function. Rows with identical values in the grouping columns are grouped. In the query result, each group is interpreted as a single row and aggregate functions (like SUM, MIN, MAX) can be applied to the results For example, if the grouping had three rows with the same value, you could do COUNT(*) as an aggregate function and it would return 3.
GROUP BY is an optional part of a query. It goes after the WHERE clause or the FROM clause if the WHERE clause is not needed.
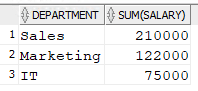
For instance, you want to know the total salary of a department. You should use the SUM aggregate function and group the data by departments.
|
1 |
SELECT Department ,Sum(Salary) FROM Employee GROUP BY Department; |
In our data set, this will return:
Filtering Groups of Data
The HAVING clause in SQL is used in conjunction with the GROUP BY clause to filter groups based on a specific condition. The HAVING clause operates on the results of the aggregate function, whereas the WHERE” clause operates on individual rows.
|
1 2 3 4 5 6 |
SELECT fieldname1, fieldname2, ... fieldname_n, aggregate_function (aggregate_fieldname) FROM tables WHERE conditions GROUP BY fieldname1, fieldname2, ... fieldname_n HAVING aggregate_condition; |
The aggregate condition is the condition that you want to apply to the groups of data, using the results of the aggregate function. For example, you could specify HAVING AVG(fieldname2) > value to only show the groups where the average of fieldname2 is greater than a certain value.
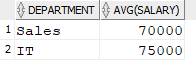
For an example, the following query returns the average salary for all departments that have an average over 61000 using the HAVING clause.
|
1 2 3 |
SELECT Department, AVG(salary) FROM Employee GROUP BY Department HAVING AVG(Salary) > 61000; |
The result is:
Summary
In this introduction to the SELECT statement in Oracle, we have looked at how to query a single table, return only certain columns, put that data into a specified order, filter it down to a set of (if desired, distinct) rows, and then group that data and do aggregates.
It is a lot in one introduction, but the SELECT statement is the one statement that pretty much every Oracle user of any level will use. In the future, I will look at querying multiple tables at the same time, as well as how to create and remove data from a database.
This document contains proprietary information and is protected by copyright law.
Copyright © 2026 Red Gate Software Limited. All rights reserved


Load comments