
Oracle’s INSERT, UPDATE, and DELETE statements are the core DML (Data Manipulation Language) commands for modifying table data. INSERT adds new rows using single-row syntax, INSERT ALL for multi-table inserts, or INSERT from SELECT for bulk operations. UPDATE modifies existing rows with SET clauses that support single-column, multi-column, and subquery-based updates. DELETE removes rows based on WHERE conditions. Because Oracle implicitly starts a transaction after every DML statement, you must issue COMMIT to save changes or ROLLBACK to undo them – changes are not visible to other sessions until committed.
Introduction
In this article, we’ll be focusing on three of the most used SQL commands in Oracle: INSERT, UPDATE, and DELETE. These commands are used to insert new data into tables, update existing data, and delete data from tables, respectively.
In this article I will take a closer look at each of these statements and how they are used in Oracle. Please note the INSERT, UPDATE, and DELETE statements can only be used on tables that you have been granted the privilege to execute these commands.
Note that by default, Oracle implicitly starts a transaction after every statement. Because of this, you must use the COMMIT or ROLLBACK statements to manage these transactions after you attempt to make your changes to the contents of a table (the transaction starts even if no data is modified, like if you have a WHERE clause that does not return FALSE for any rows.) For more detail on Oracle transactions, see Transactions in the Oracle documentation)
A transaction is a sequence of one or more SQL statements that are treated as a single unit of work. Once you have made your changes, you need to execute one of the following statements:
- COMMIT: This statement is used to permanently save the changes made during a transaction. When you issue a
COMMITstatement, all the changes made during the transaction are made permanent and cannot be undone. After theCOMMITstatement is executed, a new transaction begins. - ROLLBACK: This statement is used to undo the changes made during a transaction. When you issue a
ROLLBACKstatement, all the changes made during the transaction are undone, and the database is restored to its previous state. After theROLLBACKstatement is executed, a new transaction begins.
It’s important to use COMMIT and ROLLBACK statements carefully to ensure data integrity. If a transaction is not committed, the changes made during the transaction will not be visible to other users or applications and could hinder their work. If a transaction is rolled back, any changes made during the transaction will be lost.
Here’s an example of an "Employee" table: You can use the following SQL script to create the "Employee" table. We will use this table to learn to insert, update and delete commands.
Note: In our following CREATE TABLE Statement, we utilized the Oracle NOT NULL constraint for Name, LastName, and Dob columns, which ensures that a column cannot store NULL values. These constraints are inline and commonly included in the column definition of a CREATE TABLE statement. When you define one or more columns as the primary key for a table, it automatically includes the NOT NULL constraint, which prohibits NULL values from being inserted into that column. If you try to insert a NULL value into a primary key column, or one defined as NOT NULL, Oracle SQL will raise an error.
Additionally in Oracle SQL, a default constraint sets a value that is automatically assigned to a column when a new row is inserted into a table and a value for that column is not specified. The default value is specified when the table is created using the DEFAULT keyword. we have defined the DEFAULT value 'Unknown' for the "Department" column.
SQL script to create the "Employee" table.
|
1 2 3 4 5 6 7 8 9 |
CREATE TABLE Employee ( EmployeeId INT PRIMARY KEY, Name VARCHAR(50) NOT NULL, LastName VARCHAR(50) NOT NULL, FirstName VARCHAR(50) NOT NULL, Department VARCHAR(50) DEFAULT 'Unknown', Dob DATE NOT NULL, Salary DECIMAL(10, 2) NOT NULL ); |
The INSERT Statement
In this section I will cover the typical uses of the INSERT statement. The Oracle INSERT statement is very similar to other RDBMS platforms, but it also has several, quite useful differences.
INSERT Statement Basic Syntax:
The SQL INSERT statement is used to add new data to a database. There are different types of SQL INSERT statements, each with its syntax and usage. The basic INSERT statement is used to insert a single row of data into a table, while the other types are used for more complex data insertion operations.
The basic INSERT command is used to add new data to a table in Oracle. The syntax for this command is as follows:
|
1 2 |
INSERT INTO table_name (column1, column2, ..., columnN) VALUES (value1, value2, ..., valueN); |
In this syntax, table_name is the name of the table you want to insert data into, and column1 through columnN are the names of the columns you want to insert data into. The VALUES keyword is followed by a comma-separated list of values that correspond to the columns you specified earlier.
In this section, we will cover the following different ways of writing SQL INSERT statements.
- Single row
INSERTstatement. INSERTALLstatements.INSERTfromSELECTstatement.
Single row INSERT statement
A single-row INSERT statement inserts a single row into a table. Let’s consider an example to understand this statement better. Using the table named "Employee" as defined at the beginning of the article, to insert a new employee row into this table, you can use the following INSERT statement:
|
1 2 3 4 5 |
INSERT INTO Employee (EmployeeId, Name, LastName, FirstName, Department, Dob, Salary) VALUES ('1000', 'Allen Cox', 'Cox', 'Allen', 'IT', TO_DATE('01-July-1982', 'DD-MM-YYYY'),75000); COMMIT; |
This statement will add a new row to the "Employee" table with the specified values.
Now let’s see what happens if we don’t specify the "Department" column in our INSERT statement because we already defined a default value for the "Department" column in the CREATE TABLE statement.
|
1 2 3 4 5 6 |
INSERT INTO Employee (EmployeeId, Name, LastName, FirstName, Dob, Salary) VALUES ('1001', 'Allen Cox', 'Cox', 'Allen', TO_DATE('01-July-1982', 'DD-MM-YYYY'),75000); COMMIT; |
You will notice that the "Department" column has the default value 'Unknown', which is automatically assigned because we omitted the column from the INSERT statement.
Output:
![]()
Note: It is not required to specify the columns in the INSERT statement. So, the following is allowed:
|
1 2 3 4 5 |
INSERT INTO Employee VALUES ('1001', 'Allen Cox', 'Cox', 'Allen', TO_DATE('01-July-1982', 'DD-MM-YYYY'),75000); COMMIT; |
This will be covered later in the article in more detail, but you should always specify the columns for the INSERT statement in code that is meant to be executed sometime in the future. The time savings of not including the list of columns is so much less than when there are changes to the underlying table and the code breaks and must be supported.
Inserting Multiple Rows at a time
In this section, I will cover the multiple ways that you can insert more than a single row at a time.
Multiple Batches
Perhaps this is obvious, but one straightforward way is to insert more than a few rows, is to create a script with multiple inserts in a batch. The script above will put five records into the Employee table.
|
1 2 3 4 5 6 7 8 9 10 11 12 13 14 15 16 17 18 19 20 21 22 23 24 25 26 27 |
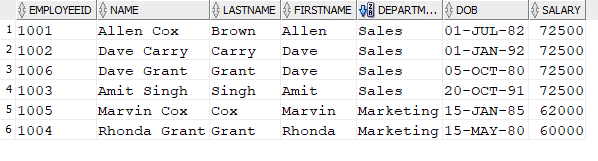
INSERT INTO Employee (EmployeeId, Name, LastName, FirstName, Department, Dob, Salary) VALUES ('1002', 'Dave Carry', 'Carry', 'Dave', 'Sales', TO_DATE('01-Jan-1992', 'DD-MM-YYYY'),70000); INSERT INTO Employee (EmployeeId, Name, LastName, FirstName, Department, Dob, Salary) VALUES ('1003', 'Amit Singh','Singh', 'Amit', 'Sales', TO_DATE('20-Oct-1991', 'DD-MM-YYYY'),50000); INSERT INTO Employee (EmployeeId, Name, LastName, FirstName, Department, Dob, Salary) VALUES ('1004', 'Rhonda Grant', 'Grant', 'Rhonda', 'Marketing', TO_DATE('15-May-1980', 'DD-MM-YYYY'),60000); INSERT INTO Employee (EmployeeId, Name, LastName, FirstName, Department, Dob, Salary) VALUES ('1005', 'Marvin Cox', 'Cox', 'Marvin', 'Marketing', TO_DATE('15-Jan-1985', 'DD-MM-YYYY'),62000); INSERT INTO Employee (EmployeeId, Name, LastName, FirstName, Department, Dob, Salary) VALUES ('1006', 'Dave Grant', 'Grant', 'Dave', 'Sales', TO_DATE('05-Oct-1980', 'DD-MM-YYYY'),90000); COMMIT; |
Rerun the SELECT statement using the "Employee" table now looks like this:
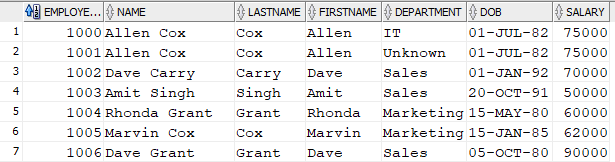
If there are errors in any of the rows, you can ROLLBACK the transaction and none of the new rows would be created.
Read also: Converting a single instance to Oracle RAC
INSERT ALL statement
The INSERT ALL statement in Oracle allows you to insert multiple rows into one or more tables using a single statement. It is useful when you need to insert data into multiple tables based on a single source of data.
Syntax:
|
1 2 3 4 5 6 7 8 9 10 11 |
INSERT ALL INTO table1 (column1, column2, ...) VALUES (value1, value2, ...) INTO table2 (column1, column2, ...) VALUES (value1, value2, ...) INTO table3 (column1, column2, ...) VALUES (value1, value2, ...) Subquery; |
In the original statement, it is required that each value expression value1, value2, or value3 refers to a column returned by the select list of the subquery. It is important to note that the column names and values must match in each INTO and VALUES clause. Also, the number of columns and their data types must be compatible between the INTO clause and the corresponding VALUES clause.
However, to use literal values instead of values returned by the subquery, you can utilize the following subquery:
SELECT * FROM dual;
Here’s an example:
Suppose we have two tables: "Employee" and "Address". The "Employee" table is the same as the one we created at the beginning of the article. The "Address" table is as follows:
|
1 2 3 4 5 6 7 8 |
CREATE TABLE Address ( EmployeeId NUMBER PRIMARY KEY, Address_Line1 VARCHAR2(100), Address_Line2 VARCHAR2(100), City VARCHAR2(50), State VARCHAR2(50), Country VARCHAR2(50) ); |
Let’s say we want to insert data into both tables using a single INSERT ALL statement. We can do this as follows:
|
1 2 3 4 5 6 7 8 9 10 11 12 13 14 |
INSERT ALL INTO Employee (EmployeeId, Name, LastName, FirstName, Department, Dob, Salary) VALUES ('1007', 'Ram Singh', 'Singh', 'Ram', 'IT', TO_DATE('08-July-1982', 'DD-MM-YYYY'),75000) INTO Address (EmployeeId, Address_Line1, City, State, Country) VALUES ('1007', '123 Main St', 'Anytown', 'CA', 'USA') SELECT * FROM dual; COMMIT; |
In this example, we are inserting data into two tables, "Employee" and "Address". The SELECT * FROM dual statement at the end is required because the INSERT ALL statement requires a subquery (in this case a SELECT statement) at the end.
The first INTO clause specifies that we want to insert data into the "Employee" table, and the second INTO clause specifies that we want to insert data into the "Address" table. The SELECT statement at the end specifies the data we want to insert.
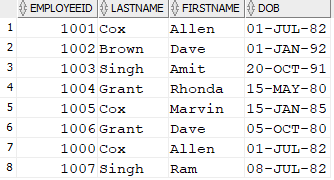
After executing this statement, the "Employee" table would contain the following row: ![]()
And the "Address" table would contain the following row:

INSERT ALL subquery example
Suppose we have two tables, "Name" and "Salary" and we want to insert records into both tables using a single INSERT ALL statement. We’ll INSERT the employee’s salary and name details from the "Employee" table.
You can create "Name" and "Salary" table using the following code:
|
1 2 3 4 5 6 7 8 9 10 11 |
CREATE TABLE Name ( EmployeeId NUMBER PRIMARY KEY, LastName VARCHAR(50) NOT NULL, FirstName VARCHAR(50) NOT NULL, Dob DATE NOT NULL ); CREATE TABLE Salary ( EmployeeId NUMBER PRIMARY KEY, Salary DECIMAL (10, 2) NOT NULL ); |
Let’s now write an INSERT statement to insert the data.
|
1 2 3 4 5 6 7 8 9 10 |
INSERT ALL INTO Name (EmployeeId, LastName , FirstName , Dob) VALUES (EmployeeId, LastName , FirstName , Dob) INTO Salary (EmployeeId , Salary) VALUES (EmployeeId , Salary) SELECT EmployeeId, LastName , FirstName , Dob, Salary FROM Employee ; |
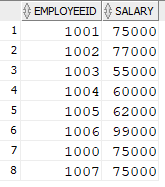
The data in the “Name” table appears as shown after executing the INSERT ALL statement mentioned above.
Output of the "Salary" Table:
INSERT from SELECT statement
The INSERT INTO SELECT statement is used to insert data into a table from another table. This can be useful when you need to copy data from one table to another or when you need to modify the data in some way before inserting it into the new table.
The syntax for the INSERT INTO SELECT statement is as follows:
|
1 2 3 4 |
INSERT INTO table_name (column1, column2, ..., columnN) SELECT column1, column2, ..., columnN FROM source_table WHERE condition; |
Just like for the single-row usage of the INSERT statement, table_name is the name of the table you want to insert data into, and column1 through columnN are the names of the columns you want to insert data into.
The SELECT keyword is followed by a list of columns from the source table, and the FROM keyword is followed by the name of the source table. The WHERE keyword is optional and allows you to filter the data before inserting it into the new table.
For example, the following SQL statement would copy all rows from the "Employee" table where the "Department" column is "Sales" into a new table called "Sales_Employee".
Use the following SQL to create the "Sales_Employee" table.
|
1 2 3 4 5 6 |
CREATE TABLE Sales_Employee ( EmployeeId varchar(15) Primary key, Name varchar(15), Dob DATE, Salary NUMBER(8,0) ); |
Use the following SQL to insert the data into the "Sales_Employee" table.
|
1 2 3 4 5 6 |
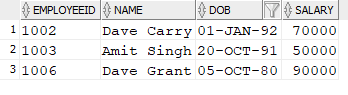
INSERT INTO Sales_Employee(EmployeeId, Name, Dob, Salary) SELECT EmployeeId, Name, Dob, Salary FROM Employee WHERE Department = 'Sales'; COMMIT; |
The SQL statement above will put three records into the "Sales_Employee" table. The output of the SELECT statement from the "Sales_Employee" table looks like this.
Insert Data Without Using an Explicit Column List
This brings us to a discussion of INSERT statements that do not specify a column list. It is a useful technique when doing quick, ad-hoc work, but it has limitations.
In previous examples, we provided values for all columns of the table. This approach allows you to choose only the columns you wish to create data for (and let the NULL and/or default constraints handle the other columns.) If you do not include all columns, you must ensure that the values are in the same order as the columns are declared in the table.
In this case, the INSERT INTO syntax would be as follows:
|
1 2 3 4 |
INSERT INTO table_name VALUES (value1, value2, value3, ...); COMMIT; |
So for example, you could write the following statement to add rows from “Employee” into the “Sales_Employee” table:
|
1 2 3 4 5 |
INSERT INTO Sales_Employee SELECT EmployeeId, Name, Dob, Salary From Employee WHERE Department = 'Sales'; COMMIT; |
This is a valid way to write an INSERT statement. It is generally a good practice to specify the column list when inserting data into a table in Oracle SQL. By specifying the column list, you explicitly state which columns the data is being inserted into, and in which order.
This can help prevent errors and ensure that the data is inserted into the correct columns. While this may not seem like a big deal, if the structure of the table changes and you execute this statement, the best case is that you receive an error. Worst case data is inserted that makes no sense.
There are several reasons why it is considered good practice to specify the column list:
- Clarity: By specifying the column list, you make it clear which columns are being populated with data. This can make your code more readable and easier to understand.
- Maintenance: Specifying the column list can make it easier to maintain your code in the long term. If you or another developer need to modify the code or data structures later, it will be easier to understand and modify if the column list is explicitly stated.
- Performance: In some cases, not specifying the column list can result in slower performance. If you do not specify the column list, Oracle SQL will have to perform additional work to determine which columns the data should be inserted into. This can result in slower insert times, especially for large datasets.
There are some cases where not specifying the column list may be acceptable. For example, if you are inserting data into a table with a very small number of columns, and the order of the columns is unlikely to change, you may be able to omit the column list without much risk.
In general, it is recommended to always specify the column list when inserting data into a table in Oracle SQL, unless you have a good reason not to.
Read also:
Oracle System Change Number explained
Exporting data from MySQL using SELECT INTO OUTFILE
UPDATE Statement:
The UPDATE statement is used in Oracle SQL for modifying data in a table. It allows you to change the values of one or more columns in one or more rows of a table based on specified conditions.
UPDATE Syntax:
The basic syntax of the UPDATE statement is as follows:
|
1 2 3 4 5 6 |
UPDATE table_name SET column1 = <strong>scalar_</strong>expression1, column2 = <strong>scalar_</strong>expression2, ..., columnN = <strong>scalar_</strong>expression2 WHERE condition; |
In this syntax:
table_nameis the name of the table you want to update.column_nameis the name of the column you want to update.scalar_expressionis the expression that calculates the new value for the column. This can be a constant, a function call, a column reference, an arithmetic expression, or a string expression.conditionis an optional condition that specifies which rows to update. If omitted, all rows in the table will be updated. Let’s consider an example to understand this statement better.
Examples:
Suppose you want to update the salary of the employee with an “EmployeeId" of 1002 to 80000.
Before executing the UPDATE statement, the data in the "Employee" table looks like the following:

You can use the following UPDATE statement.
|
1 2 3 4 5 |
UPDATE Employee SET Salary = 80000 WHERE EmployeeId = 1002; COMMIT; |
After executing the UPDATE statement, the data in the "Employee" table will look like the following as we can see the Salary column is updated to 80000.
![]()
As an example of updating multiple columns, let’s edit “Salary", “Department", and “LastName" column values using a single UPDATE statement. Before executing the UPDATE statement, the data in the "Employee" table looks like the following:
![]()
|
1 2 3 4 5 6 7 |
UPDATE Employee SET Salary = 70000, Department='Sales', LastName='Brown' WHERE EmployeeId = 1002; COMMIT; |
After running the UPDATE statement, you would notice that the “Salary", “Department", and “LastName" column values for "EmployeeId" 1002 have been updated to this.

Now let’s use an arithmetic expression to update the "Salary" column in the "Employee" table:
Before executing the UPDATE statement, the data in the "Employee" table looks like the following:

Now run the following UPDATE statement:
|
1 2 3 4 5 |
UPDATE Employee SET Salary = Salary * 1.1 WHERE department = 'Sales'; COMMIT; |
We are using an arithmetic expression to update the salary column of all employees in the Sales department. The SET clause sets the "Salary" column to the current value of salary multiplied by 1.1, effectively giving all sales employees a 10% raise.

Update using a subquery:
The following statement will update the "Salary" column of all rows in the "Employee" table where the "Department" column equals 'Sales' to the average salary of employees in the Sales department.
|
1 2 3 4 5 6 7 8 9 |
UPDATE Employee SET Salary = ( SELECT AVG(Salary) FROM Employees WHERE Department = 'Sales' ) WHERE Department = 'Sales'; COMMIT; |
After running the UPDATE statement, you would notice the following change in the Salary Column of table “Employee”.
Tips for Using the UPDATE Statement
- Pay attention to the WHERE clause: Use the
WHEREclause to specify which rows you want to update. This will help to improve performance and prevent accidental updates to the wrong rows. If you omit theWHEREclause, you risk updating all rows in the table. - Keep backups of your data: Be careful when using the
UPDATEstatement in a production environment. Always make sure you have a backup of your data before performing any modification operations. This can help you recover your data in case of a mistake or error. - Use subqueries carefully: Subqueries can be a powerful tool when working with the
UPDATEstatement, as they allow you to update data based on the results of another query. However, subqueries can also be slow and resource-intensive, especially if they are used to update a large number of rows. Use subqueries carefully and only when necessary. - Test your UPDATE statement first: Before running an
UPDATEstatement on a production database, it is important to test it on a smaller dataset to ensure that it is working correctly. This can help you identify any syntax errors or other issues before you make changes to your live data.
Read also:T-SQL equivalents for INSERT and UPDATE
DELETE Statement:
The DELETE statement is used to remove one or more rows from a table. The DELETE statement is utilized for managing data in a database, and it is essential to understand how to use it effectively.
DELETE Basic Syntax:
|
1 2 |
DELETE FROM table_name WHERE condition; |
In this syntax, ‘table_name’ is the name of the table from which you want to delete rows, and ‘condition’ is an expression that evaluates to true or false for each row in the table. If the condition is true for a row, that row will be deleted.
For example, the following SQL statement would delete all rows from the “Employee” table where the “Department” column is ‘Sales’.
|
1 2 3 4 |
DELETE FROM Employee WHERE Department = 'Sales'; COMMIT; |
If you want to delete all rows from a table, you can omit the WHERE clause:
|
1 |
DELETE FROM table_name; |
This statement will delete all rows from the specified table.
For example, the following SQL statement would delete all rows from the “Employee” table.
|
1 2 3 |
DELETE FROM Employee; COMMIT; |
Deleting Data using a subquery
In some cases, you may need to delete rows based on values in another table. Oracle allows you to do this using the DELETE statement with a subquery. The subquery is used to specify which rows to delete from the target table.
The syntax for deleting data from multiple tables using a subquery is as follows:
|
1 2 3 4 |
DELETE FROM table_name1 WHERE column_name IN (SELECT column_name FROM table_name2 WHERE condition); |
In this syntax, table_name1 is the target table, and table_name2 is the source table. The subquery in parentheses is used to select the rows to delete from the target table based on the specified condition.
For example, the following SQL statement would delete all employees from the “Employee” table whose Salary is greater than 60000 in the "Sales_Employee" table.
|
1 2 3 4 5 6 |
DELETE FROM Employee WHERE Employeeid IN (SELECT Employeeid FROM Sales_Employee WHERE SALARY > 60000); COMMIT; |
Tips for Using the DELETE Statement
- Pay attention to the
WHEREclause to specify the conditions for deleting rows. If you omit theWHEREclause, you risk deleting all rows in the table. (Which is quite bad if not what you expected to do.) - It’s important to exercise caution when using the
DELETEstatement to remove a large number of rows in a production environment. Always make sure you have a backup of your data before performing any deletion operations. - Use the
TRUNCATEstatement instead ofDELETEwhen you need to delete all rows from a table.TRUNCATEis much faster thanDELETEfor this purpose. (Note thatTRUNCATEhas limitations and security differences toDELETE, for more detail onTRUNCATE, check out the Oracle documentation here.)
Summary
In this article, we have looked at the usage of SQL commands, INSERT, UPDATE, and DELETE in Oracle, one of the most widely used relational database management systems. The article focuses on the basic syntax and types of SQL INSERT statements in Oracle, including single row and inserts from SELECT statements with examples.
Additionally, it covers the basic syntax of UPDATE and DELETE statements in Oracle. These commands help in manipulating the data in the database efficiently. We learned to add new data, update existing data, and delete data from a table, respectively followed by some tips.
FAQs: INSERT, UPDATE and DELETE statements in Oracle
1. How do you insert multiple rows in Oracle?
Oracle supports several approaches for multi-row inserts. Use INSERT ALL to insert into one or more tables from a single statement, specifying each INTO clause with its target table and values. For bulk inserts from existing data, use INSERT INTO … SELECT to copy rows from one table to another based on a query. Oracle does not support the multi-row VALUES syntax used in SQL Server (INSERT INTO table VALUES (row1), (row2)), so INSERT ALL or INSERT from SELECT are the standard approaches.
2. What is the difference between DELETE and TRUNCATE in Oracle?
DELETE removes specific rows based on a WHERE condition and generates redo/undo data, meaning the operation can be rolled back with ROLLBACK. TRUNCATE removes all rows from a table instantly without generating row-level undo – it’s a DDL command that auto-commits and cannot be rolled back. Use DELETE when you need to remove specific rows or need the ability to undo the operation. Use TRUNCATE when you need to empty an entire table quickly.
3. How do you update multiple columns in a single Oracle UPDATE statement?
In the SET clause of an UPDATE statement, list each column assignment separated by commas: UPDATE table_name SET column1 = value1, column2 = value2, column3 = value3 WHERE condition. You can also use a subquery to update multiple columns from another table: UPDATE table_name SET (column1, column2) = (SELECT col_a, col_b FROM other_table WHERE …) WHERE condition.
4. Why are my Oracle INSERT or UPDATE changes not visible to other users?
Oracle uses an implicit transaction model – every DML statement starts a transaction automatically. Your changes are only visible to your own session until you issue a COMMIT statement. Other users will see the data as it existed before your transaction began. This is Oracle’s read consistency mechanism, powered by the System Change Number (SCN). If you need to undo your changes, use ROLLBACK before committing.
This document contains proprietary information and is protected by copyright law.
Copyright © 2026 Red Gate Software Limited. All rights reserved


Load comments