
This article walks through each of the five MySQL constraint type with CREATE TABLE and ALTER TABLE syntax, INSERT and UPDATE examples showing what happens when constraints are violated, naming patterns for constraint names (useful for targeted DROP CONSTRAINT and constraint-violation error messages), and the performance and locking considerations for each type.
Prerequisite: basic MySQL familiarity and a MySQL 8.0+ instance for the CHECK constraint examples.
This article is part of Robert Sheldon's continuing series on Learning MySQL. To see all of the items in the series, click here.
MySQL provides a set of constraints that you can include in your table definitions to help ensure the integrity of the data. The constraints let you better control the types of data that can be added to the database. For example, you can use constraints to set a column’s uniqueness or nullability, specify a default value for a column, or verify that the data falls within a certain range of acceptable values.
MySQL supports six basic types of constraints for ensuring data integrity: PRIMARY KEY, NOT NULL, DEFAULT, CHECK, UNIQUE, and FOREIGN KEY. In this article, I introduce you to each constraint type and provide examples for how they work. The examples include a series of CREATE TABLE statements that demonstrate different ways to incorporate constraints into your table definitions. If you’re not familiar with the CREATE TABLE statement or how to create tables in a MySQL database, refer to an earlier article in this series that introduces you to the statement.
Some resources also consider data types to be constraints because they limit the types of data that can be inserted into a table’s columns. For example, a column configured with an integer data type will take whole numbers but not decimals or string values. I do not cover data types in this article and instead focus only the six other constraint types. For information about data types, see the MySQL article Data Types.
Note: The examples in this article are based on a local instance of MySQL that hosts a very simple database. The last section of the article—“Appendix: Preparing your MySQL environment”—provides information about how I set up my environment and includes a SQL script for creating the database I used when building these examples.
PRIMARY KEY constraints
A PRIMARY KEY constraint provides a mechanism for uniquely identifying each row in a table. It is defined on one or more of a table’s columns (the key columns) to ensure the row’s uniqueness. When you add a PRIMARY KEY constraint to a table, MySQL also creates a unique index on the key columns to enforce their uniqueness.
A table can have only one primary key, and the key columns must be defined as NOT NULL. If they are not explicitly defined as NOT NULL, MySQL implicitly declares them as such to ensure that each row in the table has an associated primary key value. This is important because a unique index on its own can contain multiple NULL values, so NOT NULL is needed to guarantee that a unique identifier is associated with each row.
You can add a primary key to a table when you create the table. The easiest way to add a single-column primary key is to include it in the column definition, as in the following example:
|
1 2 3 4 5 6 7 |
DROP TABLE IF EXISTS airplanes; CREATE TABLE airplanes ( plane_id INT UNSIGNED PRIMARY KEY, plane VARCHAR(50), engine_type VARCHAR(50), engine_count TINYINT); |
The statement creates a primary key on the plane_id column. The column’s definition includes the PRIMARY KEY keywords, which tells MySQL to create a PRIMARY KEY constraint on that column when creating the airplanes table. MySQL creates the unique index at the same time.
That’s all you need to do to create a primary key. MySQL does the rest. If you want to create a primary key on multiple columns, you must define it separately from the column definition, which I’ll be discussing shortly.
Note: The CREATE TABLE statement in this example is preceded by a DROP TABLE statement that includes the IF EXISTS option. Because the examples in this article re-create the airplanes table, you should precede each example with the DROP TABLE statement if trying out the examples for yourself. Although I won’t be repeating the DROP TABLE statement going forward, this is the approach I used when I created and tested the examples for this article.
MySQL tracks all constraints defined on all the tables in a database. You can view the constraints by querying the TABLE_CONSTRAINTS table in the INFORMATION_SCHEMA, which tracks all database metadata. The following SELECT statement retrieves information about existing constraints in the travel database:
|
1 2 3 |
SELECT table_name, constraint_name, constraint_type FROM information_schema.table_constraints WHERE constraint_schema = 'travel'; |
The statement returns the results shown in the following figure. The results indicate that PRIMARY KEY constraints have been defined on the airplanes table and manufacturers table, which was created as part of the setup for this article.
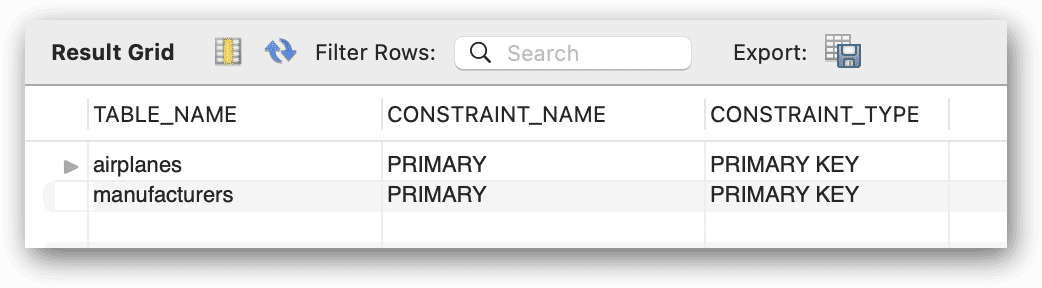
MySQL automatically assigns the name PRIMARY to each primary key constraint and to its associated unique index. Unlike other types of constraints, you cannot change these names. In addition, you should not use the name PRIMARY for any other indexes you create.
You can verify the PRIMARY KEY constraint in the airplanes table by running the following INSERT statement twice in a row:
|
1 2 3 |
INSERT INTO airplanes (plane_id, plane, engine_type, engine_count) VALUES (1001,'A340-600','Jet',4); |
The first time you run the statement, MySQL inserts the data with no problem, but when you run the same statement a second time, MySQL returns the following error because you violated the PRIMARY KEY constraint:
|
1 |
Error Code: 1062. Duplicate entry '1001' for key 'airplanes.PRIMARY' |
Another method you can use to define a PRIMARY KEY constraint is to add a separate constraint definition after the column definitions, as in the following example:
|
1 2 3 4 5 6 |
CREATE TABLE airplanes ( plane_id INT UNSIGNED, plane VARCHAR(50), engine_type VARCHAR(50), engine_count TINYINT, PRIMARY KEY (plane_id)); |
This CREATE TABLE statement achieves the same results as the previous CREATE TABLE statement. In this case, however, you must specify the column on which the primary key will be created. MySQL will then create a PRIMARY KEY constraint on plane_id column, naming the constraint and index PRIMARY.
In some cases, you might want to create a PRIMARY KEY constraint on multiple columns. For example, you might have two columns in a table that do no uniquely identify each row individually, but together they do. In the following example, the CREATE TABLE statement defines a primary key on the plane_id and alt_id columns:
|
1 2 3 4 5 6 7 |
CREATE TABLE airplanes ( plane_id INT UNSIGNED, alt_id INT UNSIGNED, plane VARCHAR(50), engine_type VARCHAR(50), engine_count TINYINT, PRIMARY KEY (plane_id, alt_id)); |
A primary key made up of multiple columns is sometimes referred to as a composite primary key. The need to use composite primary keys depends on the nature of your data. In this case, the plane_id and alt_id columns are used together to create a unique identifier for each row, making it possible for them to serve as the primary key. To test how this work, start by running the following INSERT statement:
|
1 2 3 |
INSERT INTO airplanes (plane_id, alt_id, plane, engine_type, engine_count) VALUES (1001,173,'A340-600','Jet',4); |
The statement should insert the data with no problem because there are no conflicting primary key values. Now run the next INSERT statement, which specifies the same plane_id value but a different alt_id value:
|
1 2 3 |
INSERT INTO airplanes (plane_id, alt_id, plane, engine_type, engine_count) VALUES (1001,174,'A340-600','Jet',4); |
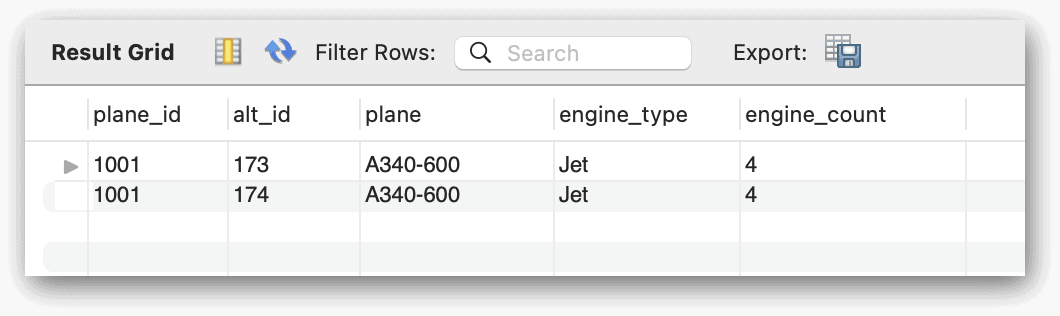
Once again, the INSERT statement should run without problem because together the values in the two columns are still unique. You can verify that the airplanes table now contains the two rows of data by running the following SELECT statement:
|
1 |
SELECT * FROM airplanes; |
The statement returns the results shown in the following figure, which indicates that the information in both rows is the same except for the alt_id values.
If you were to rerun the previous INSERT statement (or use the same plane_id and alt_id values in a different INSERT statement), MySQL would instead return the following error:
|
1 |
Error Code: 1062. Duplicate entry '1001-174' for key 'airplanes.PRIMARY' |
When defining primary keys on InnoDB tables, try to keep the key columns as short as possible to minimize storage overhead, such as using integers rather than 20-character strings. Each secondary index defined on an InnoDB table contains a copy of the primary key column for the corresponding rows, and the extra data can add up. Shorter key columns can also result in better query performance, depending on the type of queries.
MySQL schema comparison for faster, safer deployments
Note that you do not have to drop the entire table to change the constraint. Using the ALTER TABLE statement, you can drop the primary key constraint, and then recreate it.
|
1 2 3 4 5 6 7 |
--Remove the existing constraint ALTER TABLE airplanes DROP PRIMARY KEY; --Add the new PRIMARY KEY constraint ALTER TABLE airplanes ADD PRIMARY KEY (plane_id, alt_id); |
If you are new to MySQL, this syntax for altering a primary key may not be what you expect, but the PRIMARY KEY constraint has a set name, unlike in some other RDBMS types.
NOT NULL constraints
When defining a column in a CREATE TABLE statement, you can specify the column’s nullability, which determines whether the column accepts NULL values. A NULL value typically means that there is no data or that the column’s value is not known. This is different from a value of 0 or an empty string, although NULL is sometimes confused with these values. (A fair amount of confusion and debate continue to surround NULL, but this is a discussion well outside the scope of this article.)
You can specify a column’s nullability by including the keywords NULL or NOT NULL in the column definition. By default, MySQL permits NULL values, so if you don’t specify a nullability option, MySQL will assume NULL, unless the column is a primary key. If you do not want to permit NULL values, you must add the NOT NULL keywords to your column definitions, as in the following example:
|
1 2 3 4 5 6 7 |
CREATE TABLE airplanes ( plane_id INT UNSIGNED NOT NULL, alt_id INT UNSIGNED NOT NULL, plane VARCHAR(50) NOT NULL, engine_type VARCHAR(50) NOT NULL, engine_count TINYINT NOT NULL, PRIMARY KEY (plane_id)); |
The CREATE TABLE statement is the same as in the previous example, only now each column definition includes NOT NULL. You can test a column’s nullability by running a few INSERT statements, starting with the following:
|
1 2 3 |
INSERT INTO airplanes (plane_id, alt_id, plane, engine_type, engine_count) VALUES (1001,173,'A340-600','Jet',4); |
This statement should run with no problem because the statement provides a non-NULL value for all the columns, but now try to run the following INSERT statement, which specifies NULL as the engine_type value:
|
1 2 3 |
INSERT INTO airplanes (plane_id, alt_id, plane, engine_type, engine_count) VALUES (1002,174,'A350-800 XWB',NULL,2); |
This time MySQL returns the following error, which states that the engine_type value cannot be NULL:
|
1 |
Error Code: 1048. Column 'engine_type' cannot be null |
Instead of trying to insert a NULL value, you might try to insert the row without specifying an engine_type value:
|
1 2 3 |
INSERT INTO airplanes (plane_id, alt_id, plane, engine_count) VALUES (1002,174,'A350-800 XWB',2); |
This time you’ll get a different error message because MySQL doesn’t know what to do with the engine_type column:
|
1 |
Error Code: 1364. Field 'engine_type' doesn't have a default value |
If a default value is assigned to the column (a topic I’ll be discussing shortly), MySQL will insert that value into the column if no value is provided. Without a default value, MySQL returns an error.
However, this is true only if strict mode is enabled on your MySQL server, which is the default setting. If strict mode is disabled, MySQL will implicitly insert the data type’s default value, which in this case, is an empty string. This is because the data type for the engine_type column is VARCHAR, and MySQL uses an empty string as the implicit default value for all string types except ENUM.
Note: A discussion about strict mode and how to disable and enable it is beyond the scope of this article. For information about strict mode, see the MySQL topic Server SQL Modes.
At times, you might want to define a column to permit NULL values, in which case, you can specify NULL in the column definition, or you can omit the nullability option. (Many database teams prefer to include default settings in schema definitions as part of best practices.) The following CREATE TABLE statement sets the engine_type column to NULL:
|
1 2 3 4 5 6 7 |
CREATE TABLE airplanes ( plane_id INT UNSIGNED NOT NULL, alt_id INT UNSIGNED NOT NULL, plane VARCHAR(50) NOT NULL, engine_type VARCHAR(50) NULL, engine_count TINYINT NOT NULL, PRIMARY KEY (plane_id)); |
Now try to insert a row into the table without specifying the engine_type value:
|
1 2 3 |
INSERT INTO airplanes (plane_id, alt_id, plane, engine_count) VALUES (1001,173,'A340-600',4); |
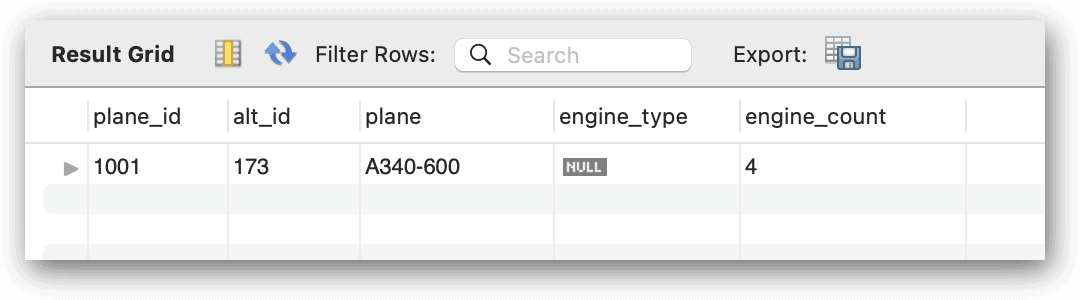
This time, MySQL will insert NULL for the column’s value, which you can confirm by querying the airplanes table:
|
1 |
SELECT * FROM airplanes; |
The following figure shows the results returned by the SELECT statement. As you can see, the engine_type value is set to NULL.
The debate over whether to support NULL values in a relational database has been going on for years (along with the debate about what NULL means). The extent to which you use NULL values will depend on the policies that your team has adopted. If you’re trying to limit the use of NULL, you can sometimes accommodate unknown values by adding DEFAULT constraints to your column definitions.
DEFAULT constraints
When creating or updating a table, you can add DEFAULT constraints to your column definitions. A DEFAULT constraint specifies the value to use for a column when an INSERT statement does not provide the value.
The default value can be a literal constant or a scalar expression. If you specify an expression, it must adhere to the following rules:
- The expression must be enclosed in parentheses.
- The expression can reference other columns, but it cannot depend on a column defined with
AUTO_INCREMENT. - The expression cannot include subqueries, parameters, variables, stored functions, or loadable functions. However, it can include operators, literals, or built-in functions (both deterministic and nondeterministic).
To add a literal DEFAULT constraint to a column definition, you need only specify the DEFAULT keyword, followed by a default value that conforms to the column’s data type. For example, the following CREATE TABLE statement defines a DEFAULT constraint on the engine_type column:
|
1 2 3 4 5 6 7 |
CREATE TABLE airplanes ( plane_id INT UNSIGNED NOT NULL, alt_id INT UNSIGNED NOT NULL, plane VARCHAR(50) NOT NULL, engine_type VARCHAR(50) NOT NULL DEFAULT 'unknown', engine_count TINYINT NOT NULL, PRIMARY KEY (plane_id)); |
In this case, the default value is the string unknown. You can test this out be running the following INSERT statement, which does not include a value for the engine_type column:
|
1 2 3 |
INSERT INTO airplanes (plane_id, alt_id, plane, engine_count) VALUES (1001,173,'A340-600',4); |
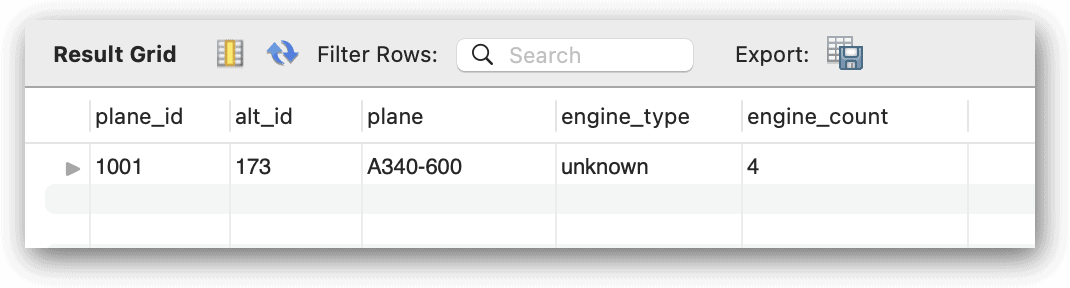
To verify that the default value has been added, you can run the following SELECT statement:
|
1 |
SELECT * FROM airplanes; |
The statement returns the results shown in the following figure, which indicates the engine_type column has a value of unknown.
As noted above, you can specify an expression for the default value, rather than a literal. For example, the following CREATE TABLE statement includes the create_date and last_update columns, which are defined with default values:
|
1 2 3 4 5 6 7 8 9 10 |
CREATE TABLE airplanes ( plane_id INT UNSIGNED NOT NULL, alt_id INT UNSIGNED NOT NULL, plane VARCHAR(50) NOT NULL, engine_type VARCHAR(50) NOT NULL DEFAULT 'unknown', engine_count TINYINT NOT NULL, create_date TIMESTAMP NOT NULL DEFAULT CURRENT_TIMESTAMP, last_update TIMESTAMP NOT NULL DEFAULT CURRENT_TIMESTAMP ON UPDATE CURRENT_TIMESTAMP, PRIMARY KEY (plane_id)); |
Both new columns use the CURRENT_TIMESTAMP function for the default value. The last_update column also includes the ON UPDATE CURRENT_TIMESTAMP clause, which instructs MySQL to update the column’s value when the row has been updated. However, this clause is not part of the DEFAULT clause. In both column definitions, the default expression is only the CURRENT_TIMESTAMP function.
You might have noticed that the DEFAULT clauses in the two column definitions do not enclose their expressions in parentheses. It turns out that the parentheses are not required when you use the CURRENT_TIMESTAMP function as the default value in TIMESTAMP or DATETIME columns. You can confirm that it works by running the following INSERT and SELECT statements:
|
1 2 3 4 5 |
INSERT INTO airplanes (plane_id, alt_id, plane, engine_type, engine_count) VALUES (1001,173,'A340-600','Jet',4); SELECT * FROM airplanes; |
The INSERT statement runs with no problem, and the SELECT statement returns the expected results, which are shown in the following figure. MySQL automatically adds the timestamps to the create_date and last_update columns. If you had enclosed the default expression in parentheses, you would have received the same results.

If you update the row in any way, MySQL will automatically update the last_update column with the current timestamp, providing a record for when the row last changed.
Accelerate and simplify database development with Redgate
CHECK constraints
Another type of constraint that MySQL supports is the CHECK constraint, which verifies that each data value inserted into a column meets the requirements specified by the constraint. A CHECK constraint defines an expression that must evaluate to TRUE or UNKNOWN (to accommodate NULL values) for a value to be added into the column. If the expression evaluates to FALSE, the insert or update fails, and MySQL issues a constraint violation.
A CHECK constraint can be specified within a column definition or after the column definitions. In either case, the constraint’s expression must adhere to the following rules:
- The expression cannot reference a column defined with
AUTO_INCREMENTor a column in another table. - The expression cannot include stored functions, loadable functions, procedure and function parameters, variables, or subqueries. However, the expression can include literals, operators, or deterministic built-in functions.
To create a CHECK constraint as part of a column definition, you need only specify the CHECK keyword, following by the expression. For example, the following CREATE TABLE statement defines a CHECK constraint on the wingspan column:
|
1 2 3 4 5 6 7 8 9 10 11 12 |
CREATE TABLE airplanes ( plane_id INT UNSIGNED NOT NULL, alt_id INT UNSIGNED NOT NULL, plane VARCHAR(50) NOT NULL, engine_type VARCHAR(50) NOT NULL DEFAULT 'unknown', engine_count TINYINT NOT NULL, wingspan DECIMAL(5,2) NOT NULL CHECK (wingspan BETWEEN 10 AND 400), create_date TIMESTAMP NOT NULL DEFAULT CURRENT_TIMESTAMP, last_update TIMESTAMP NOT NULL DEFAULT CURRENT_TIMESTAMP ON UPDATE CURRENT_TIMESTAMP, PRIMARY KEY (plane_id)); |
The CHECK constraint’s expression specifies that the wingspan value must be between 10 and 400. You can verify whether this works correctly by first running the following INSERT statement, which specifies a wingspan value of 208.17.
|
1 2 3 4 |
INSERT INTO airplanes (plane_id, alt_id, plane, engine_type, engine_count, wingspan) VALUES (1001,173,'A340-600','Jet',4,208.17); |
MySQL should insert the row without any issues because the wingspan value meets the criteria specified by the CHECK constraint, but now try to add a value that falls outside the acceptable range:
|
1 2 3 4 |
INSERT INTO airplanes (plane_id, alt_id, plane, engine_type, engine_count, wingspan) VALUES (1002,174,'A350-800 XWB','Jet',2,408.17); |
In this case, the specified wingspan value is 408.17, which causes MySQL to baulk and return the following error:
|
1 |
Error Code: 3819. Check constraint 'airplanes_chk_1' is violated. |
Notice that the error message refers to the constraint as airplanes_chk_1. This is the name that MySQL automatically assigned to the constraint when it was created. You can conform this by again querying the INFORMATION_SCHEMA, like you did after you added a primary key:
|
1 2 3 |
SELECT table_name, constraint_name, constraint_type FROM information_schema.table_constraints WHERE constraint_schema = 'travel'; |
The following figures shows the results returned by the SELECT statement, which include the newly added CHECK constraint:
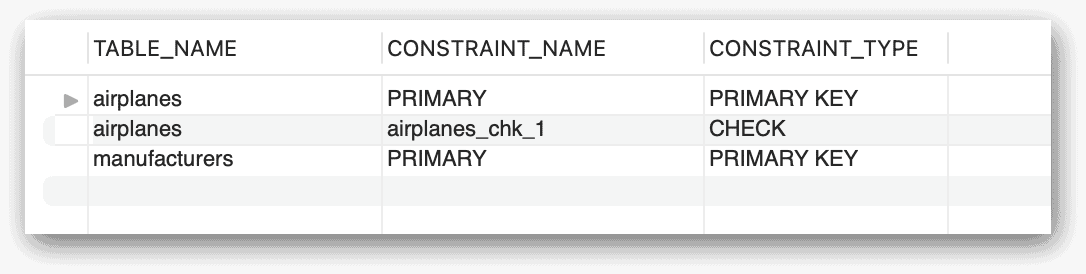
MySQL follows a specific formula when naming a constraint. For CHECK constraints, it uses the table name, followed by _chk_, and then followed by an ordinal number that is automatically incremented with each new CHECK constraint. However, you can provide a custom name for a CHECK constraint, as in the following example:
|
1 2 3 4 5 6 7 8 9 10 11 12 13 |
CREATE TABLE airplanes ( plane_id INT UNSIGNED NOT NULL, alt_id INT UNSIGNED NOT NULL, plane VARCHAR(50) NOT NULL, engine_type VARCHAR(50) NOT NULL DEFAULT 'unknown', engine_count TINYINT NOT NULL, wingspan DECIMAL(5,2) NOT NULL CONSTRAINT chk_wingspan CHECK (wingspan BETWEEN 10 AND 400), create_date TIMESTAMP NOT NULL DEFAULT CURRENT_TIMESTAMP, last_update TIMESTAMP NOT NULL DEFAULT CURRENT_TIMESTAMP ON UPDATE CURRENT_TIMESTAMP, PRIMARY KEY (plane_id)); |
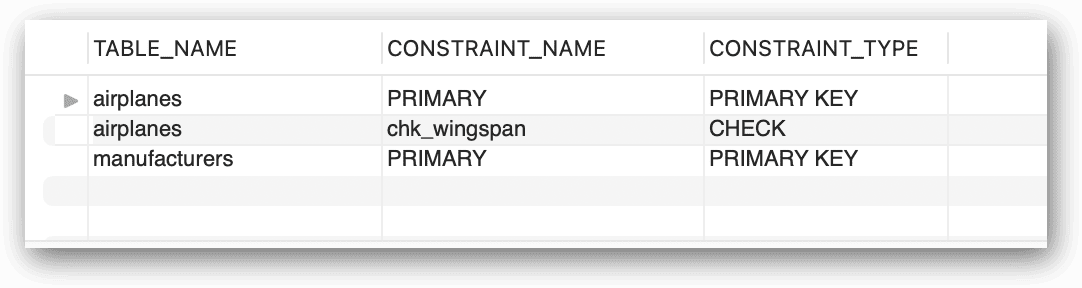
To name a CHECK constraint, you proceed the CHECK keyword with the CONSTRAINT keyword, followed by the constraint name, which in this case, chk_wingspan. Now when you query the INFORMATION_SCHEMA, the results should reflect the new name, as shown in the following figure.
When naming a CHECK constraint or certain types of constraints, the constraint name must be unique within the database and for the constraint type. This means you cannot create two CHECK constraints within the same database that are both named chk_wingspan, even if they’re defined on different tables. (When naming a constraint, be sure to follow your team’s naming conventions.)
You can also define a CHECK constraint after the column definitions, as you saw with PRIMARY KEY constraints:
|
1 2 3 4 5 6 7 8 9 10 11 12 13 |
CREATE TABLE airplanes ( plane_id INT UNSIGNED NOT NULL, alt_id INT UNSIGNED NOT NULL, plane VARCHAR(50) NOT NULL, engine_type VARCHAR(50) NOT NULL DEFAULT 'unknown', engine_count TINYINT NOT NULL, wingspan DECIMAL(5,2) NOT NULL, create_date TIMESTAMP NOT NULL DEFAULT CURRENT_TIMESTAMP, last_update TIMESTAMP NOT NULL DEFAULT CURRENT_TIMESTAMP ON UPDATE CURRENT_TIMESTAMP, PRIMARY KEY (plane_id), CONSTRAINT chk_wingspan CHECK (wingspan BETWEEN 10 AND 400)); |
This CREATE TABLE statement achieves the same results as the previous one, creating a CHECK constraint named chk_wingspan. One of the advantages of creating a CHECK constraint after the column definitions is that you’re not tied to a specific column, making it possible to reference multiple columns in your expression, as in the following example:
|
1 2 3 4 5 6 7 8 9 10 11 12 13 14 15 16 |
CREATE TABLE airplanes ( plane_id INT UNSIGNED NOT NULL, alt_id INT UNSIGNED NOT NULL, plane VARCHAR(50) NOT NULL, engine_type VARCHAR(50) NOT NULL DEFAULT 'unknown', engine_count TINYINT NOT NULL, wingspan DECIMAL(5,2) NOT NULL, plane_length DECIMAL(5,2) NOT NULL, create_date TIMESTAMP NOT NULL DEFAULT CURRENT_TIMESTAMP, last_update TIMESTAMP NOT NULL DEFAULT CURRENT_TIMESTAMP ON UPDATE CURRENT_TIMESTAMP, PRIMARY KEY (plane_id), CONSTRAINT chk_wingspan CHECK (wingspan BETWEEN 10 AND 400), CONSTRAINT chk_length CHECK (plane_length < (wingspan * 2))); |
The statement defines a CHECK constraint named chk_length. The constraint’s expression ensures that the plane_length value is always less than the wingspan value doubled. This is the sort of constraint you might create to avoid inserting anomalous data. You can test the constraint by running a couple INSERT statements, starting with the following statement:
|
1 2 3 4 |
INSERT INTO airplanes (plane_id, alt_id, plane, engine_type, engine_count, wingspan, plane_length) VALUES (1001,173,'A340-600','Jet',4,208.17,247.24); |
This INSERT statement should run with no problem because the plane_length value falls within the acceptable range, but suppose you now try to run the next statement, which specifies 498.58 as the plane_length value:
|
1 2 3 4 |
INSERT INTO airplanes (plane_id, alt_id, plane, engine_type, engine_count, wingspan, plane_length) VALUES (1002,174,'A350-800 XWB','Jet',2,212.42,498.58); |
Because the plane_length value exceeds the amount specified by the CHECK expression, MySQL returns the following error:
|
1 |
Error Code: 3819. Check constraint 'chk_length' is violated. |
MySQL CHECK constraints can be useful when you need to apply business rules that govern what is considered acceptable types of data. For this reason, CHECK constraints are often specific to the circumstances in which they’re implemented.
Constraints can be added and removed from a table using the ALTER TABLE statement, this time using the name of the constraint:
|
1 2 3 4 5 |
ALTER TABLE airplanes</code> <code> DROP CONSTRAINT chk_wingspan;</code> <code> ALTER TABLE airplanes</code> <code> ADD CONSTRAINT chk_wingspan </code> <code> CHECK (wingspan BETWEEN 10 AND 400); |
UNIQUE constraints
A UNIQUE constraint creates a unique index on one or more key columns. The index ensures the uniqueness of the data inserted into the columns. The only exception to this is the NULL value. Unlike some database management systems, MySQL permits its unique indexes to contain multiple NULL values. However, you can avoid the multiple values by configuring the column as NOT NULL.
The simplest way to define a UNIQUE constraint on a single column is to add it to the column definition. For example, the following CREATE TABLE statement defines a UNIQUE constraint on the alt_id column:
|
1 2 3 4 5 6 7 8 9 10 11 12 13 14 15 16 17 |
DROP TABLE IF EXISTS airplanes; CREATE TABLE airplanes ( plane_id INT UNSIGNED NOT NULL, alt_id INT UNSIGNED NOT NULL UNIQUE, plane VARCHAR(50) NOT NULL, engine_type VARCHAR(50) NOT NULL DEFAULT 'unknown', engine_count TINYINT NOT NULL, wingspan DECIMAL(5,2) NOT NULL, plane_length DECIMAL(5,2) NOT NULL, create_date TIMESTAMP NOT NULL DEFAULT CURRENT_TIMESTAMP, last_update TIMESTAMP NOT NULL DEFAULT CURRENT_TIMESTAMP ON UPDATE CURRENT_TIMESTAMP, PRIMARY KEY (plane_id), CONSTRAINT chk_wingspan CHECK (wingspan BETWEEN 10 AND 400), CONSTRAINT chk_length CHECK (plane_length < (wingspan * 2))); |
As with the other examples, you can test the constraint by running a couple INSERT statements, starting with the following one:
|
1 2 3 4 |
INSERT INTO airplanes (plane_id, alt_id, plane, engine_type, engine_count, wingspan, plane_length) VALUES (1001,173,'A340-600','Jet',4,208.17,247.24); |
The statement should run with no problem, but the next one will not because the alt_id value violates the UNIQUE constraint because the statement is trying to again insert 173:
|
1 2 3 4 |
INSERT INTO airplanes (plane_id, alt_id, plane, engine_type, engine_count, wingspan, plane_length) VALUES (1002,173,'A350-800 XWB','Jet',2,212.42,198.58); |
Not surprisingly, the statement returns the following error:
|
1 |
Error Code: 1062. Duplicate entry '173' for key 'airplanes.alt_id' |
As with other constraint types, you can also define a UNIQUE constraint after the column definitions, although you must also specify the column name:
|
1 2 3 4 5 6 7 8 9 10 11 12 13 14 15 16 17 |
CREATE TABLE airplanes ( plane_id INT UNSIGNED NOT NULL, alt_id INT UNSIGNED NOT NULL, plane VARCHAR(50) NOT NULL, engine_type VARCHAR(50) NOT NULL DEFAULT 'unknown', engine_count TINYINT NOT NULL, wingspan DECIMAL(5,2) NOT NULL, plane_length DECIMAL(5,2) NOT NULL, create_date TIMESTAMP NOT NULL DEFAULT CURRENT_TIMESTAMP, last_update TIMESTAMP NOT NULL DEFAULT CURRENT_TIMESTAMP ON UPDATE CURRENT_TIMESTAMP, PRIMARY KEY (plane_id), CONSTRAINT chk_wingspan CHECK (wingspan BETWEEN 10 AND 400), CONSTRAINT chk_length CHECK (plane_length < (wingspan * 2)), UNIQUE (alt_id)); |
After you add a UNIQUE constraint to a table definition, you can again query the INFORMATION_SCHEMA, which should give you the results shown in the following figure.
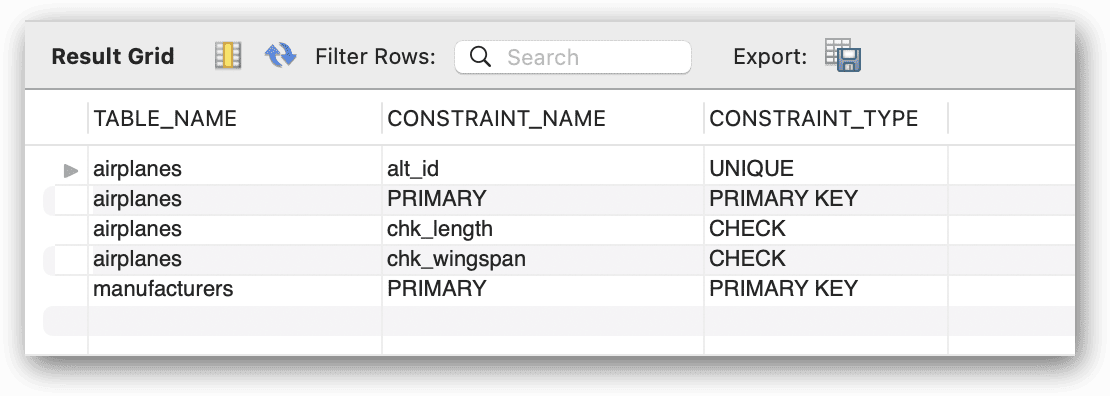
MySQL named the UNIQUE constraint alt_id, after the column on which the constraint is defined. MySQL also assigned this name to the associated index. However, you can provide a name for the constraint (and index), just like you can with CHECK constraints:
|
1 2 3 4 5 6 7 8 9 10 11 12 13 14 15 16 17 |
CREATE TABLE airplanes ( plane_id INT UNSIGNED NOT NULL, alt_id INT UNSIGNED NOT NULL, plane VARCHAR(50) NOT NULL, engine_type VARCHAR(50) NOT NULL DEFAULT 'unknown', engine_count TINYINT NOT NULL, wingspan DECIMAL(5,2) NOT NULL, plane_length DECIMAL(5,2) NOT NULL, create_date TIMESTAMP NOT NULL DEFAULT CURRENT_TIMESTAMP, last_update TIMESTAMP NOT NULL DEFAULT CURRENT_TIMESTAMP ON UPDATE CURRENT_TIMESTAMP, PRIMARY KEY (plane_id), CONSTRAINT chk_wingspan CHECK (wingspan BETWEEN 10 AND 400), CONSTRAINT chk_length CHECK (plane_length < (wingspan * 2)), CONSTRAINT uc_alt_id UNIQUE (alt_id)); |
In this case, the name of the constraint is uc_alt_id, which you can again confirm by querying the INFORMATION_SCHEMA. You can also define a UNIQUE constraint on multiple columns, just like a primary key. In the following example, I define a composite UNIQUE constraint on the alt_id1 and alt_id2 columns.
|
1 2 3 4 5 6 7 8 9 10 11 12 13 14 15 16 17 18 |
CREATE TABLE airplanes ( plane_id INT UNSIGNED NOT NULL, alt_id1 INT UNSIGNED NOT NULL, alt_id2 INT UNSIGNED NOT NULL, plane VARCHAR(50) NOT NULL, engine_type VARCHAR(50) NOT NULL DEFAULT 'unknown', engine_count TINYINT NOT NULL, wingspan DECIMAL(5,2) NOT NULL, plane_length DECIMAL(5,2) NOT NULL, create_date TIMESTAMP NOT NULL DEFAULT CURRENT_TIMESTAMP, last_update TIMESTAMP NOT NULL DEFAULT CURRENT_TIMESTAMP ON UPDATE CURRENT_TIMESTAMP, PRIMARY KEY (plane_id), CONSTRAINT chk_wingspan CHECK (wingspan BETWEEN 10 AND 400), CONSTRAINT chk_length CHECK (plane_length < (wingspan * 2)), CONSTRAINT uc_alt_id UNIQUE (alt_id1, alt_id2)); |
A composite UNIQUE constraint works just like a composite PRIMARY KEY constraint, when it comes to inserting data. For example, the following two INSERT statements run with no problem, even though they specify the same alt_id1 value:
|
1 2 3 4 5 6 7 8 9 |
INSERT INTO airplanes (plane_id, alt_id1, alt_id2, plane, engine_type, engine_count, wingspan, plane_length) VALUES (1001,173,297,'A340-600','Jet',4,208.17,247.24); INSERT INTO airplanes (plane_id, alt_id1, alt_id2, plane, engine_type, engine_count, wingspan, plane_length) VALUES (1002,173,298,'A350-800 XWB','Jet',2,212.42,198.58); |
However, the next INSERT statement tries to add a pair of alt_id1 and alt_id2 values that already exist:
|
1 2 3 4 |
INSERT INTO airplanes (plane_id, alt_id1, alt_id2, plane, engine_type, engine_count, wingspan, plane_length) VALUES (1003,173,298,'A350-900','Jet',2,212.42,198.58); |
As expected, MySQL returns the following error:
|
1 |
Error Code: 1062. Duplicate entry '173-298' for key 'airplanes.uc_alt_id' |
Adding a UNIQUE constraint to a table definition is a fairly straightforward process. Keep in mind however, that MySQL uses the same name for both the constraint and the unique index, so don’t try to create another index with the same name.
Note: just as before, you can drop and alter a UNIQUE constraint using the ALTER TABLE statement.
FOREIGN KEY constraints
Another type of constraint that MySQL supports is the FOREIGN KEY constraint. This one is different from the other constraints in that it enables you to enforce referential integrity across tables. A foreign key establishes a relationship between a parent table and child table. The parent table holds the referenced column values, and the child table holds the referencing values.
Note: The topic of foreign keys is much more involved than what I can cover in this article in depth. This article aims to give you a big picture of all the MySQL constraints. For more specific information about foreign keys, I recommend that you review the MySQL article FOREIGN KEY constraints.
Although you can set up a FOREIGN KEY constraint that references a column in the same table (as you might do when working with hierarchical data), most foreign key relationships reference one or more columns in a different table. For example, the following CREATE TABLE statement defines a foreign key that references the manufacturer_id column in the manufacturers table:
|
1 2 3 4 5 6 7 8 9 10 11 12 13 14 15 16 17 18 19 20 |
CREATE TABLE airplanes ( plane_id INT UNSIGNED NOT NULL, alt_id INT UNSIGNED NOT NULL, plane VARCHAR(50) NOT NULL, manufacturer_id INT UNSIGNED NOT NULL, engine_type VARCHAR(50) NOT NULL DEFAULT 'unknown', engine_count TINYINT NOT NULL, wingspan DECIMAL(5,2) NOT NULL, plane_length DECIMAL(5,2) NOT NULL, create_date TIMESTAMP NOT NULL DEFAULT CURRENT_TIMESTAMP, last_update TIMESTAMP NOT NULL DEFAULT CURRENT_TIMESTAMP ON UPDATE CURRENT_TIMESTAMP, PRIMARY KEY (plane_id), CONSTRAINT chk_wingspan CHECK (wingspan BETWEEN 10 AND 400), CONSTRAINT chk_length CHECK (plane_length < (wingspan * 2)), CONSTRAINT uc_ids UNIQUE (plane_id, alt_id), FOREIGN KEY (manufacturer_id) REFERENCES manufacturers (manufacturer_id)); |
When defining a foreign key, you must specify the FOREIGN KEY clause, followed the name of the column on which you’re creating the foreign key. You must also include a REFERENCES clause that specifies the parent table and the target column within that table. In this case, the manufacturer_id column in the airplanes table is referencing the manufacturer_id column in the manufacturers table.
To test the foreign key, you can run the following INSERT statement, which uses 101 for the manufacturer_id value:
|
1 2 3 4 |
INSERT INTO airplanes (plane_id, alt_id, plane, manufacturer_id, engine_type, engine_count, wingspan, plane_length) VALUES (1001,173,'A340-600',101,'Jet',4,208.17,247.24); |
For the INSERT statement to run successfully, the manufacturers table must include a row with a manufacturer_id value of 101, which it does (assuming you created and populated the manufacturers table). But suppose you were to now run the following INSERT statement, which uses a manufacturer_id value that does not exist in the manufacturers table:
|
1 2 3 4 |
INSERT INTO airplanes (plane_id, alt_id, plane, manufacturer_id, engine_type, engine_count, wingspan, plane_length) VALUES (1002,175,'A350-800 XWB',121,'Jet',2,212.42,198.58); |
When you try to execute the statement, MySQL returns the following error:
|
1 2 3 |
Error Code: 1452. Cannot add or update a child row: a foreign key constraint fails (`travel`.`airplanes`, CONSTRAINT `ibfk_1` FOREIGN KEY (`manufacturer_id`) REFERENCES `manufacturers` (`manufacturer_id`)) |
As you can see in the message, MySQL has named the constraint airplanes_ibfk_1. What you don’t see is that MySQL also created a non-unique index on the manufacturer_id column in the airplanes table and named the index manufacturer_id.
As with other constraint types, you can assign a custom name to a foreign key. For this, you must precede the FOREIGN KEY clause with the CONSTRAINT keyword, followed the constraint name, as in the following example:
|
1 2 3 4 5 6 7 8 9 10 11 12 13 14 15 16 17 18 19 20 21 22 |
CREATE TABLE airplanes ( plane_id INT UNSIGNED NOT NULL, alt_id INT UNSIGNED NOT NULL, plane VARCHAR(50) NOT NULL, manufacturer_id INT UNSIGNED NOT NULL, engine_type VARCHAR(50) NOT NULL DEFAULT 'unknown', engine_count TINYINT NOT NULL, wingspan DECIMAL(5,2) NOT NULL, plane_length DECIMAL(5,2) NOT NULL, create_date TIMESTAMP NOT NULL DEFAULT CURRENT_TIMESTAMP, last_update TIMESTAMP NOT NULL DEFAULT CURRENT_TIMESTAMP ON UPDATE CURRENT_TIMESTAMP, PRIMARY KEY (plane_id), CONSTRAINT chk_wingspan CHECK (wingspan BETWEEN 10 AND 400), CONSTRAINT chk_length -- CHECK (wingspan < (plane_length / 2))); CHECK (plane_length < (wingspan * 2)), CONSTRAINT uc_ids UNIQUE (plane_id, alt_id), CONSTRAINT fk_manufacturer FOREIGN KEY (manufacturer_id) REFERENCES manufacturers (manufacturer_id)); |
Now both the constraint and associated index will be named fk_manufacturer, rather than the names assigned by MySQL. Again, be aware that the name must be unique within the data for the particular constraint type, so don’t try to create another foreign key with the same name, just like you should not try to create an index with the same name.
Getting started with MySQL constraints
MySQL constraints are one of the most important tools you have for ensuring the integrity of your data. But you need to understand how they work and how to implement them to realize their full potential. In this article, I’ve introduced you to the various types of constraints and the ways you can add them to your tables. I recommend that you learn more about each constraint type so you fully understand the ways in which it works and its limitations. A good place to start is with the MySQL topic CREATE TABLE statement. There you’ll find descriptions of each constraint type and links to additional information.
Appendix: Preparing your MySQL environment
For the examples for this article, I used a Mac computer that was set up with a local instance of MySQL 8.0.29 (Community Server edition) and MySQL Workbench. I also created the travel database and the manufacturers table. If you want to try out the examples, you should first run the following script against your MySQL instance:
|
1 2 3 4 5 6 7 8 9 10 11 12 13 14 15 |
--NOTE: if you have been working through the examples, --you may need to drop the existing database first (or use --a different database name.) CREATE DATABASE IF NOT EXISTS travel; USE travel; CREATE TABLE manufacturers ( manufacturer_id INT UNSIGNED NOT NULL, manufacturer VARCHAR(50) NOT NULL, create_date TIMESTAMP NOT NULL DEFAULT CURRENT_TIMESTAMP, last_update TIMESTAMP NOT NULL DEFAULT CURRENT_TIMESTAMP ON UPDATE CURRENT_TIMESTAMP, PRIMARY KEY (manufacturer_id) ); INSERT INTO manufacturers (manufacturer_id, manufacturer) VALUES (101,'Airbus'), (102,'Beagle Aircraft Limited'), (103,'Beechcraft'), (104,'Boeing'); |
The script creates the travel database, adds the manufacturers table, and inserts several rows into the table. Be aware, however that most of the examples in this article do not reference the manufacturers table. They simply use a CREATE TABLE statement to define different versions of the airplanes table to demonstrate various types of constraints. The manufacturers table is used only when explaining how to define a FOREIGN KEY constraint.
Brief summary
MySQL supports five types of constraints that let you enforce data integrity at the database level rather than relying on application code:
PRIMARY KEY
Uniquely identifies each row; combines NOT NULL and UNIQUE semantics; indexed automatically; one per table.
FOREIGN KEY
Enforces referential integrity between tables (orders.customer_id references customers.id); requires InnoDB storage engine for enforcement (MyISAM parses but doesn’t enforce).
NOT NULL
Column cannot contain NULL; equivalent to specifying ‘NOT NULL’ in the column definition.
DEFAULT
Column takes a specified default value when INSERT doesn’t provide one; MySQL 8.0+ supports expressions in defaults, not just literals.
CHECK (MySQL 8.0.16+)
Custom validation rule that rows must satisfy; earlier MySQL versions parsed CHECK syntax but silently ignored it, an infamous gotcha that tripped up MySQL users for years. The MySQL 8.0.16 CHECK enforcement closed that gap.
Simple Talk is brought to you by Redgate Software
This document contains proprietary information and is protected by copyright law.
Copyright © 2026 Red Gate Software Limited. All rights reserved


Load comments