
Executive Summary
MySQL joins combine rows from two or more tables based on related column values. This article covers all five MySQL join types: INNER JOIN (returns only matching rows from both tables), LEFT OUTER JOIN (all rows from the left table, matched rows from the right), RIGHT OUTER JOIN (all rows from the right table, matched rows from the left), FULL OUTER JOIN (all rows from both tables, matched and unmatched – simulated in MySQL using UNION), and CROSS JOIN (every row from the left table combined with every row from the right, producing a Cartesian product). Each type is explained with working MySQL 8 examples using a sample travel database.
This article is part of Robert Sheldon's continuing series on Learning MySQL. To see all of the items in the series, click here.
Tables in a MySQL database are commonly related to one another, often in multiple ways, and it is only by linking the tables together that you can derive meaningful information from the data. To connect these tables together, you can use the JOIN clause, which you include in your SELECT, DELETE, or UPDATE statements. The clause provides a structure for connecting the data from multiple tables, letting you specify which tables to join and under what conditions to join them.
MySQL supports three basic types of joins: inner joins, outer joins, and cross joins. Outer joins can be further broken down to left outer joins and right outer joins. You can also use left and right joins together to create full outer joins. In this article, I explain how to add joins to your SELECT statements and provide examples that demonstrate how they work. Each example retrieves data from the manufacturers and airplanes tables in the travel database, which you’ve seen in previous articles in this series.
Note: The examples in this article are based on a local instance of MySQL that hosts a very simple database. The last section of the article—“Appendix: Preparing your MySQL environment”—provides information about how I set up my environment and includes a SQL script for creating the database I used when building these examples.
MySQL inner joins
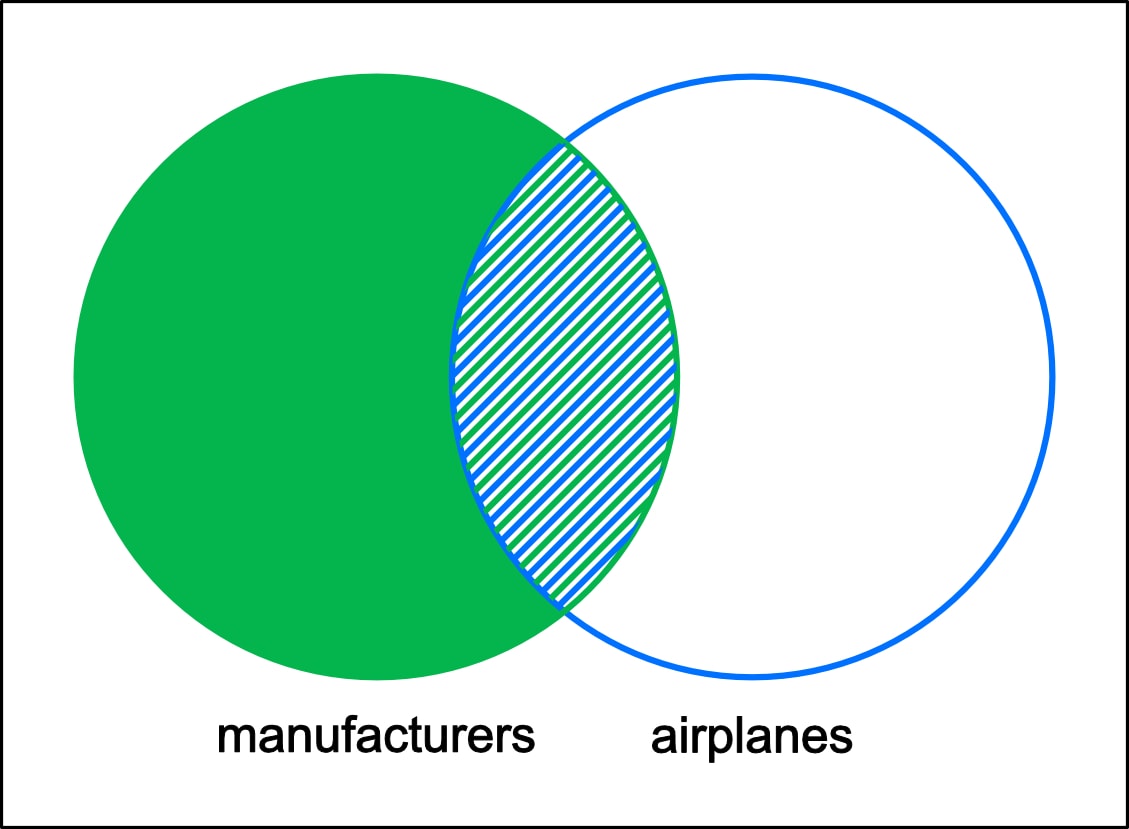
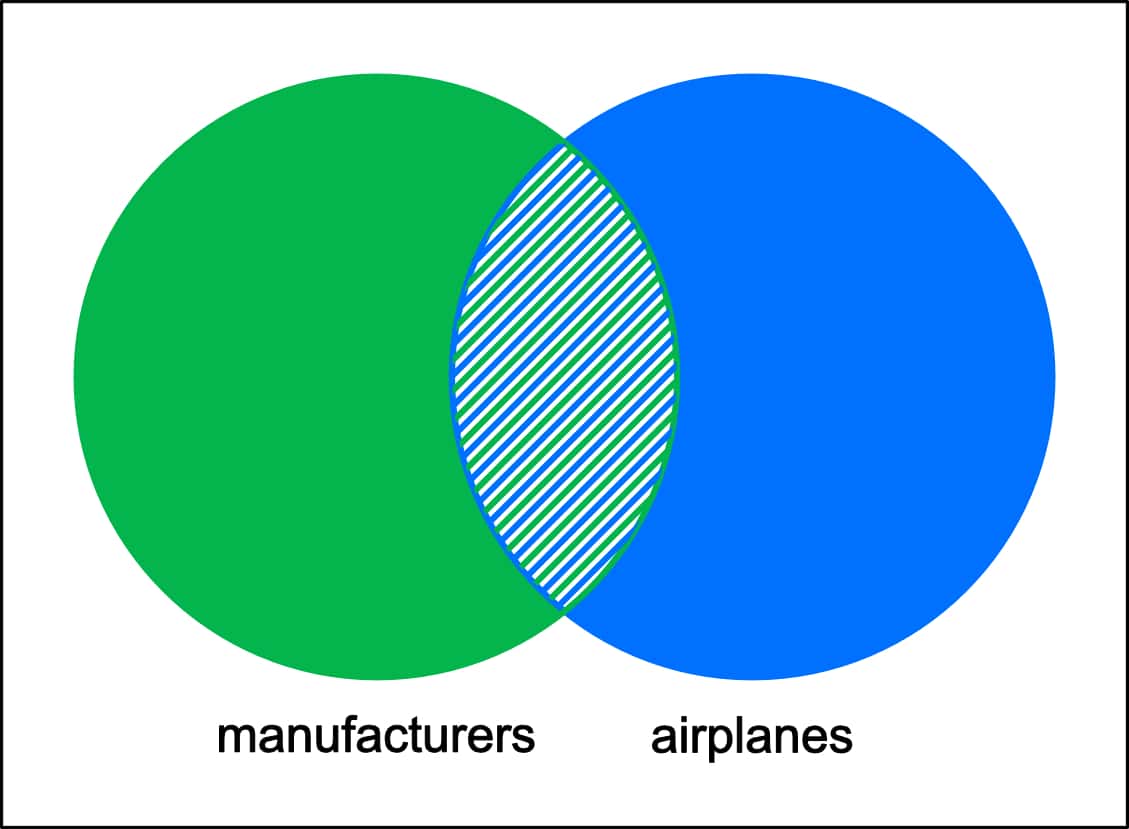
An inner join can retrieve matching data from multiple tables based on one or more columns that are common to both tables. For example, the manufacturers and airplanes tables in the travel database each contain the manufacturer_id column. You can create an inner join that links the data in the two tables together based on the values in those columns. The join will return all rows with matching manufacturer_id values. The following figure shows how you might visualize an inner join between the two tables.
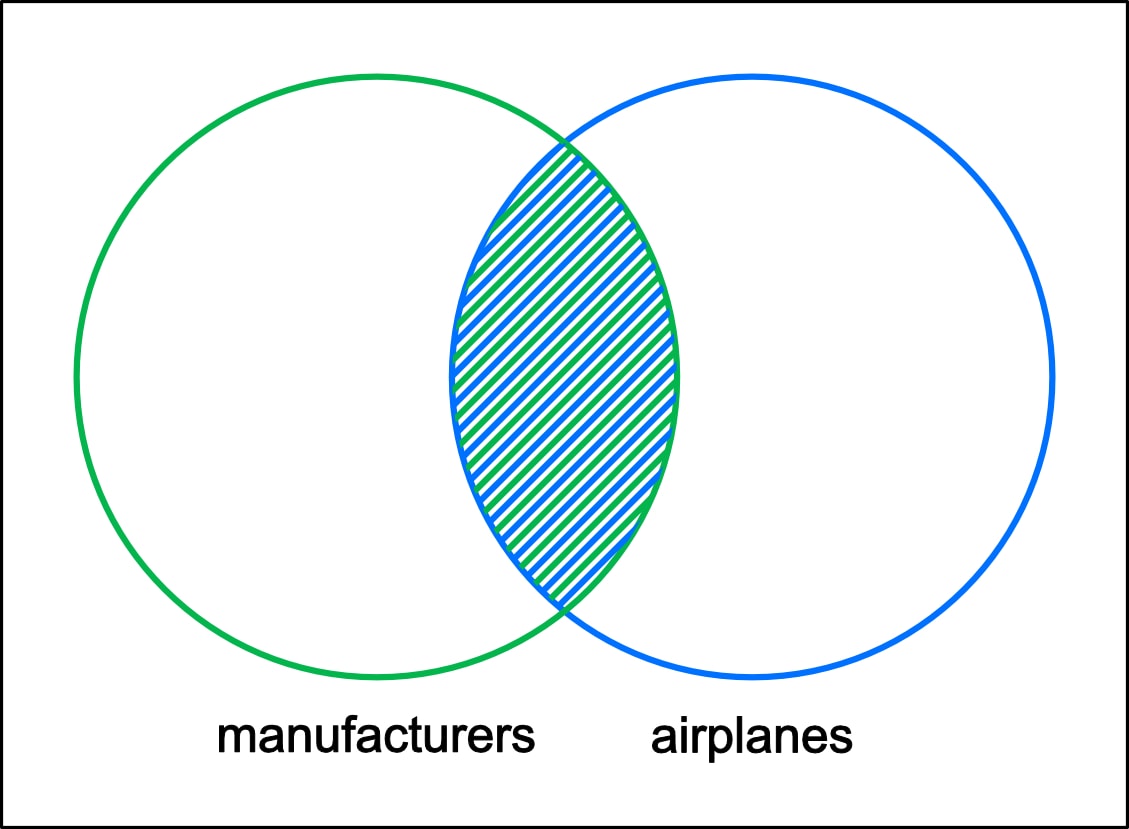
The left circle represents the data in the manufacturers table, and the right circle represents the data in the airplanes table. The area in which they intersect is where the manufacturer_id values in the manufacturers table are equal to the manufacturer_id values in the airplanes table.
Note: if you are well acquainted with Venn diagrams, you know they generally work with complete sets of data. They help visualize which rows will be returned in the join operation but note that only the column values in the join condition are part of the intersection (for an INNER JOIN operation) and the other combinations that will be included.
An inner join returns only the matching rows from the two tables and excludes all other rows. You’ll see this in action shortly, but first take a look at the following syntax, which represents a SELECT statement and its INNER JOIN clause at their most basic:
|
1 2 3 4 |
SELECT select_list FROM tbl_1 [[AS] tbl_1_alias] [INNER] JOIN tbl_2 [[AS] tbl_2_alias] [ON tbl_1_col = tbl_2_col]; |
The first two lines in the syntax are similar to most other SELECT statements. They define the SELECT clause and the initial part of the FROM clause. The third line represents the start of JOIN clause, which is actually a subclause in the FROM clause. The JOIN clause specifies the name of the second table. This is the table that will be joined to the first table.
The fourth line in the syntax shows the ON clause. Although the clause is technically optional, it is typically included when defining an inner join because it will behave as if the join criteria is always the Boolean value of True. Later in the article, I’ll discuss joins that don’t include the ON clause on purpose, but for now, assume that you’ll be including it all of your queries that you expect to be an INNER JOIN. The clause defines a search condition that determines how the tables are joined.
The syntax shows how the ON clause is commonly structured. It defines a value equality expression which states that a column in the first table must equal a column in the second table. You can create other types of expressions, but for this article, we’ll focus only on value equality expressions because those are the most common.
The following example demonstrates how the various syntax elements plug into an actual SELECT statement:
|
1 2 3 |
SELECT m.manufacturer, a.plane, a.engine_type, a.icao_code FROM manufacturers AS m INNER JOIN airplanes AS a ON m.manufacturer_id = a. manufacturer_id; |
After the SELECT clause, the statement defines a FROM clause, which starts by specifying the manufacturers table and assigning it the m alias. A table alias can be useful when referencing the table’s individual columns in other clauses, such as the SELECT clause (and essential if you need to reference the same table twice). Otherwise, you would need to include the entire table name to ensure that there is no ambiguity between columns from different table. Theoretically, you do not need to qualify a name if it is unique among the joined tables, but many database and development teams consider its inclusion a best practice.
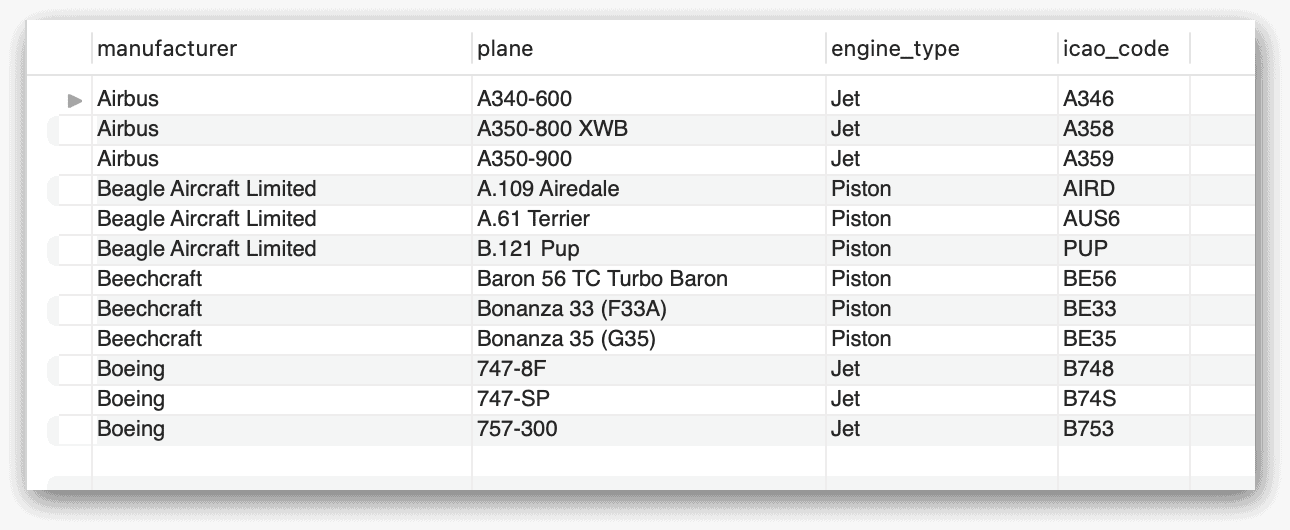
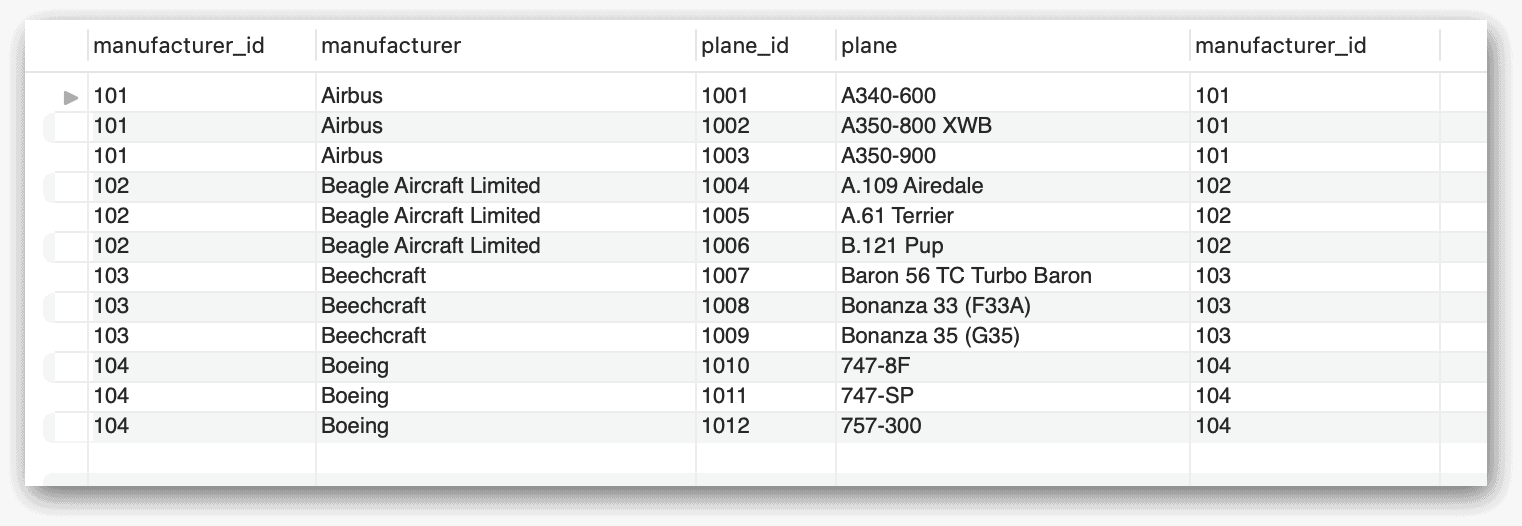
The FROM clause then goes on to define the INNER JOIN clause. It identifies airplanes as the second table and assigns it the alias a. Next comes the ON clause and its search condition, which specifies that the m.manufacturer_id values must equal the a.manufacturer_id values for the rows to be returned. In other words, the clause limits the statement’s results to only those rows with matching manufacturer_id values. The following figure shows the data returned by the SELECT statement.

Because the query returns only those rows with matching manufacturer_id values, the results do not include manufacturers in the manufacturers table for which there are no matching planes in the airplanes table, nor do they include planes in the airplanes table for which there are no matching manufacturers in the manufacturers table.
Now let’s move on to the AS keyword, which the example above uses when defining the table aliases. You do not need to include this keyword. For example, you can recast the previous SELECT statement as follows:
|
1 2 3 |
SELECT m.manufacturer, a.plane, a.engine_type, a.icao_code FROM manufacturers m INNER JOIN airplanes a ON m.manufacturer_id = a. manufacturer_id; |
You also do not need to include the INNER keyword in your JOIN clause. When JOIN is used without INNER, MySQL assumes that you want to perform an inner join. The following example returns the same results as the previous two SELECT statements:
|
1 2 3 |
SELECT m.manufacturer, a.plane, a.engine_type, a.icao_code FROM manufacturers m JOIN airplanes a ON m.manufacturer_id = a. manufacturer_id; |
The fact that you do not need to include the INNER keyword indicates that MySQL considers an inner join to be the most natural type of join. In fact, MySQL supports something called a “natural join,” which you can use in place of an inner join when the compared columns have the same name and datatype, as in the following example:
|
1 2 |
SELECT m.manufacturer, a.plane, a.engine_type, a.icao_code FROM manufacturers m NATURAL JOIN airplanes a; |
The SELECT statement returns the same results as the previous statements even though it does not include an ON clause. Be aware, however, that a natural join, unlike an inner join, removes duplicate columns, such as those you get with a SELECT * query. In this case, the natural join returns only one manufacturer_id column, rather than one from each table. In contrast, the inner join returns both columns. Also note that if your tables share other column names (name, row_last_modified_time, for example,) a NATURAL JOIN will not work properly.
Note: MySQL joins are a complex topic. This article focuses only on creating joins that combine two tables, basing the joins on a single set of matching columns. While you can only join two tables at a time, you can join more than two tables in a statement, and you can base your joins on more than one set of matching columns. You can also define other types of search criteria in your ON clauses (other than value equality). For more information about joins, see the MySQL documentation, starting with the JOIN Clause topic.
The examples that we’ve looked at up to this point have included only a SELECT clause and a FROM clause, which contained the join definition. You can include other clauses, however, just like you can in any SELECT statement. For example, the following SELECT statement includes a WHERE clause and ORDER BY clause:
|
1 2 3 4 5 |
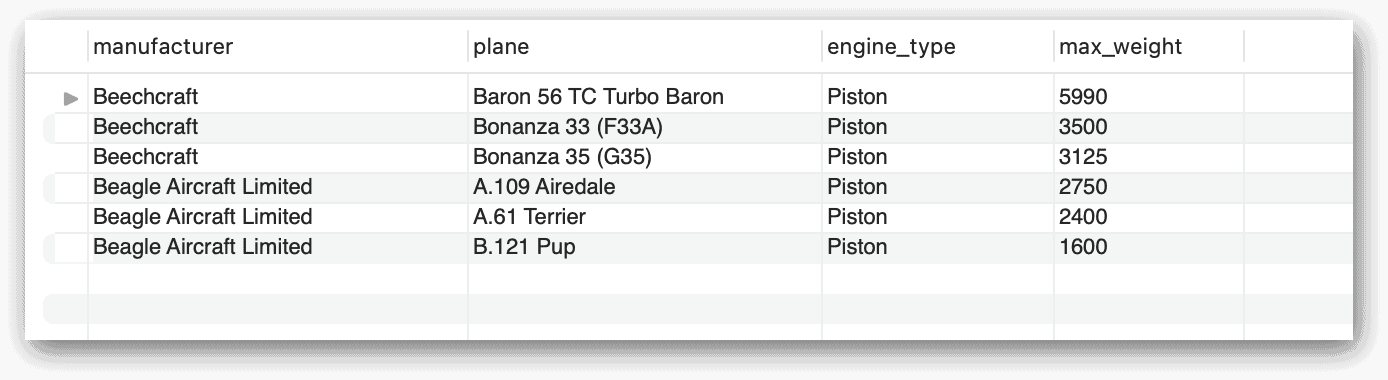
SELECT m.manufacturer, a.plane, a.engine_type, a.max_weight FROM manufacturers AS m INNER JOIN airplanes AS a ON m.manufacturer_id = a. manufacturer_id WHERE a.max_weight < 10000 ORDER BY a.max_weight DESC; |
The statement now returns only six rows, which are shown in the following figure. As expected, all the returned data meets the condition defined in the WHERE clause.
You can also group and aggregate the data returned by your joined tables. The next SELECT statement groups the data based on the manufacturer_id values in the manufacturers table and then aggregates the data in those groups:
|
1 2 3 4 5 6 |
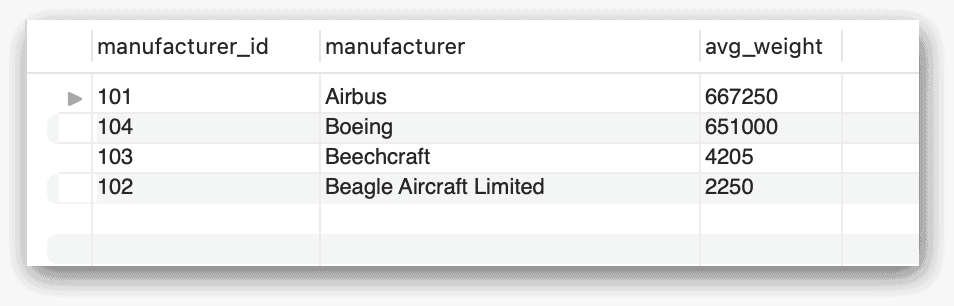
SELECT m.manufacturer_id, m.manufacturer, ROUND(AVG(a.max_weight)) AS avg_weight FROM manufacturers AS m INNER JOIN airplanes AS a ON m.manufacturer_id = a. manufacturer_id GROUP BY m.manufacturer_id ORDER BY avg_weight DESC; |
In this case, the SELECT clause calculates the average max_weight value for the planes associated with each manufacturer and assigns the avg_weight alias to the generated column. The following figure shows the results returned by the SELECT statement.
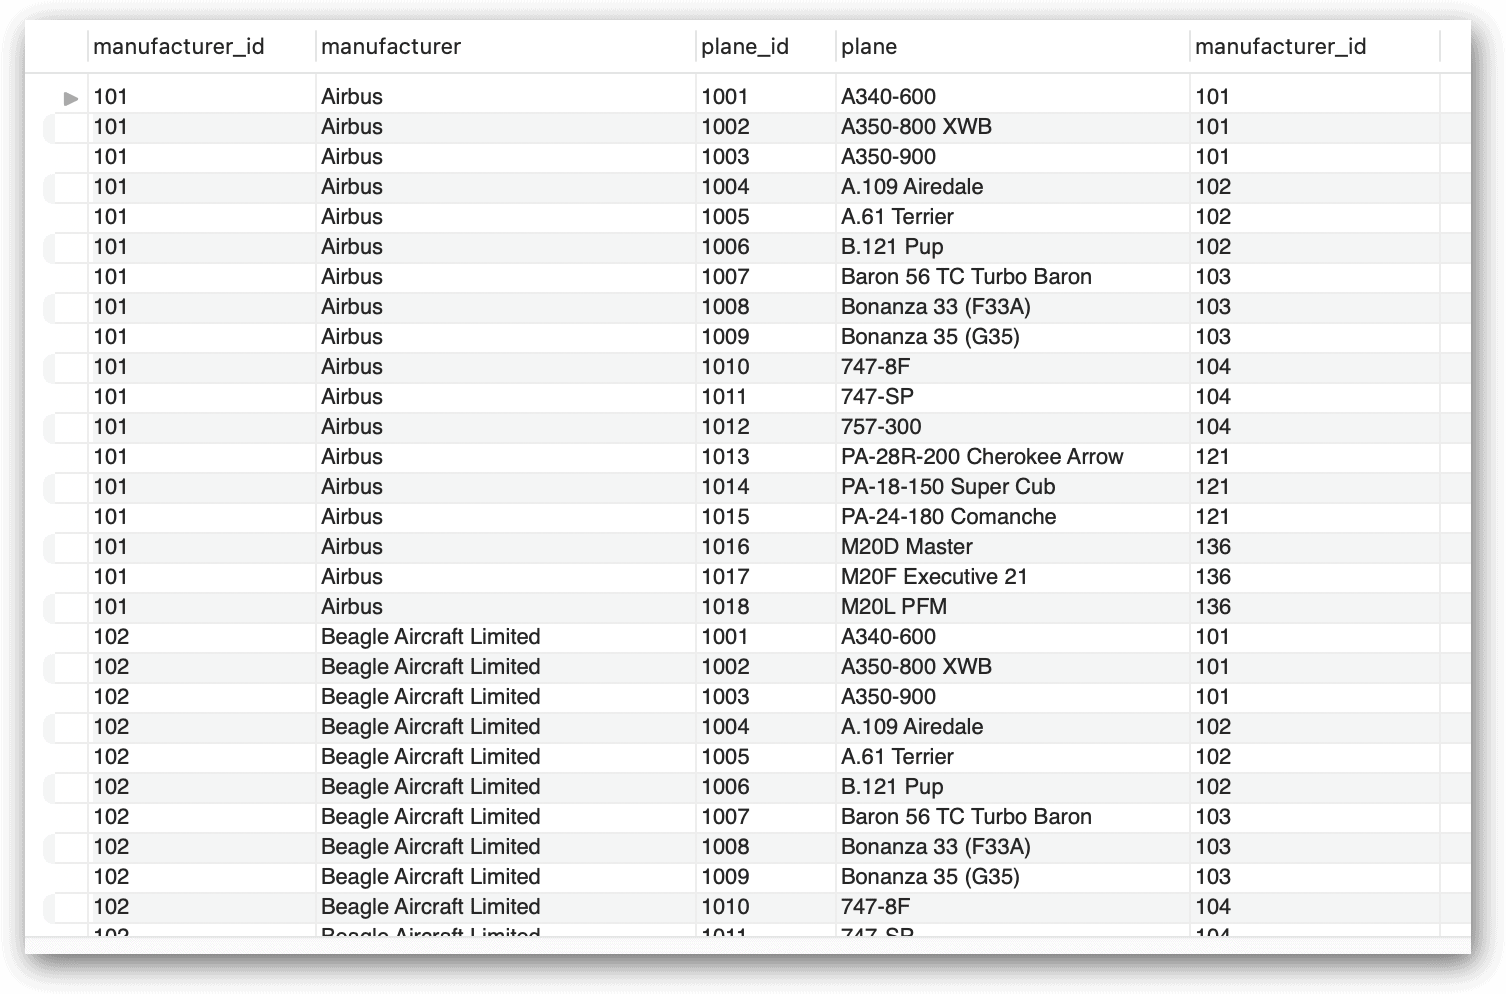
Be aware of the cardinality of rows in your output when you are aggregating data. For example, this was the raw data when we joined the tables together:
Note: If you count the number of manufacturers using this set of data, you will get 12, while there are just 4. Generally, the table with the key value you are joining on will be the one that you need to use in the GROUP BY clause, and the table referencing that table will be the one that you need to use in aggregate functions like AVG, SUM, MIN, MAX, etc.
MySQL also supports the USING clause when defining a join condition, which you use in place of the ON clause. You can include the USING clause only if the matching columns have the same names and are configured with the same data type. This is useful when the same name is used in both tables, but you have additional columns with the same name as well. The USING clause is safer to use than a NATURAL JOIN in reusable code because it is not susceptible to new, duplicated columns.
The manufacturer_id columns in the manufacturers and airplanes tables meet the requirement, so you can recast the previous SELECT statement as follows:
|
1 2 3 4 5 6 |
SELECT m.manufacturer_id, m.manufacturer, ROUND(AVG(max_weight)) AS avg_weight FROM manufacturers AS m INNER JOIN airplanes AS a USING (manufacturer_id) GROUP BY m.manufacturer_id ORDER BY avg_weight DESC; |
When specifying the column in the USING clause, you must enclose it in parentheses. In addition, you should not qualify the column name with a table name or alias as you do in an ON clause. You simply specify the column name.
MySQL left and right outer joins
In some cases, you might want to retrieve the non-matching data from one of the joined tables, along with the matching data from both tables. To do so, you should define an outer join rather than an inner join.
MySQL supports two types of outer joins: left outer joins and right outer joins. The “left” refers to the left table specified in the JOIN clause, and the “right” refers to the right table specified in the clause. In a left outer join, non-matching rows in the left table are included in the results, and in a right outer join, non-matching rows in the right table are included in the results.
For example, the following figure shows you how you might visualize a left outer join between the manufacturers and airplanes tables.
As you saw with inner joins, the left circle represents the manufacturers table, which is the “left” table, and the right circle represents the airplanes table, which is the “right” table. The area in which they intersect is where the manufacturer_id values in both tables match. The join also incorporates the non-matching data in the left table, which is indicated by the solid green.
Creating an outer join works much like an inner join. The following syntax shows a basic SELECT statement that includes the LEFT OUTER JOIN clause:
|
1 2 3 4 |
SELECT select_list FROM tbl_1 [[AS] tbl_1_alias] LEFT [OUTER] JOIN tbl_2 [[AS] tbl_2_alias] [ON tbl_1_col = tbl_2_col]; |
The syntax is similar to an inner join except for the use of the LEFT keyword and optional OUTER keyword. The syntax is meant to show only the most basic elements necessary to perform a left outer join. It does not reflect other clauses that you can add to your SELECT statements, such as WHERE or GROUP BY. For example, the following query creates a left outer join with the manufacturers table specified as the left table:
|
1 2 3 4 5 6 |
SELECT m.manufacturer_id, m.manufacturer, a.plane, a.engine_type, a.max_weight, a.wingspan FROM manufacturers AS m LEFT OUTER JOIN airplanes AS a ON m.manufacturer_id = a. manufacturer_id ORDER BY a.plane; |
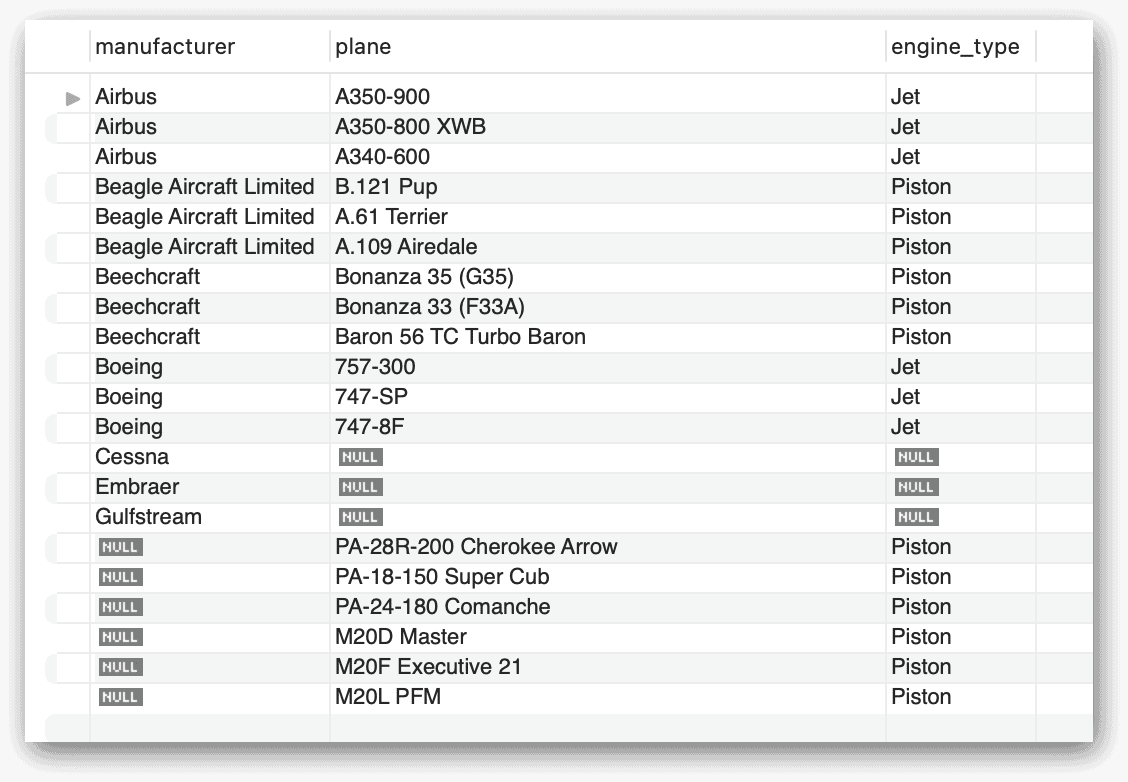
In addition to the JOIN clause, the also includes an ORDER BY clause that sorts the data by the plane column, in ascending order. The SELECT statement returns the result set shown in the following figure.
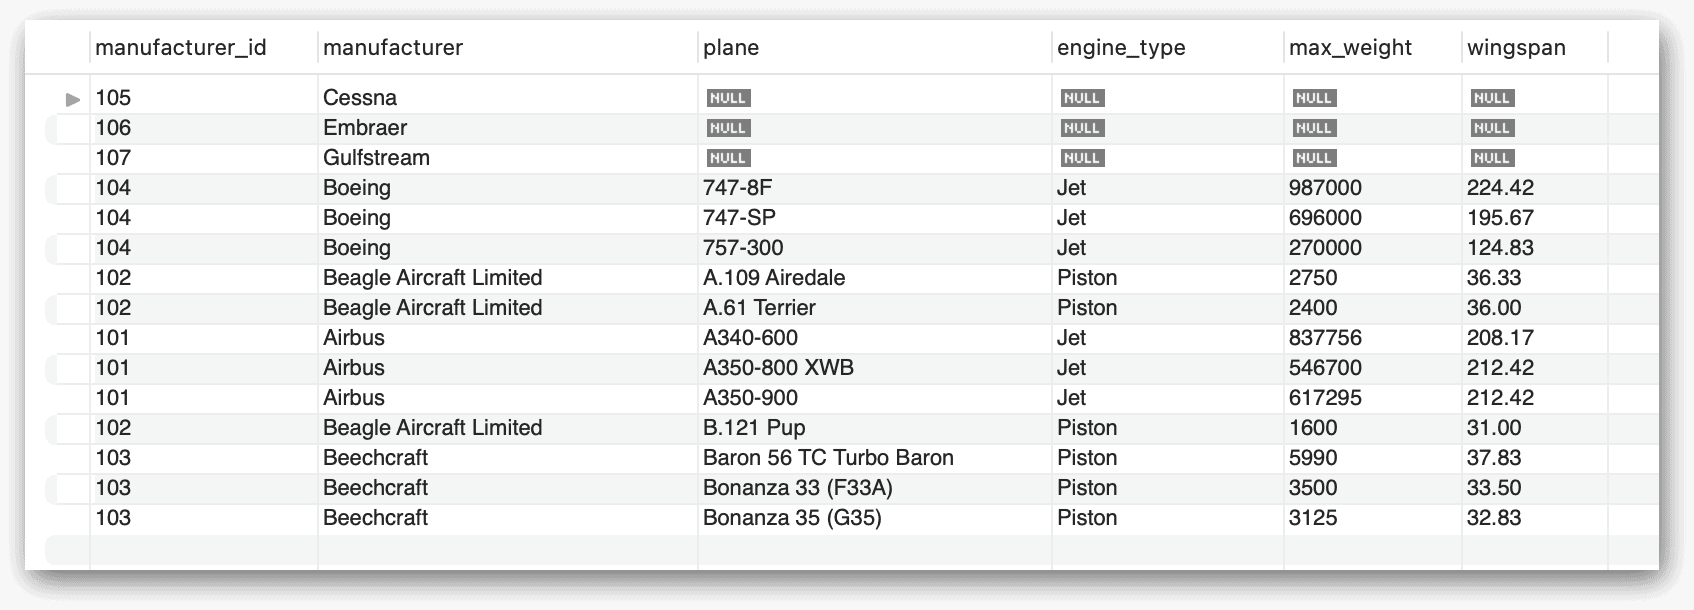
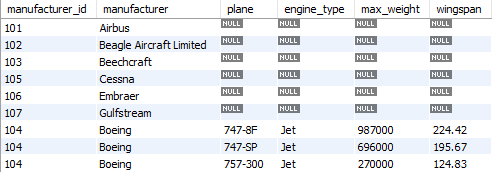
In addition to the matching rows, the statement returns all rows from the manufacturers table for which there is no matching data in the airplanes table. You can identify these rows by the NULL values in the columns from the airplanes table. In this case, the first three rows have no matching data. However, the rest of the rows in the left table match rows in the right table, so those results look much like you saw with the inner joins.
MySQL also lets you include a USING clause in your outer join statements, just like you can your inner joins. For example, you can recast the previous SELECT statement to include a USING clause, which returns the same results:
|
1 2 3 4 5 6 |
SELECT m.manufacturer_id, m.manufacturer, a.plane, a.engine_type, a.max_weight, a.wingspan FROM manufacturers AS m LEFT OUTER JOIN airplanes AS a USING (manufacturer_id) ORDER BY a.plane; |
A right outer join works just like a left outer join except that it returns non-matching rows from the right table rather than the left table, as illustrated in the following figure. Once again, the area in which the two circles intersect is where the manufacturer_id values in the two tables match. The solid part of the right circle represents the non-matching data in the right table.

A right outer join is simply the reverse of a left outer join. They can be used interchangeably by reversing the table order. In fact, MySQL documentation recommends that you stick with left joins for all your outer joins: “RIGHT JOIN works analogously to LEFT JOIN. To keep code portable across databases, it is recommended that you use LEFT JOIN instead of RIGHT JOIN.” If you take this approach, you need only reverse the order of the tables when building your queries.
While generally a good approach, despite the MySQL recommendations there might be times when you need to use a right outer join, such as when you are joining multiple tables, or when you’re constructing a full outer join (which I’ll demonstrate shortly). The following syntax shows a basic SELECT statement that includes the RIGHT OUTER JOIN clause:
|
1 2 3 4 |
SELECT select_list FROM tbl_1 [[AS] tbl_1_alias] RIGHT [OUTER] JOIN tbl_2 [[AS] tbl_2_alias] [ON tbl_1_col = tbl_2_col]; |
The syntax differs from the left outer join only in the use of the RIGHT keyword rather than the LEFT keyword. The SELECT statement in the following example demonstrates what this looks like:
|
1 2 3 4 5 6 |
SELECT m.manufacturer_id AS man_tbl_id, m.manufacturer, a.plane_id, a.plane, a.manufacturer_id AS air_tbl_id FROM manufacturers AS m RIGHT OUTER JOIN airplanes AS a ON m.manufacturer_id = a. manufacturer_id ORDER BY a.plane; |
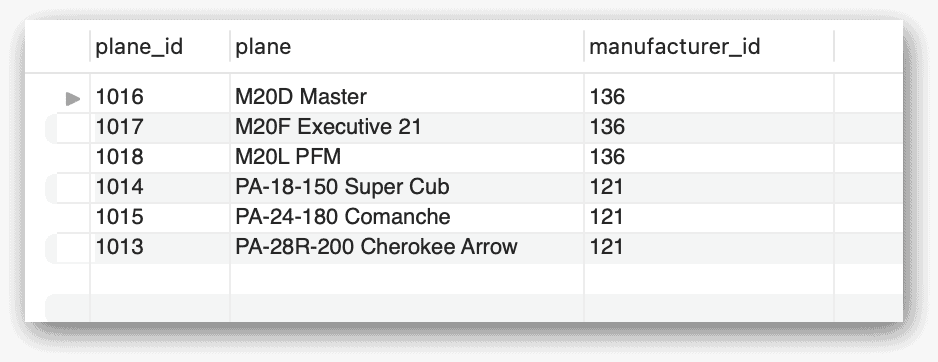
In this example, I included the manufacturer_id column from both tables, providing a different alias for each one. This makes it easier to distinguish between the two columns and to see which manufacturer_id values exist in the airplanes table that do not exist in the manufacturers table. The following figure shows the results returned by the SELECT statement.
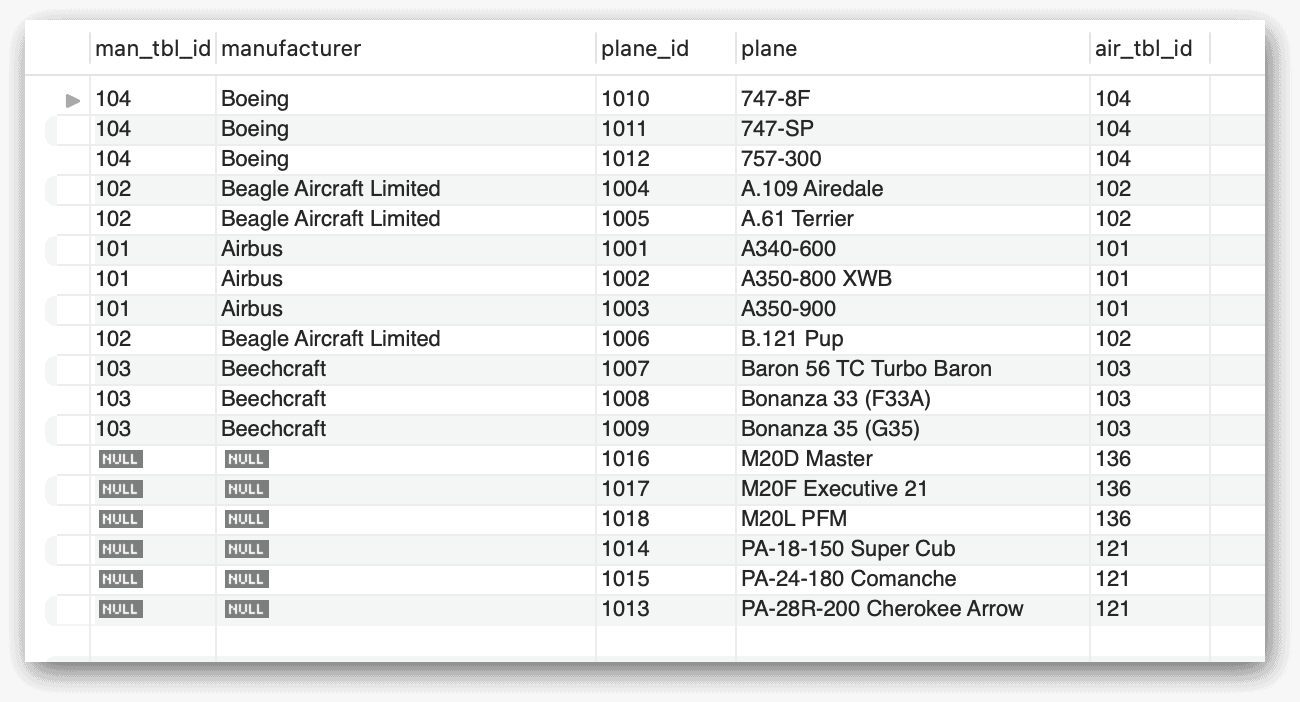
As the figure demonstrates, the airplanes table contains six non-matching rows, which are indicated by the NULL values in the man_tbl_id and manufacturer columns, both of which come from the manufacturers table.
Note that the examples for this article are not necessarily best practices in database design. However, to demonstrate some of the different join types, it was necessary to have rows in each table that did not relate to one another.
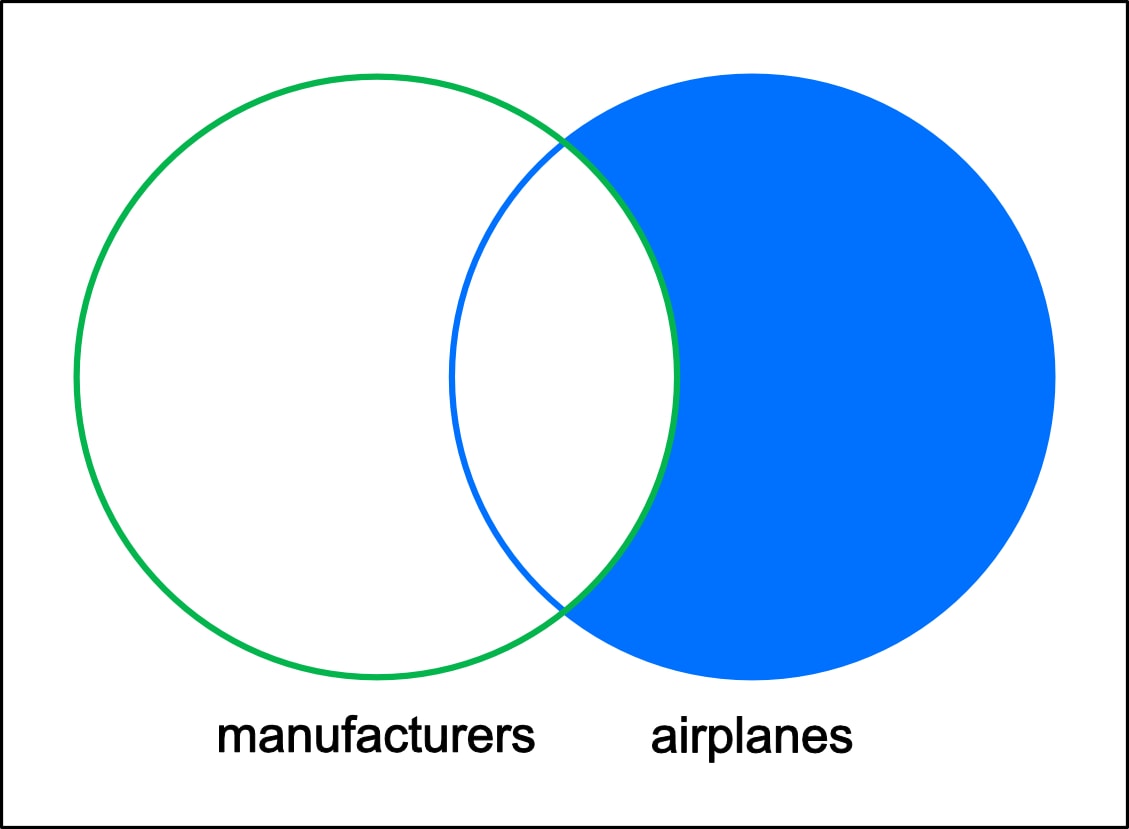
In some cases, you might need to perform an outer join that returns only the non-matching rows in one of the tables. For example, you might want to know which rows in the airplanes table reference manufacturer_id values that do not exist in the manufacturers table, as illustrated in the following figure.
You can retrieve this information by adding a WHERE clause to your SELECT statement that checks the data for nullability. In effect, you’re taking advantage of the NULL values returned by your query when there are no corresponding matches. For example, the following SELECT statement is the same as the previous one except that it includes a WHERE clause:
|
1 2 3 4 5 6 |
SELECT a.plane_id, a.plane, a.manufacturer_id FROM manufacturers AS m RIGHT OUTER JOIN airplanes AS a ON m.manufacturer_id = a. manufacturer_id WHERE m.manufacturer IS NULL ORDER BY a.plane; |
The WHERE clause uses the IS NULL operator to check whether the manufacturer_id column contains a NULL value. If it does, the expression evaluates to true and the row is returned, giving us the results shown in the following figure.
Checking for NULL values in this way provides a handy method for identifying what might be anomalous data, which could be the result of a bulk-loading operation, merging tables from a legacy system, a bug at the application or data level, or some other process.
Where filtering by NULL finds the values that don’t match, be careful about filtering rows in the WHERE clause unless you realize what you are doing. For example, executing the following:
|
1 2 3 4 5 6 7 |
SELECT m.manufacturer_id, m.manufacturer, a.plane, a.engine_type, a.max_weight, a.wingspan FROM manufacturers AS m LEFT OUTER JOIN airplanes AS a USING (manufacturer_id) WHERE a.manufacturer_id = 104 -- where clause filter ORDER BY a.plane; |
Will just return the rows with manufacturer = 104. This, in effect, turns this into an INNER JOIN, because all of the mismatched rows from the LEFT OUTER JOIN will be eliminated because their manufacturer_id is NULL and hence, does not equal 104. However, change your join to:
|
1 2 3 4 5 6 7 |
SELECT m.manufacturer_id, m.manufacturer, a.plane, a.engine_type, a.max_weight, a.wingspan FROM manufacturers AS m LEFT OUTER JOIN airplanes AS a ON m.manufacturer_id = a.manufacturer_id AND a.manufacturer_id = 104 ORDER BY a.plane; |
And the output is changed again, but perhaps not exactly what you wanted as now every manufacturer is returned, but only rows that match the a.manufacturer_id = 104 predicate are returned.
MySQL full outer joins
A full outer join returns all data from the two connected tables. In addition to the matching rows from both tables, the join returns unmatched rows in the left table and unmatched rows in the right table, as illustrated in the following figure. In this case, the result set includes manufacturers with no corresponding planes in the airplanes table and planes with no corresponding manufacturers in the manufacturing table, along with the matching data from both tables.
MySQL does not support full outer joins like some database systems. You can get around this by using a UNION operator to join a left outer join statement and a right outer join statement, as in the following example:
|
1 2 3 4 5 6 7 8 9 |
SELECT m.manufacturer, a.plane, a.engine_type FROM manufacturers AS m LEFT OUTER JOIN airplanes AS a USING (manufacturer_id) UNION ALL SELECT m.manufacturer, a.plane, a.engine_type FROM manufacturers AS m RIGHT OUTER JOIN airplanes AS a USING (manufacturer_id); |
The individual SELECT statements work just like the earlier examples of left and right outer joins. The UNION ALL operator joins the two statements together to return a single result set, which is shown in the following figure.
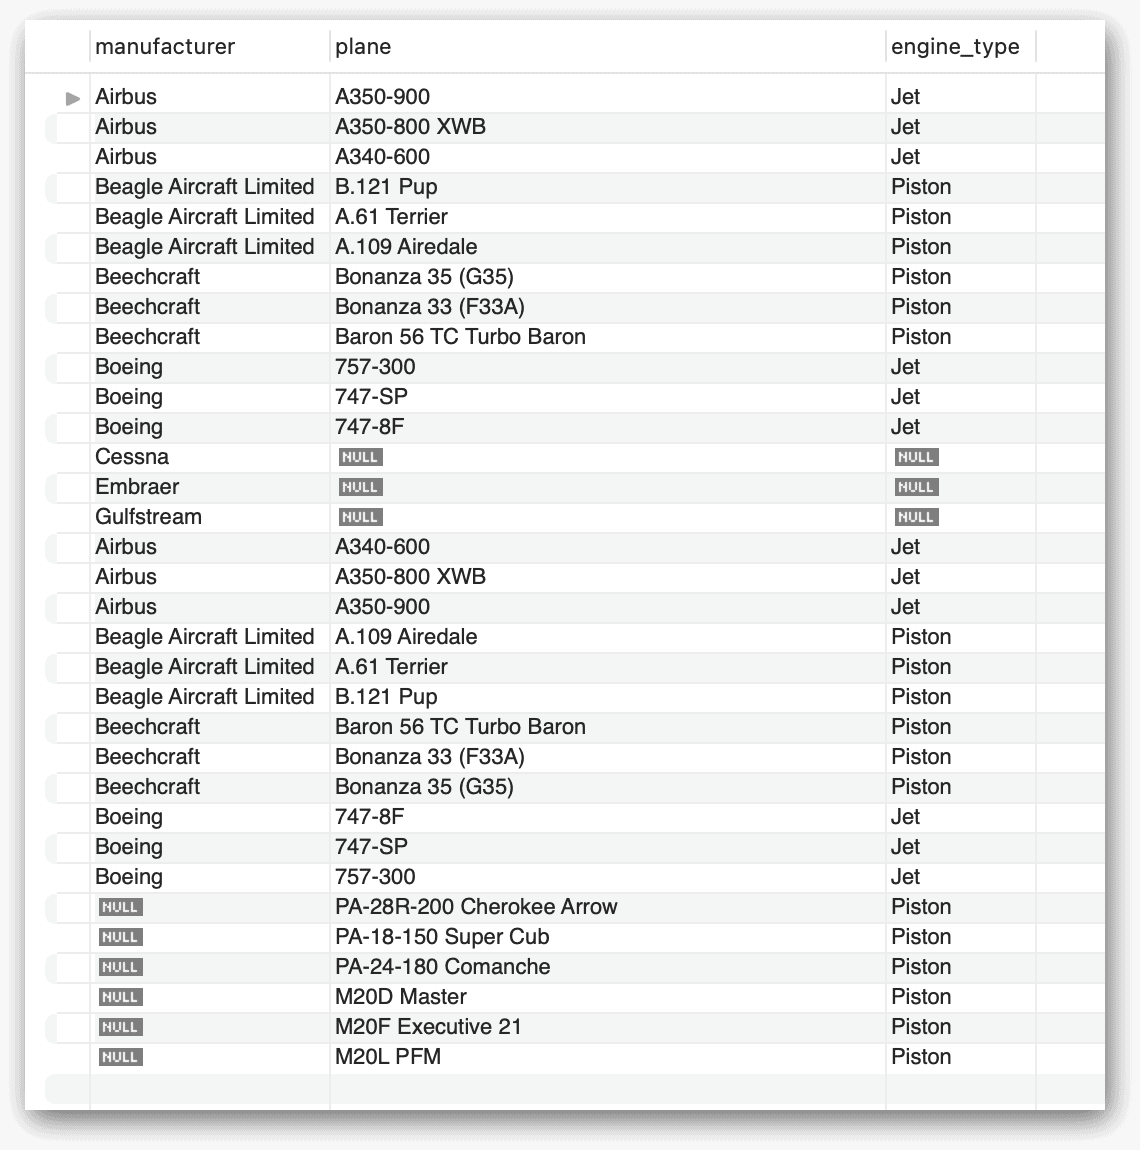
The results include both matching rows and non-matching rows, which are indicated by the NULL values. However, because the two statements are joined together, the results also include duplicate rows. For example, the Airbus planes are each listed twice, as are all the other planes. You can eliminate the duplicates by using the UNION operator without the ALL qualifier, as in the following example:
|
1 2 3 4 5 6 7 8 9 |
SELECT m.manufacturer, a.plane, a.engine_type FROM manufacturers AS m LEFT OUTER JOIN airplanes AS a USING (manufacturer_id) UNION SELECT m.manufacturer, a.plane, a.engine_type FROM manufacturers AS m RIGHT OUTER JOIN airplanes AS a USING (manufacturer_id); |
Now the statement returns only distinct rows, whether the data is matching or non-matching, as shown in the following figure:
Although MySQL doesn’t provide a specific clause for creating full outer joins, such as you’ll find in SQL Server or other database systems, there might be times when you need a more complete picture than what either a left outer join or right outer join can provide on its own. Using a UNION operator to combine the two outer joins is a handy way to accomplish this.
MySQL cross joins
Another type of join that MySQL supports is the cross join, which matches each row in the left table to each row in the right table to produce what is referred as a Cartesian product. The following figure illustrates a cross join between the manufacturers table and the airplanes table.
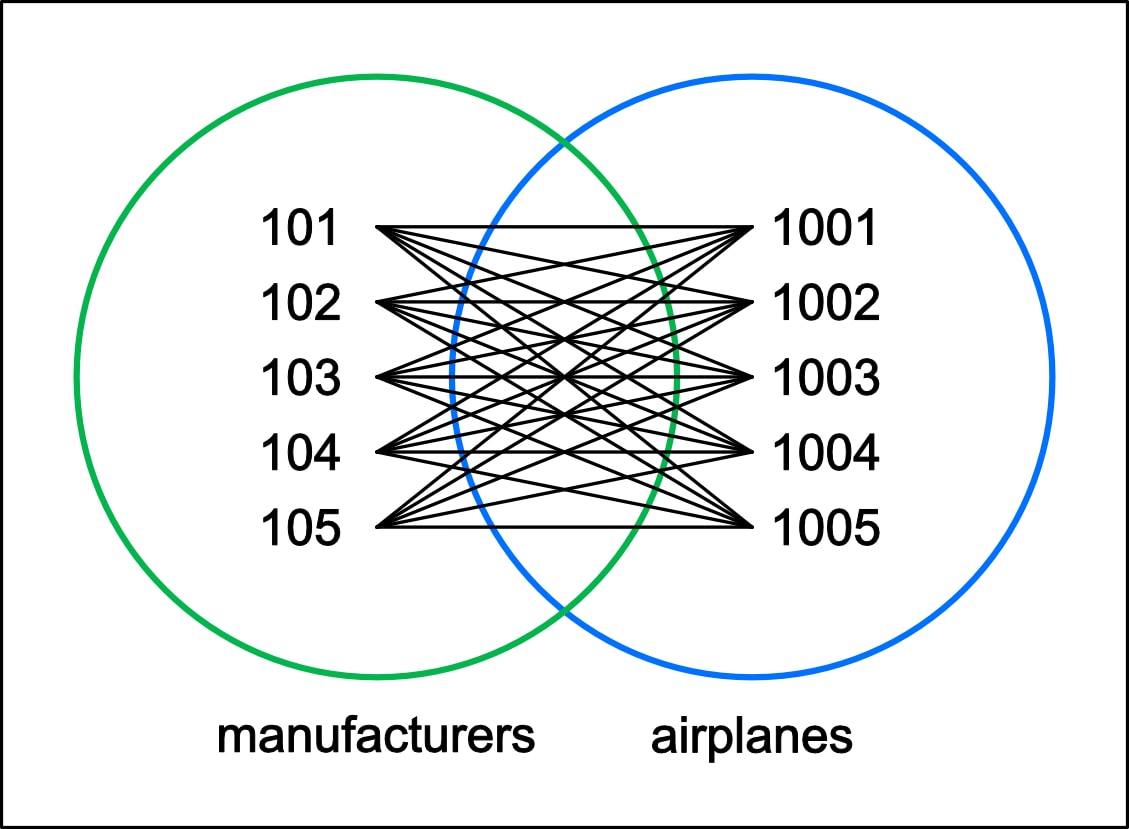
The figure shows the various ways that each value pair can be matched. For example, the 101 value in the manufacturers table is matched to every value in the airplanes table, and the 1001 value in the airplanes table is matched to every value in the manufacturers table. This process continues for each value in both tables until all values have been matched up. The following syntax shows a basic SELECT statement that includes the CROSS JOIN clause:
|
1 2 3 4 |
SELECT select_list FROM tbl_1 [[AS] tbl_1_alias] CROSS JOIN tbl_2 [[AS] tbl_2_alias] [ON tbl_1_col = tbl_2_col]; |
Except for the CROSS keyword, the syntax elements should all look familiar to you. That said, the cross join is not as clear-cut as it might appear. Notice that the syntax, like the previous join examples, indicates that the ON clause is optional. A cross join statement returns a Cartesian product only if it does not include this clause. If the clause is included, the statement behaves much like a regular inner join.
Some sources imply that a MySQL cross join is strictly limited to producing a Cartesian product, but this is clearly not the case, as indicated by its support for the ON clause (or USING clause). According to MySQL documentation, “JOIN, CROSS JOIN, and INNER JOIN are syntactic equivalents (they can replace each other). In standard SQL, they are not equivalent. INNER JOIN is used with an ON clause, CROSS JOIN is used otherwise.”
Let’s look at a few examples to better understand how the cross join works. The following SELECT statement defines a cross join without including an ON clause or USING clause:
|
1 2 3 4 5 |
SELECT m.manufacturer_id, m.manufacturer, a.plane_id, a.plane, a.manufacturer_id FROM manufacturers AS m CROSS JOIN airplanes AS a ORDER BY m.manufacturer_id, a.plane_id; |
The statement returns a Cartesian product for the manufacturers and airplanes tables. The manufacturers table contains seven rows, and the airplanes table contains 18 rows. Because a cross join matches each row in the first table to each row in the second table, you can multiply the two row counts together (7 x 18) to calculate the total number of rows that should be included in the Cartesian product. In this case, the total is 126, which is the number of rows returned by the SELECT statement.
The following figure shows a small portion of these results. Notice that there is an Airbus row for each plane, even if that plane is not manufactured by Airbus. The same is true for all manufacturers. The cross join simply combines the individual rows together.
This in itself should seem straightforward enough, and by all accounts, this is how you should use the cross join—to return a Cartesian product. However, because CROSS JOIN and INNER JOIN are syntactic equivalents, you can achieve the same results with an inner join that does not include an ON clause or USING clause:
|
1 2 3 4 5 |
SELECT m.manufacturer_id, m.manufacturer, a.plane_id, a.plane, a.manufacturer_id FROM manufacturers AS m INNER JOIN airplanes AS a ORDER BY m.manufacturer_id, a.plane_id; |
The statement returns the same Cartesian product as the previous example. However, this is not the only way to return these results. You can instead specify the two table names, separated by a comma, and drop the JOIN clause altogether:
|
1 2 3 4 |
SELECT m.manufacturer_id, m.manufacturer, a.plane_id, a.plane, a.manufacturer_id FROM manufacturers m, airplanes a ORDER BY m.manufacturer_id, a.plane_id; |
Once again, you’ll end up with the same Cartesian product that was returned by the previous two examples.
Note: MySQL documentation warns that the precedence of a comma operator is less than the actual JOIN keywords. This might be an issue if you mix join types in a statement that combines more than two tables.
In addition, the comma operator can be used only to generate a Cartesian product. It cannot be used with an ON or USING clause. This is not the case for a cross join, which can include either of these clauses, just like an inner join. The following examples shows a cross join that contains a USING clause:
|
1 2 3 4 5 6 |
SELECT m.manufacturer_id, m.manufacturer, a.plane_id, a.plane, a.manufacturer_id FROM manufacturers AS m CROSS JOIN airplanes AS a USING (manufacturer_id) ORDER BY m.manufacturer_id; |
By adding the USING clause, the statement now returns only 12 rows, rather than 126. The results are shown in the following figure.
You can return the same results with the following inner join statement, which also incorporates the USING clause:
|
1 2 3 4 5 6 |
SELECT m.manufacturer_id, m.manufacturer, a.plane_id, a.plane, a.manufacturer_id FROM manufacturers AS m INNER JOIN airplanes AS a USING (manufacturer_id) ORDER BY m.manufacturer_id; |
Despite the fact that CROSS JOIN and INNER JOIN are syntactic equivalents, the general consensus is to use cross joins when you want to work directly with the Cartesian product and use inner joins when you want to qualify the join with an ON or USING clause. This doesn’t preclude the use of other SELECT clauses in your cross join statements (such as WHERE or ORDER BY), but it does serve as general guideline for differentiating between the two when you want to generate a Cartesian product.
Getting started with MySQL joins
The topic of MySQL joins is a complex one, as I noted earlier. A single article is not nearly enough to cover all the various ways you can use joins to combine data from multiple tables. Although the article provides you with a jumping-off point, it by no means covers every aspect of join creation. You can, for example, combine different types of joins into a single query, define joins in your DELETE and UPDATE statements, join three or more tables in a single statement, or base your joins on two or more sets of matching columns. To do all this, however, you need a good foundation on which to build, and this article might help you get started with that process.
Read also:
MySQL CTEs for readable, reusable query building
MySQL subqueries as an alternative approach to complex join logic
Appendix: Preparing your MySQL environment
For the examples for this article, I used a Mac computer that was set up with a local instance of MySQL 8.0.29 (Community Server edition). I also used MySQL Workbench to interface with MySQL. Through Workbench, I created the travel database, added the manufacturers and airplanes tables, and inserted test data into the tables.
If you want to try out the examples for yourself, start by running the following script against your MySQL instance:
|
1 2 3 4 5 6 7 8 9 10 11 12 13 14 15 16 17 18 19 20 21 22 23 24 25 |
DROP DATABASE IF EXISTS travel; CREATE DATABASE travel; USE travel; CREATE TABLE manufacturers ( manufacturer_id INT UNSIGNED NOT NULL, manufacturer VARCHAR(50) NOT NULL, create_date TIMESTAMP NOT NULL DEFAULT CURRENT_TIMESTAMP, last_update TIMESTAMP NOT NULL DEFAULT CURRENT_TIMESTAMP ON UPDATE CURRENT_TIMESTAMP, PRIMARY KEY (manufacturer_id) ); CREATE TABLE airplanes ( plane_id INT UNSIGNED NOT NULL, plane VARCHAR(50) NOT NULL, manufacturer_id INT UNSIGNED NOT NULL, engine_type VARCHAR(50) NOT NULL, engine_count TINYINT NOT NULL, max_weight MEDIUMINT UNSIGNED NOT NULL, wingspan DECIMAL(5,2) NOT NULL, plane_length DECIMAL(5,2) NOT NULL, parking_area INT GENERATED ALWAYS AS ((wingspan * plane_length)) STORED, icao_code CHAR(4) NOT NULL, create_date TIMESTAMP NOT NULL DEFAULT CURRENT_TIMESTAMP, last_update TIMESTAMP NOT NULL DEFAULT CURRENT_TIMESTAMP ON UPDATE CURRENT_TIMESTAMP, PRIMARY KEY (plane_id)); |
The script creates the travel database and adds the manufacturers and airplanes tables. In previous articles, I had defined a primary key on the airplanes table that referenced the manufacturers table. For this article, I did not include the foreign key so it would be easier to demonstrate various join operations.
After you create the tables, you should run the following INSERT statements:
|
1 2 3 4 5 6 7 8 9 10 11 12 13 14 15 16 17 18 19 20 21 22 23 24 25 |
INSERT INTO manufacturers (manufacturer_id, manufacturer) VALUES (101,'Airbus'), (102,'Beagle Aircraft Limited'), (103,'Beechcraft'), (104,'Boeing'), (105,'Cessna'), (106,'Embraer'), (107,'Gulfstream'); INSERT INTO airplanes (plane_id, plane, manufacturer_id, engine_type, engine_count, wingspan, plane_length, max_weight, icao_code) VALUES (1001,'A340-600',101,'Jet',4,208.17,247.24,837756,'A346'), (1002,'A350-800 XWB',101,'Jet',2,212.42,198.58,546700,'A358'), (1003,'A350-900',101,'Jet',2,212.42,219.16,617295,'A359'), (1004,'A.109 Airedale',102,'Piston',1,36.33,26.33,2750,'AIRD'), (1005,'A.61 Terrier',102,'Piston',1,36,23.25,2400,'AUS6'), (1006,'B.121 Pup',102,'Piston',1,31,23.17,1600,'PUP'), (1007,'Baron 56 TC Turbo Baron',103,'Piston',2,37.83,28,5990,'BE56'), (1008,'Bonanza 33 (F33A)',103,'Piston',1,33.5,26.67,3500,'BE33'), (1009,'Bonanza 35 (G35)',103,'Piston',1,32.83,25.17,3125,'BE35'), (1010,'747-8F',104,'Jet',4,224.42,250.17,987000,'B748'), (1011,'747-SP',104,'Jet',4,195.67,184.75,696000,'B74S'), (1012,'757-300',104,'Jet',2,124.83,178.58,270000,'B753'), (1013,'PA-28R-200 Cherokee Arrow',121,'Piston',1,30.00,23.50,2600,'P28R'), (1014,'PA-18-150 Super Cub',121,'Piston',1,35.29,22.50,1750,'PA18'), (1015,'PA-24-180 Comanche',121,'Piston',1,36.00,24.79,2550,'PA24'), (1016,'M20D Master',136,'Piston',1,35.00,23.25,2500,'M20P'), (1017,'M20F Executive 21',136,'Piston',1,36.00,24.00,2740,'M20P'), (1018,'M20L PFM',136,'Piston',1,36.42,26.75,2900,'M20P'); |
The INSERT statements first populate the manufacturers table and then the airplanes table. The statement for each table intentionally includes data without corresponding records in the other table. For example, the manufacturers table includes manufacturers with no products in the airplanes table, and the airplanes table includes products for manufacturers that do not exist in the manufacturers table. These inclusions will help us test various types of join conditions.
FAQs: MySQL joins
1. What is the difference between INNER JOIN and OUTER JOIN in MySQL?
INNER JOIN returns only rows where there is a match in both tables. If a row in the left table has no matching row in the right table (or vice versa), it is excluded from the result. OUTER JOINs include non-matching rows: LEFT OUTER JOIN (or LEFT JOIN) returns all rows from the left table and matched rows from the right – unmatched right-table columns appear as NULL. RIGHT OUTER JOIN returns all rows from the right table and matched rows from the left. FULL OUTER JOIN returns all rows from both tables (not natively supported in MySQL – simulate with UNION of LEFT and RIGHT joins).
2. When should I use a LEFT JOIN instead of an INNER JOIN in MySQL?
Use LEFT JOIN when you want to include all rows from the left (primary) table even if they have no matching rows in the right table. Common use cases: finding customers who have no orders (WHERE right_table.id IS NULL after a LEFT JOIN), retrieving all products whether or not they have associated inventory records, or reporting across tables where the relationship is optional rather than required. Use INNER JOIN when you only want rows with a confirmed relationship in both tables and have no interest in unmatched rows.
3. How do I do a FULL OUTER JOIN in MySQL?
MySQL does not natively support FULL OUTER JOIN syntax (unlike PostgreSQL and SQL Server). Simulate it with UNION: SELECT * FROM table_a LEFT JOIN table_b ON table_a.id = table_b.id UNION SELECT * FROM table_a RIGHT JOIN table_b ON table_a.id = table_b.id; UNION removes duplicates between the two result sets, giving the equivalent of a full outer join. UNION ALL would include duplicate matching rows from both queries – use UNION (deduplicating) for the correct FULL OUTER JOIN equivalent.
4. What is a CROSS JOIN in MySQL and when is it useful?
A CROSS JOIN returns every combination of rows from two tables – also called a Cartesian product. If table_a has 5 rows and table_b has 4 rows, the CROSS JOIN returns 20 rows. Use CROSS JOIN when you intentionally want all combinations: generating a combination matrix, creating a calendar of all date/time combinations, or testing with all possible parameter pairings. Avoid accidental CROSS JOINs from forgotten JOIN conditions – they can return millions of rows and cause significant performance issues.


Load comments