
I am a C# developer in an AWS world. I have been doing C# work in the Microsoft space for over 10 years. I was given a chance to work with colleagues who are redesigning an existing application into C# .NET Core within the Amazon Web Services (AWS) space. I am here to explain some of what I have learned.
I want to talk to you about the structure of AWS Serverless Application (.NET Core) Step Function. (Serverless is crazy, right? Just wait.) This article begins by describing the ‘Hello world’ Visual Studio template AWS generates for you. Then, it steps through changing the project files to show how to add more functionality. It shows how to leverage an existing C# logic/assembly into an AWS Lambda and how that Lambda could be treated as a microservice.
Serverless means you do not have to think about managing a server. Wiki has a good definition.
Installing VS Components
To follow along with this article, you must have an AWS account and install the AWS Toolkit for Visual Studio. I’m using Visual Studio Community 2017. Visit AWS on Amazon to create an AWS account.
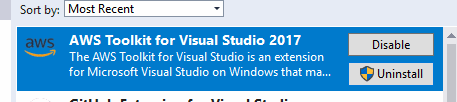
You can find the latest AWS Toolkit in the Extension and Updates (Tools => Extensions and Updates …) . Within the dialog window, select online the section and search for AWS Toolkit. You will see here that I have it installed:
Or visit Visual Studio Marketplace and search for AWS Toolkit. For Visual Studio 2017 it is located here. For Visual Studio 2013/2015, it is located here. You can download the AWS SDK for .NET here.
The AWS Toolkit installs an AWS Explorer window.

When you choose an AWS template for the first time, Visual Studio will ask you for account information such as your AWS access key, your AWS secret, and in what region you want to work for creating your default profile. As you can see, I chose to use the US West region.
Navigating AWS
I will be referencing the AWS Console throughout this article. In the upper right hand corner, you will see a button Sign in to the Console. Clicking that button takes you to a login screen. After authenticating, you finally end up on the AWS dashboard. In this dashboard you will see several services listed.
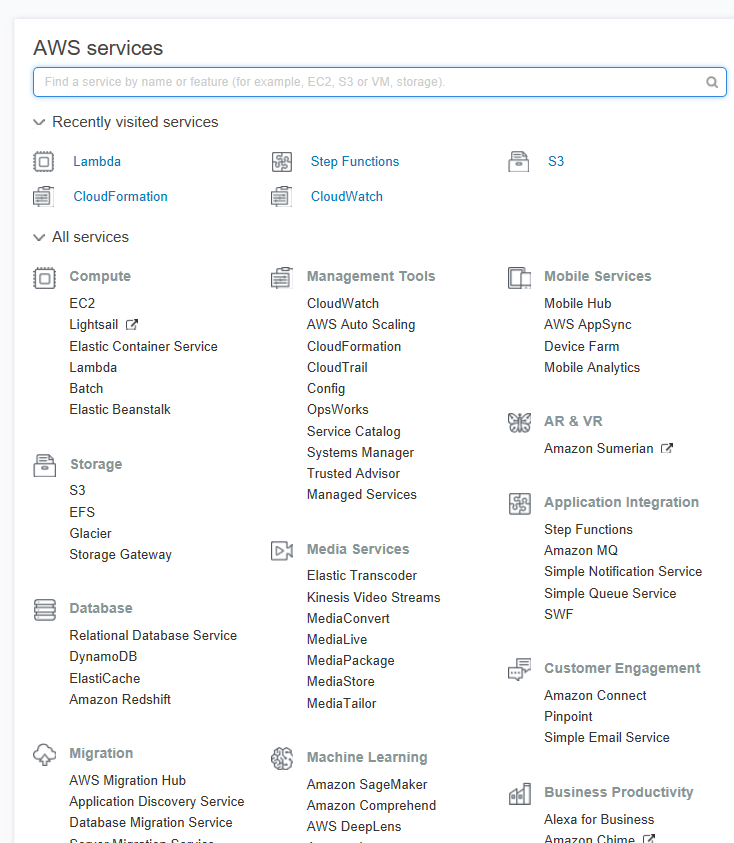
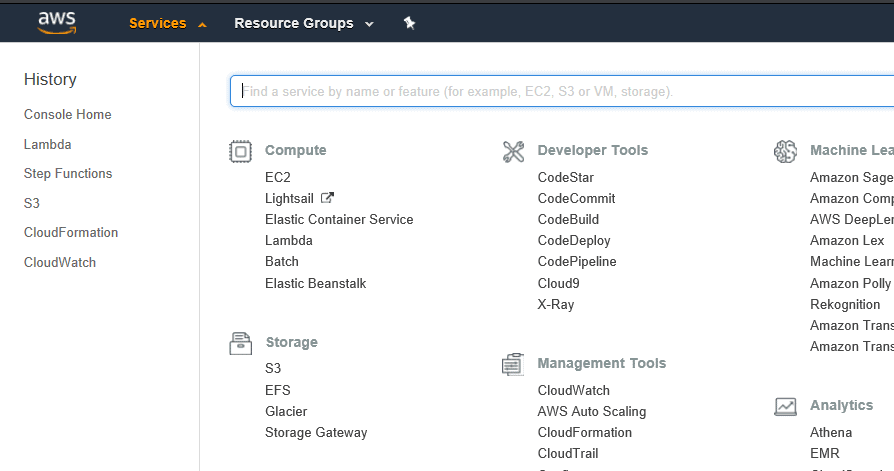
This article will visit the consoles for Lambda, Step Functions, CloudFormation, and S3 as you follow along. The top banner of the console website has a dropdown called Services. Chose that dropdown for ease of navigating between console screens.
Setting up Account Privileges
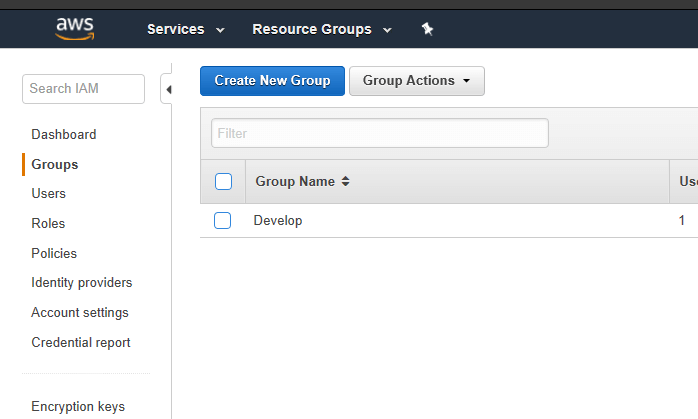
To see what your account privileges are when you created your account, you can go to the IAM console for drilling down to the details. There are a couple of tasks you may want to complete. I created a new Group called Develop within the Groups section.
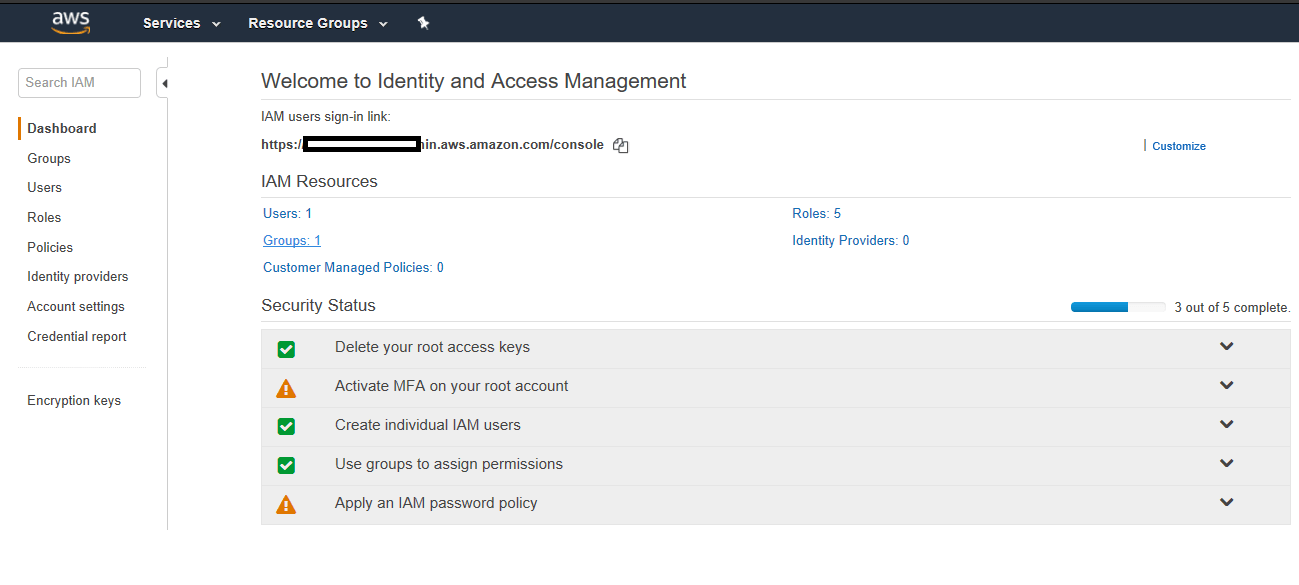
You will have to assign a name and permissions as you walk through the wizard. I gave Develop the AdministratorAccess policy, and I assigned myself to that group.
To create a group, click the Create New Group button to start the Create New Group Wizard.
Set the Group Name to something that will help you remember what it does.
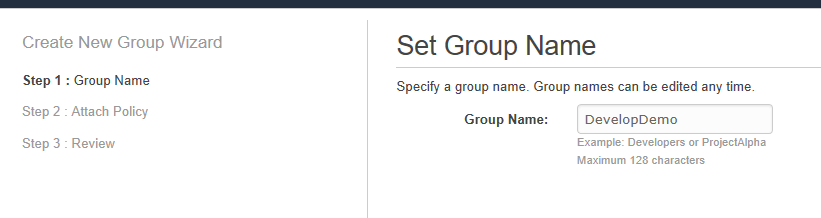
Click the Next Step button to advance to Attach Policy.
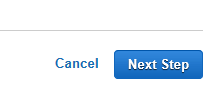
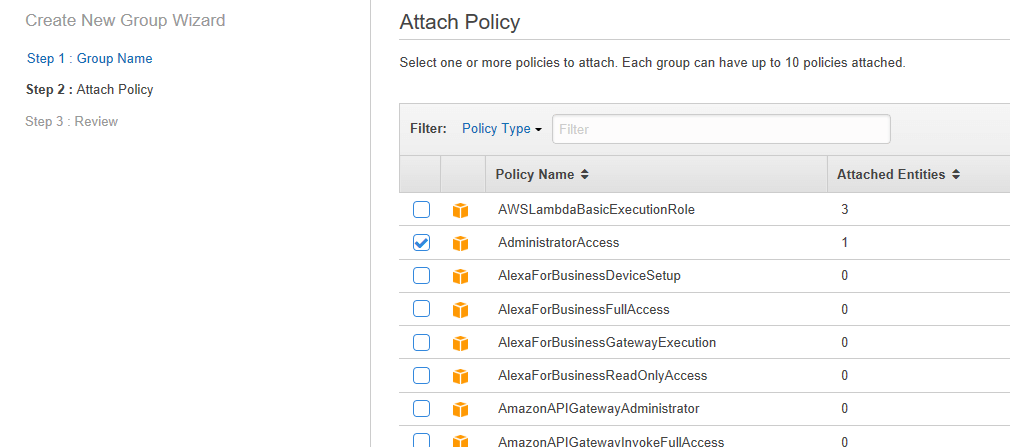
For the demo, select AdminstratorAccess before clicking the Next Step button for reviewing your actions.
After reviewing the group name and the policies, select the Create Group button.

Then, on the Groups tab and add your account to the group by selecting the Add User to Group button. You will be able to select a user. 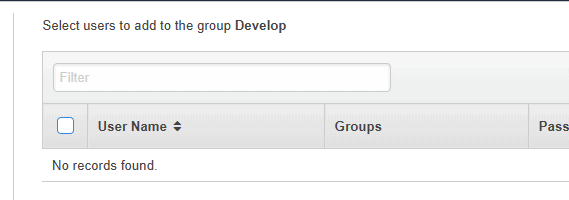
This article doesn’t dive too deep into the Identity and Access Management (IAM) since that could be the topic of a future article.
Creating the VS Project
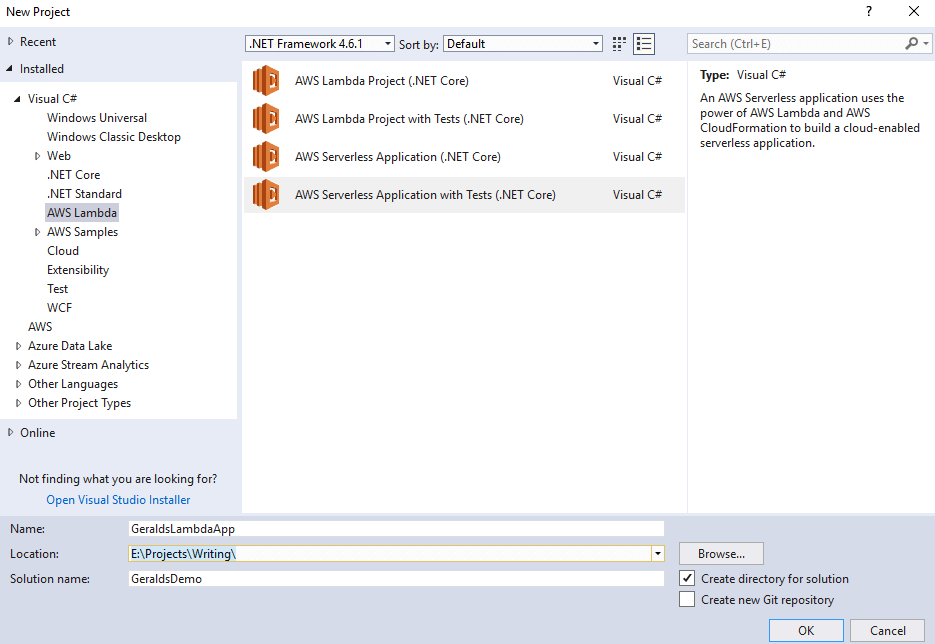
Create a Visual Studio solution/project by choosing AWS Serverless Application (.NET Core) within the New Project UI.
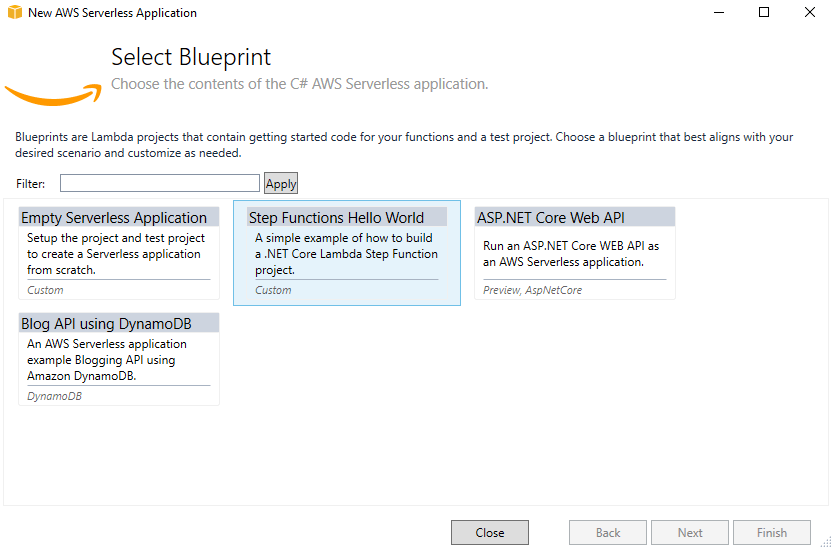
On the next screen choose Step Functions Hello World and click Finish.
The C# solution created will look something like the following:
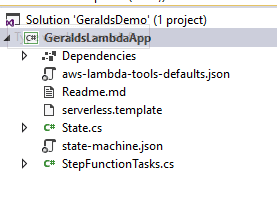
Basically, the GeraldsLambdaApp is an AWS Step Functions project similar to a workflow that calls Lambdas. Lambdas are like functions that run as Micro Services. It’s time to dissect the project.
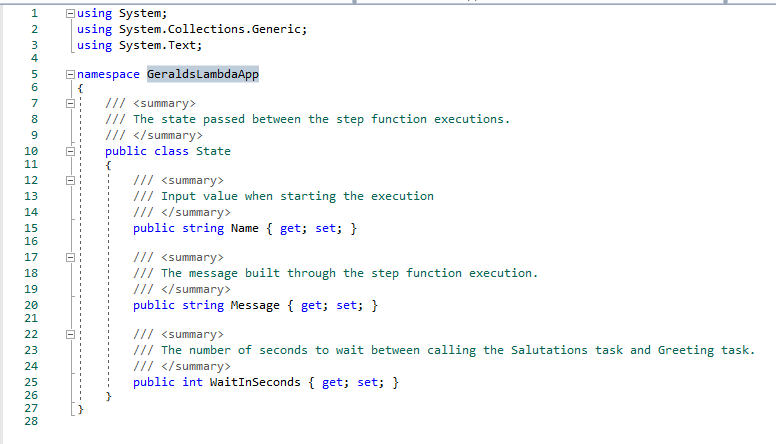
Since I’m a developer I must look at the code. The State.cs file contains the State class which is a vanilla data transfer object.
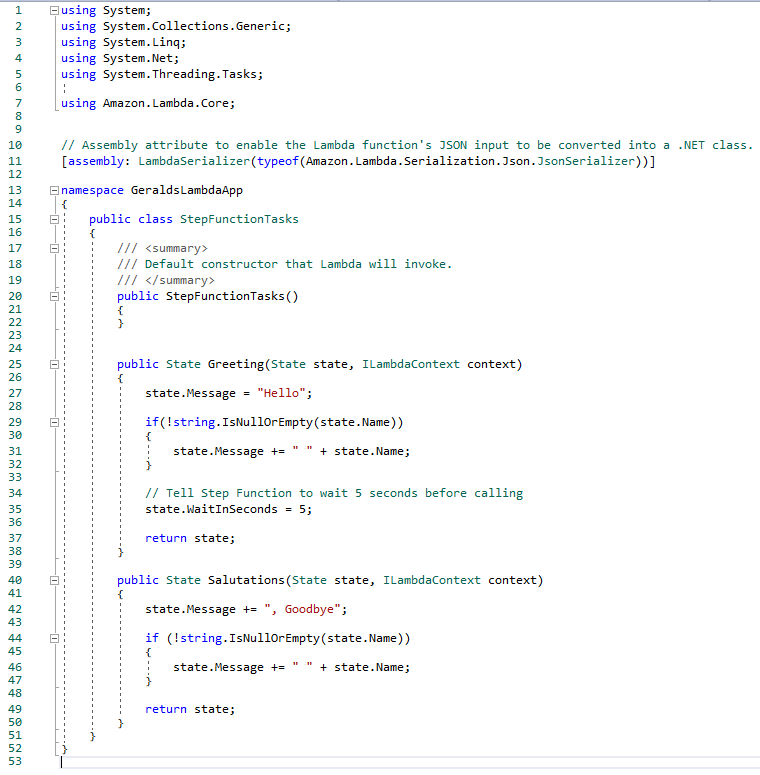
There is nothing earth shattering in the StepFunctionTasks.cs; it contains two methods that take in the State class and an ILambdaContext object.
The .NET Core dependencies are pretty straightforward.

Now onto the AWS files.
Take note of the following AWS files because they are instrumental for deploying to AWS via Visual Studio:
- aws-lambda-tools-defaults.json
- serverless.template
- state-machine.json
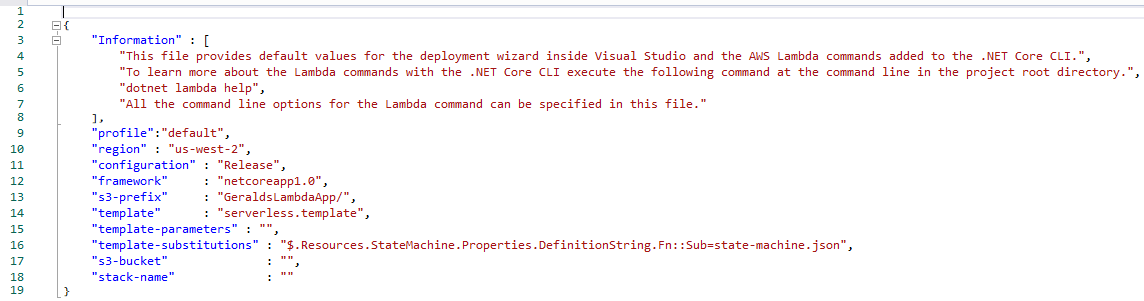
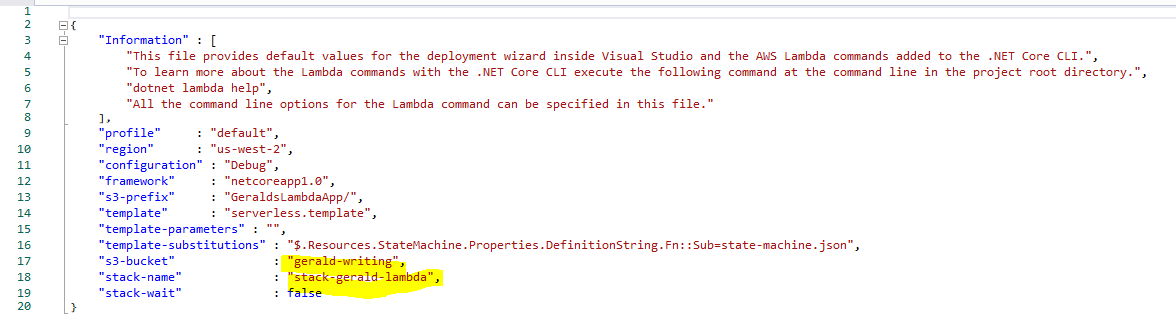
The aws-lambda-tools-defaults.json file contains the settings for deploying from Visual Studio to AWS; this is metadata on how to deploy, and it looks like this:
Take a look at the properties.
- profile is the AWS credentials you use to connect to AWS. You need to ensure you have all the proper permissions. This example uses the default profile. The profile is created when you install the AWS tool kit and can be managed in the Visual Studio AWS Explorer. You can add profiles, but that is beyond what I want to talk about with you today.
- region is the AWS region you are placing the application into. There are 15 AWS regions (not counting localhost) listed in the AWS Explorer. I chose the US West two region.
- configuration is what configuration that is being deployed, for example, Release and Debug.
- framework is associated with the .NET framework you are working with. .NET Core 2.0 is supported.
- s3-prefix is the value used within the AWS S3 bucket, i.e., folder name.
- template is the name of AWS Cloud Formation template to use for deploying the application.
- template-parameters are parameters for deployment. This example does not have any.
- template-substitutions is for identifying what to replace within the template. The first part is the path within the template and the value to put there after Fn::Sub=. This example sets the property DefinionString of the StateMachine within the Resources section of the template with the value state-machine.json.
- s3-bucket is the AWS S3 bucket that will be used for placing the assemblies that are within a zip file and a stack template file that contains all the information for deploying your application.
- stack-name is the name you will see in within AWS Cloud Formation console.
The file serverless.template is the Cloud Formation template that defines your application infrastructure. There are several screen shots to walk through.
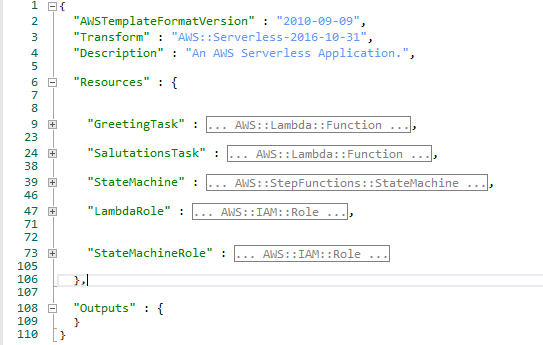
As you can see, the description describes what your application is doing. Resources is a collection of stuff that makes up the application. This example has two Lambda tasks: GreetingTask and SalutationsTask (C# code). The StateMachine describes the Step Function (workflow). And, there are two roles listed describing the permission needed to perform the actions.
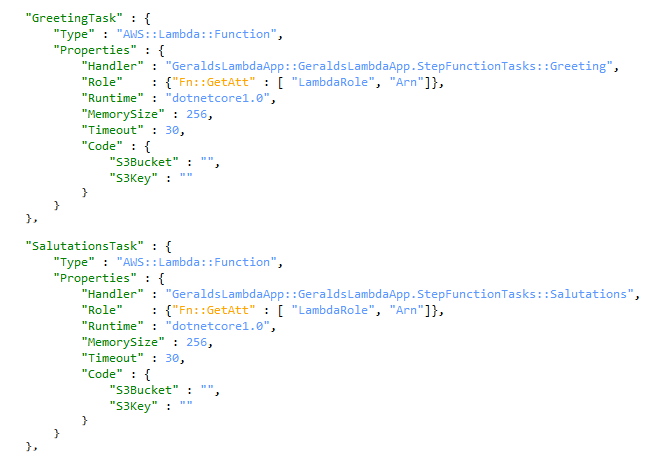
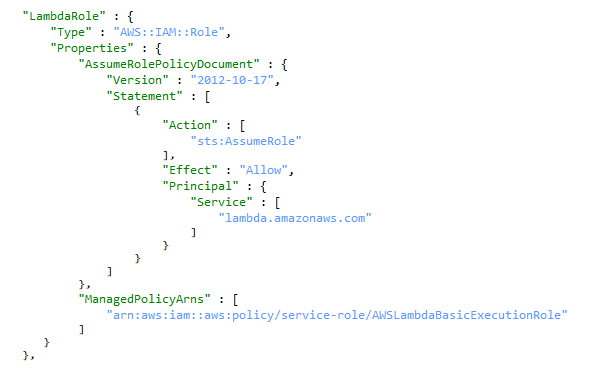
The task’s properties handler value is associated with the C# code. The pattern is: Assembly::Namespace.ClassName::MethodName. This handler value can only be 128 characters long. The properties Role value has {“Fn::GetAtt”: [“LambdaRole”, “Arn”]} which tells the deployment executable to go read the LambdaRole section for the specific Arn value(s) – the ManagedPolicyArns property.
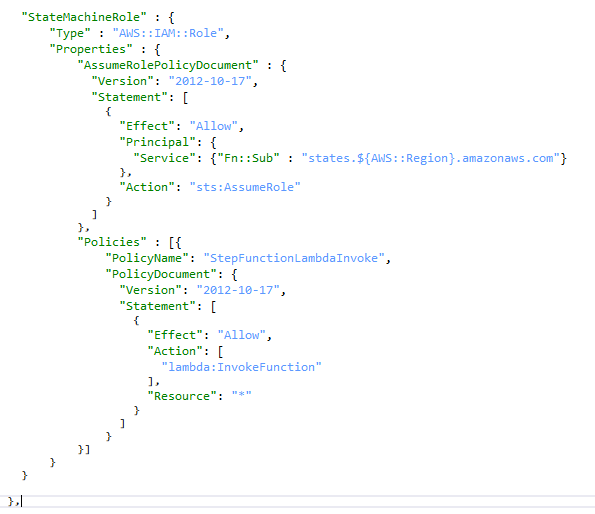
In this illustration you see Fn::Sub which is telling the deployment executable to replace the parameter. This parameter is found in the aws-lambda-tools-defaults.json file within the template-substitutions property.
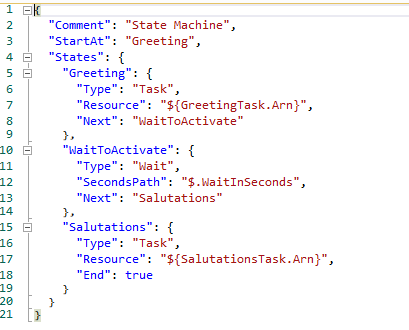
The file state-machine.json file describes the AWS Step Function steps.
The properties:
- Comment should describe what this state machine is accomplishing.
- StartAt is where to begin within the state machine. The value is listed within the States section.
- States is the list of work flow activities that are available.
- Greeting and Salutations are the names of C# methods that are being called.
- Type is the state type you are invoking.
- Resource is the ARN to be used. In this example, the ARN is parameterized since it’s not known until deployment time.
- SecondsPath is a value to wait (i.e., thread sleep) that is a parameter in the C# State class, again parameterized.
- Next is the next step in the workflow.
- End is saying it’s done.
The Type property can have the following values:
- Pass –this a pass-through step
- Task – this is the logic you want to invoke
- Choice – decision time here
- Wait –wait for a spell
- Succeed – success – it’s done
- Fail – something happened, and the execution needs to stop
- Parallel – think of this as creating parallel tasks
Files StepFunctionTasks.cs and State.cs are the C# code. You can review the logic on your own.
Now to deploy this to see what you have. Within the solution explorer, right-click on the project to get a context menu. Within that menu, select Publish to AWS Lambda… which will display the following form:

This example has the following settings:
- Account profile to use: default
- Region: US West
- Configuration: Debug
- Framework: .NET Core 1.0 (2.0 is also supported)
- Stack Name: stack-gerald-lambda (the name of the functions in AWS)
- S3 bucket: Gerald-writing (the storage space)
- Save settings: True (changes to the aws-lambda-tools-default.json file)
You can leave the S3 bucket and stack name blank, and AWS will create GUID-like values for you. I prefer to control the name so that I can find what I am looking for. I want to know which S3 bucket is being used because I need to clean up that S3 Bucket over time (AWS won’t do that for me) and I want a handle on my Cloud Formation name to distinguish it from my other templates. Choose Publish to push your code to AWS. The next screen shows a deployment log of what is happening. I have not included a screen shot of that nor the last AWS screen within Visual Studio; these last two screens are the Cloud Formation log activities and can also be seen within the AWS console’s Cloud Formation UI.
During deployment, changes are made to the s3-bucket and stack-name properties in the aws-lambda-tools-defaults.json file.
There are several screens with the AWS console to discuss. You could find all this within Visual Studio, but I tend to gravitate to the AWS console because I work there often and that is where I do some of my testing
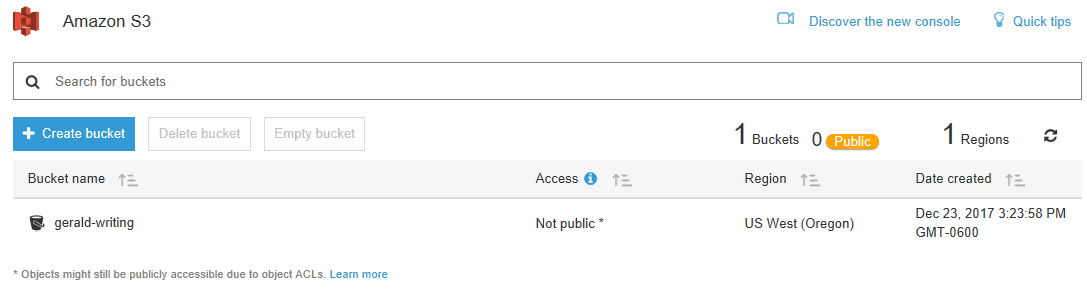
Begin by viewing S3 within the AWS console. Recall in the aws-lambda-tools-defaults.json file there is a property s3-bucket and the example set the value to Gerald-writing. You can see it in the list of S3 buckets. NOTE: s3-bucket names are unique across AWS.
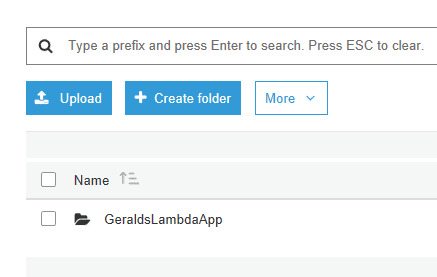
Navigate into the bucket to see the s3-prefix property value you assigned in the aws-lambda-tools-defaults.json file.
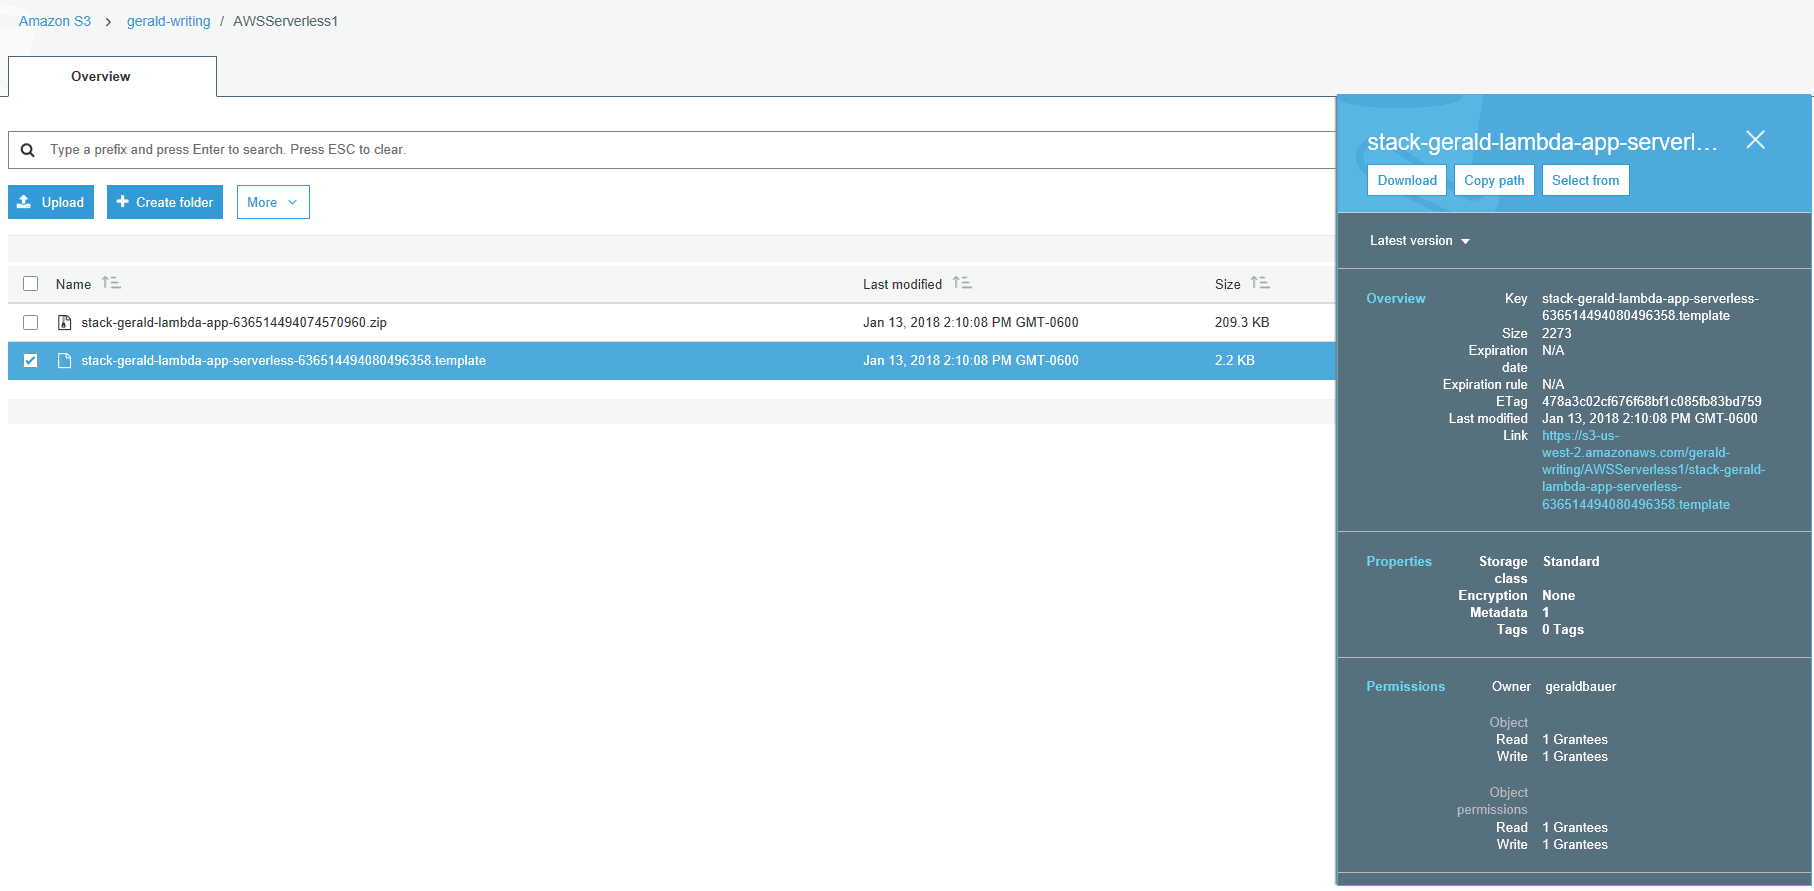
Navigate into this folder to see the zip folder that contains the code and the template file.
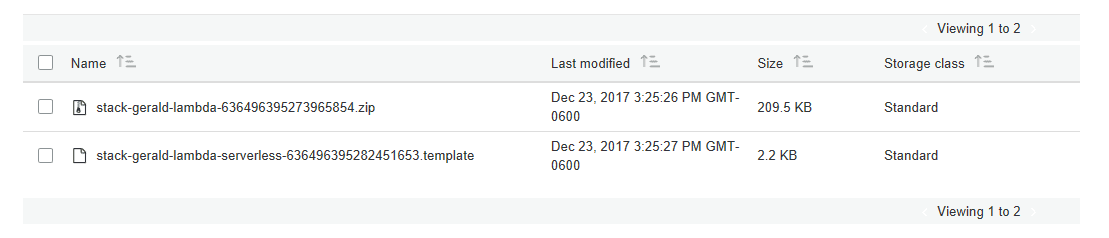
If you look at the template, you will see that it is fully filled out with the parameter values. Take a look and compare what you see in Visual Studio bin folder and the template saying what is being deployed.
Navigate within the AWS console to the Lambda Functions page. Make sure that the Region (found next to your account name at the top right) matches the region you specified when publishing to AWS. Your functions will look similar to this:

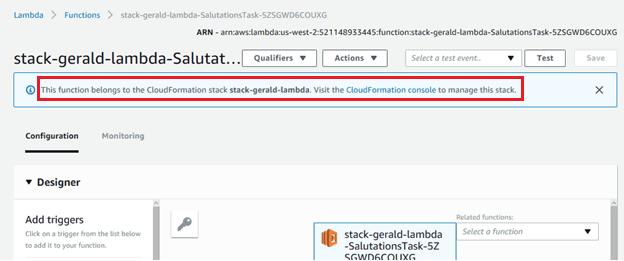
Click the Salutations Task lambda, and you will see that the lambda belongs to a Cloud Formation.
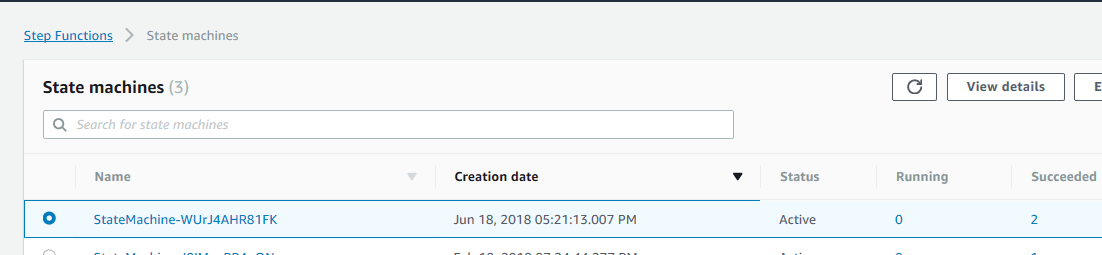
Search for Step Function within the AWS console and you’ll see the following:

Click the StateMachine name to take you to a Details screen. You will see detailed information for identifying the state machine (ARN), what role is used (IAM role ARN), the date created, an Executions tab, and a Definition tab. The Executions tab is where you can test your code by clicking on Start execution. This will bring up a modal dialog page where you can place your execution code. In this case it would be the JSON representation of the C# State class.
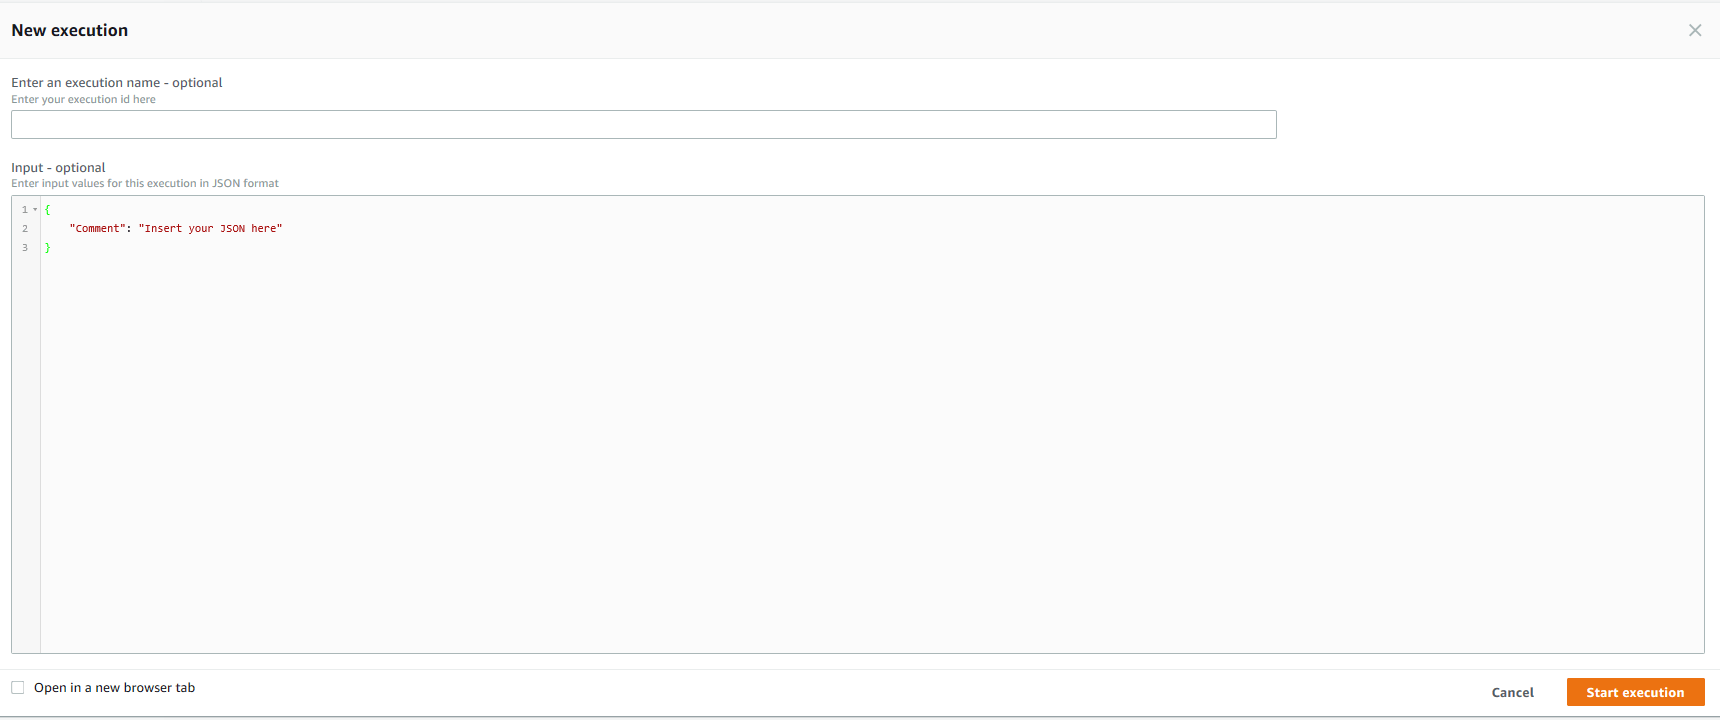
Replace the code with the following JSON snippet but add your own name if you wish.
|
1 2 3 4 5 |
{ "name": "Gerald", "message": "Hey", "waitInSeconds": 5 } |
Click Start Execution that you see in the lower right-hand corner to exercise the code. The execution detail page then appears telling you what is happening on the “Visual Workflow” tab. 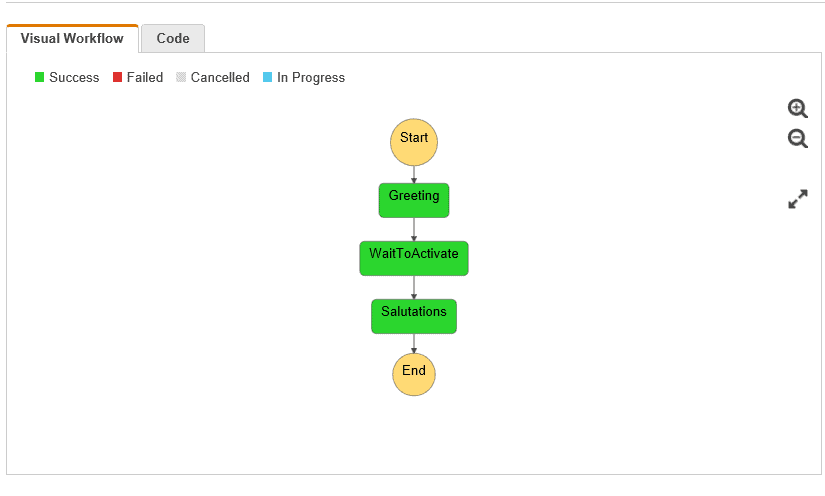
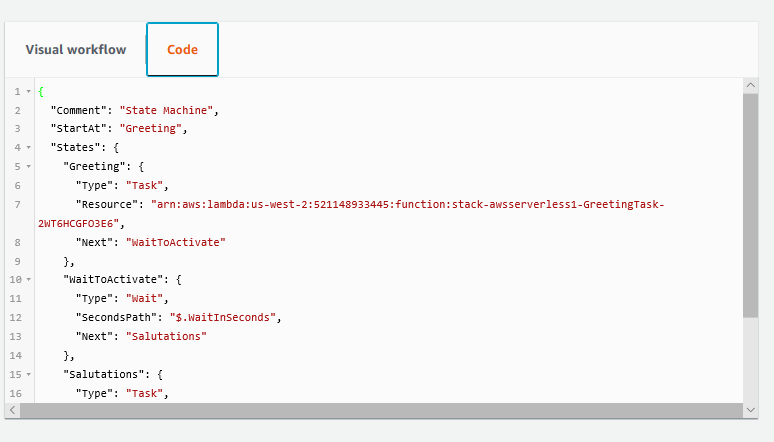
Examine the Code tab, and you will see the Visual Studio file state-machine.json with filled in values.
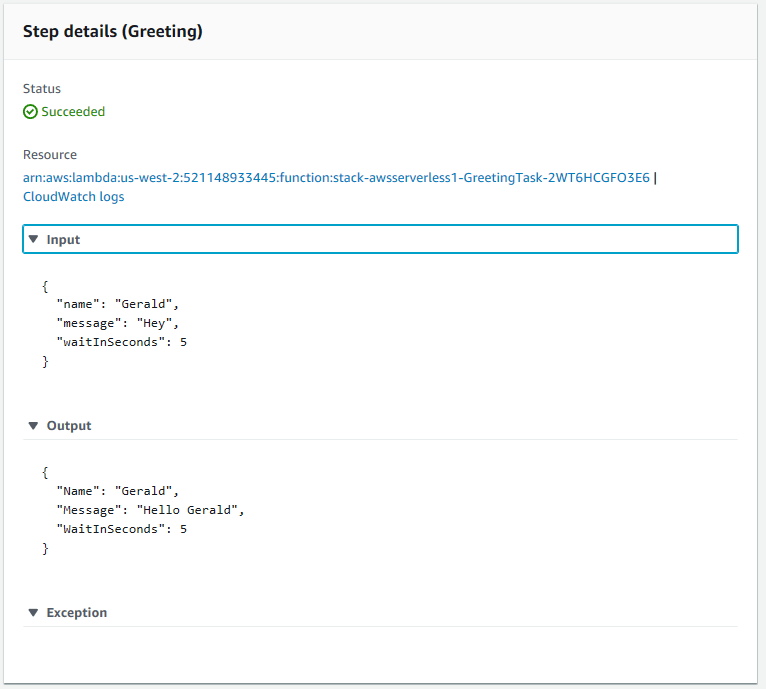
On the right side you can examine each step to see what happened. Switch back to the Visual Workflow tab and select the Greeting node to see what happened. Notice you have the Input JSON, the Output JSON, and any exception that occurred.
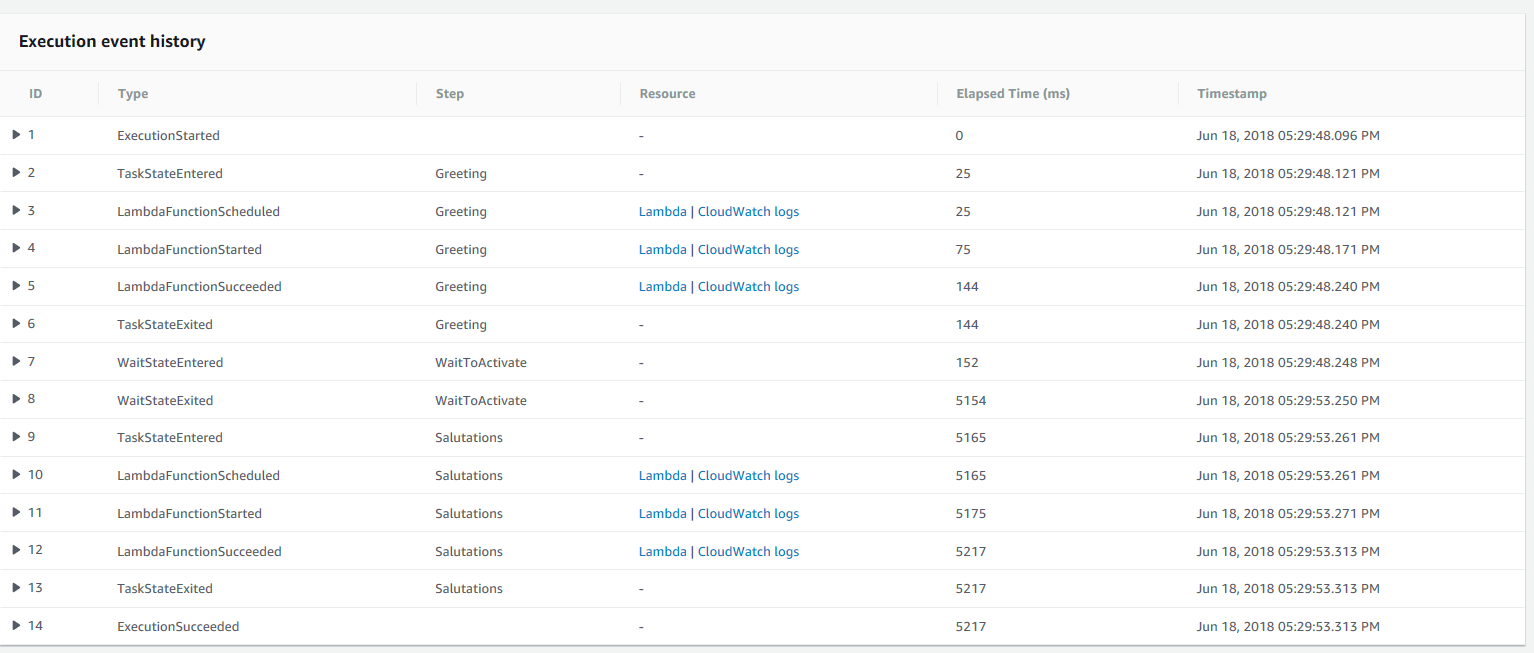
At the bottom of the page you will see the Execution event history section which gives you the details of what just happened at each Lambda State.
Expand the step arrows to see the JSON value related with each Lambda State. 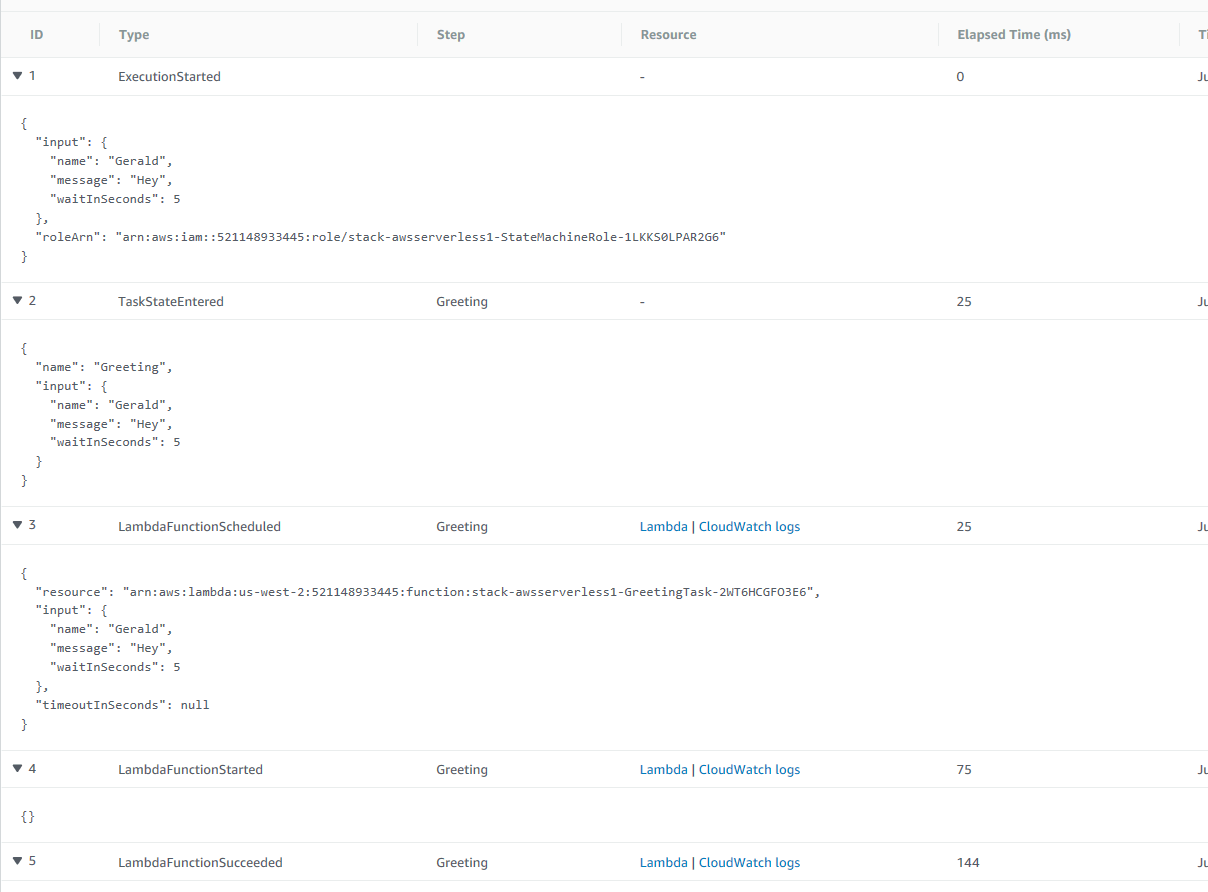
Navigate back to the State machines page. Select the state machine name and chose the View details button.
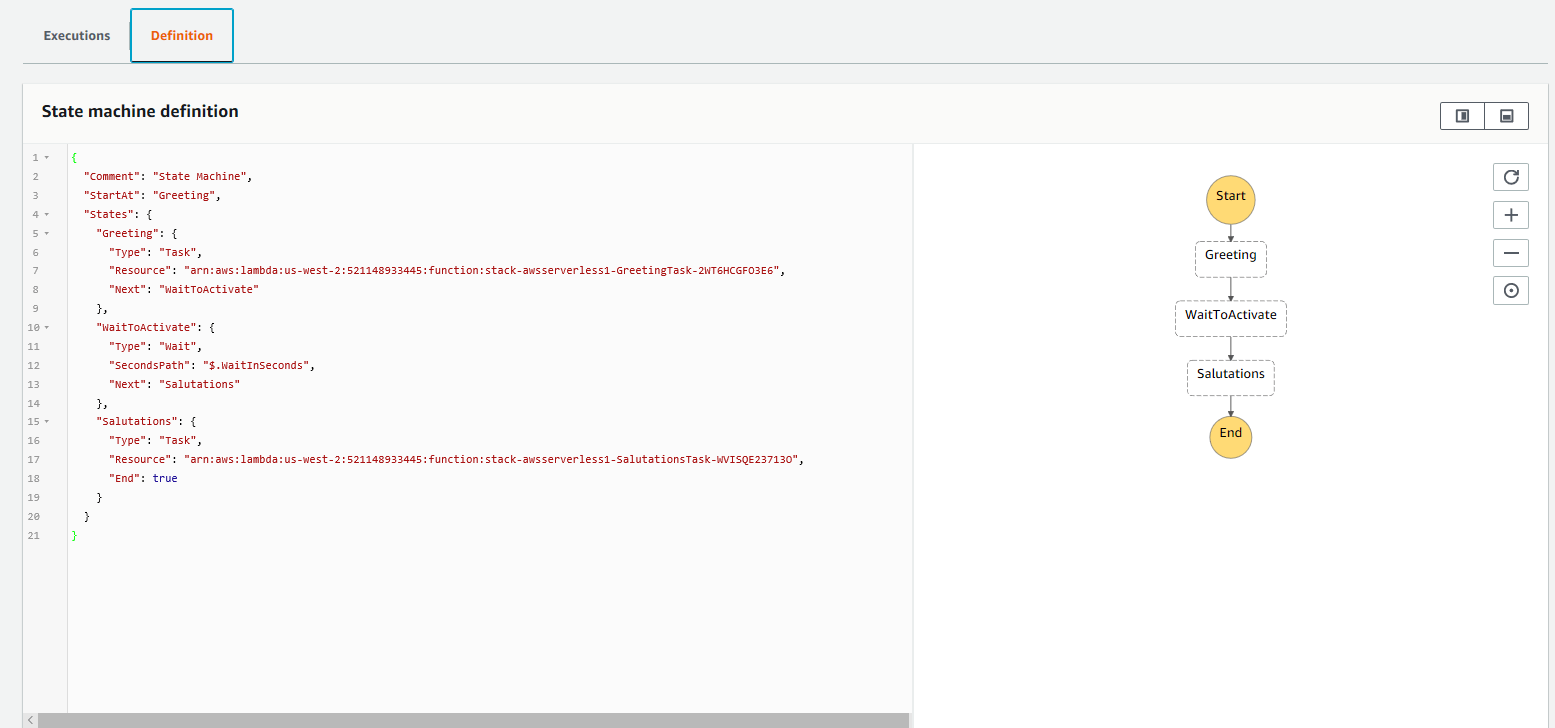
 There are two tabs Executions and Definition. Click on Definition. Notice that the code is what you saw in the state-machine.json file with a visualization of what the steps are on the right.
Navigate to the AWS console’s CloudFormation page where you will see the following:
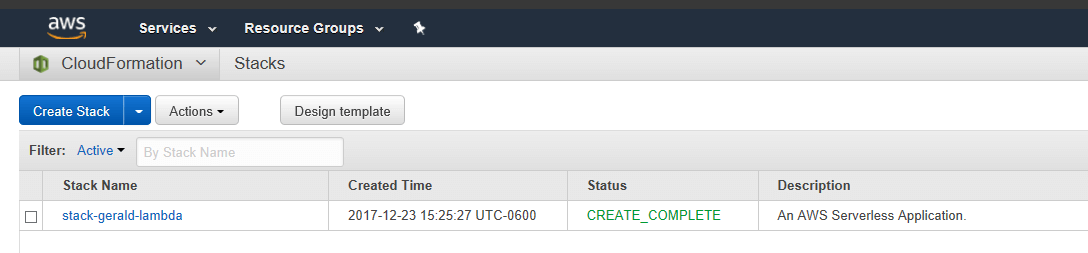
Click the hyperlink under Stack Name to see the log information that you saw in Visual Studio after publishing.
It’s time to review the power of the AWS Cloud Formation template. Go back to the main Cloud Formation UI. Delete the stack by selecting the checkbox next to the stack name. Select the Actions dropdown button and choose Delete Stack. Go back to the Lambda and Step Function pages. Everything was cleaned up for you. The only exception is the S3 bucket – the zip file and template are still in place. By having a Cloud Formation template, I can tear down and stand up the system in one deployment. For me with my DevOps hat on, I’m impressed! I have a simple mechanism to deploy an application or piece of a larger ecosystem. I can take this same template, change my configuration, and use it for deploying to another environment for testing or to production.
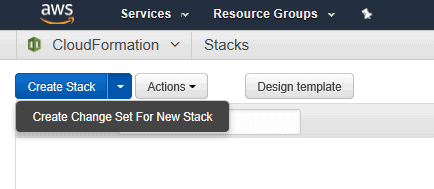
If you want to re-deploy the functions you just deleted, navigate to the CloudFormation – Stacks screen. Select Create Change Set For New Stack next to the Create Stack button.
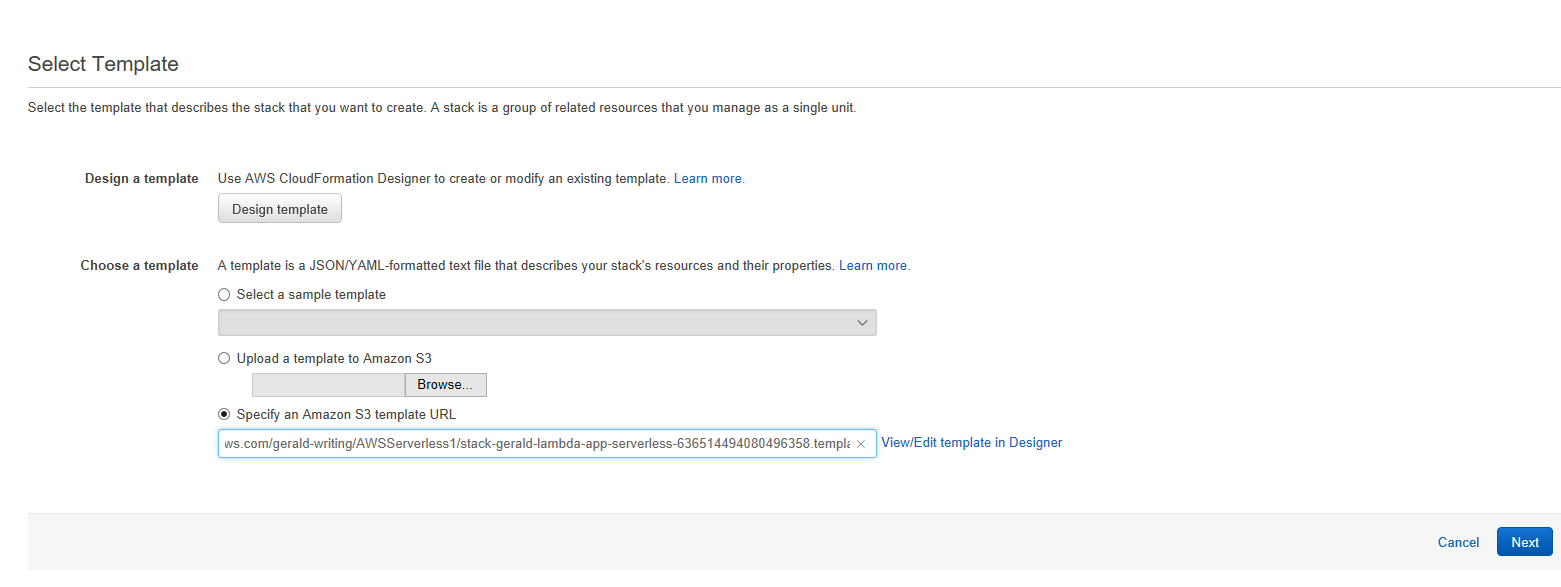
You will be taken to a new screen that asks where the template resides.
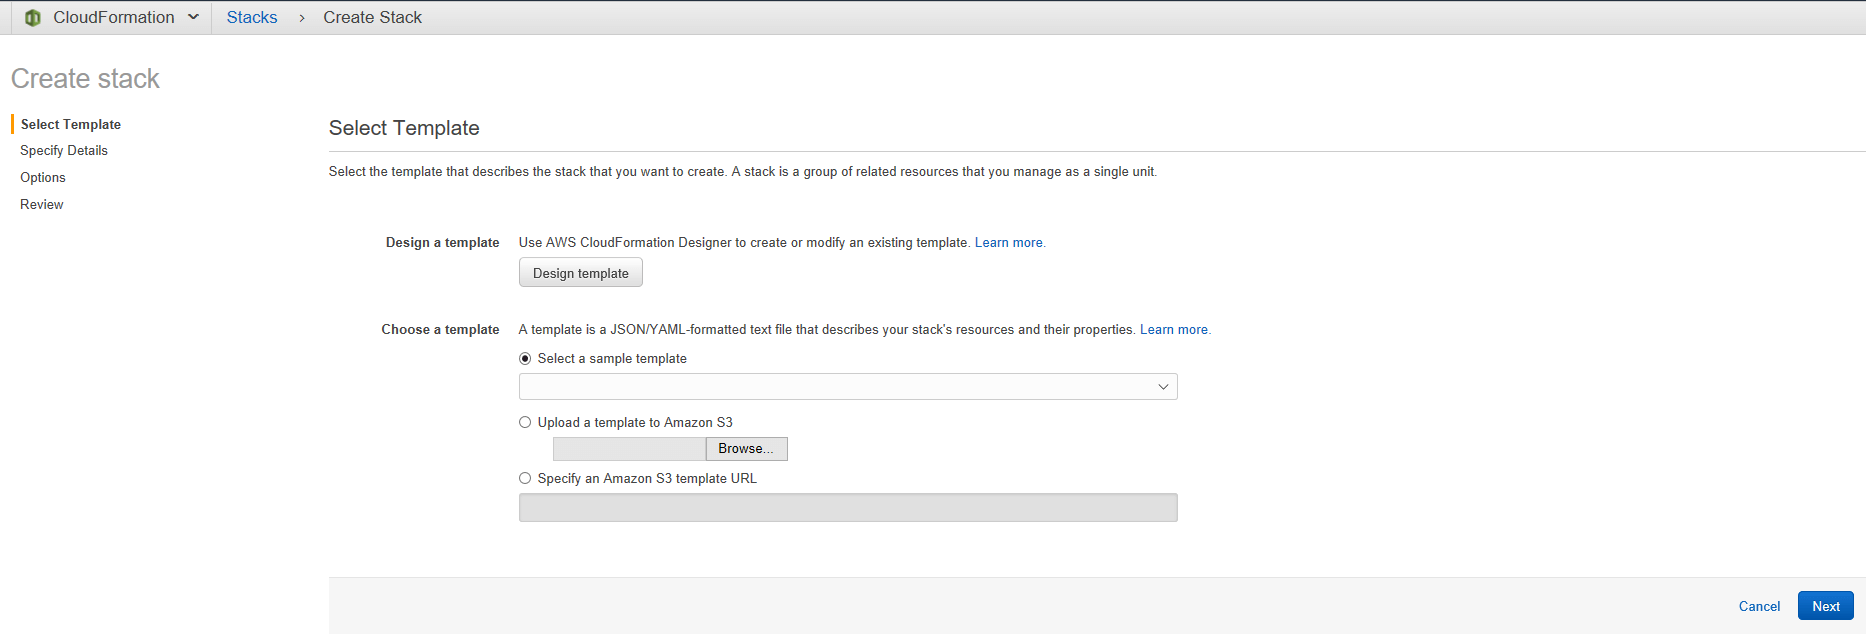
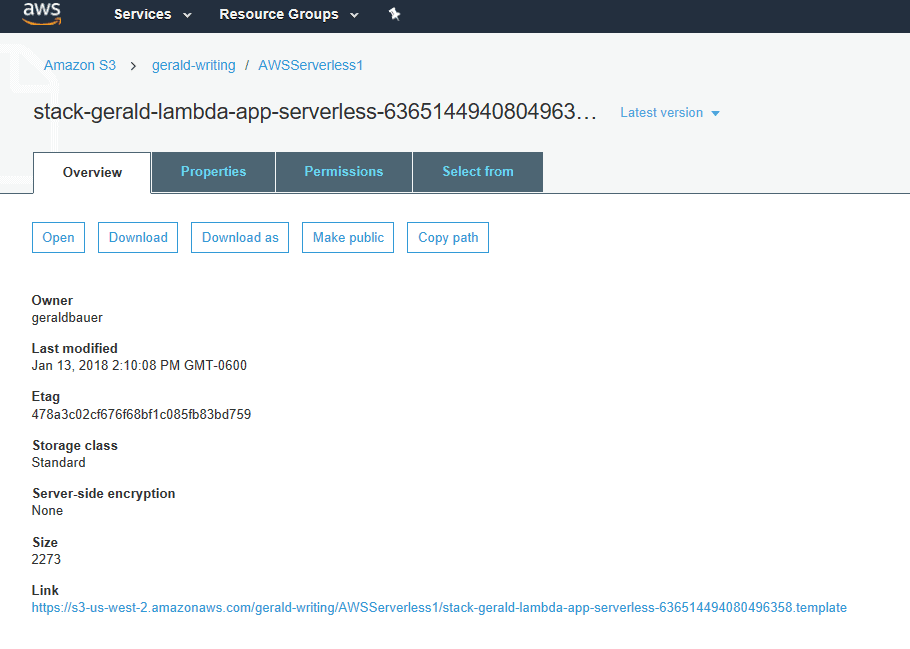
Since the template is already stored in an AWS S3 bucket, select the Specify an Amazon S3 template URL and paste in the link of the template. You get the link by navigating to the Amazon S3 bucket, selecting the folder you placed the template in, select checkbox next to the name of the template, and in the details copy the link.
Or click on the name to get the link.
Now that you have pasted into the textbox for Specify an Amazon S3 template URL, you can View/Edit the template or choose Next. Fill in the information as you move through the wizard screens.
You can explore this process on your own. I want to demonstrate Visual Studio deployments use case.
Implementing Your Own Code
Now that you understand the parts, you can make some changes to fully understand what is needed because ‘Hello World’ apps don’t make it to production. (Well, maybe they do, and they just don’t tell anyone.) The project code can be found at the bottom of the article.
Now it’s time to revisit the C# code in a real-world example. I am assuming you, the reader, is a C# developer that knows how to create solutions, projects, classes, interfaces, enums, and so forth within Visual Studio. My objective is to demonstrate using multiple classes instead of one class that contains your business logic and how that will look in the template and workflow files.
My real world-like example will have a set of validation rules for inputs that I can use when receiving an API call. I will accomplish this using a total of six C# classes: three task classes (workflow), two state classes, and an input class that will be examined. Notice that the state classes and application user information class are basically Data Transfer Objects (DTOs).
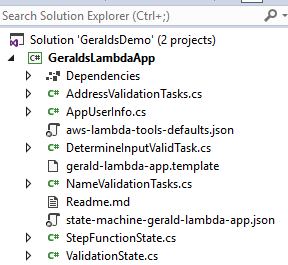
I created a project called GeraldLambdaApp within my GeraldsDemo solution. I then added classes and files for my real-world example.
Here are the C# class parts:
- The AppUserInfo class is a simple DTO that only contains properties that houses the data that will be validated against. I know you may formulate your application user into different objects (one for person, one for address, one for communication) whereas I put them all into one DTO to simplify the object for demonstration purposes. These properties are as follows:
- FirstName – the first name of the application user, this is a string
- LastName – the last name of the application user, this is a string
- AddressLine1 – the first line of an address, this is a string
- AddressLine2 – the second line of an address, this is a string
- City – the city associated with the address, this is a string
- State – the state associated with the address, this is a string
- Postal – the postal code, aka zip code, associated with the address, this is a string
- Country – the country associated with the address, this is a string
- Email – an email address for the application user, this is a string
- PhoneNumber – a phone number for the application user
- The ValidationState is a simple DTO that contains properties for holding onto the validation results. Once more, you will formulate your DTO to meet your application needs. The properties are as follows:
- PropertyName – the property name the validation error is for, this is a string
- ValidationMessage – the validation message you want the consumer of your application to know, this is a string
- IsError – an indicator that there is an error, this is a Boolean
- IsWarning – an indicator that there is a warning, this is a Boolean
- The StepFunctionState is another DTO, but a wrapper around what is being validated and the results. This object is passed between Lambdas. I like to have one object that encompasses the objects I’m working with. Some places may call this their input DTO. Some may not wish to name the class with ‘State.’ I did so that you can tie it back to the Hello World example. The properties are as follows:
- InputValue – this is the AppUserInfo class that is being validated
- InputValidation – this is a list of ValidationState objects (some may wish to use IEnumerable, but I am trying to demonstrate how to reuse the same object between Lambdas)
- HasErrors – an indicator that you have errors associated with the validation, this is a Boolean
- The AddressValidationTasks class is one of the validation business logic that has one public method with multiple private methods. This is a check to see if the address is acceptable. You could have multiple methods for each property of the address. I did not because I wanted to demonstrate that you could have one class be a single Lambda endpoint where a lot of work happens. Here are the methods:
- Address – public method that takes in the StepFunctionState class and the ILambdaContent. This method returns a StepFunctionState class. This method calls the Validate method.
- Validate – private method that takes in the AppUserInfo class and returns a list of ValidationState classes. This method checks to see if there is a value for the specified property and if the length is acceptable. If not, you add a new ValidationState to or ValidationState list.
- IsThereValue – private method that takes in a string value and return a Boolean. This method checks to see if the string value is not null or white spaces.
- IsLengthValid – private method that takes in a string value and an integer representing the maximum size of the string. This method checks to see if the string length is less than or equal to the input integer value.
- The NameValidationTasks class is another validation business logic that contains two public methods. I am demonstrating that a single class can have more than one Lambda endpoints. It could have been done it in one Lambda, but I wanted to show that each endpoint can live in a single class. The methods are as follows:
- FirstName – public method that takes in a StepFunctionState class and the ILambdaContent. This method returns a StepFunctionState. This method validates that the FirstName property of the StepFunctionState InputValue property is valid (not null or white space and length does not exceed 50). If not valid, add a new ValidationState to the input StepFunctionState InputValidation property.
- LastName – public method that takes in a StepFunctionState class and the ILambdaContent. This method returns a StepFunctionState. This method validates that the LastName property of the StepFunctionState InputValue property is valid (not null or white space and length does not exceed 50). If not valid, add a new ValidationState to the input StepFunctionState InputValidation property.
- The DetermineInputValidTask class has a single public method that sets the StepFunctionState properties HasErrors and HasWarnings. The method is
- SetErrorsAndWarnings – public method that takes in a StepFunctionState class and the ILambdaContent. This method returns a StepFunctionState. This method sets the StepFunctionState HasErrors property based upon the StepFunctionState InputValidation property when an error is present. This method sets the StepFunctionState HasWarnings property based upon the StepFunctionState InputValidation property when a warning is present.
I know some folks just want to see the C# code and not just read about them.
Here is AppUserInfo.cs
|
1 2 3 4 5 6 7 8 9 10 11 12 13 14 15 16 |
namespace GeraldsLambdaApp { public class AppUserInfo { public string FirstName { get; set; } public string LastName { get; set; } public string AddressLine1 { get; set; } public string AddressLine2 { get; set; } public string City { get; set; } public string State { get; set; } public string Postal { get; set; } public string Country { get; set; } public string Email { get; set; } public string PhoneNumber { get; set; } } } |
ValidateionState.cs
|
1 2 3 4 5 6 7 8 9 10 |
namespace GeraldsLambdaApp { public class ValidationState { public string PropertyName { get; set; } public string ValidationMessage { get; set; } public bool IsError { get; set; } public bool IsWarning { get; set; } } } |
StepFunctionState.cs
|
1 2 3 4 5 6 7 8 9 10 11 12 13 14 15 16 17 18 |
using System.Collections.Generic; namespace GeraldsLambdaApp { /// <summary> /// The state passed between the step function executions. /// </summary> public class StepFunctionState { public AppUserInfo InputValue { get; set; } public List<ValidationState> InputValidation { get; set; } = new List<ValidationState>(); public bool HasErrors { get; set; } public bool HasWarnings { get; set; } } } |
AddressValidationTasks.cs
|
1 2 3 4 5 6 7 8 9 10 11 12 13 14 15 16 17 18 19 20 21 22 23 24 25 26 27 28 29 30 31 32 33 34 35 36 37 38 39 40 41 42 43 44 45 46 47 48 49 50 51 52 53 54 |
using Amazon.Lambda.Core; using System.Collections.Generic; using System.Text.RegularExpressions; namespace GeraldsLambdaApp { public class AddressValidationTasks { public StepFunctionState Address(StepFunctionState state, ILambdaContext context) { state.InputValidation.AddRange(Validate(state.InputValue)); return state; } private List<ValidationState> Validate(AppUserInfo userInfo) { var validationStates = new List<ValidationState>(); if (!IsThereValue(userInfo.AddressLine1)) validationStates.Add(new ValidationState { IsError = true, PropertyName = nameof(userInfo.AddressLine1), ValidationMessage = "Address line 1 is required." }); else if (!IsLengthValid(userInfo.AddressLine1, 50)) validationStates.Add(new ValidationState { IsError = true, PropertyName = nameof(userInfo.AddressLine1), ValidationMessage = $"Address line 1 needs to less than {50} characters." }); if (!IsThereValue(userInfo.City)) validationStates.Add(new ValidationState { IsError = true, PropertyName = nameof(userInfo.City), ValidationMessage = $"{nameof(userInfo.City)} is required." }); else if (!IsLengthValid(userInfo.City, 20)) validationStates.Add(new ValidationState { IsError = true, PropertyName = nameof(userInfo.AddressLine1), ValidationMessage = $"{nameof(userInfo.City)} cannot exceed {20} characters." }); if (!IsThereValue(userInfo.State)) validationStates.Add(new ValidationState { IsError = true, PropertyName = nameof(userInfo.State), ValidationMessage = $"{nameof(userInfo.State)} is required." }); else if (!IsLengthValid(userInfo.State, 50)) validationStates.Add(new ValidationState { IsError = true, PropertyName = nameof(userInfo.AddressLine1), ValidationMessage = $"{nameof(userInfo.State)} cannot exceed {20} characters." }); if (!IsThereValue(userInfo.Postal)) validationStates.Add(new ValidationState { IsError = true, PropertyName = nameof(userInfo.Postal), ValidationMessage = $"{nameof(userInfo.Postal)} is required." }); else if (!IsLengthValid(userInfo.Postal, 11)) validationStates.Add(new ValidationState { IsError = true, PropertyName = nameof(userInfo.AddressLine1), ValidationMessage = $"{nameof(userInfo.Postal)} cannot exceed {11} characters." }); if (!IsThereValue(userInfo.Country)) validationStates.Add(new ValidationState { IsError = true, PropertyName = nameof(userInfo.Country), ValidationMessage = $"{nameof(userInfo.Country)} is required." }); else if (!IsLengthValid(userInfo.Country, 50)) validationStates.Add(new ValidationState { IsError = true, PropertyName = nameof(userInfo.AddressLine1), ValidationMessage = $"{nameof(userInfo.Country)} cannot exceed {50} characters." }); if (!IsThereValue(userInfo.Email)) validationStates.Add(new ValidationState { IsError = true, PropertyName = nameof(userInfo.Email), ValidationMessage = $"{nameof(userInfo.Email)} is required." }); else if (!IsLengthValid(userInfo.Email, 50)) validationStates.Add(new ValidationState { IsError = true, PropertyName = nameof(userInfo.AddressLine1), ValidationMessage = $"{nameof(userInfo.Email)} cannot exceed {50} characters." }); if (!IsThereValue(userInfo.PhoneNumber)) validationStates.Add(new ValidationState { IsError = true, PropertyName = nameof(userInfo.PhoneNumber), ValidationMessage = $"{nameof(userInfo.PhoneNumber)} is required." }); else if (!IsLengthValid(userInfo.PhoneNumber, 10)) validationStates.Add(new ValidationState { IsError = true, PropertyName = nameof(userInfo.AddressLine1), ValidationMessage = $"{nameof(userInfo.PhoneNumber)} cannot exceed {10} characters." }); return validationStates; } private bool IsThereValue(string value) { return !string.IsNullOrWhiteSpace(value); } private bool IsLengthValid(string value, int length) { return value.Length <= length; } } } |
NameValidationTasks.cs
|
1 2 3 4 5 6 7 8 9 10 11 12 13 14 15 16 17 18 19 20 21 22 23 24 25 26 27 28 29 30 31 32 33 34 35 36 37 38 39 40 41 42 43 44 45 46 47 48 49 50 51 52 53 54 55 56 57 58 |
using Amazon.Lambda.Core; // Assembly attribute to enable the Lambda function's JSON input to be converted into a .NET class. [assembly: LambdaSerializer(typeof(Amazon.Lambda.Serialization.Json.JsonSerializer))] namespace GeraldsLambdaApp { public class NameValidationTasks { /// <summary> /// Default constructor that Lambda will invoke. /// </summary> public NameValidationTasks() { } public StepFunctionState FirstName(StepFunctionState state, ILambdaContext context) { if (string.IsNullOrWhiteSpace(state.InputValue.FirstName)) state.InputValidation.Add(new ValidationState { IsError = true, PropertyName = nameof(state.InputValue.FirstName), ValidationMessage = "First name is required." }); else if (state.InputValue.FirstName.Length > 50) state.InputValidation.Add(new ValidationState { IsError = true, PropertyName = nameof(state.InputValue.FirstName), ValidationMessage = $"Address line 1 needs to less than {50} characters." }); return state; } public StepFunctionState LastName(StepFunctionState state, ILambdaContext context) { if (string.IsNullOrWhiteSpace(state.InputValue.LastName)) state.InputValidation.Add(new ValidationState { IsError = true, PropertyName = nameof(state.InputValue.LastName), ValidationMessage = "Last name is required." }); else if (state.InputValue.LastName.Length > 50) state.InputValidation.Add(new ValidationState { IsError = true, PropertyName = nameof(state.InputValue.LastName), ValidationMessage = $"Address line 1 needs to less than {50} characters." }); return state; } } } |
Within NameValidationTasks.cs file you see the code
|
1 |
[assembly: LambdaSerializer(typeof(Amazon.Lambda.Serialization.Json.JsonSerializer))] |
It resides outside of the Namespace. It could live in any of your C# files. If you wanted to, you could create just a cs file that contains just this reference. There is no particular reason why it has to be in this file. With that said, I would keep it with code that is not referenced throughout your application, unless everything is with an AWS Lambda. The purpose of this logic is to reference the lambda serializer so that you can reference the objects without casting them when deserializing a JSON input.
DetermineInputValidTask.cs
|
1 2 3 4 5 6 7 8 9 10 11 12 13 14 15 16 17 18 19 20 21 |
using Amazon.Lambda.Core; using System.Linq; namespace GeraldsLambdaApp { public class DetermineInputValidTask { public DetermineInputValidTask() { } public StepFunctionState SetErrorsAndWarnings(StepFunctionState state, ILambdaContext context) { state.HasErrors = state.InputValidation.Any(s => s.IsError == true); state.HasWarnings = state.InputValidation.Any(s => s.IsWarning == true); return state; } } } |
The AWS files needed:
- A file named aws-lambda-tools-defaults.json that has the metadata for AWS to deploy your application. This was discussed earlier.
- A .template file. I named mine gerald-lambda-app.template. Recall that this template file is a JSON file that describes the application you are deploying.
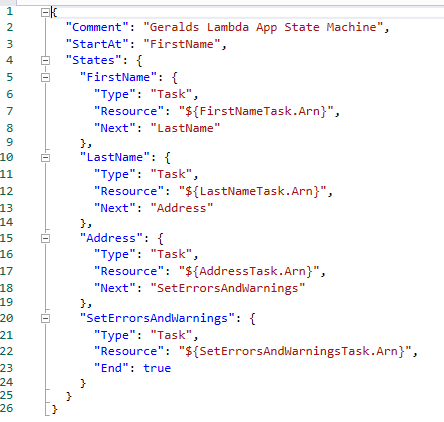
- A state machine JSON file. I called mine state-machine-gerald-lambda-app.json. Remember this file defines the workflow process.
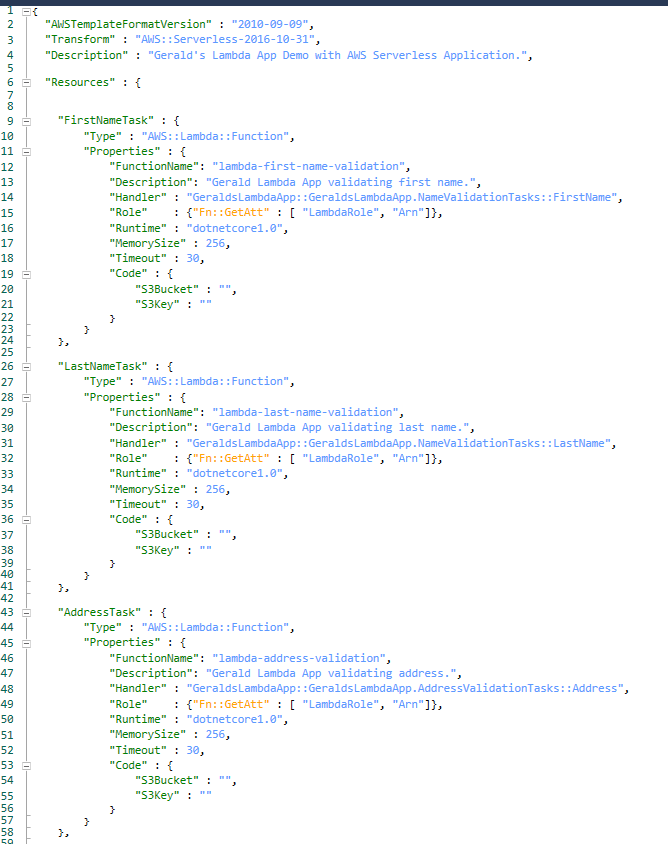
Now you need to create the Cloud Formation template to register the Lambdas, the access roles, and the state machine. You have four AWS Lambdas (tasks):
- FirstNameTask – found in NameValidationTasks.cs
- LastNameTask – found in NameValidationTasks.cs
- AddressTask – found in AddressValidationTasks.cs
- SetErrorsAndWarningsTask – found in DetermineInputValidTask.cs
Recall the handler within the template is the Assembly Name::Namespace.Class Name::Method Name.
The temple file gerald-lambda-app.template:
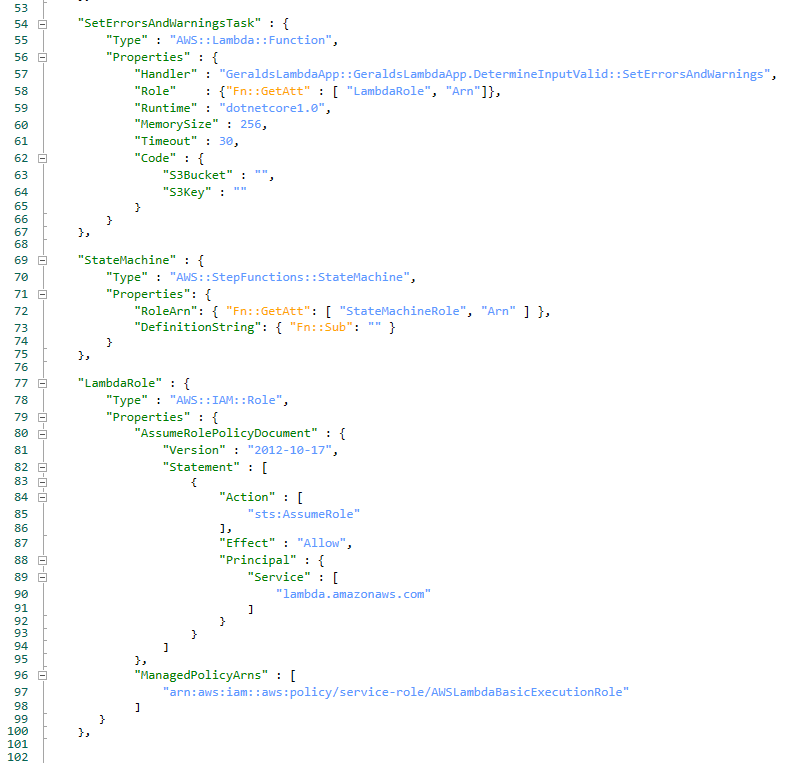

Here is the state machine step function JSON (state-machine-gerald-lambda-app.json) for the workflow:
Here is what the solution looks like:
I tend to keep the Readme.md file more as a reference.
Then publish the application to AWS via Visual Studio as you did earlier in this article with the sample code AWS provided. Within the solution explorer, right-click on the project to get a context menu. Within that menu, select Publish to AWS Lambda…Here is a successful deployment within Visual Studio.
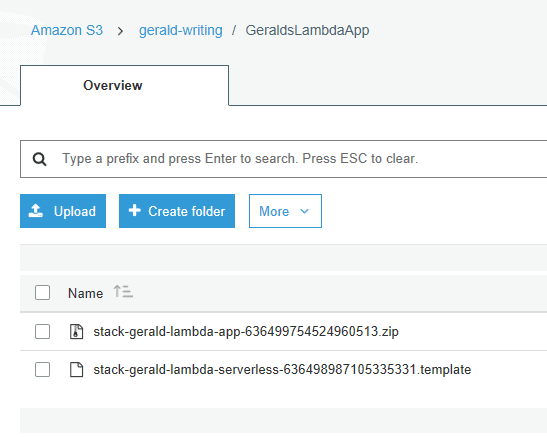
Notice this new change within the AWS S3 bucket (using the AWS Console as you did earlier for navigation):
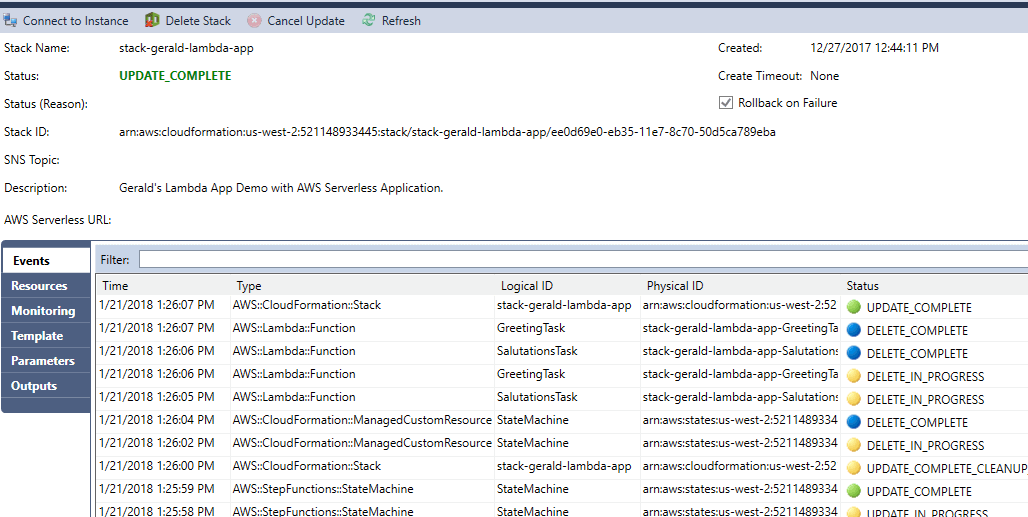
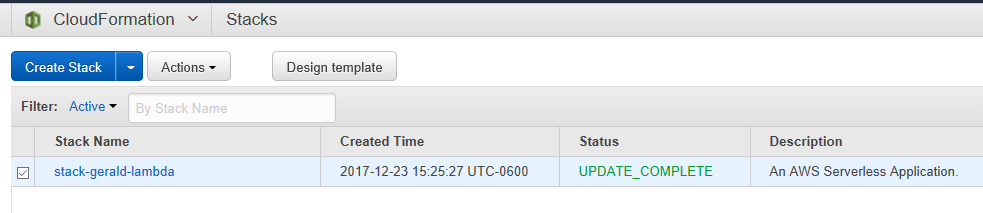
Navigate to the Cloud Formation UI using AWS Console you’ll see that the new code/application exists:
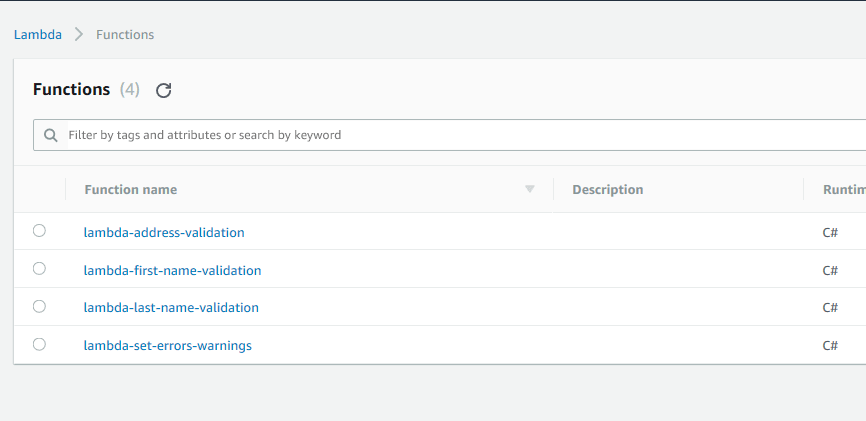
If you navigate via AWS console to the AWS Lambda screen, you’ll see the new application’s AWS Lambdas:
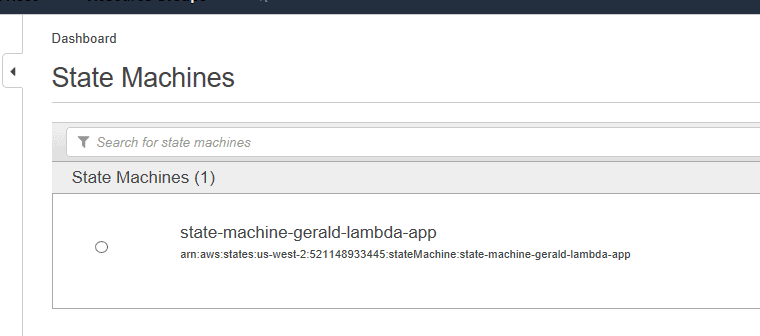
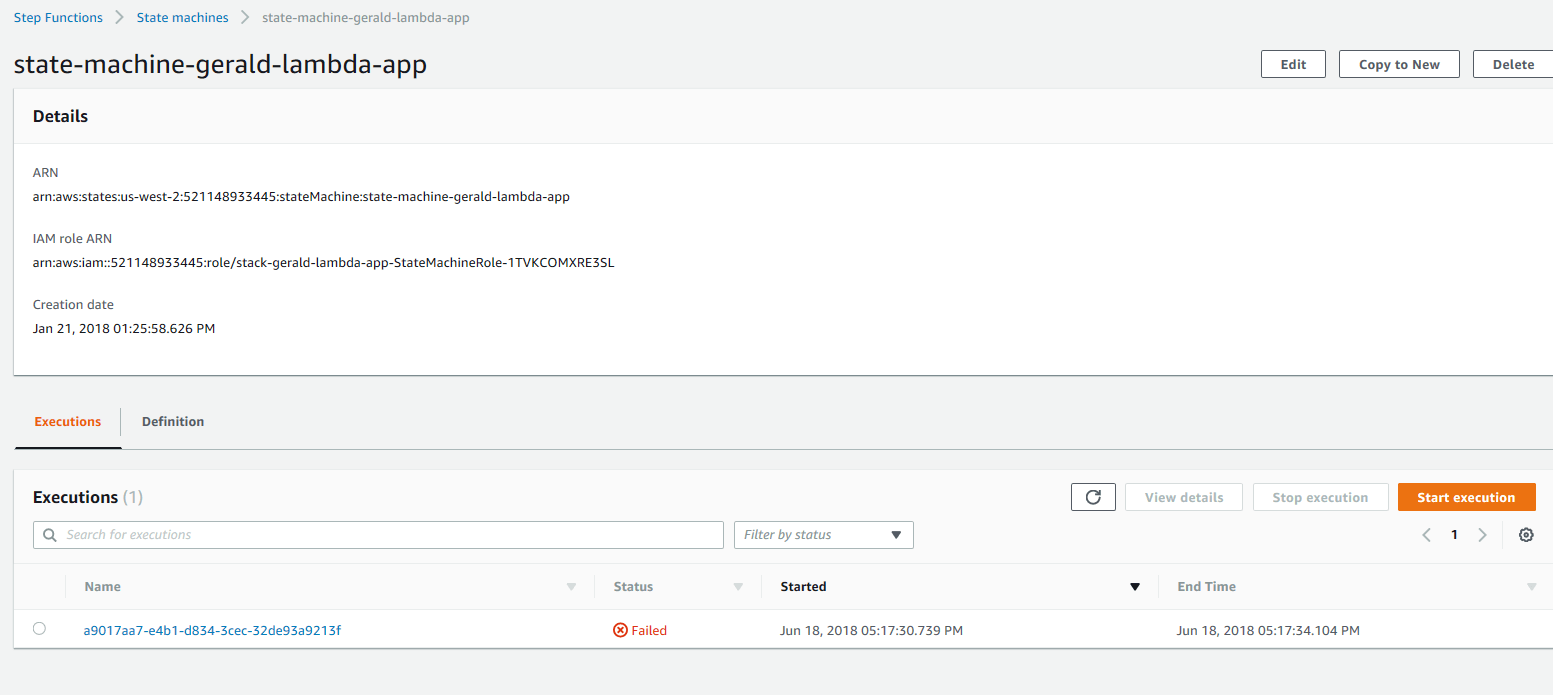
Navigate to the Step Functions page to see the State Machine.
You can see the details of the state machine by clicking the State Machine name and then choosing the Definition tab.
Now it’s time to test the state machine. Select the Executions tab and choose Start execution.
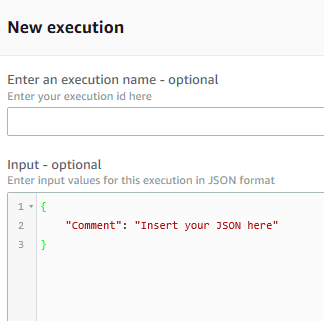
Create a JSON document that represents the inputs and replace the code.
|
1 2 3 4 5 6 7 8 9 10 11 12 |
{ "InputValue": { "FirstName": "Gerald", "LastName": "Bauer", "AddressLine1": "123 Main Street", "City": "Sometown", "State": "MN", "Postal": "55101", "Country": "USA", "Email": "gb@sometown.com" } } |
Select Start execution button and watch it work through the workflow.
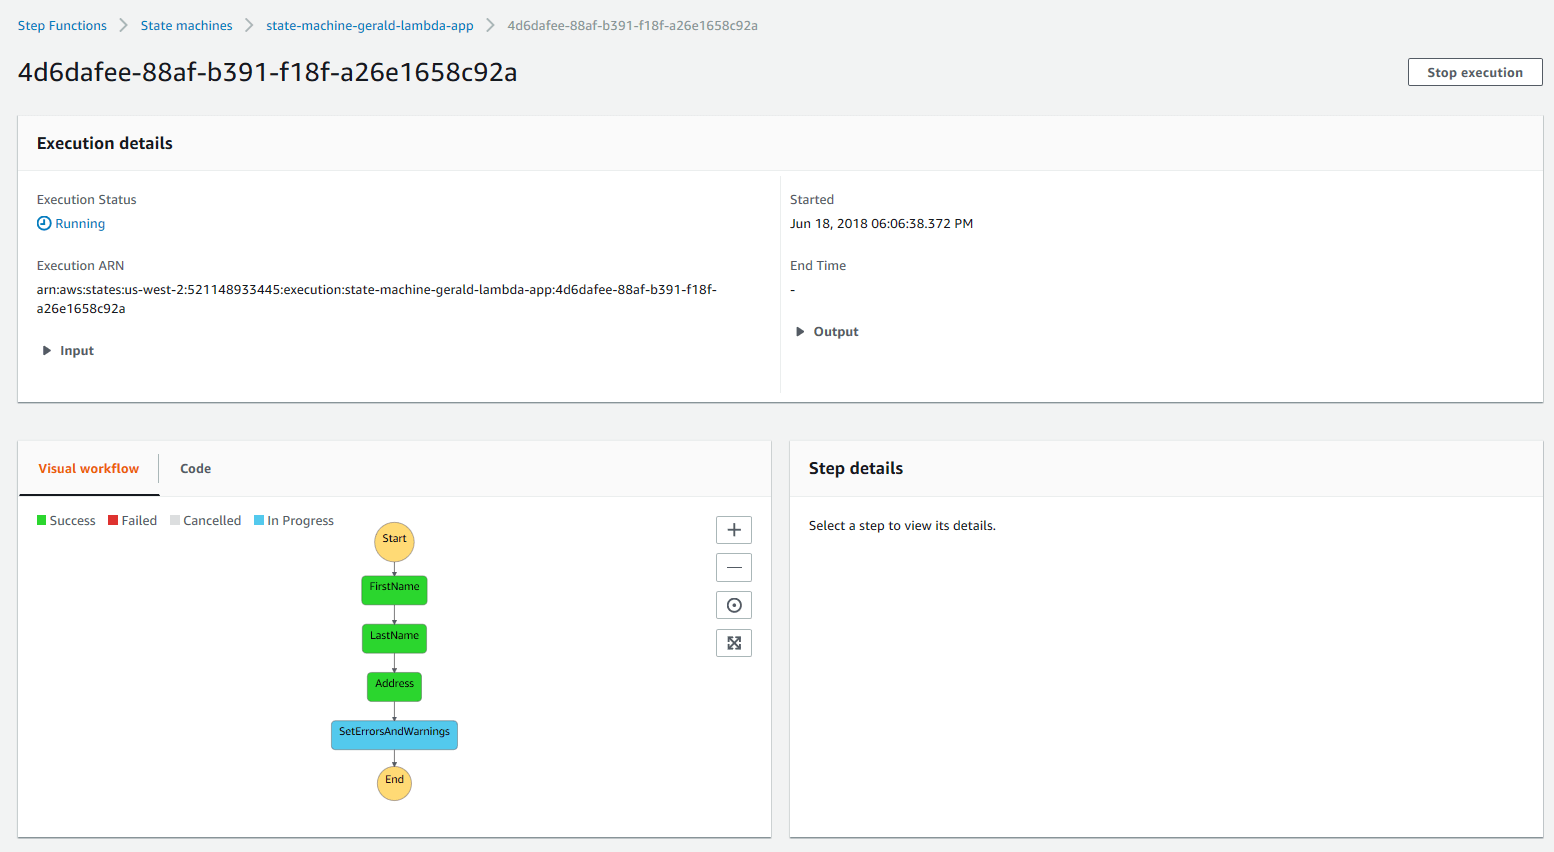
Once you see that you have successfully walked thru the steps, expand the Output arrow over to the right:
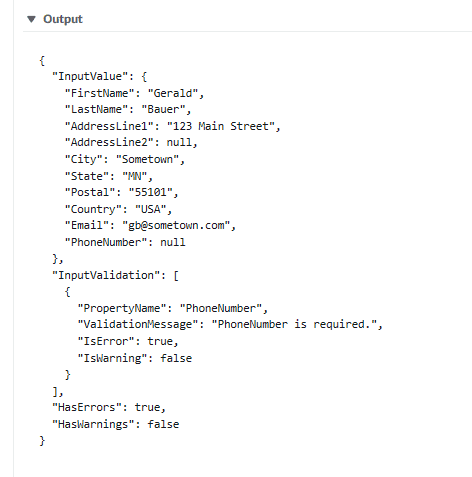
Oops! We forgot the phone number – the validation worked. Recall the validation for user phone number in the AddressValidationTasks.cs.
Now you are going to say, this is interesting, but I have existing code that I would like to deploy to AWS Lambdas. You have options. Reference your existing project from the AWS Lambda project or turn that existing C# logic into a NuGet package. These options use the AWS Lambda as a wrapper class to access the exiting logic. The benefits are that, if there is change in architecture platform, you protected yourself from having to rewrite the entire application and your code could use Dependency Injection from what the Lambda creates making it easier for unit tests. I prefer having the AWS Lambda as a wrapper class for my logic.
If you want to move into Microservices or examine the benefits of having Microservices, the AWS Lambdas could help in achieving that goal. I like the Serverless aspect of the Lambdas because of the ease of deployment and not having to think about the Operating System. (Even Azure offers Serverless capabilities.)
In my demo, I have not used environment variables. In the Windows OS these are environment variables at the machine level. The same is true with AWS environment variables. Environment variables can be found within the Lambda UI:

Summary
This article examined the “Hello World” example AWS provided in the Visual Studio AWS Serverless Application (.NET Core) template. It reviewed the C# project’s AWS parts: the Cloud Formation template that creates Lambdas and a Step Function, the Step Function (state machine) JSON, and investigated the Visual Studio default deployment JSON. Then that that project was transformed into something you can use to meet your needs. It then discussed wrapping existing logic with the AWS Lambda and expose it as Serverless MicroService.
This document contains proprietary information and is protected by copyright law.
Copyright © 2026 Red Gate Software Limited. All rights reserved
Load comments