
This article covers the .NET Core Web API on an AWS Elastic Beanstalk. I’ll give an overview of what an Elastic Beanstalk is, create a .NET Core API on an Elastic Beanstalk, configure the Elastic Beanstalk to a specific environment, and provide code to allow you to check the health of your application.
First, you must get your development environment established. I will describe what an AWS Elastic Beanstalk is. Then, I’ll walk you through creating an API and installing it with some knowledge passed along.
You can find out how to install the VS components, navigate AWS and set up account privileges in my previous article. Make sure you have everything in place if you wish to follow along with this one.
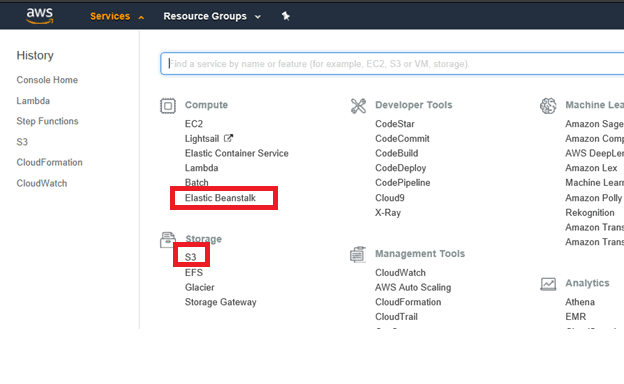
During this article, you will be visiting the consoles for Elastic Beanstalk and S3. The top banner of the console website has a dropdown called Services. Chose that dropdown for ease of navigating between console screens.
AWS Elastic Beanstalk
You are probably wondering just what an AWS Elastic Beanstalk is. I know the first time I heard it, I did. To understand you must learn about EC2.
AWS EC2 is the acronym for Amazon Compute Cloud. Think of it as a virtual machine. AWS has several prebaked virtual machine instances that you can use. These prebaked instances are called AMI (Amazon Machine Images), and there are various images. For example, there are Linux images (e.g. Red Hat, SUSE, and Ubuntu) and Window images (e.g. 2016 server, 2012 R2, 2008 R2 and SP2). You get to determine the instance type you want to use. Each instance type has an appropriate price tag. There are free types, of which I use to learn more about AWS. Within this laundry list, you determine the number of CPUs, memory, storage, performance, and other related items that you need. Treat EC2 instances as you would a physical machine.
Elastic Beanstalks are a wrapper for managing your EC2 instances. You still decide the platform you want the Beanstalk to contain. You decide to have a load balancer or not. No load balancer means only one EC2 instance to work with. Load balanced you need to determine the minimal number of EC2 instances and the maximum number of EC2 instances you want running. This translates into dollars you are willing to spend on VMs. You configure when to add additional EC2 instances. Load balance will instantiate on demand additional EC2 instances. Think of it this way, it basically growing and shrinking EC2 instances on demand; taking the guess work out of what you think you your computing needs are for your application, just like an accordion. For this article, I am going to step you through creating a Beanstalk with Windows in the free tier configuration.
Creating an Elastic Beanstalk
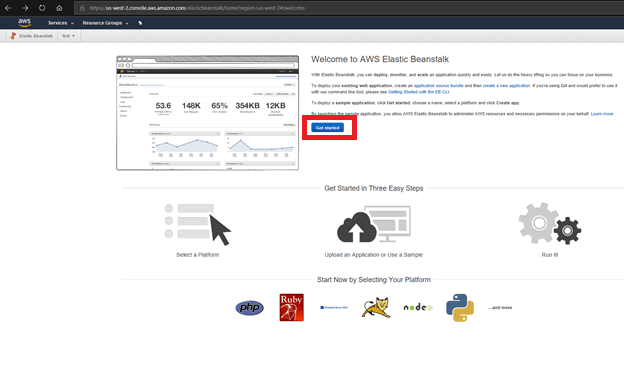
Navigate to the AWS Elastic Beanstalk service within the AWS console. Select the Get started button.
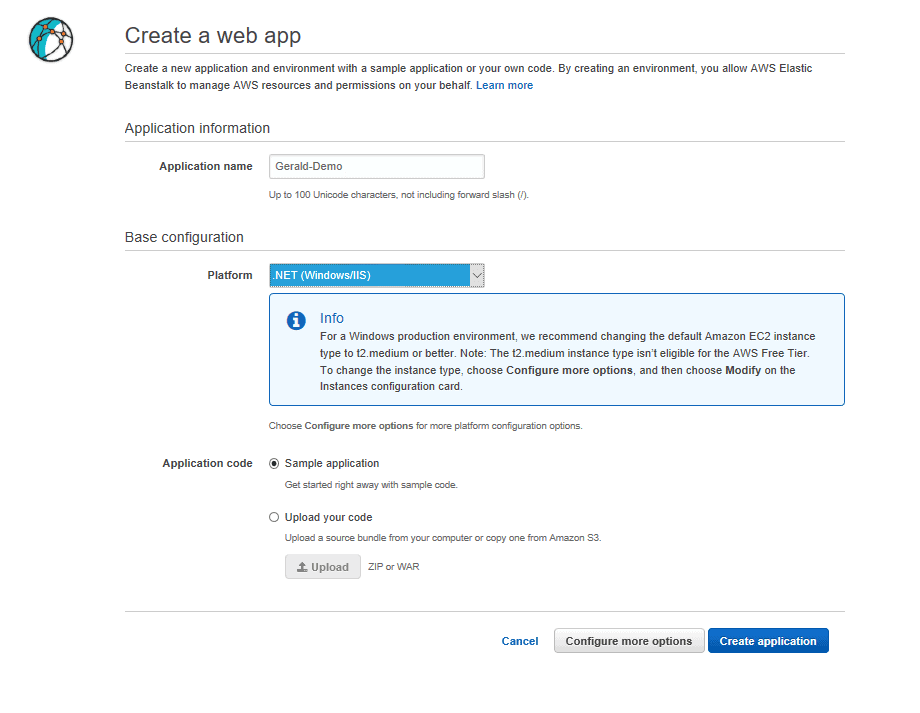
Define the application name, choose the platform you want to work with (Windows for this use case), and select the Sample application for the application code. This article uses the sample application to walk through the configuration parts of a beanstalk. Once everything is in place, click Configure more options.
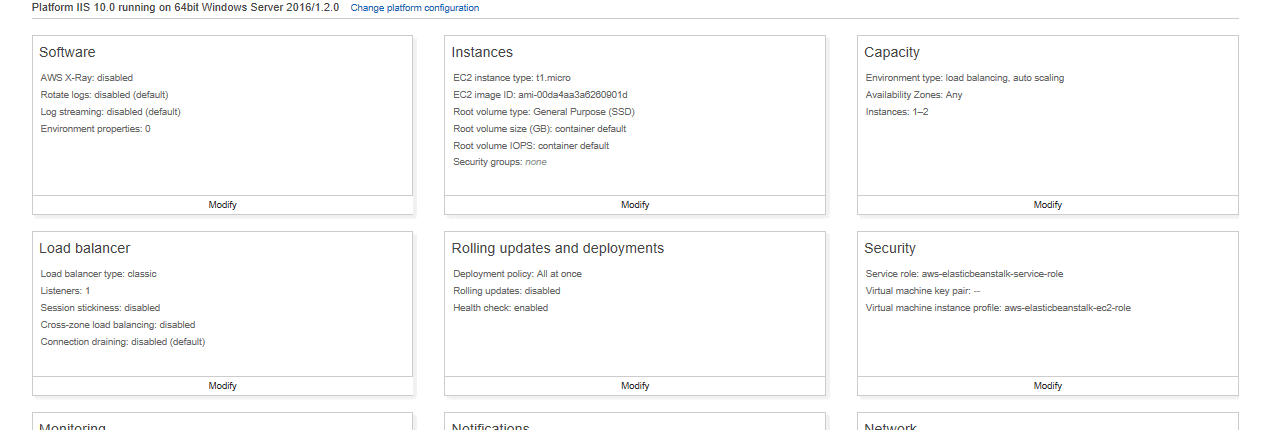
On the next screen, you’ll see a series of cards that allow you to configure each area of the Elastic Beanstalk. In this article, I’ll discuss the Instances, Capacity, Load balancer, Monitoring, and Tags cards in more detail.
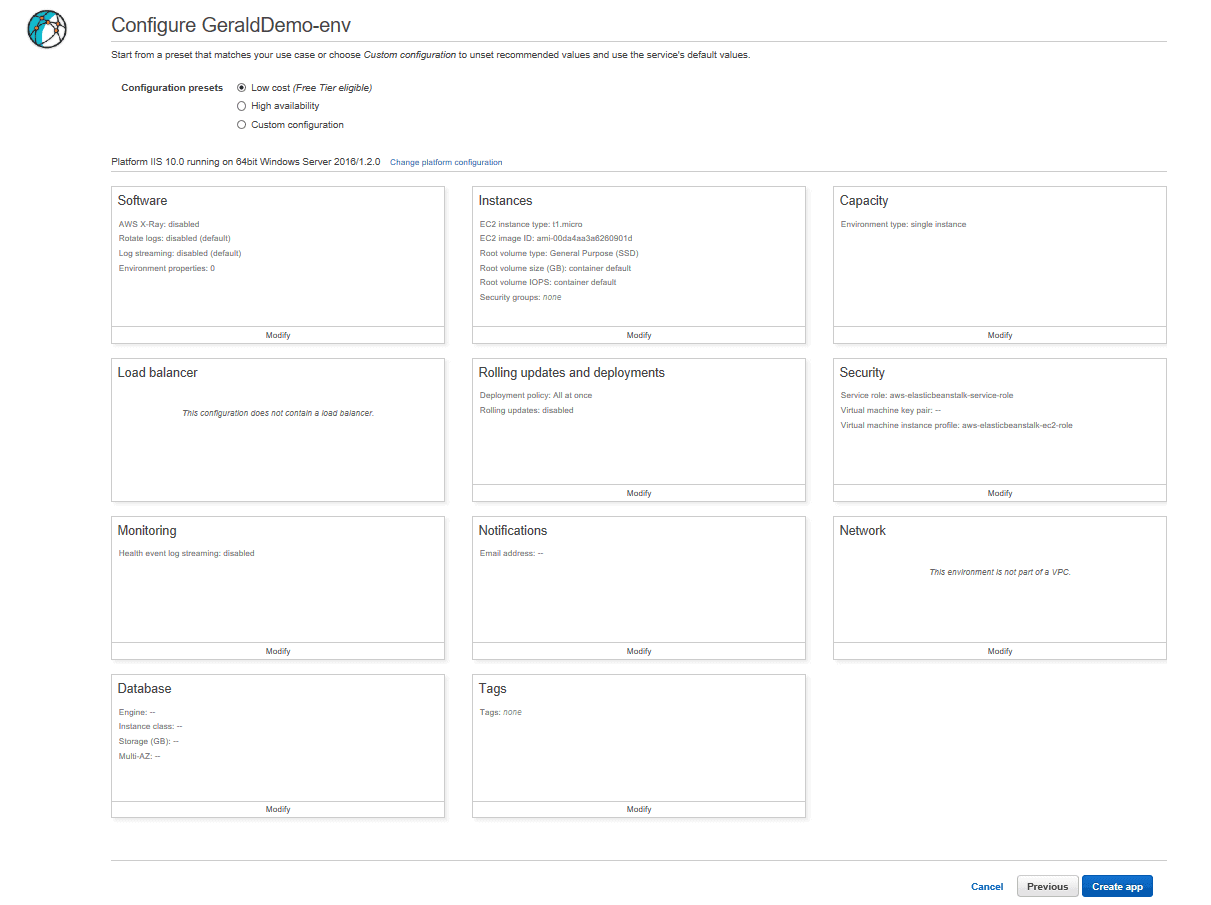
The Instances card tells you what size of EC2 instance you have. Leave it at the t1.micro level. This level is free to use.
The Capacity card is where you specify the number of instances for load balancing. The default is single instance; there is a second option of Load balanced. Click Modify on the Capacity card and make the following changes:
- Set the Environment type to Load balanced.
- Set the Instances have a Min value of 1 and a Max value of 2.
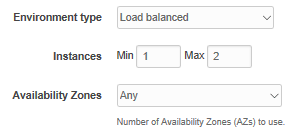
- Any Availability zone is fine.
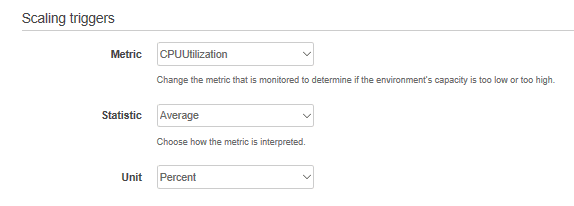
- The Scaling triggers setting determines when the next instance should be created. Change it to CPUUtilization since these EC2 instances are tiny.
- Leave Average as the Statistic even though there are other options.
- Change Unit to Percent.
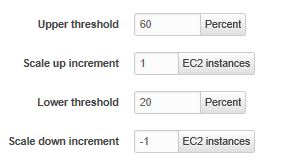
- Leave Period and Breach duration to be five minutes respectively.
- Change the Upper threshold to 60 Percent and the Lower threshold to 20 Percent.
- Leave the Scale-up increment and Scale-down increment to 1 and -1 respectively.
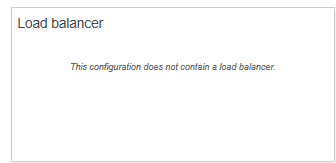
Don’t forget to save your work. When you return to the main configuration page you will see the Load balancer card now has more information.
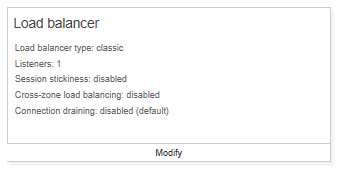
When you navigate to the Load balancer card by clicking Modify, you will see the following
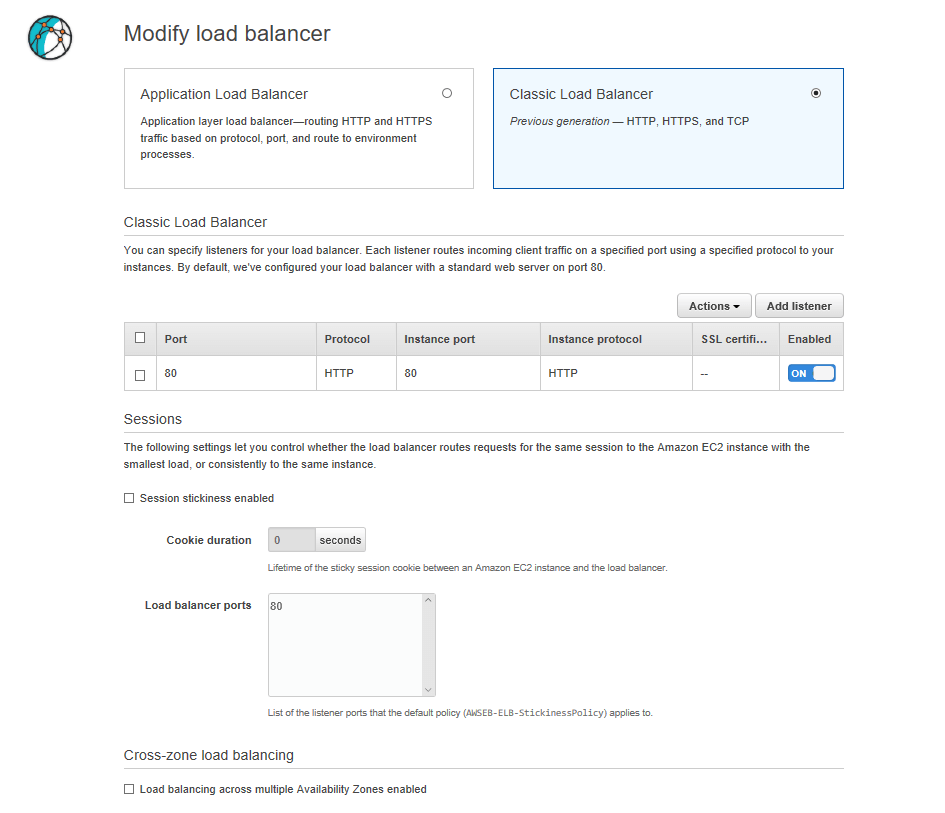

Leave the current values in place. It is here where you can change your address to use HTTPS. Click Cancel to go back to the main configuration screen.
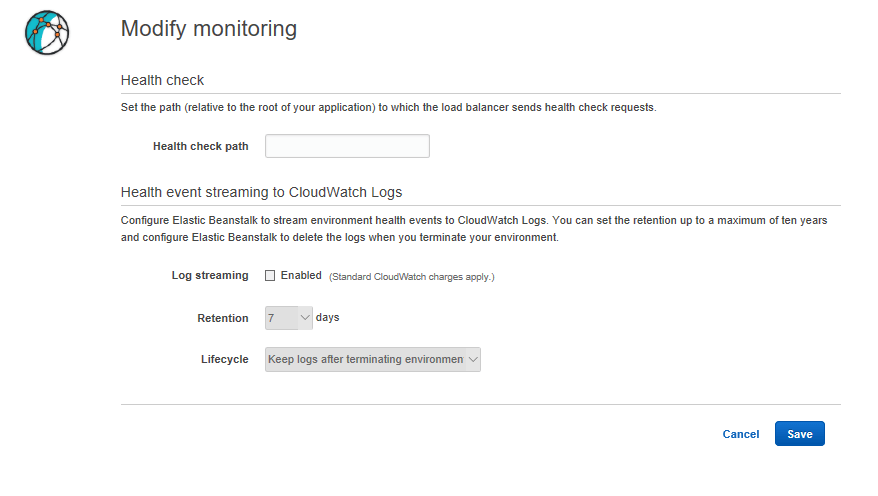
For now, do not do anything with the Monitoring card. This will be covered later in the article.
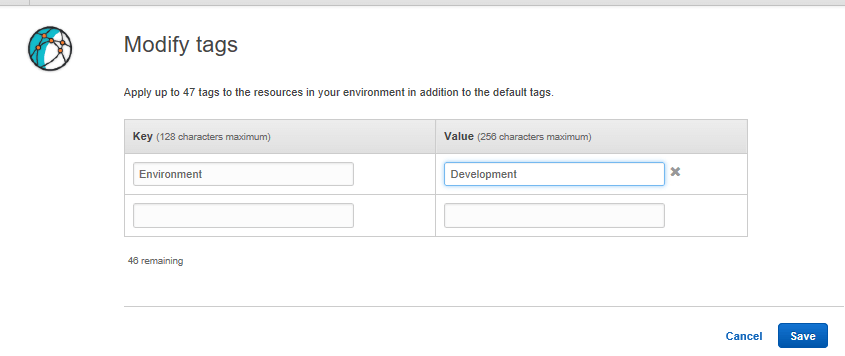
The last card I want to point out is the Tags card. As you can see, it is for key-value pairs. These key-value pairs can be used for searching in the EC2 instance page when you are looking for specifics. I have added the key Environment and the value Development. Also, these tags do appear in the billing also to give you a gut check of what it is you are paying for.
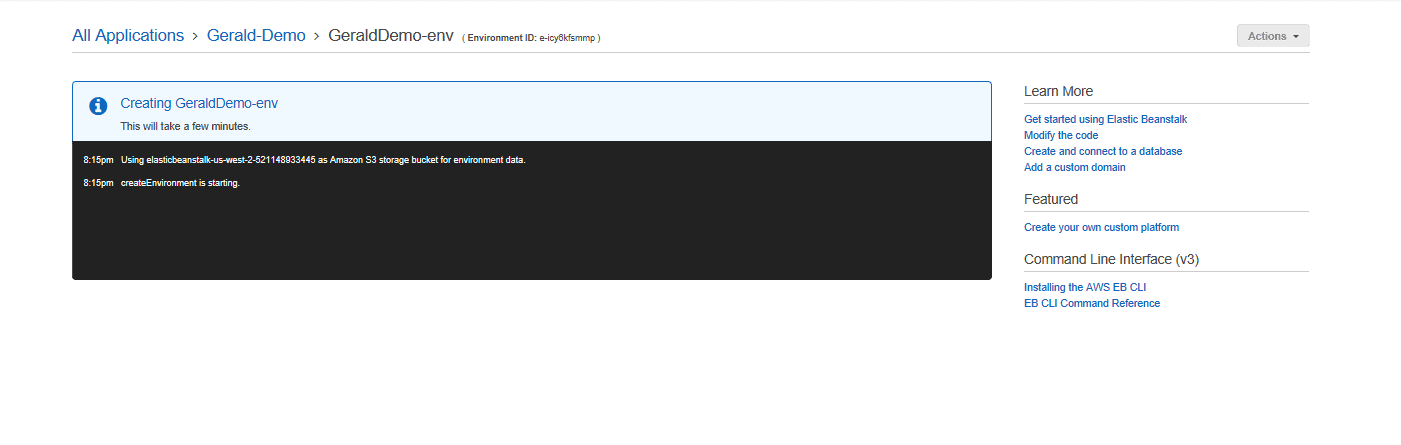
Now that it’s configured, create the app by clicking on the Create app button. The next screen is a console-like screen showing you what is happening.
When it is completed, you’ll see the dashboard. It can take quite a while to start up, so be patient!
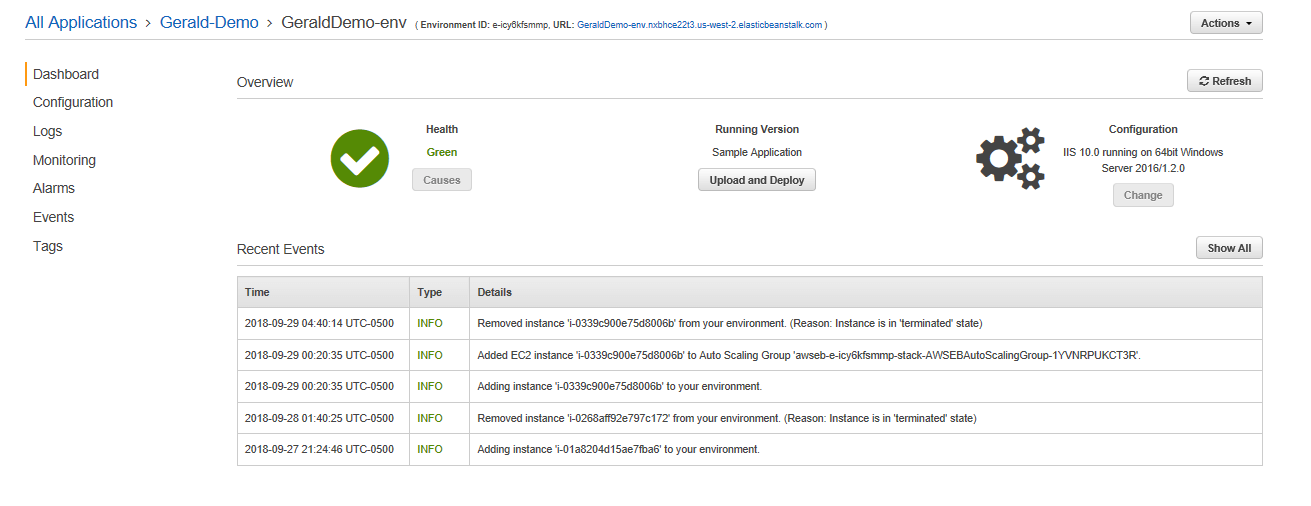
The Health will be either Green, Yellow, Grey, or Red. Green means all is well; Yellow means something is not quite right; Grey is when there is a transition going on (e.g. installing app, refreshing, or rebuilding everything); and Red means there is a serious problem, and nothing is working.
Remember at the beginning of the article, and I talked about EC2 instances? You can now see the EC2s that the Beanstalk created. Navigate to EC2 via the AWS console. On the landing page choose Running Instances under the Resources title or Instances in the left navigation bar; they both go to the same page.

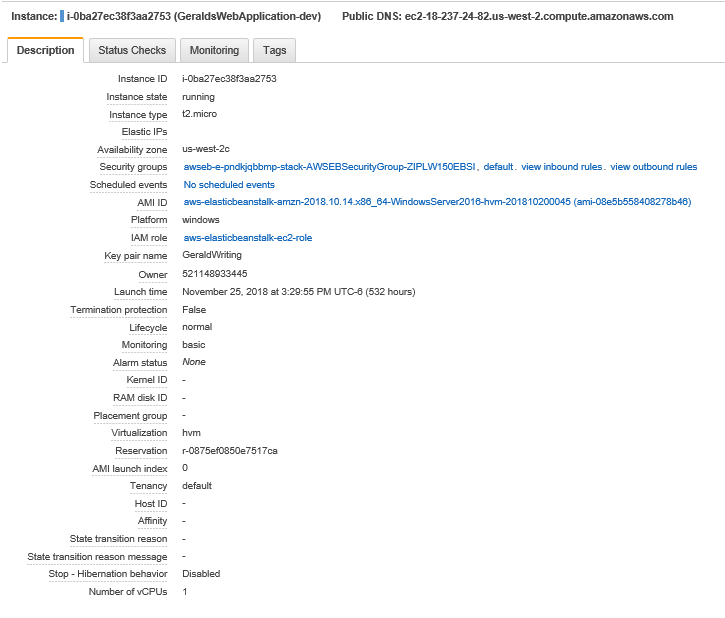
Select the instance you want to interrogate, and you’ll see the information in the lower half of the page. You will only see one EC2 instance because of how you configured the Capacity card. You set the Min value, Max value, and Scaling Trigger values; since there is nothing taxing the EC2 instance, you will only see one instance. Once you go over the Scaling Trigger values, another EC2 instance will automatically be created. There is a lot of information for you to digest on this EC2 page. Navigate to the different tabs to review the information if you wish, but I don’t want to dive into EC2 instances details in this article; I want to make you aware of what is happening with Elastic Beanstalks.

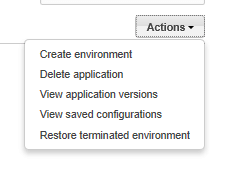
Now that you have seen how to create an Elastic Beanstalk with a sample application, clean up your environment by deleting the beanstalk. Navigate back to Elastic Beanstalk and choose the Actions button/dropdown and select the Delete application.
It will ask you to confirm your delete action. Choose Delete. You will see that the application turns grey. If you go back to the EC2 dashboard, you will see that the EC2 instance has been removed. Now that you have a high-level understanding of AWS Elastic Beanstalks, it’s time to write some C# code.
Creating the VS Project
Create a Visual Studio solution/project by choosing ASP.NET Core Web Application within the New Project UI.
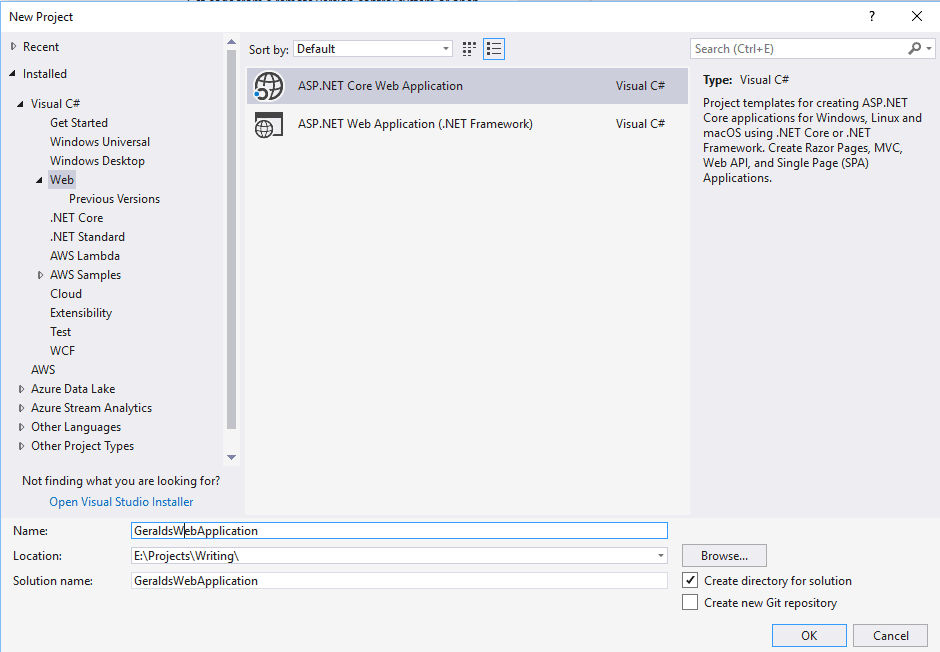
On the next screen, New ASPNET Core Web Application, choose API. I unchecked the checkbox to Configure for HTTPS since that is not within scope of the article.
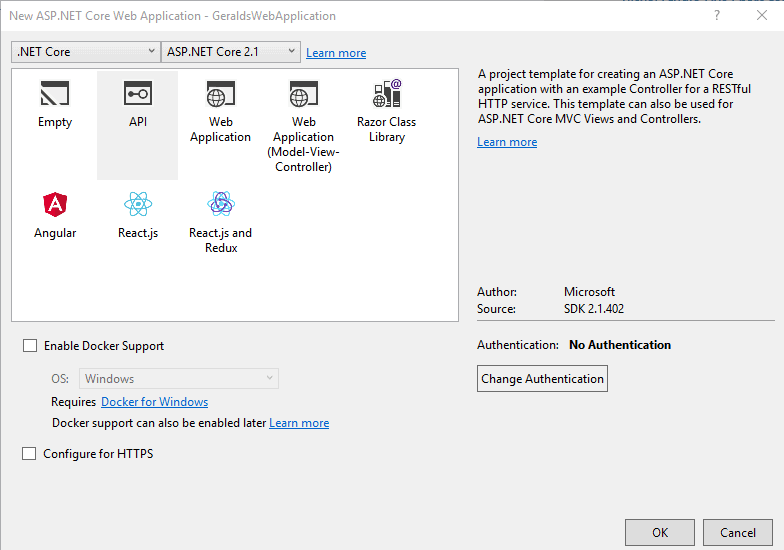
In the Solution Explorer, you will see your C# API solution and project.

Publishing the Application
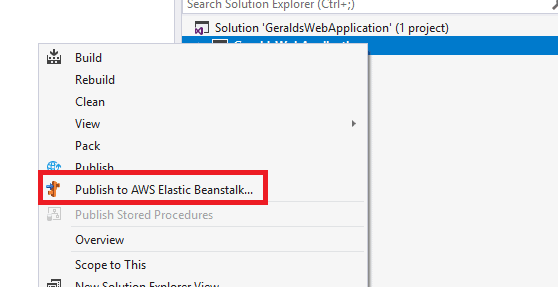
The first thing I want to show you is you can publish to AWS Elastic Beanstalk from Visual Studio. Right-click on the application and select Publish to AWS Elastic Beanstalk…
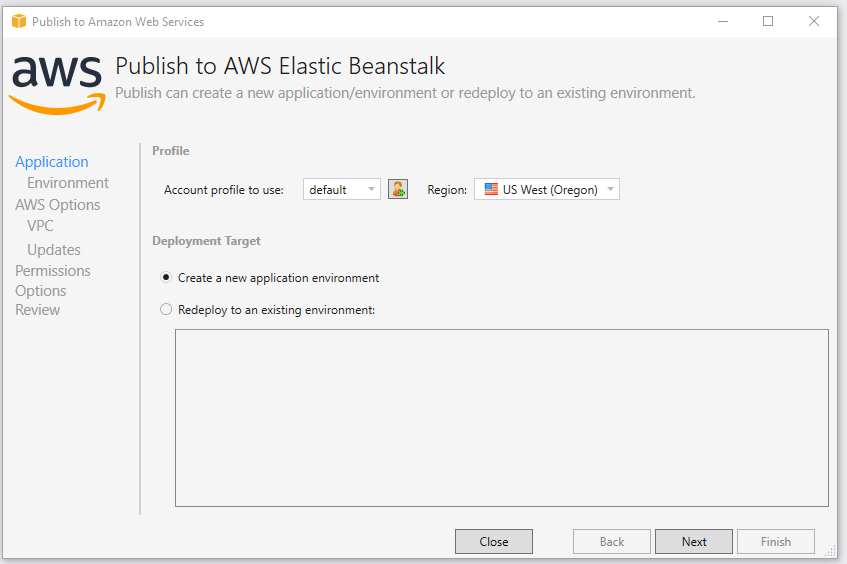
The Publish to Amazon Web Services dialog window appears. Choose Next.
The application name is filled in for you automatically. You may change it if you like. Think of this as the container that will house your applications in the various environments (e.g. Development, Integration, Testing, Stress, Beta, Production, and the list can go on). You don’t need all the environments in this container; this is a conversation amongst the teams. Regardless, you will need to provide an environment name. For the environment name you can either choose from the drop down (name of the application plus dash -dev, -test, or -prod) list or type in a name of your choice.
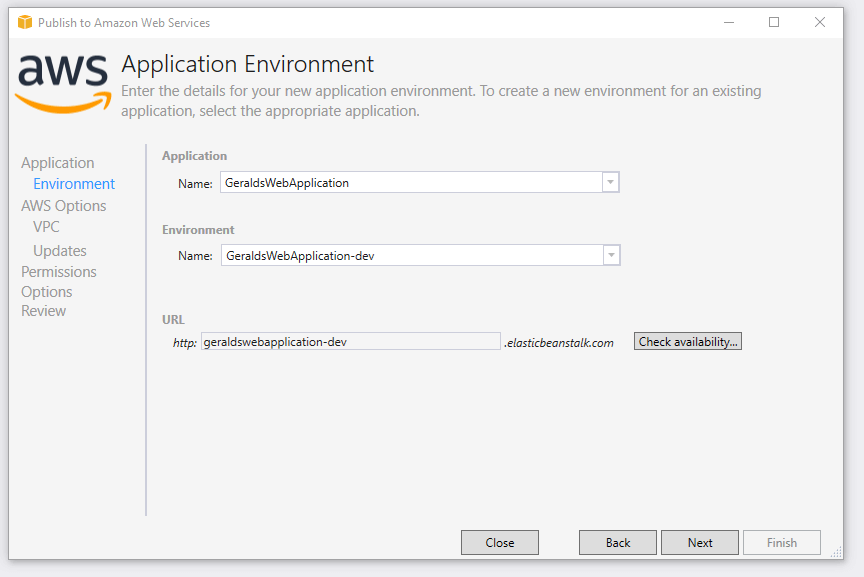
Next you will want to check the availability of that URI, so click the Check availability… button.

If the name is not available, use something else. Chose Next which will present the AWS Options page.
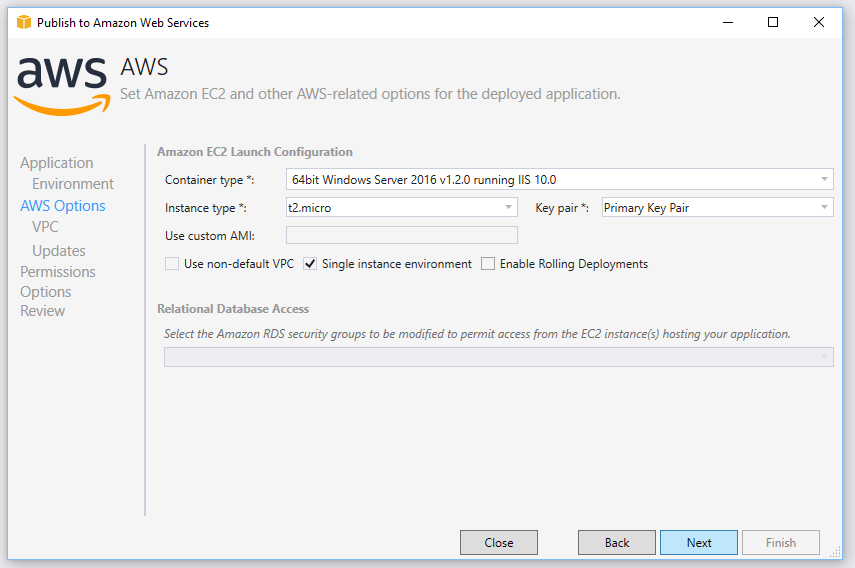
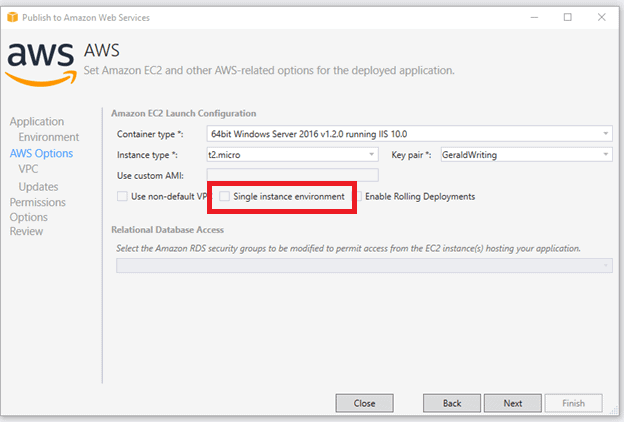
As you can see, you will define what the environment setting are. I choose the default container type, which is Windows. You can change this if needed. I choose the default instance type, t2.micro, instead of changing the type.
Key pair is something you will want to think about. I won’t discuss it in this article other than to say if you want to communicate between AWS parts, you will want a key pair. I kept the Single instance environment option checked. Chose Next to get to the permission page.
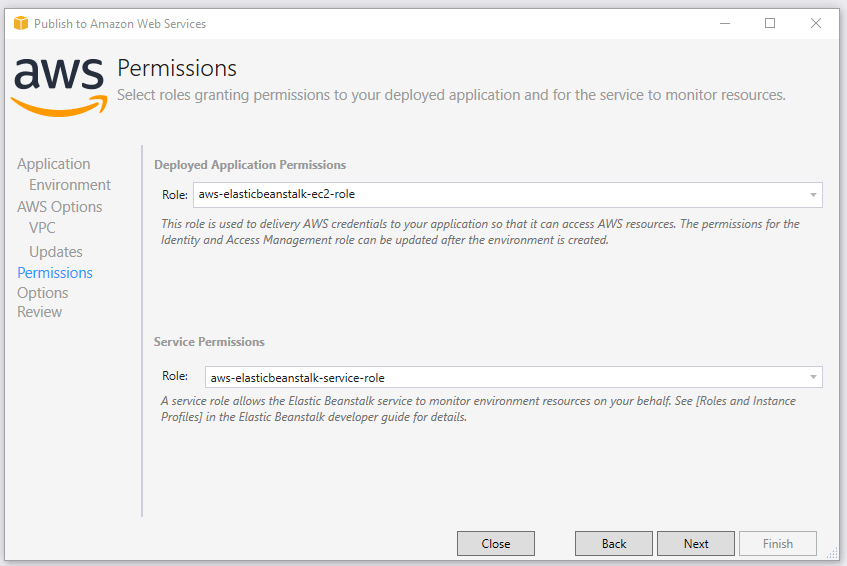
You can leave the defaults or changes them as needed. You can also create your own roles, but that is outside the scope of this article. Chose Next to go to the Application Options page.
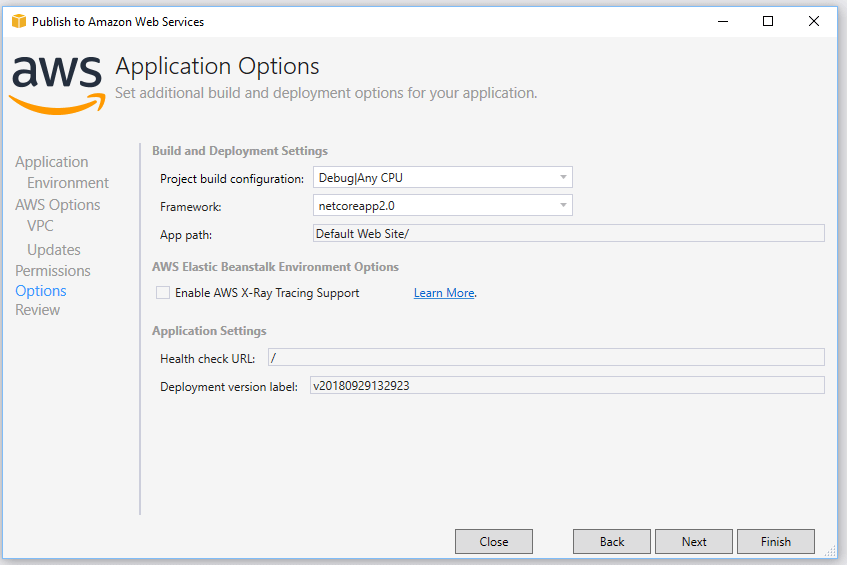
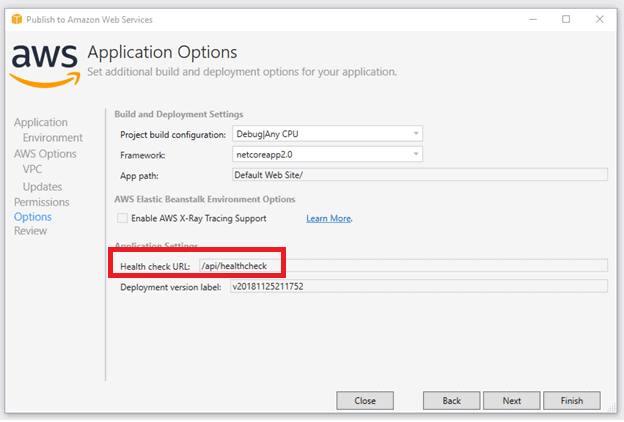
For now, keep all the defaults. Later on, you will change the Health check URL. Chose Next to get to the Review page.
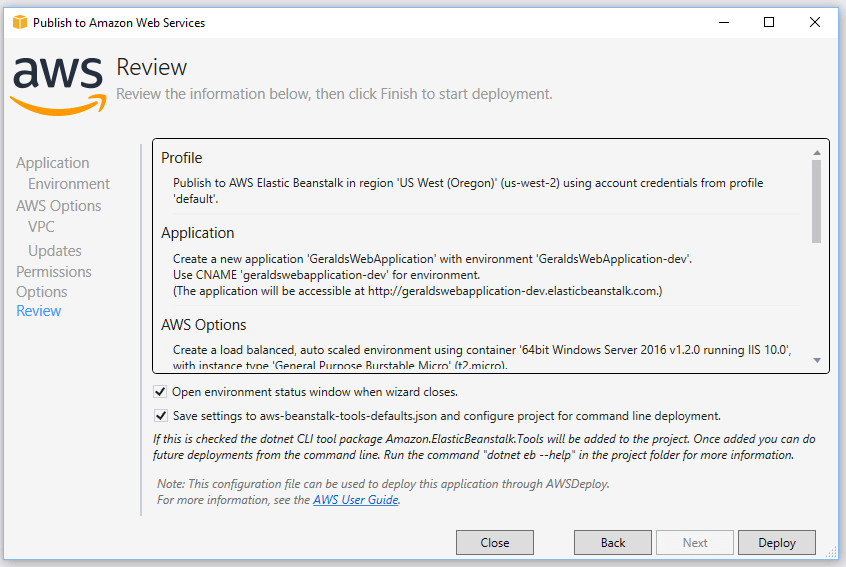
As you can tell, this page allows you to review what you have configured. You can go back if you wish to make the necessary adjustments. I kept the checks in the two checkboxes checked. The Open environment status windows when wizard closes option allows you to see what is occurring on deployment from Visual Studio. You could go to the AWS console to watch it also. The Save settings to aws-beanstalk-tools-defaults.json and configure project for command line deployment will generate the JSON file aws-beanstalk-tools-defaults.json, more on this later. Select Deploy. The environment status window appears. After a few minutes, you will see success in the Visual Studio page.
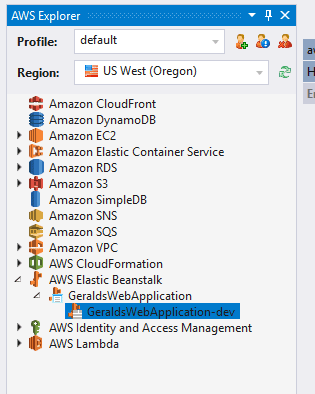
You will also see that the application has been deployed within Visual Studio. Bring up the AWS Explorer. Within the tree, expand AWS Elastic Beanstalk, then expand the application.
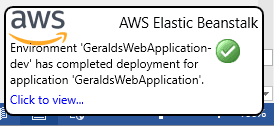
AWS also shows a popup telling that the deployment is done at the bottom of the screen.
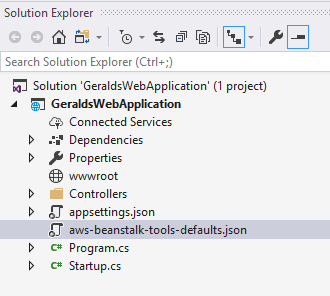
Note that a new file appeared in your solution, aws-beanstalk-tools-defaults.json. This file contains the information for deployment.
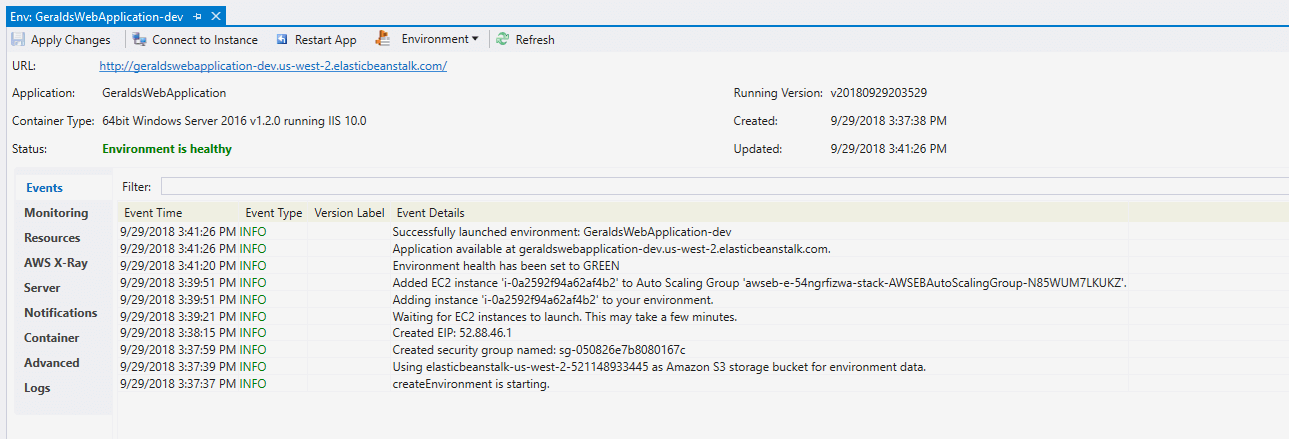
You can also watch progress in the AWS console by navigating to Elastic Beanstalk. When the application setup is complete, you will see the following within the AWS console:
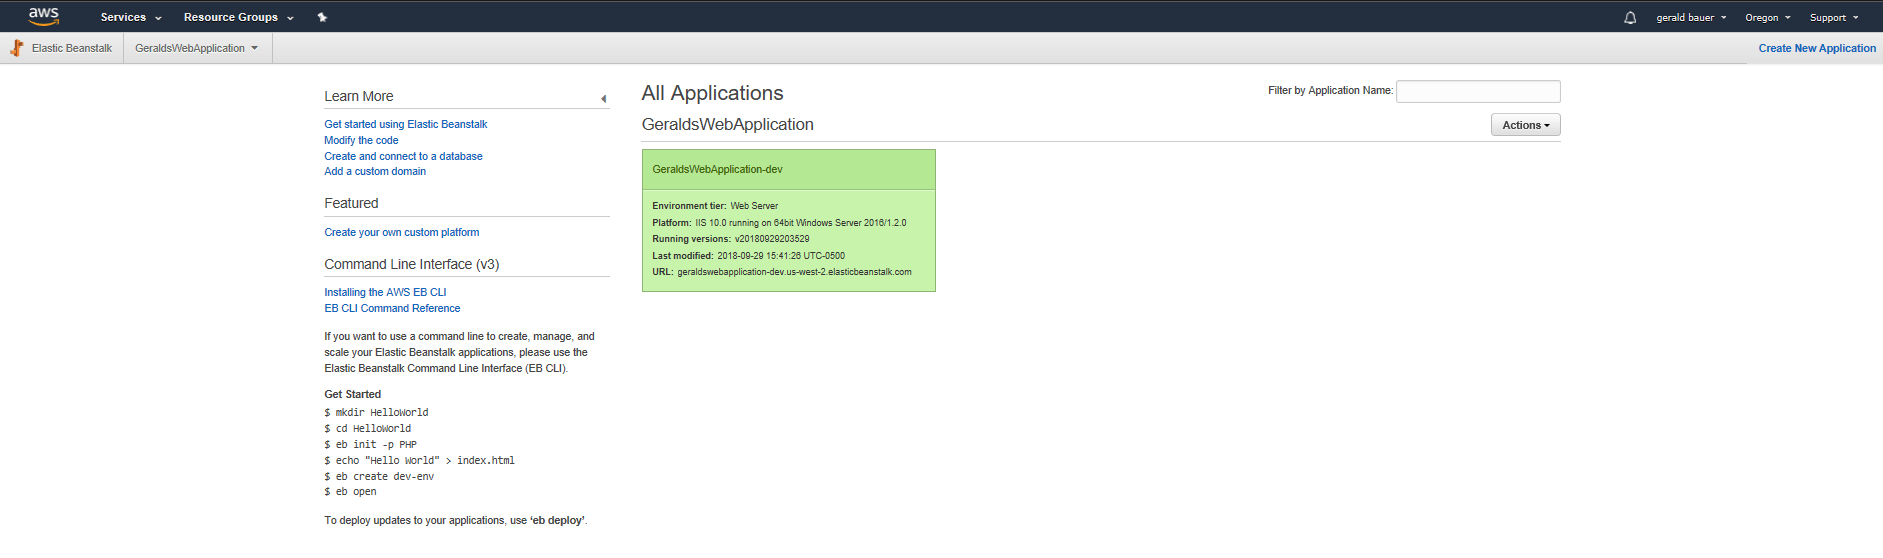
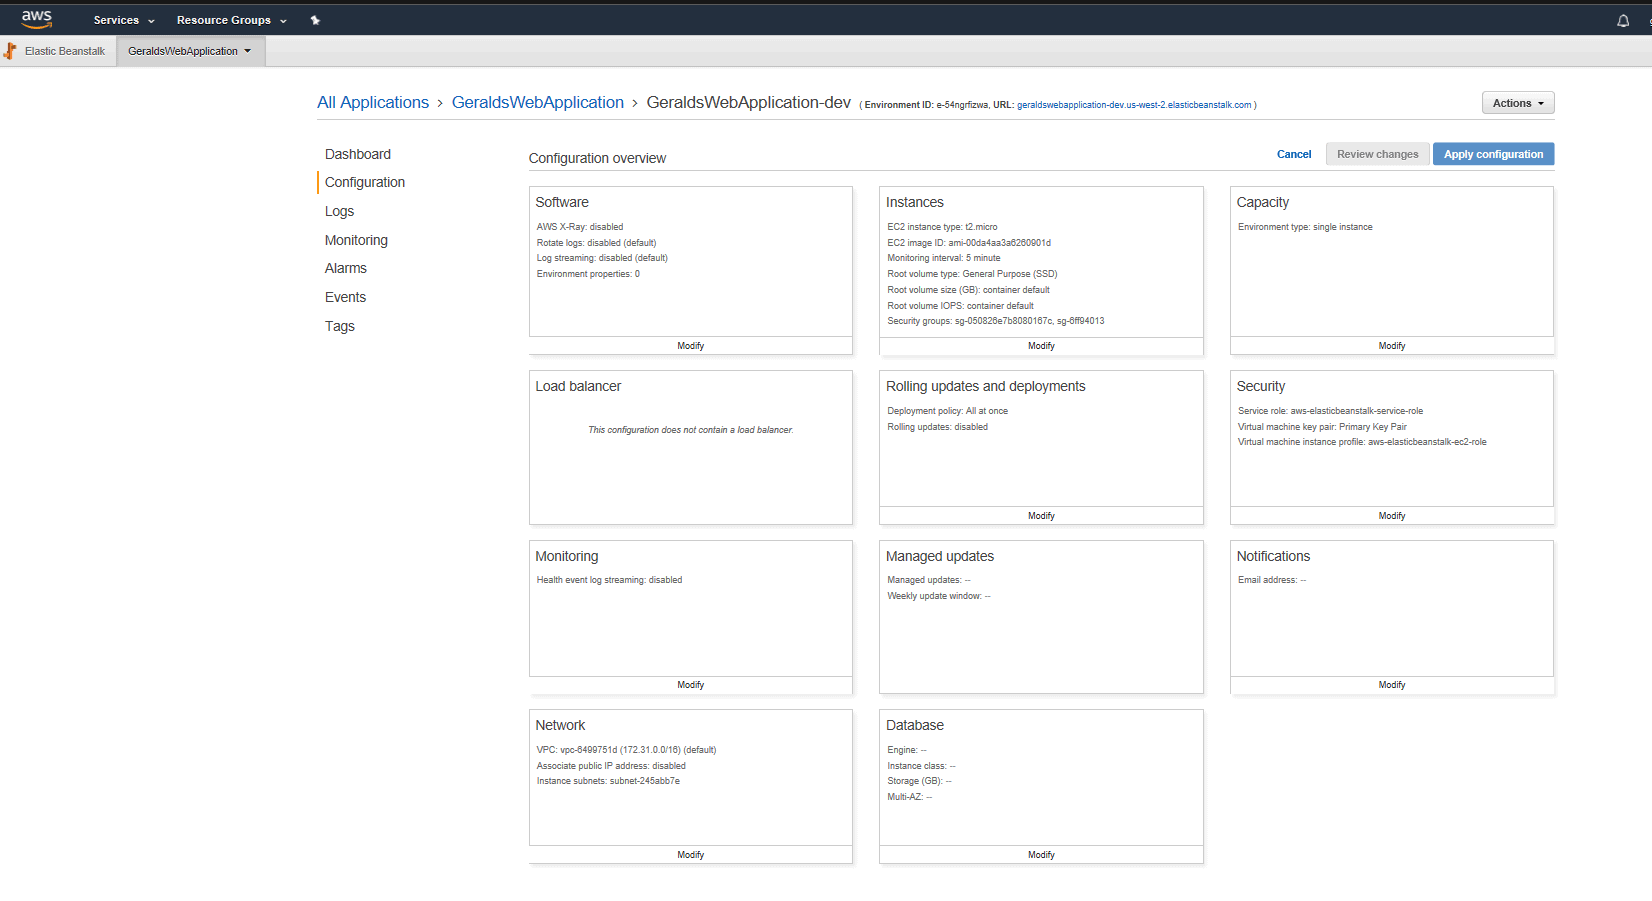
Click on the application name and then Configuration to navigate to the configuration page. Note how the configuration looks different than when you manually set it up through AWS.
Also navigate to the EC2 instances to see an EC2 instance with your application environment name. Later on, you will reconfigure everything, but first make sure that the deployed code runs.
Testing the Application
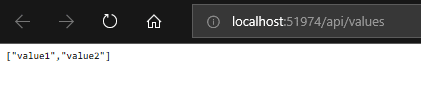
You can find the URL to your application from the AWS console at the top of the screen or from the link displayed on the Visual Studio deployment page. For my example, it is http://geraldswebapplication-dev.us-west-2.elasticbeanstalk.com. When you created the API application, a ValueController class is generated for you within the Controllers folder. At the top of this class you will see the Route attribute that defines the route to this controller. This Route takes in a string parameter. It is set to api/[controller] so that you do not have to specify the controller specifically for each controller. The framework replaces [controller] with the class name minus Controller. For this example, it will become api/values. Take the URL and append the path to the values controller that the template created for you to get http://geraldswebapplication-dev.us-west-2.elasticbeanstalk.com/api/values. Navigate there with your favorite browser to see the http get output:

Go back to the Visual Studio project and take a look at the aws-beanstalk-tools-defaults.json file. This file tells us what AWS needs to know for deploying the application.
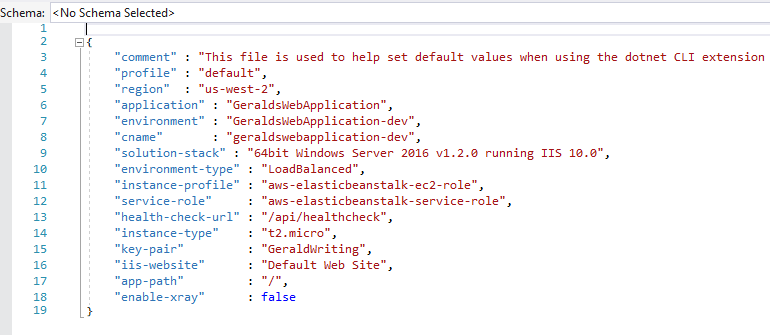
The next step is to add code that will function as a health check to assist you or your DevOps person to interrogate the application. Create a new class under Controllers called HeathcheckController. There will be two methods within this controller, both are HTTP Get verbs. The Get without an input parameter is the one used in configuring the AWS Healthcheck. That will be line 13 in the aws-beanstalk-tools-defaults.json file. The only thing it will return is Ok() which yields an Http status code of 200. The second Get with a string input parameter is the one you will be working on the most. For now, you will only define the value env which will return the environment name that the Windows VM thinks it is.
What business value does this add? Good question. If the application is down, you have a quick method to ask your application certain questions, such as
- Can you talk with the database?
- Can you talk with other services?
- Are you configured correctly?
- And so forth
Also, the health check can be used as part of installation smoke testing. This is a quick way to make sure something is not messed up in the configuration. Here is the code for the new HealthcheckController class.
|
1 2 3 4 5 6 7 8 9 10 11 12 13 14 15 16 17 18 19 20 21 22 23 24 25 26 27 28 29 30 31 32 33 |
using Microsoft.AspNetCore.Mvc; using Newtonsoft.Json; using System; using System.Collections.Generic; using System.Dynamic; namespace GeraldsWebApplication.Controllers { [Produces("application/json")] [Route("api/Healthcheck")] public class HealthcheckController : Controller { [HttpGet(Name = "GetAppStatusCode")] public IActionResult Get() { return Ok(); } [HttpGet("{key}", Name = "GetSpecificAppStatusCode")] public IActionResult Get(string key) { dynamic result = new ExpandoObject(); switch (key.ToLower()) { case "env": result.Environment = Environment.GetEnvironmentVariable("ASPNETCORE_ENVIRONMENT") ?? "unknown"; break; default: result.Add(new KeyValuePair<string, object>(key, "undefined")); break; } return Ok(JsonConvert.SerializeObject(result)); } } } |
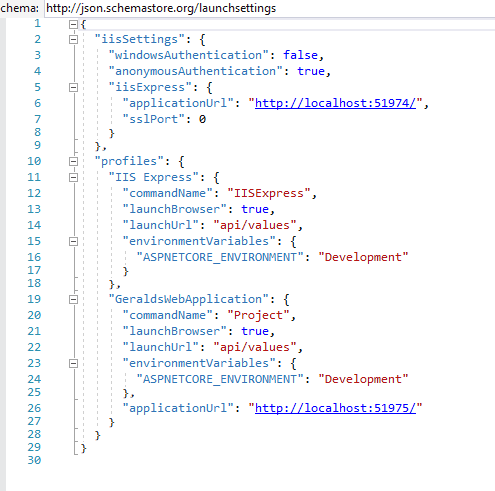
Hit F5 to run the app. The launch settings are defined in the launchSettings.json file found in the Properties section of the project. My project is using port 51974, and yours will likely be something different. As you see in the profiles for IIS Express, the default launch URL which is set to api/values which corresponds to the ValuesController Get method.
When running the app as you did earlier, you get:
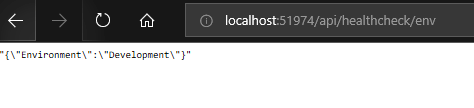
Navigate to http:// localhost:51974/api/healthcheck/env (replacing your port) and you’ll see:
Now deploy this project to see how the new controller behaves. Just like before, right click on the project and select Publish to AWS Elastic Beanstalk… Notice that your previous deployment appears in the deployment target section. Chose the Redeploy to an existing environment radio button and select your project name.
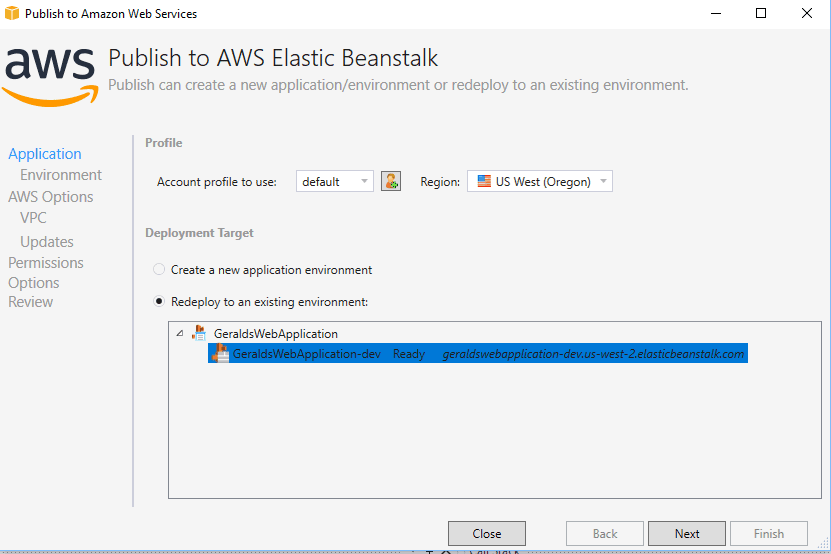
Chose Next. Note that you skip the several configuration wizard screens and land on the options section. Chose Next to go to the Review page and then select Deploy.
Now you can smoke check your deployed application. Go to http://geraldswebapplication-dev.us-west-2.elasticbeanstalk.com/api/values. Yes, you can still see the values:

Now navigate to http://geraldswebapplication-dev.us-west-2.elasticbeanstalk.com/api/healthcheck/env to see the results:

Unknown, hmm. The application’s VM hasn’t been configured. The Tags section within the application won’t assist because they do not reside within the Windows world, so to speak. You need to add a command within the code to tell AWS deployment to add the environment variable.
Within the AWS documentation for Configuration Options, you can set commands for before creating the environment, during the environment creation, and after the environment has been created. For this case, you will be running the command after the environment is set up.
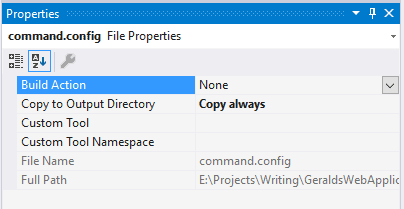
To create the command, create a new folder in the API project called .ebextensions. Within that folder create a file called command.config. Add the following text to that file:
|
1 2 3 |
commands: 01_create_env_variable: command: "powershell.exe [Environment]::SetEnvironmentVariable('ASPNETCORE_ENVIRONMENT', 'Development', 'Machine')" |
Please note the indentation on the second and third lines. If you do not have that indentation, you will get a warning message telling you that the values will be skipped when you are deploying the application. The command will not run. In this use case the ASPNETCORE_ENVIRONMENT variable will not be set.
I use PowerShell to do my scripting work. As you see in the command line a PowerShell executable will set an environment variable, specifically ASPNETCORE_ENVIRONMENT with the value of Development. The ASPNETCORE_ENVIRONMENT variable works with the .NET Core API appsettings.json to set configuration values.
Open the properties of the command.config file and change the Copy to Output Directory option to Copy always.
Redeploy to AWS. You’ve done the drill a couple of times now.
It’s time to do the smoke check again. You’ll see the value when calling the values controller. The api/healthcheck/env now displays which environment you are working with.

I have only discussed adding code to see what environment I am working with. I have extended the health check controller to check the assemblies’ version, call a database to ensuring the application can talk with it, and other services too. The health check controller is an entry point into your application that will assist you in troubling shooting and smoke testing your application.
The command.config file is needed for deployment because, when a new EC2 instance is created, it uses that file to configure the server. You only deployed one instance from Visual Studio. Now change that and test that the environment configuration follows the code.
Changing the Configuration
Now that your application is working as expected, you can change the configuration. Navigate to the AWS Console and to the application environment to change the capacity configuration values from one instance to two. Notice that the load balancer is not configured.
Click the modify link of the Capacity card to view the options. Change the options to match the configuration that you set up in the first example.
- Change the environment type from Single instance to Load balanced.
- Change the instance Min value from one to two, leaving the Max value at four.
- Change the Scalling triggers so that the Metric is set to CPUUtilization
- Set Unit to Percent.
- Change Upper threshold 60 and lower threshold to 20
Click the Apply button. You will get a warning that the world is changing. Click Confirm.
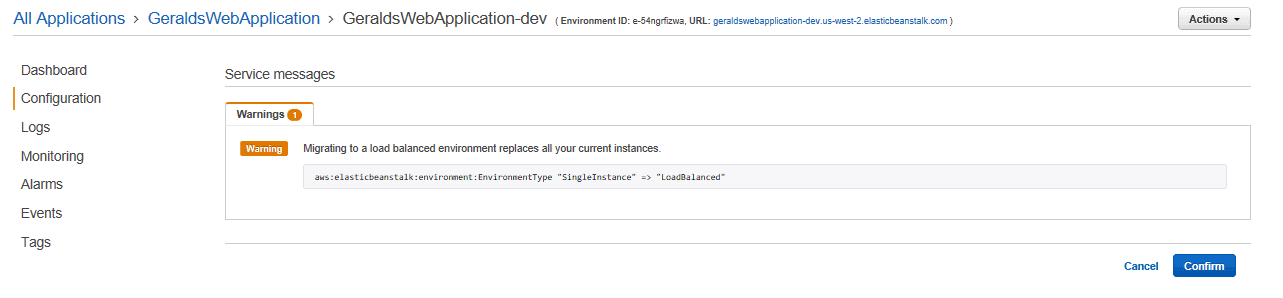
Your application is now going offline to reconfigure itself.
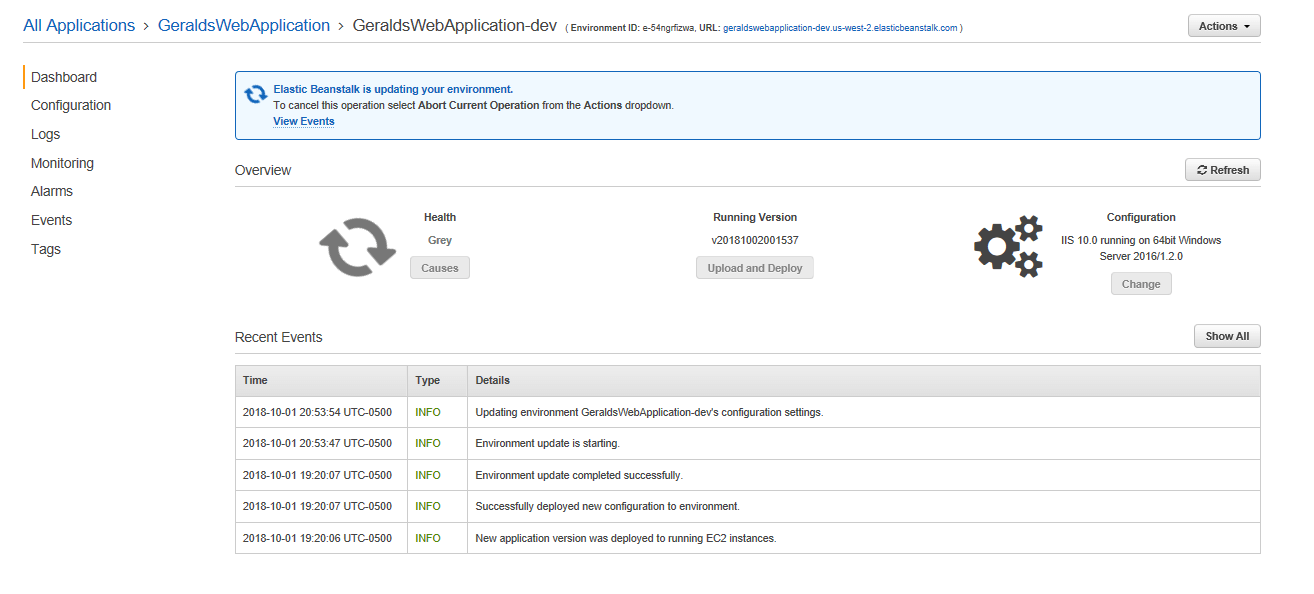
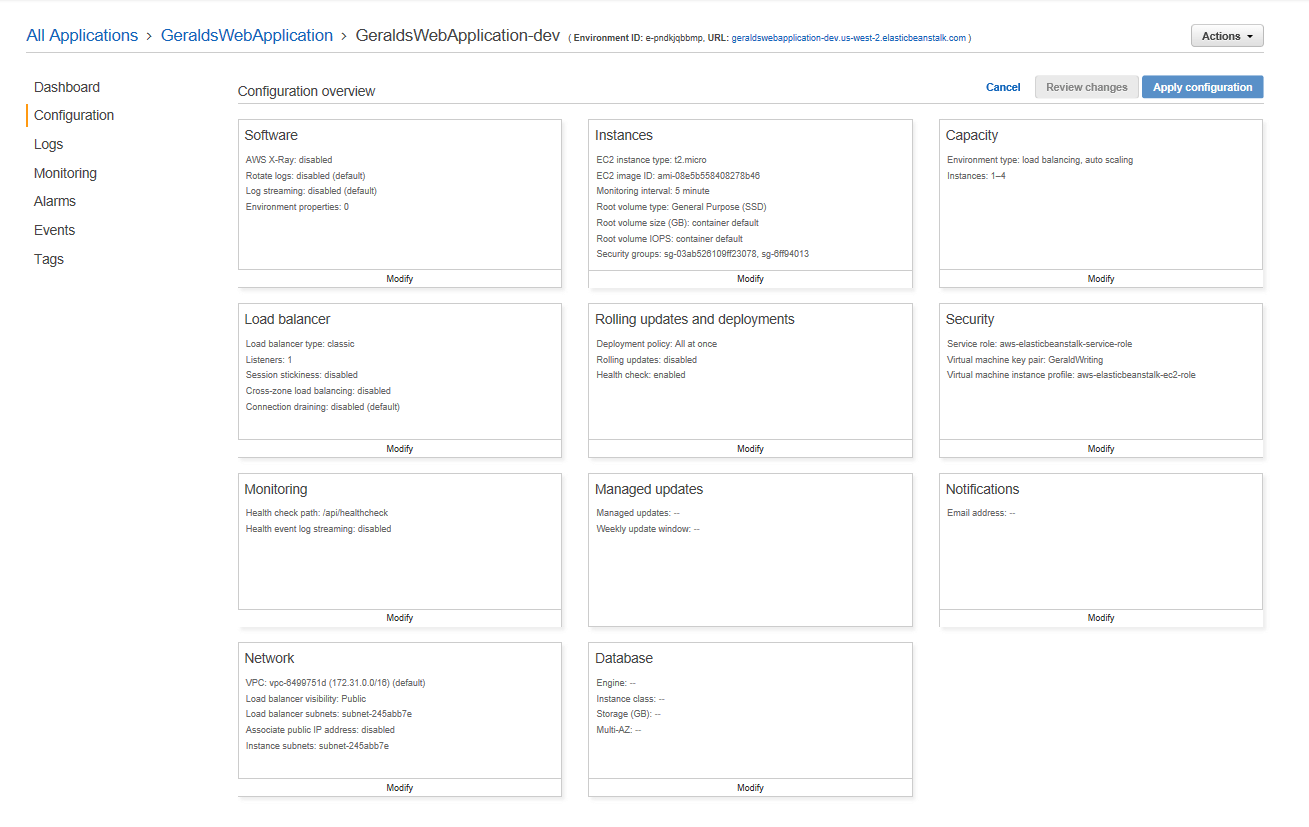
Once the app status is green again, go back to the configuration section to examine the capacity and the load balancer cards.
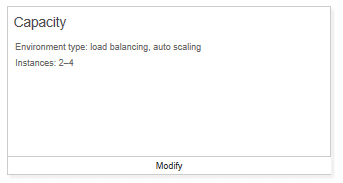
As you see from the cards, you will always have two instances running with a maximum number of four instances and a load balancer. Go to EC2 to see your two instances.

Now configure the health check monitoring. You are going to set the Health check path value to be /api/healthcheck. To do this click Modify on the Monitoring card and change the health check path.
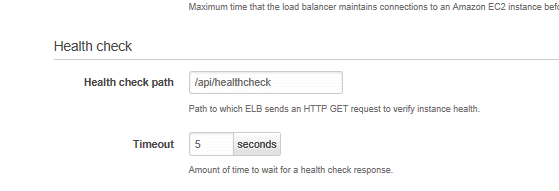
Click apply. This time you will not get a warning message but the system will restart itself to apply the health check. I have noticed that setting this health check pinging is like the ping scripts we use to write to keep IIS awake.
You could have made the same changes when deploying the app from within the Visual Studio AWS Deployment Wizard. On the AWS Options page you could have unchecked the Single instance environment checkbox.
Within the options page, you could have set the health check url. Meaning you have the HealthCheckController ready to be called.
On the Review page, ensure you have checked the Generate AWSDeploy configuration checkbox to generate the aws-beanstalk-tools-defaults.json file. Note that you will see that the capacity is 1-4 instances, there is a load balancer, and the Health check path is filled in with what is defined in the deployment wizard within Visual Studio.
Summary
This article has given you an introduction to AWS Elastic Beanstalk. You learned that the beanstalk is a wrapper around AWS EC2 instance(s). You can configure the beanstalk to be load balanced so that the number of instances being used can grow when demand increase and shrink when demand decreases. You have successfully deployed a .NET Core API to a beanstalk. Along the way, you learned that you can configure the Windows machine with commands. I introduced a controller called HealthCheck to check the health of your application, you must determine what that means.
This document contains proprietary information and is protected by copyright law.
Copyright © 2026 Red Gate Software Limited. All rights reserved
Load comments