
- First Part – The basics: the basic principles of how container virtualization is implemented in Windows Server 2016 operating system.
- Second part – Up and Running: creating and managing Windows Server Containers using Docker.
- Third part – Into your Stride Working with Windows Containers and Docker
- Fourth part -- Save the Container Data
Overview
In the previous article in this series, Working with Windows Containers and Docker: The Basics, I examined the basics of how container virtualization is being implemented in the Windows Server 2016 operating system. With this basic run-through of Windows Containers out of the way, I can go on to explain how you can work with this new feature in Windows Server 2016.
Introduction
In Part 1 of this series, we learned about Windows Containers Fundamentals and Docker. Containers provide lightweight and Agile virtualization capabilities that developers can use to quickly deploy and update apps in their own development environment. This article will explain how to create and manage Windows Server Containers using Docker. By the end of this step, we will have our Container Host up and running with just one IIS container. That’s pretty cool!
Windows Server 2016 with Containers on Azure
For many Developers and Sysadmins, it makes a lot of sense to deploy services to the Microsoft Azure cloud, but you have the additional option of deploying your Container Host to the Microsoft Azure cloud. One of the advantages of using Azure in this way is that you can deploy a Windows Server 2016 virtual machine with the Containers feature already installed. By doing so, you are then able to experiment with Windows Server Container, with both Server Core and Nano Server Container OS Images installed and ready to use with Docker.
Log in to your Azure portal and create a virtual machine using the Windows Server 2016 Core with Containers image, as shown below:

Docker Commands
How do you set about working with Docker on Windows Server? Before going more into the practical side, we need to get familiar with the essential Docker PowerShell commands. You can run the docker –help command:
|
1 2 3 4 5 6 7 8 9 10 11 12 13 14 15 16 17 18 19 20 21 22 23 24 25 26 27 28 29 30 31 32 33 34 35 36 37 38 39 40 41 42 |
Commands: attach Attach to a running container build Build an image from a Dockerfile commit Create a new image from a container's changes cp Copy files/folders between a container and the local filesystem create Create a new container diff Inspect changes on a container's filesystem events Get real time events from the server exec Run a command in a running container export Export a container's filesystem as a tar archive history Show the history of an image images List images import Import the contents from a tarball to create a filesystem image info Display system-wide information inspect Return low-level information on a container, image or task kill Kill one or more running containers load Load an image from a tar archive or STDIN login Log in to a Docker registry. logout Log out from a Docker registry. logs Fetch the logs of a container pause Pause all processes within one or more containers port List port mappings or a specific mapping for the container ps List containers pull Pull an image or a repository from a registry push Push an image or a repository to a registry rename Rename a container restart Restart one or more containers rm Remove one or more containers rmi Remove one or more images run Run a command in a new container save Save one or more images to a tar archive (streamed to STDOUT by default) search Search the Docker Hub for images start Start one or more stopped containers stats Display a live stream of container(s) resource usage statistics stop Stop one or more running containers tag Tag an image into a repository top Display the running processes of a container unpause Unpause all processes within one or more containers update Update configuration of one or more containers version Show the Docker version information wait Block until one or more containers stop, then print their exit codes Run 'docker COMMAND --help' for more information on a command. |
There is enough here for everyday use. We’ll get started by using one of the most common of the Docker commands:
|
1 |
PS > docker images |
This command shows you which Docker Images are available locally. After installing Windows Containers no Docker Images are, as yet, installed. The first thing you have to do is to pull Windows Server Images from the Docker Hub. You don’t need a Docker Hub Account to perform this task:
|
1 |
PS > docker pull <image_name> |
I will describe this command in more detail in the next section. When you have at least one image available, you can start a Windows Container:
|
1 |
PS > docker run -–name <Container_Name> <Image_Name> |
It means that a Windows Container called <Container_Name> will be started from the Image called <Image_Name>. When you have more than one container running, it can be useful to get a list of all running containers:
|
1 |
PS > docker ps |
Finally, you will need some information about your containers, such as the IP Address. Use the following to retrieve this information:
|
1 |
PS > docker inspect |
Retrieve Images from Docker Hub
In Docker container parlance, the image is the template from which you spawn new containers. We can download some pre-built Docker images from the Docker Hub. At the time this was written, Microsoft has two container images in their gallery: Nano Server and Windows Server Core. Let’s download them both by pulling the images from Docker Hub:
|
1 2 3 4 5 6 7 8 9 |
PS > docker images REPOSITORY TAG IMAGE ID CREATED SIZE PS > docker pull microsoft/windowsservercore Using default tag: latest latest: Pulling from microsoft/windowsservercore 3889bb8d808b: Downloading [=> ] 102.7 MB/4.07 GB 3430754e4d17: Downloading [=====> ] 102.2 MB/913.1 MB PS > docker pull microsoft/nanoserver […] |
Ok, but how to know the exact name of the image that you need? That’s pretty simple. On Docker Hub, you will notice the following section named “Docker Pull Command” as shown below.
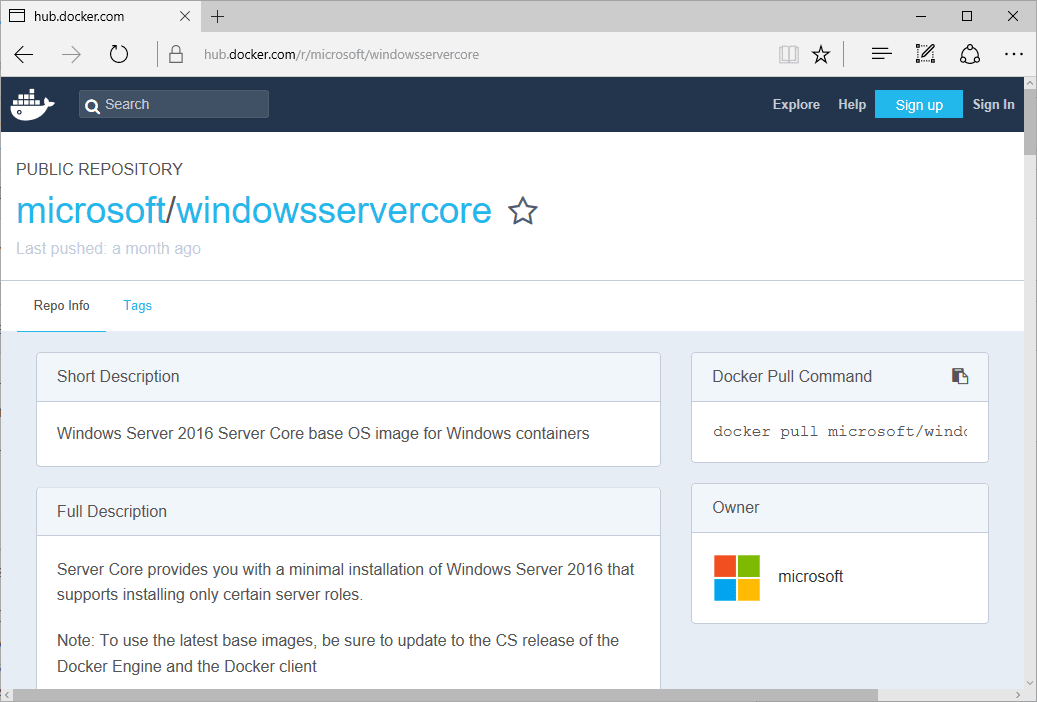
The only necessary step is to copy and paste the command to download the image. Once the image installation process completes (it can take a while, depending on your Internet connection speed), confirm that Windows Server Core image is available locally. Run Docker images to check:
|
1 2 3 4 |
PS > docker images REPOSITORY TAG IMAGE ID CREATED SIZE microsoft/windowsservercore latest 4d83c32ad497 6 weeks ago 9.56GB microsoft/nanoserver latest d9bccb9d4cac 6 weeks ago 925MB |
If you have deployed the pre-configured virtual machine in Azure, the two base images are already pulled.
Deploy a new Windows Container
Now we will use the Docker run command to deploy a new container named CoreServerCMD that uses the Windows Server Core image. The -it switch denotes an interactive session, and cmd.exe means that we want to enter the container inside a new cmd.exe console. Be careful, the repository name must be lowercase.
|
1 2 3 4 5 6 7 8 9 10 11 |
PS > docker run -it --name CoreServerCMD microsoft/windowsservercore cmd.exe Microsoft Windows [Version 10.0.14393] (c) 2016 Microsoft Corporation. All rights reserved. C:\>ipconfig Windows IP Configuration Ethernet adapter vEthernet (Container NIC b4dc9191): Connection-specific DNS Suffix . : Link-local IPv6 Address . . . . . : fe80::81ac:61de:7cef:3467%17 IPv4 Address. . . . . . . . . . . : 172.21.149.87 Subnet Mask . . . . . . . . . . . : 255.255.240.0 Default Gateway . . . . . . . . . : 172.21.144.1 |
Basically, the docker run translates the cmd.exe command within the new Server Core-based container. Now, we have a container named CoreServerCMD which is running. We can check with the Docker ps command:
|
1 2 3 |
PS > docker ps CONTAINER ID IMAGE COMMAND CREATED STATUS NAMES 9e8e23686548 microsoft/windowsservercore "cmd.exe" 5 minutes ago Up 3 minutes CoreServerCMD |
The Docker ps command by default shows only running containers but passing the -a flag to the command will show all containers. You can start and stop containers very simply by running:
|
1 2 3 4 |
PS > <a href="https://docs.docker.com/engine/reference/commandline/stop/">docker stop</a> CoreServerCMD CoreServerCMD PS > <a href="https://docs.docker.com/engine/reference/commandline/stop/">docker st</a>art CoreServerCMD CoreServerCMD |
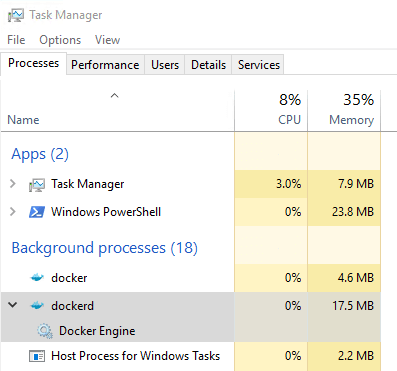
When you start a Windows Container, take a look at the Task Manager tool and you will notice a new process called “Docker”. When you stop your container, this process will disappear:
OK, the container is up and running but you don’t need to execute the docker run command once again. To re-enter the running container, the docker attach command will do the job:
|
1 |
PS > <a href="https://docs.docker.com/engine/reference/commandline/attach/">docker attach</a> CoreServerCMD |
Containers have both a name and identifier, and either of them can be used to identify the container to inspect. Inspect is a core Docker instruction (Docker Docs- Docker Inspect) that allows you to get all the information about Container and Image. Below, I inspect my container:
|
1 2 3 4 5 6 7 8 9 10 11 12 13 14 15 16 17 18 19 20 21 22 23 24 25 26 27 28 29 30 31 32 33 34 35 36 37 38 39 40 41 42 43 44 45 |
PS > docker inspect CoreServerCMD [ { "Id": "9e8e236865487f3f715d2b1d5582512d9f068f97219c01249a497e03afcff94d", "Created": "2017-02-26T12:20:41.2866341Z", "Path": "cmd.exe", "Args": [], "State": { "Status": "exited", "Running": false, "Paused": false, "Restarting": false, "OOMKilled": false, "Dead": false, "Pid": 0, "ExitCode": 9009, "Error": "", "StartedAt": "2017-02-26T12:24:24.8655415Z", "FinishedAt": "2017-02-26T12:32:26.5074121Z" }, "Image": "sha256:4d83c32ad497f063ae77377afb9285ed3f8a2d2dc52eb53268a7152777b25add", "ResolvConfPath": "", "HostnamePath": "", "HostsPath": "", "LogPath": "C:\\ProgramData\\docker\\containers\\9e8e236865487f3f715d2b1d5582512d9f068f97219c01249a497e03afcff94d\\9e8e236865487f3f715d2b1d5582512d9f068f97219c01249a497e03afcff94d-json.log", "Name": "/CoreServerCMD", "RestartCount": 0, "Driver": "windowsfilter", "MountLabel": "", "ProcessLabel": "", "AppArmorProfile": "", "ExecIDs": null, "HostConfig": { "Binds": null, "ContainerIDFile": "", "LogConfig": { "Type": "json-file", "Config": {} }, "NetworkMode": "default", "PortBindings": {}, "RestartPolicy": { "Name": "no", "MaximumRetryCount": 0 […] |
The output has been truncated. You can display specific settings using the –f parameter:
|
1 2 3 4 5 6 |
PS > docker inspect -f '{{.Config.Hostname}}' CoreServerCMD 9e8e23686548 PS > docker inspect -f '{{.Config.Image}}' CoreServerCMD microsoft/windowsservercore PS > docker inspect -f '{{.NetworkSettings.IPAddress}}' CoreServerCMD 172.21.149.87 |
Build your own container image
Docker containers are created by using base images. Basically, an image can contain nothing more than the operating-system fundamentals, or it can contain a full application stack ready for use. So, let’s see an example. You may have a custom website that you want to deploy in a Windows Container. You have two ways to do the job. You can run a Windows Container or just use a Docker file. To run a Windows Container, install and configure the IIS role and finally import your html files: To use a Docker File takes a bit more explaining. Just imagine, for the sake of this example, that you have a folder called “MyWebSite” containing two files:
- Index.html
- Dockerfile
What is a Dockerfile?
Dockerfile is a script, composed of various “commands” also called “instructions” and arguments listed successively to automatically perform actions on a base image in order to create a new one. The Dockerfile greatly helps with deployments by automating and simplifying this process.
Below is the content of my Dockerfile:
|
1 2 3 4 5 6 7 8 |
FROM microsoft/iis MAINTAINER Nicolas PRIGENT RUN mkdir C:\site RUN powershell -NoProfile -Command \ Import-module IISAdministration; \ New-IISSite -Name "Site" -PhysicalPath C:\site -BindingInformation "*:8080:" COPY index.html C:\site EXPOSE 8080 |
My Dockerfile begins with a “FROM” keyword. This keyword defines an image from which the build process starts. In my example, I will use the Microsoft IIS image, then create a folder and finally run some PowerShell commands via the “RUN” keyword. Thanks to this Dockerfile, Docker will create a new container image. A container image is the captured state information of a container that you have created and customized on a container host. Once you have customized a container image for a particular purpose, you can then use it to create new containers from it. It’s something like a “Template” for creating new containers for some specific purpose that you can list with the Docker images command.
Creating a container image
OK, my Dockerfile is ready. Here are the commands I need to run to create my new image:
|
1 2 3 4 5 6 7 8 9 10 11 12 13 14 15 16 17 18 19 20 21 22 23 24 25 |
PS > cd C:\MyWebsite PS C:\MyWebsite> docker build -t myiis . Sending build context to Docker daemon 3.072kB Step 1/6 : FROM microsoft/iis ---> a3dd2dff392b Step 2/6 : MAINTAINER Nicolas PRIGENT ---> Running in 2325e0d1cad2 ---> 5c647612617c Removing intermediate container 2325e0d1cad2 Step 3/6 : RUN mkdir C:\site ---> Running in bec661fdb10c ---> 5173bcee6d03 Removing intermediate container bec661fdb10c Step 4/6 : RUN powershell -NoProfile -Command Import-module IISAdministration; New-IISSite -Name "Site" -PhysicalPath C:\site -BindingInformation "*:8080:" ---> Running in d9abe719e201 ---> 0d84ea9a9af5 Removing intermediate container d9abe719e201 Step 5/6 : COPY index.html C:\site ---> b6b3342f2761 Removing intermediate container 45e11d3a432f Step 6/6 : EXPOSE 8080 ---> Running in 7f8983d773d5 ---> f815a0ab0695 Removing intermediate container 7f8983d773d5 Successfully built f815a0ab0695 |
“myiis” is the repository name and must be lowercase. At the end of my Dockerfile, I expose my website on the 8080 port number. At this step, I can confirm that my container image has been successfully created:
|
1 2 3 4 5 6 |
PS > docker images REPOSITORY TAG IMAGE ID CREATED SIZE myiis latest 5b4148e14c8f 45 seconds ago 9.82GB microsoft/iis latest a3dd2dff392b 6 weeks ago 9.82GB microsoft/windowsservercore latest 4d83c32ad497 7 weeks ago 9.56GB microsoft/nanoserver latest d9bccb9d4cac 7 weeks ago 925MB |
Now, I just have to use Docker run to create a new container from my new container image:
|
1 2 3 4 |
PS > docker run -d -p 8080:8080 --name websitecontainer myiis PS > docker ps CONTAINER ID IMAGE […] STATUS PORTS NAMES a6a41cf3b19c myiis […] Up Less than a second 0.0.0.0:8080->8080/tcp websitecontainer |
That’s cool, my container is up and running. I can get the container IP Address with the following command and go to my website on the following URL: http://172.21.158.179:8080
|
1 2 3 4 5 |
PS > docker inspect -f '{{range .NetworkSettings.Networks}}{{.IPAddress}}{{end}}' a6a41cf3b19c 172.21.158.179 Or PS > docker inspect -f '{{range .NetworkSettings.Networks}}{{.IPAddress}}{{end}}' websitecontainer 172.21.158.179 |
Please be careful; because if you begin with Docker and Windows Containers, you will probably make the following mistake: You will try to get the IP address from the image instead of the container. Ensure you get the container ID from docker ps. if you use the image name, you are asking Docker to show you the IP Address of the image. This, of course, does not make sense, because images do not have IP Addresses.
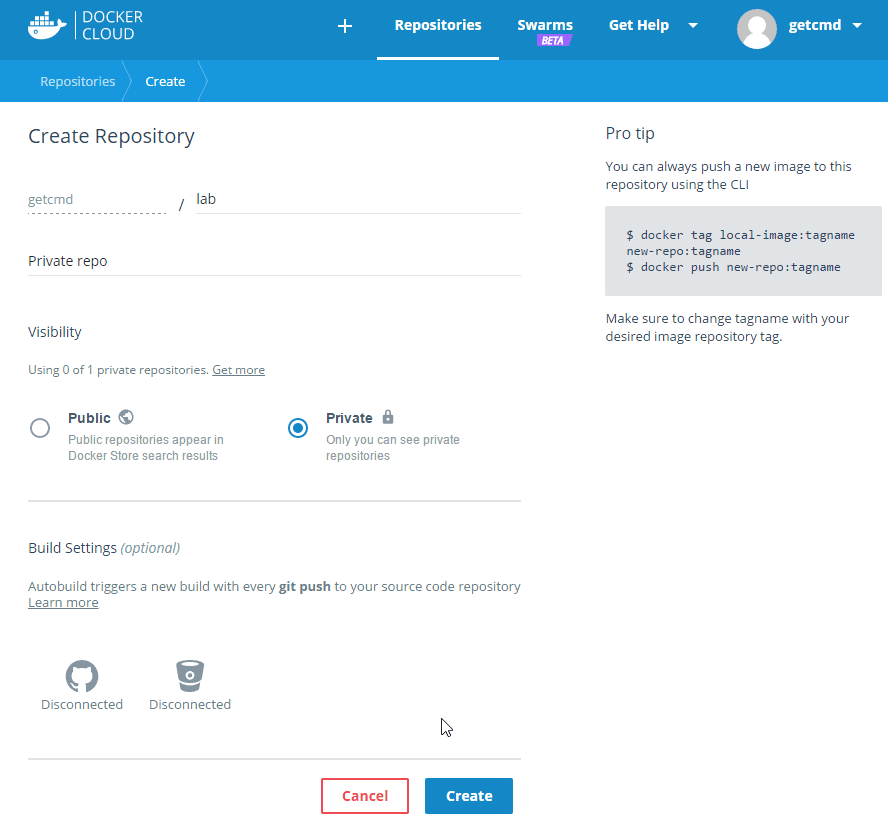
Push your images to Docker Hub
First, you must create a free Docker account here: https://cloud.docker.com/. Docker Hub lets you store and share your base images. It means that co-workers can use your base image from your repository.

You can create repositories and manually push images using the docker push command. These repositories can be either public or private. You can create one private repository for free, and unlimited public repositories.
Click on Repositories and Create. You must enter a name and an optional description. Next, choose a visibility setting for the repository.
When you need to push an image to Docker Hub, you must use three commands. The first one will tag the image:
|
1 |
PS > docker tag f45ecff4c38c getcmd/lab:latest |
- Getcmd is my Docker ID
- Lab is my private repository
- Latest is the tag
Now run the docker images command to verify that the same image ID now exists in two different repositories.
|
1 2 3 4 |
PS > docker images REPOSITORY TAG IMAGE ID CREATED SIZE getcmd/lab latest f45ecff4c38c 2 hours ago 9.89GB myiis latest f45ecff4c38c 2 hours ago 9.89GB |
The second command stores your credentials using the docker login command:
|
1 2 3 4 5 |
PS > docker login Login with your Docker ID to push and pull images from Docker Hub. If you don't have a Docker ID, head over to https://hub.docker.com to create one. Username: getcmd Password: Login Succeeded |
Now, you can push the image:
|
1 2 3 4 5 6 7 8 9 10 11 12 13 14 |
PS > docker push getcmd/lab The push refers to a repository [docker.io/getcmd/lab] 0a2abd09b43e: Pushed 68da241f1f36: Pushed 26de02533429: Pushed 12af8be2d3dc: Pushed b54f48930406: Pushed 5b4aace84103: Mounted from microsoft/iis 1f2f3eb32edc: Pushed 0451551dda21: Pushed c28d44287ce5: Skipped foreign layer f358be10862c: Skipped foreign layer latest: digest: sha256:95fa14a4e1af0d8b52ed6dc10c06b6f1085285126ddef2882210dd904de88565 size: 2619 latest: digest: size: 2619 |
Note: You can log out of Docker Hub using docker logout command
Conclusion
In this article we discussed about the Docker commands that allow you to work with Windows containers. We also download Container images from the Docker HUB, and we have created a free Docker account to store our own images. Next, we have seen how to build our container image and create a container from the container image.
Containerization provides you with an open-ended device that can simplify your deployments in many different ways. In the next article, I will explain how to use Hyper-V Containers, how to convert Windows services to run in a Windows Container, and reveal the mysteries of Docker-compose.
I hope that this article has helped you to understand more about Windows Containers.
Load comments