
With practically every application you use on your computer—be it a word processor, an IDE, a web browser, an instant messager—after you install it and use it a bit, you inevitably want to customize it to your working style, so you open up the preferences panel and tweak a few settings to your liking. You make those changes just once; they are saved by the application so that the next time you open it up, it remembers your preferences and gives you the user experience you prefer. PowerShell is a different kind of application, of course, in that it uses a command-line rather than a GUI, but it has a cleverly hidden capability to give you the same preference-setting capability. A few examples:
- When you list files (
Get-ChildItem) do you always like to include hidden files (with the-Forceswitch)? - When you want help on a cmdlet (
Get-Help) do you always use the-ShowWindowswitch so that it pops open help in a separate window? - Are you still new to PowerShell, treading carefully by always including
-Confirmon any cmdlet that accepts it?
All of those preferences can be set once and then automatically applied with no further intervention on your part.
The second handy use of such preferences is on the occasion when you need to use several cmdlets in succession, all of which need a certain value for a parameter. Say, for example, you frequently run cmdlets on a remote machine. Here you might need to use the built-in cmdlets New-PSSession, Enter-PSSession, and Invoke-Command, and on each of those you need to specify, e.g.
-ComputerName htxyz1032243.dev.mycompany-testdev-1
Rather than having to type that on each cmdlet (today, then tomorrow, then…) you have likely already realized that you could put that unwieldy computer name into a variable and shorten it to, say,
-ComputerName $myRemoteMachine
But with PowerShell’s preference capability you can go one better, not having to include the ComputerName parameter at all unless you access a different remote machine!
PowerShell provides a special preference variable, $PSDefaultParameterValues, that can save all that needless repetition by specifying the default values for parameters. The values you assign to this variable are somewhat less transparent than specifying values with a given command, as you’ll see, but once you configure those values you can safely tuck them away in your PowerShell profile and not be further concerned with them. This article explains how to use it directly, and provides some helper functions to make it even more powerful.
Suggested Uses
Before explaining the details of how to use this special preference variable, the following table presents a few ideas for useful general purpose settings. At this point, focus more on the right-hand column to see what the setup does for you; you’ll soon be up to speed on precisely what is being done in the left-hand column.
|
Assignment |
Purpose |
|
|
Apply |
|
|
Whenever you invoke |
|
|
For any cmdlet that honors the |
|
|
Whenever you list directory contents, always include hidden files and folders. |
|
|
For any cmdlet that requires credentials, automatically apply saved credentials. Note that because of the first line of code at left, every time you start up PowerShell you will get a prompt asking you to enter your credentials. But you won’t have to enter it again as long as the window remains open. |
|
|
Whenever you list your command history, just show the most recent 10 items. |
|
|
Always apply |
(Kudos to Boe Prox in his post Using $PSDefaultParameterValues in PowerShell for a couple of these.)
I should point out that, though this does present quite a convenience in many cases, you need to make sure you define default values carefully: because you can use wildcards in the definitions you can easily specify too broad a set of cmdlets, inadvertently setting defaults for cmdlets you did not intend. A second potential downside is that you will now be introducing obfuscation in your commands—including behaviors via default that you are not explicitly calling out in your commands. So, if you are writing scripts, for example, best practice dictates you should avoid abbreviations and spell out cmdlet and parameter names. I would add to that to always be explicit with your parameters and do not rely on these implicit defaults.
Operations on $PSDefaultParameterValues
$PSDefaultParameterValues is a standard hash table, so all the standard operations for a hash table may be used. This section details these standard operations in the context of $PSDefaultParameterValues.
Initialize
Option 1: By assigning a hash table literal, this overwrites any previous values of the hash. This style allows you to add multiple values at one time.
|
1 2 3 4 5 |
$PSDefaultParameterValues = @{ 'foo:mode' = 5 'bar:name' = 'abc' 'baz:ErrorAction' = 'Continue' } |
Option 2: You can also use the Add method because $PSDefaultParameterValues starts out as an empty hash (rather than $null, like a typical variable). The Add method can only assign one value at a time, though, so multiple calls are needed to include multiple elements.
|
1 2 3 |
$PSDefaultParameterValues.Add('foo:mode', 5) $PSDefaultParameterValues.Add('bar:name', 'abc') $PSDefaultParameterValues.Add('baz:ErrorAction', 'Continue') |
Add Elements
Option 1: If you want to add to what is already present, make sure you use the hash addition operator (+=) rather than just assignment (=). Again, you can add multiple items at one time with this approach:
|
1 2 3 4 |
$PSDefaultParameterValues += @{ '*-PsSession:ComputerName' = 'htxyz1032243.dev.mycompany-testdev-1' 'Invoke-Command:ComputerName' = 'htxyz1032243.dev.mycompany-testdev-1' } |
Option 2: Use the Add method on the hash table.
|
1 2 3 4 |
$PSDefaultParameterValues.Add( '*-PsSession:ComputerName', 'htxyz1032243.dev.mycompany-testdev-1') $PSDefaultParameterValues.Add( 'Invoke-Command:ComputerName', 'htxyz1032243.dev.mycompany-testdev-1') |
Fetch an Element
Option 1: A hash table element may be fetched either with an array-like syntax or with a property-like syntax. Here’s the array-like approach. Here, a string key must always be quoted:
|
1 |
Write-Output $PSDefaultParameterValues['baz:ErrorAction'] |
Option 2: Typically when you use a property-like syntax you can drop the quotes, but in this case you must include them because of the embedded colon in the key.
|
1 |
Write-Output $PSDefaultParameterValues.'baz:ErrorAction' |
Update an Element
An update has the same options as a fetch; either way, just assign a new value to that key in the hash.
Option 1:
|
1 2 |
$PSDefaultParameterValues['*-PsSession:ComputerName'] = 'xy3.dev.mycompany-testdev-2' |
Option 2:
|
1 2 |
$PSDefaultParameterValues.'*-PsSession:ComputerName' = 'xy3.dev.mycompany-testdev-2' |
Remove Elements
Option 1: Remove a single element with the Remove method.
|
1 |
$PSDefaultParameterValues.Remove('foo:mode') |
Option 2: Remove all elements with the Clear method.
|
1 |
$PSDefaultParameterValues.Clear() |
$PSDefaultParameterValues Syntax Notes
This $PSDefaultParameterValues variable is just a standard hash table but augmented with the ability to validate the format of its hash keys (reference: System.Management.Automation.DefaultParameterDictionary).
The Key
A key in this particular dictionary must be of the form:
<Key> :: = ‘“‘ <CmdletName> ‘:‘ <ParameterName> ‘“‘
The only validation that is actually done in a DefaultParameterDictionary is confirming that both <CmdletName> and <ParameterName> are non-empty and separated by a colon; it does not check that either the cmdlet or parameter actually exists.
Both the <CmdletName> and <ParameterName> may contain standard globbing wildcards. (Globbing essentially means you can use an asterisk to match any group of characters or a question mark to match any single character; see Supporting Wildcard Characters in Cmdlet Parameters for more details.) You’ll observe I showed an example of that under “Add Elements” above.
The Value
Each value in this dictionary must be one of these:
<Value> ::= <Object> | ‘{‘ <NormalScriptBlock> ‘}’ | <SpecialScriptBlock>
If the default value is a constant in all cases, just assign that literal value—all the instances in the previous section show examples of this. If, on the other hand, the default value may vary but in a predictable way, you can specify arbitrary code with a script block to determine a value under different conditions.
Important Note:
The official documentation only gives part of the story on script blocks. In fact, it shows only one syntax option for script blocks:
|
1 |
$PSDefaultParameterValues=@{"<CmdletName>:<ParameterName>"={<ScriptBlock>}} |
It goes on to state [red highlighting mine]: “When the specified parameter takes a script block value, enclose the script block value in a second set of braces, such as:
$PSDefaultParameterValues=@{ “Invoke-Command:ScriptBlock”={{Get-Process}} }
That is usually true. If you run the above setup statement it evaluates the right-hand side of the assignment—a script block containing a script block—so ends up correctly assigning the inner script block to the hash value. So when you eventually run Invoke-Command it correctly executes the script block containing just Get-Process.
Without the second set of braces, what happens is odd. The resultant value added to the hash still seems to be a valid script block(!), as shown in [2] below, but then when executing [3] it fails.
[1]: $PSDefaultParameterValues=@{ "Invoke-Command:ScriptBlock"={Get-Process} }
[2]: $PSDefaultParameterValues['Invoke-Command:ScriptBlock'].GetType().FullName
System.Management.Automation.ScriptBlock
[3]: Invoke-Command
WARNING: The binding of default value
'System.Collections.ObjectModel.Collection`1[System.Management.Automation.PSObject]' to
parameter 'ScriptBlock' failed
OK, so for some reason you must have a second set of braces to yield a true script block. This is what I refer to in the syntax specification above as a NormalScriptBlock. But it gets even more curious. A couple sections lower in this article, you will find a more in-depth example of using script blocks. In that example, it only works with a single set of braces; it fails if you add a second set of braces. This is what I am calling a SpecialScriptBlock in the syntax specification above. Alas, I have not yet isolated what makes it special, so if you have any clues please add a reader comment below!
One Special Element
This hash has one special, optional element as well. You can define an element with the key Disabled and the value $true or $false. If this element is absent (either never added or at some point removed), or it is present with a value $false, then the hash is enabled and default value processing will be applied to your commands. If it is present with a value $true, that turns off default value processing for all commands. This provides a convenient mechanism for maintaining a list of defaults and allowing you to turn it off and on at any time should the need arise, without losing any of those default assignments.
Persisting your Settings
Any settings you make to $PSDefaultParameterValues exist only for the duration of your current PowerShell session. If you open a new PowerShell window later, the variable will again start out empty. Therefore, any values you setup for this hash table should be done in your PowerShell profile if you plan to use them frequently. That way, on startup of a PowerShell session, those values are preloaded for you automatically. (Be aware that you actually have more than one profile available—see my Persistent PowerShell: The PowerShell Profile article for all the details. You can set the value of $PSDefaultParameterValues in any one of your profiles.)
Script Blocks and Dynamic Defaults
All of the above samples set the default value to an object—Boolean in most of them, a Credential object in the last one. But recall from the syntax section earlier that you can also supply a script block when you want to apply a more dynamic default value. To illustrate this I am going to borrow Lee Holmes’ excellent example in recipe 1.4, Supply Default Values for Parameters, from Windows PowerShell Cookbook, 3rd Edition. His example illustrates how, when you want to invoke cmdlets on remote machines, you can automatically supply different credentials based on the name of the remote machine. Holmes’ particular example is well chosen as it takes very little code but shows a real use, not some academic (read: useless) example. Alas, there are a couple issues with his implementation that prevent it from working, which I address here.
First, you need to set up the credentials you will be using. The obvious choice for this is to use a hash table keyed off the machine name. Let’s assume there are two machines you need to interact with very frequently. Further, we will assume that there are other machines you need to interact with only infrequently, so we won’t set defaults for those here. When you execute this first bit of setup code, you will be prompted by each instance of Get-Credential to enter the corresponding password for each user. Those passwords will be stored securely in credential objects in the hash table. (I have added the UserName values explicitly here so when you see the results showing the auto-default working, you have a concrete reference. Also, you’ll have less typing, only needing to supply a password for each.)
|
1 2 3 |
$credmap = @{} $credmap['RemoteMachine1'] = Get-Credential -UserName RemoteUser1 -Message 'pwd?' $credmap['RemoteMachine2'] = Get-Credential -UserName RemoteUser2 -Message 'pwd?' |
Next let’s define a value in $PSDefaultParameterValues so that any cmdlet having a Credential parameter will apply this default, which is a script block. That’s line 1 in the code below. In order to lookup a credential by machine name, the cmdlet has to include a parameter named ComputerName; you will find that all the relevant remoting cmdlets include such a parameter: New-PSSession, Invoke-Command, Receive-Job, etc. Then line 2 checks if the user has actually supplied a value for ComputerName. If not, we cannot lookup any credential so the code returns nothing, which means that no default value will be applied. That’s certainly what one would reasonably expect.
Let’s now focus on the case where the user has supplied a value for ComputerName to whatever cmdlet is invoked. Line 3 looks up the credential for that machine. If it is defined, it will have a truthy value so line 4 returns that credential; if not defined, line 5 will invoke Get-Credential on the spot, popping up a dialog to accept your username and password, and then return that new credential value it just created. So as long as a ComputerName is supplied to the cmdlet being invoked, this guarantees that a valid credential object will automatically be supplied to the cmdlet’s Credential parameter.
|
1 2 3 4 5 6 7 8 |
$PSDefaultParameterValues["*:Credential"] = { # 1 if($args[0].BoundParameters -contains "ComputerName") # 2 { $cred = $credmap[$PSBoundParameters["ComputerName"]] # 3 If ($cred) { $cred } # 4 else { Get-Credential } # 5 } } |
Finally, this small RemoteConnector function is all we need to see how everything works. This function takes two parameters, ComputerName and Credential, exactly the two parameters that we’ve setup to be able to automatically supply a credential based on machine name. (I have added the CmdletBinding attribute here; without it, auto-defaulting does not work!)
|
1 2 3 4 5 |
function RemoteConnector { [CmdletBinding()] param($ComputerName, $Credential) "Connecting as " + $Credential.UserName } |
To prove that the auto-default is working, all the function does is display the user name from that auto-supplied credential. When I invoke the function with RemoteMachine1, it successfully looks up that credential and is then able to retrieve the UserName property, displaying RemoteUser1. Similarly for RemoteMachine2 and RemoteUser2.
|
1 2 3 4 5 6 7 8 9 10 |
[1]: RemoteConnector -ComputerName RemoteMachine1 Connecting as RemoteUser1 [2]: RemoteConnector -ComputerName RemoteMachine2 Connecting as RemoteUser2 [3]: RemoteConnector -ComputerName RemoteMachine3 cmdlet Get-Credential at command pipeline position 1 Supply values for the following parameters: Connecting as OtherUser |
However, when I use RemoteMachine3—which has not had a default value supplied—it first prints a message saying it is invoking Get-Credential then displays this pop-up…
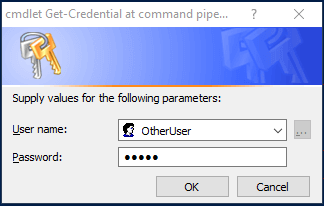
…and finally prints the user name I just entered from that pop-up.
There’s just one final, important difference from Holmes’ implementation to mention. In setting up the auto-defaulting he did not include line 5, the else clause, so if the machine name was not found, it would not supply a default. To compensate for that, he marked the Credential parameter of RemoteConnector as mandatory, meaning that if you did not supply a credential value on the command line, and there was nothing to auto-default, then RemoteConnector itself would prompt you to enter a credential object but without the Get-Credential pop-up. But that means it is expecting you to type in a Credential object, which is not possible. (Nonetheless, I am happy to stand on his shoulders and be able to present this cool example.)
Convenience for Your Custom PowerShell Code
Besides setting up some convenient shortcuts for use with built-in cmdlets, for developers it is also handy to be able to work some magic with your own custom cmdlets. In my shop, for example, we have one module containing a couple dozen cmdlets, many of which use a common parameter, Mode. This Mode parameter varies from client to client, but for any single client, every cmdlet working on their data needs to use the same value of Mode. So I have to add -Mode hist-0010-dev.test onto each cmdlet I am using, which gets very tiring/annoying very quickly. You could, of course, put that value into a variable and then just use, e .g. -Mode $myMode, which is less typing, but if less is better, then no typing at all is better still.
Now, you have seen that wildcards can be used to specify defaults, so I could just use a setting:
$PSDefaultParameterValues += @{'*:Mode' = 'hist-0010-dev.test'}
However, the term “Mode” is so common there is a high probability that I will run some unrelated cmdlet that also happens to accept a Mode parameter but where that parameter means something completely different. Even if the parameter name was less common, though, I would have similar reservations about a possible collision. I wanted a way to guarantee there is no chance of collision (assuming you have appropriately named your cmdlets uniquely).
What I came up with is the Set-DefaultParameter cmdlet. This is a “wrapper” around the $PSDefaultParameterValues variable that applies a default for a specified parameter but only for cmdlets within a specified module. Put this code in your PowerShell profile so it is available to you whenever you need it. (By the way, when I say “put [it] in your PowerShell profile” that implies just inlining it but that would make for a long, messy profile! I urge you instead to put it in its own file in a profile_scripts directory that is read and sourced by your profile—see the section on Complex Functions in my article Persistent PowerShell: The PowerShell Profile for details.)
Note that this cmdlet comes fully documented in the project file accompanying this article.
|
1 2 3 4 5 6 7 8 9 10 11 12 13 14 15 16 17 18 19 20 21 22 23 24 25 26 27 28 29 30 31 32 33 |
function Set-DefaultParameter { [CmdletBinding()] param( [Parameter(Mandatory)][string]$ModuleName, [Parameter(Mandatory)][string]$ParameterName, [Parameter(Mandatory)][object]$DefaultValue ) Get-Command -module $ModuleName | Where-Object { $_.Parameters.ContainsKey($ParameterName) } | Foreach-Object { _AddDefault $_ $ParameterName $DefaultValue } } function _AddDefault( [System.Management.Automation.FunctionInfo]$cmdlet, [string]$paramName, [string]$value) { $cmdletName = $cmdlet.Name # check for any standard cmdlet parameters here $hasCmdletBinding = $cmdlet.Parameters.ContainsKey('ErrorAction') if ($hasCmdletBinding) { Write-Verbose $cmdletName $key = "$cmdletName`:$paramName" $global:PSDefaultParameterValues[$key] = $value } else { Write-Warning "Skipping '$cmdletName' because it would be ignored due to lack of cmdlet binding" } } |
As you can see, you simply specify a module name, a parameter name, and a default value for that parameter. Set-DefaultParameter then adds entries to $PSDefaultParameterValues for each cmdlet in that module that has that parameter. I will use a trivial demo module to illustrate how this works. To try it yourself simply paste the three functions below into a new file called DemoModule.psm1. Note the psm1 ending denoting a module (as opposed to a ps1 ending denoting a plain script). Also note that this is fine for a throw-away module, but for creating real modules see my suggestions in Further Down the Rabbit Hole: PowerShell Modules and Encapsulation. (The attached project file provides the fully realized module, complete with manifest.)
|
1 2 3 4 5 6 7 8 9 10 11 12 13 14 15 16 17 18 19 20 21 22 |
function Test-Cmdlet1 { [CmdletBinding()] param($Mode) "Cmdlet1: Mode is [$Mode]" } function Test-Cmdlet2 { [CmdletBinding()] param($Mode, $Color, $Name) "Cmdlet2: Mode is [$Mode], Color is [$Color], Name is [$Name]" } function Test-Cmdlet3 { # No cmdlet binding so this function will not accept an external default! #[CmdletBinding()] param($Mode, $Color, $Name) "Cmdlet3: Mode is [$Mode]" } |
To set the stage, you need to [1] dot-source the Set-DefaultParameter cmdlet into the current PowerShell scope (explained in the Using Dot Source Notation with Scope section of the help topic about_Scopes) so it is available to use and [2] import the DemoModule. Note that I have included the -Verbose parameter here so you can see the three functions loaded from the module. Command [3] is just to show that $PSDefaultParameterValues starts out empty.
1]: . .\Set-DefaultParameter.ps1
[2]: Import-Module .\DemoModule\DemoModule.psm1 -Verbose
VERBOSE: Loading module from path 'C:\usr\simpletalk\DemoModule\DemoModule.psm1'.
VERBOSE: Importing function 'Test-Cmdlet1'.
VERBOSE: Importing function 'Test-Cmdlet2'.
VERBOSE: Importing function 'Test-Cmdlet3'.
[3]: $PSDefaultParameterValues.Count
0

[4]: Set-DefaultParameter -ModuleName DemoModule `
     -ParameterName Mode -DefaultValue internal -Verbose
VERBOSE: Test-Cmdlet1
VERBOSE: Test-Cmdlet2
WARNING: Skipping 'Test-Cmdlet3' because it would be ignored due to lack of cmdlet
binding
[5]: $PSDefaultParameterValues

Name                           Value
----                           -----
Test-Cmdlet2:Mode              internal
Test-Cmdlet1:Mode              internal

[6]: Test-Cmdlet1
Cmdlet1: Mode is [internal]

[7]: Test-Cmdlet2
Cmdlet2: Mode is [internal], Color is [], Name is []

[8]: Test-Cmdlet3
Cmdlet3: Mode is []

[9]: Test-Cmdlet1 -Mode 'something else'
Cmdlet1: Mode is [something else]
In command [4] you run Set-DefaultParameter. Adding -Verbose shows the cmdlets that have been processed from the module. Even though all three cmdlets above accept a Mode parameter, $PSDefaultParameterValues only works with true cmdlets, not plain functions. Test-Cmdlet3 is just a plain function because it lacks the CmdletBinding attribute so it is skipped. (To be clear, there is nothing stopping you from adding Test-Cmdlet3 to $PSDefaultParameterValues but it just would not do anything.) In command [5], then, you see the updated contents of $PSDefaultParameterValues. Commands [6], [7], and [8] show execution of the cmdlets in DemoModule; observe that the default has been automatically applied to the first two. Command [9] shows that if you do provide an explicit value, that nicely overrides the automatic default.
Conclusion
I am continually finding little known but powerful productivity boosters like $PSDefaultParameterValues in PowerShell; the language continues to surprise and delight me, though I’ve been using it for quite some time. I think you will agree that with just this one system variable, there are a variety of ways you can leverage it to save you time in your daily work.
This document contains proprietary information and is protected by copyright law.
Copyright © 2026 Red Gate Software Limited. All rights reserved
Load comments