
- PowerShell Desired State Configuration – Part 1: The Basics
- PowerShell Desired State Configuration – Part 2: LCM and Push Management Model
- PowerShell Desired State Configuration – Part 3: Pull Mode
- PowerShell Desired State Configuration – Part 4: Automating and Monitoring Pull Mode
DSC has two configuration modes: “Push” or “Pull”. Each mode allows users to ensure that the servers and workstations in their care to acquire and retain the correct configuration. In the terms used by DSC, they allow you to apply a desired configuration-state over a target node. I’ve already described the Push mode in the first two parts of this series. In the Push mode, the configuration is pushed manually on target nodes and it is unidirectional. In the “Pull” mode, however, nodes are configured to get their desired configuration from the ‘pull’ server. This mode is better when machines must be created quickly, or if they need to be done ‘on demand’ for occasionally-connected nodes such as mobile devices or IOT nodes. I suggest you read both parts in order to understand the basics and decide which DSC mode you need to implement so as to fit your particular requirements.
Pull mode
In order to use the pull mode, it is necessary to have a server that has the Windows DSC feature installed. This server is called ‘Pull Server’ in the DSC jargon. In my environment, I dedicate a server to host this feature but you can use an existing server equally well.
A pull server must have Windows Management Framework 4 (WMF) installed, but this is the only prerequisite.
So in this article, the technical environment is the following:
- DSC01: Pull server
- ADM01 and ADM11: Two nodes

Figure 1: Pull mode
This mode is the most complex to implement, but also the easiest to maintain. One example: In push mode, if a node happens to be offline, then deployment will fail. Sysadmin have to regularly try again to ‘push’ the configuration. In the pull mode, the operation is much more dynamic. Whatever the status of the node is, the configuration will be applied when it will be back online.
What is pull server?
A pull server is just an Internet Information Services (IIS) Web server that will contain the MOF files for your nodes. It will also respond to requests from each node’s Local Configuration Manager (LCM) to distribute configurations. Thus, the node requests its configuration file from the pull server (Arrow n°1), which then returns with the associated DSC resources. This is the biggest advantage of the pull mode; the DSC resources are downloaded automatically from the pull server on to each node (Arrow n°2). Then, at regular intervals, the nodes will send their status to the pull server to check for changes to configuration.
The pull server is a central repository for the MOF files and the DSC resources.
A pull server can distribute the MOF files via two protocols:
- Server Message Block (SMB): This method uses shared folders on a file server. However, if you need to manage machines in several networks separated by a firewall, then your network port management will be more complex. In addition, the security permissions will have to be managed properly. The biggest advantage of this method is redundancy. In order to have high availability, you can use a replication service between two file servers via Distributed File System Replication (DFS-R) protocol. I will not detail this method in this article.
- HyperText Transfer Protocol (http/https): This is the method we are going to study because it is the easiest way to manage machines located in different networks. It uses http protocol and just requires an IIS server for communications.
Installation of the Pull Server
To install a Pull server, you will need to add the “Desired State Configuration” Windows feature and configure two Web Services. The first web service will allow nodes to download their configuration and the second is called “Compliance Server” to avoid configuration-drift on the nodes.
The pull server can be configured with DSC! It is a very good way of learning DSC, so we will use the following PowerShell script:
Note: You must install the “DSC resources kit” in order to use the resource xDscWebService contained in the xPSDesiredStateConfiguration module. For more explanations, I refer you to the first part of the series “The Basics”, in “The DSC resources” section.
|
1 2 3 4 5 6 7 8 9 10 11 12 13 14 15 16 17 18 19 20 21 22 23 24 25 26 27 28 29 30 31 32 33 34 35 36 37 38 39 40 41 42 43 44 45 46 47 48 49 |
configuration CreatePullServer { param ( [string[]]$ComputerName = 'localhost' ) Import-DSCResource -ModuleName xPSDesiredStateConfiguration Node $ComputerName { WindowsFeature DSCServiceFeature { Ensure = "Present" Name = "DSC-Service" } xDscWebService PSDSCPullServer { Ensure = "Present" EndpointName = "PSDSCPullServer" Port = 8080 PhysicalPath = "$env:SystemDrive\inetpub\wwwroot\PSDSCPullServer" CertificateThumbPrint = "AllowUnencryptedTraffic" ModulePath = "$env:PROGRAMFILES\WindowsPowerShell\DscService\Modules" ConfigurationPath = "$env:PROGRAMFILES\WindowsPowerShell\DscService\Configuration" State = "Started" DependsOn = "[WindowsFeature]DSCServiceFeature" } xDscWebService PSDSCComplianceServer { Ensure = "Present" EndpointName = "PSDSCComplianceServer" Port = 9080 PhysicalPath = "$env:SystemDrive\inetpub\wwwroot\PSDSCComplianceServer" CertificateThumbPrint = "AllowUnencryptedTraffic" State = "Started" IsComplianceServer = $true DependsOn = ("[WindowsFeature]DSCServiceFeature", "[xDSCWebService]PSDSCPullServer") } } } CreatePullServer |
Figure 2: CreatePullServer.ps1
Let’s take a look at this script to understand its content.
|
1 2 3 4 5 6 7 |
configuration CreatePullServer { ## PART1 param ( [string[]]$ComputerName = 'localhost' ) |
This first section will create a configuration called “CreatePullServer”. An array is created to contain the nodes that will be configured.
|
1 2 |
## PART2 Import-DSCResource -ModuleName xPSDesiredStateConfiguration |
Import-DSCResource is a keyword that is only available within a configuration. This keyword imports DSC resources that will then be used in the configuration. Here we need the xDscWebService resource contained inside the xPSDesiredStateConfiguration module.
Note: This is a keyword and not a cmdlet. You will get an error if you use it in a PowerShell console. I will explain in detail in next article.
|
1 2 3 |
## PART3 Node $ComputerName { |
Here we use the array mentioned in the beginning of the script.
|
1 2 3 4 5 6 |
## PART4 WindowsFeature DSCServiceFeature { Ensure = "Present" Name = "DSC-Service" } |
The keyword “WindowsFeature” indicates that we want to configure a Windows feature. Yes, I know that it is obvious! Here, we add two properties: Name followed by “DSC-Service” which is the name as used in Windows and Ensure with the value “Present” which mean that we want to install it.
|
1 2 3 4 5 6 7 8 9 10 11 12 13 |
## PART5 xDscWebService PSDSCPullServer { Ensure = "Present" EndpointName = "PSDSCPullServer" Port = 8080 PhysicalPath = "$env:SystemDrive\inetpub\wwwroot\PSDSCPullServer" CertificateThumbPrint = "AllowUnencryptedTraffic" ModulePath = "$env:PROGRAMFILES\WindowsPowerShell\DscService\Modules" ConfigurationPath = "$env:PROGRAMFILES\WindowsPowerShell\DscService\Configuration" State = "Started" DependsOn = "[WindowsFeature]DSCServiceFeature" } |
This part configures the first Web service through which the nodes will get their configuration. You can change all the values except the last one DependsOn because DSC feature is mandatory.
|
1 2 3 4 5 6 7 8 9 10 11 12 13 14 15 |
## PART6 xDscWebService PSDSCComplianceServer { Ensure = "Present" EndpointName = "PSDSCComplianceServer" Port = 9080 PhysicalPath = "$env:SystemDrive\inetpub\wwwroot\PSDSCComplianceServer" CertificateThumbPrint = "AllowUnencryptedTraffic" State = "Started" IsComplianceServer = $true DependsOn = ("[WindowsFeature]DSCServiceFeature", "[xDSCWebService]PSDSCPullServer") } } } |
Finally, part 6 configures the second Web service “Compliance Server” which will control drift configuration on target nodes. Several properties are used in this script, here is their description:
- Ensure: Name of the web service.
- EndpointName: Port used to communicate with the web service.
- Port: Defines the content location.
- PhysicalPath: Defines the content location.
- CertificateThumbPrint: Indicates the thumbprint to use with https protocol. Here, we will indicate that traffic will not be encrypted.
- State: Indicates that the web service is active or not.
- IsComplianceServer: This property activates the compliance feature.
- DependsOn: Indicates which resource is mandatory before creating the web service.
Running this configuration generates a “localhost.mof” file:
|
1 2 3 4 5 6 7 |
PS C:\Users\Administrator> CreatePullServer -OutputPath C:\DSC\CreatePullServer\ Directory: C:\DSC\CreatePullServer Mode LastWriteTime Length Name ---- ------------- ------ ---- -a--- 3/6/2016 3:48 PM 3800 localhost.mof |
Now, we just have to run the following command to configure our Pull Server:
|
1 |
PS> Start-DSCConfiguration -Path "C:\DSC\CreatePullServer" -Wait -Verbose |
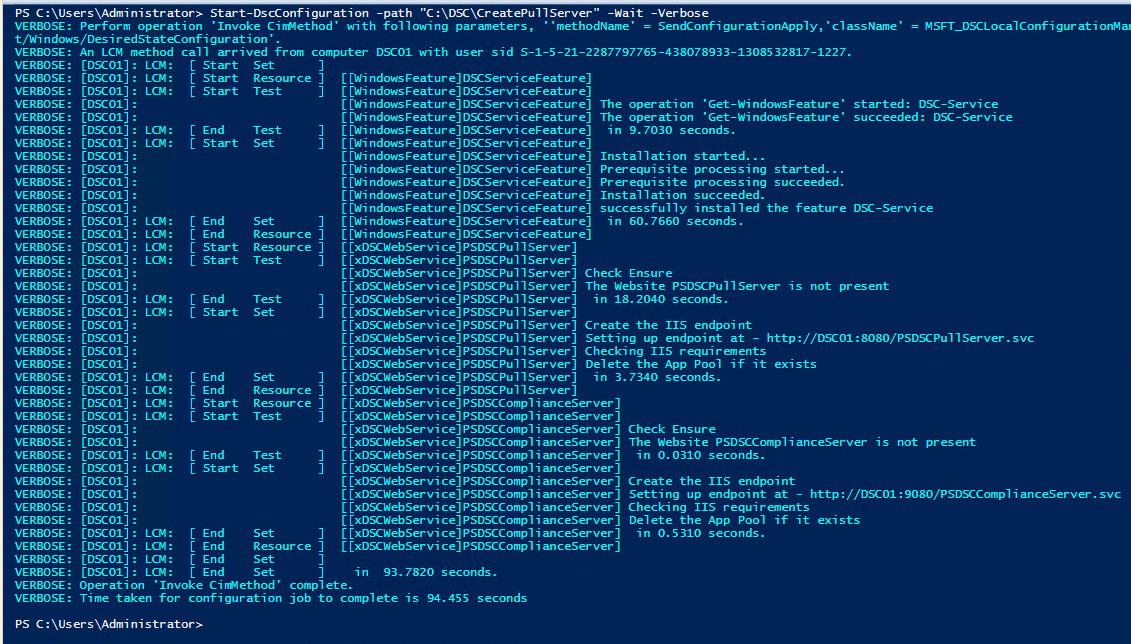
Figure 3: Setting up the Pull Server
Let us verify that everything went well. Firstly, is the DSC feature installed?
|
1 2 3 4 5 |
PS C:\Users\administrator> Get-WindowsFeature -Name DSC-Service Display Name Name Install State ------------ ---- ------------- [X] Windows PowerShell Desired State Configurati... DSC-Service Installed |
Secondly, were two Web Services created?
|
1 2 3 4 5 6 7 |
PS C:\Users\administrator> Get-Website | ft -Autosize Name ID State Physical Path Bindings ---- -- ----- ------------- -------- Default Web Site 1 Started %SystemDrive%\inetpub\wwwroot http *:80: PSDSCPullServer 2 Started C:\inetpub\wwwroot\PSDSCPullServer http *:8080: PSDSCComplianceServer 3 Started C:\inetpub\wwwroot\PSDSCComplianceServer http *:9080: |
Everything seems fine. Last check using the Get-DscConfiguration cmdlet that will display the current DSC configuration (remember the “current.mof” file. This cmdlet will query this file).
|
1 2 3 4 5 6 7 8 9 10 11 12 13 14 15 16 17 18 19 20 21 22 23 24 25 26 27 28 29 30 31 32 33 34 35 |
PS C:\Users\administrator> Get-DscConfiguration Credential : DisplayName : Windows PowerShell Desired State Configuration Service Ensure : Present IncludeAllSubFeature : False LogPath : Name : DSC-Service Source : PSComputerName : CertificateThumbPrint : AllowUnencryptedTraffic ConfigurationPath : C:\Program Files\WindowsPowerShell\DscService\Configuration DSCServerUrl : http://DSC01:8080/PSDSCPullServer.svc EndpointName : PSDSCPullServer Ensure : Present IsComplianceServer : ModulePath : C:\Program Files\WindowsPowerShell\DscService\Modules PhysicalPath : C:\inetpub\wwwroot\PSDSCPullServer Port : 8080 State : Started PSComputerName : CertificateThumbPrint : AllowUnencryptedTraffic ConfigurationPath : DSCServerUrl : http://DSC01:9080/PSDSCComplianceServer.svc EndpointName : PSDSCComplianceServer Ensure : Present IsComplianceServer : ModulePath : PhysicalPath : C:\inetpub\wwwroot\PSDSCComplianceServer Port : 9080 State : Started PSComputerName : |
We can validate the proper functioning of the web service from any node through a web browser: https://dsc01:8080/PSDSCPullServer
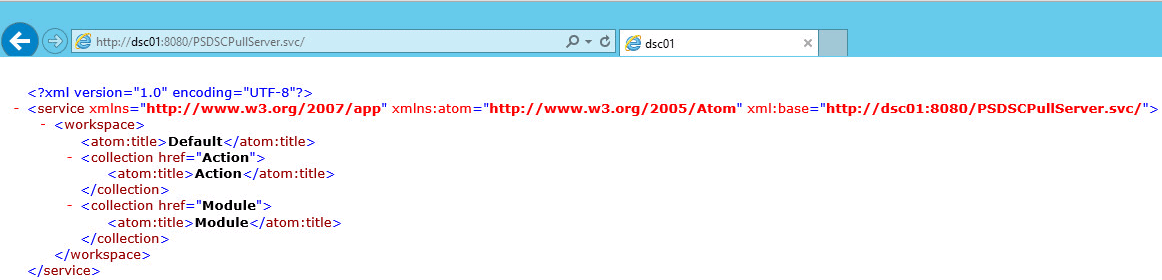
Figure 4: Check the web service
Manual installation of the Pull Server
For those who do not wish to use DSC to configure the Pull Server, we’ll have to start by adding the DSC feature:
|
1 |
PS> Add-WindowsFeature -Name DSC-Service |
or
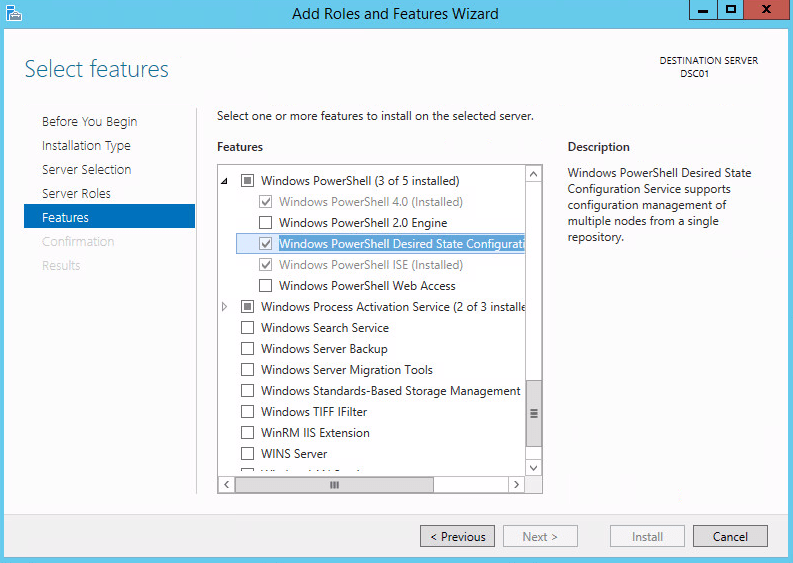
Figure 5: Add DSC Windows Feature
Then we go to the Web server settings (IIS Manager) to configure the two sites with the same properties listed in the DSC configuration. This requires some basic IIS skills, which is why I recommend using the DSC script.
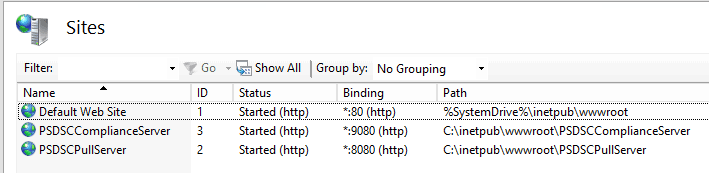
Figure 6: IIS Sites
Nodes configuration
By default, the LCM is configured in Push mode on each node. We have to change this setting.
Note: In pull mode, the name of the MOF file will no longer be the name of the node, e.g. “ADM01.mof” but it will contain a Globally Unique Identifier (GUID) that we will generate.
Firstly, we will generate two GUID:
|
1 2 3 4 5 6 7 8 9 10 11 12 13 |
PS C:\> $guidADM01 = [GUID]::NewGuid() PS C:\> $guidADM11 = [GUID]::NewGuid() PS C:\> $guidADM01 Guid ---- 18ca85b8-1500-4aca-8f05-fbf61c1f48b0 PS C:\> $guidADM11 Guid ---- 4aa09541-82d7-491f-9408-a1fa10757734 |
Then, we will create the metaconfiguration that will be applied to the LCM of ADM01 and ADM11. Please check the previous article for more information about metaconfiguration.
|
1 2 3 4 5 6 7 8 9 10 11 12 13 14 15 16 17 18 19 20 21 22 23 24 25 26 |
configuration LCMPullMode { param ( [string]$ComputerName, [string]$GUID ) node $ComputerName { LocalConfigurationManager { ConfigurationID = $GUID ConfigurationMode = 'ApplyAndAutocorrect' RefreshMode = 'Pull' DownloadManagerName = 'WebDownloadManager' DownloadManagerCustomData = @{ ServerUrl = 'http://dsc01:8080/PSDSCPullServer.svc' AllowUnsecureConnection = 'true' } RebootNodeIfNeeded = $true } } } LCMPullMode -ComputerName ADM01 -GUID 18ca85b8-1500-4aca-8f05-fbf61c1f48b0 LCMPullMode -ComputerName ADM11 -GUID 4aa09541-82d7-491f-9408-a1fa10757734 |
This configuration uses two parameters: The name of the machine to be configured, followed by its GUID. We set the DownloadManagerName property with the value “WebDownloadManager”. If you use SMB protocol for your Pull Server, then the value must be replaced by ‘DSCFileDownloadManager’. The second DownloadManagerCustomData property contains the URL to access our server. In SMB mode, this value should contain the path of the shared folder.
Two MOF files are generated:
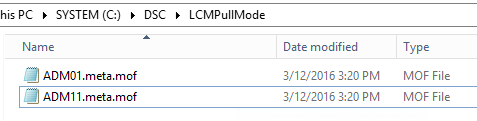
Figure 7: Two MOF files
Now, we can apply the metaconfiguration on the nodes:
|
1 |
PS> Set-DscLocalConfigurationManager -Path .\LCMPullMode |
What remains is to verify if changes are applied on both nodes. Everything seems ok.
|
1 2 3 4 5 6 7 8 9 10 11 12 13 14 15 16 17 18 19 20 21 22 23 24 25 26 27 28 29 30 31 32 33 34 35 36 37 |
PS C:\> $session = New-CimSession -ComputerName ADM01 PS C:\> Get-DscLocalConfigurationManager -CimSession $session AllowModuleOverwrite : False CertificateID : ConfigurationID : 18ca85b8-1500-4aca-8f05-fbf61c1f48b0 ConfigurationMode : ApplyAndAutoCorrect ConfigurationModeFrequencyMins : 30 Credential : DownloadManagerCustomData : {MSFT_KeyValuePair (key = "ServerUrl"), MSFT_KeyValuePair (key = "AllowUnsecureConnection")} DownloadManagerName : WebDownloadManager RebootNodeIfNeeded : True RefreshFrequencyMins : 15 RefreshMode : Pull PSComputerName : ADM01 PS C:\> $sessionADM11 = New-CimSession -ComputerName ADM11 PS C:\> Get-DscLocalConfigurationManager -CimSession $sessionADM11 AllowModuleOverwrite : False CertificateID : ConfigurationID : 4aa09541-82d7-491f-9408-a1fa10757734 ConfigurationMode : ApplyAndAutoCorrect ConfigurationModeFrequencyMins : 30 Credential : DownloadManagerCustomData : {MSFT_KeyValuePair (key = "ServerUrl"), MSFT_KeyValuePair (key = "AllowUnsecureConnection")} DownloadManagerName : WebDownloadManager RebootNodeIfNeeded : True RefreshFrequencyMins : 15 RefreshMode : Pull PSComputerName : ADM11 |
Let’s check that the pull server’s URL is correct:
|
1 2 3 4 5 6 |
PS C:\> (Get-DscLocalConfigurationManager).DownloadManagerCustomData key Value PSComputerName --- ----- -------------- ServerUrl http://dsc01:8080/PSDSCPullServer.svc AllowUnsecureConnection true |
How to deploy a configuration?
Now we’ll use the following example: verify that the audio service is in automatic mode and is started. The nodes were previously configured to correct any unwanted changes. So the service will remain always started.
Here is the configuration that we will be using:
|
1 2 3 4 5 6 7 8 9 10 11 12 13 14 15 16 |
configuration AudioServiceConfig { param([string[]] $computerName) node $computerName { Service Audio { Name = 'Audiosrv' StartupType = 'Automatic' State = 'Running' } } } AudioServiceConfig -ComputerName ADM01,ADM11 |
Nothing too complicated here. The keyword “Service” is followed by a friendly name and by these three properties:
- Name: Name of the service as used in Windows
- StartupType: Corresponds to the startup mode in Windows
- State: Status of the service
You can get the properties and their values with the following command:
|
1 2 3 4 5 6 7 8 9 10 |
PS C:\Users\administrator> (Get-DscResource -Name Service).Properties | ft -AutoSize Name PropertyType IsMandatory Values ---- ------------ ----------- ------ Name [string] True {} BuiltInAccount [string] False {LocalService, LocalSystem, NetworkService} Credential [PSCredential] False {} DependsOn [string[]] False {} StartupType [string] False {Automatic, Disabled, Manual} State [string] False {Running, Stopped} |
Two files were generated but we need to rename them with their respective GUID:
|
1 2 3 |
PS> Rename-Item .\ADM01.mof 18ca85b8-1500-4aca-8f05-fbf61c1f48b0.mof PS> Rename-Item .\ADM11.mof 18ca85b8-1500-4aca-8f05-fbf61c1f48b0.mof |
Note: Using the GUID instead of the hostname complicates the management of MOF files a little more. We will see later how to manage them to reduce this disadvantage. In this article, I recommend using a txt or csv file and specify the following pair “hostname = GUID“.
The next step is to generate a checksum file to ensure the authenticity and integrity of configurations. If you need to update an existing configuration, it will be mandatory to generate a new checksum file. Otherwise, the configuration will not be applied for security reason. This avoids any unwanted changes. The New-DSCChecksum cmdlet will automatically create two checksum files:
|
1 2 3 4 5 6 7 8 9 10 11 12 13 14 15 16 17 18 19 20 21 22 23 24 25 |
PS C:\dsc\AudioServiceConfig> dir Directory: C:\dsc\AudioServiceConfig Mode LastWriteTime Length Name ---- ------------- ------ ---- -a--- 3/12/2016 3:44 PM 1164 18ca85b8-1500-4aca-8f05-fbf61c1f48b0.mof -a--- 3/12/2016 3:44 PM 1164 4aa09541-82d7-491f-9408-a1fa10757734.mof PS C:\dsc\AudioServiceConfig> New-DSCCheckSum * PS C:\dsc\AudioServiceConfig> dir Directory: C:\dsc\AudioServiceConfig Mode LastWriteTime Length Name ---- ------------- ------ ---- -a--- 3/12/2016 3:44 PM 1164 18ca85b8-1500-4aca-8f05-fbf61c1f48b0.mof -a--- 3/12/2016 5:29 PM 64 18ca85b8-1500-4aca-8f05-fbf61c1f48b0.mof.checksum -a--- 3/12/2016 3:44 PM 1164 4aa09541-82d7-491f-9408-a1fa10757734.mof -a--- 3/12/2016 5:29 PM 64 4aa09541-82d7-491f-9408-a1fa10757734.mof.checksum |
It is almost over. We need to move the files in the directory that we have indicated in our CreatePullServer configuration with the following property:
|
1 |
ConfigurationPath = "$env:PROGRAMFILES\WindowsPowerShell\DscService\Configuration" |
These two PowerShell lines allows us to publish them in order to make them available for the nodes:
|
1 2 |
$destination = 'C:\Program Files\WindowsPowerShell\DscService\Configuration' Copy 'C:\DSC\AudioServiceConfig\*.mof*' -Destination $destination |
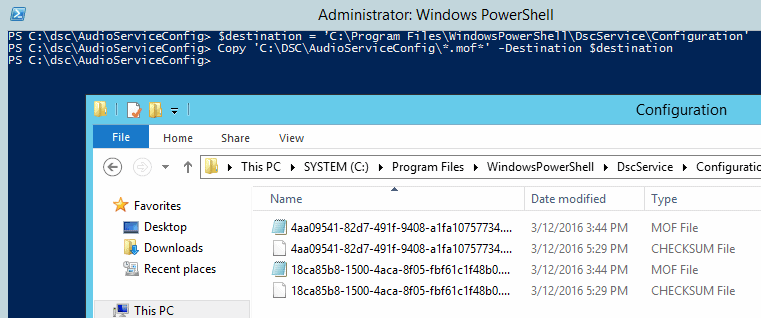
Figure 8: Publish MOF files
Well, it’s over! The nodes will now get their configuration in the next fifteen minutes. Finally, what have we achieved? I created the following diagram to summarize all the steps:
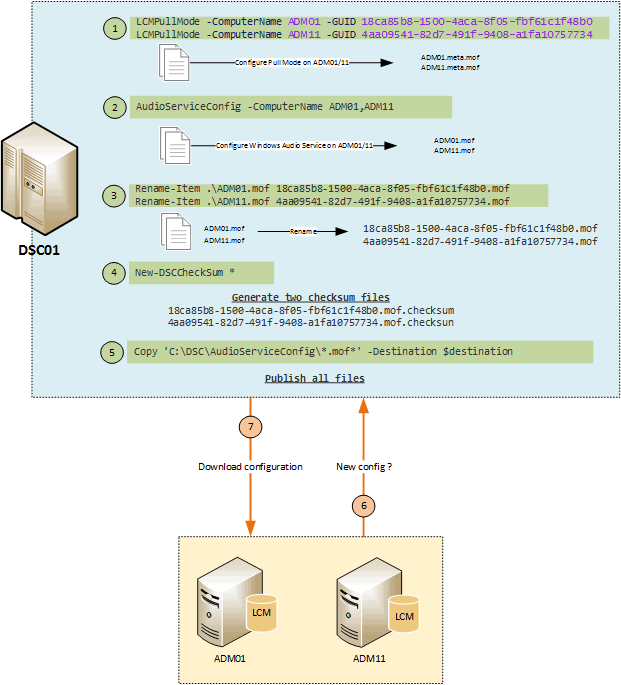
Figure 9: Step-by-step publishing process
We will discuss in next article how to automate these steps.
To go further
Ok, at this time our nodes are configured properly. Several days pass, and you want to ensure that they are still configured properly. How are you going to do that?
- Could you log each node? That is tedious!
- Can you use Get-DscConfiguration cmdlet through a CIM session? Yes, but if the configuration is long or complex, then you will have difficulty trying to troubleshoot in this manner.
There is a cmdlet dedicated for this purpose: Test-DscConfiguration that displays True/False depending on the status. In my example below, I verify the status of my two nodes that are valid, and then I stop the Audio service on ADM01. The Test-DscConfiguration cmdlet indicates to me that the desired configuration is not applied at that time.
|
1 2 3 4 5 6 7 8 9 10 11 |
PS C:\> $sessionADM01 = New-CimSession -ComputerName ADM01 PS C:\> $sessionADM11 = New-CimSession -ComputerName ADM11 PS C:\> Test-DscConfiguration -CimSession $sessionADM01 True PS C:\> Test-DscConfiguration -CimSession $sessionADM11 True PS C:\> PS C:\> PS C:\> Test-DscConfiguration -CimSession $sessionADM01 False PS C:\> |
I can now use the Get-DscConfiguration cmdlet in order to troubleshoot the problem and find that the Audio Service has been stopped manually:
|
1 2 3 4 5 6 7 8 9 10 11 12 13 14 15 16 |
PS C:\> Get-DscConfiguration -CimSession $session BuiltInAccount : LocalService Credential : Dependencies : {MMCSS, RpcSs, AudioEndpointBuilder} Description : Manages audio for Windows-based programs. If this service is stopped, audio devices and effects will not function properly. If this service is disabled, any services that explicitly depend on it will fail to start DisplayName : Windows Audio Name : Audiosrv Path : C:\Windows\System32\svchost.exe -k LocalServiceNetworkRestricted StartupType : Automatic State : Stopped Status : PSComputerName : ADM01 |
The LCM present on each node verifies its configuration regularly, thanks to a scheduled task named “Consistency”. The execution of this task will check the configuration without waiting for the next cycle.
|
1 2 3 4 5 6 |
PS C:\> Get-ScheduledTask -TaskPath "\Microsoft\Windows\Desired State Configuration\" TaskPath TaskName State -------- -------- ----- \Microsoft\Windows\Desired State Configurat... Consistency Ready \Microsoft\Windows\Desired State Configurat... DSCRestartBootTask Ready |
To correct the configuration of ADM01, I run the “Consistency” task to apply the desired configuration using the Start-ScheduledTask cmdlet:
|
1 2 3 |
Invoke-Command -ComputerName ADM01 -Command { Start-ScheduledTask -TaskName '\Microsoft\Windows\Desired State Configuration\Consistency' } |
Conclusion
PowerShell’s Desired State Configuration (DSC) system has two distinct modes of use, the ‘push’ mode and the ‘pull’ mode. They are both useful, but are intended for different requirements. The ‘Pull’ Mode of Desired State Configuration (DSC) is more complex to implement than the ‘push’ mode, but is usually far better suited to an environment with many machines to manage. The ‘push’ mode is better suited to a scheduled operation, where configuration needs to happen at a particular time, but the ‘Pull’ mode is going to be of more general use. Now that you know the two DSC modes that can be implemented, you can now select which of the modes will suit your needs and constraints.
This document contains proprietary information and is protected by copyright law.
Copyright © 2026 Red Gate Software Limited. All rights reserved
Load comments