
- PowerShell Desired State Configuration – Part 1: The Basics
- PowerShell Desired State Configuration – Part 2: LCM and Push Management Model
- PowerShell Desired State Configuration – Part 3: Pull Mode
- PowerShell Desired State Configuration – Part 4: Automating and Monitoring Pull Mode
- PowerShell Desired State Configuration – Part 5: DSC Resources
Desired State Configuration (DSC) allows us to simply define what needs to be configured on one or more machines. To achieve this, DSC is based on the concept of ‘resource’. A DSC ‘resource’ is used in a DSC configuration to perform an action on a DSC node. In effect, a resource corresponds to what can be configured on a node. We mentioned in the first article of this series that there are several resources provided by default with DSC. These built-in resources are called “official” resources and can be listed using the following command:
|
1 |
PS > Get-DscResource |select Name,Module,Properties | Ft –AutoSize |
Official resources are added to each new version of DSC after being tested by the PowerShell team to eliminate possible bugs. However, these resources are likely to be too limited for your mundane requirements. Desired State Configuration has been designed to be extendable, and so there are two other types of resources that can be used. This allows us to create resources that do what we need without having to wait for the next versions of DSC, and we can manually add DSC resources via the ‘Resource Kits’. There are several types of kits.
- Official Resource Kits: We just mentioned them – they are resources that are tested and validated by the PowerShell team and distributed with DSC. Some examples are: Group, Package, Registry, …
- Experimental Resource Kits: As the name suggests, these are experimental resources and therefore are untested and not validated. These resources are mainly obtained via the ‘PowerShell Gallery’ website which is the central repository for PowerShell content or via the ‘PowerShell Git’. So be careful when using them, especially if you use them in a production environment. These resources have a specific naming convention because their name must begin with an “X”. Some examples are: xAzure, xHyper-V, xSQLServer, …
- Community Resource Kits: It is noticeable that the DSC community is growing steadily and more and more content is made available by contributors. Anyone can contribute by creating their own DSC resources. They can be obtained on forums and the Git repository. Perhaps even you or your colleagues could provide them. As we shall see in this chapter, anyone can develop their own resource very easily. These resources also have a specific naming convention in that their name must begin with the letter “C”. Some examples are: cFailoverCluster, cSystemCenterManagement, …
Note: Microsoft recommends that, when editing an official or experimental resources, you should rename it with the prefix letter “c” to avoid confusion.
I recommend that you regularly follow the PowerShell team blog in order to stay informed of the release of the latest DSC resources.
What is a DSC Resource?
A DSC resource is similar to a Windows PowerShell module. This type of module regroups one or more resources and contains several elements:
- The scheme: This is the definition of configurable properties, held in a MOF file named ‘.schema.mof’
- The implementation: This is the code that configures the node via the DSC configuration. It is held in a script module with the extension of .psm1. There can also be the .psd1 file which contains the manifest, but it is not mandatory.
An example is worth a thousand words – so let us analyze the “xHyper-V” resource:
|
Module Name |
Version |
Sub-Folders or Files |
DSCResources |
DSC Resource Files |
|
xHyper-V |
||||
|
3.4.0.0 |
||||
|
DSCResources |
||||
|
xVHD |
||||
|
xVHD.psm1 |
||||
|
xVHD.schema.mof |
- Module Name: This is the official name of the module from which you can search.
- Version: This is the version of the module. It allows you to identify new versions before using the “Update-Module” cmdlet to install the new version.
- Sub-Folders or Files: This directory contains at least a “DSCResources” subdirectory, but probably more containing such files as examples, the license, the readme file or the documentation
- DSCResources: This directory is the most interesting because it contains the PowerShell scripts that will be used to configure nodes. It is a good idea to indulge your natural curiosity by opening them up to better understand the resource.
Installing a DSC Resource
Now to practice. It requires no special skills to Install a DSC resource. It is very simple. Basically, you just copy and paste files into a folder. To know where to copy the resources, use the following command:
|
1 |
PS > Get-ChildItem -Path Env:\PSModulePath | select value | fl * |
The first step is to search our module, and there are several methods for doing this. WMF 5.0 provides the “Find-Module” cmdlet which is part of the “PowerShellGet” module. This will search directly in the modules available on the site ‘PowerShell Gallery’ site:
|
1 |
PS > Find-Module -Includes DscResource –Verbose |
You can also list the modules that contain the tag “DSCResourceKit”.
|
1 |
PS > Find-Module -Tag DSCResourceKit |
Finally, the “Find-DSCResource” cmdlet can also be used. Don’t confuse this with the ‘Get-DSCResources’ cmdlet that lists the resources that are present locally on the machine.
|
1 |
PS > Find-DSCResource |
A manual search on the PowerShell Gallery website will also allow you to search for resources:
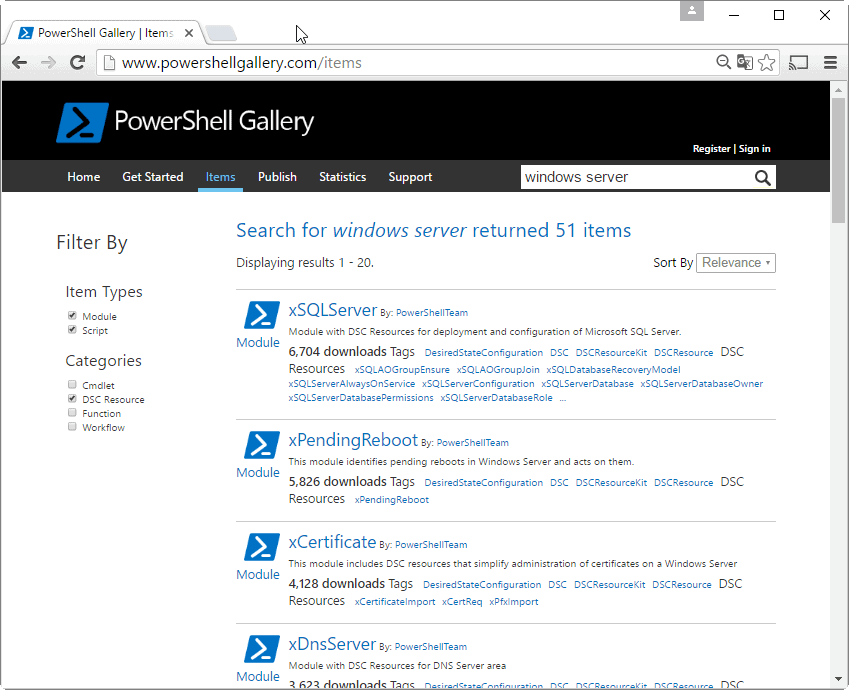
Figure 1 – PowerShell Gallery website
Note: It is possible to save the module on your machine to analyze it before installation. For this, use the “Save-Module” cmdlet:
|
1 |
PS > Save-Module -Name xSQLServer -Path C:\TEMP\DSCResources\SQL\ |
To install the module, you will need administrator privileges on your workstation. Run the following command to install, by example, the xSQLServer module:
|
1 |
PS > Install-Module -Name xSQLServer |
The module is copied to the $env:ProgramFiles\WindowsPowerShell\Modules. If you do not have administrator account, then you must add the following parameter: “-Scope CurrentUser”. The module will be installed into the following directory: C:\Users\%USERNAME%\Documents\WindowsPowerShell\
|
1 |
PS > Install-Module -Name xPendingReboot -Scope currentuser |
If you have a previous version of the module, then you can update it via the “Update-Module” cmdlet.
Remember that, in the case of push mode, the resource must be present on each node that you want to configure. This is in contrast to the pull mode, where the resource must be present only on the Pull Server.
Using a DSC Resource
Before you use a DSC resource, you need to understand how it works and know the available properties. Let us start by the Get-DSCResource cmdlet which will list DSC Resources:
|
1 2 3 4 5 6 7 8 9 10 11 12 13 14 |
PS C:\> Get-DscResource Package | select -ExpandProperty Properties Name PropertyType IsMandatory Values ---- ------------ ----------- ------ Name [string] True {} Path [string] True {} ProductId [string] True {} Arguments [string] False {} Credential [PSCredential] False {} DependsOn [string[]] False {} Ensure [string] False {Absent, Present} LogPath [string] False {} PsDscRunAsCredential [PSCredential] False {} ReturnCode [UInt32[]] False {} |
The following configuration use the “Package” resource in the push mode:
|
1 2 3 4 5 6 7 8 9 10 11 12 13 14 15 16 17 |
Configuration Install7Zip { Node $env:ComputerName { Package 7Zip { Ensure = 'Present' Name = '7-Zip 9.20 (x64 edition)' Path = 'C:\DSC\Package\7Zip\7z920-x64.msi' ProductId = '23170F69-40C1-2702-0920-000001000000' } } } Install7Zip -OutputPath C:\DSC\Package\7Zip Start-DscConfiguration -Path C:\DSC\Package\7Zip -wait -verbose -Force |
- The ensure parameter installs or uninstalls the package.
- The path parameter indicates the location of the 7Zip executable.
- The ProductID allows to detect if the package is installed correctly or not.
To obtain this ProductID, the most common method is to manually install the package and then get the ID in the registry:
|
1 |
PS > Gci HKLM:\SOFTWARE\Wow6432Node\Microsoft\Windows\CurrentVersion\Uninstall\ |
As a sysadmin, I use SCCM to manage all my machines. So my tip is to use SCCM to easily get the ProductID from the application deployment tab. This avoids me from unnecessarily installing the software on a machine.
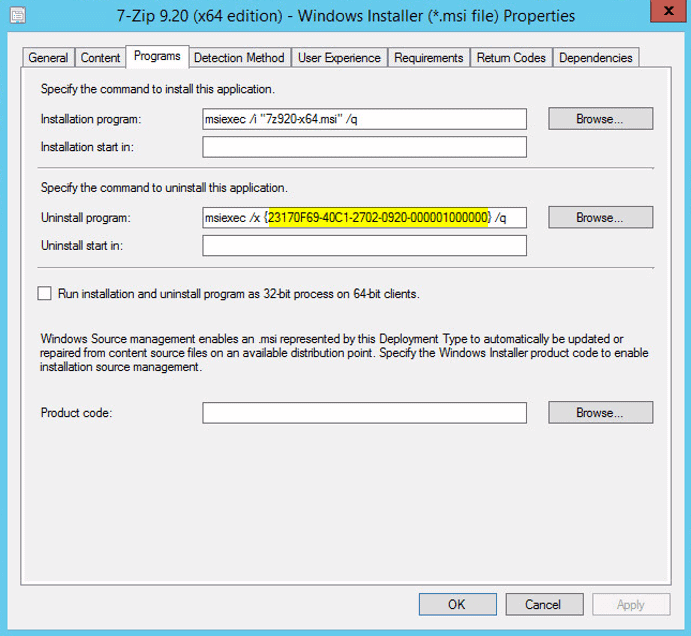
Figure 2 – SCCM Application
Furthermore, I advise you to use shared folders to centralize your packages and so to easily access them from your nodes.
A reboot may be required after installing or uninstalling (Ensure = Absent).
The installation time is extremely fast! Installing 7Zip is done in 2.2 seconds and the uninstallation in 8 seconds.
|
1 2 3 4 5 6 7 8 9 10 11 12 13 14 15 16 17 18 19 20 21 22 23 24 25 26 27 |
Directory: C:\Package\7Zip Mode LastWriteTime Length Name ---- ------------- ------ ---- -a--- 7/23/2016 11:12 PM 1310 dsc01.mof VERBOSE: Perform operation 'Invoke CimMethod' with following parameters, ''methodName' = SendConfigurationApply,'className' = MSFT_DSCLocalConfigurationManager,'namespaceName' = root/Microsoft/Windows/DesiredStateConfiguration'. VERBOSE: An LCM method call arrived from computer DSC01 with user sid S-1-5-21-2287797765-438078933-1 308532817-1227. VERBOSE: [DSC01]: LCM: [ Start Set ] VERBOSE: [DSC01]: LCM: [ Start Resource ] [[Package]7Zip] VERBOSE: [DSC01]: LCM: [ Start Test ] [[Package]7Zip] VERBOSE: [DSC01]: [[Package]7Zip] The package 7-Zip 9.20 (x64 edition) is not installed VERBOSE: [DSC01]: LCM: [ End Test ] [[Package]7Zip] in 0.0310 seconds. VERBOSE: [DSC01]: LCM: [ Start Set ] [[Package]7Zip] VERBOSE: [DSC01]: [[Package]7Zip] The package 7-Zip 9.20 (x64 edition) is not installed VERBOSE: [DSC01]: [[Package]7Zip] Package configuration starting VERBOSE: [DSC01]: [[Package]7Zip] The machine requires a reboot VERBOSE: [DSC01]: [[Package]7Zip] Package has been installed VERBOSE: [DSC01]: [[Package]7Zip] Package configuration finished VERBOSE: [DSC01]: LCM: [ End Set ] [[Package]7Zip] in 2.2190 seconds. VERBOSE: [DSC01]: LCM: [ End Resource ] [[Package]7Zip] VERBOSE: [DSC01]: [] A reboot is required to progress further. Please reboot the system. VERBOSE: [DSC01]: LCM: [ End Set ] VERBOSE: [DSC01]: LCM: [ End Set ] in 2.3600 seconds. VERBOSE: Operation 'Invoke CimMethod' complete. VERBOSE: Time taken for configuration job to complete is 2.377 seconds |
Now, let’s look at an example of the experimental resource. We will create a VHD file with the xHyper-V resource:
|
1 2 3 4 5 6 7 8 9 10 11 12 13 14 15 16 17 18 19 20 21 22 23 24 25 26 27 28 29 30 31 32 33 34 35 36 37 38 39 40 41 42 43 44 45 46 47 48 |
configuration NewVHD { param ( [Parameter(Mandatory)] [string]$Name, [Parameter(Mandatory)] [string]$Path, [Parameter(Mandatory)] [Uint64]$MaximumSizeBytes, [ValidateSet("Vhd","Vhdx")] [string]$Generation = "Vhd", [ValidateSet("Present","Absent")] [string]$Ensure = "Present" ) Import-DscResource -module xHyper-V Node HYPV01 { WindowsFeature HyperV { Ensure = 'Present' Name = 'Hyper-V' } File VMFolder { DestinationPath = (Join-Path -Path C:\Scripts\VHDs -ChildPath $($Name)) Ensure = "Present" Force = $True Type = "Directory" } xVHD NewVHD { Ensure = $Ensure Name = "$($Name)_DISK1" Path = (Join-Path -Path C:\Scripts\VHDs -ChildPath $($Name)) Generation = $Generation MaximumSizeBytes = $MaximumSizeBytes DependsOn = "[File]VMFolder" } } } |
This example allows me to focus on an important line:
|
1 |
Import-DscResource -module xHyper-V |
Import-DscResource could be mistaken for a PowerShell cmdlet, but it is actually a keyword that can be used only in a DSC configuration. It allows us to load the xHyper-V resources needed to configure the node.
Creating a DSC Resource
For specific needs, you will probably need to create your own resources. Writing a DSC resource is carried out with the aid of the xDscResourceDesigner module that provides several cmdlets in order to simplify the process.
|
1 |
PS > Find-Module xDscResourceDesigner |
Let us view the available cmdlets in this module:
|
1 2 3 4 5 6 7 8 9 10 |
PS > get-command -module xDscResourceDesigner CommandType Name Version Source ----------- ---- ------- ------ Function Import-xDscSchema 1.9.0.0 xDscResourceDesigner Function New-xDscResource 1.9.0.0 xDscResourceDesigner Function New-xDscResourceProperty 1.9.0.0 xDscResourceDesigner Function Test-xDscResource 1.9.0.0 xDscResourceDesigner Function Test-xDscSchema 1.9.0.0 xDscResourceDesigner Function Update-xDscResource 1.9.0.0 xDscResourceDesigner |
We will begin by creating our resource properties via the New-xDscResourceProperty cmdlet:
|
1 2 3 4 5 |
# Define DSC resource properties $Property1 = New-xDscResourceProperty -Name Prop1 -Type String -Attribute Key $Property2 = New-xDscResourceProperty -Name Prop2 -Type String -Attribute Write -ValidateSet "Present", "Absent" $Property3 = New-xDscResourceProperty -Name Prop3 -Type String -Attribute Required |
We can now create our resource by integrating the above properties:
|
1 2 3 4 5 6 |
# Create the DSC resource New-xDscResource -Name cMyDscResource ` -Property $Property1,$Property2,$Property3 ` -Path "$env:ProgramFiles\WindowsPowerShell\Modules" ` -ModuleName cMyDscModule |
We’ll now execute these lines. Below is the output:
|
1 2 3 4 5 6 7 8 9 10 11 12 13 14 15 16 17 |
Directory: C:\Program Files\WindowsPowerShell\Modules Mode LastWriteTime Length Name ---- ------------- ------ ---- d----- 24.07.2016 15:22 cMyDscModule Directory: C:\Program Files\WindowsPowerShell\Modules\cMyDscModule Mode LastWriteTime Length Name ---- ------------- ------ ---- d----- 24.07.2016 15:22 DSCResources Directory: C:\Program Files\WindowsPowerShell\Modules\cMyDscModule\DSCResources Mode LastWriteTime Length Name ---- ------------- ------ ---- d----- 24.07.2016 15:22 cMyDscResource |
The tree view of your module is created automatically by PowerShell and some files are now present.
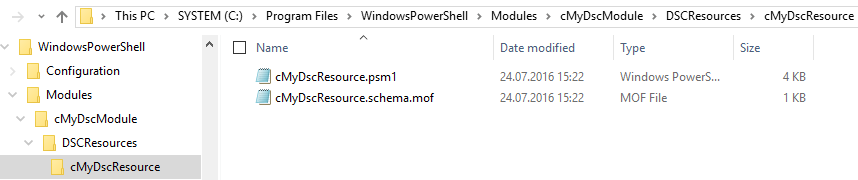
The most important is the .psm1 file which contains the following three functions that you must implement:
- Function Get-TargetResource { # Gather information about the task }
- Function Set-TargetResource { # Apply what we want to do }
- Function Test-TargetResource { # Test the system }
- Export the module at the end of the file: Export-ModuleMember -Function * -TargetResource
Finally, let us check that our module is available on the machine:
|
1 2 3 4 5 6 7 8 9 |
PS > Get-Module -ListAvailable | ? Name -like "cM*" Directory: C:\Program Files\WindowsPowerShell\Modules\CustomResources ModuleType Version Name ExportedCommands ---------- ------- ---- ---------------- Manifest 1.0 cMyDscModule |
And also the DSC resource:
|
1 2 3 4 5 |
PS > Get-DscResource -Name "cMy*" ImplementedAs Name ModuleName Version Properties ------------- ---- ---------- ------- ---------- PowerShell cMyDscResource cMyDscModule 1.0 {Prop1, Prop3, DependsOn, Prop2...} |
Now you can run a DSC configuration with your own DSC resource! Don’t forget to load your module:
|
1 |
Import-DscResource -module cMyDscModule |
Conclusion
With this series of articles now completed, I advise you, as usual, to take the examples and adapt them to your network environment to become familiar with this new DSC concept.
We saw in this series the DSC resource that is the backbone of Desired State Configuration. We have imported new resources but also created customs resources to meet specific needs.
Before writing your own resources, I suggest that you first browse the experimental resources as there are many. Keep in mind that the DSC mode you choose will have only one impact on the resources that you use:
- In Push mode, it will be mandatory to deploy the resources on the nodes that must be configured.
- In Pull mode, the resources must only be on the Pull server so that nodes can download them.
DSC is a very powerful tool but requires some practice to use it properly. Thus the verbose mode will allow you to effectively analyze possible configuration deployment errors.
This document contains proprietary information and is protected by copyright law.
Copyright © 2026 Red Gate Software Limited. All rights reserved
Load comments